This tutorial covers how to write components that provide a "selected object" and how to write components that update themselves as the global selection changes.
"Selection" is an important concept for any non-trivial
application. NetBeans has two basic concepts of selection—the contents of
the focused
TopComponent's
Lookup, and
the focused TopComponent's
activated Node(s). Here you will deal only with the Lookup
portion of selection—doing more advanced things will be covered in a later
tutorial.
Selection is used to make possible such things as context sensitive actions (actions that are enabled or disabled depending on what is displayed), and palette windows such as the Property Sheet or Navigator components in the IDE, which each display some aspect of whatever is selected.
Basically, each TopComponent has a bag of objects that it can put things
into, and which other code is able to query. That bag of objects is its
Lookup—essentially a Map where the keys are class objects and the
values are objects that extend or implement the key-class. The thing that
makes this approach tremendously useful is the ability to use this mechanism
to decouple the components that provide some object and the components that
consume those objects—so they can be implemented in separate modules, or
new editors for old objects can be provided and the rest of the system will
continue to work transparently.
To download the completed sample, click here.
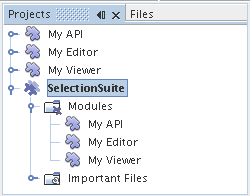
The example for this tutorial will contain three modules, contained within a module suite, as illustrated below:
Start by creating the module suite to contain all three modules:
Right click the org.myorg.myapi package and choose
New > Java Class, as shown below:

APIObject.
public final class APIObject {

   private final Date date = new Date();
   private static int count = 0;
   private final int index;

   public APIObject() {
      index = count++;
   }

   public Date getDate() {
      return date;
   }

   public int getIndex() {
      return index;
   }

   public String toString() {
       return index + " - " + date;
   }

}
This will be all of the code that this module contains. As you can see,
each time a new instance of APIObject is created, a counter
is incremented—so there will be some unique attribute to each instance
of APIObject.
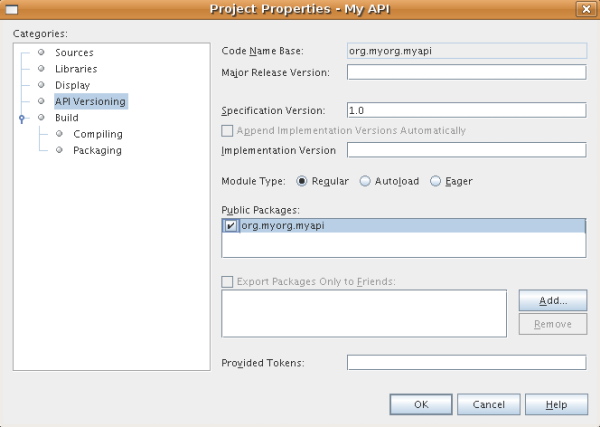
org.myorg.myapi
package so other modules can see classes in it. Right click the My API project
and choose Properties.In the API Versioning page
in the Project Properties dialog box, check the
checkbox for org.myorg.api in the
Public Packages list, shown below:
APIObject class, so each of them needs to
say that they depend on the API module.
For each of the other module projects in turn,
right click the project node and choose Properties.
In the Libraries page of each Project
Properties dialog box, click the Add Dependency
button. In the dialog box that pops up,
type APIObject—there
should be only one match, which is your API module.
Select it and click
OK to add the dependency.

Now you will create a singleton component that will track if there is an
APIObject available in the global selection (i.e., if the
focused TopComponent has one in its Lookup). If there is one, it will display
some data about it. One common use case for this sort of thing is creating
master/detail views.
A "singleton component" is a component like the Projects window in the NetBeans IDE, or the Property Sheet or the Navigator—a component that there is only ever one of in the system. The Window Component wizard will automatically generate all of the code needed to create such a singleton component—you just have to use the form designer or write code to provide the contents of your singleton component.
org.myorg.myviewer package and choose
New > Other.On the "Basic Settings" page of the wizard,
select navigator as the
location in which to place your viewer component, and check the
checkbox to open the component on startup,
as shown below:

MyViewer and
click Finish (or press Enter).TopComponent—a singleton component called
MyViewerTopComponent. Click the editor tab for
MyViewerTopComponent—the form editor should be visible.
You will add two labels to the component, which will display some information
about the selected APIObject if there is one.
Drag two JLabels to the form from the Palette, one below the other.
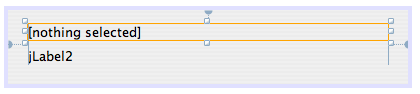
Change the text of the first as shown above, so that by default it displays "[nothing selected]".
MyViewerTopComponent
implements LookupListener:
public class MyViewerTopComponent extends TopComponent implements LookupListener {
LookupListener is imported.Put the caret in the signature line as shown below. A lightbulb glyph should appear in the editor margin. Press Alt-Enter, and then Enter again when the popup appears with the text "Implement All Abstract Methods". This will add the LookupListener method to your class.

LookupListener. Now it needs
something to listen to. In your case, there is a convenient global Lookup
object, which simply proxies the Lookup of whatever component has focus—it
can be obtained from the call Utilities.actionsGlobalContext().
So rather than tracking what component has focus yourself, you can simply
listen to this one global selection lookup, which will fire appropriate
changes whenever focus changes. Edit the source code so that it contains
the following methods as shown here:
    private Lookup.Result result = null;
    public void componentOpened() {
        Lookup.Template tpl = new Lookup.Template (APIObject.class);
        result = Utilities.actionsGlobalContext().lookup(tpl);
        result.addLookupListener (this);
    }

    public void componentClosed() {
        result.removeLookupListener (this);
        result = null;
    }

    public void resultChanged(LookupEvent lookupEvent) {
        Lookup.Result r = (Lookup.Result) lookupEvent.getSource();
        Collection c = r.allInstances();
        if (!c.isEmpty()) {
            APIObject o = (APIObject) c.iterator().next();
            jLabel1.setText (Integer.toString(o.getIndex()));
            jLabel2.setText (o.getDate().toString());
        } else {
            jLabel1.setText("[no selection]");
            jLabel2.setText ("");
        }
    }
componentOpened() is called whenever the component is
made visible by the window system; componentClosed() is
called whenever the user clicks the X button on its tab to close it.
So whenever the component is showing, you want it to be tracking the
selection—which is what the above code does.
The resultChanged() method is your implementation of
LookupListener. Whenever the selected APIObject
changes, it will update the two JLabels you put on the form.
Now you need something to actually provide instances of APIObject,
for this code to be of any use. Fortunately this is quite simple.
You will create another TopComponent, this time, one that opens
in the editor area and offers an instance of APIObject from
its Lookup. You could use the Window Component template
again, but that template is designed for creating singleton components, rather
than components there can be many of. So you will simply create a TopComponent
subclass without the template, and an action which will open additional ones.
TopComponent. The
dialog should automatically suggest setting a dependency on the
Window System API. Do the same thing for Lookups (Utilities
API).org.myorg.myeditor package in the
My Editor project, and choose New > JPanel Form.false for each one.MyEditor to extends TopComponent
instead of javax.swing.JPanel:
public class MyEditor extends TopComponent {
MyEditor:
APIObject obj = new APIObject();
associateLookup (Lookups.singleton (obj);
jTextField1.setText ("APIObject #" + obj.getIndex());
jTextField2.setText ("Created: " + obj.getDate());
setDisplayName ("MyEditor " + obj.getIndex());
Right-click in the editor
and choose Fix Imports.
The line
associateLookup (Lookups.singleton (obj));
will create a Lookup that contains only one object—the new
instance of APIObject—and assign that Lookup
to be what is returned by MyEditor.getLookup().
While this is an artificial example,
you can imagine how APIObject might represent a file, an entity in a
database or anything else you might want to edit or view. Probably you
can also imagine one component that allowed you to select or edit multiple
unique instances of APIObject—that will be the subject of the
next tutorial.
To make your editor component at least somewhat interesting (though it
doesn't actually edit anything), you set the text
fields' values to values from the APIObject, so you have
something to display.
MyEditor components in the editor
area, so that there will be something to show. To do anything meaningful
with selection, you will need more than one editor so that there is more
than one APIObject to track.
Since you will want multiple editors,
you need a simple action on the main menu which will create and open another instance
of MyEditor in the window system (as opposed to what the
Window Component template would create for us, which is an action that always
looks up a singleton component such as the Navigator or Property Sheet components
in the IDE).
org.myorg.myeditor package and choose
New > Other.OpenEditorAction and set its display name to say
"Open Editor".OpenEditorAction,
which subclasses CallableSystemAction (a NetBeans subclass of
javax.swing.Action which lets you associate context sensitive
help with an action). Add the following code to its performAction()
method:
MyEditor editor = new MyEditor();
editor.open();
editor.requestActive();
The above code will simply create a new instance of
MyEditor (which
in turn will create a new instance of APIObject and put it in
its Lookup) and
open it in the window system.
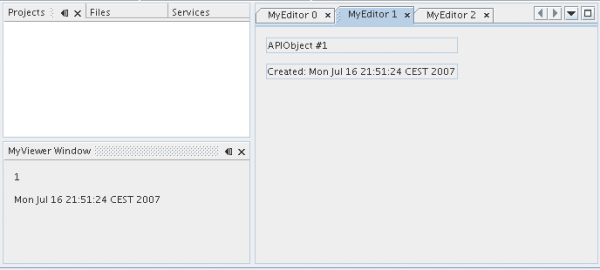
Now you're ready to run the tutorial. Simply right click SelectionSuite,
the module suite which owns your three modules, and choose Run from the popup
menu. When the IDE opens, simply choose File > Open Editor—invoke your
action. Do this a couple of times, so that there are several of your editor
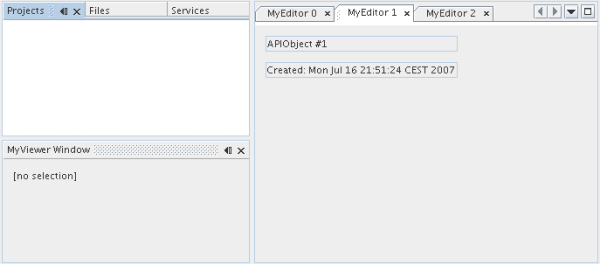
components open. Your singleton MyViewer window should also be open. Notice how
the MyViewer window's contents change as you click different tabs,
as shown here:
If you click in the Projects window, notice that the text changes to "[No Selection]", as shown below:
If you do not see the MyViewer window, you probably did not check
the checkbox in the wizard to open it on system start—simply go to the
Window menu and choose Open MyViewer Window to display it.
APIObject from its Lookup.
To really picture the value of this, imagine APIObject were something
much more complex; imagine that MyEditor is an image editor, and
APIObject represents an image being edited. The thing that's powerful here is
that you could replace MyEditor with, say, an SVG vector-based editor,
and the viewer component (presumably showing attributes of the currently edited image)
will work transparently with that new editor. It is this model of doing things
that is the reason you can add new tools into the NetBeans IDE that work against Java
files, and they will work in different versions of NetBeans, and that you can have
an alternate editor (such as the form editor) for Java files and all the components
and actions that work against Java files still work when the form editor is used.
This is very much the way NetBeans works with Java and other source files—
in their case, the thing that is available from the editor's Lookup is a
DataObject,
and components like Navigator and the Property Sheet are simply watching what object is
being made available by the focused TopComponent.
Another valuable thing about this approach is that often people are migrating existing applications to the NetBeans platform. The object that is part of the data model, in that case, is probably existing, working code that should not be changed in order to integrate it into NetBeans. By keeping the data model's API in a separate module, the NetBeans integration can be kept separate from the core business logic.
APIObject
it has with a new one on the fly.
MyEditor in the form editor (click the Design toolbar
button in the editor toolbar), and drag a JButton to it.text property of the JButton to "Replace".JButton and choose Events > Action > actionPerformed.
This will cause the code editor to open with the caret in an event handler method.
public class MyEditor extends TopComponent {
    private final InstanceContent content = new InstanceContent();
InstanceContent is a class which allows us to modify the content of a Lookup
(specifically an instance of AbstractLookup) on the fly.
associateLookup (new AbstractLookup (content));
jButton1ActionPerformed (null);
private void jButton1ActionPerformed(java.awt.event.ActionEvent evt) {
    APIObject obj = new APIObject();
    jTextField1.setText ("APIObject #" + obj.getIndex());
    jTextField2.setText ("Created: " + obj.getDate());
    setDisplayName ("MyEditor " + obj.getIndex());
    content.set(Collections.singleton (obj), null);
}
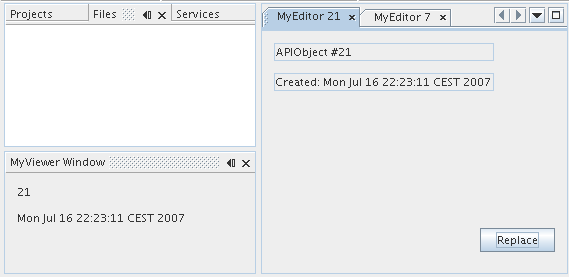
You're now ready to run the suite again. Right click SelectionSuite again and
choose Run. Notice how, now, when you click the Replace button, all of the
components update, including the instance of MyViewer—everything.
Map that only contains
one key and one value? The answer is, yes, it is like that. Where this technique becomes
even more powerful is when you provide multiple objects from multiple APIs.
As an example, it is very common in NetBeans to provide context sensitive
actions. A case in point is the built-in SaveAction that is part
of NetBeans' Actions API. What this action actually does is, it simply listens
for the presence of something called SaveCookie on the global context—
the same way your viewer window listens for APIObject. If a SaveCookie
appears (editors typically add one to their lookup when the content of the file
is modified but not yet saved), the action becomes enabled, so the Save toolbar
button and menu items become enabled. When the Save action is invoked, it calls
SaveCookie.save(), which in turn causes the SaveCookie to
disappear, so the Save action then becomes disabled until a new one appears.
As you may have noticed, context sensitivity was one option in the New
Action wizard. The actions currently generated by the wizard actually
use a way of doing this that pre-dates Lookup; the Lookup-based way of doing such
context sensitive actions is described
in the developer FAQ.
So the pattern in practice is to provide more than just a single object from
your component's Lookup—different auxilliary components and different
actions will be interested in different aspects of the object being edited. These
aspects can be cleanly separated into interfaces which those auxilliary components
and actions can depend on and listen for.
While not directly related to the topic of this tutorial, it's worth noticing
that if you open three MyEditor instances, and shut down and restart
NetBeans, you end up with three MyEditor instances magically appearing
on restart. By default, your editors are serialized to disk on shutdown and
restored on restart.
If you do not want this behavior, there are two other choices. Override
the following method on MyEditor to cause editors never to be reopened on restart:
public int getPersistenceType() {
    return PERSISTENCE_NEVER;
}
If you want to persist the components that are open but discard those that have
been closed, return PERSISTENCE_ONLY_OPENED instead. The default
(for backward compatibility reasons) is PERSISTENCE_ALWAYS, which
is not appropriate for editor-style componenents—it means that even editors that have been closed
are kept forever and reloaded on restart.
Note, though, that part of what is serialized to disk is the location of
your component in the main window. So singleton TopComponentss such as the
property sheet, or our viewer component, should use PERSISTENCE_ALWAYS -
otherwise if they are closed once by the user, the next time they are opened they
will appear in the editor area instead of where they are supposed to be.
layer.xml file to install objects. In the case of the
My API module, it is actually not used. So a polite thing to do to get a
slight improvement in startup time would be the following:
OpenIDE-Module-Layer: org/myorg/myapi/layer.xml
layer.xml file in
org.myorg.myapi