NetBeans Selection Management Tutorial II—Using Nodes

The previous tutorial covered the basics
of component-wide selection handling in NetBeans—how to provide objects from
a TopComponent's
Lookup, and
how to write other components that are sensitive to the Lookup of whatever
component has focus.
This tutorial focuses on the Nodes API, which makes it possible to do more granular
views and selection than just component-level selection. Of course, you could write
a component that reads and writes into its own Lookup whatever it wants, and
provides more granular selection logic that way. But the Nodes API makes it very
easy to do this, and offers a number of advantages over doing it yourself.
The first advantage is that the Nodes API provides a presentation layer—a
layer between the data model being edited in some way, and the UI components
that expose the data model to the user. This is quite useful and powerful, as
the same model may be presented in multiple ways, or with multiple UIs.
The second advantage is the Explorer API—the module org.openide.explorer
provides a vast array of components—trees, lists, tree tables and more—which can
render a Node and its children.
A Node is a generic hierarchical object—a Node has:
- Children—Nodes in a hierarchy underneath it, that can be displayed in a tree
- Actions—An array of actions that can be displayed in a popup menu
- Display Name—A human-readable, localized display name that can be shown in a UI component
- Icon—An icon that can be shown in a UI component
and Nodes can fire changes in any of the above, and the explorer UI components
will automatically update themselves.
This is not to say that the content of the previous tutorial was useless—on
the contrary, it is the reason the Nodes API can work. The reason:
org.openide.nodes.Node has a method, you guessed it, getLookup().
In fact what is happening when you change selection in the Projects tab in the IDE,
for example, is...the Projects tab is a TopComponent. It proxies the Lookup
of whatever object(s) are currently selected in the tree—just as the
Utilities.actionsGlobalContext() Lookup proxies whichever
component is focused and fires changes when focus changes.
Thanks to the components in the Explorer API, it is very easy to create your own
views of a tree of Nodes, and have this type of proxying in your
own components with very little code. Viewer type components such as the
MyViewer component in the previous tutorial do not have to do anything
special to be able to respond to selection changes in Explorer components—they
will automatically be notified as selection changes.
Getting Started
The starting point for the code in this tutorial will be the code from the
previous tutorial—it is assumed that
you are familiar with it and what it does.
To download the completed sample, click here.
Creating an Explorer View
The first thing you will do is some substantial modifications to your
MyEditor editor component. This starts with opening it in the
editor.
- First, bring up the properties dialog for the My Editor project.
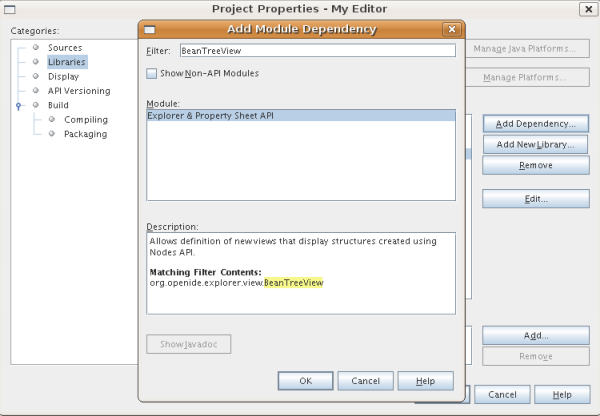
On the Libraries tab, click the add button, and type "BeanTreeView"
in the dialog. Click OK once you see the Explorer & Property Sheet API listed,
as shown below. This will add a dependency on the Explorer API module,
so you can use classes from it.
- Next, delete the body of the action handler method:
private void jButton1ActionPerformed(java.awt.event.ActionEvent evt) {
}
and delete the call to it from the constructor.
This way, when you delete the button it is associated with, the handler method will be
deleted too.
- Switch to the form designer, select all of the components, and
delete them.
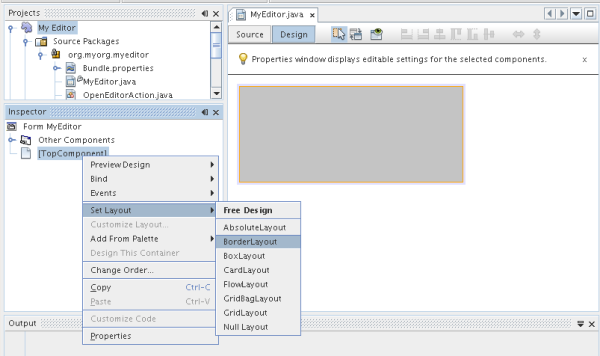
- In the Component Inspector, right click the
TopComponent
node, and choose Set Layout > BorderLayout, as shown below:
- Click the
JScrollPane button in the Component
Palette window and drop the scroll pane on the form—it will take
up the entire form. The secret here is that all of the Explorer UI
components are subclasses of JScrollPane—so you can
simply change the instantiation code to create an explorer view
instead.
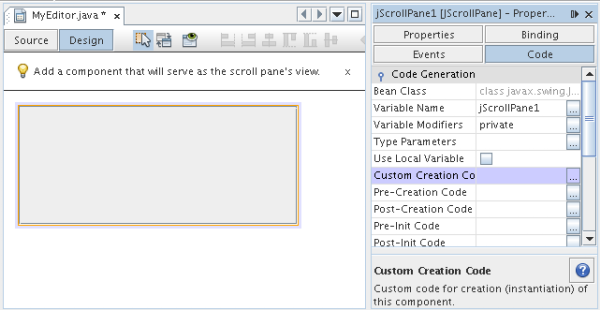
- Select your
JScrollPane, and click the Code button at the top of
the property sheet. Look for "Custom Creation Code" in the list,
as shown below:
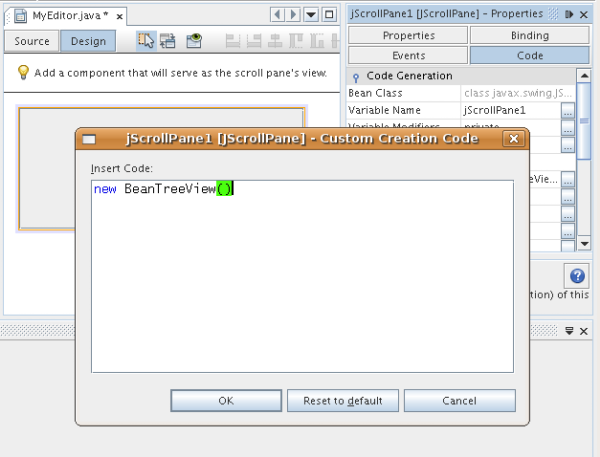
- Set the text
of this property to be
new BeanTreeView(), as shown below:
BeanTreeView
is a component from the Explorer API—a basic JTree-based
view over a Node and its children, with built-in handling
of popup menus, searching and more.
- Switch to the code editor and press Ctrl-Shift-I to import BeanTreeView, because
the import statement needs to be added, as indicated below:

- The next step is to give your tree something to show. Explorer UI
components work like this: When added to a container, they search that
container and their ancestors until they find one that implements
ExplorerManager.Provider. So you don't set the node to be viewed directly
on the component—you set it on the component's manager. This makes
it possible to have multiple views, master/detail views and such, all
managed by a single manager. Add to the signature of MyEditor as follows:
public class MyEditor extends TopComponent implements ExplorerManager.Provider {
Then press Ctrl-Shift-I to fix imports. Keeping the caret in the signature
line, a lightbulb glyph should appear in the margin. Press Alt-Enter, and
accept the hint "Implement all abstract methods". This will add one
method, getExplorerManager(). Implement it as follows:
private final ExplorerManager mgr = new ExplorerManager();
public ExplorerManager getExplorerManager() {
    return mgr;
}
- Now, since the goal is one component that can display multiple
APIObjects, you need a Node or two to display in your component.
Each one will own its own instance of APIObject. So,
right now you'll just add the code that will create a root node for
your tree view. Add the following line to the constructor:
mgr.setRootContext(new AbstractNode(new MyChildren()));
This is the code that sets the root node for all of the explorer views
that are child components of MyEditor.
- If you tried Fix Imports, you may have seen the error dialog telling
you that neither
AbstractNode, nor MyChildren
could be resolved. To resolve AbstractNode, you need to add
one dependency, on the Nodes API module. Right click the My Editor project,
go to the Libraries page and click Add Dependency. Type "AbstractNode" in
the Add dialog, and when the item "Nodes API" in the list is
selected, click OK or press Enter.
- Now, back in the source editor, press Ctrl-Shift-I to Fix Imports. You
will be notified that
MyChildren could not be resolved. That's
okay—you're about to write it.
Implementing Nodes and Node Children
You'll notice you're using a class called AbstractNode above. Despite
its name, it is not an abstract class! It is a utility implementation of
org.openide.nodes.Node which can save you some time and trouble—rather
than implement Node yourself, you can just create an AbstractNode and pass it a
Children object which will provide child nodes for it, and then set
its icon and display name as needed. So it is a simple way to get a Node
object to represent something, without needing to do any subclassing of Node
itself.
The next step is to implement MyChildren, so that there are subnodes
underneath the initial node.
- Right click the
org.myorg.myeditor package in the My Editor
project, and choose New > Java Class from the popup menu
- In the New Java Class wizard, name the class "MyChildren", and click
Finish or press Enter to create the class.
- Modify the signature of the class so it extends
Children.Keys:
class MyChildren extends Children.Keys {
- Press Ctrl-Shift-I to Fix Imports
- Position the caret in the class signature line. When the lightbulb glyph appears
in the margin, press Alt-Enter and then Enter again to accept the hint "Implement
all Abstract Methods". This will add a
createNodes (Object key)
method—this is where you will create the nodes that will be children of your root
node.
- But first, you want to override one method—
addNotify. As with
the addNotify() pattern in Swing components, Children.Keys.addNotify()
is called the first time something pays attention to this Children object—the first
time it is asked for its child nodes. So you can delay creation of child Nodes until
the user has really expanded the parent node in a view and needs to see them. Position
the caret somewhere in the source file and press Alt-Insert. Then choose 'Override Method...'.
In the dialog that appears, expand 'Children', select the addNotify()
method, and click OK or press Enter.
- Implement the
addNotify() method as follows:
protected void addNotify() {
    APIObject[] objs = new APIObject[5];
    for (int i = 0; i < objs.length; i++) {
        objs[i] = new APIObject();
    }
    setKeys (objs);
}
As you may have guessed from the name Children.Keys, what your parent
class does is take an array or Collection of key objects, and act as a
factory for Nodes for them. So, you call setKeys() in
addNotify(), since addNotify() is telling you that something
is about to ask for the child nodes. For each element in the array or collection
you pass to setKeys(), createNodes() will be called
once (note this means that if you want, you can have more than one node to represent
one object).
- Now you need to implement the code that actually creates Node objects for all
of these. Implement
createNodes() as follows:
protected Node[] createNodes(Object o) {
    APIObject obj = (APIObject) o;
    AbstractNode result = new AbstractNode (new MyChildren(), Lookups.singleton(obj));
    result.setDisplayName (obj.toString());
    return new Node[] { result };
}
- Press Ctrl-Shift-I to Fix Imports.
- The last step is to install a bit of plumbing code that will wire up your
explorer manager to your TopComponent's lookup. First, delete the line
private final InstanceContent content = new InstanceContent();
from the head of the class definition—you will be using a utility to wire
up the selected Node's Lookup to your component's
Lookup.
- Modify the constructor of
MyEditor so it looks like this:
public MyEditor() {
    initComponents();
    associateLookup (ExplorerUtils.createLookup(mgr, getActionMap()));
    mgr.setRootContext(new AbstractNode(new MyChildren()));
    setDisplayName ("My Editor");
}
Running the Tutorial
You may have noticed that because you pass a new instance of MyChildren
to each AbstractNode you create, that you will end up with an infinitely
deep tree of APIObjects—each Node will have five child
Nodes, each with its own APIObject.
You are now ready to run, so right-click SelectionSuite and choose
Clean and Build, and then right-click again and choose Run from the popup menu.
When NetBeans starts, use your Open Editor action on the File menu to open an
instance of MyEditor.
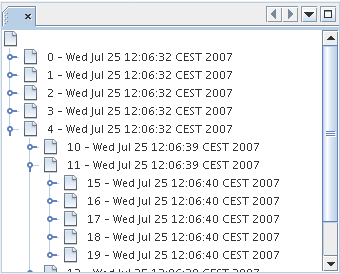
Notice that as you click and/or expand different nodes, the viewer and the property sheet update
themselves
to show the APIObject belonging to each node, as shown below:

Exploring Explorer
Now that you have the above code, it can be interesting to explore some of the
other components available in NetBeans, which can also render a Node
and it's children. You can do this simply by opening MyEditor in
the form editor and changing the Custom Creation Code property to use a different
component. For some of these you will need to replace the JScrollPane with
a different type of component (if it seems easier, just delete the JScrollPane
in the form editor, and add the code add (new BeanTreeView(), BorderLayout.CENTER)
to the constructor.
Some of the options are:
- ListView—display nodes in a JList (you can set how deep into the
Node hierarchy it should go)
- TreeTableView—a tree-table—a table whose leftmost column is
a tree
- ChoiceView—a combo-box view of a Node and its children
- MenuView—a
JButton that pops up a menu of a Node and
its children
- IconView—a component that shows Node children in equally spaced
icons, rather like Windows Explorer
Handling Multi-Selection
You may have noticed that BeanTreeView, the basic tree view for
Nodes, lets you select more than one Node at a time. Therefore, it might be
desirable to modify your viewer component to display information about all of
the selected nodes:
- Open
org.myorg.myviewer.MyViewerTopComponent from the My Viewer
project, in the editor.
- Replace the
resultChanged() listener method with the following
code:
public void resultChanged(LookupEvent lookupEvent) {
    Lookup.Result r = (Lookup.Result) lookupEvent.getSource();
    Collection c = r.allInstances();
    if (!c.isEmpty()) {
        StringBuffer text1 = new StringBuffer();
        StringBuffer text2 = new StringBuffer();
        for (Iterator i = c.iterator(); i.hasNext();) {
            APIObject o = (APIObject) i.next();
            text1.append (o.getIndex());
            text2.append (o.getDate().toString());
            if (i.hasNext()) {
                text1.append (',');
                text2.append (',');
            }
        }
        jLabel1.setText (text1.toString());
        jLabel2.setText (text2.toString());
    } else {
        jLabel1.setText("[no selection]");
        jLabel2.setText ("");
    }
}
So you can see that, not only does the Lookup created by ExplorerUtils
handle proxying the Lookup of whatever Node is
selected; it also correctly proxies the Lookups of multiple
Nodes.

Review of Concepts
To review a few of the concepts you've covered here:
- A
Lookup is like a Map where the keys are classes and the values are
instances of those classes. It's also useful to think of a Lookup
as a place that objects swim into and out of, and you can subscribe to
be notified of the arrival and departure of specific types of object.
Utilities.actionsGlobalContext() is a Lookup which
proxies the Lookup of whichever TopComponent currently
has keyboard focus, and fires changes when focus moves to a different component.Nodes are presentation objects that can be displayed in
a tree, list or other component from the Explorer API. Each Node
has its own Lookup.- Just as
Utilities.actionsGlobalContext proxies the Lookup
of TopComponents (so you can just ask that lookup for a result and listen for changes
in it, rather than having to track focus changes yourself), so also the Lookup
created by ExplorerUtils.createLookup(ExplorerManager, ActionMap) will
create a Lookup which automatically proxies the Lookup of
whatever Node(s) are selected in an Explorer component.
Next Steps
So you now have a view that can display Nodes that expose some
underlying model object (APIObject in your case). In the
next tutorial, you will cover how to enhance
the Nodes you have already created with actions, properties and more
colorful display names.


