Contents
| - | Creating a Ruby Project |
| - | Working With Ruby Files |
| - | Creating a Ruby on Rails Project |
| - | Working With Ruby on Rails Files |
| - | Using the JRuby Interactive Ruby (IRB) Console |

Contributed by Chris Kutler
November 2007 [Revision number: V6.0-1]
This tutorial gives you a whirlwind tour of Ruby and Ruby on Rails application development in the NetBeans IDE. The tutorial shows you how to use the IDE's Ruby support to perform some of the typical phases of application development.
The tutorial is designed so that you do not need to go through it in any particular order. You might want to skim over it quickly and then return to each section as time allows. If you prefer a step by step tutorial, you might want to first try Creating a Ruby Weblog in 10 Minutes.
Contents
|

|
This tutorial requires the following technologies and resources:
See Installing and Configuring Ruby Support for information about installing and configuring NetBeans Ruby support and working with database servers from NetBeans Ruby on Rails projects.
A project is the equivalent of your working environment for an application. When you create a new Ruby project, you have the choice of creating a project from existing files, or creating a new set of folders with templates for your Ruby project.
Note: When you open an existing Ruby or JRuby project that you built outside of the IDE, the only NetBeans related modification that the IDE makes to the project is to create a nbproject folder, which contains NetBeans metadata.
You can have several projects open in the IDE at the same time. When you have more than one project open, you must specify which project is the main project. The main project is the project that the IDE runs when you click the Run Main Project button. To switch the main project, right-click on a project in the Project's window and choose Set as Main Project.
When you create an new Ruby project, the IDE creates a
file named main.rb by default, and sets this file as
the main script. When you click the Run Main Project
button (
 ),
the IDE saves all file changes and runs the main script. To switch to
a different start script, right-click the Project node
in the Projects window and choose Properties from
the pop-up menu. Select the Run category and, in the
Main Script text field, type the file name.
Note: The main.rb file is created for Ruby projects. When you create a Ruby on Rails project, as shown in the Creating a Ruby on Rails Project section, the IDE does not create a main.rb file.
Try It
Below are the steps to create a Ruby project.
If you haven't done so already, start the IDE by using the appropriate step from the following list:
Name the project, for example simple_ruby_application, and click Finish.
The IDE displays the main.rb file in the editor. Notice how the code calls puts to display the string "Hello World".
Click the Run Main Project button
( )
to run the application.
Figure 1: Output Window

You work with your Ruby project files similar to how you would work with them from a text editor. You open a file by double-clicking on the file's node in either the Projects window or the Files window. You can also press Alt-Shift-O (use Ctrl-Shift-O on the Mac) to access files by name.
The IDE's editor offers many features to facilitate your programming tasks. You will learn about some of the basic editing features in this section. A comprehensive list of the editing features can be found on the NetBeans Ruby Editing wiki page.
Try It.
Follow these steps to create a simple Ruby project that displays a product list. First, you create a class for an individual product item. Next you create a class for the item list and a data file to supply the product data. Last, you edit the main.rb file to display the list. As you develop the code, the steps will also introduce editing features.
In the Projects window, create a class file by right-clicking the Source Files node and choosing New > Ruby Class from the pop-up menu. Type Item in the Class text box and click Finish.
The IDE creates a file named item.rb and opens the file in the editor.Replace the contents of the item.rb file with the following incorrect code. You will fix the code in the remaining steps.
| Code Sample 1: Item Class |
class Item
def initialize(id, type, price)
end
def simple_method(id, type, price)
@id = id
@type = type
@price = price.to_f
end
def to_s
"Item #{@id} is a #{@type}: Price $#{@price}"
end
end
|
Figure 2: Unused Variables
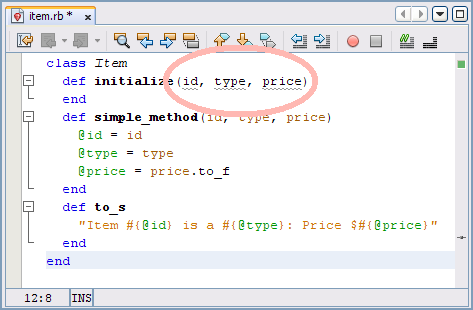
Figure 3: Multiple Line Selection

The purpose of the simple_method was to hold the code required for the previous steps. You can now delete this method. First, place the cursor on the end statement for the simple_method.
Notice that the IDE highlights the corresponding def.This step along with the next two steps shows how to use code completion. Open up a line at the top of the class block, then place the cursor in the line, type attr_a, and press Ctrl-Space (if Ctrl-Space does not work on your system, use Ctrl-\).
The IDE displays a list of possible code completions, as shown in the following figure.Figure 4: Code Completion List for attr_a

Select attr_accessor :attr_names rw, and press Enter.
The IDE completes the code and selects attr_names for editing, as shown in the next figure.Figure 5: Completed Code
Type id, :type, :price to complete the statement and press Enter.
The statement should look like the following code.attr_accessor :id, :type, :price
The completed script should look like the following code sample.
| Code Sample 2: Formatted Item Class |
class Item
  attr_accessor :id, :type, :price
  def initialize(id, type, price)
    @id = id
    @type = type
    @price = price.to_f
  end
  def to_s
    "Item #{@id} is a #{@type}: Price $#{@price}"
  end
end
|
Replace the contents of the items_list.rb file with the following statements.
| Code Sample 3: ItemsList Class |
class ItemsList

  DATA_FILE="data.txt"
  attr_accessor :items

  def initialize
    @items = ItemsList.load_item_data
  end

  private

  def self.load_item_data
    items = []
    File.open(DATA_FILE) do |data_file|
      data_file.readlines.each do |line|
        items << Item.new(*line.split("\s"))
      end
    end
    items
  end

end
|
Open up a line above the Class definition and type require ' (single quote).
Notice how the IDE provides the ending single quote and places the cursor between the quotes, as shown in the following figure. The IDE automatically inserts and removes matching delimiters, such as quotes, braces, and brackets, as well as end statements for code blocks.Figure 6: Delimiter Pair Matching
Figure 7: Code Completion for require Statement
Ensure that the Folder is set to lib, and click Finish.
Note: You are placing the text file in the lib folder because, by default, when you run the project from the IDE, the default working directory is the lib folder.Paste the following text into the data.txt file.
| Code Sample 4: Product Data |
BF15678 book 25.32 C29589 cd 18.95 F89028 beverage 2.00 BN98232 book 45.33 BF15890 book 15.98 |
In the Projects window, double-click main.rb to display the file in the editor window. Replace the contents with the following statements, which display the list of items:
| Code Sample 5: main.rb Contents |
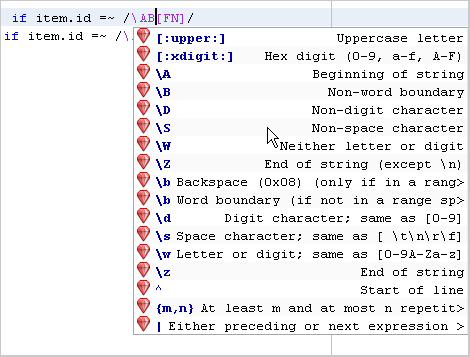
require 'items_list' items_list = ItemsList.new items_list.items.each do |item| line_item = item.to_s line_item.gsub!(/book/, 'fiction \0') if item.id =~ /\AB[FN]/ line_item.gsub!(/fiction/, 'non-\0') if item.id =~ /\ABN/ puts line_item end puts "\n" |
Figure 8: Regular Expression Code Completion
To run the project, click the Run Main Project button in the main toolbar.
The IDE saves all your changes and runs the main.rb script. The application output appears in the Output window, as shown in the following figure.Figure 9: simple_ruby_application Output

For More Information
Creating a Ruby on Rails project in the IDE is very similar to using the rails command in a terminal window. In fact, when you create a project, the IDE creates the same folders and files that a rails command would create.
You create a project by right-clicking in the Projects window and choosing New Project from the pop-up menu. You select Ruby from the Categories pane, and you select either Ruby on Rails Application or Ruby on Rails Application With Existing Sources from the Projects pane.
You can have several projects open in the IDE at the same time. The node for the main project, which is the project the NetBeans actions act on, is shown in bold. To switch the main project, right-click on a project in the Project's window and choose Set as Main Project.
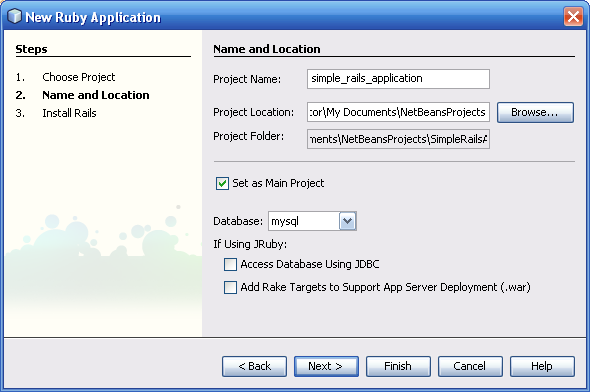
As shown in the following figure, the second page of the New Project wizard enables you to name the project and specify its location. A drop-down list provides the names of several supported database servers. The IDE uses the selected database server as well as the Access Database Using JDBC option to determine how to write the contents for the database.yml file.
Figure 10: Page 2 of New Ruby on Rails Project Wizard
Try It
Follow these steps to create a Ruby on Rails project.
Next, choose the database server the you will use with the application. If you are using JRuby, you must choose MySQL, PostgresSQL, Oracle, HSQLDB, or Java DB (also known as Derby).
The IDE uses this information to seed the database.yml file.
Note: If you plan to use this project solely for this tutorial, you will not be accessing any databases, so you can accept the default database settings.If you are using JRuby and you are accessing a database server other than MySQL, you must select the Access Database Using JDBC checkbox. If your database server is MySQL, the use of JDBC is optional.
When this checkbox is checked, the IDE adds statements to the environment.rb file to use the ActiveRecord-JDBC gem.
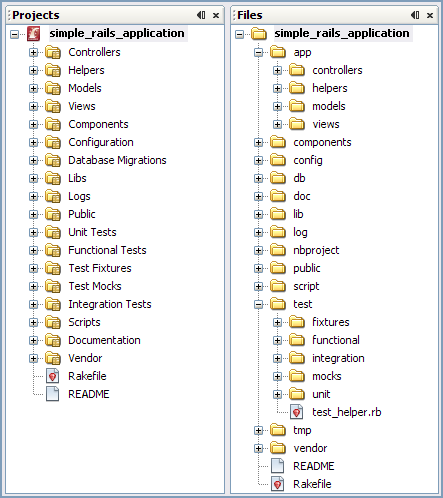
Note: To use a JDBC connection, you must obtain a JDBC 3.0 client driver for your database server, and put a copy of the JDBC driver in the JRuby/lib folder.Click the Files tab and compare this physical file structure with the logical view that is presented in the Project's window.
The following figure shows the windows side by side, to make it easy to compare the two views.Figure 11: Comparison of Projects Window and Files Window
In addition to Ruby projects, NetBeans Ruby support enables you to work with Ruby on Rails projects. Rails is a framework that enables you to quickly create database-backed web applications that are based on the model-view-controller (MVC) architecture.
Just as with Ruby projects, you can open a file in the editor by double-clicking on the file's node in either the Projects window or the Files window, or by pressing Alt-Shift-O (use Ctrl-Shift-O on the Mac) to access a file by name.
The pop-up menus for the nodes in the Project window provide easy access to Rails scripts and Rake tasks, such as the generate script for generating code, and the db:migrate task for migrating to a specific version of the database tables.
The IDE understands the relationships between the file types, and makes it easy to navigate to associated files. For example, if you are editing a view file, you can use the pop-up menu to navigate to the associated action file or test.
As with all NetBeans projects, you can run your application by clicking the Run Main Project button. The IDE saves all file changes, starts the web server, if necessary, then displays the welcome page in your browser. You can also use the Run File menu action in the editor to open in the browser the relevant URL to whatever controller, action, view, or helper you are editing.
Try It
Complete the following steps to create a Rails version of the sample project presented in the Working With Ruby Files section. In this variation, the constructor takes a hash instead of positional arguments, you get the data from a YAML file, and the ItemsList functionality has been moved to the Item class.
Note: Typically, with a Rails project, you base your model classes on database tables. However, to make this example quick and simple, the application gets its data from a YAML file.
In the Projects window, right-click the Models node and choose Generate from the pop-up menu.
The Rails Generator dialog box opens, with model selected in the Generate drop-down list, as shown below.Figure 12: Rails Generator Invoked From the Model Node
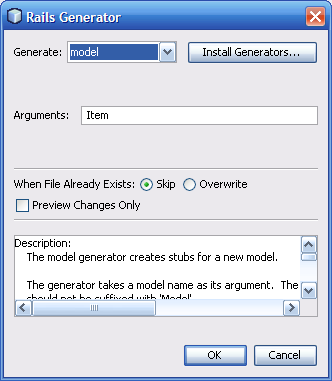
Type Item in the Arguments text box, and click OK.
The IDE creates a file named item.rb and opens the file in the editor. A node for the file appears under the Models node in the Projects window. The IDE also creates a test suite under Unit Test, a test fixture under Test Fixtures, and a migration under Database Migrations > migrate.Replace the contents of the item.rb file with the following code.
| Code Sample 6: Item Class |
# Takes:
#   :id => unique item id
#   :type => type of item
#   :price => price of the item

class Item
  DATA_FILE="data.yml"
  attr_accessor :id, :type, :price

  def initialize(attributes)
    @id = attributes['id']
    @type = attributes['type']
    @price = attributes['price'].to_f
  end

  def to_s
    "Item #{@id} is a #{@type}: Price $#{@price}"
  end

  def self.load_item_data
    YAML.load_file(DATA_FILE).collect do |item_hash|
      Item.new(item_hash)
    end
  end

end
|
Type data in the File Name text box and click Finish.
The IDE creates a file named data.yml in the project's root folder, and opens the file in the editor. Because the file is in the root folder, you do not see it in the logical view of the Project window. However, it does appear in the Files window.Replace the contents of the data.yml file with the following text.
| Code Sample 7: data.yml |
- id: BF15678 type: book price: 25.32 - id: C29589 type: cd price: 18.95 - id: F89028 type: beverage price: 2.00 - id: BN98232 type: book price: 45.33 - id: BF15890 type: book price: 15.98 |
The model is ready. Now add the controller and the view. In the Projects window, right-click the Controllers node and choose Generate from the pop-up menu.
The Rails Generator dialog box opens with controller selected in the Generate drop-down list, as shown below.Figure 13: Rails Generator Invoked From the Controllers Node
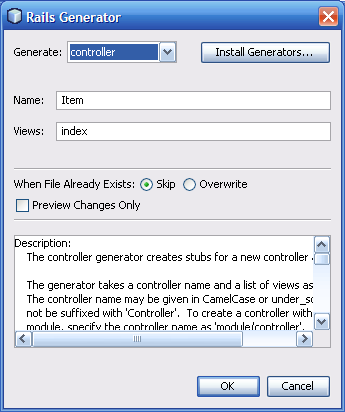
Type Item in the Name text box, type index in the Views text box, and click OK.
The IDE creates both the ItemController class and the index.rhtml view, which is under the Views > item node. In addition, the IDE creates Functional Tests > item_controller_test.rb and Helpers > item_helper.rb.Replace the contents of the item_controller.rb file with the following code.
| Code Sample 8: ItemController Class |
class ItemController < ApplicationController
  def index
    @items = Item.load_item_data
  end
end
|
Figure 14: Navigating to the View
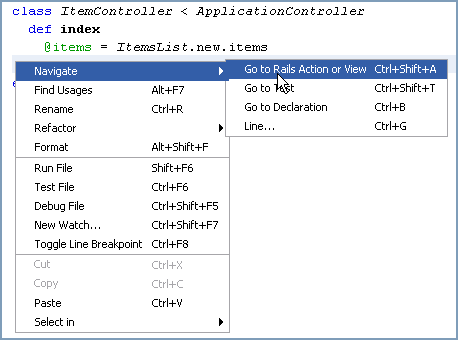
Replace the contents of index.rhtml with the following markup.
| Code Sample 9: index.rhtml |
<h1>List of Items</h1>

<table border="1">
  <tr><th>Id</th><th>Type</th><th>Price</th></tr>
  <% for item in @items %>
    <tr>
      <td><%= item.id %>
      </td>
      <td><%= item.type %></td>
      <td align="right"><%= '%.02f' % item.price %></td>
    </tr>
  <% end %>
</table>
|
Click the Save All button in the main toolbar to save all your changes.
The asterisks (*) in the file tabs, which indicated modified files, disappear.Right-click in the editor and choose Run File.
The IDE sends the URL for the item controller and the index action to the server, which, in turns sends the following page to the browser.Figure 15: Index View Displayed in the Browser
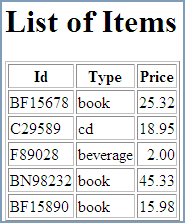
Try clicking the Run Main Project to run the whole application.
Note that the standard Ruby on Rails welcome page appears. This is because the router, by default, displays the Public > index.html file. You will change the routing in the following steps.# map.connect '', :controller => "welcome"
Replace the comment the following code shown in bold.
| Code Sample 10: Routing Code |
# You can have the root of your site routed by hooking up '' # -- just remember to delete public/index.html. map.connect '', :controller => "item" |
Figure 16: Server Stop Button

Take a look at Using Databases With JRuby and Creating a Ruby Weblog in 10 Minutes.
How would you build your task list application if you used database table instead of a file?For More Information
As you might guess, the JRuby Interactive Ruby (IRB) Console is a module that lets you interactively enter Ruby statements, just as you do with the Ruby IRB. In addition, the JRuby Interactive Ruby (IRB) Console provides interoperability with Java platform applications.
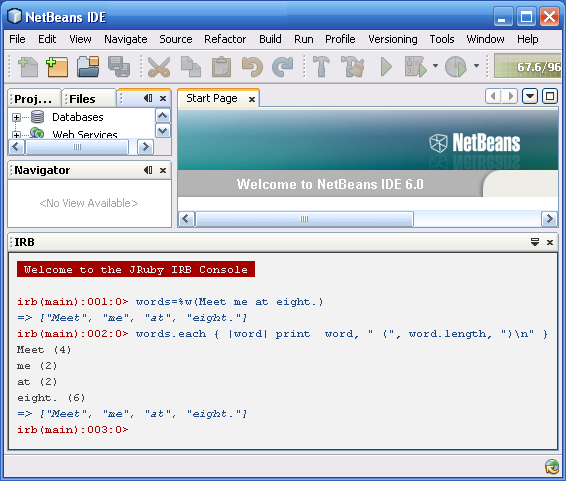
You open the console by choosing Window > Other > Ruby Shell (IRB) from the main menu. The console appears in the lower portion of the IDE, as shown in the following figure.
Figure 17: JRuby IRB Console
The IRB Console is launched from the NetBeans installation folder. To switch to another folder, type the following command, replacing your-path with the path to the folder that contains the Ruby files.
=> Dir.chdir("your-path")
Closing the console window does not stop the IRB
session. When you reopen the window, the command history
is still there. To stop a session, type quit
or exit in the console.
Use the IRB to try out Ruby statements. For example, type the following statements to see what Ruby outputs:
>> String.ancestors
>> "fig mango orange melon grapes".split(pattern="\s")
>> "[email protected]" =~ /\A[\w\._%-]+@[\w\.-]+\.[a-zA-Z]{2,4}\z/
Try to think of other Ruby statements you might want to test, such as seeing what type of exception is thrown.
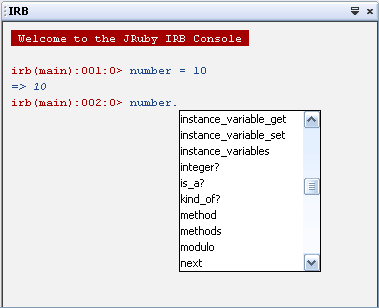
Figure 18: Code Completion Pop-Up
For More Information
To learn how to use the IDE to quickly build a Ruby on Rails application, go to Creating a Ruby Weblog in 10 Minutes.
To obtain support and stay informed of the latest changes to the NetBeans Ruby development features, join the [email protected] and [email protected] mailing lists.