Understanding the Travel Reservation Service
Contributed by Bob May, maintained by Irina Filippova
December 2007
 The Travel Reservation Service is a sample business process provided with the NetBeans IDE 6.0 with SOA. The Travel Reservation Service acts as a logical aggregator of other services and is based on business logic typical of travel reservation systems as described below.
- The process assumes that a client initiates the process by sending a message that contains a partial travel itinerary document.
- The client's travel itinerary can have:
- No pre-existing reservations, or
- A combination of pre-existing airline, vehicle and/or hotel reservations.
- The Travel Reservation Service examines the incoming client itinerary and processes the itinerary to completion.
- If the client itinerary does not contain a pre-existing airline reservation, the Travel Reservation Service passes the itinerary on to its partner service, the Airline Reservation Service, to add the airline reservation.
- The Airline Reservation Service passes back the modified itinerary to the Travel Reservation Service.
- The Travel Reservation Service conducts similar logic for both vehicle and hotel reservations. In each case it will delegate the actual provisioning of the reservation to the Vehicle Reservation Service and the Hotel Reservation Service.
- Finally, the Travel Reservation Service passes the completed itinerary back to the original client, completing the process.
Expected duration: 60 minutes
Contents
top
Tutorial Requirements
Before you proceed, make sure you review the requirements in this section.
Prerequisites
This tutorial assumes that you have some basic knowledge of, or programming experience with, the Java language and platform and the NetBeans IDE.
System Requirements
This tutorial assumes that your system meets the requirements specified in the System Requirements topic of the NetBeans IDE 6.0 Release Notes.
Software Needed for the Tutorial
Before you begin, you need to install the following software on your computer: NetBeans IDE 6.0 with SOA and the GlassFish application server.
top
Configuring and Starting the GlassFish Application Server
When you install full NetBeans 6.0 download, it includes the GlassFish application server. The NetBeans IDE will automatically start the application server when needed.
To start the GlassFish application server:
- If the Services window is not visible, choose Window > Services.
- In the Services window, expand the Servers node.
The Servers node should contain the GlassFish application server subnode. If the GlassFish application server node does not appear, go to To configure the GlassFish Application Server.
- Right-click the GlassFish application server node and select Start.
The Output window displays logging information about the application startup. If the Output window is not visible, choose Window > Output > Output.
When the message Application server startup complete appears in the Output window, the application server is running.
Note: If a green arrow badge appears on the GlassFish application server node, the server is running.
Note: Deploying an application to the GlassFish application server will automatically start the server. Thus, you do not have to manually start the application server.
Note: The following procedure shows how to configure the IDE to use an alternate version of the GlassFish V2 application server.
To configure the GlassFish V2 application server:
You might want to use a different version of the application server than the one provided with NetBeans 6.0. For example, you might want to download and install a more current version of the GlassFish V2 application server from the GlassFish Community site.
The following procedure shows how to configure the NetBeans 6.0 IDE to use an alternate version of the GlassFish V2 application server. It assumes that you have downloaded and installed the alternate version of the application server.
- In the Services window, right-click the Servers node and choose Add Server from the pop-up menu.
The Add Server Instance dialog box opens.
- In the Choose Server page, select GlassFish V2 from the list.
- Click Next.
The Platform Folder Location page opens.
- In the Platform Location field, use the Browse button to navigate to and select the installation location of the application server.
If you installed the GlassFish application server in the default location, use Table 1 as a guide for locating the installation. Otherwise, navigate to the location where you installed the GlassFish V2 application server.
Table 1: Default Application Server Installation Directory
Solaris OS
Linux |
root |
/opt/glassfish-v2 |
/opt/SUNWappserver |
Solaris OS
Linux |
user |
~/glassfish-v2 |
~/SUNWappserver |
| Mac OS X |
N/A |
/Applications/NetBeans/glassfish-v2b58g |
/Applications/NetBeans/NetBeans 6.0 |
| Windows |
N/A |
C:\Program Files\glassfish-v2-b58g |
C:\Sun\AppServer |
- Select the Register Local Default Domain radio button and click Next.
- Enter the user name and password for the domain's administrator.
If you accepted the default values during the installation, the user name is admin and the password is adminadmin.
- Click Finish.
top
Creating a New Project with the Travel Reservation Service Sample Project
- From the IDE's main menu, choose File > New Project.
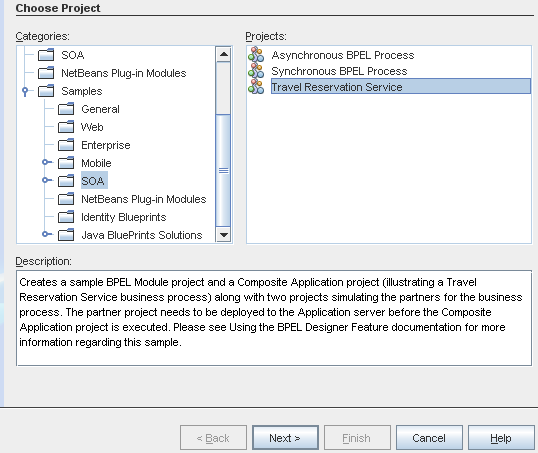
- Under Categories select Samples > SOA.
- Under Projects, select Travel Reservation Service and click Next.
- Accept the default values or type a project name and location of your choice.
Note that in this document, the project name is TravelReservationService.
- Click Finish.
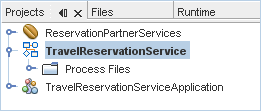
The Projects window now contains three project nodes: one for TravelReservationService, a BPEL module, one for TravelReservationServiceApplication, a Composite Application project, and one for ReservationPartnerServices, a bundled EJB project.
top
Deploying the Partner Web Services Project
The Travel Reservation Service communicates with its partner services via their public interfaces. These interfaces are defined in partner-specific WSDL files.
The IDE includes a bundled EJB project called ReservationPartnerServices. The ReservationPartnerServices project contains a basic EJB and JMS based implementation of the three partner services. These partner services are Hotel Reservation Service, Vehicle Reservation Service and Airline Reservation Service. These partner web services must be deployed to the bundled GlassFish application server before you can test run the Travel Reservation Service process.
This implementation is only meant to serve as a test harness for the Travel Reservation Service process. The implementation of the partner services should not be of any interest to the BPEL developer. They are merely prerequisites to the testability of the Travel Reservation Service.
To deploy the ReservationPartnerServices project:
- In the Projects window, right-click the ReservationPartnerServices node and choose Undeply and Deploy. This deploys the ReservationPartnerServices.
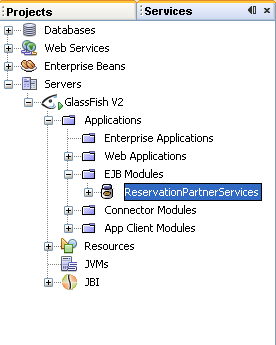
- Verify that the ReservationPartnerServices application was successfully deployed by performing the following steps:
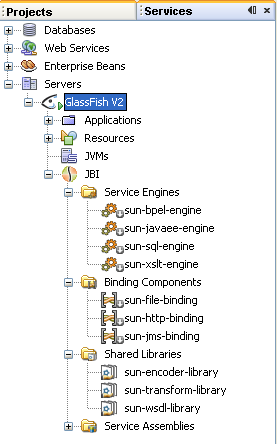
- Switch to the Runtime window and expand the GlassFish V2 node.
- Expand the Applications node and then expand the EJB Modules node.
top
Deploying the Composite Application Project to the Application Server
The TravelReservationServiceApplication project already contains a BPEL project as a JBI module (see the TravelReservationServiceApplication > JBI Modules > TravelReservationService.jar node). Deploy the TravelReservationServiceApplication Composite Application to make the service assembly available to the application server, thus allowing its service units to be run.
- In the Projects window, right-click the TravelReservationServiceApplication project's node, and choose Deploy from the pop-up menu.
- In the Warning dialog box, make sure GlassFish V2 is selected and click OK.
The deployment succeeded if you see the following message in the Output window:
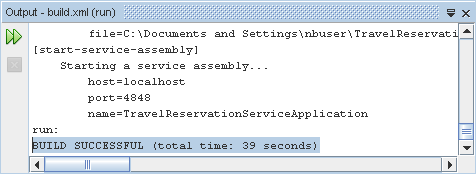
top
Performing a Test Run of the Travel Reservation Service Process
The test-run feature enables business process developers to perform test runs of their processes. BPEL processes are deployed to the BPEL runtime, which manages the process lifecycle. A BPEL process starts with a receive or pick activity responsible for initiating the process.
A BPEL process is also a web service. Like any web service, a BPEL process has a companion WSDL file that describes its public interface. This interface in turn describes the operations and messages that clients can target in order to create the process instance. Upon the receipt of a message targeted at one of these receive activities, the BPEL runtime will create a BPEL process instance and hand the message to the process instance for processing.
For example, in the case of the TravelReservationService.wsdl there is an operation called buildItinerary. This is the operation that TravelReservationService clients will call in order to initiate a conversation with the TravelReservationService.
<portType name="TravelReservationPortType">
	<operation name="buildItinerary">
      		<input message="tns:ItineraryIn"/>
      		<output message="tns:ItineraryOut"/>
      		<fault name="itineraryProblem" message="tns:ItineraryFault"/>
	</operation>
</portType>
Thus, to test a BPEL process, you must send the BPEL runtime a message targeted at one of the process receive activities.
This version of the BPEL Designer contains features to make this testing a point-and-click experience. Specifically, with the TravelReservationService sample project, you can send buildItinerary requests to the deployed TravelReservationService.
To test run TravelReservationService:
- Expand the TravelReservationServiceApplication > Test nodes.
There are 4 subnodes:
- HasNoReservations - a test itinerary with no reservations
- HasAirline - a test itinerary with a pre-existing airline reservation
- HasVehicle - a test itinerary with pre-existing airline and vehicle reservations
- HasHotel - a test itinerary with a pre-existing airline, vehicle and hotel reservations
These test nodes are actually XML files that contain SOAP message data. Each one represents a different case that can be used to test the TravelReservationService in order to exercise the process in slightly different ways.
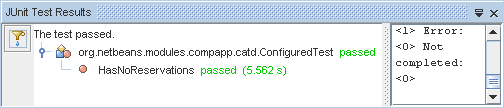
- Right-click the HasNoReservations node and choose Run from the pop-up menu.
Once you select the Run action, the IDE sends the HasNoReservations SOAP message to the BPEL runtime. The IDE will indicate if the test is successful.
Notes:
- If you perform a Test Run on one of the Test Scenarios before having added the JBI module or deployed the project, the test run will fail.
- To resolve an issue with service endpoints when performing a test run, refer to the Ports section of the Developer Guide to the BPEL Designer: Troubleshooting for instructions.
top
Debugging the Travel Reservation Service Process
You can use the IDE to debug your sample BPEL application.
General Debugging Steps
- In the Projects window, under the TravelReservationService > Process Files node, double-click the TravelReservationService.bpel file.
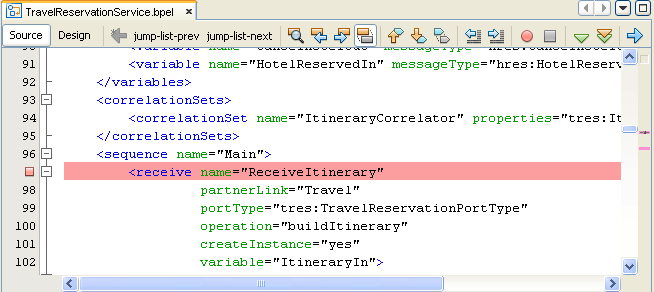
- In the Source Editor, set breakpoints in your source code by clicking the line number of the element you want to place a breakpoint for. We will use the HasNoReservations test, so we will place breakpoints on activities invoking all three partner services.
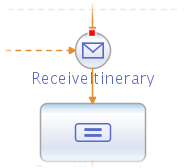
- Place a breakpoint on the ReceiveItinerary receive activity at line 97. This is the activity that initiates the process. If line numbers are not visible, choose View > Show Line Numbers from the main menu.
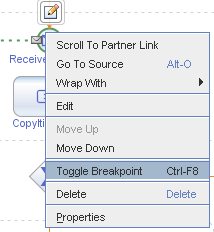
You can also set breakpoints on the diagram. To do so, switch to the Design view, right-click the element and choose Toggle Breakpoint from the pop-up menu.
A red box appears at the top of the element with a breakpoint.
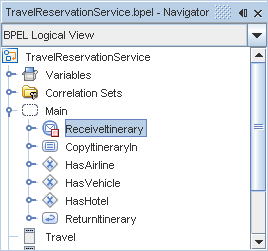
The Toggle Breakpoint pop-up menu command is also available for the elements in the Navigator BPEL Logical View. If the Navigator window is not open, choose Window > Navigating > Navigator from the main menu. For the elements with breakpoints, the Navigator shows a small red box like the one in the following image (ReceiveItinerary):
- Place breakpoints on the ReserveAirline (line 130), ReserveVehicle (line 183) and ReserveHotel (line 236) invoke activities.
- Now add watches to your project:
- If the Watches window is not visible, choose Window > Debugging > Watches from the main menu.
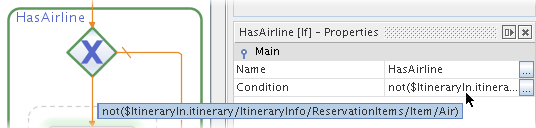
- In the Source view, go to line 127 and copy the XPath expression:
not($ItineraryIn.itinerary/ItineraryInfo/ReservationItems/Item/Air)
Alternatively, select the HasAirline if element on the diagram and copy the XPath expression from the Condition row in the Properties window. If the Properties window is not visible, choose Window > Properties from the main menu.
- Right-click inside the Watches window and choose New Watch.
- In the New watch dialog box, paste the XPath expression into the Watch Expression field and click OK.
- Add two more watches for expressions at lines 180 and 233. Your Watches window should now have three items:

- In the Projects window, right-click the TravelReservationServiceApplication node, and choose Debug Project (BPEL).
- Wait until the BUILD SUCCESSFUL message appears in the Output window.
- Switch to the BPEL Debugger Console window to ensure the Debug session started message appeared.
- Ensure you have the following windows open:
- BPEL Variables; choose Window > Debugging > BPEL > BPEL Variables from the main menu if it is not open.
- BPEL Process Instances; choose Window > Debugging > BPEL > BPEL Process Instances from the main menu if it is not open.
- BPEL Process Execution; choose Window > Debugging > BPEL > BPEL Process Execution from the main menu if it is not open.
- In the Projects window, right-click HasNoReservations under the Test node under TraveReservationServiceApplication and choose Run to start the test.
- When the process reaches the first breakpoint, observe the following windows:
- BPEL Variables window.
It shows the structure of local variables and their values for the current process instance and the position where the current process instance became suspended.
Notice that you can access and modify the XML portion that pertains to a particular variable in the Value dialog box provided its value is XML. To display the dialog box, press the ellipsis (...) button at the end of the row in the BPEL Variables window.
- BPEL Process Instances window.
It lists all BPEL process instances running on the BPEL Service Engine within the current debugging session.
The numbered TravelReservationService instance should be in the Suspended state.
- BPEL Process Execution window.
It graphically represents the progress of executing the current BPEL process instance in the BPEL Debugger.
The ReceiveItinerary activity should be highlighted with green, which means it is being executed at the moment.
The rest of the activities are gray since they have not been executed yet.
- Watches window.
It should contain the <Cannot evaluate the expression> string in the Value column for all three expressions. This is because the process has stopped at the start of the very first receive activity and the ItineraryIn message has not arrived yet.
- Click Continue on the Debugging toolbar (Ctrl-F5). The process stops at the second breakpoint. By this time the ItineraryIn message has arrived and the conditions in the watches have been evaluated. The value of all the three expressions should be set to true.
Note: Expressions return true if the message does not contain a corresponding reservation item. If you run the HasAirline test, the value of the not($ItineraryIn.itinerary/ItineraryInfo/ReservationItems/Item/Air) expression, which checks whether the incoming message does not contain the Airline reservation item, will be set to false.
- Click Continue.
On the completion of the process the HasNoReservations test passes successfully.
- Select Run > Finish Debugger Session from the main menu.
Debug Actions at a Breakpoint
Once a process instance is suspended you can perform any of the following conventional Debug toolbar actions (if the Debug toolbar is not visible, choose View > Toolbars > Debug):
- Finish Debugger Session (Shift-F5). End the current debug session.
- Continue (Ctrl-F5). Cause the current process instance to run until it encounters the next breakpoint or until the process instance completes.
- Step Into (F7). Steps to the next BPEL activity. This step is only supported at the granularity of an activity in BPEL language terms. It does not step at a finer granularity. As you step, the current line indicator will advance and the BPEL Variables and Watches window contents can change accordingly.
- Run to Cursor (F4). Allows for setting breakpoints dynamically, when the process is being executed, in the Navigator window and both the Source and Design views of the BPEL Designer.
top