UML: Creating Use Case Diagrams
Contributed and maintained by Cindy Castillo, Bob May
November 2007 [Revision number: V1-4]
This publication is applicable to NetBeans IDE 6.0 release
In this tutorial, you learn how to use the UML features of the IDE to create a simple UML Use Case diagram. Using the Use Case diagram model, you show the relationship among actors and use cases within an application. The Use Case diagram that you create tracks various functions and those who interact with the functions within a theoretical banking application.
A Use Case diagram is useful when you are describing requirements for a system in the analysis, design, implementation and documentation stages. The purpose of this tutorial is to introduce the IDE's UML Use Case diagram, not to teach you about UML concepts or the Java programming language.
Expected duration: 30 minutes
Contents
Tutorial Requirements
Before you proceed, make sure you review the requirements in this section.
Prerequisites
To use this tutorial, the IDE must be installed on your system and you should be familiar with the basic parts of the IDE. You should also have a basic familiarity with the Java programming language and UML. For a basic understanding of the IDE, see the IDE Basics topics in the online help. A good resource for UML techniques and theory is the official UML resource page at http://www.uml.org/.
This tutorial assumes that your system meets the requirements specified in the Systems Requirements section of the NetBeans 6.0 Release Notes.
Software Needed for This Tutorial
Before you begin, download and install the following software:
- NetBeans 6.0
Select the All Download option.
top
Creating the UML Project and the Use Case Diagram
To begin this tutorial, you need to first create a UML project and a Use Case Diagram.
- Create a new working directory called UMLTutorial on a local partition of your system.
- From the main menu, choose File > New Project and then do the following in the New Project wizard:
- Under Categories, select UML.
- Under Projects, select Java-Platform Model.
- Click Next
The New Java-Platform Model wizard appears.
- In the Project Name field, type UMLTutorialProject.
Notice that when you type the Project Name, the IDE automatically suggests this name for the name of the Project Folder.
- For the Project Location field, click Browse.
- In the Select Project Location dialog box, select UMLTutorial, which is the directory you created in Step 1.
- Click Open to dismiss the dialog box.
- In the Name and Location page, click Finish.
The IDE creates the UML project and the New Wizard opens and displays the Create New Diagram dialog box.
- In the Diagram Type list, select Use Case Diagram.
- In the Diagram Name field, type UseCaseDiagram.
- Leave UMLTutorialProject in the Namespace field and click Finish.
The IDE does the following:
- Creates the UseCaseDiagram node under the Model node
- Displays the new diagram in the Diagram editor (the diagram is empty at this point)
- Opens the Modeling Palette
top
Adding and Labeling Use Case Elements
In this section, you add the Use Case elements using the Modeling Palette in the IDE.
- From the Basic section of the Modeling Palette, select the Use Case icon
 and click once in the upper left portion of the Diagram editor.
This action places a Use Case element on the diagram.
- Deselect the icon by right-clicking anywhere in the Diagram editor or pressing the ESC key.
- If not already selected, select the newly added element by clicking on it once.
- Type Withdraw Money and press Enter.
This labels the element Withdraw Money.
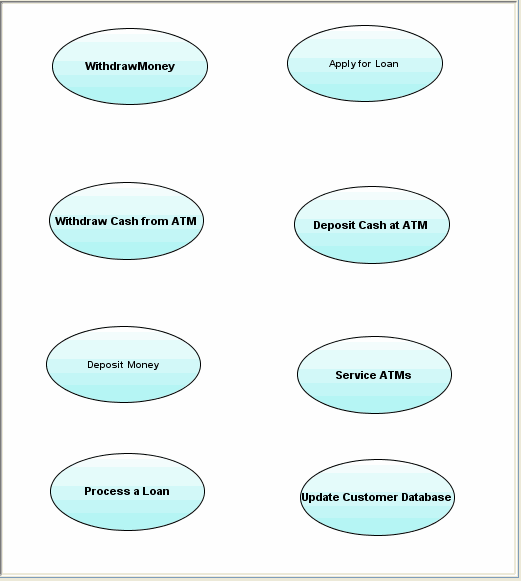
- Select the Use Case icon again and place seven more Use Case elements on the diagram. Place the elements in four rows consisting of two elements across horizontally in each row.
- Deselect the icon by right-clicking anywhere in the Diagram editor.
- Select the Use Case element located below Withdraw Money.
- Type Withdraw Cash from ATM and press Enter.
- Label the remaining Use Case elements as follows:
- Deposit Money
- Process a Loan
- Apply for Loan
- Deposit Cash at ATM
- Service ATMs
- Update Customer Database
Tip: As you add and label diagram elements, you can resize them as needed by right-clicking the element and selecting Resize to Element to Contents in the pop-up menu.
The diagram should now resemble the following figure.
top
Adding and Labeling Actor Elements
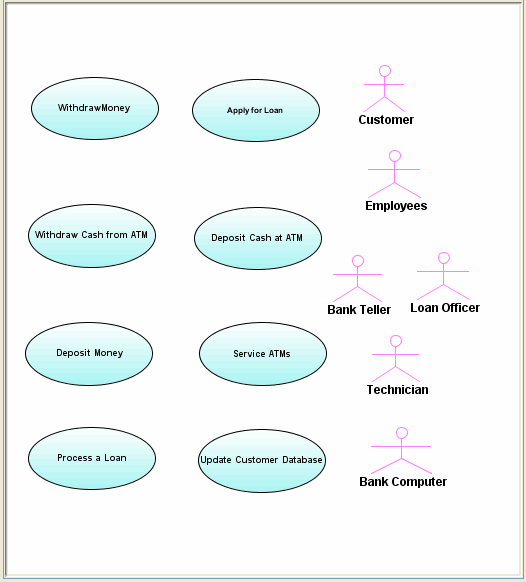
Now, add and label the Actor elements.
- From the Basic section of the Modeling Palette, select the Actor icon
 .
.
- Click once to the right of the Apply for a Loan Use Case element to place the Actor element in the diagram.
An unnamed Actor element is placed in the Diagram editor.
- Click ESC to deselect the icon.
- Select the Actor element that you just placed in the diagram, type Customer and press Enter.
The Actor element is labeled.
Tip: As you add more diagram elements, click the Fit To Window button  on the Diagram toolbar to rearrange the diagram so that you can view the entire diagram in the Diagram editor.
- Place five more Actor elements below the Customer Actor in the Diagram editor.
- Deselect the Actor icon by clicking the anywhere in the Diagram editor.
- Label the newly added Actor elements as follows:
- Employees
- Bank Teller
- Loan Officer
- Technician
- Bank Computer
The diagram should resemble the following figure.
- Right-click the UseCaseDiagram tab and choose Save Document from the pop-up menu.
top
Linking Actor Elements to Other Actor Elements
In this section, you link the Actor elements to each other, using the Generalization.
- From the Basic section of the Modeling Palette, select the Generalization icon
 .
.
- Click the Bank Teller element, then click the Employees element.
A link snaps into place between the two Actor elements. Information for the Generalization notation appears in the Properties window.
- Right-click anywhere in the diagram editor to deselect the Generalization icon.
- In the Diagram editor, select the Generalization link.
- In the Properties window, click the Stereotypes property ellipsis button (...).
The Stereotypes wizard appears.
- Click Add, click then click in the blank Name field and type implementation.
- Click OK.
The link is labeled <<implementation>>.
- Add Generalization links for the following:
Loan Officer to Employees
Technician to Employees
top
Linking Actor Elements to Use Case Elements
In this section, you link the Actor elements with the Use Case elements using the Associations.
- From the Basic section of the Modeling Palette, select the Association icon
 .
.
- Click Customer element and then click the Withdraw Cash From ATM Use Case element.
A link snaps into place from the Actor to the Use Case.
- Right-click anywhere in the diagram editor to deselect the Association icon.
- With the new Association link still selected, point the cursor to the center of the line representing the link and right-click the Association link.
Note: When the link is selected, it appears blue. It can be tricky to keep the cursor on the link. If the cursor is pointing into the white space when you right-click, you may see the pop-up menu for the Diagram editor rather than the pop-up menu for the link. Try again, making sure the link is blue, right-click and you should see the correct pop-up menu for the link as shown in the following figure.
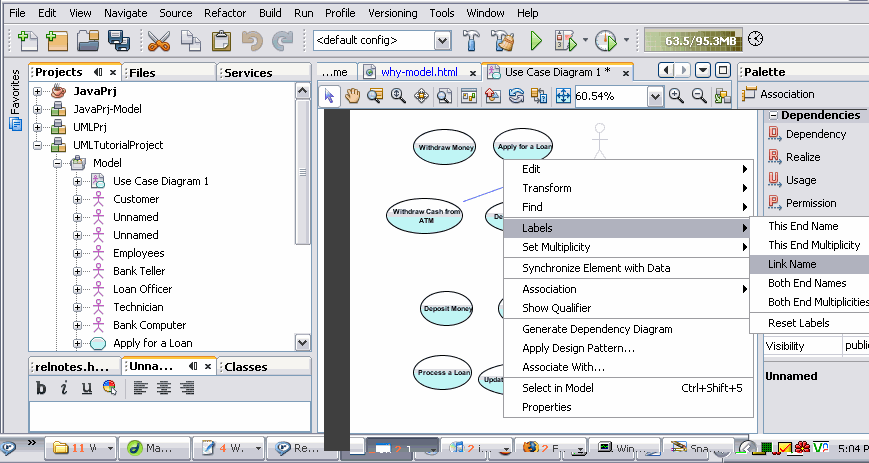
- Choose Labels > Link Name from the pop-up menu.
The link is labeled with the text Unnamed, which is highlighted.
- Type the text uses and press Enter.
The link is labeled with the text uses.
- From the Basic section of the Modeling Palette, select the Association icon and add seven more links, connecting the Actors and Use Cases by clicking the Actor element first, and then clicking the Use Case element as follows:
- Customer to Deposit Cash at ATM
- Customer to Apply for Loan
- Bank Teller to Withdraw Money
- Bank Teller to Deposit Money
- Bank Computer to Update Customer Database
- Technician to Service ATMs
- Loan Officer to Process a Loan
- Deselect the Association icon.
top
Using Extend Links
An Extend link shows a relationship from one Use Case to another, specifying how the behavior defined for the extension use case can be inserted into the behavior defined for the base use case.
- From the Basic section of the Modeling Palette, select the Extend icon
 .
.
- Click once in the Withdraw Cash From ATM element, and click again in the Withdraw Money element.
A link labeled <<extend>> is drawn with the arrow pointing towards the Withdraw Money element.
- Repeat steps 1 and 2 to draw Extend links between the following Use Cases:
Deposit Cash at ATM > Deposit Money
Process a Loan > Apply for Loan
- Right-click anywhere in the Diagram editor to deselect the Extend Link icon.
- To rearrange the diagram, click the Orthogonal Layout button
 on the Diagram toolbar and click Yes in the Layout warning dialog box.
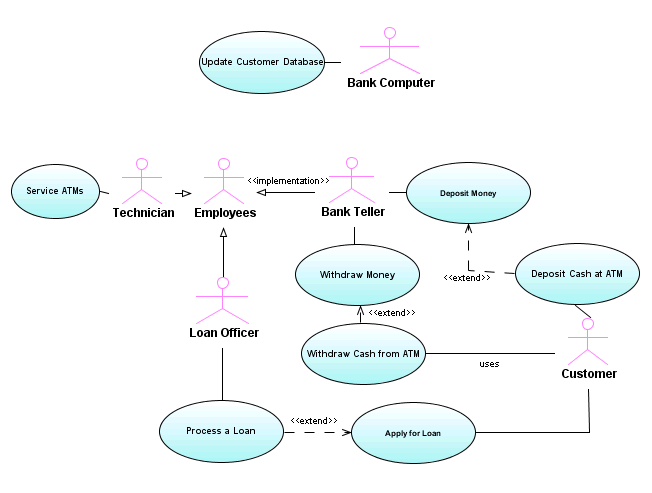
Note: You may need to expand the diagram to see the Orthogonal Layout button on the toolbar. To do this, double-click the UseCaseDiagram tab. You can also right-click in the Diagram editor and choose Layout > Orthogonal from the pop-up menu. The IDE rearranges the UseCaseDiagram diagram into a rectangular layout style. Your finished diagram should resemble the following figure. Your diagram may have a slightly different layout. As long as the relationships and elements are correctly reflected, any slight difference in appearance is normal.
- Press Ctrl-S to save the diagram.
top
Summary
In this tutorial, you learned how to create a Use Case diagram for a simple banking application. You learned how to perform the following tasks:
- Create a UML project
- Create a Use Case diagram
- Use the UML icons from the Modeling Palette to create use cases and actors
- Connect the use cases and actors to show the functions of the application
top
Next Steps
To send comments and suggestions, obtain support, and stay informed of the latest
changes to the NetBeans IDE J2EE development features, join the [email protected]
mailing list.
top
>> More NetBeans IDE Documentation