Getting Started with Java EE Applications
This document takes you through the basics of developing an enterprise application
using EJB 3.0 technology which is part of the Java EE 5 platform.
This document shows how the EJB 3.0 technology can simplify the process of developing
enterprise applications.
This document uses the NetBeans IDE 6.0 Release.
Expected duration: 30 minutes
Tutorial Exercises

Prerequisites
This document assumes you have some basic knowledge of, or programming experience
with, the following technologies:
- Java Programming
- NetBeans IDE
Software Needed for the Tutorial
For this tutorial you need to have the following software installed on your computer:
- "Web & Java EE" or "All" download of NetBeans IDE 6.0.
- Java Standard Development Kit (JDK) version 5.0 or version 6.0.
- GlassFish V2 Application Server (bundled with full IDE download) or
Sun Java System Application Server, Platform Edition 9 (download)
For this tutorial you need to register a local instance of GlassFish/Sun Java System Application Server with the IDE.
Setting Up the Enterprise Application Project
The goal of this exercise is to create the NewsApp enterprise application project
containing an EJB module and a web module.
The NewsApp application uses a message-driven bean to receive and process messages
sent to the queue by a servlet.
The application uses servlets to send messages to the message-driven bean and to display messages.
Creating an Enterprise Application
- Choose File > New Project (Ctrl-Shift-N) from the main menu.
- Select Enterprise Application from the Enterprise category and click Next.
- Name the project NewsApp and set the server to Sun Java System Application Server.
- Set the Java EE Version to Java EE 5, and select Create EJB Module and Create Web Application Module, if unselected.
- Click Finish.
Summary
In this exercise we created a Java EE 5 enterprise application containing an EJB module and a web module.
Coding the EJB Module
In this exercise we will create the objects in the EJB module.
We will create an entity class, a message-driven bean and a session facade.
We also will create a persistence unit to provide the container with information for managing our entities, and
the Java Message Service (JMS) resources that our message-driven bean will use.
Creating a Persistence Unit
First we create a persistence unit that defines the data source and entity manager used in our application.
- Right-click the EJB module and choose New > File/Folder.
- From the Persistence category, select Persistence Unit and click Next.
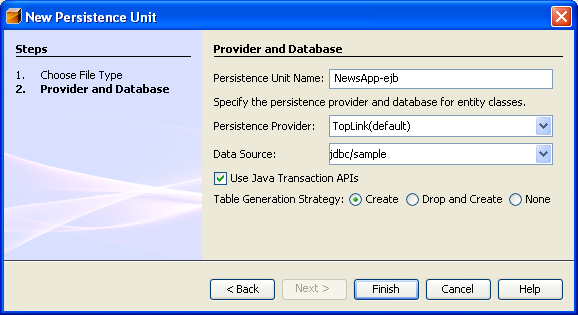
- Keep the default Persistence Unit Name.
- For the Persistence Provider, choose TopLink (default).
- For the Data Source, choose the default data source jdbc/sample.
- Check that the persistence unit is using the Java Transaction API
and that the Table Generation Strategy is set to Create
so that the tables based on our entity classes are created when the application is deployed.
- Click Finish.

When you click Finish, the IDE creates persistence.xml and opens it in
the Source Editor in Design view. Close persistence.xml.
Creating the NewsEntity Entity Class
In this exercise we will create the NewsEntity entity class.
An entity class is a simple Java class.
When you create the entity class, the IDE adds the @Entity annotation to define the class as an entity class.
After we create the class, we will create fields in the class to represent the data that we want in our table.
Each entity class must have a primary key.
When you create the entity class, the IDE adds the @Id annotation to declare which field to use as the primary key.
The IDE also adds the @GeneratedValue annotation and specifies the key generation strategy for the primary Id.
To create the NewsEntity class, do the following:
- Right-click the EJB module in the Project window and choose New > File/Folder to open the New File wizard.
- From the Persistence category, select Entity Class and click Next.
- Type NewsEntity for the class name, type ejb for the
package, and leave the Primary Key Type as Long. Click Finish.
When you click Finish, the entity class NewsEntity.java opens in the Source Editor.
In the Source Editor, do the following:
- Add the following field declarations to the class:
private String title;
private String body;
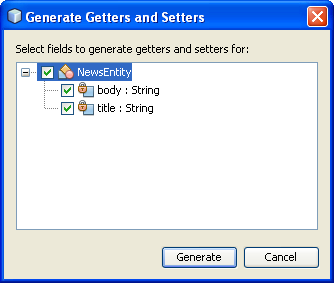
- Right-click in the Source Editor and choose Insert Code and select Getter and Setter to generate getters and setters for each of the fields.
- In the Generate Getters and Setters dialog box, select the body and title fields and click Generate.
- Save your changes.

In the next step we will create the NewMessage message-driven bean.
Creating the NewMessage Message-Driven Bean
Now we will create the NewMessage message-driven bean in our EJB module.
We will use the New Message-Driven Bean wizard to create the bean and the necessary JMS resources.
To create the NewMessage message-driven bean, do the following:
- Right-click the EJB module in the Projects window and choose New > File/Folder to open the New File wizard.
- From the Enterprise category, select Message-Driven Beans and click Next.
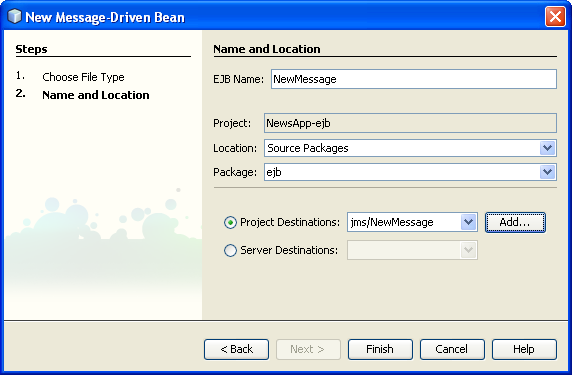
- Type NewMessage for the class name.
- Select ejb from the Package drop-down list.
- Click Add to open the Add Message Destination dialog box.
- In the Add Message Destination dialog box, type jms/NewMessage and
select Queue for the destination type. Click OK.
- Make sure that the project destination is correct and click Finish.

When you click Finish, the new message-driven bean class NewMessage.java opens in the Source Editor.
You can see that the @MessageDriven annotation and configuration properties are added to the class.
@MessageDriven(mappedName = "jms/NewMessage", activationConfig =  {
        @ActivationConfigProperty(propertyName = "acknowledgeMode", propertyValue = "Auto-acknowledge"),
        @ActivationConfigProperty(propertyName = "destinationType", propertyValue = "javax.jms.Queue")
    })
This annotation tells the container that the component is a message-driven bean and the JMS resource used by the bean.
When the IDE generates the class, the Mapped Name of the resource (jms/NewMessage) is derived from the name of the class (NewMessage.java).
The JMS resource is mapped to the JNDI name of the destination from which the bean receives messages.
The New Message-Driven Bean wizard has already add the information for the JMS resources to sun-resources.xml.
The EJB 3.0 API enables us to look up objects in the JNDI namespace from within the bean class
so that we do not need to configure deployment descriptors to specify the JMS resources.
The EJB 3.0 specifications allow us to use annotations to introduce resources directly into a class.
We will now use annotations to introduce the MessageDrivenContext resource into our class, and then inject
the PersistenceContext resource which will be used by the EntityManager API to manage the persistent entity instances.
We will add the annotations to the class in the Source Editor.
- Inject the MessageDrivenContext resource into the class by adding the following
annotated field (in bold) to the class:
public class NewMessage implements MessageListener {

@Resource
private MessageDrivenContext mdc;
- Introduce the entity manager into the class by right-clicking in the code and
selecting Persistence > Use Entity Manager from the pop-up menu.
This adds the following annotation to your source code:
@PersistenceContext
private EntityManager em;
and generates the following method in your code:
public void persist(Object object) {
    em.persist(object);
}
- Modify the persist method to change the name to save.
The method should look like the following:
public void save(Object object) {
    em.persist(object);
}
- Modify the onMessage method by adding the following to the body:
    ObjectMessage msg = null;
    try {
        if (message instanceof ObjectMessage) {
            msg = (ObjectMessage) message;
            NewsEntity e = (NewsEntity) msg.getObject();
            save(e);
        }
    } catch (JMSException e) {
        e.printStackTrace();
        mdc.setRollbackOnly();
    } catch (Throwable te) {
        te.printStackTrace();
    }
- Press Alt-Shift-F to generate any necessary import statements.
Note: When generating the import statements, we want to make sure to import the jms and javax.annotation.Resource libraries.
- Save the file.
Creating the Session Bean
Next we create a session facade for the NewsEntity entity class.
To create the session facade, do the following:
- Right-click the EJB module and choose New > File/Folder.
- From the Persistence category, select Session Beans for Entity Classes and click Next.
- From the list of available entity classes, select ejb.NewsEntity and click Add and then click Next.
- Check that the Package is set to ejb and that a local interface will be created.
- Click Finish.
When you click Finish, the session facade class NewsEntityFacade.java is created
and opens in the Source Editor. The IDE also creates the local interface NewsEntityFacadeLocal.java.
EJB 3.0 technology simplifies the creation of session beans by reducing the amount of required code.
You can see that the annotation @Stateless is used to
declare the class as a stateless session bean component and that the class no longer needs a statement implementing
javax.ejb.SessionBean.
The code is also much cleaner because with EJB 3.0 technology the business methods no longer need to have code declaring they throw checked exceptions.
You can see that the PersistenceContext resource was injected directly into the session bean component
when we created the session facade.
Summary
In this exercise, we coded an entity class and a message-driven bean in the EJB module.
We then created a session facade for the entity class.
We also created the JMS resources that will be used by our application.
Coding the Web Module
We will now create the servlets ListNews and PostMessage in our web module.
These servlets will be used to read and add messages.
Creating the ListNews Servlet
In this exercise we will create a simple servlet for displaying our data.
We will use annotations to call our entity bean from our servlet.
- Right-click the web module project and choose New > Servlet.
- Type ListNews for the Class Name.
- Enter web for the Package name and click Finish.
When you click Finish, the class ListNews.java opens in the Source Editor.
In the Source Editor, do the following:
- Right-click in the source code and select Enterprise Resources > Call Enterprise Bean.
- In the Call Enterprise Bean dialog box, select NewsEntityFacade and click OK.
When you click OK, the entity bean resource is injected in the servlet using the @EJB annotation.
- In the processRequest method, modify the method by uncommenting the code and adding the following lines in bold to the body of the method:
out.println("<h1>Servlet ListNews at " + request.getContextPath () + "</h1>");

List news = newsEntityFacade.findAll();
for (Iterator it = news.iterator(); it.hasNext();) {
    NewsEntity elem = (NewsEntity) it.next();
    out.println(" <b>"+elem.getTitle()+" </b><br />");
    out.println(elem.getBody()+"<br /> ");
}
out.println("<a href='PostMessage'>Add new message</a>");

out.println("</body>");
- Press Alt-Shift-F to generate any necessary import statements for the class.
When generating the import statements, we want to import the java.util libraries.
- Save the changes to the file.
Creating the PostMessage Servlet
In this exercise we will create the PostMessage servlet that will be used to post messages.
We will use annotations to inject the JMS resources we created directly into the servlet,
specifying the variable name and the name to which it is mapped.
We will then add the code to send the JMS message and the code for the
HTML form for adding a message.
- Right-click the web module project and choose New > Servlet.
- Type PostMessage for the Class Name.
- Enter web for the Package name and click Finish.
When you click Finish, the class PostMessage.java opens in the Source Editor.
In the Source Editor, do the following:
- Use annotations to inject the ConnectionFactory and Queue resources by adding the following field declarations (in bold):
public class PostMessage extends HttpServlet {
    @Resource(mappedName="jms/NewMessageFactory")
    private  ConnectionFactory connectionFactory;

    @Resource(mappedName="jms/NewMessage")
    private  Queue queue;
- We now add the code to send the JMS messages by adding the following code in bold to the processRequest method:
response.setContentType("text/html;charset=UTF-8");

// Add the following code to send the JMS message
String title=request.getParameter("title");
String body=request.getParameter("body");
if ((title!=null) && (body!=null)) {
    try {
        Connection connection = connectionFactory.createConnection();
        Session session = connection.createSession(false, Session.AUTO_ACKNOWLEDGE);
        MessageProducer messageProducer = session.createProducer(queue);

        ObjectMessage message = session.createObjectMessage();
        // here we create NewsEntity, that will be sent in JMS message
        NewsEntity e = new NewsEntity();
        e.setTitle(title);
        e.setBody(body);

        message.setObject(e);
        messageProducer.send(message);
        messageProducer.close();
        connection.close();
        response.sendRedirect("ListNews");

    } catch (JMSException ex) {
        ex.printStackTrace();
    }
}

PrintWriter out = response.getWriter();
- We now uncomment the code to print the HTML and add the web form for adding a message.
Add the following lines in bold to the processRequest method
out.println("Servlet PostMessage at " + request.getContextPath() + "</h1>");

// Add the following code to add the form to the web page
out.println("<form>");
out.println("Title: <input type='text' name='title'><br/>");
out.println("Message: <textarea name='body'></textarea><br/>");
out.println("<input type='submit'><br/>");
out.println("</form>");

out.println("</body>");
- Press Alt-Shift-F to generate any necessary import statements for the class.
Note: When selecting the which libraries to import for Connection, ConnectionFactory, Session and
Queue, make sure you import the java.jms libraries.
- Save your changes to the file.
Running the Project
We can now run our project.
When we run the project, we want our browser to open to the page with the ListNews servlet.
We do this by specifying the URL in the Properties dialog box for our Enterprise Application.
The URL is relative to the context path for our application.
After we enter the relative URL, we can build, deploy and run our application from the Projects window.
To set the relative URL and run our application, do the following:
- In the Projects window, right-click the NewsApp enterprise application node and select Properties in the pop-up menu.
- Select Run in the Categories pane.
- In the Relative URL textfield, type /ListNews.
- Click OK.
- In the Projects window, right click the NewsApp enterprise application node and choose Run Project.
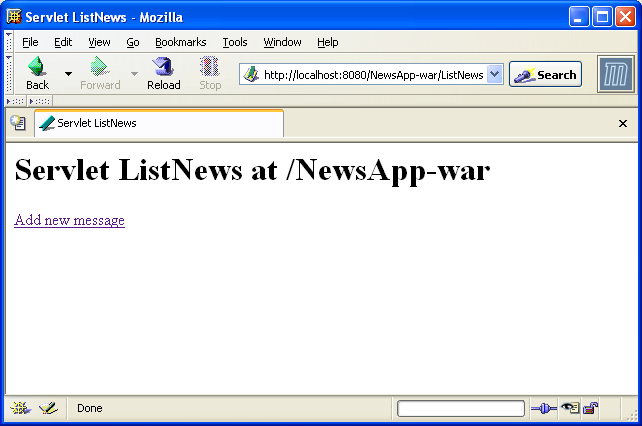
When you run the project, the ListNews servlet opens in your browser and displays a list of the messages in the database.
When you first run the project, the database is empty, but you can click Add Message to add a message.

When you add a message with the PostMessage servlet, the message is sent to the
message-driven bean for writing to persistent storage, and the ListNews servlet is called to display the messages in the database.
The list of messages in the database retrieved by ListNews often does not yet contain the new message because our message service is asynchronous.
Troubleshooting
The following are some of the problems you may encounter when creating your project.
Problem with JMS Resources
When using the wizard to create JMS resources,
you may see the following server error message in the output window:
[com.sun.enterprise.connectors.ConnectorRuntimeException:
                    JMS resource not created : jms/Queue]
This message could indicate that the JMS resource was not created or was not registered with the application server.
You can use the Admin Console of the Sun Java System Application Server to check, create and edit JMS resources.
To open the Admin Console, do the following:
- Confirm that the Sun Java System Application Server is running by expanding the Servers node in the Runtime of the IDE.
A small green arrow next to the Sun Java System Application Server node indicates the server is running.
- Right-click the Sun Java System Application Server node and choose View Admin Console to open the login window in your browser.
- Log in to the Sun Java System Application Server. The default user name and password are admin and adminadmin.
- In the Admin Console in your browser, expand the Resources node and JMS Resources node in the left frame.
- Click on the Connection Factories and Destination Resources links in the left frame to check if the resources are
registered with the server and if necessary modify the resources. If the resources do not exist, you can create them
in the Admin Console.
You need to make sure that the JMS connection factory resource
in the PostMessage servlet is mapped to the correct JNDI name of the JMS connection factory resource
registered with the Sun Java System Application Server.
The following resources should be registered with the Sun Java System Application Server:
- a Destination resource with the JNDI name jms/NewMessage and type javax.jms.Queue
- a Connection Factory resource with the JNDI name jms/NewMessageFactory and type
javax.jms.QueueConnectionFactory
Next Steps
For more information about using NetBeans IDE 5.5 to develop Java EE applications, see the following resources:
You can find more information about using EJB 3.0 Enterprise Beans in the
Java EE 5 Tutorial.


