Contents
| - | About Scopes |
| - | Adding Properties to Managed Beans |
| - | Creating the Start Page |
| - | Creating the Results Page |
| - | Specifying Page Navigation |
| - | Running the Application |
| - | Doing More |
| December, 2007 [Revision number: 6.0] |
In this tutorial, you use the NetBeans IDE with Visual Web JSF application development functionality to create an application that demonstrates how to use application, session, and request scopes to manage your application's objects. Scope is the availability (or context) of an object and its intended life span in a web application. The web application that you create in this tutorial uses an object in application scope to tally votes, and uses an object in session scope to ensure that a user votes only once per session. The application uses a request scope object to display the time that the user submitted the vote. The time is stored in request scope, because the application does not need the value after the response is sent to the client browser. |
Expected duration: 45 minutes
Contents
|
|
This tutorial works with the following technologies and resources
| JavaServer Faces Components/ Java EE Platform |
||||
| Travel Database | ||||
* In order to take advantage of NetBeans IDE 6.0's Java EE 5 capabilities, use an application server that is fully compliant with the Java EE 5 specification such as the Sun Java Application Server 9/GlassFish.
This tutorial has been tailored for use with the GlassFish v2 Application Server. If you are using a different server, consult the Release Notes and FAQs for known problems and workarounds. For detailed information about the supported servers and Java EE platform, see the Release Notes.
As long as a user stays on a page, the component values are remembered even when the page redisplays, such as when the user clicks a button that returns null. However, when the user leaves the page, the component values disappear.
To make values available to other pages, or to make values available to the same page, should the user return to it, you need to store the values. When you create a project from the IDE, the IDE creates three managed beans for storing values:
RequestBean1SessionBean1ApplicationBean1The following figure shows the Navigator window with the default managed beans.
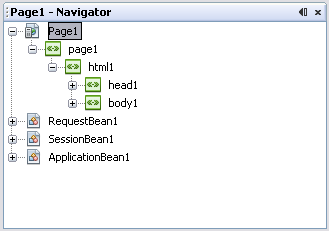 Figure 1: Default Managed Beans Figure 1: Default Managed Beans |
A managed bean is a JavaBeans object that a JavaServer Faces web application instantiates and stores in either request scope, session scope, or application scope. The web application stores RequestBean1 in request scope, SessionBean1 in session scope, and ApplicationBean1 in application scope.
To add a property to one of these managed beans, you double-click the bean in the Navigator window and type the property declaration in the source code. Right-click anywhere in the Java editor and choose Refactor > Encapsulate Fields. Then select the property from the list, select which methods to add, and click Refactor.
Before you create a bean property to store a value, you must determine the appropriate scope for the property's value. Because many users can access a web application at the same time, you need to use the smallest scope possible to make the best use of server resources. The following figure illustrates the duration of each type of scope.
session.invalidate().  Figure 2: Web Application Scopes Figure 2: Web Application Scopes |
For example, your web application has a drop-down list of measurement types (pixels, centimeters, and inches). You might want to store the list of choices in ApplicationBean1 so that all concurrent user sessions can share the list. On the other hand, you might store the user's login name in SessionBean1, so that the name is available for all the pages that the user accesses in that session. If you don't need the information beyond the lifetime of the current request, you can save space by putting the property in RequestBean1.
Warning: You cannot use a request bean if you have included the <redirect> element inside the <navigation-case> element of a navigation rule. (You see these rules when you click the XML button in the Page Navigation editor.) When the page is submitted, the <redirect> element redirects the page and ends the request before a subsequent page can use any of the values stored in the Request Bean.
When you create a page from the IDE, the Java source code for the page bean contains methods for accessing the RequestBean1, SessionBean1, and ApplicationBean1 objects. To access properties of these managed beans, you use code similar to the statements in the following code snippet.
| Code Sample 1: Accessing an Application Bean Property |
ApplicationBean1 appBean = getApplicationBean1(); Option[] choices = appBean.BallotOptions(); |
The web application instantiates a managed bean the first time within that bean's scope that a page accesses a property in the managed bean. For example, an instance of a SessionBean1 object does not exist for the user's session until the user accesses a page that references a SessionBean1 property. An instance of an ApplicationBean1 object is created the first time a page from any session accesses the application bean, and it persists as long as the web application is running.
Tip: To add additional managed beans:
Type the File Name of the new managed mean and click Finish.
The new managed bean appears in the Projects window under the Source Packages node.The pages in this web application require access to the following values, which you create in this section:
ballotOptions. An array property that contains the list of ballot choices. Because the list remains the same for all sessions, this property goes in application scope. tally. A hash map property that accumulates all the session votes. Because it must persist across sessions, it goes in application scope. hasVoted. A boolean property that tracks whether the user has voted. Because the application needs to persist the value across several requests in a single session, the application stores the value in session scope. timestamp. A Date property in which the application records the time that the user submits a vote, for use by the next page. Because the application does not need the value after the next page is rendered, the application stores the value in request scope.Scopes and click Next.In the Frameworks panel, check Visual Web JavaServer Faces and click Finish.
The Scopes project's Page1.jsp opens in the Visual Designer.In the Navigator window, double-click ApplicationBean1.
This opens ApplicationBean1.java for editing.private Option[] ballotOptions;
private HashMap tally;
Right-click in the Java editor and choose Fix Imports. Because there is more than one package that contains the Option class, the Fix Imports dialog appears.
com.sun.webui.jsf.model.Option.com.sun.rave.web.ui.model.Option.In the Encapsulate Fields dialog, check the boxes to create both getter and setter methods for both the ballotOptions and tally properties, as shown in the figure below.
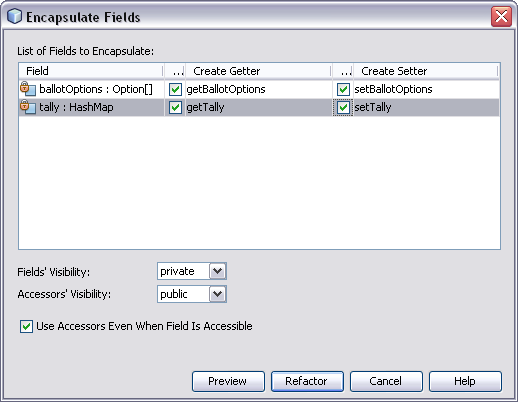 Figure 1: Encapsulate Fields Dialog Figure 1: Encapsulate Fields Dialog |
Scroll to the init method and add the following code shown in bold to the bottom of the method.
Code Sample 2: Code to Add to the Application Bean's init Method |
        // TODO - add your own initialization code here
        // populate ballot items
        ballotOptions = new Option[] {
            new Option("java", "Java Programming Language"),
            new Option("cpp", "C++"),
            new Option("fortran", "Fortran")
        };

        // initialize counters for ballot choices
        tally = new HashMap();
        for (int i=0; i < ballotOptions.length; i++) {
            this.tally.put(ballotOptions[i].getValue(), "0");
} |
Add the following methods at the end of the file, just before the last end brace.
| Code Sample 3: Application Bean Vote Counting Methods |
    /**
     * Vote counter for property tally.
     */
    public void incrementTallyFor(String category) {
        int count = getTallyFor(category);
        count++;
        this.tally.put(category, Integer.toString(count));
    }

    /**
     * Getter for value in property tally.
     * @param category HashMap key
     * @return Value to which the specified key is mapped
     */
    public int getTallyFor(String category) {
        String stringCount = (String) this.tally.get(category);
        if (stringCount == null) {
            return 0;
        } else {
            int count = Integer.valueOf(stringCount).intValue();
            return count;
        }
    }
|
In the Navigator window, double-click SessionBean1. This opens SessionBean1.java for editing.
Note: If the Navigator window is not open, click the Page1 tab in the editing area and click Design in the editing toolbar. The Navigator window appears when the IDE is in design mode.private boolean hasVoted;
Scroll to the init method and add the following code shown in bold to the bottom of the method.
Code Sample 4: Code to Add to the Session Bean's init Method |
        // TODO - add your own initialization code here
setHasVoted(false); |
private java.util.Date timestamp;
Click on Page1 tab and then Design button for Page1. Check the Navigator window to ensure that the properties in the request bean, session bean, and application bean match the following figure.
 Figure 4: Request, Session, and Application Bean Properties Figure 4: Request, Session, and Application Bean Properties |
Follow the steps in this section to create the page shown running in a browser in the following figure. If the user clicks the Submit Vote button, the page submits the user's vote. Once the user has voted, the button is disabled to prevent the user from voting again in that session.
 Figure 5: Page1 Figure 5: Page1 |
Reader's Poll: What Is Your Favorite Programming Language?.id to voteRBGroup.Right-click the Radio Button Group component and choose Bind to Data from the pop-up menu.
A Bind to Data dialog box appears.View Results.id to viewButton.Click the ellipsis button ![]() for the
for the action property, select viewButton_action from the drop-down list, and click OK.
viewButton_action event handler, which returns null.Submit Vote.id to voteButton.Click the ellipsis button ![]() for the
for the disabled property.
In the dialog box, select Use Binding, click Bind to an Object, and select SessionBean1 > hasVoted, as shown in the following figure, and then click OK.
 Figure 6: Binding the Figure 6: Binding the disabled Property |
Double-click the Submit Vote button.
The IDE adds thevoteButton_action action handler, opens the Java source for the page, and displays the method.Replace the body of the method with the following code shown in bold.
Code Sample 5: voteButton_action Method |
    public String voteButton_action() {

        if (voteRBGroup.getSelected() == null) {
            return null;
        }

        // Tallies are kept across all user sessions
        String votedFor = voteRBGroup.getSelected().toString();
        getApplicationBean1().incrementTallyFor(votedFor);

        // User can only vote one time per session
        getSessionBean1().setHasVoted(true);

        // Don't need the timestamp after the next request ends
        Date now = new Date();
        getRequestBean1().setTimestamp(now);

        return null;
} |
java.util.Date from the Date drop-down list, and click OK.Follow these steps to create the page that is shown running in a browser in the following figure. This page displays the current tally. The user can click the Refresh Results button to get the latest tally, which includes the votes that have been submitted by other users since the page was last displayed.
 Figure 7: Results Figure 7: Results |
Results, and click Finish to create the page. Results.Home.id to homeButton.action property, select homeButton_action from the Handler drop-down list, and click OK.Refresh Results.id to refreshButton.action property, select refreshButton_action from the Handler drop-down list, and click OK.cellspacing property to 10 and the columns property to 1.Drag a Static Text component inside the Grid Layout component. When the outline of the Grid Layout component becomes a solid blue line, drop the Static Text component, as shown in the following figure.
 Figure 8: Dropping a Component Into a Grid Panel Component Figure 8: Dropping a Component Into a Grid Panel Component |
Static Text component's id to resultsST. Leave its text property blank.Clear the checkbox for the escape property.
text property. By setting the escape property to false, the HTML code will be passed to the browser unaltered. id to messageST. Leave its text property blank.In the Navigator window, double-click the prerender method to open it in the Java editor, and then add the following code shown in bold.
Code Sample 6: prerender Method |
    public void prerender() {
      // Display latest poll results
      ApplicationBean1 appBean = getApplicationBean1();
      Option[] choices = appBean.getBallotOptions();
      String str = "<table border=\"0\" cellpadding=\"5\">";
      for (int i = 0; i < choices.length; i++) {
        int count =
          appBean.getTallyFor(choices[i].getValue().toString());
        str = str + "<tr><td>" +
          choices[i].getLabel() +
          "</td><td>" +
          count +
          "</td></tr>";
      }
      str = str + "</table>";
      resultsST.setText(str);

      RequestBean1 reqBean = getRequestBean1();
      Date timestamp = (Date) reqBean.getTimestamp();
      if (timestamp != null) {
        messageST.setText("Your vote was recorded at " +
          (String)DateFormat.getTimeInstance(DateFormat.LONG).format(
          timestamp));
      }
} |
text property for the first Static Text component. If the user just voted, the second Static Text component displays the date and time the vote was registered. java.util.Date.Select from the Option drop-down list according to the version of Java EE you are using for your project:
com.sun.webui.jsf.model.Option.com.sun.rave.web.ui.model.Option.Follow these steps to specify the page navigation for the buttons, as shown in the following figure.
 Figure 9 : Page Flow Editor Figure 9 : Page Flow Editor |
Right-click on a blank spot in the page and choose Page Navigation from the pop-up menu.
This displays the faces-config.xml in the Page Flow Editorview results and press Enter.vote and press Enter.home, and press Enter.In the Files window, expand Scopes > web >WEB-INF, as shown in the following figure.
 Figure 10: Files Window Figure 10: Files Window |
Type 1 in the Session Timeout text box, as shown in the following figure.
 Figure 11: Setting Session Timeout in the Figure 11: Setting Session Timeout in the web.xml Visual Editor |
When the start page appears, select a radio button and click Submit Vote.
The browser displays the results page. Note that the results page shows the time that you submitted your vote.Click Home to return to the start page.
The Submit Vote is disabled because you have voted.Click View Results.
Note that the results page no longer shows the time that you voted. This is because the previous request bean is out of scope and a new request bean has been instantiated.http://localhost:8080/Scopes. You might need to change 8080 to a different port if you are not using the default server configuration.http://localhost:8080/Scopes into the browser's address text box, and press Enter. Submit another vote.In the first browser, click Refresh Results from the results page.
The results should include the vote that you submitted from the second browser.Using what you have learned in this tutorial, build an application that prompts for a login name. Add a page that displays the number of unique users who have accessed the web application.
You use the application bean, the session bean, and the request bean to store information for use by other pages.
If you only need the information for use by the next page, use the request bean.
Note: You cannot use the request bean if you have included the<redirect> element inside the <navigation-case> element of a navigation rule.