Tutorial Requirements
Before you proceed, make sure you review the requirements in this section.
Prerequisites
This tutorial assumes that you have some basic knowledge of, or programming experience with, the Java language and platform and the NetBeans IDE.
Software Needed for This Tutorial
Before you begin, you need to install the following software on your computer:
- NetBeans IDE 6.0
Select the Download All option. The Download All option includes SOA Pack and GlassFish V2, which are required for this tutorial.
About the WSDL Editor
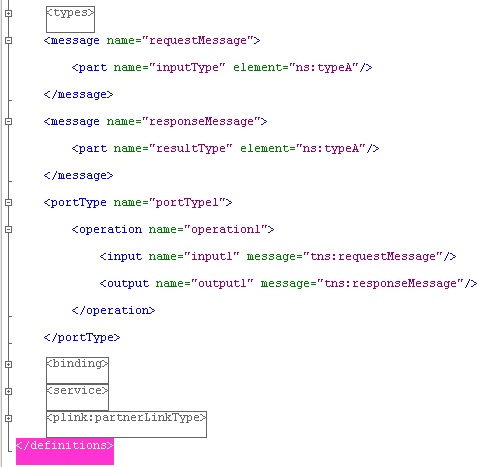
The WSDL Editor enables you to edit Web Services Description Language (WSDL) files.
WSDL is an XML-based language for describing web services. A WSDL file contains the following types of information:
- Information about the functionality of the web service
- Information about how to access the web service
The WSDL Editor supports version 1.1 of the WSDL specification.
The WSDL Editor provides the following views:
- In the Source view, the underlying XML source code appears.
- In the WSDL view, the WSDL file appears as a tree component or a series of columns.
- In the Partner view, you can visualize and configure the abstract elements in a WSDL file.
To create a WSDL file, you use a wizard. You must choose one of the following approaches:
- Create a WSDL file from scratch
- Create a WSDL file based on an existing WSDL file
Source View
In the Source view, the underlying XML source code appears. You can directly edit the XML.
The top of the Source Editor has a tab for each open document. Each tab shows the name of the document. If the document has been modified and has not been saved, then an asterisk (*) appears after the name. You can right-click a tab to access various commands.
A toolbar is located at the top of the Source Editor window.
Source code displayed in the Source Editor is syntactically colored.
The Source Editor status line is located beneath the horizontal scroll bar. To toggle between insert mode and overwrite mode, use the Insert key.
Using Code Completion in WSDL Files
The WSDL Editor enables you to use the following types of code completion in WSDL files:
- Element code completion. When you type a starting tag (<) inside a parent element, the code completion box displays a list of child elements for the parent element. For example, assume that you place the cursor immediately after the <portType> element. When you type the starting tag (<), the code completion box displays the following list of child elements: documentation and operation.
- Attribute code completion. When you press Spacebar inside an element tag, the code completion box displays a list of attributes for the element.
The code completion box can include elements and attributes that are specific to individual bindings, such as the FTP binding.
When the code completion box is visible, you can continue typing to fine tune the selection of items in the list. You can also use the mouse or navigation keys to scroll through the list.
To select an item in the list, do one of the following:
- Highlight the item and press Enter
- Double-click the item
WSDL View
In the WSDL view of the WSDL Editor, the WSDL file appears as a tree component or a series of columns.
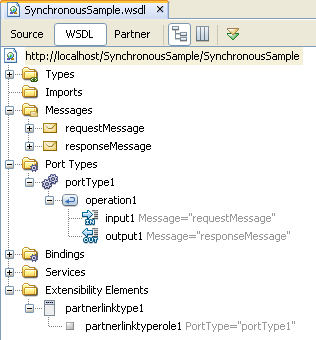
The WSDL view has two subviews: tree view and column view. To switch between the subviews, use the buttons in the WSDL Editor toolbar.
The main nodes in the WSDL view correspond to the major elements in a WSDL file.
- Types. This node enables you to import XML schemas and to add inline schemas.
- Imports. This node enables you to import WSDL files.
- Messages. This node enables you to create, edit, and delete messages.
- Port Types. This node enables you to create, edit, and delete port types.
- Bindings. This node enables you to create, edit, and delete bindings.
- Services. This node enables you to create, edit, and delete services.
- Extensibility Elements. This node enables you to add the following extensibility elements: partner link types, properties, and property aliases.
Some of the nodes in the WSDL view allow you to add extension attributes. Right-click the node and choose Add Extension Attribute. In the Add Extension Attribute dialog box, specify the name and namespace. Once you add the attribute, you can specify the value from the Properties window. To delete the attribute, right-click the node and choose Remove Attributes.
If you right-click a node and choose Go To > Source, then the Source view appears with the cursor positioned at the beginning of the component's block.
Configuring the Root Element
The root element of a WSDL file contains properties for the name of the WSDL file, the target namespace, the default namespace, and namespace prefixes. You can use the WSDL Editor to edit these properties.
To configure the root element:
- In the WSDL view, select the root node.
- If the Properties window is not visible, choose Window > Properties.
- Edit the name, target namespace, and default namespace as necessary.
- Edit the values of the namespace prefixes as necessary.
Importing XML Schemas Using the WSDL View
You can use the WSDL Editor to import one or more XML schema files into a WSDL file.
If an XML schema file cannot be imported, then the file is crossed out in the Add Import dialog box. This situation can happen for the following reasons:
- The XML schema file has already been imported.
- The namespace is incompatible with the WSDL file that is doing the import.
The WSDL Editor allows you to import an XML schema file that is located in a different project. For more information, see the "About Cross-Project XML File References" topic in the IDE online help.
To import an XML schema:
- In the WSDL view, right-click the Types node and choose Add > Schema Import.
The Add Import dialog box opens. - Expand the By File or By Namespace node to navigate to and select the XML schema file.
- Click OK.
The schema import node appears.
Adding Inline Schemas Using the WSDL View
The WSDL Editor provides support for the built-in simple types in W3C XML Schema. The built-in simple types include such types as string, date, and integer.
You can define your own data types by adding an inline schema. The WSDL Editor enables you to configure one or more schema elements and types, and to define the structure of the elements and types.
To add an inline schema:
- In the WSDL view, right-click the Types node and choose Add > Inline Schema.
The inline schema node appears.
To configure the global properties of the inline schema:
- If the Properties window is not visible, choose Window > Properties.
- Select the inline schema node.
- Perform one or more of the following optional tasks:
- Specify a unique ID.
- Specify whether locally declared attributes must be qualified with the namespace prefix.
- Specify whether locally declared elements must be qualified with the namespace prefix.
- Specify the default value of the block attribute, which controls the use of substitution.
- Specify the default value of the final attribute, which controls the use of type derivation.
- Specify the version of the schema.
- Specify the target namespace of the schema.
To define the structure of the inline schema:
- Add one or more of the following XML Schema components as necessary.
The interface is the same as the Schema view that appears when you edit an XML schema.
- Complex types
- Simple types
- Elements
- Attributes
- Attribute groups
- Global group
Importing WSDL Files Using the WSDL View
You can use the WSDL Editor to import one or more other WSDL files into a WSDL file.
If a WSDL file cannot be imported, then the file and the file's namespace are crossed out in the Add Import dialog box. This situation can happen for the following reasons:
- The WSDL file has already been imported.
- The WSDL file is the same WSDL file.
- The namespace is incompatible with the WSDL file that is doing the import.
The WSDL Editor allows you to import a WSDL file that is located in a different project. For more information, see the "About Cross-Project XML File References" topic in the IDE online help.
To import a WSDL file:
- In the WSDL view, right-click the Imports node and choose Add WSDL Import.
The Add Import dialog box opens. - Expand the By File or By Namespace node to navigate to and select the WSDL file.
- Click OK.
The WSDL import node appears.
Configuring Messages Using the WSDL View
You can use the WSDL Editor to create, edit, and delete messages.
In a WSDL file, a port type contains one or more related operations that the web service can perform. An operation receives a message, sends a message, or does both.
Each message contains one or more logical parts. For each part, you must specify the name and the type of content.
If you change the name of a message or part, then the WSDL Editor renames all occurrences in the same file. To rename all occurrences in associated XSD, WSDL, and BPEL files as well, right-click the component node and choose Refactor > Rename.
To create a message:
- In the WSDL view, right-click the Messages node and choose Add Message.
A message node appears. The message contains one part. The part's type of content is undefined. - If the Properties window is not visible, choose Window > Properties.
- The Element or Type property specifies the type of content. To set the value, click the ellipsis (...) button. The Element or Type dialog box enables you to select any of the built-in types in W3C XML Schema. If you added an inline schema or imported a schema, then you can select an element or type from the schema.
To add a part to a message:
- Right-click the message node and choose Add > Part.
A part node appears. The type of content is undefined.
To change the name of a message or part:
- If the Properties window is not visible, choose Window > Properties.
- Select the message or part node.
- Set the Name property to the new name.
To delete a message or part:
- Select the message or part node.
- Press Delete.
Configuring Port Types Using the WSDL View
You can use the WSDL Editor to create, edit, and delete port types.
In a WSDL file, a port type contains one or more related operations that the web service can perform. An example of an operation is GetQuote.
The WSDL Editor supports the following categories of operations:
- Request-response. The operation receives a message as input, and sends a message as output.
- One-way. The operation receives a message as input.
Each message contains one or more logical parts. For each part, you must specify the name and the type of content.
If you change the name of a port type or operation, then the WSDL Editor renames all occurrences in the same file. To rename all occurrences in associated XSD, WSDL, and BPEL files as well, right-click the component node and choose Refactor > Rename.
To create a port type:
- In the WSDL view, right-click the Port Types node and choose Add Port Type.
The Create New Port Type dialog box appears. - Enter a name for the port type.
- Enter a name for the operation.
- Select the category of operation.
- Define the message that the operation receives as input. You can create a message from scratch by entering a new message name in the drop-down list, or you can select an existing message from the drop-down list. For a new message, the Add and Remove buttons enable you to add and remove message parts.
- If the operation is a request-response operation, then define the message that the operation sends as output.
- (Optional) If the operation is a request-response operation, then you can define a message that the operation sends as a fault.
- Click OK.
A port type node appears. The port type node contains an operation node. If you created one or more messages, then the message nodes appear. In addition, a partner link type is automatically created.
To add an operation to an existing port type:
- In the WSDL view, right-click the port type node and choose Add > Operation.
The Create New Operation dialog box appears. - Enter a name for the operation.
- Select the category of operation.
- Define the message that the operation receives as input. You can create a message from scratch by entering a new message name in the drop-down list, or you can select an existing message from the drop-down list. For a new message, the Add and Remove buttons enable you to add and remove message parts.
- If the operation is a request-response operation, then define the message that the operation sends as output.
- (Optional) If the operation is a request-response operation, then you can define a message that the operation sends as a fault.
- Click OK.
An operation node appears. If you created one or more messages, then the message nodes appear.
To add a fault to a request-response operation:
- If the Properties window is not visible, choose Window > Properties.
- Right-click the operation node and choose Add > Fault.
The fault node appears. - Set the Message property to the fault message.
To change the name of a port type or operation:
- If the Properties window is not visible, choose Window > Properties.
- Select the port type or operation node.
- Set the Name property to the new name.
To change the parameter order of an operation:
- The parameter order is intended for use with RPC bindings.
- If the Properties window is not visible, choose Window > Properties.
- Select the operation node.
- Click the ellipsis (...) button for the Parameter Order property.
The Parameter Order dialog box appears. - Move message parts from the Available Parameters list to the Current Parameters list.
- Arrange the parts in the desired order.
- Click OK.
To delete a port type or operation:
- Select the port type or operation node.
- Press Delete.
Configuring Bindings Using the WSDL View
You can use the WSDL Editor to create, edit, and delete bindings.
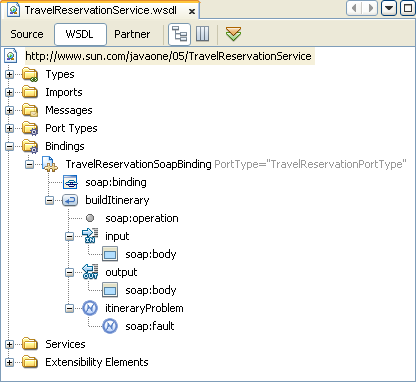
In a WSDL file, a binding contains protocol and data format information for the operations and messages of a port type.
The WSDL view provides the following approaches:
- You can quickly create a binding and service from an existing port type.
- You can create the binding, service, and their subnodes individually.
If you change the name of a binding, then the WSDL Editor renames all occurrences in the same file. To rename all occurrences in associated XSD, WSDL, and BPEL files as well, right-click the binding node and choose Refactor > Rename.
To create a binding and service from a port type:
- In the WSDL view, right-click the port type node and choose Add > Binding and Service Port.
The Generate Binding and Service Port dialog box appears. - Enter a name for the binding.
- Select the type of binding.
- Select the binding subtype. The choices vary depending on the binding type.
- Enter a name for the service.
- Enter a name for the port.
- Click OK.
A binding node and a service node appear.
The binding node contains an extensibility element (for example, file:binding) that identifies the type of binding. The binding node also contains one or more operation nodes.
The service node contains a port node. The port node contains an address extensibility element (for example, file:address). - For information on how to configure the extensibility elements of the binding and service, see the appropriate binding component user's guide.
To create a binding individually:
- In the WSDL view, right-click the Bindings node and choose Add Binding.
A binding node appears. - If the Properties window is not visible, choose Window > Properties.
- Select the binding node.
- (Optional) Change the value of the Name property.
- Set the Type property to the port type that the binding will reference.
- Right-click the binding node, point to Add, and choose the desired binding type (for example, File Binding).
A node that identifies the binding type appears. - Right-click the binding node and choose Add > Binding Operation.
- If the binding's port type has more than one operation, then the Select Operation dialog box appears.
Choose one or more operations, and click OK.
One or more operation nodes appear. - For information on how to configure the binding's extensibility elements, see the appropriate binding component user's guide.
To delete a binding:
- Select the binding node.
- Press Delete.
Configuring Services Using the WSDL View
You can use the WSDL Editor to create, edit, and delete services.
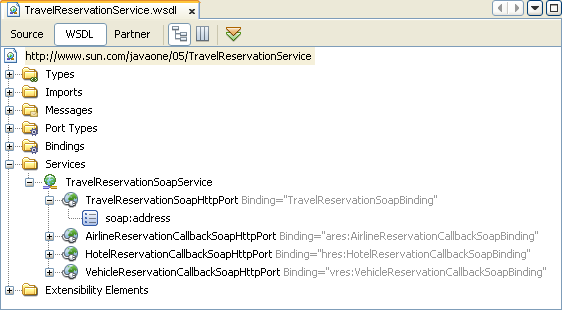
In a WSDL file, a service consists of one or more related ports. Each port associates a binding with a network address, thus defining an individual endpoint that clients can access.
The WSDL view provides the following approaches:
- You can quickly create a binding and service from an existing port type.
- You can create the binding, service, and their subnodes individually. Before you can configure the service's port, you must create the binding.
To create a binding and service from a port type:
- In the WSDL view, right-click the port type node and choose Add > Binding and Service Port.
The Generate Binding and Service Port dialog box appears. - Enter a name for the binding.
- Select the type of binding.
- Select the binding subtype. The choices vary depending on the binding type.
- Enter a name for the service.
- Enter a name for the port.
- Click OK.
A binding node and a service node appear.
The binding node contains an extensibility element (for example, file:binding) that identifies the type of binding. The binding node also contains one or more operation nodes.
The service node contains a port node. The port node contains an address extensibility element (for example, file:address). - For information on how to configure the extensibility elements of the binding and service, see the appropriate binding component user's guide.
To create a service individually:
- In the WSDL view, right-click the Services node and choose Add Service.
A service node appears. - If the Properties window is not visible, choose Window > Properties.
- Select the service node.
- (Optional) Change the value of the Name property.
- Right-click the service node and choose Add > Service Port.
A port node appears. - Select the port node.
- (Optional) Change the value of the Name property.
- Set the Binding property to the desired binding.
- Right-click the port node and add the address extensibility element (for example, File Address).
- For information on how to configure the address extensibility element, see the appropriate binding component user's guide.
To delete a service or port:
- Select the service or port node.
- Press Delete.
Configuring Partner Link Types Using the WSDL View
A partner link type characterizes the conversational relationship between two services. A partner link type can have one role or two roles.
- If a partner link type has one role, then the relationship involves a service that is willing to interact with any other service, without placing any requirements on the other service.
- If a partner link type has two roles, then the relationship involves two peer services.
A role describes the function that a partner has in the relationship. For example, in a procurement scenario, the partner link type could have two roles: Buyer and Seller.
A role must specify the port type that the service will use to receive messages.
To add a partner link type automatically
- When you do either of the following tasks, a partner link type is automatically generated.
The partner link type has a default role.
- Create a WSDL file from scratch.
- Create a port type.
- (Optional) To add a second role, do the following:
- Right-click the partner link type node and choose Add > role.
- If the Properties window is not visible, choose Window > Properties.
- Select the role.
- (Optional) Change the default name.
- Specify the port type.
To add a partner link type manually:
- In the WSDL view, right-click the Extensibility Elements node and choose Add > PartnerLinkType.
A partner link type node appears under the Extensibility Elements node. The partner link type has a default role. - (Optional) To add a second role, right-click the partner link type node and choose Add > role.
- If the Properties window is not visible, choose Window > Properties.
- For each role, do the following:
- Select the role.
- (Optional) Change the default name.
- Specify the port type.
Configuring Properties and Property Aliases Using the WSDL View
The BPEL Service Engine uses a mechanism called correlation to track the multiple, stateful, long-running exchanges of messages that typically take place between a BPEL process and its partner services.
The procedure for enabling correlation in a BPEL process includes the following initial steps, which must be performed in the WSDL file:
- Define one or more properties in the WSDL file.
A property creates an association between business data and a name that can play an important role in the global context of the BPEL process. Each property consists of a globally unique name (for example, claimNumberProperty) and a type (for example, xsd:string). - Define property aliases in the WSDL file.
A property alias maps a specific property to a specific element or attribute in a message part. When you create a property alias, you must specify the property and the message.
Once you perform these steps in the WSDL file, you can create a correlation set in the BPEL process. The correlation set references one or more properties. The correlation set can then be used by message activities (Invoke, Reply, and Receive) and by the onMessage branches of Pick elements.
- You can also use the BPEL Designer Navigator to add properties and property aliases to a WSDL file. For more information, see the "Adding Properties and Property Aliases to WSDL Files Using the Navigator" topic in the IDE online help.
To add a property to a WSDL file:
- In the WSDL view, right-click the Extensibility Elements node and choose Add > Property.
A property node appears under the Extensibility Elements node. - If the Properties window is not visible, choose Window > Properties.
- Select the property node.
- Set the name property.
- You can set the ElementOrType property to a built-in simple type, such as string or date. If you added an inline schema or imported a schema, then you can select a type from the schema.
To add a property alias to a WSDL file:
- In the WSDL view, right-click the Extensibility Elements node and choose Add > Property Alias.
A property alias node appears under the Extensibility Elements node. - If the Properties window is not visible, choose Window > Properties.
- Select the property alias node.
- Specify values for the propertyName and ElementOrTypeOrMessagePart properties. These properties enable you to map data from a message into a property value.
- To add a query, right-click the property alias node and choose Add > query.
A query node appears. The query node enables you to set the query language and the text of the query.
Finding Usages of WSDL Components
You can quickly determine where a WSDL component is used in the WSDL file.
To find usages of a WSDL component:
- In the WSDL view, right-click the component and choose Find Usages.
The Usages window opens in the lower part of the IDE. The window has three parts:- Toolbar. The toolbar buttons let you refresh information in the window, expand and collapse nodes in the tree pane, and cycle through the found usages.
- Tree pane. The tree pane contains nodes for the results of the query.
- Graph pane. The graph pane shows a graphical representation of the results.
- To zoom out, right-click in the graphic and drag up. To zoom in, right-click in the graphic and drag down.
- To pan, click and drag in any direction.
- To drag a node, click and drag the node.
Adding Documentation
You can add documentation to any WSDL language element.
To add documentation:
- In the WSDL view, right-click an element and choose Add > Documentation.
A documentation node appears. - If the Properties window is not visible, choose Window > Properties.
- Select the documentation node.
- Enter the documentation text.
Using Find in the WSDL View
You can search for WSDL components in the current WSDL file.
You can define the type of find to be performed:
- Search Selection. Starts the find action from the component most recently selected in the WSDL view.
- Use regular expression. The phrase entered into the text field is treated as a regular expression, with case-sensitivity.
For more information about regular expressions, see the "Regular Expressions For Finding and Replacing Text" topic in the IDE online help.
To search for WSDL components:
- From from the IDE's main menu, choose Edit > Find. You can also press Ctrl-F.
The Find bar opens at the bottom of the WSDL view. - In the Find box, click the magnifying glass icon and select the type of search that you want to perform: Component Name, Component Kind, Attribute Declaration, or Attribute Value.
- If you want to find matches from a specific point, then select a component in the WSDL view, click the magnifying glass icon, and select Search Selection.
- If you want to use a regular expression, then click the magnifying glass icon and select Use regular expression.
- In the Find box, type the text or regular expression and press Enter.
The IDE finds any matching components and highlights the matches in the WSDL view. - To cycle through the matching components, use the Find Next and Find Previous buttons.
To clear highlights after a search:
- In the Find bar, click Clear.
The highlights are removed from the WSDL view.
Partner View
The Partner view of the WSDL Editor represents the abstract elements of a WSDL file as interactions between partners.
The abstract elements include partner link types, roles, port types, operations, and messages.
A partner link type characterizes the conversational relationship between two services. A role describes the function that a service has in the relationship. A partner link type can have one role or two roles.
- Client/Server. In this type of interaction, the partner link type has one role. The role represents the server. The server can be invoked by one or more unspecified clients.
- Peer to Peer. In this type of interaction, the partner link type has two roles. Each role represents a peer service.
A role must specify the port type that the service will use to receive messages. A port type contains one or more related operations that the web service can perform. The WSDL Editor supports the following categories of operations:
- Request-response. The operation receives a message as input, and sends a message as output.
- One-way. The operation receives a message as input.
The concrete elements of a WSDL file (that is, bindings and services) describe how to invoke the functionality defined by the abstract elements. Creating a WSDL file that contains only abstract elements is an effective design approach. You can define the concrete elements at deployment time by using the Composite Application Service Assembly (CASA) editor. Thus, if you need to change the bindings at some point, you can do so without modifying the project.
Strategies for Defining the Abstract Elements
In the Partner view of the WSDL Editor, you can define the abstract elements by starting with the partner interactions or by starting with the messages that are exchanged by the partners.
To define the abstract elements by starting with the partner interactions:
- Create a partner link type. The partner link type contains a default role, which appears on the right. If you want to define a peer-to-peer interaction, then you must add a second role on the left.
- Choose or create the port types and operations.
- Create the messages that will be sent from one partner to another.
- Assign the messages to the partner link type's operations.
- Specify the data types for the message parts. Note that you can create or import an XML schema by using the Navigator window, and then drag the schema elements or types into the messages.
To define the abstract elements by starting with the messages:
- Create or import an XML schema by using the Navigator window.
- Create the messages that will be sent from one partner to another. Note that you can drag the schema elements or types from the Navigator window into the messages.
- Create a partner link type. The partner link type contains a default role, which appears on the right. If you want to define a peer-to-peer interaction, then you must add a second role on the left.
- Choose or create the port types and operations.
- Assign the messages to the partner link type's operations.
Partner View Layout
The Partner view of the WSDL Editor has the following components:
- Toolbar. The toolbar is located at the top of the Partner view, just below the tab for the WSDL file.
- Partner Link Types area. Contains one configuration box for each partner link type in the WSDL file.
- Messages area. Contains one configuration box for each message in the WSDL file.
- Palette. Contains partner link type, operation, and message icons. To display the Palette, choose Window > Palette from the IDE's main menu.
You can expand or collapse the configuration boxes. When a box is collapsed, click the downward arrow to expand the box. When a box is expanded, click the upward arrow to collapse the box.
The IDE's Navigator window provides a compact view of the currently selected file and simplifies navigation between different parts of the file. For WSDL files, the Navigator has two views: WSDL and XML.
The WSDL view of the Navigator window is identical to the WSDL view of the WSDL Editor.

The XML view uses a tree structure to represent the XML tags in the WSDL file.

To display the Navigator, choose Window > Navigator from the IDE's main menu.
Navigating in the Partner View
You can perform the following tasks from the toolbar of the Partner view:

- Set the magnification. The lowest magnification is 33 percent. The highest magnification is 200 percent.
- To set the magnification so that the entire diagram fits within the viewable area, click the Fit Diagram icon.
- To set the magnification so that the width of the diagram fits within the viewable area, click the Fit Width icon.
- To set the magnification to 100 percent, click the 100% icon.
- To set the magnification to a predefined percentage, select the percentage from the drop-down box.
- To set the magnification to any value between 33 and 200, enter the percentage in the drop-down box.
- To increase the magnification, click the Zoom In icon.
- To decrease the magnification, click the Zoom Out icon.
- Show or hide the partner link types.
- Show or hide the messages.
- Validate the WSDL file. The validation tool reviews the WSDL file for problems with syntax and semantics. The Output window displays any errors or warnings.
If you right-click a component and choose Go To > Source, then the Source view appears with the cursor positioned at the beginning of the component's block.
If you right-click a component and choose Go To > WSDL, then the WSDL view appears with the appropriate node highlighted.
After performing an action in the Partner view, you can reverse the action by choosing Edit > Undo (Ctrl-Z) from the IDE's main menu. You can reverse an undo command by choosing Edit > Redo (Ctrl-Y) from the IDE's main menu.
You can print the contents of the Partner view by using the IDE's standard print feature.
Creating Partner Link Types Using the Partner View
The Partner Link Types area in the Partner view contains one configuration box for each partner link type in the WSDL file.
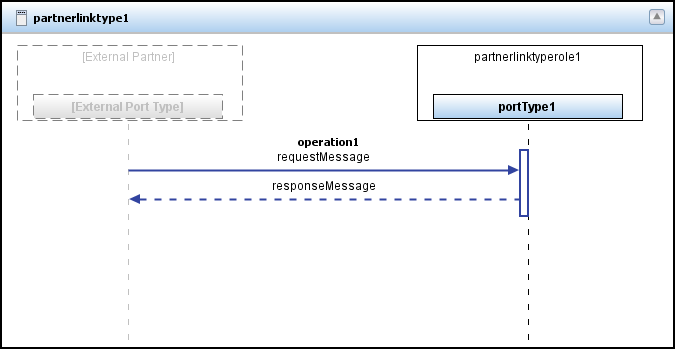
A partner link type can have one role or two roles. The first role appears in the right side of the configuration box. If included, the second role appears in the left side of the configuration box.
The role's port type appears below the role. A port type has one or more operations, which are illustrated in the area below the port types. A solid horizontal arrow indicates an input message. A dashed horizontal arrow indicates an output message.
If the operation is a request-response operation, then you can optionally add a fault. A dashed horizontal arrow indicates a fault message.
- The configuration box resembles a sequence diagram in Unified Modeling Language (UML).
Partner link types from imported WSDL files do not appear in the Partner view.
To create a partner link type with one role:
- If the WSDL file contains a port type that is not associated with a partner link type, then the Auto Create button appears in the Partner Link Types area. To generate a partner link type that references the port type, click Auto Create.
- Do one of the following:
- Click Add Partner Link Type.
- Drag the Partner Link Type icon from the Palette onto a blank portion of the Partner Link Types area.
- Right-click a blank portion of the Partner Link Types area and choose Add PartnerLinkType.
- In the right side of the configuration box, specify the port type that the service will use to receive messages. To create a new port type, double-click Enter or Select a Port Type and enter the name. To use an existing port type, click Enter or Select a Port Type and select the port type from the drop-down menu.
- If you created a new port type, or if you want to add one or more operations to an existing port type, then do the following:
- Drag one or more operations from the Palette onto the dashed vertical line that extends below the port type.
- For each operation, select the messages. You can double-click <No Message Selected> and select a message from the drop-down list. Alternately, you can drag a message from the Navigator window onto <No Message Selected>.
To add a second role to a partner link type:
- In the left side of the configuration box, double-click [External Partner] and enter the role name.
- In the left side of the configuration box, specify the port type that the service will use to receive messages. To create a new port type, double-click Enter or Select a Port Type and enter the name. To use an existing port type, click Enter or Select a Port Type and select the port type from the drop-down menu.
- If you created a new port type, or if you want to add one or more operations to an existing port type, then do the following:
- Drag one or more operations from the Palette onto the dashed vertical line that extends below the port type.
- For each operation, select the messages. You can double-click <No Message Selected> and select a message from the drop-down list. Alternately, you can drag a message from the Navigator window onto <No Message Selected>.
To add a fault to a request-response operation:
- Right-click the operation name and choose Add Fault.
The fault appears. - Double-click <No Message Selected>.
- Select the fault message.
Editing Partner Link Types Using the Partner View
The Partner Link Types area in the Partner view enables you to modify or delete the partner link types, roles, port types, and operations in a WSDL file.
To change the name of a partner link type, role, port type, or operation:
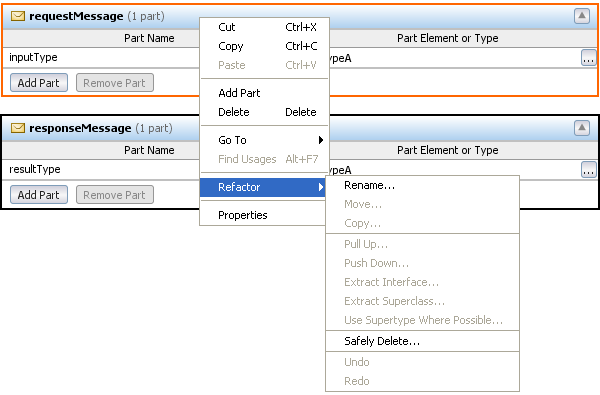
- This procedure will rename all occurrences in the same WSDL file. If you want to rename all occurrences in the same WSDL file and all associated XSD, WSDL, and BPEL files, then right-click the component and choose Refactor > Rename.
- Double-click the partner link type name, role name, port type name, or operation name.
- Change the name.
- Press Enter.
To delete an operation:
- Do one of the following:
- Select the operation and press Delete.
- Right-click the operation and choose Delete from the pop-up menu.
To delete a port type:
- Do one of the following:
- Select the port type and press Delete.
- Right-click the port type and choose Delete from the pop-up menu.
To delete a role:
- Do one of the following:
- Select the role and press Delete.
- Right-click the role and choose Delete from the pop-up menu.
To delete a partner link type:
- Do one of the following:
- Select the configuration box for the partner link type and press Delete.
- Right-click the configuration box for the partner link type and choose Delete from the pop-up menu.
Creating Messages Using the Partner View
The Messages area in the Partner view contains one configuration box for each message in the WSDL file.
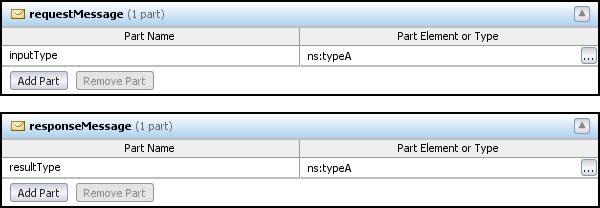
In a WSDL file, a port type contains one or more related operations that the web service can perform. An operation receives a message, sends a message, or does both.
Each message contains one or more logical parts. For each part, you must specify the name and the type of content.
To create a message:
- Do one of the following:
- Click Add Message.
- Drag the Message icon from the Palette onto a blank portion of the Messages area.
- Right-click a blank portion of the Messages area and choose Add Message.
- Do one of the following:
- In the Part Element or Type column, click the ellipsis (...) button. Select any of the built-in types in W3C XML Schema. If you added an inline schema or imported a schema, then you can select an element or type from the schema. Click OK.
- Drag an element or type from the Navigator window onto the Part Element or Type column.
To add a part to a message:
- Do one of the following:
- Click Add Part.
A new row appears. The type of content is set to xs:string. - Right-click the configuration box for the message and choose Add Part from the pop-up menu.
A new row appears. The type of content is undefined. - Drag an element or type from the Navigator window onto the configuration box for the message,
and above or below an existing row.
A new row appears. The type of content is set to the element or type that you selected.
- Click Add Part.
Editing Messages Using the Partner View
The Messages area in the Partner view enables you to modify or delete the messages in a WSDL file.
To change the name of a message:
- This procedure will rename all occurrences in the same WSDL file. If you want to rename all occurrences in the same WSDL file and all associated XSD, WSDL, and BPEL files, then right-click the component and choose Refactor > Rename.
- Double-click the message name.
- Change the name.
- Press Enter.
To change the name of a part:
- This procedure will rename all occurrences in the same WSDL file. If you want to rename all occurrences in the same WSDL file and all associated XSD, WSDL, and BPEL files, then right-click the component and choose Refactor > Rename.
- In the Part Name column, double-click the part name.
- Change the name.
- Press Enter.
To change the type of content for a part:
- Do one of the following:
- In the Part Element or Type column, click the ellipsis (...) button. Select any of the built-in types in W3C XML Schema. If you added an inline schema or imported a schema, then you can select an element or type from the schema. Click OK.
- Drag an element or type from the Navigator window onto the Part Element or Type column.
To delete a part:
- Do one of the following:
- Select the part and press Delete.
- Select the part and click Remove Part.
- Right-click the part and choose Delete from the pop-up menu.
To delete a message:
- Do one of the following:
- Select the configuration box for the message and press Delete.
- Right-click the configuration box for the message and choose Delete from the pop-up menu.
Working with WSDL Files
Creating a WSDL File From Scratch
When you create a WSDL file from scratch, the wizard contains three pages that you can fill out.
- The Name and Location page prompts you to enter basic information about the WSDL file.
- The Abstract Configuration page prompts you to define the port type, operation, and messages.
- The Concrete Configuration page prompts you to define the binding, service, and port.
You do not need to complete all three pages. You can fill out the Name and Location page and then click Finish. Or you can fill out the Name and Location page and the Abstract Configuration page and then click Finish.
To create a WSDL file from scratch:
- In the Projects window, right-click the Process Files node and choose New > WSDL Document.
- In the Name and Location wizard page, do the following:
- Enter a name for the file. The name must comply with the rules for the NCName data type. You cannot enter a name that already exists in the project.
- (Optional) Change the default folder by clicking Browse and selecting the new folder.
- Enter the target namespace for the WSDL file. The target namespace will appear in the root element.
- Specify any XML Schema files that you want to import.
- If you want to configure the abstract and concrete information from the wizard, then click Next. Otherwise, click Finish.
- In the Abstract Configuration wizard page, do the following:
- Enter a name for the port type.
- Enter a name for the operation.
- Select the category of operation.
- Define the message that the operation receives as input.
- If the operation is a request-response operation, then define the message that the operation sends as output.
- (Optional) If the operation is a request-response operation, then you can optionally define a message that the operation sends as a fault.
- If you want to configure the concrete information from the wizard, then click Next. Otherwise, click Finish.
- In the Concrete Configuration wizard page, do the following:
- Enter a name for the binding.
- Select the type of binding.
- Select the binding subtype. The choices vary depending on the binding type.
- Enter a name for the service.
- Enter a name for the port.
- Click Finish.
- If you created a SOAP binding, then the port's soap:address node includes a Location property. The Location property specifies the address of the port. The wizard generates a dummy value for the Location property. The Location property must be unique; that is, the value must not conflict with any other WSDL files that are deployed to the same application server.
Creating a WSDL File Based On an Existing WSDL File
Instead of creating a WSDL file from scratch, you can create a WSDL file based on an existing WSDL file.
To create a WSDL file based on an existing WSDL file:
- In the Projects window, right-click the Process Files node and choose New > Other.
- In the Choose File Type wizard page, do the following:
- In the Categories list, select the XML node.
- In the File Types list, select the External WSDL Document(s) node.
- Click Next.
- In the Specify Resource Location wizard page, do one of the following:
- To create a WSDL file based on a running service:
- Select the From URL button.
- Enter the URL of the service's WSDL file.
- Click Finish.
- To create a WSDL file by using an existing WSDL file on the local file system:
- Select the From Local File System button.
- Specify the folder where the WSDL file is located.
- Click Finish.
- To create a WSDL file based on a running service:
NCNAME Data Type
XML Schema includes a data type called NCName. Any name that has the NCName data type must comply with the following rules:
- The name must begin with a letter or an underscore (_).
- The valid characters for the remainder of the name are:
- Letters
- Digits
- Period (.)
- Hyphen (-)
- Underscore (_)
Using Refactoring to Rename or Delete WSDL Components
You can perform refactoring by using the following approaches:
- Rename. Enables you to rename all occurrences in the associated XSD, WSDL, and BPEL files.
- Safely Delete. Enables you to check for references to the component before you perform the delete.
- Undo. After performing a Rename or Safely Delete action, you can undo that action.
- Redo. After performing an undo of a Rename or Safely Delete action, you can redo that action.
You can also rename a component by changing the value of the Name property. The WSDL Editor renames all occurrences in the same file, but not in other files.
Validating WSDL Files
The WSDL Editor includes a validation tool. The validation tool reviews the WSDL file for problems with syntax and semantics.
To validate a WSDL file:
- Display any of the views in the WSDL Editor.
- In the toolbar, click the Validate XML button.
The Output window displays any errors or warnings.