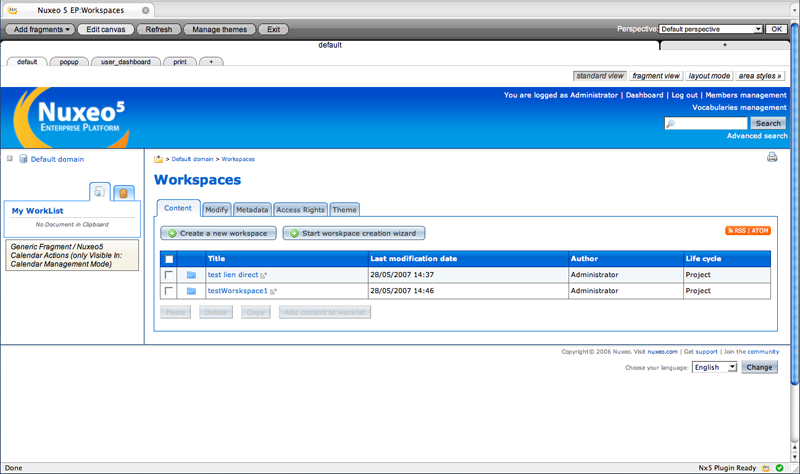
The Nuxeo theme notion is wider than the notion attached to the same word in portal concepts. Indeed, the Nuxeo Theme defines all the look and feel of your webapp: composition, layout and graphical appearance. Nuxeo does not aim at developing a portal, i.e. a JSR 168 container, but it authorizes a kind of page and widget management to get some flexibility in the design you want to give to your webapp. The tool to enable you manage those aspects is "Nuxeo Theme editor", that you can make appear with the following command when you are in Nuxeo Web app:
To switch to Nuxeo Theme editor click on the 'Themes Management' link in the user services panel.

Alternatively, you can type 'shift'+'alt'+'t'. To switch to Nuxeo Theme editor with Mozilla / Firefox < 2.0 type 'alt'+'t'
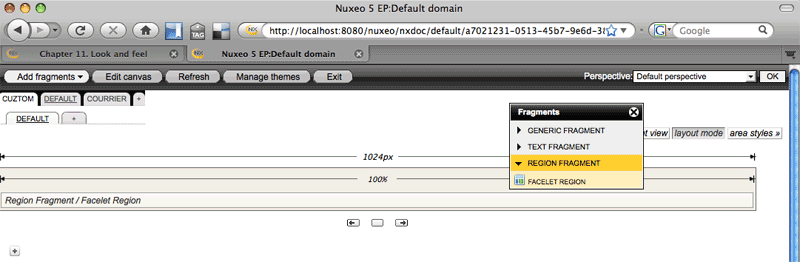
One special fragment is the Facelet region: in the properties tab of the editor you can specify the name of a faces to directly integrate it into your page.
To use Nuxeo theme editor, you need to understand its model. The main entity is the theme. Then a theme may have many pages. For each pages, you define a layout (a canvas) and add a list of fragments (widget). The graphical editor uses a tab (theme) and sub-tab (page) system. When you want to add a new page or theme click on "+" at the end of the tab list. For a page you have three possible views:
wysiwyg: you can move the widgets and evaluate the rendering.
fragments: to put the widgets in their placeholder (= a cell). You can put many widgets in a place holder.
layout: you can create new rows and divide the rows into cells, and specify the width of each cell (just edit the nn% on the screen).
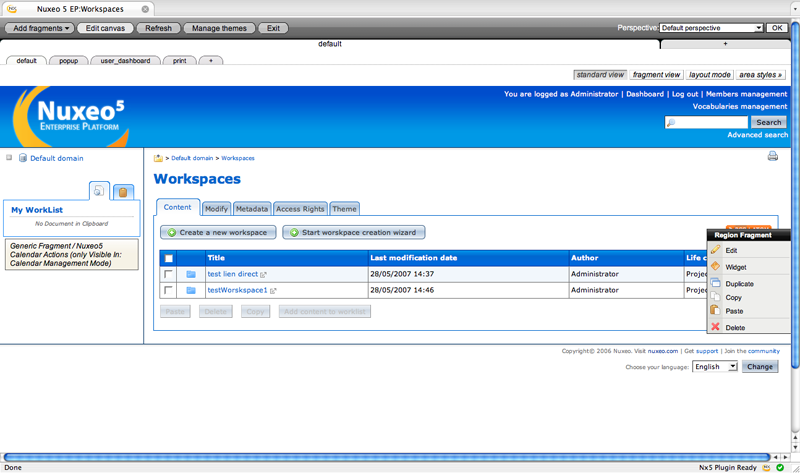
You can click on a fragment to edit it. When you edit a fragment you have a multitab editor to specify:
custom properties of the fragment: e.g. the text if it is a text fragment,
the graphical object (the widget) associated
the style of each HTML object that composes the widget.
then you specify the perspective in which the fragment can be seen.
One special fragment is the Facelet region: in the properties tab of the editor you can specify the name of a faces to directly integrate it into your page.
Nuxeo Editor is done for not having to understand the underground
mechanism. Yet it can be good to understand the background to better
leverage the tool and its possibilities. The Nuxeo component that manages
the customization and extension of Nuxeo EP 5 look and feel is:
org.nuxeo.theme.services.ThemeService. To register a
whole theme (widget, style, layout etc. ...) you need to contribute to the
extension point "theme" this way:
<extension
    target="org.nuxeo.theme.services.ThemeService" point="themes">
    <theme> <src>META-INF/nxthemes-setup.xml</src>
    </theme> </extension>
In the trunk, the default theme is in the webapp project. Having a look inside enables us to discover the main features.
The file starts with the elements declaration, we define the pages, the rows (section markup), the cells and the fragments in the cells.
<theme name="default"> <layout>
      <page name="default"> <section> <cell> <fragment
      type="generic fragment" /> </cell> <cell> <fragment
      type="generic fragment" /> </cell> <cell> <fragment
      type="generic fragment" /> </cell> </section>
      </page> <page name = ...> . . . </page>
      </layout> </theme>
All this markup refers
to an Element subtype in the java model:
PageElement,
CellElement... The fragment element, the one that gives the widget
oriented capacity to Nuxeo is typed: we have in the default distribution
"generic fragment", "action fragments". A typed fragment returns a model
to be displayed and edit in the edit mode of the fragments. This model
is often (but not always) what we can see in the "properties" tab of the
fragment editor. For now there is in the default Nuxeo
distribution:
generic fragment (empty model)
textual fragment
region fragment
action fragment
The fragment can also receive a perspective attribute that
specifies in which perspective it will be displayed (the fourth tab in
the fragment editor). You can then propose to Nuxeo user the same kind
of experience you have in Eclipse. The perspective are specified in the
perspective extension point of !ThemeService component.
Then, once you declared all the elements, you can format them through different axes :
their layout
their rendering (their view)
their style
To do this, you put, inside the <theme>
markup, children markup from those types:
layout --> <layout element =
...>
rendering --> <widget element
...>
style --> <style element =
...>
Those 3 markups use the attribute element to get the reference to which element of your skeleton they will be applied:
element="page[3]/section[3]/cell[1]"
Indeed each element is rendered by a view.
<widget element="page"> <view>page
        frame</view> </widget>
This view is
defined like this (with another extension point of !ThemeService: views):
<view
        name="page frame"> <element-type>page</element-type>
        <format-type>widget</format-type>
        <class>org.nuxeo.theme.jsf.views.JSFView</class>
        <template>nxthemes/jsf/widgets/page-frame.xml</template>
        </view>
We can see that a view is associated to
an element type. The element types contributions should be reserved to
Nuxeo only (one should manage with existing ones). The template markup
gives the html/faces/text code to be used for rendering the view.
Notice that in the view, you can access the fragment model data
through the EL call nxthemesInfo.model.
<h:outputText escape="false"
          value="#{nxthemesInfo.model.body}" />
The layout properties are given like this (still under the <theme> markup) :
<layout element="page[3]/section[3]/cell[1]">
        <width>50%</width> <padding>20px</padding>
        <margin>0</margin> </layout>
This enables to adjust the position of the fragments inside.
Then comes the style properties. Again, you
apply them to an element:
<style
        element="page[1]/section[3]/cell[1]|page[3]/section[4]/cell[1]">
        <selector path=""> <color>#757575</color>
        <border-style>solid none none none</border-style>
        <border-color>#003366</border-color>
        <border-width>1px</border-width> <background> #FFF
        url(/nuxeo/img/gray_gradient.gif) top left repeat-x
        </background> <padding>5px 15px 5px 5px</padding>
        </selector> <selector path="div">
        <font-size>9px</font-size> </selector>
        </style>
The selector specifies the markup to which the defined style is applied. The style definition used is the one of the deeper upper-element that has a style definition specified. To be exhaustive, we need to present the filter system (TODO)
We have seen how to define a theme. Now we need to see how a theme is applied. More precisely, how do I manage the choice of the page I will display? In fact, the Nuxeo Theme framework proposes many ways to specify the theme applied to the webapp for a given view:
with a cookie
with a request parameter (?theme= ...)
with an association between a JSF view id and a theme
So how to manage priority when more than one parameter is passed
to the framework? The !ThemeService component
has another extension point to achieve this: the negotiation extension point. Not only can it be
used to select a theme but it also works with other objects as we will
see later.
<negotiation object="theme"
      strategy="nuxeo5">
      <scheme>org.nuxeo.theme.jsf.negotiation.theme.RequestParameter</scheme>
      <scheme>org.nuxeo.theme.jsf.negotiation.theme.CookieValue</scheme>
      <scheme>org.nuxeo.theme.jsf.negotiation.theme.ViewId</scheme>
      <!-- local theme (specific to nuxeo5) -->
      <scheme>org.nuxeo.ecm.webapp.theme.LocalTheme</scheme>
      <scheme>org.nuxeo.theme.jsf.negotiation.theme.DefaultTheme</scheme>
      </negotiation>
As we can see in the example, the negotiation point defines the order in which the different methods for obtaining the current theme information are applied. This negotiation feature also applies to other Nuxeo Theme objects like the engine, the mode, the perspective.
Engine and filter are two notions that work together. An engine is the combination of different filters, and a filter is a "sub-unit" of rendering. So the engine is the global renderer of your web app. From the elements skeleton, it will generate the graphical appearance, passing each element through different black boxes, depending on the type of the element. Here is the definition of the default engine of Nuxeo.
<engine name="default"> <renderer
      element="theme"> <filter>add widget</filter>
      <filter>collect xmlns</filter> </renderer>
      <renderer element="page"> <filter>add widget</filter>
      <filter>set layout</filter> <filter>set
      style</filter> </renderer> <renderer
      element="section"> <filter>add widget</filter>
      <filter>set layout</filter> <filter>set
      style</filter> </renderer> <renderer element="cell">
      <filter>add widget</filter> <filter>set
      layout</filter> <filter>set style</filter>
      </renderer> <renderer element="fragment">
      <filter>control fragment visibility</filter>
      <filter>add widget</filter> <filter>set
      style</filter> <filter>write fragment tag</filter>
      </renderer> </engine>
The engine, that you
register in the ThemeService component through the
"engines" extension point lets you add for each type of element some
"filters" that will do some work around the markup content at rendering
time. Nuxeo already uses filters like the style fitler, that put the
style definition you chose, the layout filter, the "drag'n drop"
filter... One interesting use of the filters is illustrated with the
Nuxeo Theme editor: when you type shift+alt+t, the
display changes and you are in the WYSIWYG Nuxeo theme editor. But all
the components that make your page are still here, they just look a bit
different because, some different filters are used. For instance,
because of the drag'n drop filter presence, you can move the
fragments.
Graphical components may need some external resources such as CSS or JavaScript libraries. Nuxeo theme has an embedded resource management system that at rendering time automatically computes the list of the files needed for rendering a page. Resources are served using gzip compression when supported by the browser. JavaScript resources are also compressed using Dojo's ShrinkSafe. Finally all files of a same type (.css or .js) are concatenated. This reduces the number of individual downloads and it enables to manage dependencies between resources. Indeed, at declaration time you can specify the dependencies for a given resource:
<extension
      target="org.nuxeo.theme.services.ThemeService" point="resources">
      <resource name="controls.js">
      <path>nxthemes/jsf/scripts/scriptaculous/controls.js</path>
      <require>effects.js</require>
      <require>prototype.js</require> </resource>
      </extension>
Then, when you register the view associated to an element, you specify the resources it needs:
<view name="nuxeo5
      clip board"> <format-type>widget</format-type>
      <class>org.nuxeo.theme.jsf.views.JSFView</class>
      <template>incl/user_clipboard.xhtml</template>
      <resource>dragdrop.js</resource>
      </view>
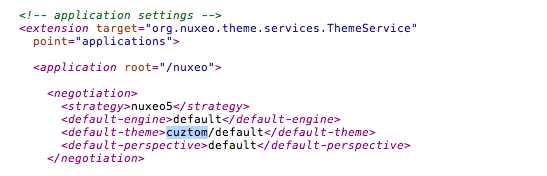
The last concept you need to know about to completely control the look and feel of your application is the application extension point:
<extension
      target="org.nuxeo.theme.services.ThemeService" point="applications">
      <application root="/nuxeo"> <negotiation>
      <strategy>nuxeo5</strategy>
      <default-engine>default</default-engine>
      <default-theme>default/default</default-theme>
      <default-perspective>default</default-perspective>
      </negotiation> <resource-caching>
      <lifetime>36000</lifetime> </resource-caching>
      <view id="/create_relation_search_document_popup.xhtml">
      <theme>default/popup</theme> </view> <view
      id="/user_dashboard.xhtml">
      <theme>default/user_dashboard</theme> </view> <view
      id="/view_calendar.xhtml">
      <perspective>view_calendar</perspective> </view>
      <view id="/print.xhtml">
      <perspective>print</perspective> </view>
      </application> </extension>
As you can see in the example, an application is associated to a web-app root context. There you specify the strategy (a negotiation grouping feature), the default engine, the default theme and perspective. You also specify the caching policy and there you also declare the JSF view id / theme association that we went through earlier in this tutorial.
Eventually, all theme and styling work will be done in the Theme
Editor. For now, we have to use both the editor and the file theme-default.xml in nuxeo/nuxeo-platform/nuxeo-platform-webapp-core/src/main/resources/META-INF/.
What can be done in the editor: page layout, widget moving, fragment styling, page/section/cell preset borders and backgrounds
What must be done in theme-default.xml :
commons styles and their inheritance
In addition to the theme-default.xml come
palettes: a bunch of presets for colors, backgrounds, fonts and other css
attributes. Nuxeo EP 5 supports text palettes and GIMP/Photoshop palettes
(for the colors).
When you add images or modify theme-default.xml, you have to redeploy your Nuxeo
5.
In case of doubt, try using the editor, because the produced code is much cleaner and compliant than anything you would write manually :-)
The file theme-default.xml is
structured as follows:
Pages and their layout
widgets in pages
definition of predefined styles (using preset values from palettes)
cell and fragments styling
In theme-contrib.xml we have our theme
called:
<!-- themes --> <extension
        target="org.nuxeo.theme.services.ThemeService" point="themes">
        <theme> <src>META-INF/theme-default.xml</src>
        </theme> </extension>
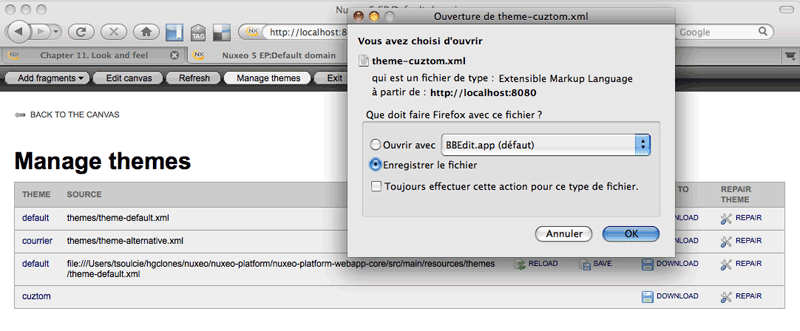
In the editor, in Manage Themes tab, it gives:
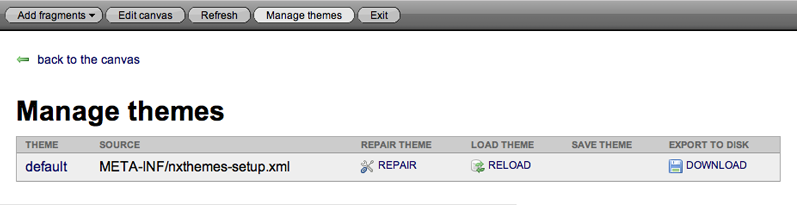
This file is deployed in JBoss. If you modify the theme using the
editor all changes will be lost so think of downloading the theme to
your Desktop, to replace the theme-default.xml in your local copy of Nuxeo EP
5.
A good way of working with this file is to add your working copy
in theme-contrib.xml. It is possible in
NXThemes to load several themes and page.
Add your file(s) in themes-contrib.xml,
for example:
<theme>
        <src>file:///path/to/sources/nuxeo/nuxeo-platform/nuxeo-platform-webapp-core/src/main/resources/META-INF/nxthemes-setup.xml</src>
        </theme>
After a redeployment, in the 'Manage Themes' section we now have a theme that can be reloaded directly from the file-system!
Starting from there, here are two ways of developing smartly:
Edit your theme-default.xml in
Eclipse (or in your XML editor) then go to theme editor, in Manage
Themes tab and click "Reload" on your local file: you can directly
see the changes you made in the XML source.
Modify the theme inside the editor, then go to Manage Themes tab and click on "Save" action. All changes will be saved in the file.
The palettes are in nuxeo/nuxeo-platform/nuxeo-platform-webapp-core/src/main/resources/themes.palettes/
They are called in nuxeo/nuxeo-platform/nuxeo-platform-webapp-core/src/main/resources/OSGI-INF/theme-contrib.xml:
<!-- Styles presets --> <extension
          target="org.nuxeo.theme.services.ThemeService" point="presets">
          <palette name="Nuxeo default fonts"
          src="themes/palettes/nxfonts.properties" category="font" />
          <palette name="Nuxeo psd colors"
          src="themes/palettes/nxcolors.aco" category="color" />
          <palette name="Nuxeo default backgrounds"
          src="themes/palettes/nxbackgrounds.properties" category="background"
          /> </extension>
There are 3 default palettes:
nxbackgrounds.properties that
specifies the banner's css background and the shadow under
it
nxcolors.aco that contains nuxeo
default colors in a photoshop palette format
nxfonts.properties that contains
default css font, small and 4 levels of titles
The easiest way for you to customize yout Nuxeo EP 5 app is to modify the existing palettes!
For example, in nxfonts.properties
change the line
default=11px Verdana, Arial,
          sans-serif
to
default=12px Courier, serif
Then all the fonts of the app will be changed to your new value!
We advise you to add your own color palette.
Currently in nxthemes-setup.xml we have a
style named default buttons, which is defined as:
<style name="default buttons"> <selector
          path="input.button">
          <background>url(/nuxeo/img/button_1.gif) 0 0 repeat-x
          #e3e6ea</background> <font preset="default (Nuxeo default
          fonts)"/> <margin>5px 10px 10px 0px</margin>
          <color>#000</color>
          <border-style>solid</border-style>
          <border-width>1px</border-width>
          <border-color>#ccc #666 #666 #ccc</border-color>
          <padding>2px 5px 2px 5px</padding>
          <cursor>pointer</cursor> </selector> <selector
          path="input.button:hover"> <color preset="white (Nuxeo psd
          colors)"/> <font preset="default (Nuxeo default fonts)"/>
          <background>url(/nuxeo/img/button_2.gif) 0 0 repeat-x
          #3f89ef</background> <border-color>#0099ff #0066cc
          #0066cc #0099ff</border-color>
          <border-style>solid</border-style>
          <border-width>1px</border-width> </selector>
          <selector path="input.button[disabled=disabled],
          input.button[disabled=disabled]:hover">
          <color>#c1c1c1</color> <font preset="default (Nuxeo
          default fonts)"/>
          <background>url(/nuxeo/img/button_disabled.gif) 0 0 repeat-x
          #ebeff4</background> <border-color>#ccc #999 #999
          #ccc</border-color> <cursor>default</cursor>
          <border-style>solid</border-style>
          <border-width>1px</border-width> </selector>
          </style>
We can see that:
a style that does not apply to an element is name
inside this style, several HTML attributes/classes are called
palette preset are called, such as the font attribute
Predefined styles are also a good way of efficiently changing the look of your application because you need to change the CSS only once!
Later in the file we notice that the 'user services' fragment takes the default buttons style preset:
 <!-- user services --> <style
          element="page[1]/section[1]/cell[2]/fragment[1]|page[3]/section[1]/cell[2]/fragment[1]"
          inherit="default buttons">
It means that the styles defined for the buttons will be applied to the 'user services' fragment (user links and search in the banner).
As we explained earlier, layout editing and local styling can be done in the theme editor.
In the editor, click on an element you want to style, click "Edit" in the Menu. Here we chose the RSS/Atom link button
Access the Style tab.
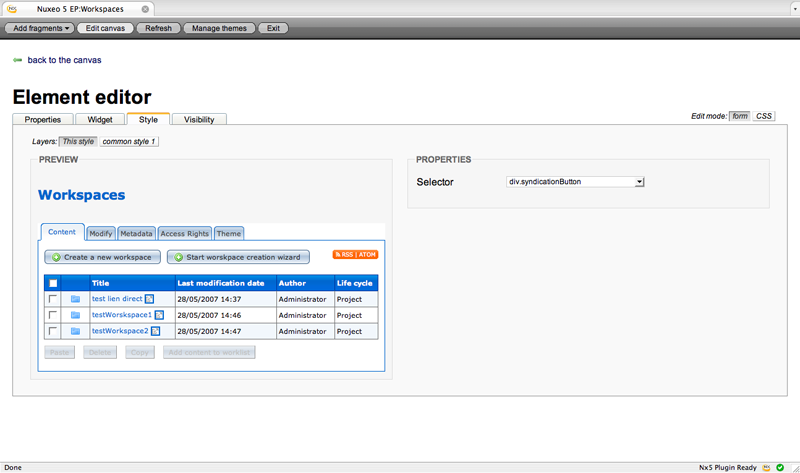
The existing selectors are on the right in the Properties box, otherwise move the mouse over the preview area and click on an element to create a CSS selector path.
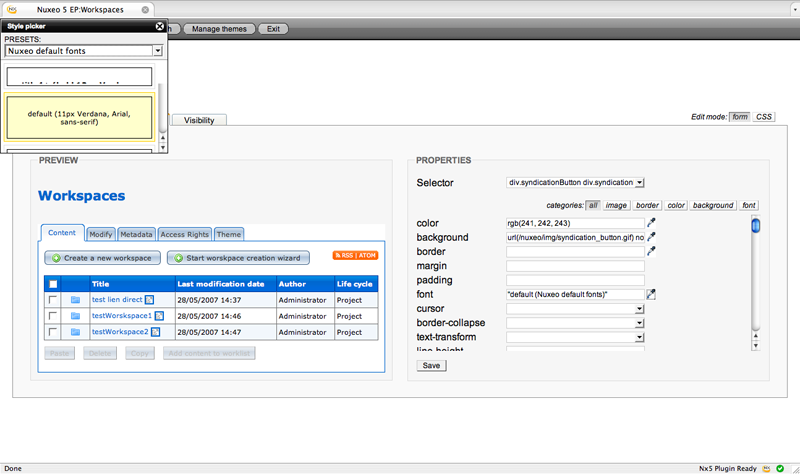
We choose to change the small font preset to the default one. As you see, the Style picker shows all the palettes and all the presets are rendered. We remove the background property for the syndication links button and add a preset background-color, our RSS/Atom button is all changed now:
When you are done with managing your theme you might want to save it to your local copy of Nuxeo. Just go in the Manage Themes tab, download the custom theme to your computer, then put it in your repository.
Congratulation, you have just customized the Nuxeo EP theme!
You may want to modify an existing fragment to customize your
project, let's say you want your compagny logo instead of Nuxeo EP's
and you own corporate links in the footer. We won't create &
declare new fragments (as we saw, fragments and their resources are
defined in theme-contrib.xml), we'll use
the default-ones to override Nuxeo EP's, considering you have your own
project using Nuxeo EP default as made in the sample
project.
Here are the steps do to so:
copy your logo (let's call it corporate_logo.gif) to your.project/src/main/resources/nuxeo.war/img
copy and paste logo.xhtml and
footer.xhtml from nuxeo/nuxeo-platform/nuxeo-platform-webapp/src/main/resources/nuxeo.war/incl
to your.project/src/main/resources/nuxeo.war/incl
so it's overridden when doing your
ant.
This is a general principle for
nuxeo.war folder. The contents of the
/img/ folder of your app are the contents
of Nuxeo EP's default .../nuxeo.war/img folder. Every specific
resource in your.project/.../nuxeo.war/img come in
addition of what is already in default .../nuxeo.war/img if non-existing there
with same filename, or come instead of what is existing in default
.../nuxeo.war/img if same
filename.
edit logo.xhtml that currently
contains
<div xmlns:h="http://java.sun.com/jsf/html"
            xmlns:ui="http://java.sun.com/jsf/facelets"
            xmlns:f="http://java.sun.com/jsf/core"
            xmlns:t="http://myfaces.apache.org/tomahawk"
            xmlns:nxu="http://nuxeo.org/nxweb/util"
            xmlns:c="http://java.sun.com/jstl/core" class="menu">
            <div> <h:form> <h:commandLink
            action="#{navigationContext.goHome()}"> <h:graphicImage
            value="#{logoHelper.logoURL}" alt="Nuxeo EP 5" width="194"
            height="99" /> </h:commandLink> </h:form>
            </div> </div>
change the line <h:graphicImage
value="#{logoHelper.logoURL}" alt="Nuxeo EP 5" width="194"
height="99" /> for something like <img src="/nuxeo/img/corporate_logo.gif"
alt="My corporate logo" /> and save your changes
edit footer.xhtml that currently
contains
<div xmlns:h="http://java.sun.com/jsf/html"
xmlns:ui="http://java.sun.com/jsf/facelets"
xmlns:f="http://java.sun.com/jsf/core"> <ui:insert
name="footer"> Copyright
<f:verbatim>&copy;</f:verbatim> 2006 Nuxeo.
Visit <!-- --> <h:outputLink
value="http://www.nuxeo.com"> <h:outputText
value="nuxeo.com" /> </h:outputLink> | Get <!--
--><h:outputLink
value="http://www.nuxeo.com/en/services/support/">
<h:outputText value="support" /> </h:outputLink> |
Join the <!-- --> <h:outputLink
value="http://www.nuxeo.org/sections/community">
<h:outputText value="community" /> </h:outputLink>
<br /> <h:form> <h:outputText
value="#{messages['label.selectLocale']}" />
<h:selectOneMenu value="#{localeSelector.localeString}"
styleClass="langSelect"> <f:selectItems
value="#{localeSelector.supportedLocales}"/>
</h:selectOneMenu> <h:commandButton
action="#{localeSelector.select}"
value="#{messages['command.changeLocale']}" class="langSubmit"
/> </h:form> </ui:insert>
</div
Change from Copyright to <br /> by something like <a href="http://yoursite.com">My Corporate
Site</a>, save your changes
Do an ant on your projet, rerun your jboss and appreciate the changes...
Congratulation, you have just customized some Nuxeo EP fragments!
We rarely create a theme from scratch. Since the default, popup and dashboards are used in every projetc, we usually duplicate the default theme and use it as a basis. But let's pretend you want to add a completely new and custom theme to your project. Here are the steps.
We assume you are familiar to Nuxeo EP way and have read the theme section above!
Log in as Administrator
Go to the Manage Theme view
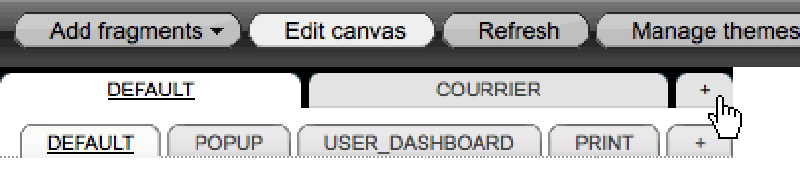
Click the plus tab, right next to the themes names
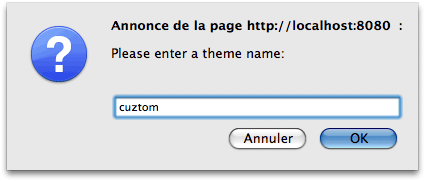
Define a (smart) name. We are currently using "cuztom"
You have a page called "default", toy with it, add sections and fragments, color the areas so your theme is not empty. We recommend to add a region fragment with name set as body so the main content is displayed.
You can add pages to your theme by clicking the plus tab next to the pages names.
Go the manage themes tab
Download your theme
You will need a few files/declaration to set your new theme.
What we will be overriding in our project is /nuxeo/nuxeo-platform/nuxeo-platform-webapp-core/src/main/resources/.
Make sure that:
You copied your downloaded cuztom theme (or duplicate
default nuxeo theme, of course) to /yourproject/.../resources/themes
META-INF/META-INF.MF calls your
OSGI-INF/cuztom-theme-contrib.xml as
component
You have a OSGI-INF/cuztom-theme-contrib.xml with
inside:
The component name set is your
project's
The theme extension point
contains your JBoss's theme file
The theme extension point
contains your local theme file (if you plan to work that
way)
The applications extension point
set the negociation with your theme as default
theme
If you have specific fragments or palettes, declare them there.
Your new theme is now part of your project and set as default. Your can ant your app and re-run JBoss.
A good way to name your files is to add your project's name
before the current Nuxeo filename. For an example, theme-contrib.xml may become cuztom-theme-contrib.xml.
Your now all set to create your own design with all the tools explained in the sections above:
Create fragments, declare theme in cuztom-theme-contrib.xml and drop them into
your pages using the theme editor
Add palettes, declare them, call them in your theme-file.
Create generic style and make elements inherit of it.
Modify the structure of the pages with the theme editor and save your changes in your local files
Add style in your local files and reload the theme using the Manage Theme tab in theme editor.
Add images and icon into your nuxeo.war folder and call them in the style, in the actions-contrib.xml or in the fragments.
Have fun and send us your creations!