Table of Contents
Objective: Create a new document type with its own unique meta-data. Understand the basics of Nuxeo projects' structure, build process, and deployment.
Minor things can become moments of great revelation when encountered for the first time. Margot Fonteyn, English ballerina ( 1919 - 1991 )
If you have any comments, questions, or general-purpose harassment you would like give us about this book, then please use the comment form at the bottom of each page! We promise that we will try to incorporate any feedback you give (minus the profanity, of course), will respond to your questions, and credit you appropriately.
Back in the first lesson, we explained that we would expect you to use Eclipse to compile Nuxeo programs and Maven to deploy them. While that was true, it was true in the sense that "Darth Vader betrayed and murdered Luke's father," that is, from a certain point of view. A more complete answer is that Eclipse and Maven have to be convinced to peacefully co-exist so that you can use them each for the purpose they are best suited-and that their duties substantially overlap. At various times, each will be used to accomplish the task of building a Nuxeo bundle, for example. Maven is quite particular about the layout of project files and Eclipse can handle almost any layout, so we will now discuss how to layout your files in the arrangement preferred by Maven.
You may be tempted to use one of the Eclipse plugins that allows Maven to be run from within Eclipse, such as m2eclipse. The authors have extensive experience with Maven, eclipse, and these plugins and have found them to consistently cause much more trouble than they are worth for a beginning developer on Nuxeo: trust us, you don't want to go there! An example difficulty with using Maven-in-Eclipse plugins is that the build and test classpaths for Nuxeo bundles are quite large and complex and, at best, the use of Maven for building will make your builds so slow that they cannot be done interactively; without the plugins, Eclipse caches enough information to do builds as you type without trouble, even on a computationally weak machine. At worst, Maven plugins can become confused about how to run your test harness and actively change (destroy) your Eclipse setup! Trust us, if you have a Maven plugin for eclipse in your eclipse this is a good time to remove it.
The set of directories that you should use when building a Nuxeo bundle, also referred to as a Nuxeo plugin, is shown in this listing of what happens when you check out the skeleton of lesson4 (explained below):
$ svn co http://svn.nuxeo.org/nuxeo/sandbox/iansmith/book/lesson-bundle
A    lesson-bundle/src
A    lesson-bundle/src/test
A    lesson-bundle/src/test/java
A    lesson-bundle/src/test/resources
A    lesson-bundle/src/main
A    lesson-bundle/src/main/java
A    lesson-bundle/src/main/resources
A    lesson-bundle/src/main/resources/META-INF
A    lesson-bundle/src/main/resources/OSGI-INF
Briefly, we will discuss the purpose of the directories in
lesson-bundle above. The src
directory and its children are the primary focus of interest for
developers. The top level division into main and
test subdirectories is to differentiate between the
bundle's implementation, in main, and the code used
to test the bundle in test. Each of these directories
has two children, java and
resources, to distinguish between Java code and all
the other support files needed. Within the Java directories, the usual
Java convention applies, a production Java class with the fully qualified
name org.nuxeo.foo.MyClass found in the file
src/main/java/org/nuxeo/foo/MyClass.java . Within the
main directory, you can see the
META-INF and OSGI-INF
directories that were discussed in the previous lesson. This layout is
quite standardized for Maven projects and although there are many more
options possible for Maven projects, this arrangement is instantly
recognizable to anyone with experience using Maven.
To make this project a bit easier to get started, we have prepared
a skeleton for you to start from, with all the directories and files in
the correct structure as explained above. We will make a new
subdirectory of /nuxeo called
/nuxeo/workspace to be used as the Eclipse
workspace for all the remaining projects. Retrieve the project skeleton
from Nuxeo's subversion repository and unpack the skeleton to create the
directory lesson-bundle that you will use in
Eclipse as your project.
iansmith@Photo /nuxeo
$ mkdir workspace

iansmith@Photo /nuxeo
$ cd workspace

iansmith@Photo /nuxeo/workspace
$ mvn -Declipse.workspace=. eclipse:add-maven-repo

iansmith@Photo /nuxeo/workspace
$ svn export http://svn.nuxeo.org/nuxeo/sandbox/iansmith/book/lesson-bundle/

iansmith@Photo /nuxeo/workspace
$ cd lesson-bundle

iansmith@Photo /nuxeo/workspace/lesson-bundle
$ ls -F
pom.xml*  src/
There is mvn command in the listing above
that initializes the Eclipse workspace. The syntax provided is for the
most common version of the Eclipse support in Maven (version 2.4).
This command simply creates a single Eclipse variable
M2_REPO. If you find that your version of Maven
does not support this command (it is currently deprecated, but still
available, in version 2.5 of the Eclipse support for Maven) you may
want to try using configure-workspace instead of
add-maven-repo.
This lesson and several upcoming lessons will be about building a new type of document, Upcoming which repesents an upcoming event as we explained in the first chapter to this book. For this lesson, our goal, roughly, is to be able to create this new type of document through the Nuxeo web user interface. An example of an Upcoming document would be a document that describes a concert that will occur at some point in the future. Obviously, there are a number of special types of meta-data associated with upcoming events, such as when they will occur and how much they cost to attend. We will be filling out the definition of this new document type as we proceed through the lessons.
Go ahead and use Maven to create our Eclipse project files (!) with a command like this:
iansmith@Photo /nuxeo/workspace/lesson-bundle
$ mvn eclipse:eclipse
Since you have never used Maven with Nuxeo before, or perhaps have never used it all before, do not be alarmed if Maven begins wildly downloading a great many things from the internet; instead, go get a cup of coffee-this will take a few minutes. It only happens the first time you use Maven with Nuxeo. When this completes, you should see a "build successful" message like this:
[INFO] Wrote settings to C:\nuxeo\workspace.lessons\lesson-bundle\.settings\org.eclipse.jdt.core.prefs
[INFO] Wrote Eclipse project for "lesson-bundle" to c:\nuxeo\workspace.lessons\lesson-bundle.
[INFO]
[INFO] ------------------------------------------------------------------------
[INFO] BUILD SUCCESSFUL
[INFO] ------------------------------------------------------------------------
[INFO] Total time: 36 seconds
[INFO] Finished at: Wed Jan 21 16:47:44 EST 2009
[INFO] Final Memory: 25M/45M
[INFO] ------------------------------------------------------------------------
Note that the build above only took 36 seconds! If you don't see a message like that at the end of your mvn output, you probably have something wrong with either your internet connectivity or your Maven configuration.
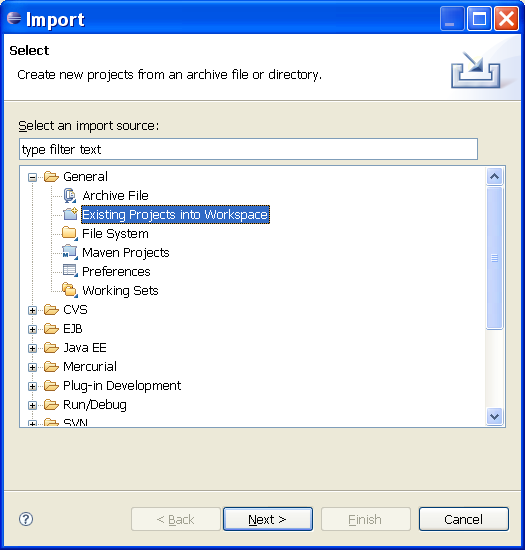
To import the project into eclipse, start up eclipse and use
/nuxeo/workspace as the workspace. Then you can use
the File Menu's Import option, hereafter written as File >
Import, and choose the General option from the dialog box that
appears. Choosing General will open up a few more choices and you should
select Existing Projects into Workspace. From here on, will write a
selection like this with square brackets around it to indicate a dialog
box and we use the plus sign to indicate a sub-choice and so importing
this existing project would be written as [ General + Existing
Projects into Workspace ] and is shown graphically in this
screen shot:
After you click , you can use
the button next to the choice to choose the
lesson-bundle directory created above. Don't choose
any of it's subdirectories. After you click ,
you should see a project layout like this in your Eclipse Package
Explorer:
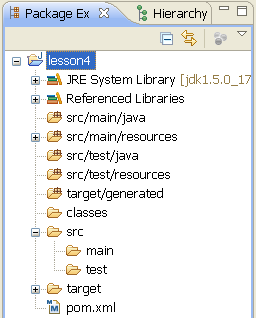
Some things may vary in your particular Eclipse. First,
you may have a slightly different JRE version than shown above. More
important, you must insure that the only two directories that Eclipse
should look in for source code are src/main/java and
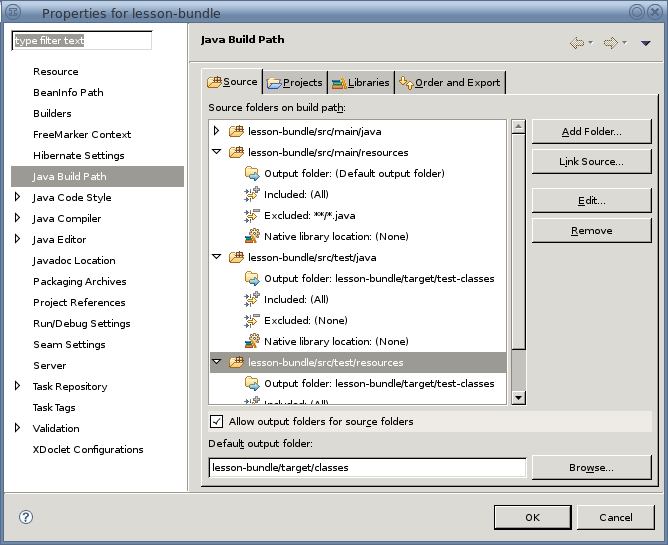
src/test/java. You can correct any errors, such as
those shown above, by using Project > Properties
with lesson-bundle selected as above, and then choosing Java Build Path
and the tab for Source. We write the last command of these as
Java Build Path ->> Source. To remove a source
directory, you should click on it's name in the dialog and then click the
button as is shown below:
We'll start by writing a manifest file for our bundle. Create this
file by selecting the directory
src/main/resources/META-INF in the Package Explorer
and then use File > New > File to create the
new file. It must be named MANIFEST.MF so it can be
found by the container. The contents of this file should be:
Manifest-Version: 1.0
Bundle-ManifestVersion: 1
Bundle-Name: lesson on first bundle, project
Bundle-SymbolicName: org.nuxeo.book.upcoming;singleton:=true
Bundle-Version: 0.0.1
Bundle-Vendor: your name
Nuxeo-Require: org.nuxeo.ecm.core,
 org.nuxeo.ecm.core.schema
Nuxeo-Component: OSGI-INF/schema-contrib.xml,
 OSGI-INF/doctype-contrib.xml,
 OSGI-INF/ui-contrib.xml
If you do not remember what some of
these lines mean you can check back with the previous lesson. The
required bundles for this project are the core ECM capabilities of Nuxeo
and the schema support from the core. [Definition: In Nuxeo, a document
schema is a set of properties that are associated
with a document.] A document can be, and usually is, a
composite of many schemas. We often say "associated" or "attached" when
referring to schemas and their relationship to documents. Most documents
have the dublincore schema attached to them.
dublincore provides a number of basic properties that most
documents need, such as title,
creator, and dateCopyrighted.
(If you would like to read more about the dublin core meta-data
initiative, you can find that information at
http://dublincore.org/.) Since Nuxeo's repository and web
user interface already understand the dublincore schema,
there is no reason for us to duplicate any of these properties. Nuxeo
developers usually write a property and the schema that defined it using
this notation, dublincore:title or using the
schema's abbreviation like this dc:title, and we will do so
in this book.
In a previous lesson on running the Nuxeo 5 server, we suggested some exercises for you to try with the Nuxeo EP Server's web user interface. When you were manipulating the properties of a document, you were actually changing properties of schemas that are shipped with Nuxeo, for example title property of the dublincore schema. Although as a user you think of the web interface as "being" the Nuxeo server, in reality the interface is just a view into in the underlying repository. Writing a program to change a property has exactly the same effect as changing it through the web interface.
Be careful about ordering with your contributions listed on
the Nuxeo-Component line above. They need to
remain in the order shown! There are dependencies between the
contributions: The schema contribution must come before
contributions that reference it, in this case the doctype
contribution, and similarly these a dependency on this ordering
between the doctype and the ui contribution. This is always true
with the Nuxeo-Component line: ordering in this line implies a
dependency and the order the contributions are made.
Another problem that can happen with manifest files is bad formatting. As shown above, you want to have "continued" lines indented by one space from their predecessors. More subtle is to leave a trailing comma at the end of the list of required bundles or the list contributions. If you do so, your bundle will not be loaded properly and you are likely to get an error saying in the log of JBoss/Nuxeo that the bundle cannot be resolved.
The manifest file above says that our bundle will be making three
contributions to extension points. The contributions will all be found
in the OSGI-INF directory of the final
bundle.
In the final bundle schema-contrib.xml will
be located at OSGI-INF/schema-contrib.xml but in
the Eclipse project it is located at
src/main/resources/OSGI-INF/schema-contrib.xml.
As before, create this file using File > New >
File with the OSGI-INF directory
selected and name the file as shown in the manifest file. The ability
to add your own meta-data to documents is a key ingredient of the
power of the Nuxeo platform. The contribution is as follows:
<?xml version="1.0"?>
<component name="org.nuxeo.book.upcoming.schema">
  <extension target="org.nuxeo.ecm.core.schema.TypeService" point="schema">
    <schema name="upcoming" src="schemas/upcoming.xsd" prefix="up" />
  </extension>
</component>
What is this, no meta-data definition? Not
yet. This is a contribution to the TypeService bundle at
the extension point schema. We have told the
TypeService about our new schema,
upcoming (with a lower case 'u' indicating it is a
schema) and we have told the extension point where to read the
definition, the file schemas/upcoming.xsd. This
file name is relative to the root directory of the bundle, so the path
in the final bundle would be schemas/upcoming.xsd
and in the Eclipse project
src/main/resources/schemas/upcoming.xsd. The
final part of the schema tag creates
namespace for our schema so we can refer to a
property foo of our schema as
up:foo (more on namespaces in just a
moment).
To actually define the fields of meta-data for upcoming, create
the file src/main/resources/schemas/upcoming.xsd
in Eclipse and use this content:
<?xml version="1.0"?>
<xs:schema xmlns:xs="http://www.w3.org/2001/XMLSchema"
  targetNamespace="http://nuxeo.org/schemas/upcoming/"
  xmlns:up="http://nuxeo.org/schemas/upcoming/">

  <xs:element name="occursOn" type="xs:dateTime" />
  <xs:element name="presenter" type="xs:string" />

</xs:schema>
If you have experience working with XML, you'll recognize this
as an XSD or XML Schema Descriptor. Whether or
not you have experience with XML, be sure to note that this file is
not a contribution to an extension point! If it
were a contribution, it would have been referenced in the
MANIFEST.MF file in the
Nuxeo-Component line! The first tag,
xs:schema is to define the XML namespace used by our
schema. We defined this in the schema contribution file as "up" and it
is good practice that they match (both use "up" in our example files)
and that targetNamespace attribute point to a URL that uniquely
identifies the schema. The critical nodes in this file are the two
xs:element nodes that define our meta-data's field names,
occursOn and presenter, and the
data type of each of our new fields.
So, we now are beginning to see how an Upcoming
document type might be used! We can set the date and time that the
event occurs, upcoming:occursOn, and we can set who
(or what organization) is going to be presenting the event,
upcoming:presenter. These values might be something
like 'Feb-2-2015-19:00:00' and 'the Rolling Stones',
respectively.
Create the doctype-contrib.xml file the
same way as our previous contribution to the schema
extension point. Here is the content of
doctype-contrib.xml:
<?xml version="1.0"?>
<component name="org.nuxeo.book.upcoming.doctype">
  <extension target="org.nuxeo.ecm.core.schema.TypeService" point="doctype">
    <doctype name="Upcoming" extends="Document">
      <schema name="common" />
      <schema name="dublincore" />
      <schema name="upcoming" />
      <schema name="file" />
      <schema name="uid" />
      <facet name="Commentable" />
      <facet name="Versionable" />
      <facet name="Indexable" />
    </doctype>
  </extension>
</component>
At this point, all the details of this file
are not critical, but there are a couple of things to notice. First,
the extension point doctype in the Nuxeo-supplied
bundle TypeService is the same bundle as in the previous
section, but a different extension point. This extension point is
being advertised for creating new document types and we are
contributing the new type Upcoming to this extension
point (we use an uppercase 'U' for the document type). This document
type is a composite of a number of different schemas, including the
dublincore schema we discussed before. Another part of
the Upcoming document type is the schema upcoming that we
defined just a moment ago (with the lower case 'u'); this new schema
is where we can add our own meta-data to the document. The facets
shown in this example indicate to the extension point that we would
like some of the standard functionality for manipulating documents in
the UI, such as the ability to add comments and have many versions of
the document.
In some configurations of Eclipse, creating a new XML or XSD file causes Eclipse to try to use a "pretty" editor rather than just allowing you to edit the file's text. You can tell if you are in this state if, when you create a new XML file, you see something like this in your Eclipse editor.
The document is empty.
Right mouse click here to insert content.
Although this type of "structural" editor is nice in some circumstances, it is important for these lessons that you edit the "raw" XML source code. You can always access this in eclipse by using the tabs at the bottom of the editor. Try clicking on the one labelled to edit text normally.
This contribution is one that is not strictly required to create
a new type of document with its own meta-data fields. This
contribution, though, is necessary if you want to have the
satisfaction of seeing your new datatype through
the web UI of Nuxeo. It should not come as a surprise, after some
thought, that a system as large and configurable as Nuxeo's ECM
solution will place some small burdens on new document types to "play
nicely" within the Nuxeo system. We will contribute the minimal amount
to the user interface that is possible and still be able to see our
Upcoming events. You should create this file in the same
way as the other contributions, in the OSGI-INF
directory:
<?xml version="1.0"?>
<component name="org.nuxeo.book.upcoming.ui">
  <extension target="org.nuxeo.ecm.platform.types.TypeService" point="types">

    <type id="Upcoming">
      <label>Upcoming Event</label>
      <default-view>view_documents</default-view>
      <layouts mode="any">
        <layout>heading</layout>
        <layout>file</layout>
      </layouts>
    </type>

    <type id="Workspace">
      <subtypes>
        <type>Upcoming</type>
      </subtypes>
    </type>

  </extension>
</component>
There are two "contributions" to the
type extension point of the
TypeService in this file. If you have been paying close
attention, you will have noticed that we have now used three different
extension points (types, schema,
and doctype) of the TypeService; no
surpise, since our objective in this lesson was to create a new
document type! The two contributions in the
ui-contrib.xml declare two different things.
First, that the type (more directly, the document
type) Upcoming has some display properties such as a
textual label, "Upcoming Event." We will discuss views and layouts in
an upcoming lesson, but for now you can assume that we are selecting
some default output choices so that an Upcoming document
will look like other file types you have seen in the web UI of
Nuxeo.
The latter declaration concerns the Workspace document type that you first encountered when you were exploring the Nuxeo UI in a previous lesson. In effect, this declaration says that an Upcoming document is a "subtype" of Workspace. The effect of this declaration is that workspaces can contain upcoming events as you view them on the web. This is an important property: based on this declaration about the type relationship between Upcoming and Workspace, an upcoming event cannot be seen, for example, within a Folder in the Nuxeo UI.
There is another file that must be placed in
the OSGI-INF directory, although it is not a contribution to any
extension point. This file must be named
deployment-fragment.xml and it describes activities
that the container needs to perform when the bundle is loaded. A
deployment fragment might, for example, install various files in
directories so that they can be used by other contributions or java code
in the the bundle. For this simple bundle, one need only declare that we
are a module and part of the larger (Nuxeo EP Server)
application:
<?xml version="1.0"?>
<fragment>
  <extension target="application#MODULE">
    <module>
      <java>${bundle.fileName}</java>
    </module>
  </extension>
</fragment>
This nomenclature is really confusing: We have bundles, components, plugins, extensions, and now modules. Why so many?
With all that we have covered in this section you should now have
eight six files in your Eclipse project. The
MANIFEST.MF file is in the
META-INF directory and points at three other files,
these three contributions to extension points are in
OSGI-INF and all end in
-contrib.xml, the deployment fragment is also in
OSGI-INF, and the crucial file for all this work,
upcoming.xsd, is alone in the
schemas directory and referred to by the
schema-contrib.xml contribution. It is worth noting
that only the deployment-fragment.xml and
MANIFEST.MF have strictly specified filenames in
the bundle by the Nuxeo infrastructure. These are specified because
these files these must be found without any help by Nuxeo as the bundle
is loaded. All the other files are found by reading the filenames from
other files.
Since this lesson requires no java code, you do not need to use Eclipse to compile your code code-or test it. We will return to the command line to build and install the bundle with Maven. To compile the files into a bundle:
iansmith@Photo /nuxeo/workspace/lesson-bundle
$ mvn clean install
This mvn command cleans up from any previous build and builds the resulting jar file into the target directory. As Maven runs, you should see Maven inform you that there are no java files to compile and no tests to run. (These come in a future lesson!) After doing its job you should see the usual Maven success message, something like this:
[INFO] ------------------------------------------------------------------------
[INFO] BUILD SUCCESSFUL
[INFO] ------------------------------------------------------------------------
[INFO] Total time: 23 seconds
[INFO] Finished at: Wed Jan 21 21:25:29 EST 2009
[INFO] Final Memory: 28M/50M
[INFO] ------------------------------------------------------------------------
You can now copy the bundle into your installation of Nuxeo 5 EP
server and restart the server, as shown below. (If your server is
currently running, you should shut it down first using one of the scripts
in the bin directory of
NuxeoServer.)
[/nuxeo/workspace/lesson-bundle]
$ cp target/lesson-bundle-0.0.1.jar /nuxeo/tools/NuxeoEP5/NuxeoServer/server/default/deploy/nuxeo.ear/plugins/

[/nuxeo/workspace/lesson-bundle]
$ cd /nuxeo/tools/NuxeoEP5/NuxeoServer/

[/nuxeo/tools/NuxeoEP5/NuxeoServer]
$ bin/run.sh
The first command above copies the output of the maven build
process, called lesson-bundle-0.0.1.jar, into the
designated area for "plugins" (a.k.a. user-written bundles) to the Nuxeo
system.
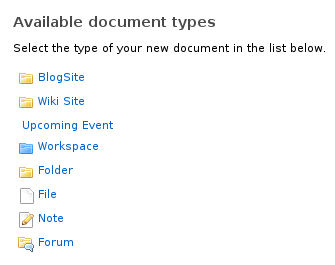
Once the server starts up (the 2nd and 3rd commands above), log in is Administrator and go to the section of the interface for Workspaces. If you do not have any workspaces, you should create one-the name doesn't matter-using the button. Click on any workspace and then click the button (its under the tab) and you should see some choices for document types like this:
Success! If you go ahead and try to create one of these documents you will not notice anything different from creating any other type of file. You will have to trust the authors that, in fact, there are some extra meta-data fields associated an Upcoming Event and that these can be changed and searched for. You will see these for yourself soon enough. We have yet to tell Nuxeo much about how we want the UI to look, we did not even specify an icon for the Upcoming Event type shown above, so it appears out of "alignment" with the other document types. Improving the UI to this new document type might make for an interesting lesson...
If you return to the listing of the workspace you created the upcoming event in, you will see the upcoming event listed in the contents of the workspace with the title you have supplied. You should see a display in the workspace content something like this:
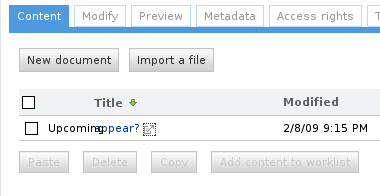
At this point, you have created a new document type with new fields that are specific to your application! Don't worry, we'll fix the problem with the crowded display shortly. The strange display is caused because we made the programming error (!) of not teaching you yet how to include an icon for the type Upcoming.
Allow Upcoming documents to be created inside Folders as well as Workspaces. Verify that this works properly through the UI by creating a Folder inside a Workspace and then an Upcoming document in the Folder.
Add another meta-data field to the Upcoming document, the admissionPrice field. This field should be a floating point value.