Manuel de Configuration de la POSBox
Pré-requis
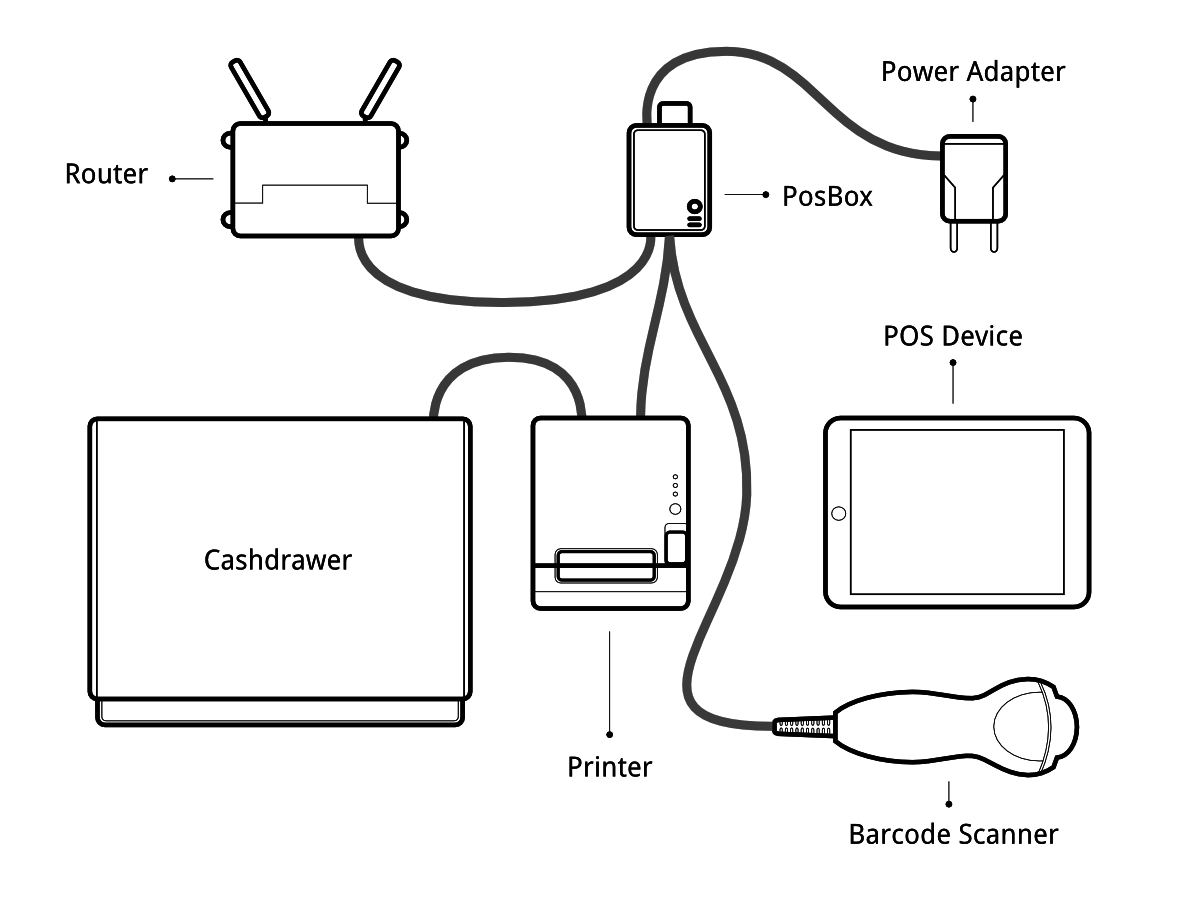
Avant de commencer à configurer votre POSBox, assurez-vous de tout avoir à disposition. Vous avez besoin de :
La POSBox
Un adaptateur secteur A2
Un ordinateur ou une tablette avec un navigateur web à jour
Une instance Saas ou Odoo avec le Point de Ventes installé
Un réseau local configuré avec DHCP (c'est le réglage par défaut)
Un câble Ethernet RJ45 ou un adaptateur Wi-Fi compatible Linux
- An Epson USB TM-T20 Printer or another ESC/POS compatible printer (officially supported printers are listed at the POS Hardware page)
Un scanner code à barre USB Eclipse Honeywell ou tout autre scanner compatible
Un tiroir-caisse compatible Epson
Guide d'installation pas à pas
Version courante de la POSbox (depuis 2015)

Connecter des périphériques
La liste officielle du matériel compatible est disponible sur la page de spécifications matérielles du POS, Bien qu'un matériel non-listé puisse tout aussi bien fonctionner.
Imprimante: Connectez une imprimante ESC/POS à un port USB et mettez la en marche.
Tiroir caisse: Le tiroir caisse devrait être connecté à l'imprimante avec un cable RJ25.
Scanner code à barres: Connectez votre scanner de code à barres. Pour que votre scanner puisse être compatible, il doit se comporter comme un clavier et être configuré en US QWERTY. Il doit également terminer les codes à barres par le caractère Entrer (keycode 28). Il s'agit le plus souvent de la configuration par défaut de votre scanner de code à barres.
Balance: Connectez votre balance électronique et mettez la en marche.
Ethernet: Si vous ne souhaitez pas utiliser le Wi-Fi, branchez le câble Ethernet. Assurez-vous de connecter la POSBox sur le même réseau que votre périphérique PdV.
- Wi-Fi: If you do not wish to use Ethernet, plug in a Linux compatible USB Wi-Fi adapter. Most commercially available Wi-Fi adapters are Linux compatible. Officially supported are Wi-Fi adapters with a Ralink 5370 chipset. Make sure not to plug in an Ethernet cable, because all Wi-Fi functionality will be bypassed when a wired network connection is available.
Power the POSBox
Connecter l'adaptateur secteur à la POSBox, une led rouge brillante devrait s'allumer.
Veuillez vérifier que la POSBox est prête
Une fois alimentée, la POSBox requière un peu de temps avant de démarrer. Une fois que la POSBox est prête, une étiquette indiquant son statut et son adresse IP devrait s'imprimer. La LED qui se trouve juste à côté de la LED rouge d'alimentation devrait alors s'allumer de façon permanente en vert.
Configurer le Point de Ventes
To setup the POSBox in the Point of Sale go to and select your Point of
Sale. Scroll down to the Hardware Proxy / POSBox section and
activate the options for the hardware you want to use through the
POSBox. Specifying the IP of the POSBox is recommended (it is printed
on the receipt that gets printed after booting up the POSBox). When
the IP is not specified the Point of Sale will attempt to find it on
the local network.
If you are running multiple Point of Sales on the same POSBox, make sure that only one of them has Remote Scanning/Barcode Scanner activated.
It might be a good idea to make sure the POSBox IP never changes in your network. Refer to your router documentation on how to achieve this.
Launch the Point of Sale
If you didn't specify the POSBox's IP address in the configuration, the POS will need some time to perform a network scan to find the POSBox. This is only done once.
Le Point de Ventes est désormais connecté à la POSBox et votre matériel est prêt à être utilisé.
Configuration Wi-Fi
The POSBox is Wi-Fi-capable. In order to use it you'll need a Linux compatible USB Wi-Fi adapter. Most commercially available Wi-Fi adapters are Linux compatible. Officially supported are Wi-Fi adapters with a Ralink 5370 chipset.
Assurez-vous que le câble Ethernet n'est pas connecté car toute fonctionnalité relative au Wi-Fi est désactivée si une connexion filaire est détectée.
Lorsque la POSBox démarre avec un adaptateur Wi-Fi, son propre point d'accès Wi-Fi -nommé "Posbox"- est proposé et sur lequel vous pouvez-vous connecter. L'étiquette qui est imprimée au démarrage de la POSBox l'indiquera. Avant de connecter la POSBox à un réseau existant, aller à la page d'accueil de la POSBox (adresse indiquée sur l'étiquette) et aller sur la page de configuration Wi-Fi. Sur cette page vous pouvez sélectionner le réseau sur lequel vous souhaiter vous connecter. Veuillez noter que nous ne supportons que les réseaux de type "open" et WPA(2)-PSK. Renseignez le mot de passe si vous vous connectez à un réseau sécurisé WPA. La POSBox essaiera de se connecter au réseau sélectionné et imprimer une nouvelle étiquette avec ses nouveaux paramètres.
If you plan on permanently setting up the POSBox with Wi-Fi, you can use the "persistent" checkbox on the Wi-Fi configuration page when connecting to a network. This will make the network choice persist across reboots. This means that instead of starting up its own "Posbox" network it will always attempt to connect to the specified network after it boots.
When the POSBox fails to connect to a network it will fall back to starting it's own "Posbox" Access Point. If connection is lost with a Wi-Fi network after connecting to it, the POSBox will attempt to re-establish connection automatically.
Multi-POS Configuration
The advised way to setup a multi Point of Sale shop is to have one POSBox per Point of Sale. In this case it is mandatory to manually specify the IP address of each POSBox in each Point of Sale. You must also configure your network to make sure the POSBox's IP addresses don't change. Please refer to your router documentation.
POSBoxless Guide (advanced)
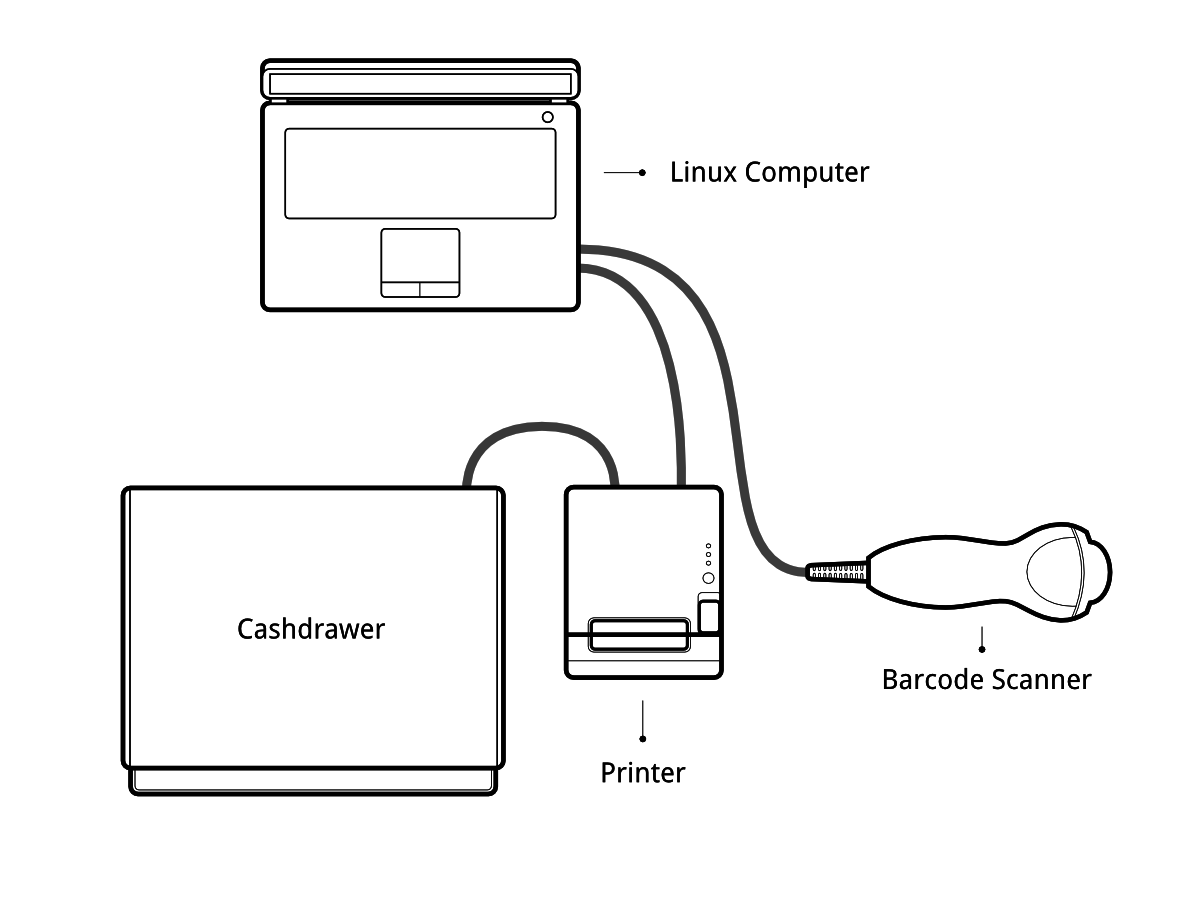
If you are running your Point of Sale on a Debian-based Linux distribution, you do not need the POSBox as you can run its software locally. However the installation process is not foolproof. You'll need at least to know how to install and run Odoo. You may also run into issues specific to your distribution or to your particular setup and hardware configuration.
Drivers for the various types of supported hardware are provided as Odoo modules. In fact, the POSBox runs an instance of Odoo that the Point of Sale communicates with. The instance of Odoo running on the POSBox is very different from a 'real' Odoo instance however. It does not handle any business data (eg. POS orders), but only serves as a gateway between the Point of Sale and the hardware.
The goal of this section will be to set up a local Odoo instance that behaves like the Odoo instance running on the POSBox.
Image building process
We generate the official POSBox images using the scripts in
https://github.com/odoo/odoo/tree/8.0/addons/point_of_sale/tools/posbox. More
specifically, we run
posbox_create_image.sh.
This builds an image
called posbox.img, which we zip and upload to nightly.odoo.com
for users to download.
The scripts in this directory might be useful as a reference if you get stuck or want more detail about something.
Summary of the image creation process
The image creation process starts by downloading the latest Raspbian image. It then locally mounts this Raspbian image and copies over some files and scripts that will make the Raspbian image turn itself into a POSBox when it boots. These scripts will update Raspbian, remove non-essential packages and install required packages. In order to boot Raspbian we use qemu, which is capable of providing ARM emulation. After this, the emulated Raspbian OS will shut itself down. We then once again locally mount the image, remove the scripts that were used to initialize the image at boot and we copy over some extra configuration files. The resulting image is then ready to be tested and used.
Pré-requis
- A Debian-based Linux distribution (Debian, Ubuntu, Mint, etc.)
- A running Odoo instance you connect to to load the Point of Sale
- You must uninstall any ESC/POS printer driver as it will conflict with Odoo's built-in driver
Guide d'installation pas à pas
Extra dependencies
Because Odoo runs on Python 2, you need to check which version of pip you need to use.
# pip --version
If it returns something like:
pip 1.5.6 from /usr/local/lib/python3.3/dist-packages/pip-1.5.6-py3.3.egg (python 3.3)
You need to try pip2 instead.
If it returns something like:
pip 1.4.1 from /usr/lib/python2.7/dist-packages (python 2.7)
Vous pouvez utiliser pip.
The driver modules requires the installation of new python modules:
# pip install pyserial
# pip install pyusb==1.0.0b1
# pip install qrcode
Droits d'accès
The drivers need raw access to the printer and barcode scanner devices. Doing so requires a bit system administration. First we are going to create a group that has access to USB devices
# groupadd usbusers
Then we add the user who will run the OpenERP server to usbusers
# usermod -a -G usbusers USERNAME
Then we need to create a udev rule that will automatically allow members
of usbusers to access raw USB devices. To do so create a file called
99-usbusers.rules in the /etc/udev/rules.d/ directory with the
following content:
SUBSYSTEM=="usb", GROUP="usbusers", MODE="0660"
SUBSYSTEMS=="usb", GROUP="usbusers", MODE="0660"
Then you need to reboot your machine.
Start the local Odoo instance
We must launch the Odoo server with the correct settings
$ ./odoo.py --load=web,hw_proxy,hw_posbox_homepage,hw_posbox_upgrade,hw_scale,hw_scanner,hw_escpos
Test the instance
Plug all your hardware to your machine's USB ports, and go to
http://localhost:8069/hw_proxy/status refresh the page a few times and
see if all your devices are indicated as Connected. Possible source of
errors are: The paths on the distribution differ from the paths expected
by the drivers, another process has grabbed exclusive access to the
devices, the udev rules do not apply or a superseded by others.
Automatically start Odoo
You must now make sure that this Odoo install is automatically started after boot. There are various ways to do so, and how to do it depends on your particular setup. Using the init system provided by your distribution is probably the easiest way to accomplish this.
Configurer le Point de Ventes
The IP address field in the POS configuration must be either
127.0.0.1 or localhost if you're running the created Odoo
server on the machine that you'll use as the Point of Sale device. You
can also leave it empty.
POSBox Technical Documentation
Technical Overview
The POSBox Hardware
The POSBox's Hardware is based on a Raspberry Pi 2, a popular single-board computer. The Raspberry Pi 2 is powered with a 2A micro-usb power adapter. 2A is needed to give enough power to the barcode scanners. The Software is installed on a 8Gb Class 10 or Higher SD Card. All this hardware is easily available worldwide from independent vendors.
Périphériques compatibles
Officially supported hardware is listed on the POS Hardware page.
Le logiciel de la POSBox
The POSBox runs a heavily modified Raspbian Linux installation, a
Debian derivative for the Raspberry Pi. It also runs a barebones
installation of Odoo which provides the webserver and the drivers. The
hardware drivers are implemented as Odoo modules. Those modules are
all prefixed with hw_* and they are the only modules that are
running on the POSBox. Odoo is only used for the framework it
provides. No business data is processed or stored on the POSBox. The
Odoo instance is a shallow git clone of the 8.0 branch.
The root partition on the POSBox is mounted read-only, ensuring that
we don't wear out the SD card by writing to it too much. It also
ensures that the filesystem cannot be corrupted by cutting the power
to the POSBox. Linux applications expect to be able to write to
certain directories though. So we provide a ramdisk for /etc and /var
(Raspbian automatically provides one for /tmp). These ramdisks are
setup by setup_ramdisks.sh, which we run before all other init
scripts by running it in /etc/init.d/rcS. The ramdisks are named
/etc_ram and /var_ram respectively. Most data from /etc and /var is
copied to these tmpfs ramdisks. In order to restrict the size of the
ramdisks, we do not copy over certain things to them (eg. apt related
data). We then bind mount them over the original directories. So when
an application writes to /etc/foo/bar it's actually writing to
/etc_ram/foo/bar. We also bind mount / to /root_bypass_ramdisks to be
able to get to the real /etc and /var during development.
Logs of the running Odoo server can be found at:
/var/log/odoo/odoo.log
Various POSBox related scripts (eg. wifi-related scripts) running on
the POSBox will log to /var/log/syslog and those messages are tagged
with posbox_*.
Accessing the POSBox
Accès local
If you plug a QWERTY USB keyboard into one of the POSBox's USB ports, and if you connect a computer monitor to the HDMI port of the POSBox, you can use it as a small GNU/Linux computer and perform various administration tasks, like viewing some logs.
The POSBox will automatically log in as root on the default tty.
Accès distant
If you have the POSBox's IP address and an SSH client you can access
the POSBox's system remotely. The login credentials are
pi/raspberry.
Updating The POSBox Software
Only upgrade the POSBox if you experience problems or want to use newly implemented features.
The best way to update the POSBox software is to download a new version of the image and flash the SD-Card with it. This operation is described in detail in this tutorial, just replace the standard Raspberry Pi image with the latest one found at the official POSBox image page. This method of upgrading will ensure that you're running the latest version of the POSBox software.
The second way of upgrading is through the built in upgrade interface that can be reached through the POSBox homepage. The nice thing about upgrading like this is that you don't have to flash a new image. This upgrade method is limited to what it can do however. It can not eg. update installed configuration files (like eg. /etc/hostapd.conf). It can only upgrade:
- The internal Odoo application
- Scripts in the folder
odoo/addons/point_of_sale/tools/posbox/configuration/
When in doubt, always use the first method of upgrading.
Problèmes
Le POS ne se connecte pas à la POSBox
La façon la plus simple de savoir si la POSBox est correctement configurée est de la démarrer avec une imprimante connectée. Cela va imprimer un reçu indiquant toute erreur le cas échéant ou l'adresse IP de la POSBox en cas de succès. Si aucun reçu n'est imprimé, procédez aux étapes suivantes:
Assurez-vous que la POSBox est allumée, indiquée par une LED rouge.
Assurez-vous que la POSBox est prête, cela est indiqué par une LED verte juste à coté de la LED rouge. La POSBox devrait être prête environ 2 minutes après le démarrage.
Assurez-vous que la POSBox est connectée au même réseau que votre POS. Le POS et la POSBox doivent tout deux être visibles dans la liste des appareils connectés sur votre réseau.
Assurez-vous que votre LAN est configurée en DHCP and donne une adresse IP parmi 192.168.0.X, 192.168.1.X, 10.0.0.X. Si vous ne pouvez pas configurer votre LAN de cette façon, vous devez manuellement assigner une adresse IP à la POSBox.
Si vous avez spécifié l'adresse IP de la POSBox dans la configuration, assurez-vous qu'elle corresponde à l'adresse imprimée sur le reçu de status imprimé au démarrage.
Assurez-vous que la page du POS n'est pas chargé en HTTPS.
La fonctionnalité de découverte automatique peut ne pas fonctionner dans Firefox. Nous conseillons de spécifier l'adresse IP de la POSBox dans la configuration du point de vente par sécurité.
Le scanner de code barre ne fonctionne pas correctement
Le scanner doit être configuré en US QWERTY et doit émettre un caractère ENTER après chaque code barre scanné. C'est la configuration par défaut sur la plupart des scanners. Vérifiez le manuel du scanner pour plus d'information.
La POSBox a besoin d'une alimentation 2A pour fonctionner avec certains scanners. Si vous n'utilisez pas l'alimentation fournie avec la POSBox, assurez-vous d'avoir assez de courant.
Certains scanners vont demander plus de 2A et ne fonctionneront pas or de façon instable, même avec l'alimentation fournie. Dans ce cas, vous devrez utiliser une alimentation externe pour le scanner.
Des scanners bon marché ne sont pas détectés comme un scanner de code barre mais comme un clavier USB. Ceux-ci ne fonctionneront pas avec la POSBox.
The Barcode Scanner is not working reliably
- Make sure that no more than one device with 'Scan via Proxy'/'Barcode Scanner' enabled are connected to the POSBox at the same time.
Printing the receipt takes too much time
- A small delay before the first print is expected, as the POSBox will do some preprocessing to speed up the next printings. If you suffer delays afterwards it is most likely due to poor network connection between the POS and the POSBox.
Some characters are not correctly printed on the receipt
- The POSBox does not support all languages and characters. It currently supports Latin and Cyrillic based scripts, with basic Japanese support.
The printer is offline
- Make sure the printer is connected, powered, has enough paper and has its lid closed, and is not reporting an error. If the error persists, please contact support.
The cashdrawer does not open
- The cashdrawer should be connected to the printer and should be activated in the POS configuration.
Crédits
Le projet POSBox à été développé par Frédéric van der Essen avec l'aide amicale de Gary Malherbe, Fabien Meghazi, Nicolas Wisniewsky, Dimitri Del Marmol, Joren Van Onder and Antony Lesuisse.
Ce développement n'aurait pas été possible sans la campagne Indiegogo et ceux qui y ont contribué. Remerciements particuliers aux partenaires qui ont soutenu la campagne ainsi que l'ensemble des partenaires fondateurs:
- Camptocamp
- BHC
- openBig
- Eeezee-IT
- Solarsis LDA
- ACSONE
- Vauxoo
- Ekomurz
- Datalp
- Dao Systems
- Eggs Solutions
- OpusVL
And also the partners who've backed the development with the Founding POSBox Bundle:
- Willow IT
- E. Akhalwaya & Sons
- Multibase
- Mindesa
- bpso.biz
- Shine IT.