Table of Contents
In this tutorial, you create a fully-functional phonebook application. The application displays a list of contacts and allows you to add, modify, and delete existing contacts.
-
In the first part of this tutorial, you use a static XML document as the data source.
-
In the second part of this tutorial, you use a relational database as the data source.
Displaying data in an OpenLaszlo application involves two major steps:
-
Defining a dataset
-
Binding data to user interface components
Example 38.1. Defining a dataset: phonebook.lzx
<canvas height="50" width="700" bgcolor="#D4D0C8">
  <dataset name="dset">
    <phonebook>
      <contact category="friends">
        <firstName>John</firstName>
        <lastName>Smith</lastName>
        <phone>617-536-7855</phone>
        <email>[email protected]</email>
      </contact>
    </phonebook>
  </dataset>
  <view name="list">
    <simplelayout axis="x"/>
    <!-- 1 -->
    <text datapath="dset:/phonebook/contact/firstName/text()"/>
    <text datapath="dset:/phonebook/contact/lastName/text()"/>
    <text datapath="dset:/phonebook/contact/phone/text()"/>
    <text datapath="dset:/phonebook/contact/email/text()"/>
    <!-- 2 -->
    <text datapath="dset:/phonebook/contact/@category"/>
  </view>
</canvas>
A dataset represents an XML document containing data for the application. A dataset tag can embed the data (like in this example), or point to an external resource as we will discuss later in this tutorial. You can define multiple datasets inside a single application. The dataset is also the cornerstone for OpenLaszlo's data binding API.
The data binding API allows user interface components to be automatically populated with data. For each user interface component, you use the datapath attribute to specify which data the component should display. The value of the datapath attribute is an XPath expression. XPath expressions use a simple URL-like notation to navigate through the hierarchical structure of an XML document. The expression is made of the name of the dataset, followed by a colon and the path to the desired tag. You use /text() to display the data value of a tag (comments 1 to 2), or @attribute_name to display the value of a tag attribute (comment 2).
To make your code easier to read and maintain, you can bind a container view to a particular node and then bind the user interface components inside the view using a relative address.
<view name="list" datapath="dset:/phonebook/contact">
  <simplelayout axis="x"/>
  <text datapath="firstName/text()"/>
  <text datapath="lastName/text()"/>
  <text datapath="phone/text()"/>
  <text datapath="email/text()"/>
  <text datapath="@category"/>
</view>
Laszlo makes it easy to manipulate and display multiple rows of data. If the XPath expression points to more than one node in the XML document, bound user interface components are repeated for each node.
Example 38.2. binding data to views
<canvas height="50" width="700" bgcolor="#D4D0C8">
  <dataset name="dset">
    <phonebook>
      <contact category="friends">
        <firstName>John</firstName>
        <lastName>Smith</lastName>
        <phone>617-536-7855</phone>
        <email>[email protected]</email>
      </contact>
      <contact category="business">
        <firstName>Mary</firstName>
        <lastName>Jones</lastName>
        <phone>415-534-1186</phone>
        <email>[email protected]</email>
      </contact>
      <contact category="friends">
        <firstName>Lisa</firstName>
        <lastName>Brown</lastName>
        <phone>212-423-1132</phone>
        <email>[email protected]</email>
      </contact>
    </phonebook>
  </dataset>
  <simplelayout axis="y"/>
  <view name="list" datapath="dset:/phonebook/contact">
    <simplelayout axis="x"/>
    <!-- 1 -->
    <text datapath="firstName/text()"/>
    <text datapath="lastName/text()"/>
    <text datapath="phone/text()"/>
    <text datapath="email/text()"/>
    <text datapath="@category"/>
  </view>
</canvas>
XPath also supports a one-based index notation to limit the number of nodes retrieved by an expression. You can experiment with the following XPath expressions for the datapath attribute of the list view (comment 1).
| XPath expresssion | Result |
|---|---|
dset:/phonebook/contact |
All the contact nodes |
dset:/phonebook/contact[1] |
First contact node only |
dset:/phonebook/contact[2-3] |
Contact nodes 2 to 3 |
dset:/phonebook/contact[2-] |
Contact nodes 2 and onwards |
dset:/phonebook/contact[-2] |
Contact nodes up to and including 2 |
At this point, the data for the phonebook application is embedded in the application source code. This is appropriate for static information that is not reused across applications. However, in most cases, externalizing the data from the application source code is a better approach.
First, we create an XML document called phonebook.xml containing the data for the phonebook application:
phonebook.xml:
<phonebook>
  <contact firstName="John" lastName="Smith" phone="617-536-7855"
           email="[email protected]"/>
  <contact firstName="Lisa" lastName="Jones" phone="415-225-8743"
           email="[email protected]"/>
  <contact firstName="Mary" lastName="Brown" phone="212-665-5211"
           email="[email protected]"/>
</phonebook>
We can now remove the data from the source code of the phonebook application, and make the dataset point to the phonebook.xml file:
Example 38.3. using an external dataset
<canvas height="50" width="700" bgcolor="#D4D0C8">
  <dataset name="dset" src="../phonebook.xml"/>
  <simplelayout axis="y"/>
  <view name="list" datapath="dset:/phonebook/contact">
    <simplelayout axis="x"/>
    <text datapath="@firstName"/>
    <text datapath="@lastName"/>
    <text datapath="@phone"/>
    <text datapath="@email"/>
  </view>
</canvas>
![[Note]](images/note.png) |
Note |
|---|---|
|
Due to a limitation of the OpenLaszlo documentation system, relative paths to referenced files (for example, ../phonebook.xml) are problematic in example programs. Examples that work inline don't work when you edit them. This is because when you press "edit" on an example in the documentation, a new instance of the example program is created. This new instance is in a different spot than the original, so relative paths are incorrect, and the example breaks. A work around for editing examples like the above is to copy and paste the example and any supporting files to your working environment. |
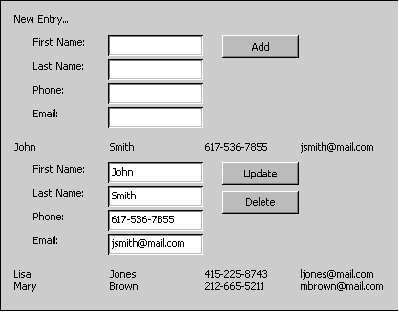
At this point, the phonebook application is only capable of displaying a list of contacts. In this section, we add update and delete capabilities to the application (we will take care of inserting new contacts later in this tutorial). The first step is to provide the application with a data input view (comment 2 to 3) that allows users to modify or delete a contact. By default, we make the view invisible. The onclick event defined for the list view (comment 1) works as a toggle to display/hide the updateContact view when a contact is clicked.
Example 38.4. using <onclick> method to update data
<canvas height="200" width="700" bgcolor="#D4D0C8">
  <dataset name="dset" src="../phonebook.xml"/>
  <simplelayout axis="y"/>
  <view datapath="dset:/phonebook/contact">
    <simplelayout axis="y"/>
    <!-- 1 -->
    <view name="list"
          onclick="parent.updateContact.setVisible(!parent.updateContact.visible);">
      <simplelayout axis="x"/>
      <text datapath="@firstName"/>
      <text datapath="@lastName"/>
      <text datapath="@phone"/>
      <text datapath="@email"/>
    </view>
    <view name="updateContact" visible="false" x="20" height="120">
      <text y="10">First Name:</text>
      <!-- 2 -->
      <edittext name="firstName" datapath="@firstName" x="80" y="10"/>
      <text y="35">Last Name:</text>
      <edittext name="lastname" datapath="@lastName" x="80" y="35"/>
      <text y="60">Phone:</text>
      <edittext name="phone" datapath="@phone" x="80" y="60"/>
      <text y="85">Email:</text>
      <edittext name="email" datapath="@email" x="80" y="85"/>
      <button width="80" x="200" y="10">Update
        <!-- 2a -->
        <handler name="onclick">
            parent.parent.datapath.updateData();
        </handler>
      </button>
      <button width="80" x="200" y="40">Delete
        <!-- 2b -->
        <handler name="onclick">
            parent.parent.datapath.deleteNode();
        </handler>
      </button>
      <!-- 3 -->
    </view>
  </view>
</canvas>
To update a dataset based on information entered in bound user interface components, you invoke the updateData() method on the datapath object (comment 2a). updateData() simply copies the data from the bound user interface components back to the dataset.
Before looking at how a datapointer can be used to add a node to a dataset, we set up the user interface to allow the user to enter a new contact.
Example 38.5. UI for adding new contact
<canvas height="400" width="700" bgcolor="#D4D0C8">
  <dataset name="dset" src="../phonebook.xml"/>
  <simplelayout axis="y"/>
  <view>
    <simplelayout axis="y"/>
    <!-- 1 -->
    <text onclick="parent.newContact.setVisible(!parent.newContact.visible);">New Entry...</text>
    <!-- 2 -->
    <view name="newContact" datapath="new:/contact"
          visible="false" x="20" height="120">
      <text y="10">First Name:</text>
      <edittext name="firstName" datapath="@firstName" x="80" y="10"/>
      <text y="35">Last Name:</text>
      <edittext name="lastname" datapath="@lastName" x="80" y="35"/>
      <text y="60">Phone:</text>
      <edittext name="phone" datapath="@phone" x="80" y="60"/>
      <text y="85">Email:</text>
      <edittext name="email" datapath="@email" x="80" y="85"/>
      <button width="80" x="200" y="10">Add
        <handler name="onclick">
          parent.parent.datapath.updateData();
        </handler>
      </button>
    </view>
    <!-- 3 -->
  </view>
  <view datapath="dset:/phonebook/contact">
    <simplelayout axis="y"/>
    <view name="list"
          onclick="parent.updateContact.setVisible(!parent.updateContact.visible);">
      <simplelayout axis="x"/>
      <text datapath="@firstName"/>
      <text datapath="@lastName"/>
      <text datapath="@phone"/>
      <text datapath="@email"/>
    </view>
    <view name="updateContact" visible="false" x="20" height="120">
      <text y="10">First Name:</text>
      <edittext name="firstName" datapath="@firstName" x="80" y="10"/>
      <text y="35">Last Name:</text>
      <edittext name="lastname" datapath="@lastName" x="80" y="35"/>
      <text y="60">Phone:</text>
      <edittext name="phone" datapath="@phone" x="80" y="60"/>
      <text y="85">Email:</text>
      <edittext name="email" datapath="@email" x="80" y="85"/>
      <button width="80" x="200" y="10">Update
        <handler name="onclick">
          parent.parent.datapath.updateData();
        </handler>
      </button>
      <button width="80" x="200" y="40">Delete
        <handler name="onclick">
          parent.parent.datapath.deleteNode();
        </handler>
      </button>
    </view>
  </view>
</canvas>
When the user clicks the "New Entry" text at the top of the contact list (comment 1), the newContact view (comments 2 to 3) is displayed. The newContact view is similar to the updateContact view except that its datapath attribute is set to "new:/contact". This creates a new temporary dataset with an empty contact node.
If you run the application, you will notice that when you click the Add button, the new contact is not added to the list of contacts: we still have to add the new contact node defined in the temporary dataset to the main dataset (dset). We use a datapointer to perform this operation.
A datapointer is a pointer to a specific node in a dataset. You typically use a datapointer when you need to manipulate data programmatically. A datapointer can only point to one node in the dataset at a time, but you can define multiple datapointers, each pointing to a different node in the dataset.
Let's modify the event handler of the Add button with the code required to add the new contact node to the dset dataset:
Example 38.6. Adding a node to a dataset
<handler name="onclick">
  parent.datapath.updateData();
  var dp=canvas.datasets.dset.getPointer();   // 1
  dp.selectChild();                           // 2
  dp.addNodeFromPointer(parent.datapath);     // 3
  parent.setDatapath("new:/contact");         // 4
</handler>
| Comment | Explanation |
|---|---|
| 1 | Obtain a datapointer for the dset dataset |
| 2 | Make the datapointer point to the first child node in dset, which is the <phonebook> tag |
| 3 | Add the new contact node to the phonebook node |
| 4 | reinitialize the datapath for the newContact view |
Example 38.7. Using <onclick> method to add new contact
<canvas height="400" width="700" bgcolor="#D4D0C8">
  <dataset name="dset" src="../phonebook.xml"/>
  <simplelayout axis="y"/>
  <view>
    <simplelayout axis="y"/>
    <!-- 1 -->
    <text onclick="parent.newContact.setVisible(!parent.newContact.visible);">New Entry...</text>
    <!-- 2 -->
    <view name="newContact" datapath="new:/contact"
          visible="false" x="20" height="120">
      <text y="10">First Name:</text>
      <edittext name="firstName" datapath="@firstName" x="80" y="10"/>
      <text y="35">Last Name:</text>
      <edittext name="lastname" datapath="@lastName" x="80" y="35"/>
      <text y="60">Phone:</text>
      <edittext name="phone" datapath="@phone" x="80" y="60"/>
      <text y="85">Email:</text>
      <edittext name="email" datapath="@email" x="80" y="85"/>
      <button width="80" x="200" y="10">Add
        <handler name="onclick">
           parent.datapath.updateData();
           var dp=canvas.datasets.dset.getPointer();
           dp.selectChild();
           dp.addNodeFromPointer(parent.datapath);
           parent.setDatapath("new:/contact");
         </handler>
      </button>
    </view>
    <!-- 3 -->
  </view>
  <view datapath="dset:/phonebook/contact">
    <simplelayout axis="y"/>
    <view name="list"
          onclick="parent.updateContact.setVisible(!parent.updateContact.visible);">
        <simplelayout axis="x"/>
        <text datapath="@firstName"/>
        <text datapath="@lastName"/>
        <text datapath="@phone"/>
        <text datapath="@email"/>
    </view>
    <view name="updateContact" visible="false" x="20" height="120">
      <text y="10">First Name:</text>
      <edittext name="firstName" datapath="@firstName" x="80" y="10"/>
      <text y="35">Last Name:</text>
      <edittext name="lastname" datapath="@lastName" x="80" y="35"/>
      <text y="60">Phone:</text>
      <edittext name="phone" datapath="@phone" x="80" y="60"/>
      <text y="85">Email:</text>
      <edittext name="email" datapath="@email" x="80" y="85"/>
      <button width="80" x="200" y="10">Update
        <handler name="onclick">
          parent.parent.datapath.updateData();
        </handler>
      </button>
      <button width="80" x="200" y="40">Delete
        <handler name="onclick">
          parent.parent.datapath.deleteNode();
        </handler>
      </button>
    </view>
  </view>
</canvas>
As you have probably noticed, most of the code for the newContact view and the updateContact view is identical. This is often a good indicator that there is an opportunity for abstracting generic code in a class. This approach promotes reuse and ensures consistency across the application. In this case we could create a generic contactview class defined as follows:
<class name="contactview" extends="view" visible="false" x="20" height="120">
  <text y="10">First Name:</text>
  <edittext name="firstName" datapath="@firstName" x="80" y="10"/>
  <text y="35">Last Name:</text>
  <edittext name="lastname" datapath="@lastName" x="80" y="35"/>
  <text y="60">Phone:</text>
  <edittext name="phone" datapath="@phone" x="80" y="60"/>
  <text y="85">Email:</text>
  <edittext name="email" datapath="@email" x="80" y="85"/>
</class>
We can now modify the Phonebook application to use the contactview class:
Example 38.8. Using "contactview" class
<canvas height="200" width="700" bgcolor="#D4D0C8" >
  <dataset name="dset" src="../phonebook.xml"/>
  <class name="contactview" extends="view" visible="false" x="20" height="120">
    <text y="10">First Name:</text>
    <edittext name="firstName" datapath="@firstName" x="80" y="10"/>
    <text y="35">Last Name:</text>
    <edittext name="lastname" datapath="@lastName" x="80" y="35"/>
    <text y="60">Phone:</text>
    <edittext name="phone" datapath="@phone" x="80" y="60"/>
    <text y="85">Email:</text>
    <edittext name="email" datapath="@email" x="80" y="85"/>
  </class>
  <simplelayout axis="y"/>
  <view>
    <simplelayout axis="y"/>
    <text onclick="parent.newContact.setVisible(!parent.newContact.visible);">New Entry...</text>
    <contactview name="newContact" datapath="new:/contact">
      <button width="80" x="200" y="10">Add
        <handler name="onclick">
          parent.datapath.updateData();
          var dp=canvas.datasets.dset.getPointer();
          dp.selectChild();
          dp.addNodeFromPointer( parent.datapath );
          parent.setVisible(false);
          parent.setDatapath("new:/contact");
        </handler>
      </button>
    </contactview>
  </view>
  <view datapath="dset:/phonebook/contact">
    <simplelayout axis="y"/>
    <view name="list" onclick="parent.updateContact.setVisible(!parent.updateContact.visible);">
      <simplelayout axis="x"/>
      <text datapath="@firstName"/>
      <text datapath="@lastName"/>
      <text datapath="@phone"/>
      <text datapath="@email"/>
    </view>
    <contactview name="updateContact">
      <button width="80" x="200" y="10">Update
        <handler name="onclick">
          parent.parent.datapath.updateData();
        </handler>
      </button>
      <button width="80" x="200" y="40">Delete
        <handler name="onclick">
          parent.parent.datapath.deleteNode();
        </handler>
      </button>
    </contactview>
  </view>
</canvas>
In the first part of this tutorial, we have explored two approaches to provide data to an OpenLaszlo application:
-
Embedding data in the source code of the application
-
Using an external XML document
The dataset can also point to a server-side script that generates XML dynamically using information coming from a database, a Web service, a legacy system, etc.
In this section of the tutorial, we modify the Phonebook application to work with a database:
-
The list of contacts is retrieved from a database table
-
Update, delete, and insert operations are applied to the database
Laszlo integrates with any server-side technology that is capable of generating XML: Java Servlets, a JavaServer Pages (JSP), CGI scripts, PHP scripts, Active Server Pages (ASP), etc.
In this tutorial we use JavaServer Pages as the server-side technology.
You need a relational database and a JDBC driver to perform this section of the tutorial.
-
Create a table named contact
-
Define four varchar(20) columns named email, first_name, last_name, and phone respectively. If your database does not support the varchar data type, choose any other text-based data type
-
Specify email as the primary key for the contact table
-
Enter some sample data
The first step is to create a JavaServer Page that generates an XML document representing the contacts in the contact table.
getcontacts.jsp:

<%@ page import="java.sql.*"%>
<phonebook>
<%
    Connection connection = null;
    try {
        Class.forName("sun.jdbc.odbc.JdbcOdbcDriver");  // 1
        connection = DriverManager.getConnection("jdbc:odbc:laszlosamples"); // 2
        Statement stmt = connection.createStatement();
        ResultSet rs = stmt.executeQuery("select * from contact");
        while (rs.next()) {
    %>
            <contact firstName="<%= rs.getString("first_name")%>"
                           lastName="<%= rs.getString("last_name")%>"
                           phone="<%= rs.getString("phone")%>"
                           email="<%= rs.getString("email")%>"/>
    <%
        }
    } catch (Exception e) {
        e.printStackTrace();
    } finally {
        try {
            connection.close();
        } catch (SQLException e) {
        }
    }
%>
</phonebook>
In this example, we use Sun's JDBC-ODBC bridge to access the database:
-
Comment 1: replace sun.jdbc.odbc.JdbcOdbcDriver with the JDBC driver you are using.
-
Comment 2: replace jdbc:odbc:laszlosamples with the JDBC URL required by your driver.
Modifying the client application is straight forward. You modify the dataset tag attributes as follows:
<dataset name="dset" src="getcontacts.jsp" request="true" type="http"/>
| Attribute | Explanation |
|---|---|
src="getcontacts.jsp" |
A fully qualified or relative URL to the server-side program that generates the XML document |
request="true" |
Indicates that the request should be submitted automatically when the application is loaded |
type="http" |
Indicates an HTTP request. type="http" is implied when the value for the src attribute references a fully qualified URL starting with http:// |
For this example, we create a single JSP that handles inserts, deletes, and updates.
contactmgr.jsp:

<%@ page import="java.sql.*"%>
<%
    Connection connection = null;
    try {
        String action=request.getParameter("action");       // 3
        String firstName=request.getParameter("firstName");
        String lastName=request.getParameter("lastName");
        String phone=request.getParameter("phone");
        String email=request.getParameter("email");
        String pk=request.getParameter("pk");               // 4

        Class.forName("sun.jdbc.odbc.JdbcOdbcDriver");
        connection = DriverManager.getConnection("jdbc:odbc:laszlosamples"); // 1
        String sql="";      // 2

        if (action.equals("insert")) {
            sql="INSERT INTO contact (first_name, last_name, phone, email) VALUES ('"+
                                     firstName+"','"+lastName+"','"+phone+"','"+email+"')";
        } else if (action.equals("update")) {
            sql="UPDATE contact SET first_name='"+firstName+"', last_name='"+lastName+
                                     "', phone='"+phone+"', email='"+email+"' WHERE email='"+pk+"'";
        } else if (action.equals("delete")) {
            sql="DELETE FROM contact WHERE email='"+pk+"'";
        }

        Statement stmt = connection.createStatement();
        System.out.println("*** Executing SQL: "+sql);
        stmt.executeUpdate(sql);
%>
        <result>success</result>
<%
    } catch (Exception e) {
        e.printStackTrace();
%>
        <result>failure</result>
<%
    } finally {
        try {
            connection.close();
        } catch (SQLException e) {
        }
    }
%>
In this example, we use Sun's JDBC-ODBC bridge to access the database:
-
Comment 1: replace sun.jdbc.odbc.JdbcOdbcDriver with the JDBC driver you are using.
-
Comment 2: replace jdbc:odbc:laszlosamples with the JDBC URL required by your driver.
This JSP expects 6 parameters from the OpenLaszlo client application (comments 3 to 4).
| Attribute | Explanation |
|---|---|
action |
The operation to perform. Can be "insert", "update", or "delete". |
firstName |
Used for insert and update only. The firstName value for a new contact (insert), or the new firstName value for an existing contact (update). |
lastName |
Used for insert and update only. The lastName value for a new contact (insert), or the new lastName value for an existing contact (update). |
phone |
Used for insert and update only. The phone value for a new contact (insert), or the new phone value for an existing contact (update). |
email |
Used for insert and update only. The email value for a new contact (insert), or the new email value for an existing contact (update). |
Pk |
Used for update and delete only. The original value of email (the primary key) before it was changed. This value is needed in the WHERE clause of the UPDATE and DELETE statements. |
<canvas bgcolor="#D4D0C8">
  <dataset name="dset" src="getcontacts.jsp" request="true" type="http"/>
  <!-- 1 -->
  <dataset name="dsSendData" request="false" src="contactmgr.jsp" type="http"/>
  <class name="contactview" extends="view" visible="false" x="20" height="120">
    <!-- 2 -->
    <text name="pk" visible="false" datapath="@email"/>
    <text y="10">First Name:</text>
    <edittext name="firstName" datapath="@firstName" x="80" y="10"/>
    <text y="35">Last Name:</text>
    <edittext name="lastname" datapath="@lastName" x="80" y="35"/>
    <text y="60">Phone:</text>
    <edittext name="phone" datapath="@phone" x="80" y="60"/>
    <text y="85">Email:</text>
    <edittext name="email" datapath="@email" x="80" y="85"/>
    <method name="sendData" args="action">
      var d=canvas.datasets.dsSendData;                       // 3
      var p=new LzParam();                                    // 3a
      p.addValue("action", action, true);
      p.addValue("pk", pk.getText(), true);
      p.addValue("firstName", firstName.getText(), true);
      p.addValue("lastName", lastName.getText(), true);
      p.addValue("phone", phone.getText(), true);
      p.addValue("email", email.getText(), true);            // 3b
      d.setQueryString(p);                                   // 3c
      d.doRequest();                                         // 3d
    </method>
    <!-- 4 -->
  </class>
  <simplelayout axis="y"/>
  <view>
    <simplelayout axis="y"/>
    <text onclick="parent.newContact.setVisible(!parent.newContact.visible);">New Entry...</text>
    <contactview name="newContact" datapath="new:/contact">
      <button width="80" x="200" y="10">Add
        <handler name="onclick">
          parent.sendData("insert");                         // 5
          parent.datapath.updateData();
          var dp=canvas.datasets.dset.getPointer();
          dp.selectChild();
          dp.addNodeFromPointer( parent.datapath );
          parent.setVisible(false);
          parent.setDatapath("new:/contact");
        </handler>
      </button>
    </contactview>
  </view>
  <view datapath="dset:/phonebook/contact">
    <simplelayout axis="y"/>
    <view name="list" onclick="parent.updateContact.setVisible(!parent.updateContact.visible);">
      <simplelayout axis="x"/>
      <text datapath="@firstName"/>
      <text datapath="@lastName"/>
      <text datapath="@phone"/>
      <text datapath="@email"/>
    </view>
    <contactview name="updateContact">
      <button width="80" x="200" y="10">Update
        <handler name="onclick">
          parent.sendData("update");                      // 6
          parent.parent.datapath.updateData();
        </handler>
      </button>
      <button width="80" x="200" y="40">Delete
        <handler name="onclick">
          parent.sendData("delete");                      // 7
          parent.parent.datapath.deleteNode();
        </handler>
      </button>
    </contactview>
  </view>
</canvas>
| Comment | Explanation |
|---|---|
| 1 | We define a new dataset called dsSendData. This dataset is used to submit the information about a contact that we want to insert, update, or delete. We set the request attribute to false: the request will be submitted to the server when the user clicks the Add, Update, or Delete button. |
| 2 | We define an invisible text component to keep track of the original primary key for the contact. |
| 3 - 4 | We add a sendData() method to the contactview class. This method will submit a request to contactmgr.jsp using the dsSendData dataset and providing the contact information as page parameters. The method takes an action argument used to tell the server which operation (insert, update, or delete) to perform with the data. |
| 3a | We create a new LzParam object. The LzParam object encapsulates the page parameters submitted to the server as part of the HTTP request. |
| 3a to 3b | We populate the LzParam object with the six page parameters expected by the server: action, firstName, lastName, phone, email, and pk. The first argument of the addValue() method is the name of the page parameter, the second argument is the value of the page parameter, and the third argument specifies whether we want that value to be URI encoded. |
| 3c | We set the page parameters for the dsSendData request. Note: you don't always have to use an LZParam object to encapsulate
page parameter. For example, you could set the page parameters for the dsSendData request using the following syntax:
d.setQueryString( { action: "action",
                    pk: pk.getText(),
                    firstName: firstName.getText(),
                    lastName: lastName.getText(),
                    phone: phone.getText(),
                    email: email.getText() } );
However, in this case, the page parameter values are not URI encoded and the request might fail if these values contain special
characters. |
| 3d | This is the way to programmatically submit a request when the request attribute of the dataset tag is set to false. |
| 5 | When the user clicks the Add button, we invoke the sendData() method requesting an insert operation. |
| 6 | When the user clicks the Update button, we invoke the sendData() method requesting an update operation |
| 7 | When the user clicks the Delete button, we invoke the sendData() method requesting a delete operation |
contactmgr.jsp returns a simple success xml document if the requested operation succeeded and failure if the operation failed. To check for the success or failure of the operation in the client application, you can define an
event handler for the ondata event of the dsSendData dataset. In this event handler you use a datapointer to check for the
value of the tag.
Example 38.9. using ondata handler to check for success
<datapointer xpath="dsSendData:/">
  <handler name="ondata">
    if (this.xpathQuery("result/text()") == "success") {
      Debug.write("Operation succeeded");
    } else {
      Debug.write("Operation failed");
    }
  </handler>
</datapointer>