Networking
In previous chapters, all nodes that comprise the fractal application were attached to the same network.
This chapter introduces the Networking API. This will enable us to build networking topologies that separate public traffic accessing the application from traffic between the API and the worker components. We also introduce load balancing for resilience, and create a secure back-end network for communication between the database, web server, file storage, and worker components.
Warning
This section assumes that your cloud provider has implemented the OpenStack Networking API (neutron). Users of clouds which have implemented legacy networking (nova-network) will have access to networking via the Compute API. Log in to the Horizon dashboard and navigate to Project->Access & Security->API Access. If you see a service endpoint for the Network API, your cloud is most likely running the Networking API. If you are still in doubt, ask your cloud provider for more information.
Work with the CLI
Because the SDKs do not fully support the OpenStack Networking API, this section uses the command-line clients.
Use this guide to install the ‘openstack’ command-line client: https://docs.openstack.org/cli-reference/common/cli_install_openstack_command_line_clients.html#install-the-clients
Use this guide to set up the necessary variables for your cloud in an ‘openrc’ file: https://docs.openstack.org/cli-reference/common/cli_set_environment_variables_using_openstack_rc.html
Ensure you have an openrc.sh file, source it, and then check that your openstack client works:
$ cat openrc.sh
export OS_USERNAME=your_auth_username
export OS_PASSWORD=your_auth_password
export OS_TENANT_NAME=your_project_name
export OS_AUTH_URL=http://controller:5000/v2.0
export OS_REGION_NAME=your_region_name

$ source openrc.sh

$ openstack --version
3.3.0
Networking segmentation
In traditional data centers, network segments are dedicated to specific types of network traffic.
The fractal application we are building contains these types of network traffic:
- public-facing web traffic
- API traffic
- internal worker traffic
For performance reasons, it makes sense to have a network for each tier, so that traffic from one tier does not “crowd out” other types of traffic and cause the application to fail. In addition, having separate networks makes controlling access to parts of the application easier to manage, improving the overall security of the application.
Prior to this section, the network layout for the Fractal application would be similar to the following diagram:
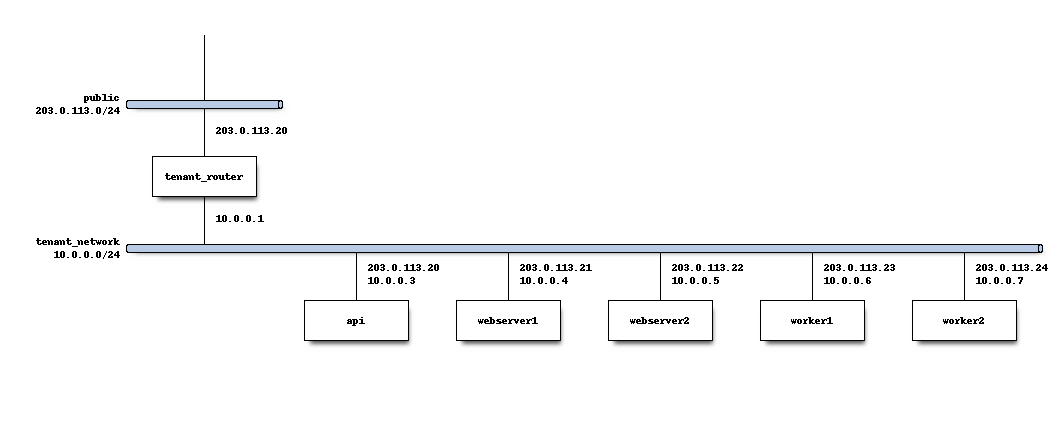
In this network layout, we assume that the OpenStack cloud in which you have been building your application has a public network and tenant router that was previously created by your cloud provider or by yourself, following the instructions in the appendix.
Many of the network concepts that are discussed in this section are already present in the diagram above. A tenant router provides routing and external access for the worker nodes, and floating IP addresses are associated with each node in the Fractal application cluster to facilitate external access.
At the end of this section, you make some slight changes to the networking topology by using the OpenStack Networking API to create the 10.0.1.0/24 network to which the worker nodes attach. You use the 10.0.3.0/24 API network to attach the Fractal API servers. Web server instances have their own 10.0.2.0/24 network, which is accessible by fractal aficionados worldwide, by allocating floating IPs from the public network.
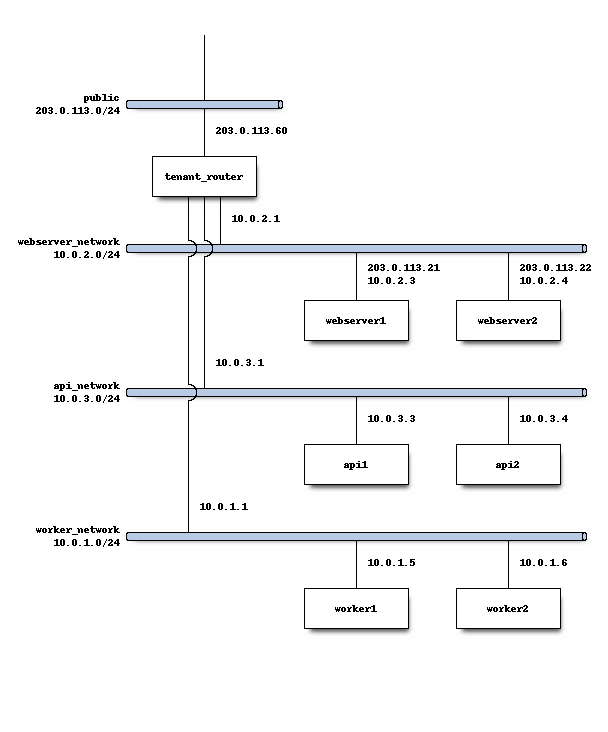
Introduction to tenant networking
With the OpenStack Networking API, the workflow for creating a network topology that separates the public-facing Fractals app API from the worker back end is as follows:
- Create a network and subnet for the web server nodes.
- Create a network and subnet for the worker nodes. This is the private data network.
- Create a router for the private data network.
- Allocate floating ips and assign them to the web server nodes.
Create networks
Most cloud providers make a public network accessible to you. We will attach a router to this public network to grant Internet access to our instances. After also attaching this router to our internal networks, we will allocate floating IPs from the public network for instances which need to be accessed from the Internet.
Confirm that we have a public network by listing the networks our tenant has access to. The public network does not have to be named public - it could be ‘external’, ‘net04_ext’ or something else - the important thing is it exists and can be used to reach the Internet.
$ openstack network list
+--------------------------------------+------------------+--------------------------------------------------+
| ID                                   | Name             | Subnets                                          |
+--------------------------------------+------------------+--------------------------------------------------+
| 27e6fa33-fd39-475e-b048-6ac924972a03 | public           | b12293c9-a1f4-49e3-952f-136a5dd24980             |
+--------------------------------------+------------------+--------------------------------------------------+
Next, create a network and subnet for the workers.
$ openstack network create worker_network
+---------------------------+--------------------------------------+
| Field                     | Value                                |
+---------------------------+--------------------------------------+
| admin_state_up            | UP                                   |
| availability_zone_hints   |                                      |
| availability_zones        |                                      |
| created_at                | 2016-11-06T22:28:45Z                 |
| description               |                                      |
| headers                   |                                      |
| id                        | 4d25ff64-eec3-4ab6-9029-f6d4b5a3e127 |
| ipv4_address_scope        | None                                 |
| ipv6_address_scope        | None                                 |
| mtu                       | 1450                                 |
| name                      | worker_network                       |
| port_security_enabled     | True                                 |
| project_id                | a59a543373bc4b12b74f07355ad1cabe     |
| provider:network_type     | vxlan                                |
| provider:physical_network | None                                 |
| provider:segmentation_id  | 54                                   |
| revision_number           | 3                                    |
| router:external           | Internal                             |
| shared                    | False                                |
| status                    | ACTIVE                               |
| subnets                   |                                      |
| tags                      | []                                   |
| updated_at                | 2016-11-06T22:28:45Z                 |
+---------------------------+--------------------------------------+


$ openstack subnet create worker_subnet --network worker_network --subnet-range 10.0.1.0/24
+-------------------+--------------------------------------+
| Field             | Value                                |
+-------------------+--------------------------------------+
| allocation_pools  | 10.0.1.2-10.0.1.254                  |
| cidr              | 10.0.1.0/24                          |
| created_at        | 2016-11-06T22:34:47Z                 |
| description       |                                      |
| dns_nameservers   |                                      |
| enable_dhcp       | True                                 |
| gateway_ip        | 10.0.1.1                             |
| headers           |                                      |
| host_routes       |                                      |
| id                | 383309b3-184d-4060-a151-a73dcb0606db |
| ip_version        | 4                                    |
| ipv6_address_mode | None                                 |
| ipv6_ra_mode      | None                                 |
| name              | worker_subnet                        |
| network_id        | 4d25ff64-eec3-4ab6-9029-f6d4b5a3e127 |
| project_id        | a59a543373bc4b12b74f07355ad1cabe     |
| revision_number   | 2                                    |
| service_types     |                                      |
| subnetpool_id     | None                                 |
| updated_at        | 2016-11-06T22:34:47Z                 |
+-------------------+--------------------------------------+
Now, create a network and subnet for the web servers.
$ openstack network create webserver_network
+---------------------------+--------------------------------------+
| Field                     | Value                                |
+---------------------------+--------------------------------------+
| admin_state_up            | UP                                   |
| availability_zone_hints   |                                      |
| availability_zones        |                                      |
| created_at                | 2016-11-06T22:36:19Z                 |
| description               |                                      |
| headers                   |                                      |
| id                        | 2410c262-6c27-4e99-8c31-045b60499a01 |
| ipv4_address_scope        | None                                 |
| ipv6_address_scope        | None                                 |
| mtu                       | 1450                                 |
| name                      | webserver_network                    |
| port_security_enabled     | True                                 |
| project_id                | a59a543373bc4b12b74f07355ad1cabe     |
| provider:network_type     | vxlan                                |
| provider:physical_network | None                                 |
| provider:segmentation_id  | 96                                   |
| revision_number           | 3                                    |
| router:external           | Internal                             |
| shared                    | False                                |
| status                    | ACTIVE                               |
| subnets                   |                                      |
| tags                      | []                                   |
| updated_at                | 2016-11-06T22:36:19Z                 |
+---------------------------+--------------------------------------+

$ openstack subnet create webserver_subnet --network webserver_network --subnet-range 10.0.2.0/24
+-------------------+--------------------------------------+
| Field             | Value                                |
+-------------------+--------------------------------------+
| allocation_pools  | 10.0.2.2-10.0.2.254                  |
| cidr              | 10.0.2.0/24                          |
| created_at        | 2016-11-06T22:37:47Z                 |
| description       |                                      |
| dns_nameservers   |                                      |
| enable_dhcp       | True                                 |
| gateway_ip        | 10.0.2.1                             |
| headers           |                                      |
| host_routes       |                                      |
| id                | 5878afa5-8f1d-4de5-8018-530044a49934 |
| ip_version        | 4                                    |
| ipv6_address_mode | None                                 |
| ipv6_ra_mode      | None                                 |
| name              | webserver_subnet                     |
| network_id        | 2410c262-6c27-4e99-8c31-045b60499a01 |
| project_id        | a59a543373bc4b12b74f07355ad1cabe     |
| revision_number   | 2                                    |
| service_types     |                                      |
| subnetpool_id     | None                                 |
| updated_at        | 2016-11-06T22:37:47Z                 |
+-------------------+--------------------------------------+
Next, create a network and subnet for the API servers.
$ openstack network create api_network
+---------------------------+--------------------------------------+
| Field                     | Value                                |
+---------------------------+--------------------------------------+
| admin_state_up            | UP                                   |
| availability_zone_hints   |                                      |
| availability_zones        |                                      |
| created_at                | 2016-11-06T22:38:51Z                 |
| description               |                                      |
| headers                   |                                      |
| id                        | 8657f3a3-6e7d-40a1-a979-1a8c54d5e434 |
| ipv4_address_scope        | None                                 |
| ipv6_address_scope        | None                                 |
| mtu                       | 1450                                 |
| name                      | api_network                          |
| port_security_enabled     | True                                 |
| project_id                | a59a543373bc4b12b74f07355ad1cabe     |
| provider:network_type     | vxlan                                |
| provider:physical_network | None                                 |
| provider:segmentation_id  | 64                                   |
| revision_number           | 3                                    |
| router:external           | Internal                             |
| shared                    | False                                |
| status                    | ACTIVE                               |
| subnets                   |                                      |
| tags                      | []                                   |
| updated_at                | 2016-11-06T22:38:51Z                 |
+---------------------------+--------------------------------------+

$ openstack subnet create api_subnet --network api_network --subnet-range 10.0.3.0/24
+-------------------+--------------------------------------+
| Field             | Value                                |
+-------------------+--------------------------------------+
| allocation_pools  | 10.0.3.2-10.0.3.254                  |
| cidr              | 10.0.3.0/24                          |
| created_at        | 2016-11-06T22:40:15Z                 |
| description       |                                      |
| dns_nameservers   |                                      |
| enable_dhcp       | True                                 |
| gateway_ip        | 10.0.3.1                             |
| headers           |                                      |
| host_routes       |                                      |
| id                | 614e7801-eb35-45c6-8e49-da5bdc9161f5 |
| ip_version        | 4                                    |
| ipv6_address_mode | None                                 |
| ipv6_ra_mode      | None                                 |
| name              | api_subnet                           |
| network_id        | 8657f3a3-6e7d-40a1-a979-1a8c54d5e434 |
| project_id        | a59a543373bc4b12b74f07355ad1cabe     |
| revision_number   | 2                                    |
| service_types     |                                      |
| subnetpool_id     | None                                 |
| updated_at        | 2016-11-06T22:40:15Z                 |
+-------------------+--------------------------------------+
Now that you have got the networks created, go ahead and create two Floating IPs, for web servers. Ensure that you replace ‘public’ with the name of the public/external network offered by your cloud provider.
$ openstack floating ip create public
+---------------------+--------------------------------------+
| Field               | Value                                |
+---------------------+--------------------------------------+
| created_at          | 2016-11-06T22:47:30Z                 |
| description         |                                      |
| fixed_ip_address    | None                                 |
| floating_ip_address | 172.24.4.2                           |
| floating_network_id | 27e6fa33-fd39-475e-b048-6ac924972a03 |
| headers             |                                      |
| id                  | 820385df-36a7-415d-955c-6ff662fdb796 |
| port_id             | None                                 |
| project_id          | a59a543373bc4b12b74f07355ad1cabe     |
| revision_number     | 1                                    |
| router_id           | None                                 |
| status              | DOWN                                 |
| updated_at          | 2016-11-06T22:47:30Z                 |
+---------------------+--------------------------------------+


$ openstack floating ip create public
+---------------------+--------------------------------------+
| Field               | Value                                |
+---------------------+--------------------------------------+
| created_at          | 2016-11-06T22:48:45Z                 |
| description         |                                      |
| fixed_ip_address    | None                                 |
| floating_ip_address | 172.24.4.12                          |
| floating_network_id | 27e6fa33-fd39-475e-b048-6ac924972a03 |
| headers             |                                      |
| id                  | 3d9f1591-a31e-4684-8346-f4bb33a176b0 |
| port_id             | None                                 |
| project_id          | a59a543373bc4b12b74f07355ad1cabe     |
| revision_number     | 1                                    |
| router_id           | None                                 |
| status              | DOWN                                 |
| updated_at          | 2016-11-06T22:48:45Z                 |
+---------------------+--------------------------------------+
Note
The world is running out of IPv4 addresses. If you get the “No more IP addresses available on network” error, contact your cloud administrator. You may also want to ask about IPv6 :)
Connecting to the Internet
Most instances require access to the Internet. The instances in your Fractals app are no exception! Add routers to pass traffic between the various networks that you use.
$ openstack router create project_router
+-------------------------+--------------------------------------+
| Field                   | Value                                |
+-------------------------+--------------------------------------+
| admin_state_up          | UP                                   |
| availability_zone_hints |                                      |
| availability_zones      |                                      |
| created_at              | 2016-11-06T22:49:59Z                 |
| description             |                                      |
| distributed             | False                                |
| external_gateway_info   | null                                 |
| flavor_id               | None                                 |
| ha                      | False                                |
| headers                 |                                      |
| id                      | e11eba23-961c-43d7-8da0-561abdad880c |
| name                    | project_router                       |
| project_id              | a59a543373bc4b12b74f07355ad1cabe     |
| revision_number         | 2                                    |
| routes                  |                                      |
| status                  | ACTIVE                               |
| updated_at              | 2016-11-06T22:49:59Z                 |
+-------------------------+--------------------------------------+
Specify an external gateway for your router to tell OpenStack which network to use for Internet access.
$ openstack router set project_router --external-gateway public
Set gateway for router project_router

$ openstack router show project_router
+-------------------------+-------------------------------------------------------------------------+
| Field                   | Value                                                                   |
+-------------------------+-------------------------------------------------------------------------+
| admin_state_up          | UP                                                                      |
| availability_zone_hints |                                                                         |
| availability_zones      | nova                                                                    |
| created_at              | 2016-11-06T22:49:59Z                                                    |
| description             |                                                                         |
| distributed             | False                                                                   |
| external_gateway_info   | {"network_id": "27e6fa33-fd39-475e-b048-6ac924972a03", "enable_snat":   |
|                         | true, "external_fixed_ips": [{"subnet_id":                              |
|                         | "d02006a5-3d10-41f1-a349-6024af41cda0", "ip_address": "172.24.4.13"},   |
|                         | {"subnet_id": "b12293c9-a1f4-49e3-952f-136a5dd24980", "ip_address":     |
|                         | "2001:db8::9"}]}                                                        |
| flavor_id               | None                                                                    |
| ha                      | False                                                                   |
| id                      | e11eba23-961c-43d7-8da0-561abdad880c                                    |
| name                    | project_router                                                          |
| project_id              | a59a543373bc4b12b74f07355ad1cabe                                        |
| revision_number         | 5                                                                       |
| routes                  |                                                                         |
| status                  | ACTIVE                                                                  |
| updated_at              | 2016-11-06T22:53:04Z                                                    |
+-------------------------+-------------------------------------------------------------------------+
Now, attach your router to the worker, API, and web server subnets.
$ openstack router add subnet project_router worker_subnet

$ openstack router add subnet project_router api_subnet

$ openstack router add subnet project_router webserver_subnet
Booting a worker
Now that you have prepared the networking infrastructure, you can go ahead and boot an instance on it. Ensure you use appropriate flavor and image values for your cloud - see Getting started if you have not already.
$ nova boot --flavor m1.tiny --image cirros-0.3.3-x86_64-disk --nic net-id=953224c6-c510-45c5-8a29-37deffd3d78e worker1
+--------------------------------------+-----------------------------------------------------------------+
| Property                             | Value                                                           |
+--------------------------------------+-----------------------------------------------------------------+
| OS-DCF:diskConfig                    | MANUAL                                                          |
| OS-EXT-AZ:availability_zone          | nova                                                            |
| OS-EXT-STS:power_state               | 0                                                               |
| OS-EXT-STS:task_state                | scheduling                                                      |
| OS-EXT-STS:vm_state                  | building                                                        |
| OS-SRV-USG:launched_at               | -                                                               |
| OS-SRV-USG:terminated_at             | -                                                               |
| accessIPv4                           |                                                                 |
| accessIPv6                           |                                                                 |
| adminPass                            | 9vU8KSY4oDht                                                    |
| config_drive                         |                                                                 |
| created                              | 2015-03-30T05:26:04Z                                            |
| flavor                               | m1.tiny (1)                                                     |
| hostId                               |                                                                 |
| id                                   | 9e188a47-a246-463e-b445-027d6e2966e0                            |
| image                                | cirros-0.3.3-x86_64-disk (ad605ff9-4593-4048-900b-846d6401c193) |
| key_name                             | -                                                               |
| metadata                             | {}                                                              |
| name                                 | worker1                                                         |
| os-extended-volumes:volumes_attached | []                                                              |
| progress                             | 0                                                               |
| security_groups                      | default                                                         |
| status                               | BUILD                                                           |
| tenant_id                            | f77bf3369741408e89d8f6fe090d29d2                                |
| updated                              | 2015-03-30T05:26:04Z                                            |
| user_id                              | a61292a5691d4c6c831b7a8f07921261                                |
+--------------------------------------+-----------------------------------------------------------------+
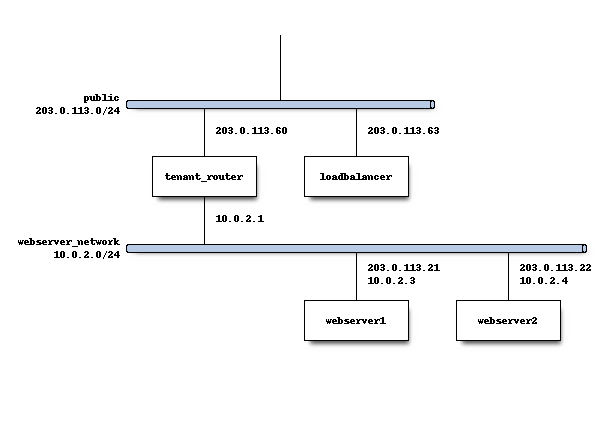
Load balancing
After separating the Fractal worker nodes into their own networks, the next logical step is to move the Fractal API service to a load balancer, so that multiple API workers can handle requests. By using a load balancer, the API service can be scaled out in a similar fashion to the worker nodes.
Neutron LbaaS API
Note
This section is based on the Neutron LBaaS API version 1.0 https://docs.openstack.org/admin-guide/networking_adv-features.html#basic-load-balancer-as-a-service-operations
The OpenStack Networking API provides support for creating loadbalancers, which can be used to scale the Fractal app web service. In the following example, we create two compute instances via the Compute API, then instantiate a load balancer that will use a virtual IP (VIP) for accessing the web service offered by the two compute nodes. The end result will be the following network topology:
libcloud support added 0.14: https://developer.rackspace.com/blog/libcloud-0-dot-14-released/
Start by looking at what is already in place.
$ openstack network list
+--------------------------------------+-------------------+---------------------------------------+
| ID                                   | Name              | Subnets                               |
+--------------------------------------+-------------------+---------------------------------------+
| 2410c262-6c27-4e99-8c31-045b60499a01 | webserver_network | 5878afa5-8f1d-4de5-8018-530044a49934  |
| 27e6fa33-fd39-475e-b048-6ac924972a03 | public            | b12293c9-a1f4-49e3-952f-136a5dd24980, |
|                                      |                   | d02006a5-3d10-41f1-a349-6024af41cda0  |
+--------------------------------------+-------------------+---------------------------------------+
Go ahead and create two instances.
$ nova boot --flavor 1 --image 53ff0943-99ba-42d2-a10d-f66656372f87 --min-count 2 test
+--------------------------------------+-----------------------------------------------------------------+
| Property                             | Value                                                           |
+--------------------------------------+-----------------------------------------------------------------+
| OS-DCF:diskConfig                    | MANUAL                                                          |
| OS-EXT-AZ:availability_zone          | nova                                                            |
| OS-EXT-STS:power_state               | 0                                                               |
| OS-EXT-STS:task_state                | scheduling                                                      |
| OS-EXT-STS:vm_state                  | building                                                        |
| OS-SRV-USG:launched_at               | -                                                               |
| OS-SRV-USG:terminated_at             | -                                                               |
| accessIPv4                           |                                                                 |
| accessIPv6                           |                                                                 |
| adminPass                            | z84zWFCcpppH                                                    |
| config_drive                         |                                                                 |
| created                              | 2015-04-02T02:45:09Z                                            |
| flavor                               | m1.tiny (1)                                                     |
| hostId                               |                                                                 |
| id                                   | 8d579f4a-116d-46b9-8db3-aa55b76f76d8                            |
| image                                | cirros-0.3.3-x86_64-disk (53ff0943-99ba-42d2-a10d-f66656372f87) |
| key_name                             | -                                                               |
| metadata                             | {}                                                              |
| name                                 | test-1                                                          |
| os-extended-volumes:volumes_attached | []                                                              |
| progress                             | 0                                                               |
| security_groups                      | default                                                         |
| status                               | BUILD                                                           |
| tenant_id                            | 0cb06b70ef67424b8add447415449722                                |
| updated                              | 2015-04-02T02:45:09Z                                            |
| user_id                              | d95381d331034e049727e2413efde39f                                |
+--------------------------------------+-----------------------------------------------------------------+
Confirm that they were added:
$ nova list
+--------------------------------------+--------+--------+------------+-------------+------------------+
| ID                                   | Name   | Status | Task State | Power State | Networks         |
+--------------------------------------+--------+--------+------------+-------------+------------------+
| 8d579f4a-116d-46b9-8db3-aa55b76f76d8 | test-1 | ACTIVE | -          | Running     | private=10.0.2.4 |
| 8fadf892-b6e9-44f4-b132-47c6762ffa2c | test-2 | ACTIVE | -          | Running     | private=10.0.2.3 |
+--------------------------------------+--------+--------+------------+-------------+------------------+
Look at which ports are available:
$ openstack port list
+--------------------------------------+------+-------------------+--------------------------------------------+
| ID                                   | Name | MAC Address       | Fixed IP Addresses                         |
+--------------------------------------+------+-------------------+--------------------------------------------+
| 11b38c90-f55e-41a7-b68b-0d434d66bfa2 |      | fa:16:3e:21:95:a1 | ip_address='10.0.0.1', subnet_id='e7f75523 |
|                                      |      |                   | -ae4b-4611-85a3-07efa2e1ba0f'              |
| 523331cf-5636-4298-a14c-f545bb32abcf |      | fa:16:3e:f8:a1:81 | ip_address='10.0.0.2', subnet_id='e7f75523 |
|                                      |      |                   | -ae4b-4611-85a3-07efa2e1ba0f'              |
|                                      |      |                   | ip_address='2001:db8:8000:0:f816:3eff:fef8 |
|                                      |      |                   | :a181', subnet_id='f8628fd8-8d61-43e2-9dc8 |
|                                      |      |                   | -a03d25443b7d'                             |
| cbba0f37-c1a0-4fc8-8722-68e42de7df16 |      | fa:16:3e:39:a6:18 | ip_address='2001:db8:8000::1', subnet_id=' |
|                                      |      |                   | f8628fd8-8d61-43e2-9dc8-a03d25443b7d'      |
+--------------------------------------+------+-------------------+--------------------------------------------+
Next, create additional floating IPs. Specify the fixed IP addresses they should point to and the ports that they should use:
$ openstack floating ip create public --fixed-ip-address 10.0.0.2 --port 523331cf-5636-4298-a14c-f545bb32abcf
+---------------------+--------------------------------------+
| Field               | Value                                |
+---------------------+--------------------------------------+
| created_at          | 2016-11-06T23:23:29Z                 |
| description         |                                      |
| fixed_ip_address    | 10.0.0.2                             |
| floating_ip_address | 172.24.4.2                           |
| floating_network_id | 27e6fa33-fd39-475e-b048-6ac924972a03 |
| headers             |                                      |
| id                  | 0ed15644-4290-4adf-91d4-5713eea895e5 |
| port_id             | 523331cf-5636-4298-a14c-f545bb32abcf |
| project_id          | 3d2db0593c8045a392fd18385b401b5b     |
| revision_number     | 1                                    |
| router_id           | 309d1402-a373-4022-9ab8-6824aad1a415 |
| status              | DOWN                                 |
| updated_at          | 2016-11-06T23:23:29Z                 |
+---------------------+--------------------------------------+

$ openstack floating ip create public --fixed-ip-address 10.0.2.4 --port 462c92c6-941c-48ab-8cca-3c7a7308f580
+---------------------+--------------------------------------+
| Field               | Value                                |
+---------------------+--------------------------------------+
| created_at          | 2016-11-06T23:25:26Z                 |
| description         |                                      |
| fixed_ip_address    | 10.0.0.1                             |
| floating_ip_address | 172.24.4.8                           |
| floating_network_id | 27e6fa33-fd39-475e-b048-6ac924972a03 |
| headers             |                                      |
| id                  | 68082405-82f2-4072-b5c3-7047df527a8a |
| port_id             | 11b38c90-f55e-41a7-b68b-0d434d66bfa2 |
| project_id          | 3d2db0593c8045a392fd18385b401b5b     |
| revision_number     | 1                                    |
| router_id           | 309d1402-a373-4022-9ab8-6824aad1a415 |
| status              | DOWN                                 |
| updated_at          | 2016-11-06T23:25:26Z                 |
+---------------------+--------------------------------------+
You are ready to create members for the load balancer pool, which reference the floating IPs:
$ neutron lb-member-create --address 203.0.113.21 --protocol-port 80 mypool
Created a new member:
+--------------------+--------------------------------------+
| Field              | Value                                |
+--------------------+--------------------------------------+
| address            | 203.0.113.21                         |
| admin_state_up     | True                                 |
| id                 | 679966a9-f719-4df0-86cf-3a24d0433b38 |
| pool_id            | 600496f0-196c-431c-ae35-a0af9bb01d32 |
| protocol_port      | 80                                   |
| status             | PENDING_CREATE                       |
| status_description |                                      |
| tenant_id          | 0cb06b70ef67424b8add447415449722     |
| weight             | 1                                    |
+--------------------+--------------------------------------+

$ neutron lb-member-create --address 203.0.113.22 --protocol-port 80 mypool
Created a new member:
+--------------------+--------------------------------------+
| Field              | Value                                |
+--------------------+--------------------------------------+
| address            | 203.0.113.22                         |
| admin_state_up     | True                                 |
| id                 | f3ba0605-4926-4498-b86d-51002892e93a |
| pool_id            | 600496f0-196c-431c-ae35-a0af9bb01d32 |
| protocol_port      | 80                                   |
| status             | PENDING_CREATE                       |
| status_description |                                      |
| tenant_id          | 0cb06b70ef67424b8add447415449722     |
| weight             | 1                                    |
+--------------------+--------------------------------------+
You should be able to see them in the member list:
$ neutron lb-member-list
+--------------------------------------+--------------+---------------+--------+----------------+--------+
| id                                   | address      | protocol_port | weight | admin_state_up | status |
+--------------------------------------+--------------+---------------+--------+----------------+--------+
| 679966a9-f719-4df0-86cf-3a24d0433b38 | 203.0.113.21 |            80 |      1 | True           | ACTIVE |
| f3ba0605-4926-4498-b86d-51002892e93a | 203.0.113.22 |            80 |      1 | True           | ACTIVE |
+--------------------------------------+--------------+---------------+--------+----------------+--------+
Now, create a health monitor that will ensure that members of the load balancer pool are active and able to respond to requests. If a member in the pool dies or is unresponsive, the member is removed from the pool so that client requests are routed to another active member.
$ neutron lb-healthmonitor-create --delay 3 --type HTTP --max-retries 3 --timeout 3
Created a new health_monitor:
+----------------+--------------------------------------+
| Field          | Value                                |
+----------------+--------------------------------------+
| admin_state_up | True                                 |
| delay          | 3                                    |
| expected_codes | 200                                  |
| http_method    | GET                                  |
| id             | 663345e6-2853-43b2-9ccb-a623d5912345 |
| max_retries    | 3                                    |
| pools          |                                      |
| tenant_id      | 0cb06b70ef67424b8add447415449722     |
| timeout        | 3                                    |
| type           | HTTP                                 |
| url_path       | /                                    |
+----------------+--------------------------------------+
$ neutron lb-healthmonitor-associate 663345e6-2853-43b2-9ccb-a623d5912345 mypool
Associated health monitor 663345e6-2853-43b2-9ccb-a623d5912345
Now create a virtual IP that will be used to direct traffic between the various members of the pool:
$ neutron lb-vip-create --name myvip --protocol-port 80 --protocol HTTP --subnet-id 47fd3ff1-ead6-4d23-9ce6-2e66a3dae425 mypool
Created a new vip:
+---------------------+--------------------------------------+
| Field               | Value                                |
+---------------------+--------------------------------------+
| address             | 203.0.113.63                         |
| admin_state_up      | True                                 |
| connection_limit    | -1                                   |
| description         |                                      |
| id                  | f0bcb66e-5eeb-447b-985e-faeb67540c2f |
| name                | myvip                                |
| pool_id             | 600496f0-196c-431c-ae35-a0af9bb01d32 |
| port_id             | bc732f81-2640-4622-b624-993a5ae185c5 |
| protocol            | HTTP                                 |
| protocol_port       | 80                                   |
| session_persistence |                                      |
| status              | PENDING_CREATE                       |
| status_description  |                                      |
| subnet_id           | 47fd3ff1-ead6-4d23-9ce6-2e66a3dae425 |
| tenant_id           | 0cb06b70ef67424b8add447415449722     |
+---------------------+--------------------------------------+
And confirm it is in place:
$ neutron lb-vip-list
+--------------------------------------+-------+--------------+----------+----------------+--------+
| id                                   | name  | address      | protocol | admin_state_up | status |
+--------------------------------------+-------+--------------+----------+----------------+--------+
| f0bcb66e-5eeb-447b-985e-faeb67540c2f | myvip | 203.0.113.63 | HTTP     | True           | ACTIVE |
+--------------------------------------+-------+--------------+----------+----------------+--------+
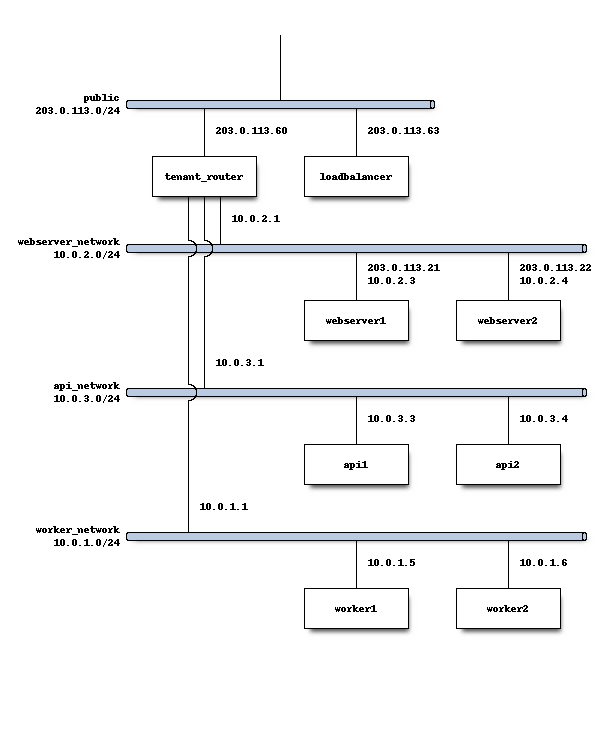
Now, look at the big picture.
Final result
With the addition of the load balancer, the Fractal app’s networking topology now reflects the modular nature of the application itself.
Next steps
You should now be fairly confident working with the Network API. To see calls that we did not cover, see the volume documentation of your SDK, or try one of these tutorial steps:
- Advice for developers new to operations: Get advice about operations.
- Going crazy: Learn some crazy things that you might not think to do ;)

Except where otherwise noted, this document is licensed under Creative Commons Attribution 3.0 License. See all OpenStack Legal Documents.