Configure remote console access
To provide a remote console or remote desktop access to guest virtual machines, use VNC or SPICE HTML5 through either the OpenStack dashboard or the command line. Best practice is to select one or the other to run.
About nova-consoleauth
Both client proxies leverage a shared service to manage token
authentication called nova-consoleauth. This service must be running for
either proxy to work. Many proxies of either type can be run against a
single nova-consoleauth service in a cluster configuration.
Do not confuse the nova-consoleauth shared service with
nova-console, which is a XenAPI-specific service that most recent
VNC proxy architectures do not use.
SPICE console
OpenStack Compute supports VNC consoles to guests. The VNC protocol is fairly limited, lacking support for multiple monitors, bi-directional audio, reliable cut-and-paste, video streaming and more. SPICE is a new protocol that aims to address the limitations in VNC and provide good remote desktop support.
SPICE support in OpenStack Compute shares a similar architecture to the
VNC implementation. The OpenStack dashboard uses a SPICE-HTML5 widget in
its console tab that communicates to the nova-spicehtml5proxy service by
using SPICE-over-websockets. The nova-spicehtml5proxy service
communicates directly with the hypervisor process by using SPICE.
VNC must be explicitly disabled to get access to the SPICE console. Set
the vnc_enabled option to False in the [DEFAULT] section to
disable the VNC console.
Use the following options to configure SPICE as the console for OpenStack Compute:
[spice]
agent_enabled = False
enabled = True
html5proxy_base_url = http://IP_ADDRESS:6082/spice_auto.html
html5proxy_host = 0.0.0.0
html5proxy_port = 6082
keymap = en-us
server_listen = 127.0.0.1
server_proxyclient_address = 127.0.0.1
Replace IP_ADDRESS with the management interface IP address
of the controller or the VIP.
VNC console proxy
The VNC proxy is an OpenStack component that enables compute service users to access their instances through VNC clients.
Note
The web proxy console URLs do not support the websocket protocol scheme (ws://) on python versions less than 2.7.4.
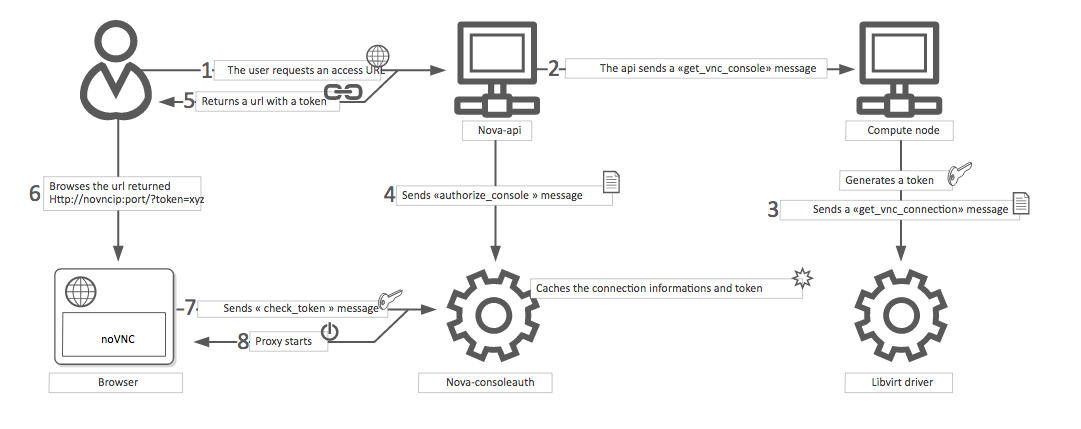
The VNC console connection works as follows:
A user connects to the API and gets an
access_urlsuch as,http://ip:port/?token=xyz.The user pastes the URL in a browser or uses it as a client parameter.
The browser or client connects to the proxy.
The proxy talks to
nova-consoleauthto authorize the token for the user, and maps the token to the private host and port of the VNC server for an instance.The compute host specifies the address that the proxy should use to connect through the
nova.conffile option,vncserver_proxyclient_address. In this way, the VNC proxy works as a bridge between the public network and private host network.The proxy initiates the connection to VNC server and continues to proxy until the session ends.
The proxy also tunnels the VNC protocol over WebSockets so that the
noVNC client can talk to VNC servers. In general, the VNC proxy:
- Bridges between the public network where the clients live and the private network where VNC servers live.
- Mediates token authentication.
- Transparently deals with hypervisor-specific connection details to provide a uniform client experience.
VNC configuration options
To customize the VNC console, use the following configuration options in
your nova.conf file:
Note
To support live migration,
you cannot specify a specific IP address for vncserver_listen,
because that IP address does not exist on the destination host.
| Configuration option = Default value | Description |
|---|---|
| [DEFAULT] | |
daemon = False |
(BoolOpt) Become a daemon (background process) |
key = None |
(StrOpt) SSL key file (if separate from cert) |
novncproxy_host = 0.0.0.0 |
(StrOpt) Host on which to listen for incoming requests |
novncproxy_port = 6080 |
(IntOpt) Port on which to listen for incoming requests |
record = False |
(BoolOpt) Record sessions to FILE.[session_number] |
source_is_ipv6 = False |
(BoolOpt) Source is ipv6 |
ssl_only = False |
(BoolOpt) Disallow non-encrypted connections |
web = /usr/share/spice-html5 |
(StrOpt) Run webserver on same port. Serve files from DIR. |
| [vmware] | |
vnc_port = 5900 |
(IntOpt) VNC starting port |
vnc_port_total = 10000 |
vnc_port_total = 10000 |
| [vnc] | |
| enabled = True | (BoolOpt) Enable VNC related features |
| novncproxy_base_url = http://127.0.0.1:6080/vnc_auto.html | (StrOpt) Location of VNC console proxy, in the form “http://127.0.0.1:6080/vnc_auto.html“ |
| vncserver_listen = 127.0.0.1 | (StrOpt) IP address on which instance vncservers should listen |
| vncserver_proxyclient_address = 127.0.0.1 | (StrOpt) The address to which proxy clients (like nova-xvpvncproxy) should connect |
| xvpvncproxy_base_url = http://127.0.0.1:6081/console | (StrOpt) Location of nova xvp VNC console proxy, in the form “http://127.0.0.1:6081/console“ |
Note
- The
vncserver_proxyclient_addressdefaults to127.0.0.1, which is the address of the compute host that Compute instructs proxies to use when connecting to instance servers. - For all-in-one XenServer domU deployments, set this to
169.254.0.1. - For multi-host XenServer domU deployments, set to a
dom0
management IP
on the same network as the proxies. - For multi-host libvirt deployments, set to a host management IP on the same network as the proxies.
Typical deployment
A typical deployment has the following components:
- A
nova-consoleauthprocess. Typically runs on the controller host. - One or more
nova-novncproxyservices. Supports browser-based noVNC clients. For simple deployments, this service typically runs on the same machine asnova-apibecause it operates as a proxy between the public network and the private compute host network. - One or more
nova-xvpvncproxyservices. Supports the special Java client discussed here. For simple deployments, this service typically runs on the same machine asnova-apibecause it acts as a proxy between the public network and the private compute host network. - One or more compute hosts. These compute hosts must have correctly configured options, as follows.
nova-novncproxy (noVNC)
You must install the noVNC package, which contains the nova-novncproxy
service. As root, run the following command:
# apt-get install nova-novncproxy
The service starts automatically on installation.
To restart the service, run:
# service nova-novncproxy restart
The configuration option parameter should point to your nova.conf
file, which includes the message queue server address and credentials.
By default, nova-novncproxy binds on 0.0.0.0:6080.
To connect the service to your Compute deployment, add the following
configuration options to your nova.conf file:
vncserver_listen=0.0.0.0Specifies the address on which the VNC service should bind. Make sure it is assigned one of the compute node interfaces. This address is the one used by your domain file.
<graphics type="vnc" autoport="yes" keymap="en-us" listen="0.0.0.0"/>Note
To use live migration, use the 0.0.0.0 address.
vncserver_proxyclient_address=127.0.0.1The address of the compute host that Compute instructs proxies to use when connecting to instance
vncservers.
Frequently asked questions about VNC access to virtual machines
Q: What is the difference between ``nova-xvpvncproxy`` and ``nova-novncproxy``?
A:
nova-xvpvncproxy, which ships with OpenStack Compute, is a proxy that supports a simple Java client. nova-novncproxy uses noVNC to provide VNC support through a web browser.Q: I want VNC support in the OpenStack dashboard. What services do I need?
A: You need
nova-novncproxy,nova-consoleauth, and correctly configured compute hosts.Q: When I use ``nova get-vnc-console`` or click on the VNC tab of the OpenStack dashboard, it hangs. Why?
A: Make sure you are running
nova-consoleauth(in addition tonova-novncproxy). The proxies rely onnova-consoleauthto validate tokens, and waits for a reply from them until a timeout is reached.Q: My VNC proxy worked fine during my all-in-one test, but now it doesn’t work on multi host. Why?
A: The default options work for an all-in-one install, but changes must be made on your compute hosts once you start to build a cluster. As an example, suppose you have two servers:
PROXYSERVER (public_ip=172.24.1.1, management_ip=192.168.1.1)
COMPUTESERVER (management_ip=192.168.1.2)
Your
nova-computeconfiguration file must set the following values:# These flags help construct a connection data structure vncserver_proxyclient_address=192.168.1.2 novncproxy_base_url=http://172.24.1.1:6080/vnc_auto.html xvpvncproxy_base_url=http://172.24.1.1:6081/console # This is the address where the underlying vncserver (not the proxy) # will listen for connections. vncserver_listen=192.168.1.2
Note
novncproxy_base_urlandxvpvncproxy_base_urluse a public IP; this is the URL that is ultimately returned to clients, which generally do not have access to your private network. Your PROXYSERVER must be able to reachvncserver_proxyclient_address, because that is the address over which the VNC connection is proxied.Q: My noVNC does not work with recent versions of web browsers. Why?
A: Make sure you have installed
python-numpy, which is required to support a newer version of the WebSocket protocol (HyBi-07+).Q: How do I adjust the dimensions of the VNC window image in the OpenStack dashboard?
A: These values are hard-coded in a Django HTML template. To alter them, edit the
_detail_vnc.htmltemplate file. The location of this file varies based on Linux distribution. On Ubuntu 14.04, the file is at/usr/share/pyshared/horizon/dashboards/nova/instances/templates/instances/_detail_vnc.html.Modify the
widthandheightoptions, as follows:<iframe src="{{ vnc_url }}" width="720" height="430"></iframe>Q: My noVNC connections failed with ValidationError: Origin header protocol does not match. Why?
A: Make sure the
base_urlmatch your TLS setting. If you are using https console connections, make sure that the value ofnovncproxy_base_urlis set explicitly where thenova-novncproxyservice is running.

Except where otherwise noted, this document is licensed under Creative Commons Attribution 3.0 License. See all OpenStack Legal Documents.