Example: FreeBSD image
This example creates a minimal FreeBSD image that is
compatible with OpenStack and bsd-cloudinit.
The bsd-cloudinit program is independently maintained
and in active development. The best source of information
on the current state of the project is at
bsd-cloudinit.
KVM with virtio drivers is used as the virtualization platform because that is the most widely used among OpenStack operators. If you use a different platform for your cloud virtualization, use that same platform in the image creation step.
This example shows how to create a FreeBSD 10 image. To create a FreeBSD 9.2 image, follow these steps with the noted differences.
To create a FreeBSD image
Make a virtual drive:
$ qemu-img create -f qcow2 freebsd.qcow2 1GThe minimum supported disk size for FreeBSD is 1 GB. Because the goal is to make the smallest possible base image, the example uses that minimum size. This size is sufficient to include the optional
doc,games, andlib32collections. To include theportscollection, add another 1 GB. To includesrc, add 512 MB.Get the installer ISO:
$ curl ftp://ftp.freebsd.org/pub/FreeBSD/releases/amd64/amd64/ISO-IMAGES/10.1/FreeBSD-10.1-RELEASE-amd64-bootonly.iso \
  > FreeBSD-10.1-RELEASE-amd64-bootonly.iso
Launch a VM on your local workstation. Use the same hypervisor, virtual disk, and virtual network drivers as you use in your production environment.
The following command uses the minimum amount of RAM, which is 256 MB:
$ kvm -smp 1 -m 256 -cdrom FreeBSD-10.1-RELEASE-amd64-bootonly.iso \
  -drive if=virtio,file=freebsd.qcow2 \
  -net nic,model=virtio -net user
You can specify up to 1 GB additional RAM to make the installation process run faster.
This VM must also have Internet access to download packages.
Note
By using the same hypervisor, you can ensure that you emulate the same devices that exist in production. However, if you use full hardware virtualization instead of paravirtualization, you do not need to use the same hypervisor; you must use the same type of virtualized hardware because FreeBSD device names are related to their drivers. If the name of your root block device or primary network interface in production differs than the names used during image creation, errors can occur.
You now have a VM that boots from the downloaded install ISO and is connected to the blank virtual disk that you created previously.
To install the operating system, complete the following steps inside the VM:
When prompted, choose to run the ISO in Install mode.
Accept the default keymap or select an appropriate mapping for your needs.
Provide a host name for your image. If you use
bsd-cloudinit, it overrides this value with the name provided by OpenStack when an instance boots from this image.When prompted about the optional
doc,games,lib32,ports, andsrcsystem components, select only those that you need. It is possible to have a fully functional installation without selecting additional components selected. As noted previously, a minimal system with a 1 GB virtual disk supportsdoc,games, andlib32inclusive. Theportscollection requires at least 1 GB additional space and possibly more if you plan to install many ports. Thesrccollection requires an additional 512 MB.Configure the primary network interface to use DHCP. In this example, which uses a virtio network device, this interface is named
vtnet0.Accept the default network mirror.
Set up disk partitioning.
Disk partitioning is a critical element of the image creation process and the auto-generated default partitioning scheme does not work with
bsd-cloudinitat this time.Because the default does not work, you must select manual partitioning. The partition editor should list only one block device. If you use virtio for the disk device driver, it is named
vtbd0. Select this device and run the create command three times:- Select Create to create a partition table. This action is the default when no partition table exists. Then, select GPT GUID Partition Table from the list. This choice is the default.
- Create two partitions:
- First partition: A 64 kB
freebsd-bootpartition with no mount point. - Second partition: A
freebsd-ufspartition with a mount point of/with all remaining free space.
- First partition: A 64 kB
The following figure shows a completed partition table with a 1 GB virtual disk:
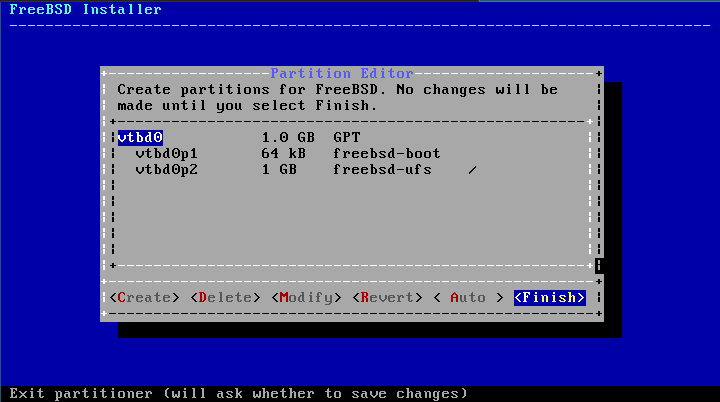
Select Finish and then Commit to commit your changes.
Note
If you modify this example, the root partition, which is mounted on
/, must be the last partition on the drive so that it can expand at run time to the disk size that your instance type provides. Also note thatbsd-cloudinitcurrently has a hard-coded assumption that this is the second partition.
Select a root password.
Select the CMOS time zone.
The virtualized CMOS almost always stores its time in UTC, so unless you know otherwise, select UTC.
Select the time zone appropriate to your environment.
From the list of services to start on boot, you must select ssh. Optionally, select other services.
Optionally, add users.
You do not need to add users at this time. The
bsd-cloudinitprogram adds afreebsduser account if one does not exist. Thesshkeys for this user are associated with OpenStack. To customize this user account, you can create it now. For example, you might want to customize the shell for the user.Final config
This menu enables you to update previous settings. Check that the settings are correct, and click exit.
After you exit, you can open a shell to complete manual configuration steps. Select Yes to make a few OpenStack-specific changes:
Set up the console:
# echo 'console="comconsole,vidconsole"' >> /boot/loader.conf
This sets console output to go to the serial console, which is displayed by nova consolelog, and the video console for sites with VNC or Spice configured.
Minimize boot delay:
# echo 'autoboot_delay="1"' >> /boot/loader.conf
Download the latest
bsd-cloudinit-installer. The download commands differ between FreeBSD 10.1 and 9.2 because of differences in how the fetch command handles HTTPS URLs.In FreeBSD 10.1 the fetch command verifies SSL peers by default, so you need to install the
ca_root_nsspackage that contains certificate authority root certificates and tell fetch where to find them. For FreeBSD 10.1 run these commands:# pkg install ca_root_nss # fetch --ca-cert=/usr/local/share/certs/ca-root-nss.crt \ https://raw.github.com/pellaeon/bsd-cloudinit-installer/master/installer.sh
FreeBSD 9.2 fetch does not support peer-verification for https. For FreeBSD 9.2, run this command:
# fetch https://raw.github.com/pellaeon/bsd-cloudinit-installer/master/installer.shRun the installer:
# sh ./installer.shIssue this command to download and install the latest
bsd-cloudinitpackage, and install the necessary prerequisites.Install
sudoand configure thefreebsduser to have passwordless access:# pkg install sudo # echo 'freebsd ALL=(ALL) NOPASSWD: ALL' > /usr/local/etc/sudoers.d/10-cloudinit
Power off the system:
# shutdown -h now

Except where otherwise noted, this document is licensed under Creative Commons Attribution 3.0 License. See all OpenStack Legal Documents.