Integrity life-cycle
We define integrity life cycle as a deliberate process that provides assurance that we are always running the expected software with the expected configurations throughout the cloud. This process begins with secure bootstrapping and is maintained through configuration management and security monitoring. This chapter provides recommendations on how to approach the integrity life-cycle process.
Secure bootstrapping
Nodes in the cloud—including compute, storage, network, service, and hybrid nodes—should have an automated provisioning process. This ensures that nodes are provisioned consistently and correctly. This also facilitates security patching, upgrading, bug fixing, and other critical changes. Since this process installs new software that runs at the highest privilege levels in the cloud, it is important to verify that the correct software is installed. This includes the earliest stages of the boot process.
There are a variety of technologies that enable verification of these early boot stages. These typically require hardware support such as the trusted platform module (TPM), Intel Trusted Execution Technology (TXT), dynamic root of trust measurement (DRTM), and Unified Extensible Firmware Interface (UEFI) secure boot. In this book, we will refer to all of these collectively as secure boot technologies. We recommend using secure boot, while acknowledging that many of the pieces necessary to deploy this require advanced technical skills in order to customize the tools for each environment. Utilizing secure boot will require deeper integration and customization than many of the other recommendations in this guide. TPM technology, while common in most business class laptops and desktops for several years, and is now becoming available in servers together with supporting BIOS. Proper planning is essential to a successful secure boot deployment.
A complete tutorial on secure boot deployment is beyond the scope of this book. Instead, here we provide a framework for how to integrate secure boot technologies with the typical node provisioning process. For additional details, cloud architects should refer to the related specifications and software configuration manuals.
Node provisioning
Nodes should use Preboot eXecution Environment (PXE) for provisioning. This significantly reduces the effort required for redeploying nodes. The typical process involves the node receiving various boot stages—that is progressively more complex software to execute— from a server.
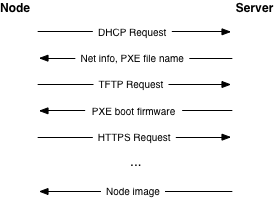
We recommend using a separate, isolated network within the management security domain for provisioning. This network will handle all PXE traffic, along with the subsequent boot stage downloads depicted above. Note that the node boot process begins with two insecure operations: DHCP and TFTP. Then the boot process uses TLS to download the remaining information required to deploy the node. This may be an operating system installer, a basic install managed by Chef or Puppet, or even a complete file system image that is written directly to disk.
While utilizing TLS during the PXE boot process is somewhat more challenging, common PXE firmware projects, such as iPXE, provide this support. Typically this involves building the PXE firmware with knowledge of the allowed TLS certificate chain(s) so that it can properly validate the server certificate. This raises the bar for an attacker by limiting the number of insecure, plain text network operations.
Verified boot
In general, there are two different strategies for verifying the boot process. Traditional secure boot will validate the code run at each step in the process, and stop the boot if code is incorrect. Boot attestation will record which code is run at each step, and provide this information to another machine as proof that the boot process completed as expected. In both cases, the first step is to measure each piece of code before it is run. In this context, a measurement is effectively a SHA-1 hash of the code, taken before it is executed. The hash is stored in a platform configuration register (PCR) in the TPM.
Note
SHA-1 is used here because this is what the TPM chips support.
Each TPM has at least 24 PCRs. The TCG Generic Server Specification, v1.0, March 2005, defines the PCR assignments for boot-time integrity measurements. The table below shows a typical PCR configuration. The context indicates if the values are determined based on the node hardware (firmware) or the software provisioned onto the node. Some values are influenced by firmware versions, disk sizes, and other low-level information. Therefore, it is important to have good practices in place around configuration management to ensure that each system deployed is configured exactly as desired.
| Register | What is measured | Context |
|---|---|---|
| PCR-00 | Core Root of Trust Measurement (CRTM), BIOS code, Host platform extensions | Hardware |
| PCR-01 | Host platform configuration | Hardware |
| PCR-02 | Option ROM code | Hardware |
| PCR-03 | Option ROM configuration and data | Hardware |
| PCR-04 | Initial Program Loader (IPL) code. For example, master boot record. | Software |
| PCR-05 | IPL code configuration and data | Software |
| PCR-06 | State transition and wake events | Software |
| PCR-07 | Host platform manufacturer control | Software |
| PCR-08 | Platform specific, often kernel, kernel extensions, and drivers | Software |
| PCR-09 | Platform specific, often Initramfs | Software |
| PCR-10 to PCR-23 | Platform specific | Software |
At the time of this writing, very few clouds are using secure boot technologies in a production environment. As a result, these technologies are still somewhat immature. We recommend planning carefully in terms of hardware selection. For example, ensure that you have a TPM and Intel TXT support. Then verify how the node hardware vendor populates the PCR values. For example, which values will be available for validation. Typically the PCR values listed under the software context in the table above are the ones that a cloud architect has direct control over. But even these may change as the software in the cloud is upgraded. Configuration management should be linked into the PCR policy engine to ensure that the validation is always up to date.
Each manufacturer must provide the BIOS and firmware code for their servers. Different servers, hypervisors, and operating systems will choose to populate different PCRs. In most real world deployments, it will be impossible to validate every PCR against a known good quantity (“golden measurement”). Experience has shown that, even within a single vendor’s product line, the measurement process for a given PCR may not be consistent. We recommend establishing a baseline for each server and monitoring the PCR values for unexpected changes. Third-party software may be available to assist in the TPM provisioning and monitoring process, depending upon your chosen hypervisor solution.
The initial program loader (IPL) code will most likely be the PXE firmware, assuming the node deployment strategy outlined above. Therefore, the secure boot or boot attestation process can measure all of the early stage boot code, such as BIOS, firmware, the PXE firmware, and the kernel image. Ensuring that each node has the correct versions of these pieces installed provides a solid foundation on which to build the rest of the node software stack.
Depending on the strategy selected, in the event of a failure the node will either fail to boot or it can report the failure back to another entity in the cloud. For secure boot, the node will fail to boot and a provisioning service within the management security domain must recognize this and log the event. For boot attestation, the node will already be running when the failure is detected. In this case the node should be immediately quarantined by disabling its network access. Then the event should be analyzed for the root cause. In either case, policy should dictate how to proceed after a failure. A cloud may automatically attempt to re-provision a node a certain number of times. Or it may immediately notify a cloud administrator to investigate the problem. The right policy here will be deployment and failure mode specific.
Node hardening
At this point we know that the node has booted with the correct kernel and underlying components. There are many paths for hardening a given operating system deployment. The specifics on these steps are outside of the scope of this book. We recommend following the guidance from a hardening guide specific to your operating system. For example, the security technical implementation guides (STIG) and the NSA guides are useful starting places.
The nature of the nodes makes additional hardening possible. We recommend the following additional steps for production nodes:
- Use a read-only file system where possible. Ensure that writeable
file systems do not permit execution. This can be handled through the
mount options provided in
/etc/fstab. - Use a mandatory access control policy to contain the instances, the node services, and any other critical processes and data on the node. See the discussions on sVirt / SELinux and AppArmor below.
- Remove any unnecessary software packages. This should result in a very stripped down installation because a compute node has a relatively small number of dependencies.
Finally, the node kernel should have a mechanism to validate that the rest of the node starts in a known good state. This provides the necessary link from the boot validation process to validating the entire system. The steps for doing this will be deployment specific. As an example, a kernel module could verify a hash over the blocks comprising the file system before mounting it using dm-verity.
Runtime verification
Once the node is running, we need to ensure that it remains in a good state over time. Broadly speaking, this includes both configuration management and security monitoring. The goals for each of these areas are different. By checking both, we achieve higher assurance that the system is operating as desired. We discuss configuration management in the management section, and security monitoring below.
Intrusion detection system
Host-based intrusion detection tools are also useful for automated validation of the cloud internals. There are a wide variety of host-based intrusion detection tools available. Some are open source projects that are freely available, while others are commercial. Typically these tools analyze data from a variety of sources and produce security alerts based on rule sets and/or training. Typical capabilities include log analysis, file integrity checking, policy monitoring, and rootkit detection. More advanced – often custom – tools can validate that in-memory process images match the on-disk executable and validate the execution state of a running process.
One critical policy decision for a cloud architect is what to do with the output from a security monitoring tool. There are effectively two options. The first is to alert a human to investigate and/or take corrective action. This could be done by including the security alert in a log or events feed for cloud administrators. The second option is to have the cloud take some form of remedial action automatically, in addition to logging the event. Remedial actions could include anything from re-installing a node to performing a minor service configuration. However, automated remedial action can be challenging due to the possibility of false positives.
False positives occur when the security monitoring tool produces a security alert for a benign event. Due to the nature of security monitoring tools, false positives will most certainly occur from time to time. Typically a cloud administrator can tune security monitoring tools to reduce the false positives, but this may also reduce the overall detection rate at the same time. These classic trade-offs must be understood and accounted for when setting up a security monitoring system in the cloud.
The selection and configuration of a host-based intrusion detection tool is highly deployment specific. We recommend starting by exploring the following open source projects which implement a variety of host-based intrusion detection and file monitoring features.
Network intrusion detection tools complement the host-based tools. OpenStack doesn’t have a specific network IDS built-in, but OpenStack Networking provides a plug-in mechanism to enable different technologies through the Networking API. This plug-in architecture will allow tenants to develop API extensions to insert and configure their own advanced networking services like a firewall, an intrusion detection system, or a VPN between the VMs.
Similar to host-based tools, the selection and configuration of a network-based intrusion detection tool is deployment specific. Snort is the leading open source networking intrusion detection tool, and a good starting place to learn more.
There are a few important security considerations for network and host-based intrusion detection systems.
- It is important to consider the placement of the Network IDS on the cloud (for example, adding it to the network boundary and/or around sensitive networks). The placement depends on your network environment but make sure to monitor the impact the IDS may have on your services depending on where you choose to add it. Encrypted traffic, such as TLS, cannot generally be inspected for content by a Network IDS. However, the Network IDS may still provide some benefit in identifying anomalous unencrypted traffic on the network.
- In some deployments it may be required to add host-based IDS on sensitive components on security domain bridges. A host-based IDS may detect anomalous activity by compromised or unauthorized processes on the component. The IDS should transmit alert and log information on the Management network.
Server hardening
Servers in the cloud, including undercloud and overcloud infrastructure, should implement hardening best practices. As OS and server hardening is common, applicable best practices including but not limited to logging, user account restrictions, and regular updates will not be covered here, but should be applied to all infrastructure.
File integrity management (FIM)
File integrity management (FIM) is the method of ensuring that files such as sensitive system or application configuration files are not corrupted or changed to allow unauthorized access or malicious behavior. This can be done through a utility such as Samhain that will create a checksum hash of the specified resource and then validate that hash at regular intervals, or through a tool such as DMVerity that can take a hash of block devices and will validate those hashes as they are accessed by the system before they are presented to the user.
These should be put in place to monitor and report on changes to system,
hypervisor, and application configuration files such as
/etc/pam.d/system-auth and /etc/keystone/keystone.conf,
as well as kernel modules (such as virtio). Best practice is to use
the lsmod command to show what is regularly being loaded on a
system to help determine what should or should not be included in FIM checks.

Except where otherwise noted, this document is licensed under Creative Commons Attribution 3.0 License. See all OpenStack Legal Documents.