The Physical Inventory area contains its own reports section.
To display a list of Item Sites that have been frozen, select the "Frozen Item Sites" option. The following screen will appear:
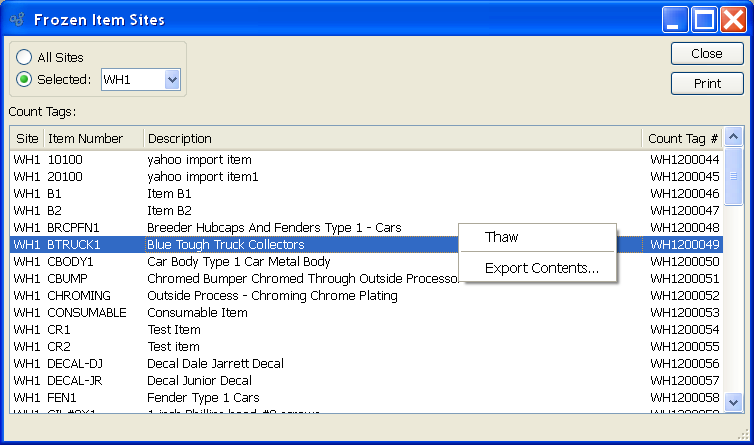
When displaying frozen Item Sites, you are presented with the following options:
- All Sites
Select to display frozen Item Sites for all Sites.
- Selected
Specify Site whose frozen Item Sites you want to display.
- Count Tags
Display lists frozen Item Sites, using the specified parameters.
To the far right of the screen, the following buttons are available:
- CLOSE
Closes the screen, returning you to the application desktop.
Runs the report associated with this screen.
Right-clicking on an Item Site in the frozen Item Sites list enables you to select from the following menu options:
To edit Count Slips entered for an associated Count Tag, select the "Count Slip Edit List" option. The following screen will appear:
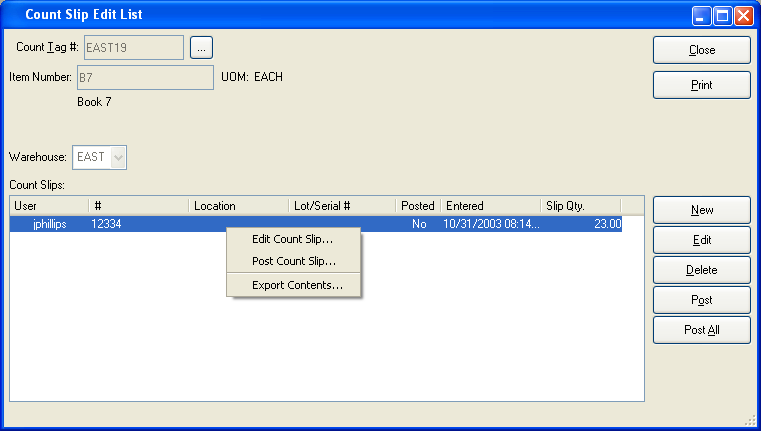
When displaying the Count Slip Edit List, you are presented with the following options:
- Count Tag #
Enter the Count Tag Number of the Count Tag whose Count Slips you want to display.
- Item Number
Displays Item Number automatically when Count Tag Number is entered into "Count Tag #" field.
- UOM
Inventory Unit of Measure.
- Site
Displays Site where Count Tag and Count Slips originate from.
- Count Slips
Display lists the Count Slip Edit List, using the specified parameters.
To the far right of the screen, the following buttons are available:
- CLOSE
Closes the screen, returning you to the application desktop.
Runs the report associated with this screen.
- NEW
Opens screen for creating a new Count Slip.
- EDIT
Enables you to edit highlighted Count Slip. The edit screen is the same as that for creating a new Count Slip—except that when editing, the fields will contain Count Slip information. Double-clicking on a Count Slip will also bring you to the editing screen.
- DELETE
Highlight a Count Slip and then select this button to remove the Count Slip from the list.
- POST
Posts individual Count Slip quantities to the associated Count Tag's total. Highlight the individual Count Slip you want to post.
- POST ALL
Posts all Count Slip quantities displayed in the "Count Slips" list to the associated Count Tag's total.
Right-clicking on a Count Slip in the Count Slips list enables you to select from the following menu options:
If the Count Slip has not been posted, the following additional menu option will also be available:
The Count Tag Edit List displays the unposted Count Tags currently available in your system. From this list, you can manage current Count Tags and their associated Count Slips. To display available Count Tags, select the "Count Tag Edit List" option. The following screen will appear:
Tip
By default, the system allows only one unposted Count Tag per Item Site. Use the Count Tag Edit List to view all unposted Count Tags in your system.

When displaying the Count Tag Edit List, you are presented with the following options:
- Search For
To search for a Count Tag in the edit list, begin typing in the search field. As you type, the list will automatically scroll toward the Count Tag you are typing. You can also search for Count Tags manually by scrolling through the list.
- All Sites
Select to display Count Tags for all Sites.
- Selected
Specify Site whose Count Tags you want to display.
- Item Sites in
-
Specify which of the following codes you want to have Count Tag displayed for:
- Class Code
If selected, you will be presented with Class Code options.
- Planner Code
If selected, you will be presented with Planner Code options.
Tip
One way to manage Count Slips associated with a Count Tag is by using the right-click menu options available from the Count Tag Edit List.
- Show Count Slips
Select to display Count Slips associated with Count Tags. Count Slips will display in a nested manner beneath their associated Count Tag. Look for a plus "+" sign in the first column to determine if Count Slips are associated. Select the plus "+" sign to reveal the Count Slips. To hide the Count Slips, select the minus "-" sign.
- No Highlighting
Select to not highlight Count Tags with variances.
- Highlight Count Tag when Variance Value Exceeds
Select to highlight Count Tags whose dollar amount variance exceeds the value entered. In addition to checking the box, you must also enter a value in the field. Once the value is entered, select the QUERY button. Count Tags meeting your criteria will automatically be highlighted in red.
Note
Count Tags showing both positive and negative variances will be highlighted. For example, if you enter "100" in the field "Highlight Count Tag When Variance Value Exceeds," all dollar amount variances greater than $100 will be highlighted, but so too will negative variances exceeding -$100. The same principle holds true if a percentage value is entered.
- Highlight Count Tag when Variance Exceeds %
Select to highlight Count Tags whose variance exceeds a user-defined percentage. In addition to checking the box, you must also enter a percentage in the percentage field. Once the percentage is entered, select the QUERY button. Count Tags meeting your criteria will automatically be highlighted in red.
- Count Tags
Display lists Count Tag Edit List, using the specified parameters. If the count quantity displays in blue type, this means the Item has not been counted.
Tip
Count Tags may be created to count an entire Item Site—or a specific Site Location within an Item Site.
To the far right of the screen, the following buttons are available:
- CLOSE
Closes the screen, returning you to the application desktop.
- QUERY
Select to generate the display, using the specified parameters.
Runs the report associated with this screen.
Note
The Count Tag Edit List supports multiple-select, using the SHIFT and/or CTRL keys.
- EDIT
Enables you to edit highlighted Count Tags. The edit screen is the same as that for creating a new Count Tag—except that when editing, the fields will contain Count Tag information. Double-clicking on a Count Tag will also bring you to the editing screen.
- DELETE
Highlight a Count Tag—or group of Count Tags using the SHIFT and/or CTRL keys—and then select this button to remove the Count Tag from the list.
- POST
Highlight an individual Count Tag—or group of Count Tags using the SHIFT and/or CTRL keys—and then select this button to post the Count Tag(s). Posts Count Tag quantities to the Quantity on Hand for the associated Item Site(s)
- Automatically Update
Select to automatically update the display every five minutes.
Right-clicking on a Count Tag in the Count Tags list enables you to select the following menu options:
- Count Slip Edit List
Select to display the Count Slip Edit List for the specified Count Tag, if any.
- View Pending Inventory History
Select to view Inventory transactions for the Item Site since the date the specified Count Tag was created.
- Edit Count Tag
Enables you to edit highlighted Count Tags. The edit screen is the same as that for creating a new Count Tag—except that when editing, the fields will contain Count Tag information. Double-clicking on a Count Tag will also bring you to the editing screen.
- Post Count Tag
Highlight an individual Count Tag—or group of Count Tags using the SHIFT and/or CTRL keys—and then select this button to post the Count Tag(s). Posts Count Tag quantities to the Quantity on Hand for the associated Item Site(s)
To view a display of Count Slips by Site, select the "Count Slips by Site" option. The following screen will appear:

When displaying Count Slips by Site, you are presented with the following options:
- All Sites
Select to display Count Slips for all Sites.
- Selected
Specify Site whose Count Slips you want to display.
- Start Date
Count Slips entered on and after this date will be displayed.
- End Date
Count Slips entered on and before this date will be displayed.
- Show Unposted Count Tags
Select to display unposted Count Tags.
- Treat Slip Numbers as Numeric
Select to treat Count Slip numbers as numeric. If selected, the display will treat existing Count Slips as if they were created in a numerical sequence. If numbers are missing from the sequence, the display will indicate the missing Count Slip numbers in red type.
- Count Slips
Display lists Count Slips by Site, using the specified parameters.
To the far right of the screen, the following buttons are available:
- CLOSE
Closes the screen, returning you to the application desktop.
Runs the report associated with this screen.
Count Tag Reports section.
To view a display of Count Tags by Item, select the "Count Tags by Item" option. The following screen will appear:
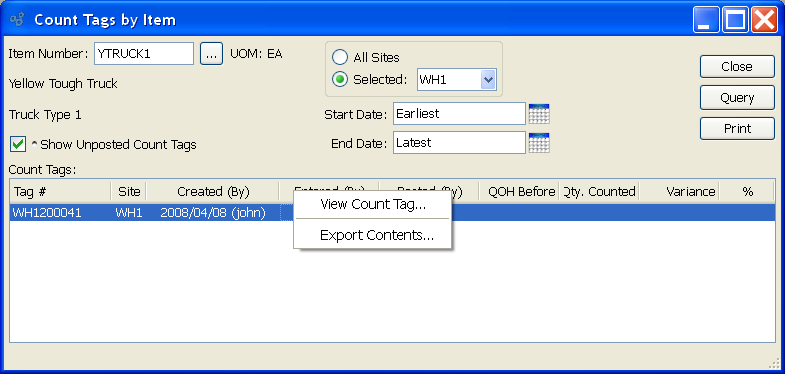
When displaying Count Tags by Item, you are presented with the following options:
- Item Number
Enter the Item Number of the Item Count Tags you want to view. The browse button located to the right of the field leads to a searchable list of make and buy items.
- UOM
Inventory Unit of Measure.
- Show Unposted Count Tags
Select to display unposted Count Tags.
- All Sites
Select to display Count Tags for all Sites.
- Selected
Specify Site whose Count Tags you want to display.
- Start Date
Count Tags entered on and after this date will be displayed.
- End Date
Count Tags entered on and before this date will be displayed.
- Count Tags
Display lists Count Tags by Item, using the specified parameters.
To the far right of the screen, the following buttons are available:
- CLOSE
Closes the screen, returning you to the application desktop.
- QUERY
Select to generate the display, using the specified parameters.
Runs the report associated with this screen.
Right-clicking on a Count Tag in the Count Tags list enables you to select the following menu options:
To view a display of Count Tags by Site, select the "Count Tags by Site" option. The following screen will appear:

When displaying Count Tags by Site, you are presented with the following options:
- Show Unposted Count Tags
Select to display unposted Count Tags.
- All Sites
Select to display Count Tags for all Sites.
- Selected
Specify Site whose Count Tags you want to display.
- Start Date
Count Tags entered on and after this date will be displayed.
- End Date
Count Tags entered on and before this date will be displayed.
- Count Tags
Display lists Count Tags by Site, using the specified parameters.
To the far right of the screen, the following buttons are available:
- CLOSE
Closes the screen, returning you to the application desktop.
- QUERY
Select to generate the display, using the specified parameters.
Runs the report associated with this screen.
Right-clicking on a Count Tag in the Count Tags list enables you to select the following menu options:
To view a display of Count Tags by Class Code, select the "Count Tags by Class Code" option. The following screen will appear:
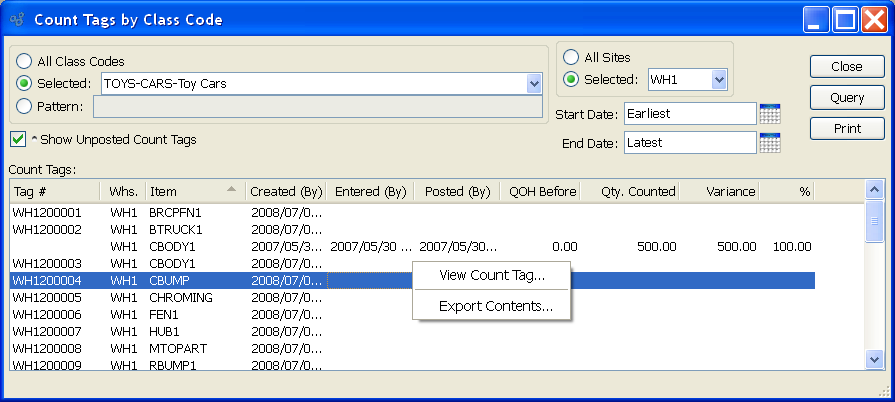
When displaying Count Tags by Class Code, you are presented with the following options:
- All Class Codes
Select to display Count Tags for all Class Codes.
- Selected
Specify Class Code whose Count Tags you want to display.
- Pattern
Enter a Class Code pattern to select a range of Class Codes. Refine your search using Regular Expressions.
- Show Unposted Count Tags
Select to display unposted Count Tags.
- All Sites
Select to display Count Tags for all Sites.
- Selected
Specify Site whose Count Tags you want to display.
- Start Date
Count Tags entered on and after this date will be displayed.
- End Date
Count Tags entered on and before this date will be displayed.
- Count Tags
Display lists Count Tags by Class Code, using the specified parameters.
To the far right of the screen, the following buttons are available:
- CLOSE
Closes the screen, returning you to the application desktop.
- QUERY
Select to generate the display, using the specified parameters.
Runs the report associated with this screen.
Right-clicking on a Count Tag in the Count Tags list enables you to select the following menu options: