Inventory history Reports section.
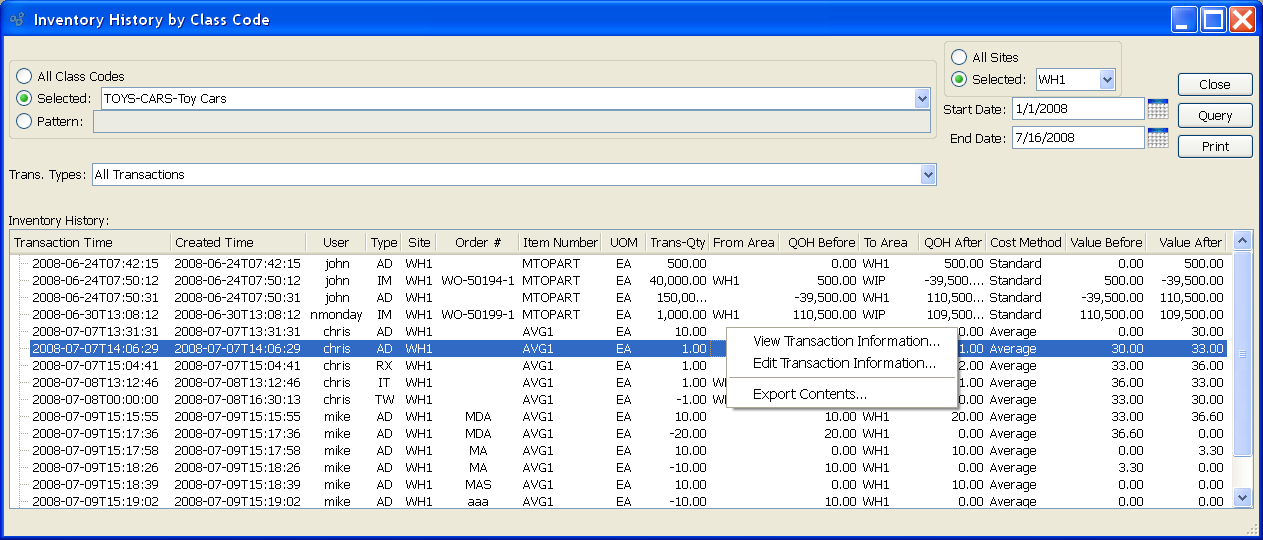
To view Inventory history by Class Code, select the "Inventory History by Class Code" option. The following screen will appear:

Tip
If a line displays in orange, this means the Item Site in question is frozen. Accurate Quantity on Hand information will not be shown until the Item Site is thawed.
When displaying Inventory history by Class Code, you are presented with the following options:
- Pattern
Enter a Class Code pattern to select a range of Class Codes. Refine your search using Regular Expressions.
- Trans. Types
-
Select one of the available transaction types:
- All Transactions
Displays all Inventory transactions.
- Receipts
Displays receipts into Inventory from Manufacturing, purchases, or miscellaneous receipts.
- Issues
Displays issues from Inventory to Manufacturing.
- Shipments
Displays shipments to customers.
- Adjustments and Counts
Displays Inventory adjustments and counts.
- Transfers
Displays Inter-Site Transfers and Location and Lot/Serial Number reassignments.
- Scraps
Displays Scrap removed from Inventory.
Note
The system prefixes Order Numbers with letters indicating the Order type. For example, Work Orders are prefixed with "WO", Purchase Orders with "PO", and Sales Orders with "SO". These letters are for display purposes only and are not considered part of the Order Number.
To the far right of the screen, the following buttons are available:
Right-clicking on a transaction in the Inventory History list enables you to select from the following menu options:
When editing transaction information, you may choose to exclude a transaction from Inventory analysis. Not including a transaction in this manner means the following Inventory analyses will ignore the transaction: Item Usage Statistics displays, Update Reorder Levels, and Update Order Up To Levels.
If the Order Number is associated with a Work Order, the following additional menu option will also be available:
To view Inventory history by Class Code, select the "Inventory History by Class Code" option. The following screen will appear:

Tip
If a line displays in orange, this means the Item Site in question is frozen. Accurate Quantity on Hand information will not be shown until the Item Site is thawed.
When displaying Inventory history by Class Code, you are presented with the following options:
- Pattern
Enter a Class Code pattern to select a range of Class Codes. Refine your search using Regular Expressions.
- Trans. Types
-
Select one of the available transaction types:
- All Transactions
Displays all Inventory transactions.
- Receipts
Displays receipts into Inventory from Manufacturing, purchases, or miscellaneous receipts.
- Issues
Displays issues from Inventory to Manufacturing.
- Shipments
Displays shipments to customers.
- Adjustments and Counts
Displays Inventory adjustments and counts.
- Transfers
Displays Inter-Site Transfers and Location and Lot/Serial Number reassignments.
- Scraps
Displays Scrap removed from Inventory.
Note
The system prefixes Order Numbers with letters indicating the Order type. For example, Work Orders are prefixed with "WO", Purchase Orders with "PO", and Sales Orders with "SO". These letters are for display purposes only and are not considered part of the Order Number.
To the far right of the screen, the following buttons are available:
Right-clicking on a transaction in the Inventory History list enables you to select from the following menu options:
When editing transaction information, you may choose to exclude a transaction from Inventory analysis. Not including a transaction in this manner means the following Inventory analyses will ignore the transaction: Item Usage Statistics displays, Update Reorder Levels, and Update Order Up To Levels.
If the Order Number is associated with a Work Order, the following additional menu option will also be available:
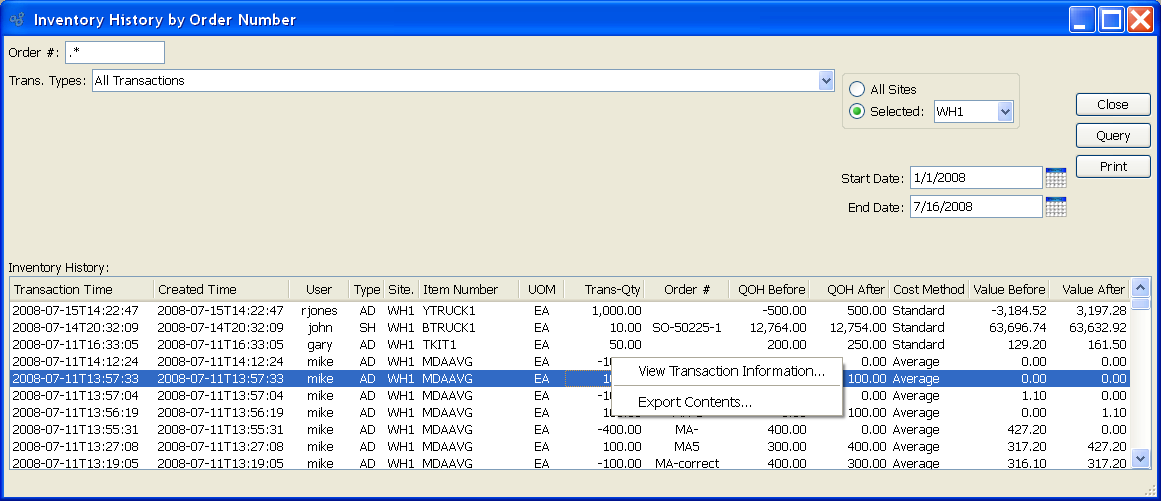
The Inventory History by Order Number display provides transaction details in support of all Order types: Sales Orders, Purchase Orders, and Work Orders. To view Inventory history by Order Number, select the "Inventory History by Order Number" option. The following screen will appear:

Tip
If a line displays in orange, this means the Item Site in question is frozen. Accurate Quantity on Hand information will not be shown until the Item Site is thawed.
When displaying Inventory history by Order Number, you are presented with the following options:
- Order #
Enter an Order Number or Regular Expression. The display will show Inventory history for the specified Order Number(s). Purchase Order Numbers, Sales Order Numbers, and Work Order Numbers are supported.
Tip
The "Order #" field supports pattern matching with Regular Expressions.
- Trans. Types
-
Select one of the available transaction types:
- All Transactions
Displays all Inventory transactions.
- Receipts
Displays receipts into Inventory from Manufacturing, purchases, or miscellaneous receipts.
- Issues
Displays issues from Inventory to Manufacturing.
- Shipments
Displays shipments to customers.
- Adjustments and Counts
Displays Inventory adjustments and counts.
- Transfers
Displays Inter-Site Transfers and Location and Lot/Serial Number reassignments.
- Scraps
Displays Scrap removed from Inventory.
- Inventory History
Display lists Inventory history by Order Number, using the specified parameters.
- All Sites
Select to display Inventory history by Order Number for all Sites.
- Selected
Specify Site whose Inventory history by Order Number you want to display.
- Start Date
This is a required field. Inventory transactions conducted on and after this date will be displayed.
- End Date
This is a required field. Inventory transactions conducted on and before this date will be displayed.
To the far right of the screen, the following buttons are available:
- CLOSE
Closes the screen, returning you to the application desktop.
- QUERY
Select to generate the display, using the specified parameters.
Runs the report associated with this screen.
Right-clicking on a transaction in the Inventory History list enables you to select from the following menu options:
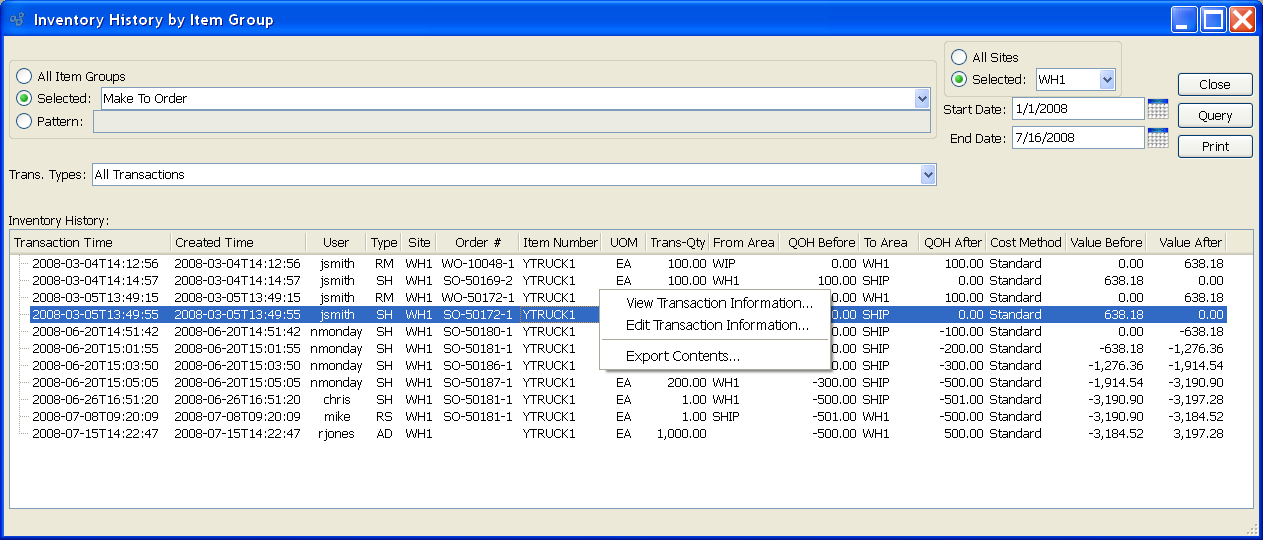
To view Inventory history by Item Group, select the "Inventory History by Item Group" option. The following screen will appear:

Tip
If a line displays in orange, this means the Item Site in question is frozen. Accurate Quantity on Hand information will not be shown until the Item Site is thawed.
When displaying Inventory history by Item Group, you are presented with the following options:
- All Item Groups
Select to display Inventory history for all Item Groups.
- Selected
Specify Item Group whose Inventory history you want to display.
- Pattern
Enter an Item Group pattern to select a range of Item Groups. Refine your search using Regular Expressions.
- Trans. Types
-
Select one of the available transaction types:
- All Transactions
Displays all Inventory transactions.
- Receipts
Displays receipts into Inventory from Manufacturing, purchases, or miscellaneous receipts.
- Issues
Displays issues from Inventory to Manufacturing.
- Shipments
Displays shipments to customers.
- Adjustments and Counts
Displays Inventory adjustments and counts.
- Transfers
Displays Inter-Site Transfers and Location and Lot/Serial Number reassignments.
- Scraps
Displays Scrap removed from Inventory.
Note
The system prefixes Order Numbers with letters indicating the Order type. For example, Work Orders are prefixed with "WO", Purchase Orders with "PO", and Sales Orders with "SO". These letters are for display purposes only and are not considered part of the Order Number.
- All Sites
Select to display Inventory history by Item Group for all Sites.
- Selected
Specify Site whose Inventory history by Item Group you want to display.
- Start Date
This is a required field. Inventory transactions conducted on and after this date will be displayed.
- End Date
This is a required field. Inventory transactions conducted on and before this date will be displayed.
- Inventory History
Display lists Inventory history by Item Group, using the specified parameters. This display is a nested list, with a plus ("+") sign located to the far left of the display next to each transaction that may be expanded to lower levels. By clicking your mouse on a plus sign, you reveal lower levels of information related to the Order.
To the far right of the screen, the following buttons are available:
- CLOSE
Closes the screen, returning you to the application desktop.
- QUERY
Select to generate the display, using the specified parameters. Start date and end date must be entered for calculation to proceed. Results will be displayed in the "Inventory History" list.
Runs the report associated with this screen.
Right-clicking on a transaction in the Inventory History list enables you to select from the following menu options:
When editing transaction information, you may choose to exclude a transaction from Inventory analysis. Not including a transaction in this manner means the following Inventory analyses will ignore the transaction: Item Usage Statistics displays, Update Reorder Levels, and Update Order Up To Levels.
If the Order Number is associated with a Work Order, the following additional menu option will also be available:
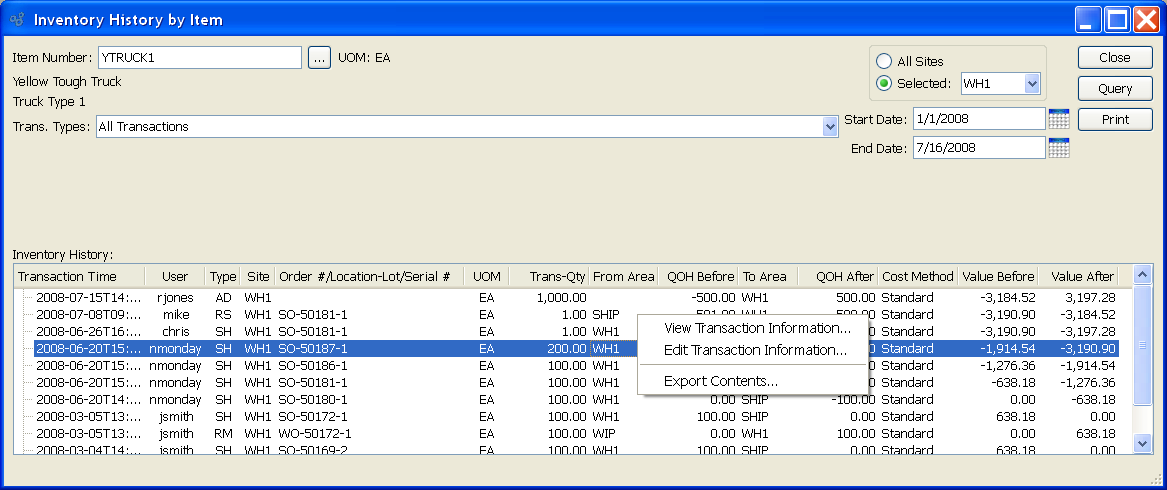
To view Inventory history by Item, select the "Inventory History by Item" option. The following screen will appear:

Tip
If a line displays in orange, this means the Item Site in question is frozen. Accurate Quantity on Hand information will not be shown until the Item Site is thawed.
When displaying Inventory history by Item, you are presented with the following options:
- Item Number
Enter the Item Number of the Item whose Inventory history you want to display. The browse button located to the right of the field leads to a searchable list of make and buy items.
- UOM
Inventory Unit of Measure.
- Trans. Types
-
Select one of the available transaction types:
- All Transactions
Displays all Inventory transactions.
- Receipts
Displays receipts into Inventory from Manufacturing, purchases, or miscellaneous receipts.
- Issues
Displays issues from Inventory to Manufacturing.
- Shipments
Displays shipments to customers.
- Adjustments and Counts
Displays Inventory adjustments and counts.
- Transfers
Displays Inter-Site Transfers and Location and Lot/Serial Number reassignments.
- Scraps
Displays Scrap removed from Inventory.
Note
The system prefixes Order Numbers with letters indicating the Order type. For example, Work Orders are prefixed with "WO", Purchase Orders with "PO", and Sales Orders with "SO". These letters are for display purposes only and are not considered part of the Order Number.
- All Sites
Select to display Inventory history by Item for all Sites.
- Selected
Specify Site whose Inventory history by Item you want to display.
- Start Date
This is a required field. Inventory transactions conducted on and after this date will be displayed.
- End Date
This is a required field. Inventory transactions conducted on and before this date will be displayed.
- Inventory History
Display lists Inventory history by Item, using the specified parameters. This display is a nested list, with a plus ("+") sign located to the far left of the display next to each transaction that may be expanded to lower levels. By clicking your mouse on a plus sign, you reveal lower levels of information related to the Order.
To the far right of the screen, the following buttons are available:
- CLOSE
Closes the screen, returning you to the application desktop.
- QUERY
Select to generate the display, using the specified parameters. Start date and end date must be entered for calculation to proceed. Results will be displayed in the "Inventory History" list.
Runs the report associated with this screen.
Right-clicking on a transaction in the Inventory History list enables you to select from the following menu options:
When editing transaction information, you may choose to exclude a transaction from Inventory analysis. Not including a transaction in this manner means the following Inventory analyses will ignore the transaction: Item Usage Statistics displays, Update Reorder Levels, and Update Order Up To Levels.
If the Order Number is associated with a Work Order, the following additional menu option will also be available: