The Item Availability Workbench is designed to consolidate on one screen the functions performed by personnel who manage and track Inventory. To access the Item Availability Workbench, select the "Item Availability Workbench" option. The following screen will appear:
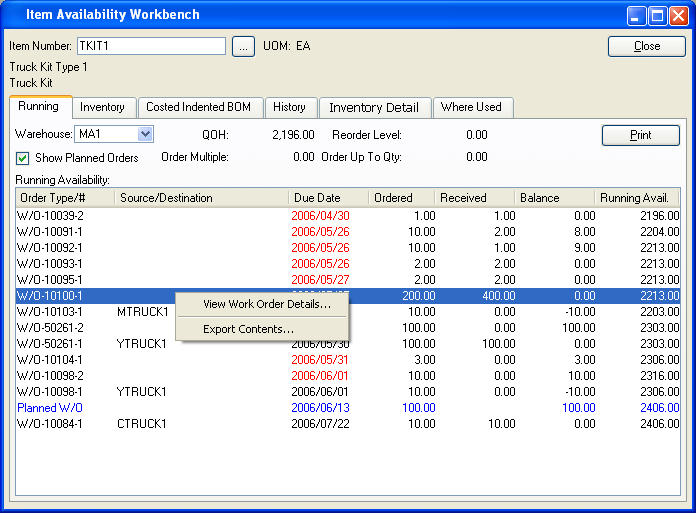
When displaying Running Availability, you are presented with the following options:
Note
When quantity appears in the "Ordered" column, this refers to quantity that is on order through either a Work Order or Purchase Order. In the case of Purchase Orders, the quantity will always be represented in the Inventory Unit of Measure (UOM)—regardless of the Vendor UOM used on the Purchase Order.
- Show Planned Orders
Select to show Planned Orders in the display. Planned Orders will display in blue type.
- Order Multiple
Displays Order Multiple specifying the increments the Item must be ordered in. Order Multiple is maintained in the Item Site master.
- Reorder Level
Displays the Reorder Level specifying the minimum Quantity on Hand allowed before an Item must be reordered. Reorder Level is maintained in the Item Site master.
To the far right of the screen, the following buttons are available:
Right-clicking on a Work Order in the Running Availability display enables you to select from the following options:
If you right-click on a Planned Order, the following additional option will also be available:
To view Inventory Availability for the specified Item, select the "Inventory" tab. The following screen will appear:
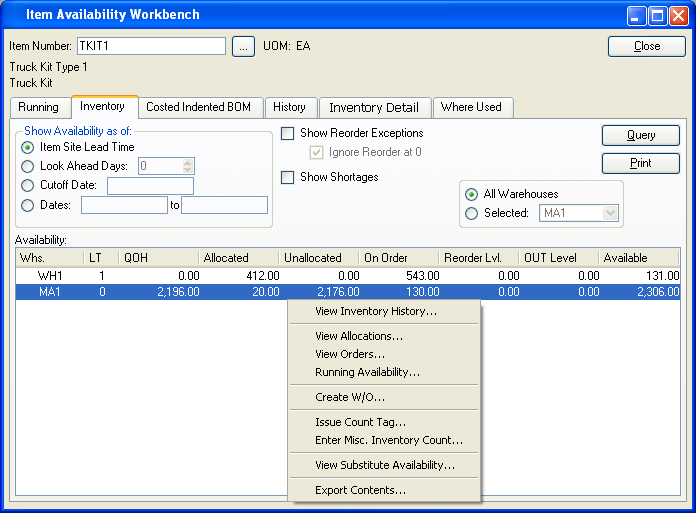
When displaying Inventory Availability by Item, you are presented with the following options:
- Show Availability as of
-
Show Availability using one of the following criteria:
- Item Site Lead Time
Select to show projected Availability based on the Lead Time specified in the Item Site master.
- Look Ahead Days
Select a number using the arrow buttons, or manually enter a value up to a maximum of 1000. Future Availability for the specified Item will be displayed based on the value entered here.
- Cutoff Date
Display will show projected Inventory Availability as of date entered up to a maximum of 1000 days.
- Dates
Display will show projected Inventory Availability for the date range entered.
- Show Reorder Exceptions
Select to show Reorder Exceptions in display. Reorder Exceptions are an indication that an Item Site's projected Availability will drop below the Reorder Level for the Item Site.
- Ignore Reorder at 0
Select to ignore Reorder Exceptions in cases where both the Item Site Reorder Level and Planned Availability are equal to zero ("0"). If selected, Item Sites matching these criteria will not be displayed.
- Show Shortages
-
Select to only show Inventory shortages in display. Shortages are always shown in the report, if they exist. However, using this option simply separates shortages out so you can see only them. A shortage exists if Availability is less than zero, as in
QOH - Allocated + Ordered < 0
- Availability
Display lists Inventory Availability by Item, using the specified parameters. If Planned Availability displays in the color orange, this means the actual or projected Quantity on Hand is at or below the Reorder Level. If the color is red, the current or projected Quantity on Hand is below 0.
Note
When quantity appears in the "On Order" column, this refers to quantity that is on order through either a Work Order or Purchase Order. In the case of Purchase Orders, the quantity will always be represented in the Inventory Unit of Measure (UOM)—regardless of the Vendor UOM used on the Purchase Order.
To the far right of the screen, the following buttons are available:
Right-clicking on an Item in the Availability list enables you to select from the following context-sensitive menu options:
The following additional options are available for purchased Items:
The following additional option is available for manufactured Items:
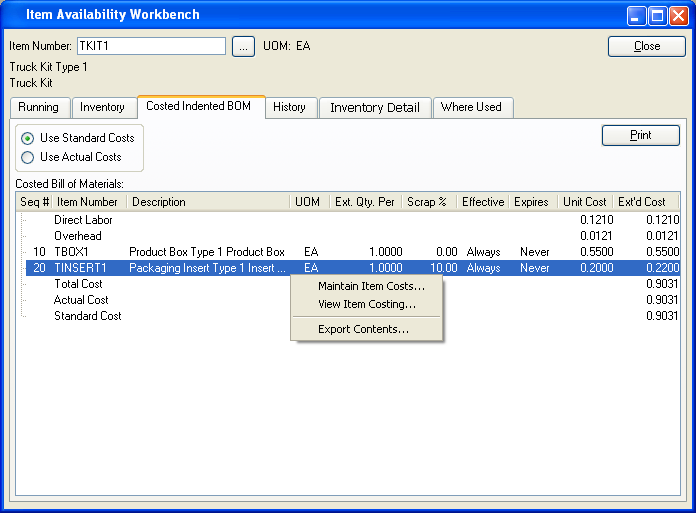
To view a Costed Indented Bill of Materials for the specified Item, select the "Costed Indented BOM" tab. The following screen will appear:
Tip
Costed Indented BOM information will be displayed only if the specified Item is a manufactured Item.
When displaying Costs for an indented Bill of Materials, you are presented with the following options:
Note
In the Costed Indented Bill of Materials, the totals displayed on the screen are derived as follows:
- Total Cost
This total is pulled from the Extended Cost column. The total may vary, depending on whether "Use Standard Costs" or "Use Actual Costs" is selected.
- Actual Cost
This value represents the Actual Cost for the parent Item whose Costed Indented BOM is being displayed.
- Standard Cost
This value represents the Standard Cost for the parent Item whose Costed Indented BOM is being displayed.
- Costed Bill of Materials
Display lists Costed Indented Bill of Materials components, using the specified parameters. The difference between the indented view and the single level view is that the indented view displays all subcomponents if there is a manufactured component listed on the Bill of Materials. The Total Cost, Actual Cost, and Standard Cost will be calculated automatically at the bottom of the display.
To the far right of the display are the following buttons and display fields:
Right-clicking on a component in the Costed Bill of Materials list enables you to select from the following menu options:
To view Inventory History for the specified Item, select the "History" tab. The following screen will appear:
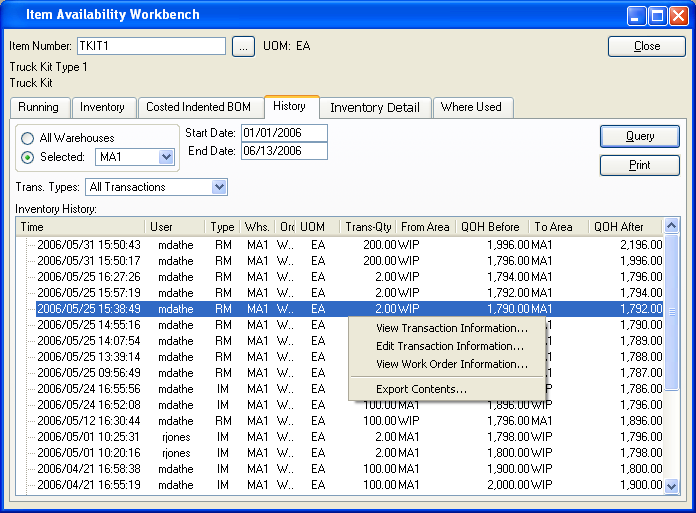
When displaying Inventory history by Item, you are presented with the following options:
- Trans. Types
-
Select one of the available transaction types:
- All Transactions
Displays all Inventory transactions.
- Receipts
Displays receipts into Inventory from Manufacturing, purchases, or miscellaneous receipts.
- Issues
Displays issues from Inventory to Manufacturing.
- Shipments
Displays shipments to customers.
- Adjustments and Counts
Displays Inventory adjustments and counts.
- Transfers
Displays Inter-Site Transfers and Location and Lot/Serial Number reassignments.
- Scraps
Displays Scrap removed from Inventory.
Note
The system prefixes Order Numbers with letters indicating the Order type. For example, Work Orders are prefixed with "WO", Purchase Orders with "PO", and Sales Orders with "SO". These letters are for display purposes only and are not considered part of the Order Number.
- Start Date
This is a required field. Inventory transactions conducted on and after this date will be displayed.
- End Date
This is a required field. Inventory transactions conducted on and before this date will be displayed.
- Inventory History
Display lists Inventory history by Item, using the specified parameters. This display is a nested list, with a plus ("+") sign located to the far left of the display next to each transaction that may be expanded to lower levels. By clicking your mouse on a plus sign, you reveal lower levels of information related to the Order. To the far right of the screen, the following buttons are available:
Right-clicking on a transaction in the Inventory History list enables you to select from the following menu options:
When editing transaction information, you may choose to exclude a transaction from Inventory analysis. Not including a transaction in this manner means the following Inventory analyses will ignore the transaction: Item Usage Statistics displays, Update Reorder Levels, and Update Order Up To Levels.
If the Order Number is associated with a Work Order, the following additional menu option will also be available:
To view Lot/Serial and/or Location information for the specified Item, select the "Inventory Detail" tab. The following screen will appear:
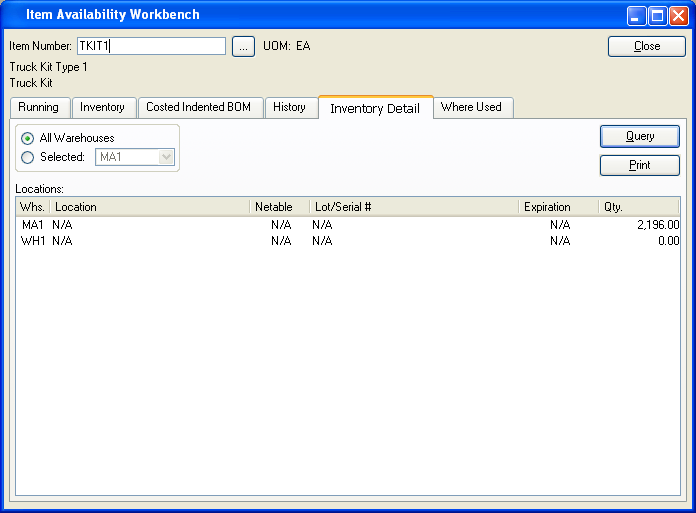
When displaying detailed Inventory information, you are presented with the following options:
To the far right of the screen, the following buttons are available:
To view where the specified Item is used for manufacturing, select the "Where Used" tab. The following screen will appear:
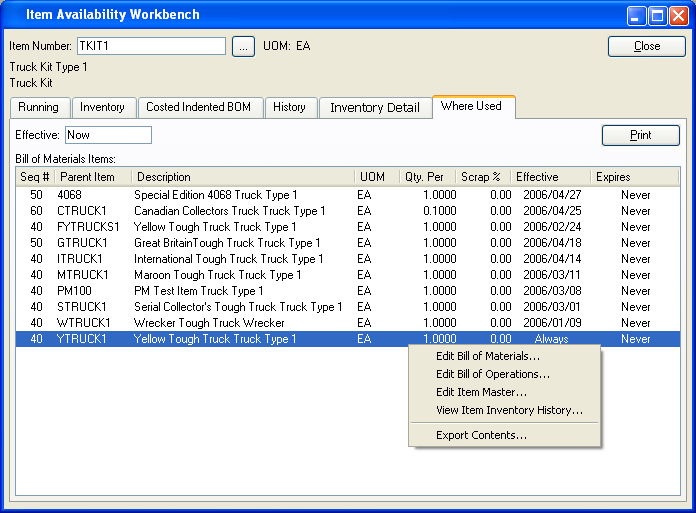
When displaying a single level Bill of Materials, you are presented with the following options:
- Item Number
Enter the Item Number of the manufactured Item you would like to view a single level Bill of Materials for.
- Show Expired Components
Select to cause expired components to be listed in the "Bill of Materials" display.
- Threshold Days
Select a number using the arrow buttons, or manually enter a value up to a maximum of 999. Components that have been expired from the Bill of Materials within the specified number of days will be included in the display.
- Show Future Components
Select to cause future components to be listed in the "Bill of Materials" display.
To the far right of the screen, the following buttons are available:
Right-clicking on an Item in the Bill of Materials Items list enables you to select from the following menu options: