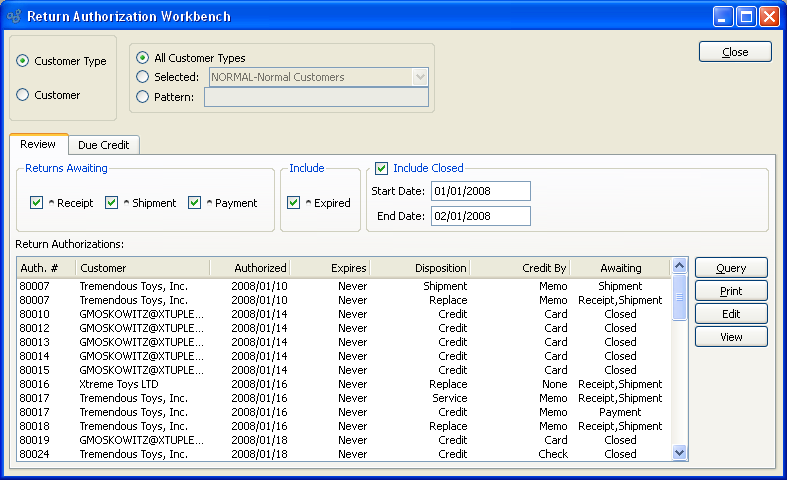
The Return Authorization Workbench is designed to help manage and process open Return Authorizations—and to process credits and refunds. The Return Authorization Workbench appears as follows:

When processing open Return Authorizations, you are presented with the following options:
- Customer Types
-
Select to display Return Authorizations for one of the following Customer Type options:
- All Customer Types
Select to display Return Authorizations for all Customer Types.
- Selected
Specify Customer Type whose Return Authorizations you want to display.
- Pattern
Enter a Customer Type pattern to select a range of Customer Types. Refine your search using Regular Expressions.
- Customer
-
Select to display Return Authorizations for a specified Customer:
- Customer #
Enter the Customer Number of the Customer whose Return Authorizations you want to display. The browse button located to the right of the field leads to a searchable Customers list. You may also access this list using the keyboard shortcut "CTRL + L". Once a Customer Number is entered, the Customer name and billing address will display. Select the "?" symbol next to the browse button to view Customer information for the specified Customer.
- Returns Awaiting
-
Return Authorizations may exist in several stages of readiness. Choose which of the following stages you want to include in the display:
- Receipt
Select to include Return Authorizations waiting for Customer returns to be posted as received.
- Shipment
Select to include Return Authorizations waiting to be shipped to Customers.
- Payment
Select to include Return Authorizations waiting for Customer payment.
- Include
-
You may choose to include the following optional information:
- Expired
Select to include expired Return Authorizations in the display. If not selected, expired Return Authorizations will not be included.
- Include Closed
-
You may choose to include closed Return Authorizations within a specified date range:
- Start Date
Closed Return Authorizations entered on and after this date will be displayed.
- End Date
Closed Return Authorizations entered on and before this date will be displayed.
- Return Authorizations
Display lists Return Authorizations by Customer or Customer Type, using the specified parameters.
To the far right of the screen, the following buttons are available:
- CLOSE
Closes the screen, returning you to the application desktop.
- QUERY
Select to generate the display, using the specified parameters.
Runs the report associated with this screen.
- EDIT
-
Enables you to edit highlighted Return Authorization. The edit screen is the same as that for creating a new Return Authorization—except that when editing, the fields will contain Return Authorization information. Double-clicking on a Return Authorization will also bring you to the editing screen.
Tip
Some of the processing required for a Return Authorization (e.g., posting Receipts) may be handled on the Return Authorization header, which you can reach by using the EDIT button.
- VIEW
Highlight a Return Authorization and then select this button to reach a read-only view of the "Edit" screen.
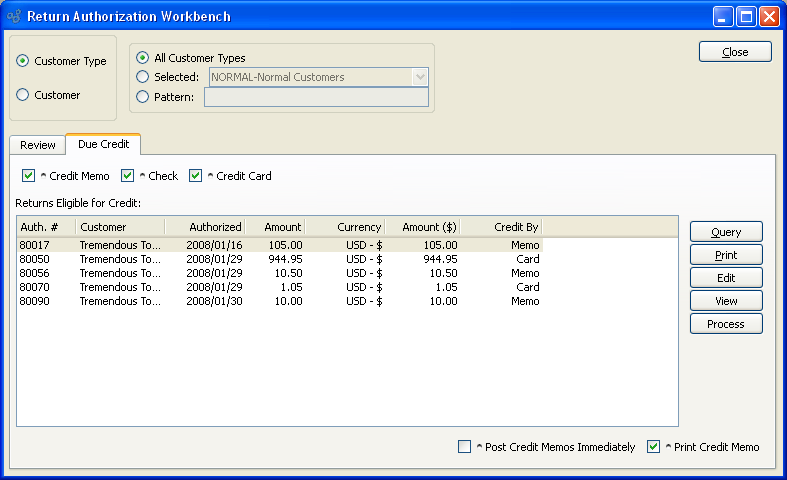
Using the Return Authorization Workbench you have the ability to process Customer returns where credit is due. To process Customer returns due credit, select the "Due Credit" tab. The following screen will appear:

When processing Customer returns due credit, you are presented with the following options:
- Credit Memo
-
Select to include Customer returns eligible for a Credit Memo in the display.
Note
Customer returns handled by Return Authorizations are handled outside the normal sales Credit Memo Inventory handling process. By default, Credit Memo Line Items created from a Return Authorization will show a quantity returned value equal to zero.
- Check
Select to include Customer returns eligible for payment by Check in the display.
- Credit Card
Select to include Customer returns eligible for a Credit Card refund in the display.
- Returns Eligible for Credit
Display lists Customer returns eligible for credit, using the specified parameters.
- Post Credit Memos Immediately
Select if you want processed Credit Memos to be posted immediately after they are created. If processing a check or credit card, this option is not available as the credit memo must automatically post in order to process a check or credit card against it.
- Print Credit Memo
Select if you want Credit Memos to be printed when you select the PROCESS button.
To the far right of the screen, the following buttons are available:
- CLOSE
Closes the screen, returning you to the application desktop.
- QUERY
Select to generate the display, using the specified parameters.
Runs the report associated with this screen.
- EDIT
-
Enables you to edit highlighted Return Authorization. The edit screen is the same as that for creating a new Return Authorization—except that when editing, the fields will contain Return Authorization information. Double-clicking on a Return Authorization will also bring you to the editing screen.
Tip
Some of the processing required for a Return Authorization (e.g., posting Receipts) may be handled on the Return Authorization header, which you can reach by using the EDIT button.
- VIEW
Highlight a Return Authorization and then select this button to reach a read-only view of the "Edit" screen.
- PROCESS
Highlight a Return Authorization and then select this button to create a Sales Order Credit Memo for the selected item. The S/O Credit Memo will be added to the list of unposted Credit Memos in an unprinted state. However, you may print the Credit Memo as you process it by selecting the "Print Credit Memo" option. If you select the "Post Credit Memos Immediately" option, then the Credit Memo will be posted as soon as it is created.