Prospects are potential Customer Accounts. The system allows you to maintain information on Prospects—and then, when the time is right, it enables you to convert Prospect Accounts to Customer Accounts.
Tip
To convert a Prospect to a Customer, simply select the "Customer" button on the Prospect's CRM Account. This will prompt you to convert the Prospect information—and also give you the chance to convert any existing Prospect Quotes to Customer Quotes.
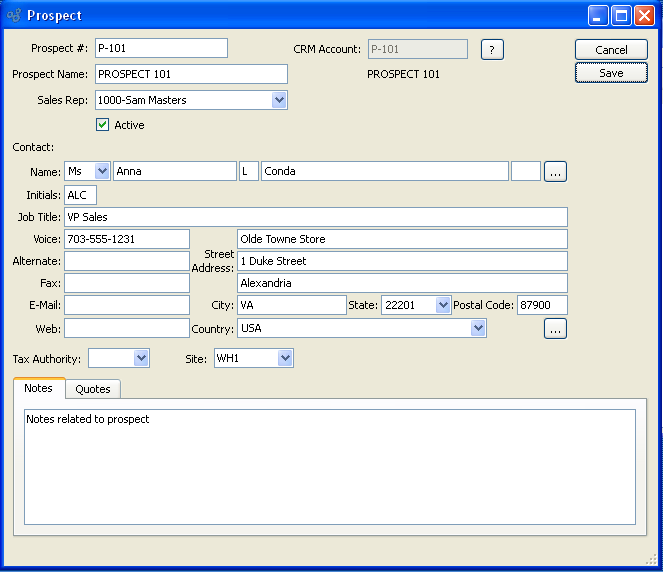
To create a new Prospect, select the "Enter New Prospect" option. The following screen will appear:

Tip
Prospects can also be created from the CRM Account screen. Simply enter a new CRM Account, selecting the "Prospect" Relationship option.
When creating a new Prospect, you are presented with the following options:
- Prospect #
Enter a code to identify the Prospect.
- Prospect Name
Enter a name to describe the Prospect.
- Sales Rep
Specify the Sales Representative associated with the Prospect.
- Active
Select to indicate the Prospect is Active. Not selecting this option means the Prospect is inactive.
- CRM Account
Displays the CRM Account Number associated with the Prospect. Prospects are a form of CRM Account. If a Prospect is created from the Sales module, a linked CRM Account will automatically be created. To view the CRM Account information for the Prospect, select the "?" symbol next to the field.
Note
If a new Contact is manually entered here, that Contact will be added automatically to the master list of Contacts.
- Contact
-
Manually enter Contact information in the fields below—or use the browse button to select pre-existing Contact information.
- Title
Select a Title from the list of available Titles.
- First
Enter the Contact's first name.
- Last
Enter the Contact's last name.
- Job Title
Enter the Contact's job title.
- Voice
Enter the Contact's phone number.
- Fax
Enter the Contact's fax number.
Enter the Contact's e-mail address.
Note
If a new Address is manually entered here, that Address will be added automatically to the master list of Addresses.
- Address
-
Manually enter the Prospect's Address information in the fields below—or use the browse button to select pre-existing Address information.
- Street Address
Enter the street Address for the Prospect.
- City
Enter the city where the Contact is Prospect.
- State
Enter the state where the Contact is Prospect.
- Postal Code
Enter the Postal Code for the Prospect.
- Country
Enter the country where the Prospect is located.
- Site
Specify the Site (i.e., Site or Store) the Prospect is associated with.
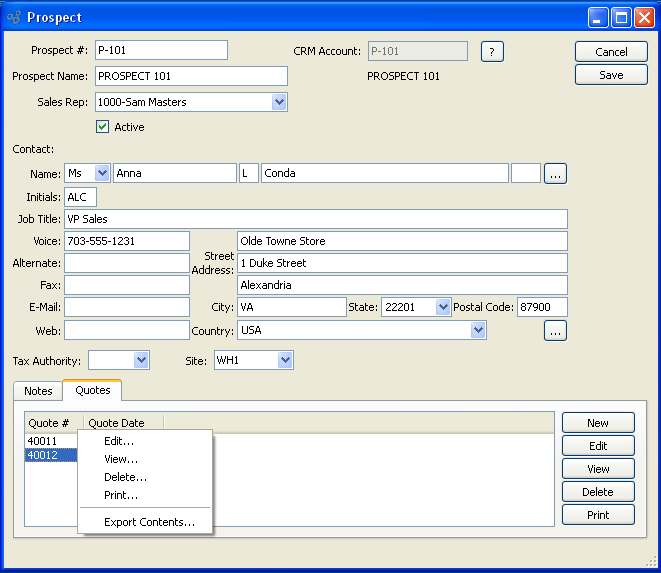
The system allows you to enter Quotes for Prospects. To view the list of existing Prospect Quotes—or to enter a new Quote for a Prospect—select the "Quotes" tab at the bottom of the Prospect screen. The following screen will appear:

The "Quotes" screen displays information on all existing Prospect Quotes, including Quote Number and Quote date.
To the far right of the screen, the following buttons are available:
- CANCEL
Closes the screen without creating a Prospect, returning you to the previous screen.
- SAVE
Creates the Prospect and adds it to the master list of Prospects.
- NEW
Opens screen for creating a new Prospect Quote.
- EDIT
Enables you to edit highlighted Prospect Quotes. The edit screen is the same as that for creating new Prospect Quotes—except that when editing, the fields will contain Prospect Quote information. Double-clicking on a Prospect Quote line will also bring you to the editing screen.
- VIEW
Highlight a Prospect Quote and then select this button to reach a read-only view of the "Edit" screen.
- DELETE
Highlight a Prospect Quote line and then select this button to remove the Prospect Quote from the list
Runs the report associated with this screen.