Planned Orders are a scheduling mechanism used by the two planning systems—Master Production Scheduling (MPS) and Material Requirements Planning (MRP)—to create "soft" demands for materials and capacity required to meet the Production Plan. These Planned Orders are converted to actual Work Orders or Purchase Orders as their Lead Time approaches.
To create a Planned Order, select the "Create Planned Order" option. The following screen will appear:
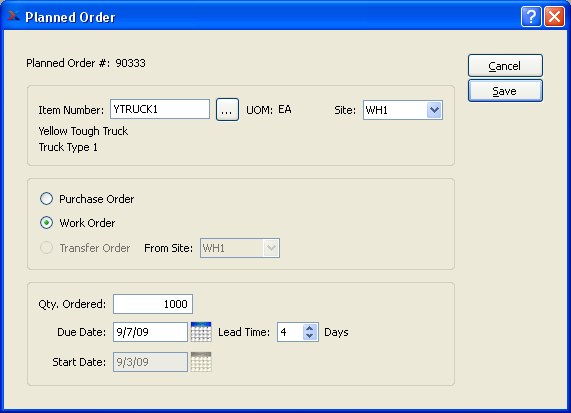
When creating a Planned Order, you are presented with the following options:
- Planned Order #
Displays system-defined Planned Order Number.
- Item Number
Enter the Item Number of the Item you want to create a Planned Order for.
- UOM
Inventory Unit of Measure.
- Site
Specify Site for Planned Order.
- Supply Type
Specify the supply type of the Planned Order; Purchase Order, Work Order, or Transfer Order. If you specify Transfer Order then you must specify the From Site.
- Qty. Ordered
Enter the quantity of the specified Item required for the Planned Order.
- Due Date
Enter the date the Planned Order must be completed by.
- Start Date
This date will be equal to the due date less the Lead Time. The start date may be changed by altering the Lead Time field.
- Lead Time (Days)
Select a number using the arrow buttons, or manually enter a value up to a maximum of 999. Value entered specifies the Lead Time required between the Due Date and the Start Date.
To the far right of the screen, the following buttons are available:
- CLOSE
Closes the screen without creating the Planned Order, returning you to the application desktop.
- CREATE
Creates the Planned Order.
When you run MPS by Planner Code, you are running the Master Production Scheduling (MPS) system. This utility creates firm Planned Orders to meet forecasted demand (i.e., from Production Plans) and also actual demand (i.e., from Sales Orders) for MPS Items. An Item is defined as an MPS Item on its Item master.
By default, Planned Orders created by the MPS planning system will be firm when they are generated. This establishes them as a legitimate source of demand within the wider planning system. The firm-by-default nature of MPS Orders distinguishes them from MRP Orders, which must be manually firmed.
The quantities for MPS Planned Orders will vary depending on the source of demand. The following considerations are used to identify the appropriate demand:
Actual demand quantity (i.e., from Sales Orders) will be used if the planned date for a Production Plan Item falls within the Demand Time Fence for that Item; forecasted demand is ignored within the Time Fence
Outside the Demand Time Fence, the system will create Planned Orders for whichever demand source is greater—that is, actual demand or forecasted demand
Tip
You might consider running the MRP system after you run MPS. Running MRP after MPS will ensure you plan for the materials required to satisfy your MPS-driven demand.
To run MPS by Planner Code, select the "Run MPS by Planner Code" option. The following screen will appear:

Note
Only Items designated as MPS Items will have Planned Orders created for them when MPS is run. By default, MPS generates firm Planned Orders.
When running MPS by Planner Code, you are presented with the following options:
- All Planner Codes
Select to create firm Planned Orders for all Planner Codes.
- Selected
Specify Planner Code you want to create firm Planned Orders for.
- Pattern
Enter a Planner Code pattern to select a range of Planner Codes. Refine your search using Regular Expressions.
- All Sites
Select to create firm Planned Orders by Planner Code for all Sites.
- Selected
Specify Site firm Planned Order by Planner Code should be created for.
- Cutoff Date
Specify how far into the future the MPS run should look for demand. The forecast will be ignored if the planned date for a Production Plan Item falls within the Demand Time Fence for that Item. Outside the Demand Time Fence, the greater of actual or forecasted demand will be used.
Tip
If you schedule an MRP or MPS job submitted to the Batch Manager to run on a periodic basis—daily, weekly, monthly—the cutoff date used for the run will automatically be updated by the number of days in the specified reschedule interval (Day = +1, Week = +7, and Month = +30).
To the far right of the screen, the following buttons are available:
- CANCEL
Closes the screen without creating firm Planned Orders by Planner Code, returning you to the application desktop.
- CREATE
Creates firm Planned Orders by Planner Code, using the specified parameters.
- SUBMIT
Select to submit the MPS run to the Batch Manager.
Run MRP section.
When you run MRP by Planner Code, you are running the Material Requirements Planning (MRP) system. This utility creates Planned Replenishment Orders to meet existing Sales Order and Work Order demand. Replenishment Orders will be created whenever a Planned Availability for an Item Site falls below its Reorder Level. The quantity of the Replenishment Order will be enough to restore Planned Availability back to the Reorder Level—or to the Order Up To (OUT) Level, if the OUT Level is greater.
Note
Running MRP by Planner Code may be used to generate Planned Orders for both parent-level manufactured Items and also lower level purchased Items. Only Items designated as MRP Items will be affected by an MRP run.
To run MRP by Planner Code, select the "Run MRP by Planner Code" option. The following screen will appear:
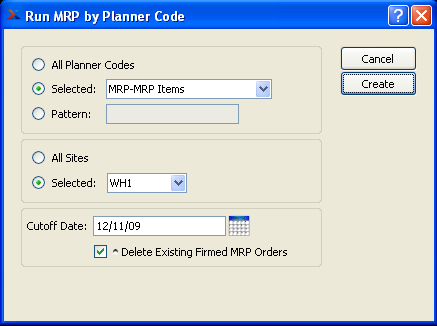
Note
The system deletes any non-firmed Planned Orders when MRP is run. If demand for the deleted Planned Orders still exists, the Orders will be replaced by new Replenishment Orders having new Planned Order Numbers. Order quantities will also be updated if demand levels have changed since MRP was last run.
When running MRP by Planner Code, you are presented with the following options:
- All Planner Codes
Select to create Planned Replenishment Orders for all Planner Codes.
- Selected
Specify Planner Code you want to create Planned Replenishment Orders for.
- Pattern
Enter a Planner Code pattern to select a range of Planner Codes. Refine your search using Regular Expressions.
- All Sites
Select to create Planned Replenishment Orders by Planner Code for all Sites.
- Selected
Specify Site Planned Replenishment Orders should be created for.
- Cutoff Date
Specify how far into the future the MRP run should look for demand.
Tip
If you schedule an MRP or MPS job submitted to the Batch Manager to run on a periodic basis—daily, weekly, monthly—the cutoff date used for the run will automatically be updated by the number of days in the specified reschedule interval (Day = +1, Week = +7, and Month = +30).
- Delete Existing Firmed MRP Orders
Firmed MRP Orders: Select to delete existing Firmed Orders. A firm Planned Order is a Planned Order that has been solidified in the schedule. By default, firm Planned Orders are not deleted when MRP is run. Selecting this option overrides that default behavior. If firm Planned Orders are deleted when MRP is run, they will automatically be replaced by soft (i.e., non-firmed) Planned Orders, assuming the demand for the requirements still exists.
Tip
Unposted Purchase Orders and Purchase Requests are considered as valid sources of supply when MRP is run.
To the far right of the screen, the following buttons are available:
- CANCEL
Closes the screen without creating Planned Replenishment Orders by Planner Code, returning you to the application desktop.
- CREATE
Creates Planned Replenishment Orders by Planner Code, using the specified parameters.
- SUBMIT
Select to submit the MRP run to the Batch Manager.
When you run MRP by Item, you are running the Material Requirements Planning (MRP) system. This utility creates Planned Replenishment Orders to meet existing Sales Order and Work Order demand. Replenishment Orders will be created whenever a Planned Availability for an Item Site falls below its Reorder Level. The quantity of the Replenishment Order will be enough to restore Planned Availability back to the Reorder Level—or to the Order Up To (OUT) Level, if the OUT Level is greater.
Tip
When running MRP by Item for manufactured Items, the system generates Planned Work Orders only. If you want to also generate Planned Orders for purchased requirements, you should run MRP by Planner Code. Only Items designated as MRP Items will be affected by an MRP run.
To run MRP for an individual Item, select the "Run MRP by Item" option. The following screen will appear:

Note
The system deletes any non-firmed Planned Orders when MRP is run. If demand for the deleted Planned Orders still exists, the Orders will be replaced by new Replenishment Orders having new Planned Order Numbers. Order quantities will also be updated if demand levels have changed since MRP was last run.
When running MRP by Item, you are presented with the following options:
- Item Number
Enter the Item Number of the Item you want to create a Planned Order for. The browse button located to the right of the field leads to a searchable list of make and buy items.
- UOM
Inventory Unit of Measure.
- Site
Specify Site Planned Replenishment Orders should be created for.
- Cutoff Date
Specify how far into the future the MRP run should look for demand.
- Explode Children
Select to perform a multi-level explosion to identify dependent demand for the specified Item. This functionality will create Planned Orders for any child demand, if necessary. The functionality mirrors the same feature available at the Planner Code level, which is available when running MRP by Planner Code.
- Delete Existing Firmed MRP Orders
Select to delete existing Firmed Orders. A firm Planned Order is a Planned Order that has been solidified in the schedule. By default, firm Planned Orders are not deleted when MRP is run. Selecting this option overrides that default behavior. If firm Planned Orders are deleted when MRP is run, they will automatically be replaced by soft (i.e., non-firmed) Planned Orders, assuming the demand for the requirements still exists.
Tip
Unposted Purchase Orders and Purchase Requests are considered as valid sources of supply when MRP is run.
To the far right of the screen, the following buttons are available:
- CANCEL
Closes the screen without creating Planned Replenishment Orders by Item, returning you to the application desktop.
- CREATE
Creates Planned Replenishment Orders by Item, using the specified parameters.
A firm Planned Order is a Planned Order that has been solidified in the schedule. When you specify that a Planned Order is "firm," you are indicating that Material Requirements Planning (MRP) should 1) recognize it as a valid source of supply and 2) not delete it when creating or deleting Planned Replenishment Orders—unless specifically told to do so. To firm Planned Orders by Planner Code, select the "Firm Planned Orders by Planner Code" option. The following screen will appear:
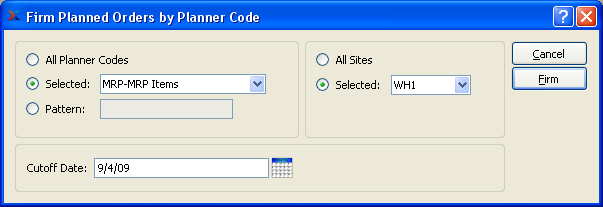
When firming Planned Orders by Planner Code, you are presented with the following options:
- All Planner Codes
Select to firm Planned Orders for all Planner Codes.
- Selected
Specify Planner Code whose Planned Orders you want to firm.
- Pattern
Enter a Planner Code pattern to select a range of Planner Codes. Refine your search using Regular Expressions.
- Cutoff Date
Indicates the last date when Planned Orders by Planner Code may be firmed.
- All Sites
Select to firm Planned Orders by Planner Code for all Sites.
- Selected
Specify Site whose Planned Orders by Planner Code you want to firm.
To the far right of the screen, the following buttons are available:
- CANCEL
Closes the screen without firming the Planned Orders by Planner Code, returning you to the application desktop.
- FIRM
Firms the Planned Orders by Planner Code.
To release Planned Orders by Planner Code, select the "Release Planned Orders by Planner Code" option. The following screen will appear:
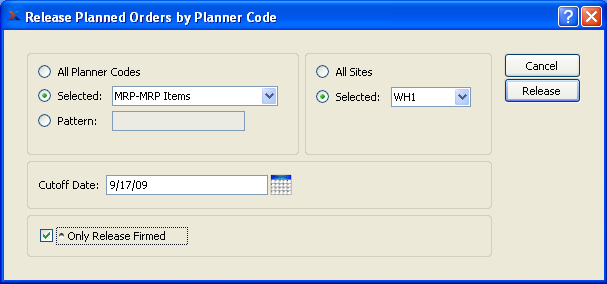
When releasing Planned Orders by Planner Code, you are presented with the following options:
- All Planner Codes
Select to release Planned Orders for all Planner Codes.
- Selected
Specify Planner Code whose Planned Orders you want to release.
- Pattern
Enter a Planner Code pattern to select a range of Planner Codes. Refine your search using Regular Expressions.
- Cutoff Date
Indicates the last date when Planned Orders by Planner Code may be released.
- Only Release Firmed
Select to release only those Planned Orders which have been firmed. If selected, non-firmed Planned Orders will not be released.
- All Sites
Select to release Planned Orders by Planner Code for all Sites.
- Selected
Specify Site whose Planned Orders by Planner Code you want to release.
To the far right of the screen, the following buttons are available:
- CANCEL
Closes the screen without releasing the Planned Orders by Planner Code, returning you to the application desktop.
- RELEASE
Releases the Planned Orders by Planner Code. The type of order created is based on the Planned Order Supply Type (Purchase Request, Work Order, or Transfer Order). If unreleased Transfer Orders exists with the appropriate From Site and To Site then Planned Transfer Orders will be appended to the existing orders.
- SUBMIT
Select to submit the release Planned Orders job to the Batch Manager.
To delete a Planned Order, select the "Delete Planned Order" option. The following screen will appear:
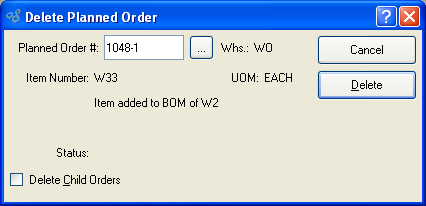
Note
Planned Orders that have been firmed in the system will not be deleted when this utility is run.
When deleting a Planned Order, you are presented with the following options:
- Planned Order #
Enter the Planned Order Number of the Planned Order you want to delete.
- Item Number
Indicates Item whose Planned Order will be deleted.
- UOM
Inventory Unit of Measure.
- Status
Indicates Planned Order status.
- Delete Child Orders
Select to simultaneously delete child Orders for the parent Planned Order. Child Planned Orders having a clearly defined relationship to their parent Planned Order will be deleted.
Tip
In some cases, the "Delete Child Orders" option will not remove all the records you may assume it should. To ensure all child Orders are deleted after a parent Planned Order is deleted, re-run MRP by Planner Code. Doing so will delete any remaining orphan Orders.
To the far right of the screen, the following buttons are available:
- CANCEL
Closes the screen without deleting the Planned Order, returning you to the application desktop.
- DELETE
Deletes the specified Planned Order.
To delete Planned Orders by Planner Code, select the "Delete Planned Orders by Planner Code" option. The following screen will appear:

Note
Planned Orders that have been firmed in the system will not be deleted when this utility is run.
When deleting Planned Orders by Planner Code, you are presented with the following options:
- All Planner Codes
Select to delete Planned Orders for all Planner Codes.
- Selected
Specify Planner Code whose Planned Orders you want to delete.
- Pattern
Enter a Planner Code pattern to select a range of Planner Codes. Refine your search using Regular Expressions.
- All Sites
Select to delete Planned Orders by Planner Code for all Sites.
- Selected
Specify Site whose Planned Orders by Planner Code you want to delete.
- Cutoff Date
Any Planned Orders created on or before the cutoff date will be deleted.
- Delete Firmed Orders
Select to delete existing Firmed Orders. A firm Planned Order is a Planned Order that has been solidified in the schedule. Firm Planned Orders will not be deleted unless this option is selected.
- Delete Child Orders
Select to simultaneously delete child Orders for the parent Planned Order. Child Planned Orders having a clearly defined relationship to their parent Planned Order will be deleted.
Tip
In some cases, the "Delete Child Orders" option will not remove all the records you may assume it should. To ensure all child Orders are deleted after a parent Planned Order is deleted, re-run MRP by Planner Code. Doing so will delete any remaining orphan Orders.
- Planning System
Specify the planning system(s) whose Planned Orders you want to delete:
- MPS and MRP
Select to delete Planned Orders from both the MPS and MRP planning systems.
- MPS
Select to delete Planned Orders from the MPS planning system only.
- MRP
Select to delete Planned Orders from the MRP planning system only.
To the far right of the screen, the following buttons are available:
- CANCEL
Closes the screen without deleting the Planned Orders by Planner Code, returning you to the application desktop.
- DELETE
Deletes Planned Orders by Planner Code, using the specified parameters.