A Purchase Order is a written authorization used to formalize purchase transactions with Vendors. Purchase Orders and/or Purchase Order Line Items can have the following statuses:
Unposted ("U"): This is the initial state a Purchase Order receives when it is first created. As long as a Purchase Order is unposted, it may continue to have additional Line Items added to it. The List Unposted Purchase Orders screen will display all unposted Purchase Orders.
Open ("O"): The status of a Purchase Order after it has been posted.
Received: The status of an open Purchase Order Line Item when the full quantity has been received.
Partial: The status of an open Purchase Order Line Item when only part of the full quantity has been received.
Closed ("C"): The final state of a Purchase Order after it has been closed.
Tip
A Purchase Order will remain open if at least one of its Line Items is open. Once all Line Items are closed, the Purchase Order will also be closed. To reopen a closed Purchase Order, simply open one of its closed Line Items.
To create a new Purchase Order, select the "Enter New Purchase Order" option. The following screen will appear:
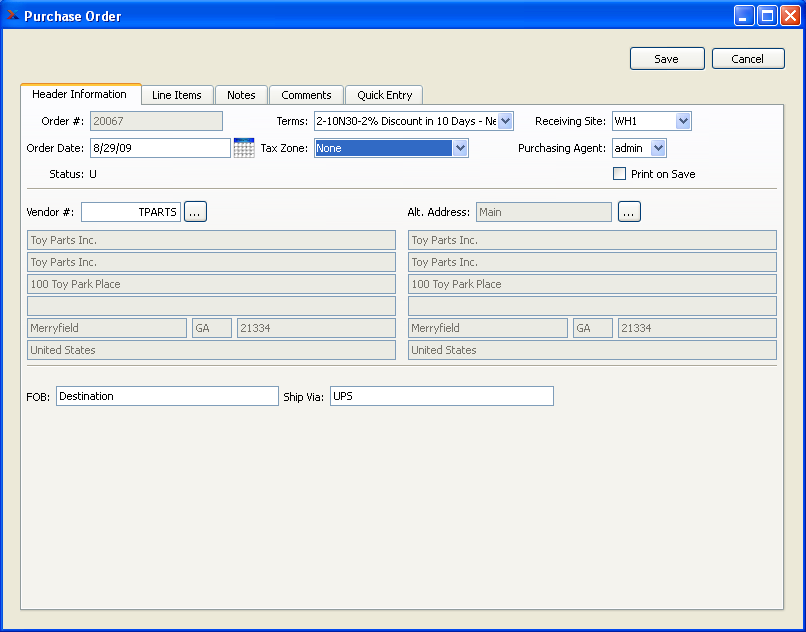
When entering a new Purchase Order, you are presented with the following options:
- Order #
Next available Purchase Order Number will automatically display, unless your system requires you to enter Purchase Order Numbers manually. Default values and input parameters for Purchase Order Numbers are configurable at the system level.
- Order Date
Displays current day's date.
- Status
The Purchase Order status will display here.
- Terms
Specify the billing Terms for the Order. Default billing Terms for a Vendor are defined on the Vendor master. You may select alternate Terms on the Purchase Order header.
- Tax Zone
Specify the Tax Zone associated with the Purchase Order. By default, the Tax Zone associated with the Vendor will be used.
- Receiving Site
Specify the Site where materials from the Purchase Order will be received. By default, all active Sites are available for selection as Receiving Sites. No special designation needs to be made in the Site master or elsewhere to indicate that a Site may be used for receiving purposes.
Tip
The receiving Site may differ from the supplying Site(s) for some Purchase Order Line Items. To update your Inventory records to indicate that Items have been moved from the receiving to the supplied from Site, perform an Inter-Site Transfer.
- Purchasing Agent
Specify the name of the agent assigned to the Order. By default, the name of the logged-in user will be entered as Purchasing Agent—assuming that user is designated as a Purchasing Agent. If the user is not a Purchasing Agent, the first alphabetical name in the list of Purchasing Agents will be entered.
- Print on Save
Check Print on Save to automatically print the Purchase Order when the Save button is pressed.
If the Vendor specified on the Purchase Order has an EDI Profile attached, you may encounter an EDI processing interface when printing the Purchase Order.
- Vendor #
Enter the Vendor number of the Vendor you are issuing the Purchase Order to.
Note
A valid Vendor number must be entered in the "Vendor #" field before Line Items can be added to the Purchase Order. If no valid Vendor number is entered, you will not be able to add Line Items to the Purchase Order.
- Main Address
Displays the main address for the specified Vendor. The main address information is the primary Vendor address stored on the Vendor master.
- Alt. Address
Enter the number of an alternate Address. By default, the alternate Address will be used as the Ship-To Address when the Purchase Order is printed.
- F.O.B.
Enter the Free On Board (F.O.B.) location for the shipping Site.
- Ship Via
Enter the preferred Ship Via method for this Vendor. By default, the Ship Via entered on the Vendor master will populate this field.
To the far right of the screen, the following buttons are available:
- SAVE
Creates the new Purchase Order and saves the Purchase Order information. If your system is configured to prompt for printing on SAVE, then you will be presented with additional processing options after this button is selected.
- CANCEL
Closes the screen without creating a new Purchase Order, returning you to the application desktop.
To create or modify Purchase Order Line Items, select the "Line Items" tab at the top of the "Purchase Order" screen. The following screen will appear:
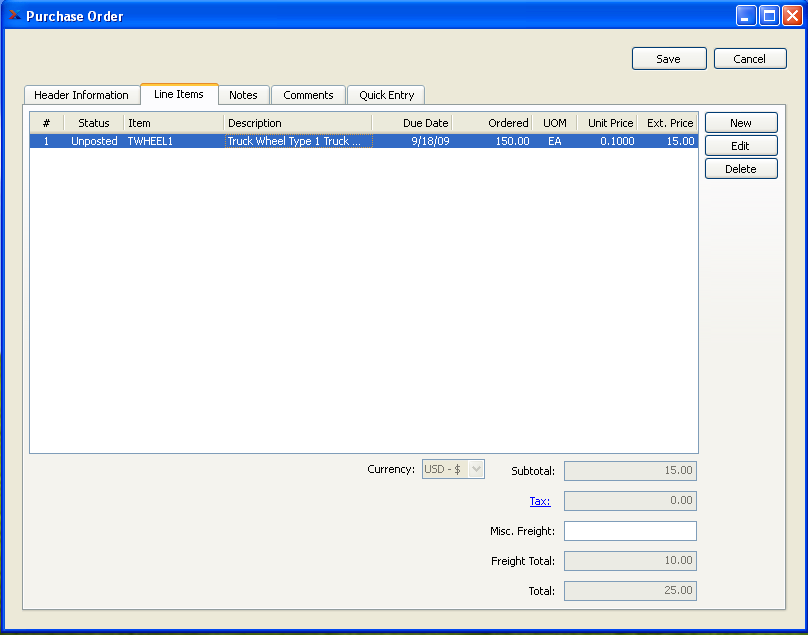
When creating or modifying Purchase Order Line Items, you are presented with the following options:
- Line Items
Display lists Line Items for this Purchase Order. A valid Vendor number must be entered in the "Vendor #" field before Line Items can be added to the Order.
- Subtotal
Displays the subtotal for the Purchase Order Line Items.
- Tax
Displays the calculated Tax amount, if applicable.
- Misc. Freight
Enter the amount of any miscellaneous freight charges to be added to the Order.
- Freight
Displays the total amount of freight charges. The amount displayed includes the sum of all Line Item freight and miscellaneous freight charges.
- Total
Displays the total value of the Purchase Order.
To the far right of the screen, the following buttons are available:
- SAVE
Saves the Purchase Order Line Item information.
- CANCEL
Closes the screen without creating a new Purchase Order, returning you to the application desktop.
- NEW
Opens screen for creating a new Purchase Order Line Item.
- EDIT
Enables you to edit highlighted Purchase Order Line Items. The edit screen is the same as that for creating a new Purchase Order Line Item—except that when editing, the fields will contain Purchase Order Line Item information. Double-clicking on a Purchase Order Line Item will also bring you to the editing screen.
- DELETE
Highlight a Purchase Order Line Item and then select this button to remove the Purchase Order Line Item from the list.
To add Notes to a Purchase Order, select the "Notes" tab at the top of the "Purchase Order" screen. The following screen will appear:
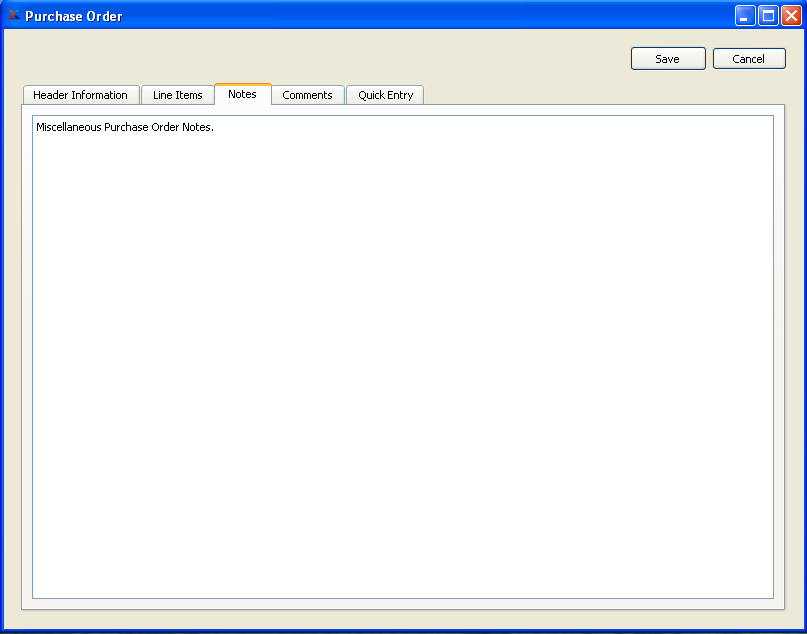
When adding Notes to a Purchase Order, you are presented with the following options:
- Notes
This is a scrolling text field with word-wrapping for entering Notes related to the Purchase Order.
To add Comments to a Purchase Order—or to view system-generated Comments—select the "Comments" tab at the top of the "Purchase Order" screen. The following screen will appear:
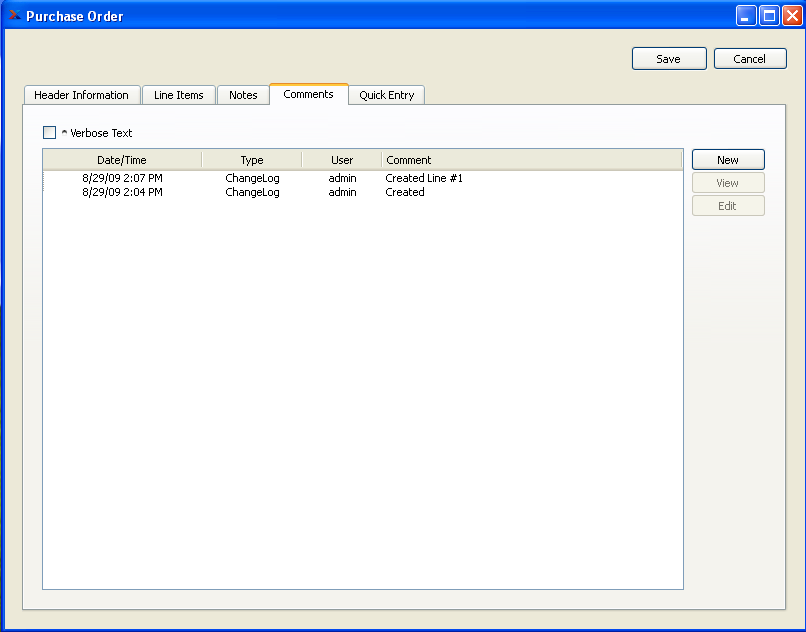
When adding or reviewing Comments, you are presented with the following options:
- Verbose Text
Select to display all Comments in the list in an expanded view which includes the entire text of each Comment. To edit a Comment, simply select the "Edit" link next to the Comment. That link will not be shown for Changelog Comments, which can't be edited. If the "Verbose Text" option is not selected, the Comment list will display only header level information for each Comment.
- Comments
Display lists Comments related to the record.
To the far right of the screen, the following buttons are available:
- NEW
Opens screen for creating a new Comment.
- VIEW
Highlight a Comment and then select this button to reach a read-only view of the "Edit" screen.
- EDIT
Enables you to edit highlighted Comments—as long as the Comments are not "ChangeLog" Comments. ChangeLog Comments are system-generated and may not be edited. The edit screen is the same as that for creating a new Comment—except that when editing, the fields will contain Comment information. Double-clicking on a Comment will also bring you to the editing screen.
To enter a new Comment, select the NEW button. The following screen will appear:
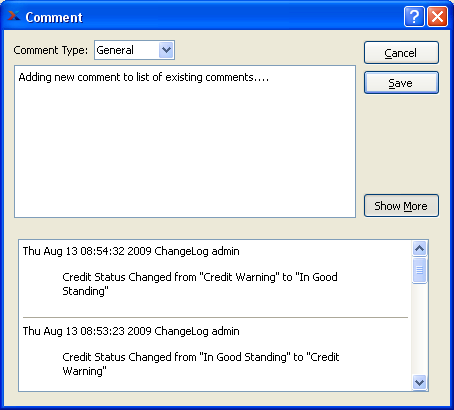
- Comment Type
Select a Comment Type from the drop-down list to classify the Comment. This is a required step. Comment Types may be system-defined (i.e., "ChangeLog" and "General") or user-defined, as described in Section 13.12, “Comment Types”. Once you have specified a Comment Type, begin typing your Comment in the main text area. The text area features word-wrapping and scroll-bar support for longer Comments.
To the far right of the screen, the following buttons are available:
- CANCEL
Closes the screen without creating the Comment, returning you to the previous screen.
- SAVE
Creates the Comment and adds it to the list of Comments.
- SHOW MORE
Select to show the complete list (i.e., "thread") of Comments associated with the record. To hide the list, simply select the SHOW MORE button again. The Comment thread will show the most recent Comment first.
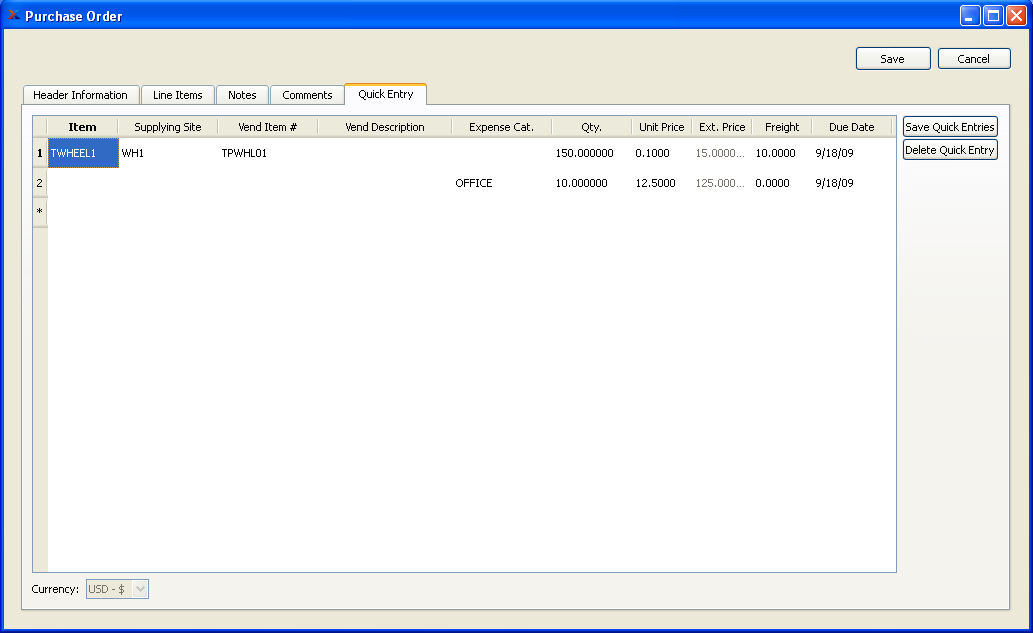
If you want to speed up your data entry of Purchase Order Line Items, you can use the Quick Entry interface. This screen allows you to enter multiple Line Items in one session. It also simplifies the process by presenting only the minimum required fields. To enter Line Items using the Quick Entry interface, select the "Quick Entry" tab at the top of the "Purchase Order" screen. The following screen will appear:
Tip
To get started entering Line Items, place your cursor in the "Item" field. You can then move from field-to-field using the TAB button on your keyboard.
When entering Purchase Order Line Items using the Quick Entry interface, you are presented with the following options:
- Item
Enter an Inventory Item Number. This field is used for entering Items stored in Inventory. Use the "Vend. Item #" field for entering non-Inventory Items.
- Supplying Site
Select a Supplying Site from the list of available options. By default, the user's preferred Site will be presented first.
- Vend. Item #
Use this field for entering non-Inventory Item Numbers. If not used to handle non-Inventory Items, this field will display Vendor Item Numbers for Inventory Items which have Item Sources defined.
- Vend Description
Enter the Vendor Description for the Item being ordered.
- Expense Cat.
Enter the Expense Category you want your non-Inventory quantity to be assigned to. Use this option for non-Inventory Line Items only.
- Qty.
Enter the quantity you want to purchase.
- Unit Price
Enter the Unit Price for the Line Item. If an Item Source is defined, this information may fill in automatically.
- Ext. Price
Displays the Extended Price. This is a calculated field and is shaded to indicate that it may not be edited.
- Freight
Enter the Freight amount, if any.
- Due Date
Enter the due date. If an Item Source is defined, this information may fill in automatically.
To the far right of the screen, the following buttons are available:
- SAVE QUICK ENTRIES
Select to save all the Line Items entered using the Quick Entry interface.
- DELETE QUICK ENTRY
Highlight a Line Item and then select this button to remove the Item from the list.
To create a new Purchase Order Line Item, select the NEW button. The following screen will appear:
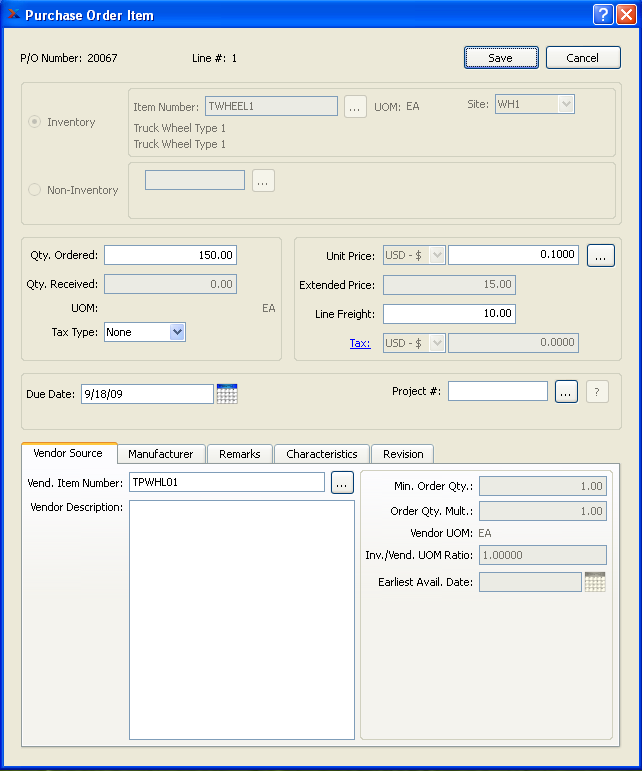
When creating a new Purchase Order Line Item, you are presented with the following options:
- P/O Number
Displays the Purchase Order Number specified in the "New Purchase Order" screen.
- Line #
The application automatically assigns line numbers to Purchase Order Line Items. Numbering begins at one ("1") and increases automatically in increments of one.
- Inventory Item
If the Item being purchased is an Inventory Item, select this option and specify the following:
- Item Number
Enter the Item Number of the Item you want to add to the Purchase Order. You may also enter manufactured Items that you normally make, but you occasionally buy.
- Supplying Site
Specify the Site the Item will be supplied from. The supplying Site is the Site that supplies the Item in question to the shipping Site for shipment to Customers. Sites may be designated as supplying Sites in the Item Site definition.
Tip
The supplying Site may differ from the receiving Site(s) for some Purchase Order Line Items. To update your Inventory records to indicate that Items have been moved from the receiving to the supplied from Site, perform an Inter-Site Transfer.
- Non-Inventory Item
If the Item being purchased is a non-Inventory Item, select this option and specify the following:
- Expense Category
Select an Expense Category to assign the non-Inventory Item to.
- Qty. Ordered
Enter the quantity of the specified Item to be ordered.
- Qty. Received
Displays quantity received from quantity ordered.
- UOM
Unit of Measure Item is being ordered in.
- Tax Type
Select a Tax Type.
- Unit Price
Enter the Unit Price for the specified Item―or use the browse button to look up pricing information, including pricing related to quantity breaks.
- Extended Price
Displays the Extended Price. The Extended Price for a Line Item is based on the quantity ordered multiplied by the Unit Price.
Note
The option to associate a Project with a Purchase Order Line Item will only be visible if your site is configured to use Projects.
- Line Item Freight
Enter the amount of freight charges for the entire Line Item quantity. The system automatically calculates the per unit freight charge by dividing the Line Item freight amount by the Line Item quantity. This per unit freight charge is needed when receiving or vouchering quantities less than the original quantity ordered. Line Item freight is distinguished from miscellaneous freight, which applies to the Purchase Order as a whole
- Tax
Displays the calculated tax amount.
- Due Date
Specify date when Order is expected to be received.
- Project #
Select a Project Number to associate with the Purchase Order Line Item. If the Purchase Order Line Item is being created from a Purchase Request driven by Sales Order demand—and the parent Sales Order had a Project Number associated with it—then the Project Number from the parent Sales Order will automatically be entered here. In this way, Sales Orders and Purchase Order Line Items may be linked to the same Project.
- Vendor Source Information
If Item Source information exists for an Inventory Item, that information will display automatically here. For non-Inventory Items, you should specify an Item Number and Item description.
- Vend. Item Number
Enter the Item number the Vendor assigns to the specified Item.
- Vendor Item Description
Enter the description the Vendor uses to describe to the specified Item.
- Min. Order Qty
For Inventory Items only, displays the minimum order quantity for the specified Item and the specified Vendor. Minimum order quantities are established in the Item Source master.
- Order Qty. Mult.
For Inventory Items only, displays the order multiple for the specified Item and the specified Vendor. Order multiples are established in the Item Source master.
- Vendor UOM:
For Inventory Items only, displays the Unit of Measure used by the Vendor for the specified Item.
- Inv./Vendor UOM Ratio:
For Inventory Items only, displays the ratio between Inventory and Vendor Units of Measure.
Note
The Inv./Vendor UOM Ratio specifies the ratio between Inventory and Vendor Units of Measure (UOM). For example, if you store an Item in single units, but a Vendor sells you the Item in cases of 12, then the ratio would be 12—or 12:1. When an Inv./Vend. ratio is specified, the system allows you to purchase Items using the Vendor's UOM; however, when the Items are received, the system will automatically convert the Inventory to your Inventory UOM.
- Earliest Avail. Due Date
For Inventory Items only, displays the earliest due date for the specified Item.
To the far right of the screen, the following buttons are available:
- SAVE
Creates the new Purchase Order Line Item and adds it to the list of Purchase Order Line Items.
- CANCEL
Closes the screen without creating a new Purchase Order Line Item, returning you to the application desktop.
To add manufacturer information to the Purchase Order Item, select the "Manufacturer" tab. The following screen will appear:
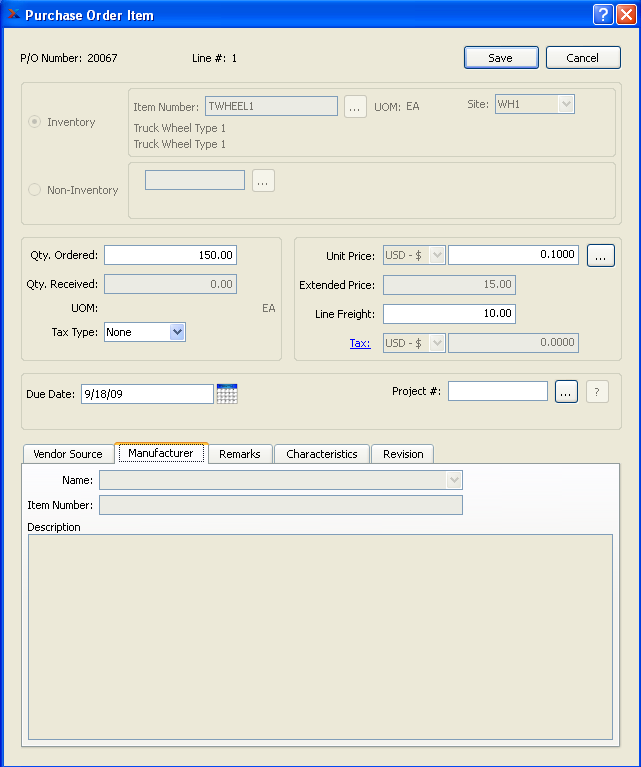
When entering manufacturer information to a Purchase Order Item, you are presented with the following options:
- Name
The name of the manufacturer who creates the Item.
- Item Number
The Item Number the manufacturer uses to identify the component.
- Description
The Description the manufacturer uses to describe the item.
To add miscellaneous Remarks to the Purchase Order Item, select the "Remarks" tab. The following screen will appear:

When entering miscellaneous Remarks to a Purchase Order Item, you are presented with the following options:
- Notes
This is a scrolling text field with word-wrapping for entering Notes related to the Purchase Order Line Item.
- Comments
To view system-generated Comments associated with an Item—or to add new Comments of your own—select the "Comments" option.
To the far right of the screen, the following buttons are available:
- NEW
Opens screen for creating a new Comment. Purchase Order Line Item Comments may only be added after the Line Item has been saved to the Purchase Order.
- VIEW
Highlight a Comment and then select this button to reach a read-only view of the Comment.
If an Item has Characteristics associated with it, you have the option of linking those Characteristics to a Purchase Order Item. In the case where Sales Order demand generates a Purchase Request, Item Characteristics and Values inherited from the Sales Order will already be linked to the Purchase Order. Ultimately, Characteristics associated with a Purchase Order Item may be printed on the Purchase Order report.
Tip
You can link Characteristics and Values to an Item by using the Item master. Once entered, these Characteristics and Values will be available to users entering Purchase Order Items.
To specify or edit Characteristics for a Purchase Order Item, select the "Characteristics" tab at the bottom of the screen. The following screen will appear:
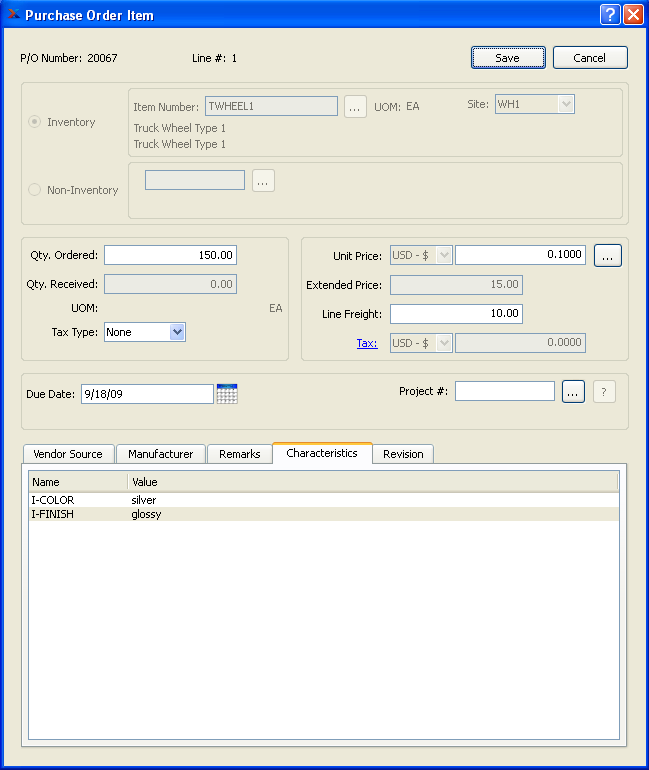
When selecting or editing Characteristics for a Purchase Order Line Item, you are presented with the following options:
- Name
Displays the name of any Item Characteristics associated with the Item. Characteristics defined as Item Characteristics may be associated with Items on the Item master.
- Value
Displays the default Value associated with an Item Characteristic, but permits you to specify an alternate Value. When associating Characteristic Values with a Purchase Order Item, you have four options: 1) Select the default Value; 2) select an alternate pre-defined Value; 3) manually enter a new Value in place of the pre-defined Value; or 4) make no selection. Making no selection means the Characteristics will not be associated with the Purchase Order Item—except in the case of Characteristics inherited from Sales Orders, by way of Purchase Requests.
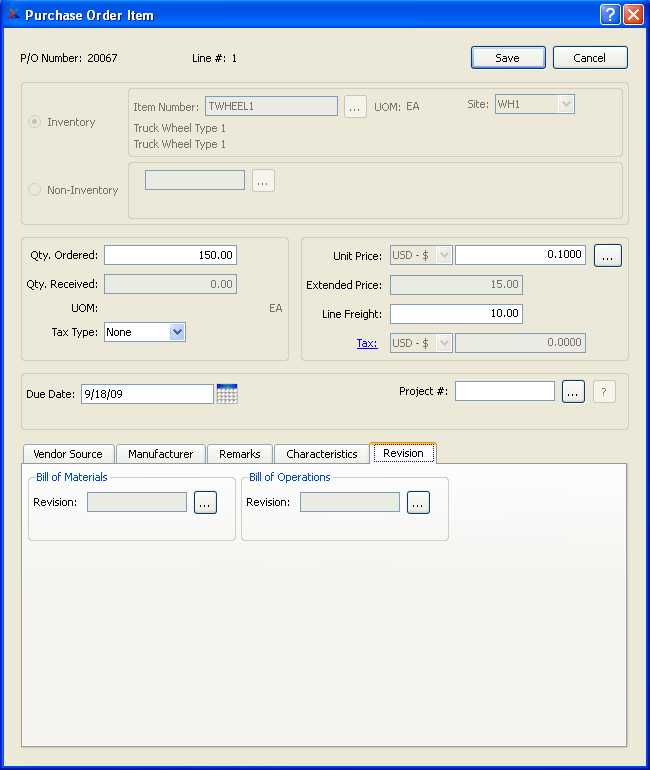
When ordering purchased Items, you have the option to specify which Revision of the Item's Bill of Materials and Bill of Operations you want to buy. By default, the active Revision will be used. To specify Revision information for a Purchase Order Item, select the "Revision" tab. The following screen will appear:
Note
You may create Purchase Order Items for pending Revisions. For Purchase Order purposes, a pending Revision is considered to be the same as an inactive Revision. The Revision status of a pending Revision will not be changed if a Purchase Order Item is created for it.
When specifying Revision information for a Purchase Order Item, you are presented with the following options:
- Bill of Materials
Specify the BOM Revision you want to use for the Purchase Order Item. By default, the active Revision will be used.
- Revision
Select from the list of existing available Revisions. The status of the Revision will also be displayed.
- Bill of Operations
Specify the BOO Revision you want to use for the Purchase Order Item. By default, the active Revision will be used.
- Revision
Select from the list of existing available Revisions. The status of the Revision will also be displayed.
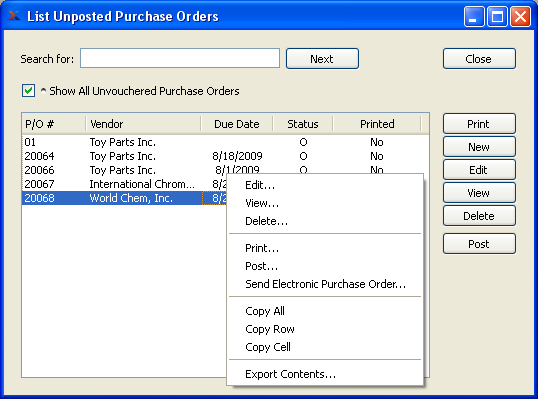
The List Unposted Purchase Orders screen displays both unposted and unvouchered Purchase Orders. From this screen you may create new or edit existing Purchase Orders. To see the list of unposted and/or unvouchered Purchase Orders, select the "List Unposted Purchase Orders" option. The following screen will appear:
Note
Unposted Purchase Orders are considered to be a valid source of supply by the planning systems.
The "Unposted Purchase Orders" screen displays information on all existing unposted Purchase Orders, including Purchase Order Number, Vendor name, Order due date, status, and printed status. The "Search For" field will locate records by Purchase Order Number or Vendor description. Use the NEXT button to move to the next match in your search. You nay also include in the list open Purchase Orders which have not yet been vouchered by selecting the "Show All Unvouchered P/Os" option.
Tip
You may select multiple Purchase Orders for printing or posting by highlighting them using your mouse—or a combination of your mouse and either the SHIFT or CTRL keys.
To the far right of the screen, the following buttons are available:
- CLOSE
Closes the screen, returning you to the application desktop.
- NEW
Opens screen for creating a new Purchase Order.
- EDIT
Enables you to edit highlighted Purchase Order. The edit screen is the same as that for creating a new Purchase Order—except that when editing, the fields will contain Purchase Order information. Double-clicking on a Purchase Order will also bring you to the editing screen.
Tip
You can edit posted Purchase Orders if you select the "Show All Unvouchered POs" option, which displays all posted POs which have not yet been vouchered.
- VIEW
Highlight a Purchase Order and then select this button to reach a read-only view of the "Edit" screen.
- DELETE
Highlight a Purchase Order and then select this button to remove the Purchase Order from the list.
- PRINT P/O
Highlight a Purchase Order and then select this button to print a copy of the selected Purchase Order.
If the Vendor specified on the Purchase Order has an EDI Profile attached, you may encounter an EDI processing interface when printing the Purchase Order.
- POST P/O
Highlight a Purchase Order and then select this button to post the selected Purchase Order.
To post a Purchase Order, select the "Post Purchase Order" option. The following screen will appear:
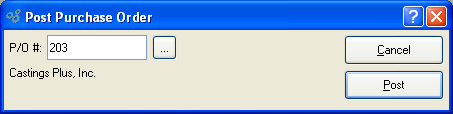
When posting a Purchase Order, you are presented with the following options:
- P/O #
Enter the Purchase Order Number of the Purchase Order you want to post.
Note
Once a Purchase Order has been posted, Line Items can no longer be added to it.
To the far right of the screen, the following buttons are available:
- CANCEL
Closes the screen, returning you to the application desktop.
- POST
Posts the specified Purchase Order.
To post Purchase Orders by Agent, select the "Post Purchase Orders by Agent" option. The following screen will appear:
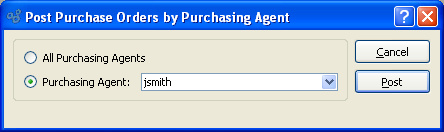
When posting Purchase Orders by Agent, you are presented with the following options:
- All Purchasing Agents
Select to post Purchase Orders for all Purchasing Agents.
- Purchasing Agent
Specify Purchasing Agent whose Purchase Orders you want to post. Users may be designated as Purchasing Agents at the system level.
Note
Once a Purchase Order has been posted, Line Items can no longer be added to it.
To the far right of the screen, the following buttons are available:
- CANCEL
Closes the screen, returning you to the application desktop.
- POST
Posts Purchase Orders using the specified parameters.
To close a Purchase Order, select the "Close Purchase Order" option. The following screen will appear:
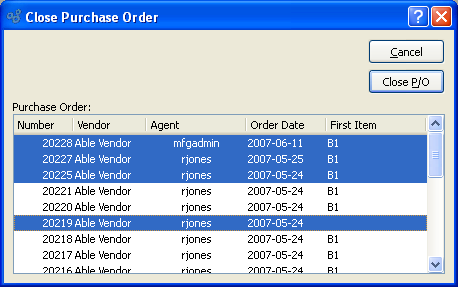
When closing a Purchase Order, you are presented with the following options:
- Purchase Order
Displays a list of open Purchase Orders. You may select one or multiple Purchase Orders to close using your mouse—or a combination of your mouse and either the SHIFT or CTRL keys.
To the far right of the screen, the following buttons are available:
- CANCEL
Closes the screen, returning you to the application desktop.
- CLOSE P/O
Closes the specified Purchase Order(s).
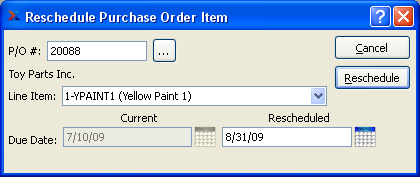
To reschedule a Purchase Order Item, select the "Reschedule Purchase Order Item" option. The following screen will appear:
Note
You may reschedule a Purchase Order Line Item after a Purchase Order has been posted—as long as the Line Item has not been closed.
When rescheduling a Purchase Order Line Item, you are presented with the following options:
- P/O #
Enter the Purchase Order Number of the Purchase Order whose Line Item you want to reschedule.
- Line Item
Specify the Purchase Order Line Item you want to reschedule.
- Due Date (Current)
Displays the current due date for the Purchase Order Line Item.
- Due Date (Rescheduled)
Enter the new rescheduled due date.
To the far right of the screen, the following buttons are available:
- CANCEL
Closes the screen, returning you to the application desktop.
- RESCHEDULE
Reschedules the Purchase Order Line Item using the specified rescheduled date.
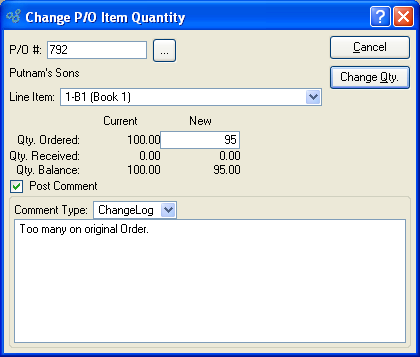
To change the quantity of a Purchase Order Line Item, select the "Change Purchase Order Item Qty." option. The following screen will appear:
Note
You may only change the quantity of Purchase Order Line Item if the Purchase Order has been posted and the Line Item is open.
When changing the quantity of a Purchase Order Line Item, you are presented with the following options:
- P/O #
Enter the Purchase Order Number of the Purchase Order whose Line Item quantity you want to change.
- Line Item
Specify the Purchase Order Line Item whose quantity you want to change.
- Qty. Ordered
Enter the quantity you would like to change the Line Item quantity to. The current Line Item quantity will be displayed.
- Qty. Received
If any of the Purchase Order Item quantity has been received, the quantity received will be displayed.
- Qty. Balance
Displays the difference between the quantity ordered and the quantity received for both the current balance and the balance after the quantity change.
- Post Comment
Select to attach a Comment to the Line Item. This option must be selected if you want to add a Comment to the Line Item.
- Comment Type
Specify one of the following Comment Types from the drop-down list: ChangeLog or General. Comment Types are used to categorize Comments. Once you have specified a Comment Type, you may type your Comment in the main text area. The text area features word-wrapping and scroll-bar support for longer Comments.
To the far right of the screen, the following buttons are available:
- CANCEL
Closes the screen, returning you to the application desktop.
- CHANGE QTY.
Changes the Purchase Order Line Item quantity using the specified quantity.
To add a Comment to a Purchase Order, select the "Add Comment to Purchase Order" option. The following screen will appear:
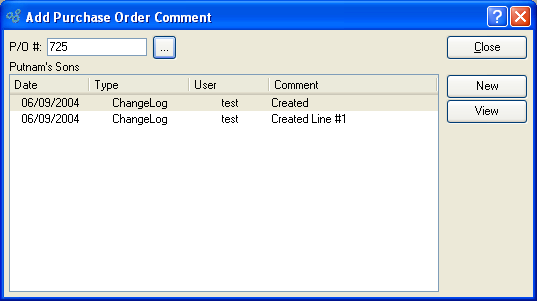
When adding or reviewing Comments, you are presented with the following options:
- Verbose Text
Select to display all Comments in the list in an expanded view which includes the entire text of each Comment. To edit a Comment, simply select the "Edit" link next to the Comment. That link will not be shown for Changelog Comments, which can't be edited. If the "Verbose Text" option is not selected, the Comment list will display only header level information for each Comment.
- Comments
Display lists Comments related to the record.
To the far right of the screen, the following buttons are available:
- NEW
Opens screen for creating a new Comment.
- VIEW
Highlight a Comment and then select this button to reach a read-only view of the "Edit" screen.
- EDIT
Enables you to edit highlighted Comments—as long as the Comments are not "ChangeLog" Comments. ChangeLog Comments are system-generated and may not be edited. The edit screen is the same as that for creating a new Comment—except that when editing, the fields will contain Comment information. Double-clicking on a Comment will also bring you to the editing screen.
To enter a new Comment, select the NEW button. The following screen will appear:
- Comment Type
Select a Comment Type from the drop-down list to classify the Comment. This is a required step. Comment Types may be system-defined (i.e., "ChangeLog" and "General") or user-defined, as described in Section 13.12, “Comment Types”. Once you have specified a Comment Type, begin typing your Comment in the main text area. The text area features word-wrapping and scroll-bar support for longer Comments.
To the far right of the screen, the following buttons are available:
- CANCEL
Closes the screen without creating the Comment, returning you to the previous screen.
- SAVE
Creates the Comment and adds it to the list of Comments.
- SHOW MORE
Select to show the complete list (i.e., "thread") of Comments associated with the record. To hide the list, simply select the SHOW MORE button again. The Comment thread will show the most recent Comment first.