Vouchers are documents authorizing payment to Vendors who have either performed services or supplied goods. A voucher "vouches for" the fact that these goods or services have been provided.
To enter a new Voucher, select the "Enter New Voucher" option. The following screen will appear:
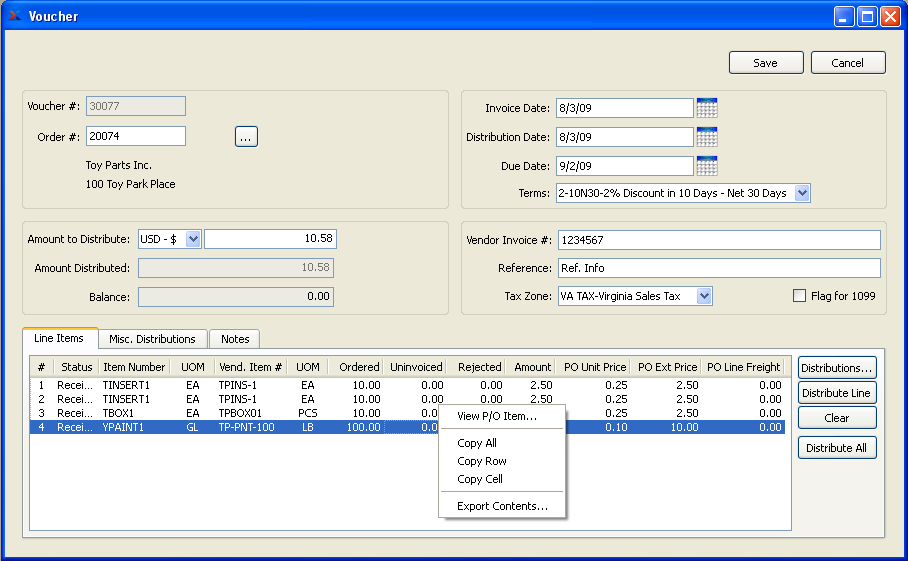
When entering a new Voucher, you are presented with the following options:
- Voucher #
Next available Voucher Number will automatically display, unless your system requires you to enter Voucher Numbers manually. Default values and input parameters for Voucher Numbers are configurable at the system level.
- PO Number
Enter the Purchase Order Number of the Purchase Order you want to create a Voucher for.
- Vendor
The name and address of the Vendor associated with the specified Purchase Order will display here.
- Amount to Distribute
Specify the dollar amount you intend to distribute to the Vendor for the specified Purchase Order. You may enter an amount greater than the amount due on the Purchase Order.
- Amount Distributed
Displays sum of all Line Item distributions for specified Purchase Order.
- Balance
Displays the difference between amount to distribute and amount distributed.
- Invoice Date
Enter an Invoice date for the Voucher. The Invoice date is used for determining the due date, based on the specified Terms.
- Distribution Date
Enter the date of the current distribution. When the Voucher is posted, this is the date when the posting will be recorded in the General Ledger.
- Due Date
Enter the date payment is due to the Vendor. The due date is derived when the specified Terms are added to the Invoice date.
- Terms
Specify the billing Terms for the Voucher. By default, the billing Terms will be transferred from the original Purchase Order. You may select alternate Terms on the Voucher header.
Tip
You are given the opportunity to apply any billing Terms Discounts when selecting a posted Voucher for payment.
- Vendor Invoice #
Enter the Vendor Invoice Number associated with the specified Purchase Order. The system will issue a warning if you attempt to enter an Invoice Number which has already been used.
- Reference
Use this field to enter any notation or reference required for further identification.
- Tax Zone
Specify the Tax Zone which has jurisdiction over the transaction. By default, the Tax Zone specified on the selected Purchase Order will be used.
- Flag for 1099
Select to flag transaction for Form 1099 Tax reporting. This is informational only and does not impact Tax calculations.
- Line Items
Display lists Line Items associated with the specified Purchase Order.
To the far right of the screen, the following buttons are available:
- CANCEL
Closes the screen without entering a new Voucher, returning you to the application desktop.
- SAVE
Creates the new Voucher.
- DISTRIBUTIONS
Highlight a Purchase Order Line Item and then select this button to reach the Voucher Item distribution screen.
- DISTRIBUTE LINE
Highlight a Purchase Order Line Item(s) and then select this button to automatically distribute all quantities and amounts for the selected Voucher Item(s).
- CLEAR
Highlight a Purchase Order Line Item(s) and then select this button to automatically clear any distributions.
- DISTRIBUTE ALL
Select to distribute quantities and amounts for all Voucher Items.
Tip
You may select multiple Purchase Order Line Items for distribution or clearing by highlighting them using your mouse—or a combination of your mouse and either the SHIFT or CTRL keys.
To add miscellaneous Cost distributions to a Voucher, select the "Misc. Distributions" tab. The following screen will appear:
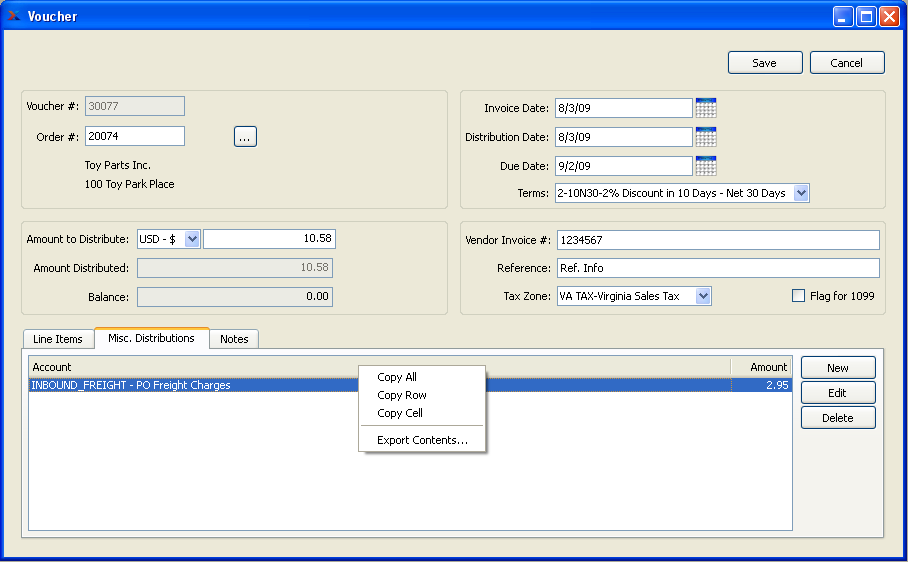
When adding miscellaneous distributions to a Voucher, you are presented with the following options:
- Account
Display lists Accounts and distribution amounts for any miscellaneous distributions associated with the Voucher.
To the far right of the screen, the following buttons are available:
- NEW
Select to enter a new miscellaneous distribution.
- EDIT
Enables you to edit highlighted miscellaneous distributions. The edit screen is the same as that for creating a new miscellaneous distribution—except that when editing, the fields will contain miscellaneous distribution information. Double-clicking on a miscellaneous distribution will also bring you to the editing screen.
- DELETE
Highlight a miscellaneous distribution and then select this button to remove the miscellaneous distribution from the list.
To add Notes to a Voucher, select the "Notes" tab. The following screen will appear:
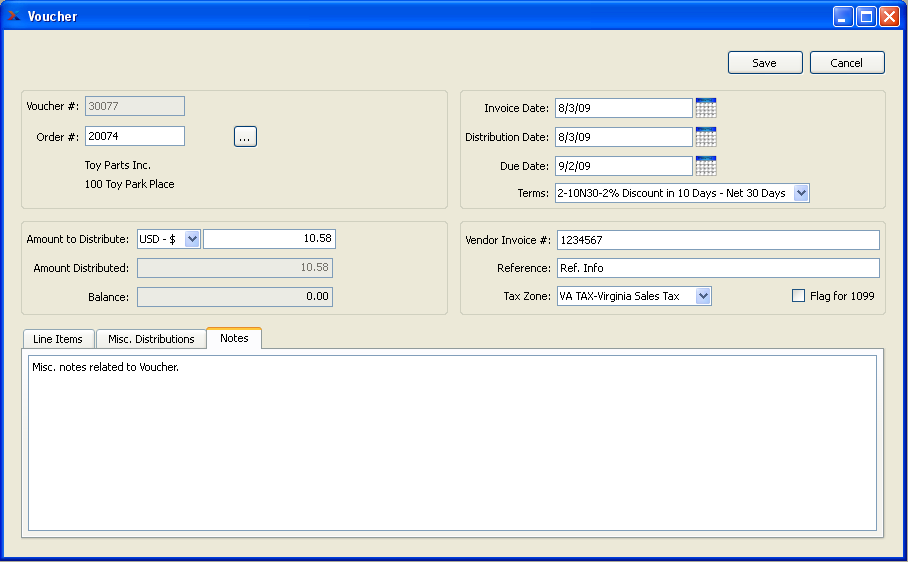
When adding Notes to a Voucher, you are presented with the following options:
- Notes
This is a scrolling text field with word-wrapping for entering general Notes related to the Sales Order. These Notes are for internal use only.
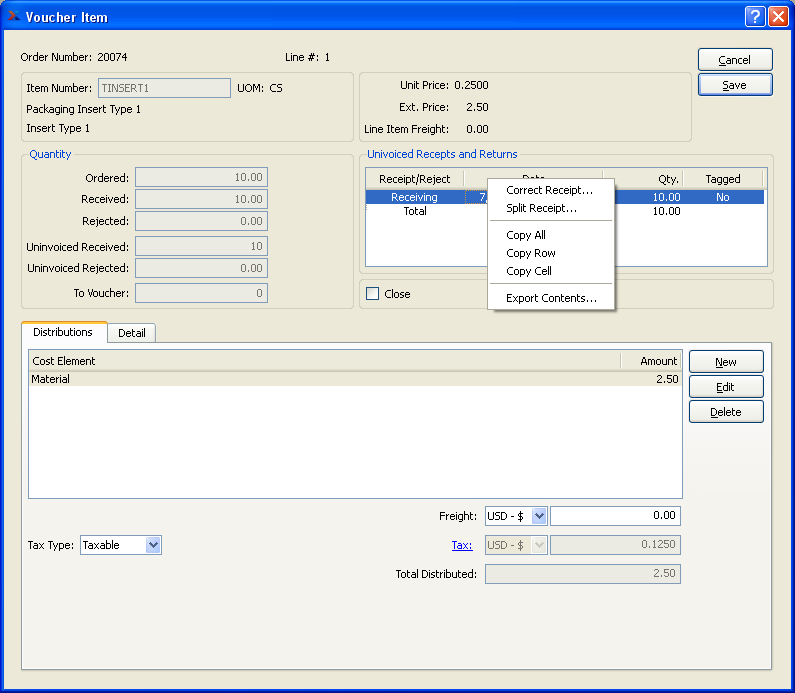
To distribute quantities from Purchase Order Line Items to the Voucher, highlight a Line Item and then select the DISTRIBUTIONS button. The following screen will appear:
Note
An Item's per unit Actual Cost will be automatically updated after a Voucher is posted if the vouchered Cost differs from the Item's current Actual Cost. The vouchered Cost for an Item is determined by dividing the amount to distribute by the quantity to voucher.
When distributing quantities from a Purchase Order Line Item to the Voucher, you are presented with the following options:
- Order Number
Displays Purchase Order Number specified on previous screen.
- Line #
Displays Line Item selected for distribution on previous screen.
- Item Number
Displays Item Number associated with specified Line Item.
- UOM
Inventory Unit of Measure.
- Line Item Price Information
Displays the following price information for the P/O Line Item:
- Unit Price
Displays the Unit Price for the Line Item.
- Ext. Price
Displays the Extended Price for the Line Item.
- Line Item Freight
Displays the amount of Line Item Freight, if any.
- Quantity
Displays the following quantity information for the P/O Line Item:
- Ordered
Displays the quantity ordered for the Line Item.
- Received
Displays the quantity received to date of the Line Item.
- Rejected
Displays the quantity rejected to date of the Line Item.
- Uninvoiced Received
Displays the uninvoiced quantity received to date of the Line Item.
- Uninvoiced Rejected
Displays the uninvoiced quantity rejected to date of the specified Line Item.
- To Voucher
This is a read-only field displaying the Purchase Order Line Item quantity tagged to be vouchered for the given Voucher Item. The quantity displayed equals the tagged received qty. minus any returned qty. which may also have been tagged. The quantity to voucher is a divisor applied to the distribution amount. The resulting amount—that is, the Voucher Item distribution amount divided by the quantity vouchered—determines the per unit Actual Cost for an Item. The system will automatically handle any differences between the Inventory and Vendor UOMs—if any differences exist.
Tip
If you want to partially pay for a Receipt—but find you cannot edit the value in the "Qty. to Voucher" field—you should first correct the quantity on the original Receipt to be the amount you want to pay for, then enter a second Receipt for the balance. To correct Receipt quantities, use the right-click menu on the "Uninvoiced Receipts and Returns" screen.
- Uninvoiced Receipts and Returns
Display lists uninvoiced Receipts and Returns for the specified Line Item. To change the tagged status for a Line Item, double-click on the quantity in the Uninvoiced Receipts and Returns display. If a received (or returned) quantity has been tagged "Yes," this means the quantity will be marked as invoiced when the Voucher is posted.
Tip
You can split or correct a Receipt by right-clicking on a line item in the Uninvoiced Receipts and Returns window.
- Close
Select to close the Line Item automatically when the Voucher is posted. This flag will be selected automatically if the received quantity tagged for vouchering is equal to or greater than the Order quantity.
- Distributions
Display lists Costing Elements used for distributing Voucher Costs. At the bottom of the display the total amount distributed will display. This total includes Costing Element distributions and any Purchase Order Line Item freight charges.
- Tax Type
Specify the Tax Type for the Line Item. By default, the Tax Type specified on the selected Purchase Order will be used
- Freight
Enter the amount of any Purchase Order Line Item freight charges. The freight amount entered in this field will be added to the total amount for the Voucher Item. If you are vouchering for less than the original quantity ordered—and if Line Item freight was entered when the Purchase Order was created—then you should consider adjusting the Line Item freight amount accordingly. To make this adjustment, multiply the quantity you are vouchering by the per unit freight charge. The per unit freight charge is determined by dividing the original Line Item freight amount by the original Line Item quantity.
- Tax
Displays the amount of Tax associated with the Line Item, if any.
- Total Distributed
Displays the total amount distributed for the Line Item.
To the far right of the screen, the following buttons are available:
- CANCEL
Closes the screen, returning you to the previous screen.
- SAVE
Saves the Line Item information and adds it to the Voucher.
- NEW
Opens screen for adding a new Costing Element to the distribution list.
- EDIT
Enables you to edit highlighted Costing Element. The edit screen is the same as that for adding a new Costing Element—except that when editing, the fields will contain Costing Element information. Double-clicking on a Costing Element will also bring you to the editing screen.
- DELETE
Highlight a Costing Element and then select this button to remove the Costing Element from the list.
To view detailed Line Item information, select the "Detail" tab. The following screen will appear:
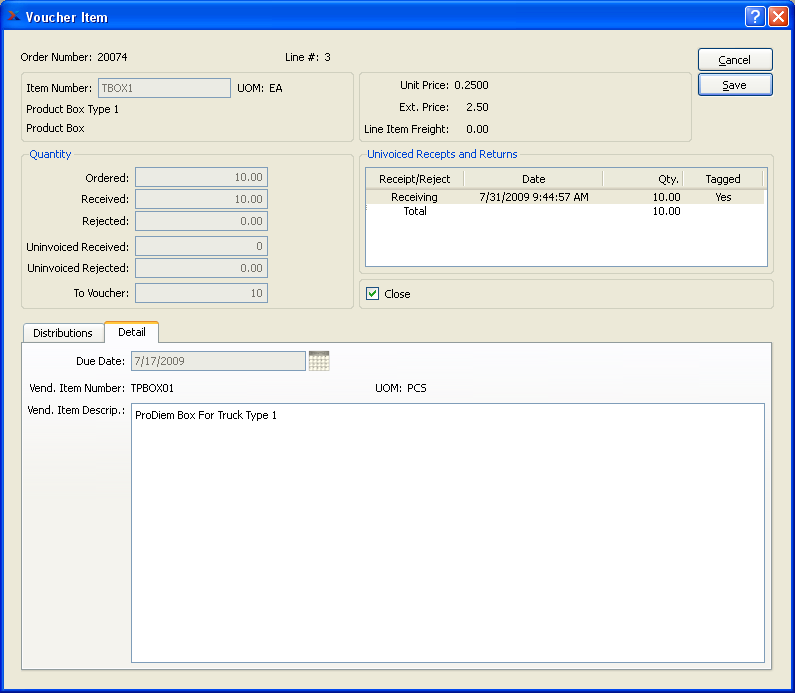
When viewing detailed Line Item information, you are presented with the following options:
- Due Date
Displays the date the Line Item was expected to be received, based on the Purchase Order information.
- Vend. Item Number
Displays the Item number the Vendor assigns to the specified Item from the Item Source record.
- UOM
Displays the Unit of Measure used by the Vendor for the specified Item from the Item Source record.
- Vend. Item Descrip.
Displays the description the Vendor uses to describe the specified Item from the Item Source record.
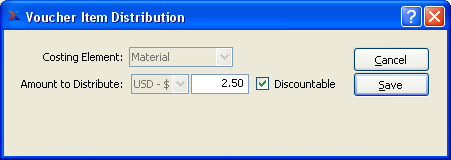
To distribute purchasing Costs to specific Costing Elements for the Item quantity being vouchered, select the NEW button. The following screen will appear:
Note
An Item's per unit Actual Cost will be automatically updated after a Voucher is posted if the vouchered Cost differs from the Item's current Actual Cost. The vouchered Cost for an Item is determined by dividing the amount to distribute by the quantity to voucher.
When distributing purchasing Costs to a specific Costing Element, you are presented with the following options:
- Costing Element
Specify the Costing Element you want to distribute purchasing Costs to. The "Material" Costing Element will be selected by default once Line Item quantity has been tagged. You may distribute Costs to more than one Costing Element per Voucher Item. The list of available Costing Elements includes the system-defined "Material" Costing Element, as well as any user-defined Costing Elements designated as available to accept Purchase Order distributions.
Tip
Be sure to specify the amount to distribute based on the pricing found on the Purchase Order. The system will automatically handle any calculations required to accommodate Inventory/Vendor Unit of Measure (UOM) ratios which are not 1:1.
- Amount to Distribute
Specify the purchasing amount to distribute to the specified Costing Element. By default, the extended Price for the Purchase Order Line Item will be entered here once Line Item quantity has been tagged. Any difference between the distribution amount and the current Actual Cost amount for the Costing Element will result in the posting of automatic updates to the current Actual Cost when the Voucher is posted.
- Discountable
Select if the Voucher Item is entitled to a Terms discount. This option may be used on a line-by-line basis—all within one Voucher. For example, purchased Items may be discountable; however, freight charges may not be. When selecting a Voucher for payment within the discount period, only discountable Items will be discounted.
To the far right of the screen, the following buttons are available:
- CANCEL
Closes the screen, returning you to the previous screen.
- SAVE
Saves the distribution information and adds it to the distribution list.
To split a Purchase Order Receipt into different, smaller quantities, highlight a Receipt and then select the "Split Receipt" option from the right-click menu. The following screen will appear:
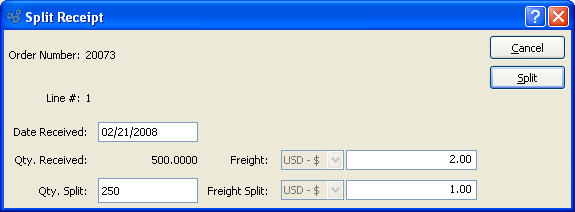
When splitting a Receipt quantity, you are presented with the following options:
- Order Number
Displays the Order Number of the Purchase Order whose Receipt is to be split.
- Line #
Displays the specific Purchase Order Line Item to be split.
- Date Received
By default, the date of the original Receipt will be displayed here. However, you may change the date.
- Qty. Received
Displays the quantity received for the selected Line Item.
- Qty. Split
Enter the quantity you want to split off from the original Receipt quantity. A new Receipt line will be created in the quantity specified here.
- Freight
By default, the original Freight amount will be displayed here. However, you may change the Freight amount.
- Freight Split
Enter the amount you want to split off from the original Freight amount. The new Freight amount will be added to the new Receipt line.
To the far right of the screen, the following buttons are available:
- CANCEL
Closes the screen, returning you to the previous screen.
- SPLIT
Select to create a new Receipt line using the specified parameters.
In addition to Line Item specific distributions, you may also enter miscellaneous distributions to affect the Voucher as a whole. To enter a miscellaneous distribution, select the NEW button from the main Voucher screen. The following screen will appear:
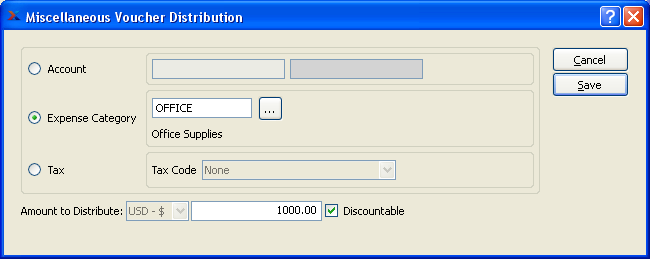
When entering a miscellaneous Voucher distribution, you are presented with the following options:
- Distribution Options
Select one of the following distribution options:
- Account
Select a General Ledger Account to use for the distribution.
- Expense Category
Select an Expense Category to use for the distribution.
- Tax
Select a Tax Code to use for the distribution.
- Amount to Distribute
Specify the amount of the miscellaneous distribution. If there is a balance still to be distributed once all Voucher Items have been distributed, then that remaining amount will be entered here by default.
- Discountable
Select if the Voucher Item is entitled to a Terms discount. This option may be used on a line-by-line basis—all within one Voucher. For example, purchased Items may be discountable; however, freight charges may not be. When selecting a Voucher for payment within the discount period, only discountable Items will be discounted.
To the far right of the screen, the following buttons are available:
- CANCEL
Closes the screen, returning you to the previous screen.
- SAVE
Saves the information and adds it to the list of miscellaneous distributions, simultaneously adjusting both the Voucher amount distributed and the balance distributed.
Miscellaneous Vouchers can be used to authorize payments for non-Inventory goods or services. You might use a miscellaneous Voucher, for example, to authorize payment for Utility bills or other non-Inventory expenses. To enter a Miscellaneous Voucher, select the "Enter New Miscellaneous Voucher" option. The following screen will appear:
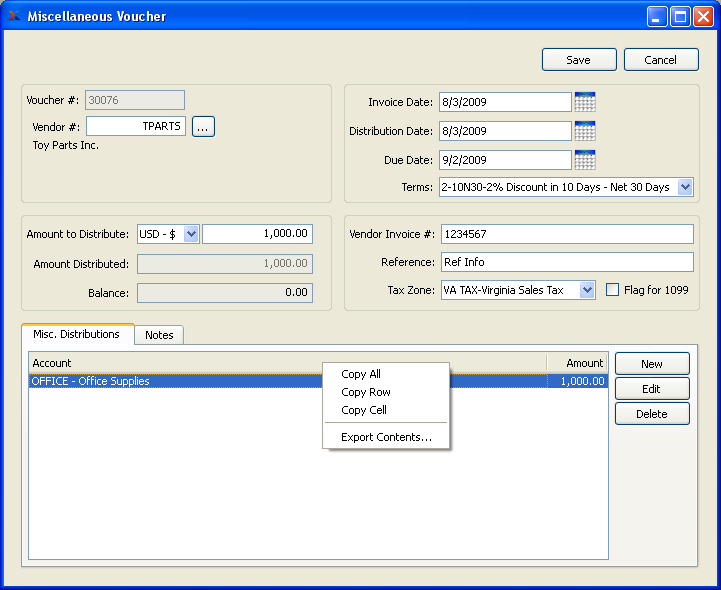
Note
A Voucher posts to the General Ledger effective on the Invoice Date entered on the Voucher—not on the date it is posted, as might be assumed.
When entering a new Voucher, you are presented with the following options:
- Voucher #
Next available Voucher Number will automatically display, unless your system requires you to enter Voucher Numbers manually. Default values and input parameters for Voucher Numbers are configurable at the system level.
- Vendor #
Enter the Vendor number of the Vendor you want to enter a Miscellaneous Voucher for.
- Amount to Distribute
Specify the dollar amount you intend to distribute to the Vendor for the Miscellaneous Voucher.
- Amount Distributed
Displays sum of all miscellaneous distributions for the Miscellaneous Voucher.
- Balance
Displays the difference between amount to distribute and amount distributed.
- Invoice Date
Enter an Invoice date for the Voucher. The Invoice date is used for determining the due date, based on the specified Terms.
- Distribution Date
Enter the date of the current distribution. When the Voucher is posted, this is the date when the posting will be recorded in the General Ledger.
- Due Date
Enter the date payment is due to the Vendor. The due date is derived when the specified Terms are added to the Invoice date.
- Terms
Specify the billing Terms for the Voucher.
- Vendor Invoice #
Enter the Vendor Invoice Number associated with the Miscellaneous Voucher.
- Reference
Use this field to enter any notation or reference required for further identification.
- Tax Zone
Specify the Tax Zone which has jurisdiction over the transaction. By default, the Tax Zone for the specified Vendor will be used.
- Flag for 1099
Select to flag transaction for Form 1099 Tax reporting. This is informational only and does not impact Tax calculations.
- Miscellaneous Distributions
Display lists miscellaneous Cost distributions related to the Miscellaneous Voucher.
To the far right of the screen, the following buttons are available:
- CANCEL
Closes the screen without entering a new Miscellaneous Voucher, returning you to the application desktop.
- SAVE
Creates the Miscellaneous Voucher.
- NEW
Select to distribute Costs for the Miscellaneous Voucher.
- EDIT
Enables you to edit highlighted miscellaneous distributions. The edit screen is the same as that for creating a new miscellaneous distribution—except that when editing, the fields will contain miscellaneous distribution information. Double-clicking on a miscellaneous distribution will also bring you to the editing screen.
- DELETE
Highlight a miscellaneous distribution and then select this button to remove the miscellaneous distribution from the list.
To add Notes to a Miscellaneous Voucher, select the "Notes" tab. The following screen will appear:
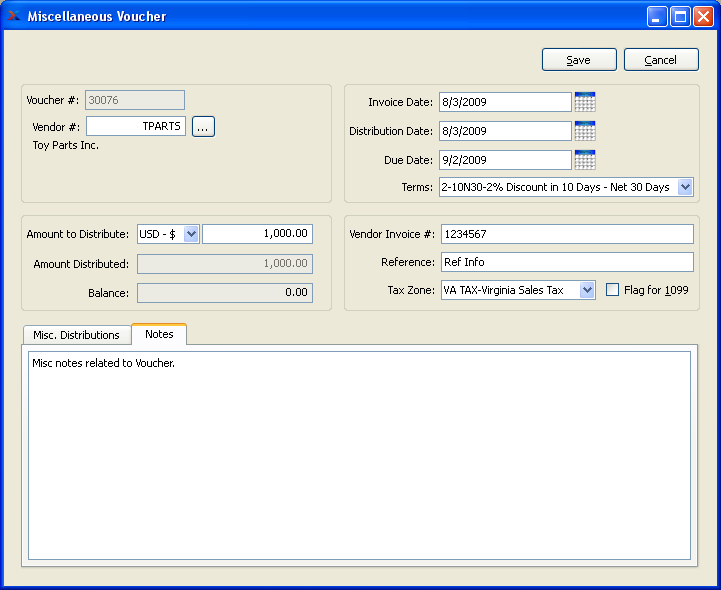
When adding Notes to a Miscellaneous Voucher, you are presented with the following options:
- Notes
This is a scrolling text field with word-wrapping for entering general Notes related to the Sales Order. These Notes are for internal use only.
In addition to Line Item specific distributions, you may also enter miscellaneous distributions to affect the Voucher as a whole. To enter a miscellaneous distribution, select the NEW button from the main Voucher screen. The following screen will appear:
When entering a miscellaneous Voucher distribution, you are presented with the following options:
- Distribution Options
Select one of the following distribution options:
- Account
Select a General Ledger Account to use for the distribution.
- Expense Category
Select an Expense Category to use for the distribution.
- Tax
Select a Tax Code to use for the distribution.
- Amount to Distribute
Specify the amount of the miscellaneous distribution. If there is a balance still to be distributed once all Voucher Items have been distributed, then that remaining amount will be entered here by default.
- Discountable
Select if the Voucher Item is entitled to a Terms discount. This option may be used on a line-by-line basis—all within one Voucher. For example, purchased Items may be discountable; however, freight charges may not be. When selecting a Voucher for payment within the discount period, only discountable Items will be discounted.
To the far right of the screen, the following buttons are available:
- CANCEL
Closes the screen, returning you to the previous screen.
- SAVE
Saves the information and adds it to the list of miscellaneous distributions, simultaneously adjusting both the Voucher amount distributed and the balance distributed.
Vouchers may be posted individually or in groups using the Unposted Vouchers screen. After they are posted, open Vouchers may later be voided using the right-click menu on the Vendor history screen. To display unposted Vouchers, select the "List Unposted Vouchers" option. The following screen will appear:
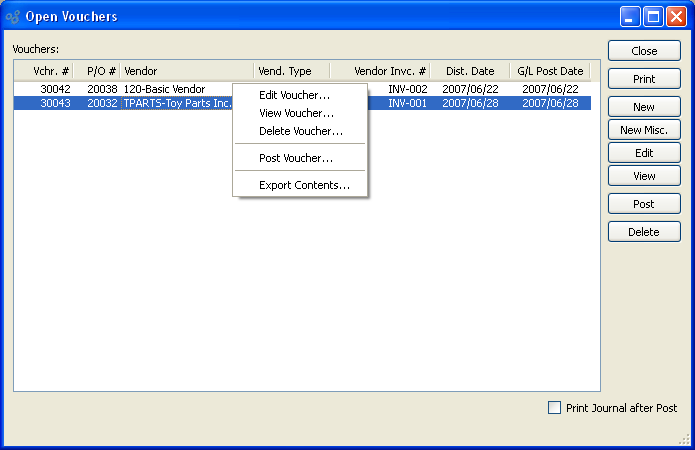
Note
Actual Costs for purchased Items will be automatically updated when Vouchers are posted if there are differences between current Actual Costs and the vouchered Costs for the Items in question. Please keep in mind that Actual Costs only will be updated at posting. For new Costs to be recognized as Standard Costs, Actual Costs must be posted to Standard.
The "Vouchers" screen displays information on all unposted Vouchers, including Voucher Number, Purchase Order Number, Vendor Number/Vendor name, Vendor Invoice Number, and distribution date. Users with the appropriate privilege will also see the G/L distribution date column.
Tip
You may select multiple Vouchers for posting by highlighting them using your mouse—or a combination of your mouse and either the SHIFT or CTRL keys.
To the far right of the screen, the following buttons are available:
- CLOSE
Closes the screen, returning you to the application desktop.
Runs the report associated with this screen.
- NEW
Opens screen for creating a new Voucher.
- NEW MISC.
Opens screen for creating a new Miscellaneous Voucher.
- EDIT
Enables you to edit highlighted Vouchers. The edit screen is the same as that for creating a new Voucher—except that when editing, the fields will contain Voucher information. Double-clicking on a Voucher will also bring you to the editing screen.
- VIEW
Highlight a Voucher and then select this button to reach a read-only view of the "Edit" screen.
Tip
If you have a Purchase Order Voucher that was corrupted by, for example, a sudden power outage, you can clear the record by running the Post Vouchers screen. In most cases, this action will remove the corrupted record and allow you to voucher the Purchase Order with a fresh Voucher.
- POST
Highlight one—or multiple—Vouchers, then select this button to post the selected Voucher(s). By default, Vouchers post to the General Ledger (G/L) on their distribution date. However, users with the appropriate privilege may change the G/L distribution date to an alternate date during the Voucher posting process. If used, Vouchers will post on the alternate date. The ability privileged users have to change the distribution date applies to the posting of both individual and also batches of Vouchers from this screen.
- DELETE
Highlight a Voucher and then select this button to remove the Voucher from the list.
- Print Journal after Post
Select if you want to print a copy of the Payables Journal after the selected Vouchers are posted.
To edit Vouchers that have been created but not yet posted, select the "Vouchering Edit List" option. The following screen will appear:
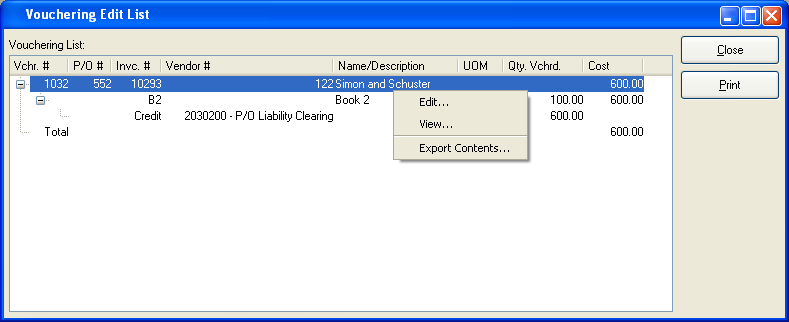
The "Vouchering Edit" screen displays information on all existing Vouchers, including Voucher Number, Purchase Order Number, Vendor number, Vendor name/description, Vendor Item UOM, quantity to Voucher, and Cost. Voucher Line Items and Account distributions will display in a nested manner beneath the associated parent Voucher. Select a plus "+" sign to reveal lower levels of detail. To hide detail, select the minus "-" sign.
To the far right of the screen, the following buttons are available:
- CLOSE
Closes the screen, returning you to the application desktop.
Runs the report associated with this screen.
To post Vouchers in batch mode, select the "Post Vouchers" option. The following screen will appear:
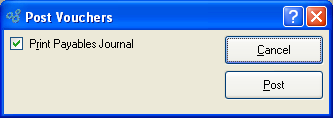
Note
Actual Costs for purchased Items will be automatically updated when Vouchers are posted if there are differences between current Actual Costs and the vouchered Costs for the Items in question. Please keep in mind that Actual Costs only will be updated at posting. For new Costs to be recognized as Standard Costs, Actual Costs must be posted to Standard.
When posting Vouchers in batch mode, you are presented with the following options:
Tip
If you have a Purchase Order Voucher that was corrupted by, for example, a sudden power outage, you can clear the record by running the Post Vouchers screen. In most cases, this action will remove the corrupted record and allow you to voucher the Purchase Order with a fresh Voucher.
To the far right of the screen, the following buttons are available:
- CANCEL
Closes the screen, returning you to the application desktop.
- POST
Posts the specified Voucher.