Purchase Reports section.
To view Item Sites by Planner Code, select the "Item Sites by Planner Code" option. The following screen will appear:
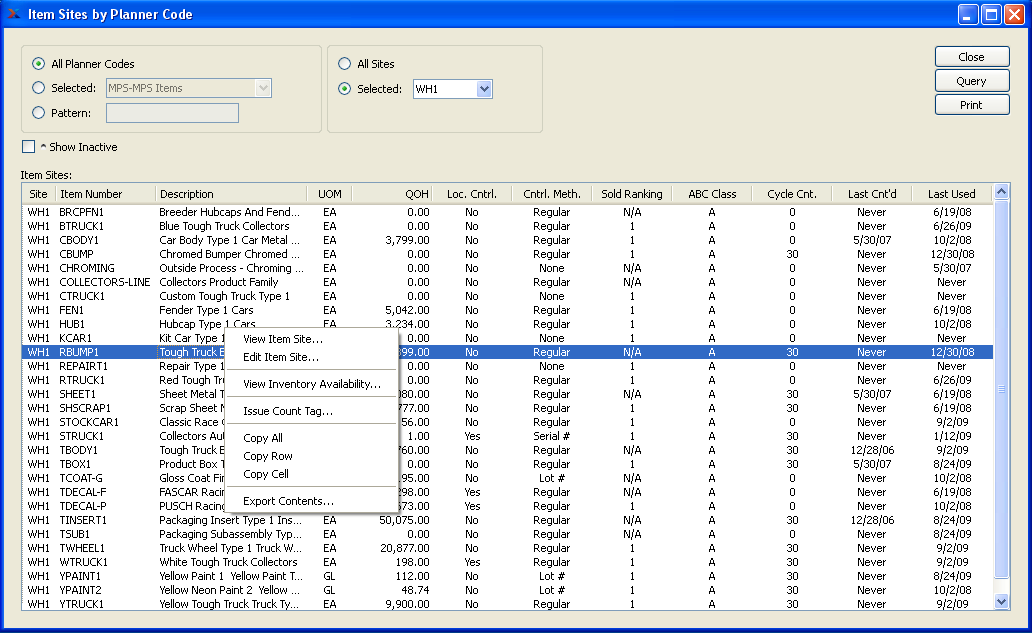
When displaying Item Sites by Planner Code, you are presented with the following options:
- All Planner Codes
Select to display Item Sites for all Planner Codes.
- Selected
Specify Planner Code whose Item Sites you want to display.
- Pattern
Enter a Planner Code pattern to select a range of Planner Codes. Refine your search using Regular Expressions.
- All Sites
Select to display Item Sites by Planner Code for all Sites.
- Selected
Specify Site whose Item Sites by Planner Code you want to display.
- Show Inactive
Select to display active as well as inactive Item Sites.
- Item Sites
Display lists Item Sites by Planner Code, using the specified parameters.
To the far right of the screen, the following buttons are available:
- CLOSE
Closes the screen, returning you to the application desktop.
- QUERY
Select to generate the display, using the specified parameters.
Runs the report associated with this screen.
Item Sources Reports section.
To view Item Sources by Vendor, select the "Item Sources by Vendor" option. The following screen will appear:
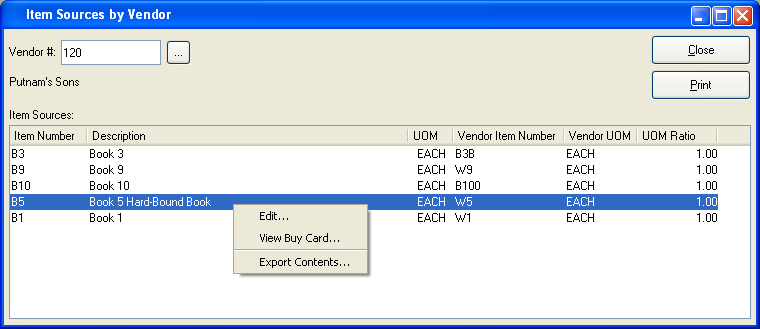
When displaying Item Sources by Item, you are presented with the following options:
- Vendor #
Enter the Vendor Number of the Vendor whose Item Sources you want to view.
- Item Sources
Display lists Item Sources by Item, using the specified parameters.
To the far right of the screen, the following buttons are available:
- CLOSE
Closes the screen, returning you to the application desktop.
Runs the report associated with this screen.
To view Item Sources by Item, select the "Item Sources by Item" option. The following screen will appear:
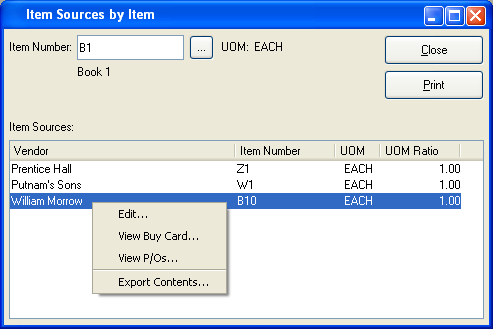
When displaying Item Sources by Item, you are presented with the following options:
- Item Number
Enter the Item Number of the Item whose Item Sources you want to view.
- UOM
Inventory Unit of Measure.
- Item Sources
Display lists Item Sources by Item, using the specified parameters.
To the far right of the screen, the following buttons are available:
- CLOSE
Closes the screen, returning you to the application desktop.
Runs the report associated with this screen.
A Buy Card is a list, formerly recorded on a card, showing an historical record of Items bought from specified Vendors. To view purchasing history by Vendor Part Number, select the "Buy Card" option. The following screen will appear:
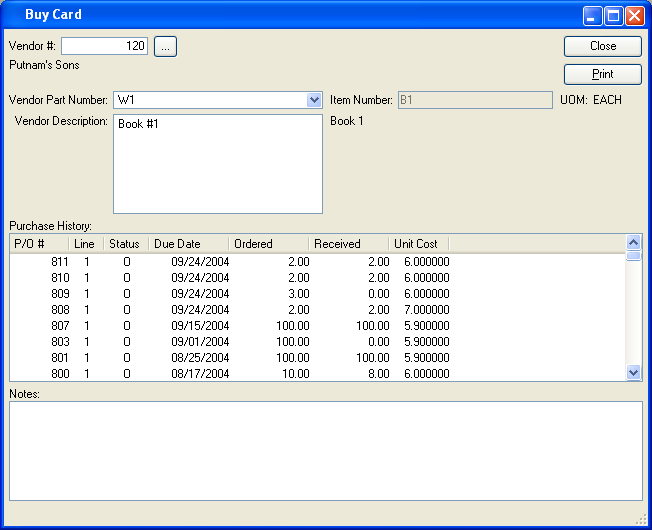
When viewing purchasing history by Vendor Part Number, you are presented with the following options:
- Vendor #
Enter the Vendor Number of the Vendor whose purchasing history by Part Number you want to view.
- Vendor Part Number
Specify the Vendor Part Number whose purchasing history you want to display.
- Vendor Description
Enter the description used by the Vendor to identify the Vendor Part Number.
- Item Number
Displays internal Item Number associated with Vendor Part Number.
- UOM
Inventory Unit of Measure.
- Purchase History
Display lists purchasing history for specified Vendor Part Number.
- Notes
Displays any Notes which may be associated with the Item Source on the Item Source master.
To the far right of the screen, the following buttons are available:
- CLOSE
Closes the screen, returning you to the application desktop.
Runs the report associated with this screen.
Purchase Request Reports section.
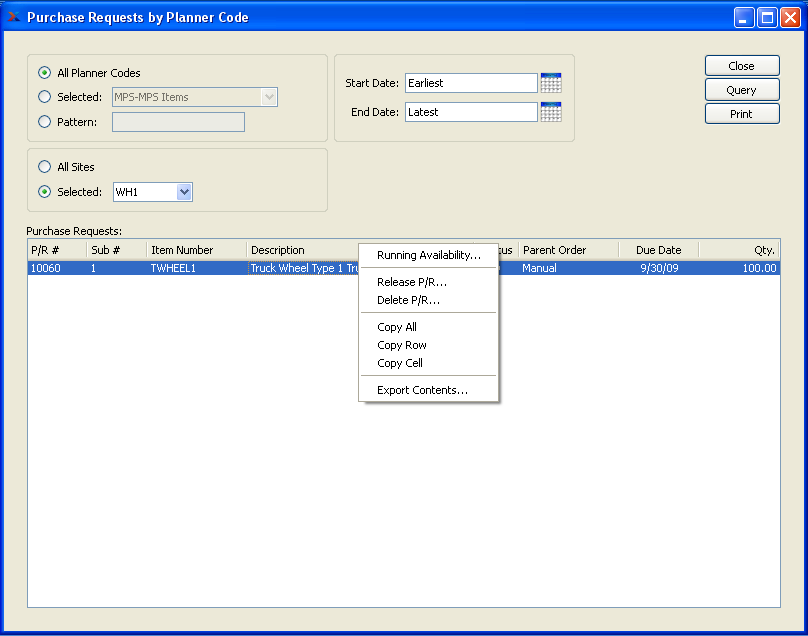
To view Purchase Requests by Planner Code, select the "Purchase Requests by Planner Code" option. The following screen will appear:
Note
Purchase Requests are considered to be a valid source of supply by the planning systems.
Tip
Purchase Requests may be created using the right-click menus available in several displays. For example, you can generate Purchase Requests from Inventory Availability and also Planned Order reports.
When displaying Purchase Requests by Planner Code, you are presented with the following options:
- All Planner Codes
Select to display Purchase Requests for all Planner Codes.
- Selected
Specify Planner Code whose Purchase Requests you want to display.
- Pattern
Enter a Planner Code pattern to select a range of Planner Codes. Refine your search using Regular Expressions.
Note
Purchase Request quantities are based on the Inventory Unit of Measure (UOM). However, some Vendor Item Sources may specify an alternate UOM. If this is the case, the system will automatically convert the requirement to the Vendor's UOM when the Purchase Request is released.
- All Sites
Select to display Purchase Requests by Planner Code for all Sites.
- Selected
Specify Site whose Purchase Requests by Planner Code you want to display.
- Start Date
Purchase Requests by Planner Code entered on and after this date will be displayed.
- End Date
Purchase Requests by Planner Code entered on and before this date will be displayed.
- Purchase Requests
Display lists Purchase Requests for the specified Planner Code, using the specified parameters.
Note
When a Purchase Request is released, the requested Item will automatically populate a Purchase Order Item screen. If Item Sources have been defined for the Item, then Item Source Prices will be used—that is, unless the Vendor price has been specifically overridden for Purchase Requests generated from Sales Orders. Project Numbers may also be transferred from Sales Orders. In this way, Sales Orders and Purchase Order Line Items may be linked to the same Project.
To the far right of the screen, the following buttons are available:
- CLOSE
Closes the screen, returning you to the application desktop.
- QUERY
Select to generate the display, using the specified parameters.
Runs the report associated with this screen.
To view Purchase Requests by Item, select the "Purchase Requests by Item" option. The following screen will appear:
Note
Purchase Requests are considered to be a valid source of supply by the planning systems.
Tip
Purchase Requests may be created using the right-click menus available in several displays. For example, you can generate Purchase Requests from Inventory Availability and also Planned Order reports.
When displaying Purchase Requests by Item, you are presented with the following options:
- Item Number
Enter the Item Number of the Item whose Purchase Requests you want to view. The browse button located to the right of the field leads to a searchable list of make and buy items.
- UOM
Inventory Unit of Measure.
Note
Purchase Request quantities are based on the Inventory Unit of Measure (UOM). However, some Vendor Item Sources may specify an alternate UOM. If this is the case, the system will automatically convert the requirement to the Vendor's UOM when the Purchase Request is released.
- All Sites
Select to display Purchase Requests by Item for all Sites.
- Selected
Specify Site whose Purchase Requests by Item you want to display.
- Purchase Requests
Display lists Purchase Requests for the specified Item, using the specified parameters.
Note
When a Purchase Request is released, the requested Item will automatically populate a Purchase Order Item screen. If Item Sources have been defined for the Item, then Item Source Prices will be used—that is, unless the Vendor price has been specifically overridden for Purchase Requests generated from Sales Orders. Project Numbers may also be transferred from Sales Orders. In this way, Sales Orders and Purchase Order Line Items may be linked to the same Project.
To the far right of the screen, the following buttons are available:
- CLOSE
Closes the screen, returning you to the application desktop.
Runs the report associated with this screen.
Purchase Orders Reports section.
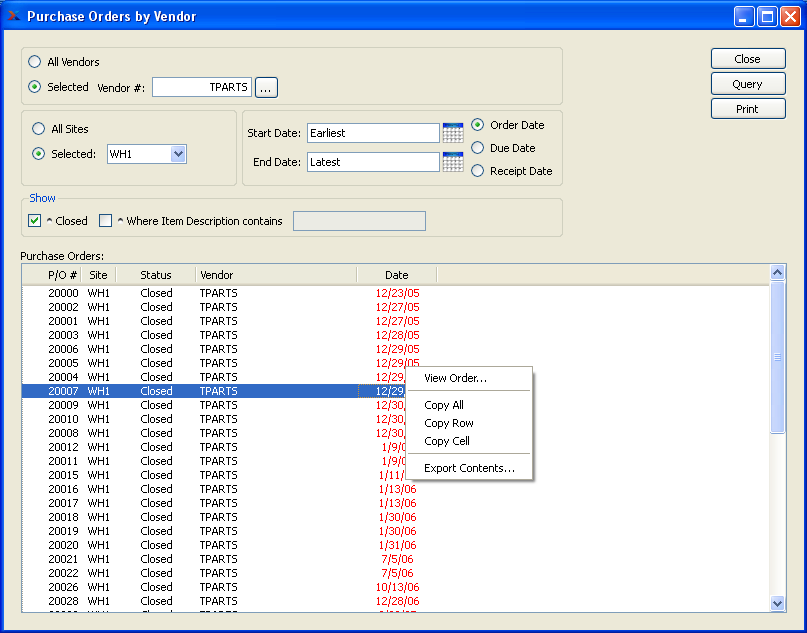
To see a summarized view of Purchase Orders by Vendor, select the "P/Os by Vendor" option. The following screen will appear:
Tip
A Purchase Order will remain open if at least one of its Line Items is open. Once all Line Items are closed, the Purchase Order will also be closed. To reopen a closed Purchase Order, simply open one of its closed Line Items.
When displaying a summarized view of Purchase Orders by date, you are presented with the following options:
- All Vendors
Select to display Purchase Orders for all Vendors.
- Selected
Select to display Purchase Orders for a selected Vendor.
- All Sites
Select to display Purchase Orders in all Sites.
- Selected
Specify Site whose Purchase Orders you want to display.
- Start Date
Enter a start date based on the corresponding date filter you choose. The following three date filters are available: Order Date, Due Date, or Receipt Date.
- End Date
Enter an end date based on the corresponding date filter you choose. The following three date filters are available: Order Date, Due Date, or Receipt Date.
- Show Closed P/Os
Select to display only closed Purchase Orders.
- Where Item Description contains
Select to display Purchase Orders whose Item Description matches the value entered in the corresponding field. This field supports pattern matching with Regular Expressions.
- P/Os
Display lists Purchase Orders by Vendor, using the specified parameters.
To the far right of the screen, the following buttons are available:
- CLOSE
Closes the screen, returning you to the application desktop.
- QUERY
Select to generate the display, using the specified parameters.
Runs the report associated with this screen.
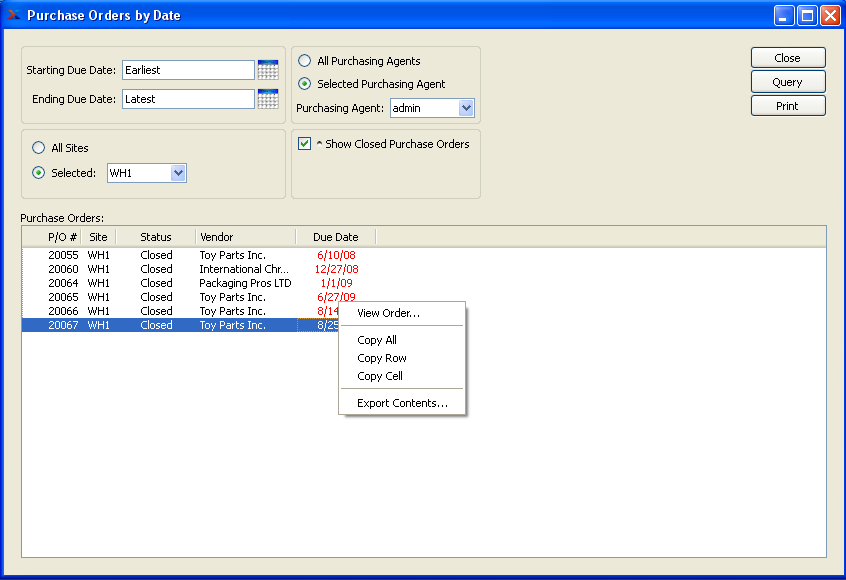
To see a summarized view of Purchase Orders by date, select the "P/Os by Date" option. The following screen will appear:
Tip
A Purchase Order will remain open if at least one of its Line Items is open. Once all Line Items are closed, the Purchase Order will also be closed. To reopen a closed Purchase Order, simply open one of its closed Line Items.
When displaying a summarized view of Purchase Orders by date, you are presented with the following options:
- Starting Due Date
Purchase Orders due on and after this date will be displayed.
- Ending Due Date
Purchase Orders due on and before this date will be displayed.
- All Sites
Select to display Purchase Orders for all Sites.
- Selected
Specify Site whose Purchase Orders you want to display.
- All Purchasing Agents
Select to display Purchase Orders by date for all Purchasing Agents.
- Selected
Specify Purchasing Agent whose Purchase Orders by date you want to display. Users may be designated as Purchasing Agents at the system level.
- P/Os
Display lists Purchase Orders by date, using the specified parameters.
To the far right of the screen, the following buttons are available:
- CLOSE
Closes the screen, returning you to the application desktop.
- QUERY
Select to generate the display, using the specified parameters.
Runs the report associated with this screen.
Purchase Order Items Reports section.
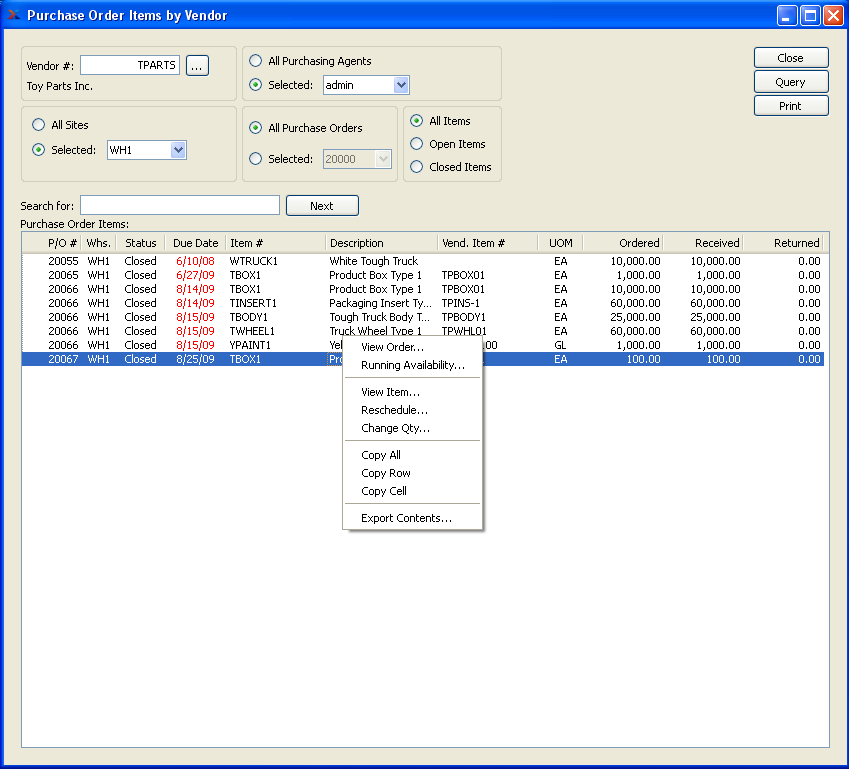
To view Purchase Order Items by Vendor, select the "P/O Items by Vendor" option. The following screen will appear:
Tip
A Purchase Order will remain open if at least one of its Line Items is open. Once all Line Items are closed, the Purchase Order will also be closed. To reopen a closed Purchase Order, simply open one of its closed Line Items.
When displaying Purchase Order Items by Vendor, you are presented with the following options:
- Vendor #
Enter the Vendor Number of the Vendor whose Purchase Order Items you want to view.
- All Sites
Select to display Purchase Order Items by Vendor for all Sites.
- Selected
Specify Site whose Purchase Order Items by Vendor you want to display.
- All Purchasing Agents
Select to display Purchase Order Items by Vendor for all Purchasing Agents.
- Selected
Specify Purchasing Agent whose Purchase Order Items by Vendor you want to display. Users may be designated as Purchasing Agents at the system level.
- All Purchase Orders
Select to display Purchase Order Items by Vendor for all Purchase Order Numbers.
- Selected
Specify Purchase Order Number whose Purchase Order Items by Vendor you want to display.
- All Items
Select to include all Purchase Order Items by Vendor in the display.
- Open Items
Select to include open Purchase Order Items by Vendor in the display.
- Closed Items
Select to include closed Purchase Order Items by Vendor in the display.
- Search for:
Enter text to more quickly find the record you're looking for. Use the NEXT button to move to the next match in your search.
- Purchase Order Items
Display lists Purchase Order Items by Vendor, using the specified parameters.
To the far right of the screen, the following buttons are available:
- CLOSE
Closes the screen, returning you to the application desktop.
- QUERY
Select to generate the display, using the specified parameters.
Runs the report associated with this screen.
To view Purchase Order Items by date, select the "P/O Items by Date" option. The following screen will appear:
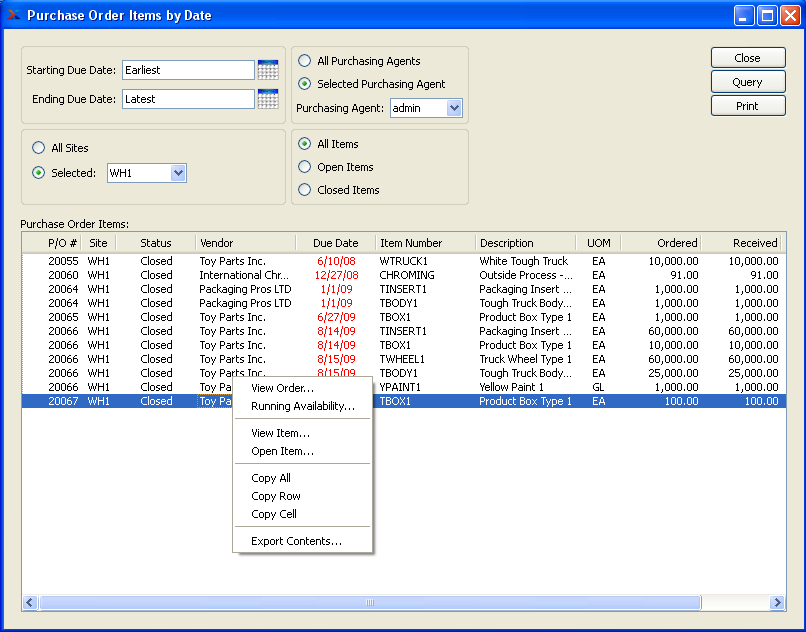
Tip
A Purchase Order will remain open if at least one of its Line Items is open. Once all Line Items are closed, the Purchase Order will also be closed. To reopen a closed Purchase Order, simply open one of its closed Line Items.
When displaying Purchase Order Items by date, you are presented with the following options:
- Starting Due Date
Purchase Order Items entered on and after this date will be displayed.
- Ending Due Date
Purchase Order Items entered on and before this date will be displayed.
- All Sites
Select to display Purchase Order Items by date for all Sites.
- Selected
Specify Site whose Purchase Order Items by date you want to display.
- All Purchasing Agents
Select to display Purchase Order Items by date for all Purchasing Agents.
- Selected
Specify Purchasing Agent whose Purchase Order Items by date you want to display. Users may be designated as Purchasing Agents at the system level.
- All Items
Select to include all Purchase Order Items by date in the display.
- Open Items
Select to include open Purchase Order Items by date in the display.
- Closed Items
Select to include closed Purchase Order Items by date in the display.
- P/O Items
Display lists Purchase Order Items by date, using the specified parameters.
To the far right of the screen, the following buttons are available:
- CLOSE
Closes the screen, returning you to the application desktop.
- QUERY
Select to generate the display, using the specified parameters.
Runs the report associated with this screen.
To view Purchase Order Items by Item, select the "P/O Items by Item" option. The following screen will appear:
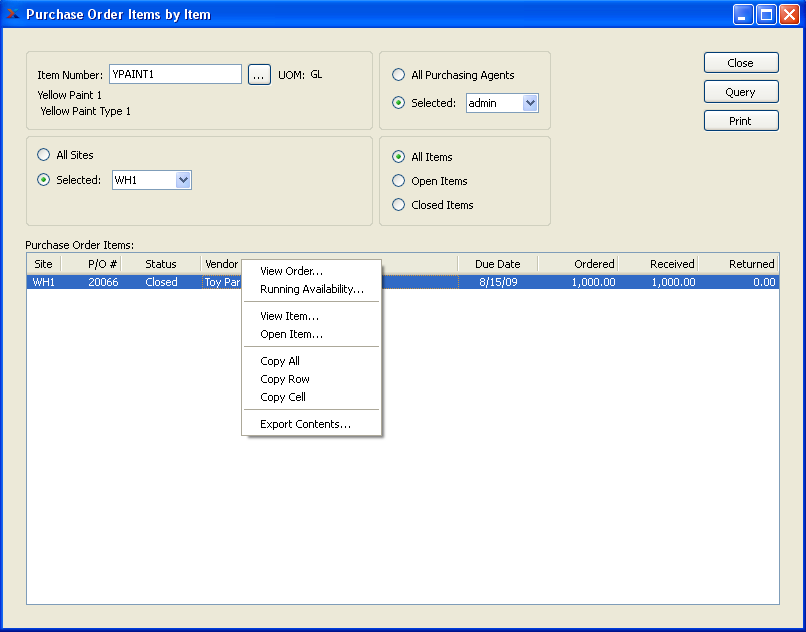
Tip
A Purchase Order will remain open if at least one of its Line Items is open. Once all Line Items are closed, the Purchase Order will also be closed. To reopen a closed Purchase Order, simply open one of its closed Line Items.
When displaying Purchase Order Items by Item, you are presented with the following options:
- Item Number
Enter the Item Number whose Purchase Order Items you want to view. The browse button located to the right of the field leads to a searchable list of make and buy items.
- UOM
Inventory Unit of Measure.
- All Sites
Select to display Purchase Order Items by Item for all Sites.
- Selected
Specify Site whose Purchase Order Items by Item you want to display.
- All Purchasing Agents
Select to display Purchase Order Items by Item for all Purchasing Agents.
- Selected
Specify Purchasing Agent whose Purchase Order Items by Item you want to display. Users may be designated as Purchasing Agents at the system level.
- All Items
Select to include all Purchase Order Items by Item in the display.
- Open Items
Select to include open Purchase Order Items by Item in the display.
- Closed Items
Select to include closed Purchase Order Items by Item in the display.
- P/O Items
Display lists Purchase Order Items by Item, using the specified parameters.
To the far right of the screen, the following buttons are available:
- CLOSE
Closes the screen, returning you to the application desktop.
- QUERY
Select to generate the display, using the specified parameters.
Runs the report associated with this screen.
The Purchase Order buffer status displays provide information on your current stock and time buffer levels for those Items having current Purchase Orders. Stock buffers apply to make-to-stock Items; whereas time buffers apply to Items which are make-to-order. Keep in mind that buffer status information will only be displayed on days when the Constraint Management system is run. If you find your displays show no information, this probably means Constraint Management has not been run.
To view Purchase Order Item buffer statuses, select the "P/O Items by Buffer Status" option. The following screen will appear:
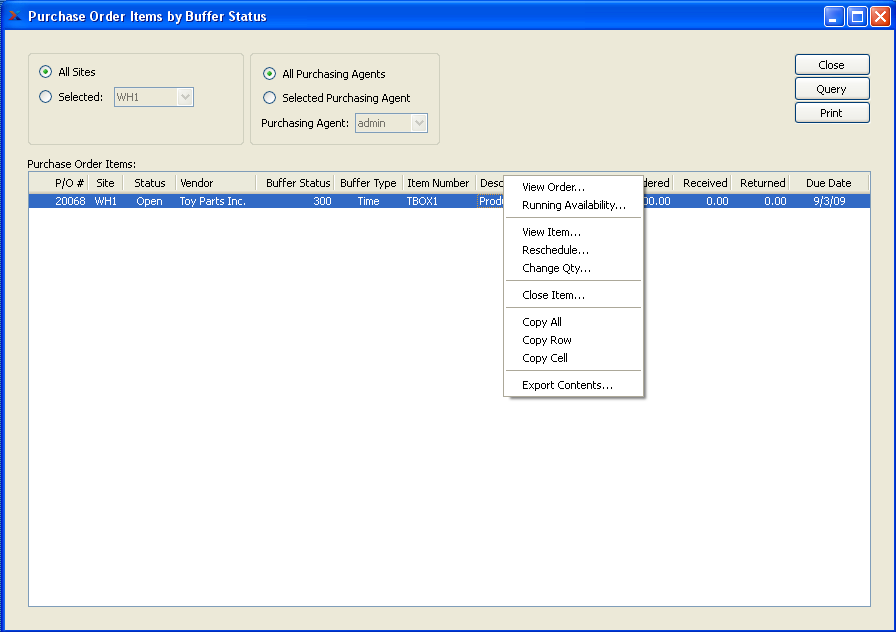
Note
When the buffer status for an Item hits 66 or higher, the status number will become red. By highlighting Items which are "red hot," the system is informing you which Items should be acted on immediately. The best remedy for red hot Item Sites is to expedite any associated Work Orders or Purchase Orders.
When displaying Purchase Order Item buffer statuses, you are presented with the following options:
- All Sites
Select to display Purchase Order Item buffer statuses for all Sites.
- Selected
Specify Site whose Purchase Order Item buffer statuses you want to display.
- All Purchasing Agents
Select to display Purchase Order Item buffer statuses for all Purchasing Agents.
- Selected
Specify Purchasing Agent whose Purchase Order Item buffer statuses you want to display. Users may be designated as Purchasing Agents at the system level.
Note
By default, the display will sort Purchase Order Items by buffer status in descending order. In other words, Purchase Order Items with the highest buffer status will appear at the top of the list; Purchase Order Items with the lowest buffer status will appear at the bottom.
- P/O Items
Display lists buffer statuses for open Purchase Order Items, using the specified parameters.
To the far right and at the bottom of the screen, the following buttons are available:
- CLOSE
Closes the screen, returning you to the application desktop.
- QUERY
Select to generate the display, using the specified parameters.
Runs the report associated with this screen.
To view Purchase Order history, select the "P/O History" option. The following screen will appear:
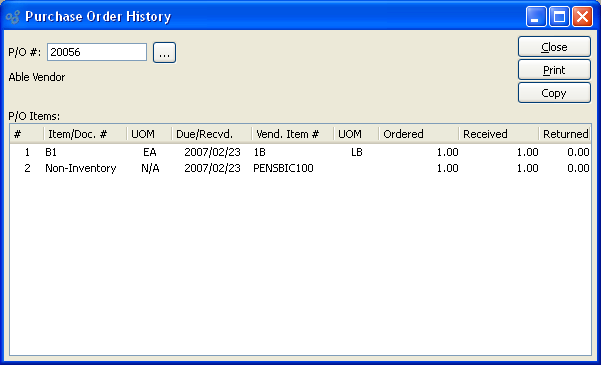
When displaying Purchase Order history, you are presented with the following options:
- P/O #
Enter the Purchase Order Number of the Purchase Order whose history you want to view.
- P/O Items
Display lists Purchase Order history for the specified Purchase Order.
To the far right of the screen, the following buttons are available:
- CLOSE
Closes the screen, returning you to the application desktop.
Runs the report associated with this screen.
- COPY
Select to create a copy of the specified Purchase Order. Once a Purchase Order is copied, the copy will appear—with a new Purchase Order Number—on the List Unposted Purchase Orders screen.
Tip
The copy functionality can be used as a templating mechanism for repetitive Purchase Orders. Consider creating a template P/O and then simply copy it whenever you need to send out a new one.
To copy a Purchase Order, select the COPY button on the "Purchase Order History" display screen. The following screen will appear:
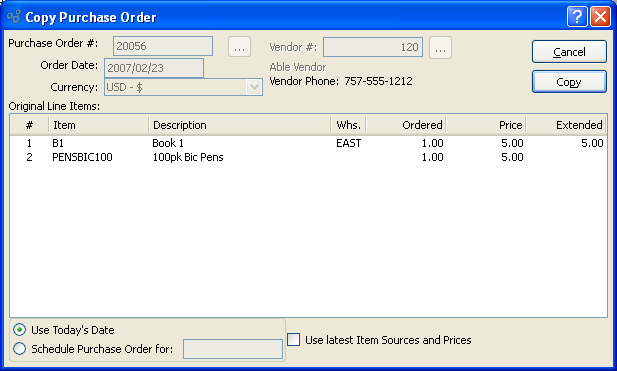
Tip
The copy functionality can be used as a templating mechanism for repetitive Purchase Orders. Consider creating a template P/O and then simply copy it whenever you need to send out a new one.
When copying Purchase Order history, you are presented with the following options:
- Purchase Order #
Displays the Purchase Order Number for the Purchase Order you are copying.
- Order Date
Displays the original Order date for the Purchase Order you are copying.
- Vendor #
Displays the Vendor Number for the Purchase Order you are copying. The Vendor name and phone number will also display.
- Original Line Items
Display lists the Line Items which originally appeared on the Purchase Order.
- Use Today's Date
Select to use today's date as the Order date for the Purchase Order copy. Due dates for Purchase Order Line Items will be adjusted automatically from today's date using Item Source Lead Times, if any.
- Schedule Purchase Order for
Specify a date to use as the Order date for the Purchase Order copy. Due dates for Purchase Order Line Items will be adjusted automatically from the specified date using Item Source Lead Times, if any.
- Use latest Item Sources and Prices
Select to use the most current Item Source information, including up-to-date Item Source Prices. If not selected, the Purchase Order copy will use the Item Source information, including Item Source Prices, in effect at the time of the original Purchase Order.
To the far right of the screen, the following buttons are available:
- CANCEL
Closes the screen without copying the Purchase Order, returning you to the application desktop.
- COPY
Creates a copy of the Purchase Order and places the copy—with a new Purchase Order Number—on the List Unposted Purchase Orders screen.
Receipts and Returns Reports section.
To view Receipts and Returns by Vendor, select the "Receipts and Returns by Vendor" option. The following screen will appear:
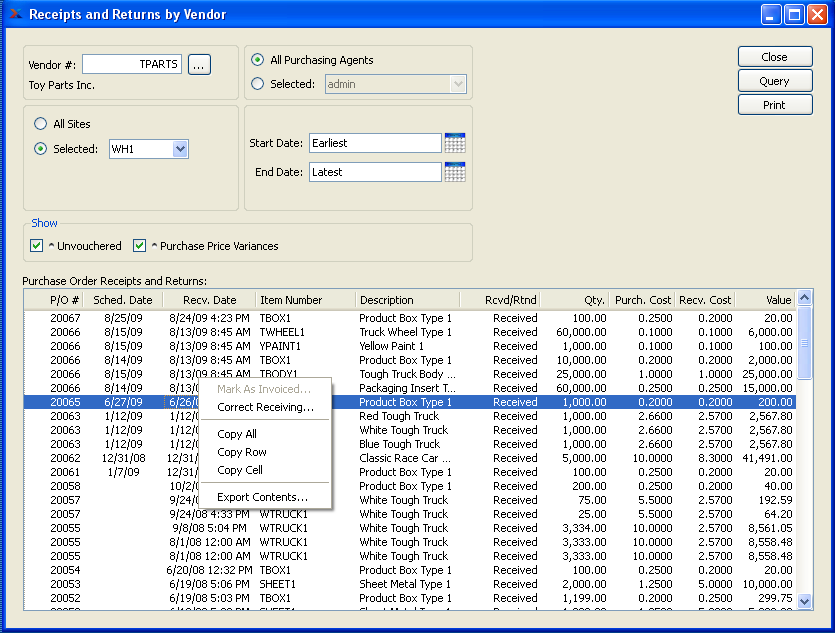
When displaying Receipts and Returns by Vendor, you are presented with the following options:
- Vendor #
Enter the Vendor Number of the Vendor whose Receipts and Returns you want to view.
- All Sites
Select to display Receipts and Returns by Vendor for all Sites.
- Selected
Specify Site whose Receipts and Returns by Vendor you want to display.
- All Purchasing Agents
Select to display Receipts and Returns by Vendor for all Purchasing Agents.
- Selected
Specify Purchasing Agent whose Receipts and Returns by Vendor you want to display. Users may be designated as Purchasing Agents at the system level.
- Start Date
Receipts and Returns by Vendor entered on and after this date will be displayed.
- End Date
Receipts and Returns by Vendor entered on and before this date will be displayed.
- Show Purchase Price Variances
Select to include purchase Price variances in the display.
- P/O Receipts and Returns
Display lists Receipts and Returns by Vendor, using the specified parameters. Purchased Cost and Receiving Cost variances will also display if the "Show Purchase Price Variances" option is selected.
Tip
If you select the "Show Purchase Price Variances" option and the value "N/A" is displayed in the "Recv. Cost" column, this simply means the Purchase Order qty. has been received but not yet vouchered.
To the far right of the screen, the following buttons are available:
- CLOSE
Closes the screen, returning you to the application desktop.
- QUERY
Select to generate the display, using the specified parameters.
Runs the report associated with this screen.
To view Receipts and Returns by date, select the "Receipts and Returns by Date" option. The following screen will appear:

When displaying Receipts and Returns by date, you are presented with the following options:
- Start Date
Receipts and Returns entered on and after this date will be displayed.
- End Date
Receipts and Returns entered on and before this date will be displayed.
- All Sites
Select to display Receipts and Returns by date for all Sites.
- Selected
Specify Site whose Receipts and Returns by date you want to display.
- All Purchasing Agents
Select to display Receipts and Returns by date for all Purchasing Agents.
- Selected
Specify Purchasing Agent whose Receipts and Returns by date you want to display. Users may be designated as Purchasing Agents at the system level.
- Show Purchase Price Variances
Select to include purchase Price variances in the display.
- P/O Receipts and Returns
Display lists Receipts and Returns by date, using the specified parameters. Purchased Cost and Receiving Cost variances will also display if the "Show Purchase Price Variances" option is selected.
Tip
If you select the "Show Purchase Price Variances" option and the value "N/A" is displayed in the "Recv. Cost" column, this simply means the Purchase Order qty. has been received but not yet vouchered.
To the far right of the screen, the following buttons are available:
- CLOSE
Closes the screen, returning you to the application desktop.
- QUERY
Select to generate the display, using the specified parameters.
Runs the report associated with this screen.
To view Receipts and Returns by Item, select the "Receipts and Returns by Item" option. The following screen will appear:

When displaying Receipts and Returns by Item, you are presented with the following options:
- Item Number
Enter the Item Number of the Item whose Receipts and Returns you want to view. The browse button located to the right of the field leads to a searchable list of make and buy items.
- All Sites
Select to display Receipts and Returns by Item for all Sites.
- Selected
Specify Site whose Receipts and Returns by Item you want to display.
- All Purchasing Agents
Select to display Receipts and Returns by Item for all Purchasing Agents.
- Selected
Specify Purchasing Agent whose Receipts and Returns by Item you want to display. Users may be designated as Purchasing Agents at the system level.
- Start Date
Receipts and Returns by Item entered on and after this date will be displayed.
- End Date
Receipts and Returns by Item entered on and before this date will be displayed.
- Show Purchase Price Variances
Select to include purchase Price variances in the display.
- P/O Receipts/Returns
Display lists Receipts and Returns by Item, using the specified parameters. Purchased Cost and Receiving Cost variances will also display if the "Show Purchase Price Variances" option is selected.
Tip
If you select the "Show Purchase Price Variances" option and the value "N/A" is displayed in the "Recv. Cost" column, this simply means the Purchase Order qty. has been received but not yet vouchered.
To the far right of the screen, the following buttons are available:
- CLOSE
Closes the screen, returning you to the application desktop.
- QUERY
Select to generate the display, using the specified parameters.
Runs the report associated with this screen.
To view uninvoiced Receipts and Returns, select the "Uninvoiced Receipts and Returns" option. The following screen will appear:
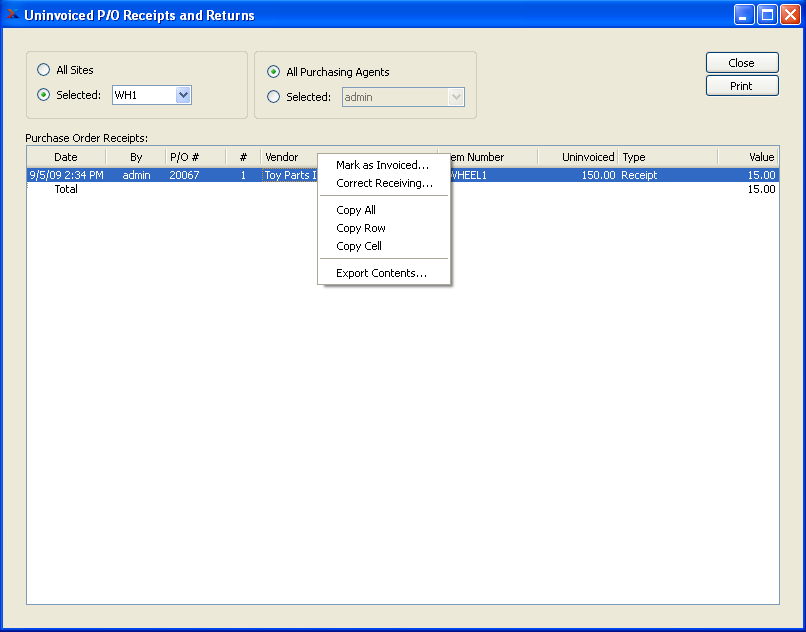
When displaying uninvoiced Receipts and Returns, you are presented with the following options:
- All Sites
Select to display uninvoiced Receipts and Returns for all Sites.
- Selected
Specify Site whose uninvoiced Receipts and Returns you want to display.
- All Purchasing Agents
Select to display uninvoiced Receipts and Returns for all Purchasing Agents.
- Selected
Specify Purchasing Agent whose uninvoiced Receipts and Returns you want to display. Users may be designated as Purchasing Agents at the system level.
- P/O Receipts
Display lists uninvoiced Receipts and Returns, using the specified parameters.
Tip
The primary path for marking Purchase Order Line Items as invoiced is on the Voucher Item screen. If received (or returned) quantity is tagged as "Yes" on the Voucher Item screen—and the Voucher is then posted—the quantity will no longer appear on the "Uninvoiced Receipts and Returns" screen.
To the far right of the screen, the following buttons are available:
- CLOSE
Closes the screen, returning you to the application desktop.
Runs the report associated with this screen.
To mark a Line Item Receipt as invoiced, highlight the Receipt and then select the "Mark as Invoiced" option from the right-click menu. The following screen will appear:
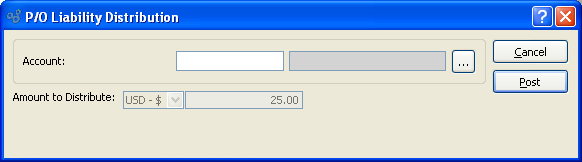
When marking a Line Item Receipt as invoiced, you are presented with the following options:
- Account
Select the Account you want to use opposite the P/O Liability Clearing Account. When this transaction is posted, the P/O Liability Clearing Account will be debited with the distribution amount—and the Account you specify will be credited. In this way, you will be sure to clear P/O Liability when marking Receipts as invoiced outside of the typical vouchering process flow.
- Amount to Distribute
Displays the Line Item Receipt amount to be distributed to the General Ledger when the transaction is posted.
To the far right of the screen, the following buttons are available:
- CANCEL
Closes the screen without marking the Receipt as invoiced, returning you to the application desktop.
- CORRECT
Select to post the distribution, using the specified Account.
To make corrections to a Purchase Order Receipt, select the "Correct Receiving" option from the right-click menu. The following screen will appear:
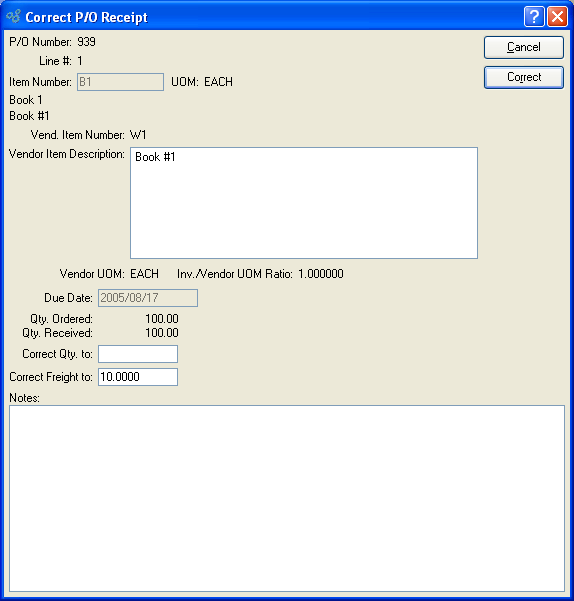
When correcting a Purchase Order Receipt, you are presented with the following options:
- P/O Number
Displays the selected Purchase Order Number.
- Line #
Displays the selected Line Item Number from the specified Purchase Order.
- Item Number
Displays Item Number associated with the specified Line Item Number.
- UOM
Inventory Unit of Measure.
- Vend. Item Number
Displays the Item Number the Vendor uses.
- Vendor Item Description
Displays the description for the Vendor Item Number.
- Vendor UOM
Displays the Unit of Measure the Vendor uses for the specified Item.
- Inventory/Vendor UOM Ratio
/Vendor UOM Ratio: Displays the ratio between Inventory and Vendor Units of Measure.
Note
The Inv./Vendor UOM Ratio specifies the ratio between Inventory and Vendor Units of Measure (UOM). For example, if you store an Item in single units, but a Vendor sells you the Item in cases of 12, then the ratio would be 12—or 12:1. When an Inv./Vend. ratio is specified, the system allows you to purchase Items using the Vendor's UOM; however, when the Items are received, the system will automatically convert the Inventory to your Inventory UOM.
- Due Date
Displays the date when the Line Item is due.
- Qty. Ordered
Displays the original Line Item quantity ordered.
- Qty. Received
Displays the total Line Item quantity received to date.
- Correct Qty. to
Enter the quantity you want to correct the received quantity to. This correction will create adjusting General Ledger entries when the CORRECT button is selected.
- Correct Freight to
Enter the amount you want to correct the Line Item freight to. This correction will create adjusting General Ledger entries when the CORRECT button is selected.
- Notes
This is a scrolling text field with word-wrapping for entering Notes related to the correction.
To the far right of the screen, the following buttons are available:
- CANCEL
Closes the screen without entering a correction, returning you to the application desktop.
- CORRECT
Select to post the correction. This action will result in adjusting General Ledger transactions.
Price Variances Reports section.
To view purchase Price variances by Vendor, select the "Price Variances by Vendor" option. The following screen will appear:
When displaying purchase Price variances by Vendor, you are presented with the following options:
- Vendor #
Enter the Vendor Number of the Vendor whose Price variances you want to view.
- All Sites
Select to display Price variances by Vendor for all Sites.
- Selected
Specify Site whose Price variances by Vendor you want to display.
- All Purchasing Agents
Select to display Price variances by Vendor for all Purchasing Agents.
- Selected
Specify Purchasing Agent whose Price variances by Vendor you want to display. Users may be designated as Purchasing Agents at the system level.
- Start Date
Price variances by Vendor entered on and after this date will be displayed.
- End Date
Price variances by Vendor entered on and before this date will be displayed.
- Price Variances
Display lists purchase Price variances by Vendor, using the specified parameters.
To the far right of the screen, the following buttons are available:
- CLOSE
Closes the screen, returning you to the application desktop.
- QUERY
Select to generate the display, using the specified parameters.
Runs the report associated with this screen.
To view purchase Price variances by Item, select the "Price Variances by Item" option. The following screen will appear:
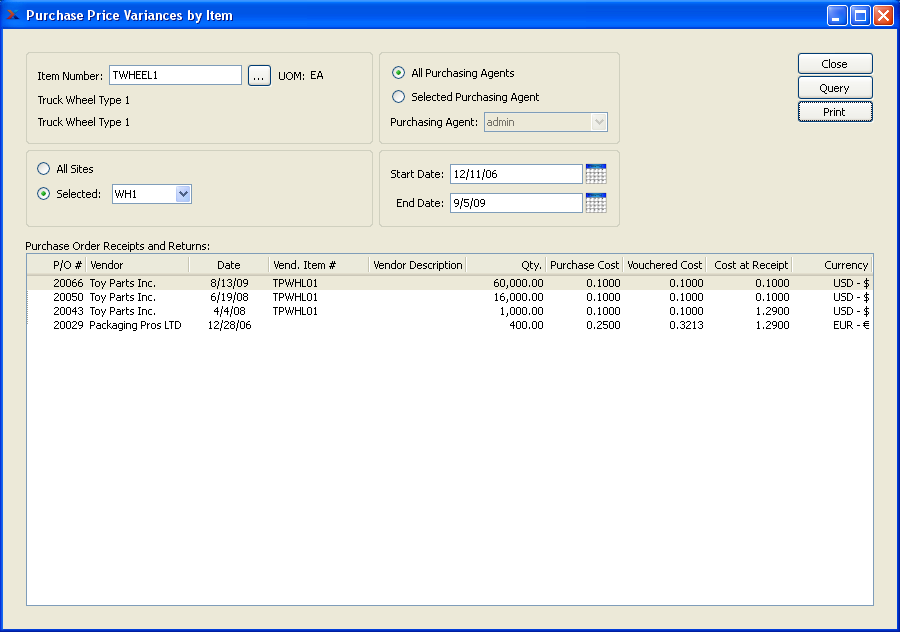
When displaying purchase Price variances by Item, you are presented with the following options:
- Item Number
Enter the Item Number of the Item whose Price variances you want to view. The browse button located to the right of the field leads to a searchable list of make and buy items.
- All Sites
Select to display Price variances by Item for all Sites.
- Selected
Specify Site whose Price variances by Item you want to display.
- All Purchasing Agents
Select to display Price variances by Item for all Purchasing Agents.
- Selected
Specify Purchasing Agent whose Price variances by Item you want to display. Users may be designated as Purchasing Agents at the system level.
- Start Date
Price variances by Item entered on and after this date will be displayed.
- End Date
Price variances by Item entered on and before this date will be displayed.
- P/O Receipts and Returns
Display lists Receipts and Returns by date, using the specified parameters
To the far right of the screen, the following buttons are available:
- CLOSE
Closes the screen, returning you to the application desktop.
- QUERY
Select to generate the display, using the specified parameters.
Runs the report associated with this screen.
Deliver Date Variances section.
To view delivery date variances by Vendor, select the "Delivery Date Variances by Vendor" option. The following screen will appear:
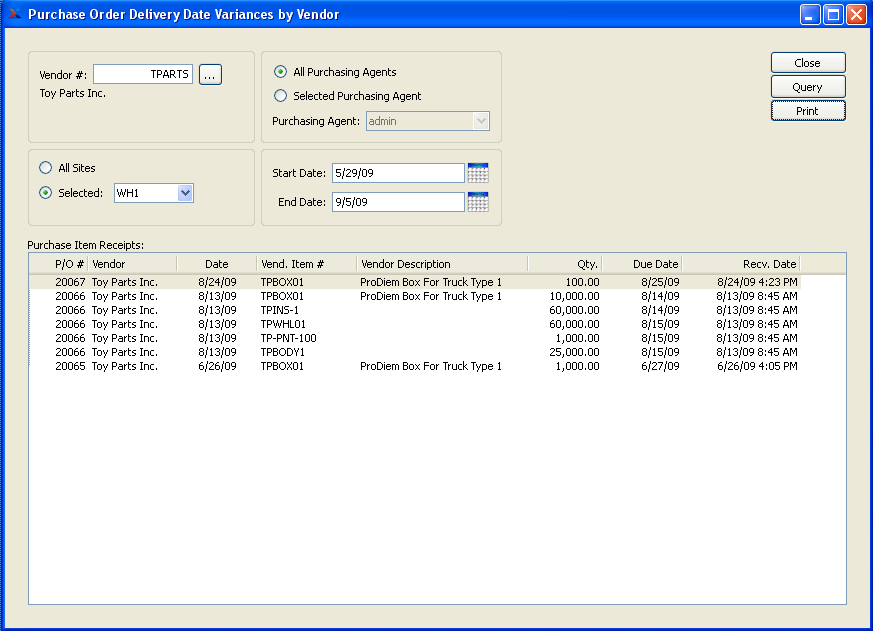
When displaying delivery date variances by Vendor, you are presented with the following options:
- Vendor #
Enter the Vendor Number of the Vendor whose delivery date variances you want to view.
- All Sites
Select to display delivery date variances by Vendor for all Sites.
- Selected
Specify Site whose delivery date variances by Vendor you want to display.
- All Purchasing Agents
Select to display delivery date variances by Vendor for all Purchasing Agents.
- Selected
Specify Purchasing Agent whose delivery date variances by Vendor you want to display. Users may be designated as Purchasing Agents at the system level.
- Start Date
Delivery date variances by Vendor entered on and after this date will be displayed.
- End Date
Delivery date variances by Vendor entered on and before this date will be displayed.
- P/O Item Receipts
Display lists Purchase Order delivery date variances by Vendor.
To the far right of the screen, the following buttons are available:
- CLOSE
Closes the screen, returning you to the application desktop.
- QUERY
Select to generate the display, using the specified parameters.
Runs the report associated with this screen.
To view delivery date variances by Item, select the "Delivery Date Variances by Item" option. The following screen will appear:

When displaying delivery date variances by Item, you are presented with the following options:
- Item Number
Enter the Item Number of the Item whose delivery date variances you want to view.
- All Sites
Select to display delivery date variances by Item for all Sites.
- Selected
Specify Site whose delivery date variances by Item you want to display.
- All Purchasing Agents
Select to display delivery date variances by Item for all Purchasing Agents.
- Selected
Specify Purchasing Agent whose delivery date variances by Item you want to display. Users may be designated as Purchasing Agents at the system level.
- Start Date
Delivery date variances by Item entered on and after this date will be displayed.
- End Date
Delivery date variances by Item entered on and before this date will be displayed.
- P/O Item Receipts
Display lists Purchase Order delivery date variances by Item.
To the far right of the screen, the following buttons are available:
- CLOSE
Closes the screen, returning you to the application desktop.
- QUERY
Select to generate the display, using the specified parameters.
Runs the report associated with this screen.
To view rejected material by Vendor, select the "Rejected Material by Vendor" option. The following screen will appear:
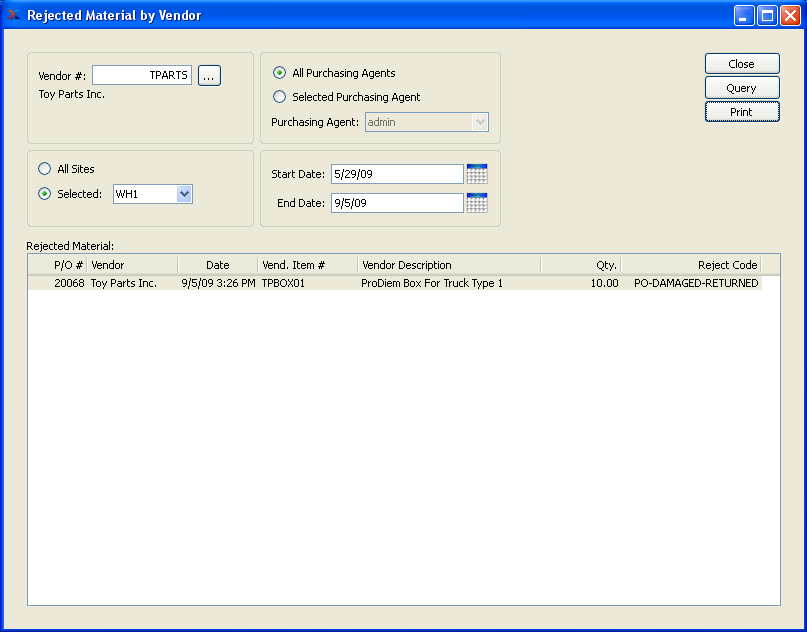
When displaying rejected material by Vendor, you are presented with the following options:
- Vendor #
Enter the Vendor Number of the Vendor whose rejected material you want to view.
- All Sites
Select to display rejected material by Vendor for all Sites.
- Selected
Specify Site whose rejected material by Vendor you want to display.
- All Purchasing Agents
Select to display rejected material by Vendor for all Purchasing Agents.
- Selected
Specify Purchasing Agent whose rejected material by Vendor you want to display. Users may be designated as Purchasing Agents at the system level.
- Start Date
Rejected material by Vendor entered on and after this date will be displayed.
- End Date
Rejected material by Vendor entered on and before this date will be displayed.
- Rejected Material
Display lists rejected material by Vendor, using the specified parameters.
To the far right of the screen, the following buttons are available:
- CLOSE
Closes the screen, returning you to the application desktop.
- QUERY
Select to generate the display, using the specified parameters.
Runs the report associated with this screen.
Vouchers may be posted individually or in groups using the Unposted Vouchers screen. After they are posted, open Vouchers may later be voided using the right-click menu on the Vendor history screen. To display unposted Vouchers, select the "List Unposted Vouchers" option. The following screen will appear:
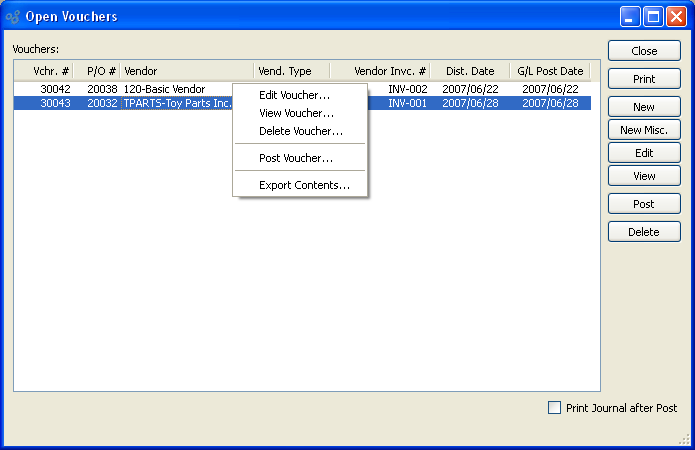
Note
Actual Costs for purchased Items will be automatically updated when Vouchers are posted if there are differences between current Actual Costs and the vouchered Costs for the Items in question. Please keep in mind that Actual Costs only will be updated at posting. For new Costs to be recognized as Standard Costs, Actual Costs must be posted to Standard.
The "Vouchers" screen displays information on all unposted Vouchers, including Voucher Number, Purchase Order Number, Vendor Number/Vendor name, Vendor Invoice Number, and distribution date. Users with the appropriate privilege will also see the G/L distribution date column.
Tip
You may select multiple Vouchers for posting by highlighting them using your mouse—or a combination of your mouse and either the SHIFT or CTRL keys.
To the far right of the screen, the following buttons are available:
- CLOSE
Closes the screen, returning you to the application desktop.
Runs the report associated with this screen.
- NEW
Opens screen for creating a new Voucher.
- NEW MISC.
Opens screen for creating a new Miscellaneous Voucher.
- EDIT
Enables you to edit highlighted Vouchers. The edit screen is the same as that for creating a new Voucher—except that when editing, the fields will contain Voucher information. Double-clicking on a Voucher will also bring you to the editing screen.
- VIEW
Highlight a Voucher and then select this button to reach a read-only view of the "Edit" screen.
Tip
If you have a Purchase Order Voucher that was corrupted by, for example, a sudden power outage, you can clear the record by running the Post Vouchers screen. In most cases, this action will remove the corrupted record and allow you to voucher the Purchase Order with a fresh Voucher.
- POST
Highlight one—or multiple—Vouchers, then select this button to post the selected Voucher(s). By default, Vouchers post to the General Ledger (G/L) on their distribution date. However, users with the appropriate privilege may change the G/L distribution date to an alternate date during the Voucher posting process. If used, Vouchers will post on the alternate date. The ability privileged users have to change the distribution date applies to the posting of both individual and also batches of Vouchers from this screen.
- DELETE
Highlight a Voucher and then select this button to remove the Voucher from the list.
- Print Journal after Post
Select if you want to print a copy of the Payables Journal after the selected Vouchers are posted.