Vendor section.
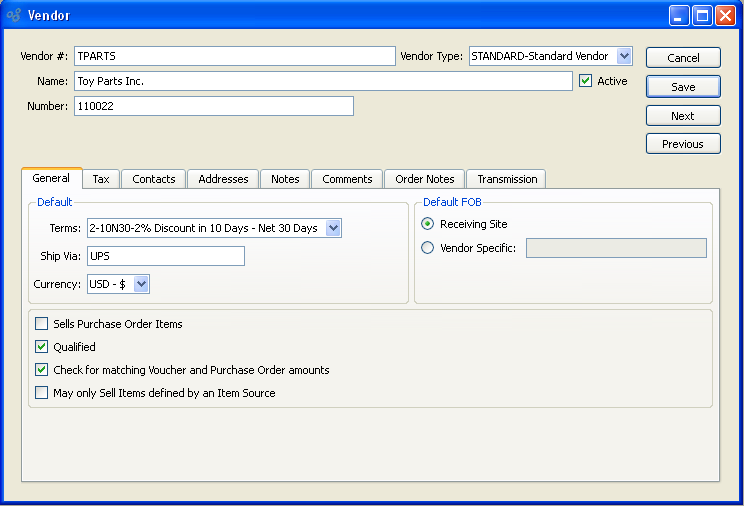
To create a new Vendor, select the "New Vendor" option. The following screen will appear:
Tip
Vendors can also be created from the CRM Account screen. Simply enter a new CRM Account, selecting the "Vendor" Relationship option.
When creating a new Vendor, you are presented with the following options:
- Vendor #
Enter a number to identify the Vendor.
- Vendor Type
Specify the Vendor Type of the Vendor.
- Name
Enter the name of the Vendor.
- Active
Select if you are actively doing business with this Vendor.
- Number
Use this field to indicate the Account number the Vendor assigns to your site.
Note
If a new Address is manually entered here, that Address will be added automatically to the master list of Addresses.
- Default
Default settings for Vendor.
- Terms
Specify the default billing Terms for the Vendor.
- Ship Via
Specify default Ship Via for Vendor.
- Currency
Specify the Currency to be used when conducting business transactions with the Vendor. This option will only be visible in systems configured to use multiple Currencies.
- Default FOB
Indicate the default Free on Board (FOB) destination by selecting one of the following options:
- Receiving Site FOB
Select if receiving site is default FOB destination.
- Vendor Specific FOB
Select if Vendor specifies an FOB destination other than the receiving Site. Enter alternate FOB details in space provided.
- Sells Purchase Order Items
Select if Vendor accepts Purchase Orders to render goods. This setting is informational only. It has no impact on the ordering process.
- Qualified
Select this flag to indicate that the Vendor is a trusted Vendor.
- Check for matching Voucher and Purchase Order amounts
Select to perform Voucher matching when entering Voucher Items for the Vendor. If selected, users will be presented with a warning message whenever a Voucher Item amount does not match the corresponding Purchase Order Item amount for the Vendor. This option will not prevent users from proceeding. Instead, the warning message simply alerts users that a mis-match exists.
- May only Sell Items defined by an Item Source
Select if you want to restrict Items purchased from the Vendor to Items having a defined Item Source. If not selected, you may choose from all purchased Items when entering a Purchase Order Line Item.
To the far right of the screen, the following buttons are available:
- CANCEL
Closes the screen without creating a new Vendor, returning you to the application desktop.
- SAVE
Creates the Vendor and enters the Vendor into the master list of Vendors.
- NEXT
Select to open the Vendor master whose Vendor Number immediately follows the current Vendor Number.
- PREVIOUS
Select to open the Vendor master whose Vendor Number immediately precedes the current Vendor Number.
To view or enter Vendor Tax information, select the "Tax" tab. The following screen will appear:
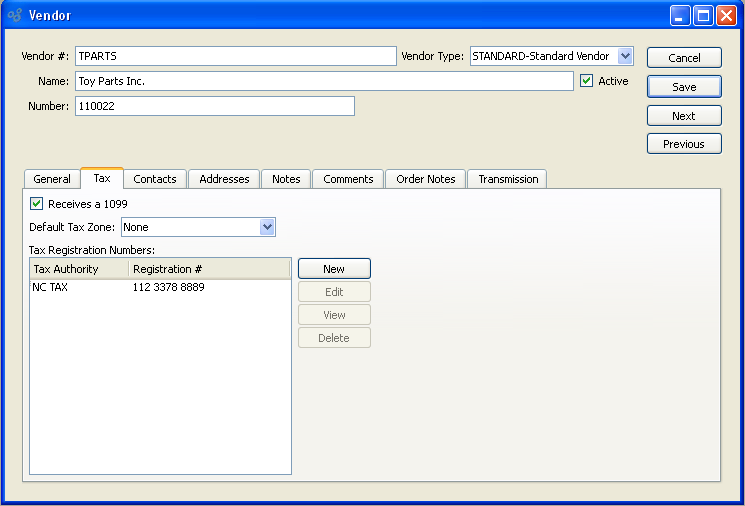
When adding Vendor Tax information, you are presented with the following options:
To the far right of the screen, the following buttons are available:
- NEW
Opens screen for creating a new Vendor Tax Registration Number.
- EDIT
Enables you to edit highlighted Vendor Tax Registration Numbers. The edit screen is the same as that for creating a new Vendor Tax Registration Number—except that when editing, the fields will contain Vendor Tax Registration Number information. Double-clicking on a Vendor Tax Registration Number will also bring you to the editing screen.
- VIEW
Highlight a Vendor Tax Registration Number and then select this button to reach a read-only view of the "Edit" screen.
- DELETE
Highlight a Vendor Tax Registration Number and then select this button to remove the Vendor Tax Registration Number from the list.
To add a new Vendor Tax Registration Number, select the NEW button. The following screen will appear:
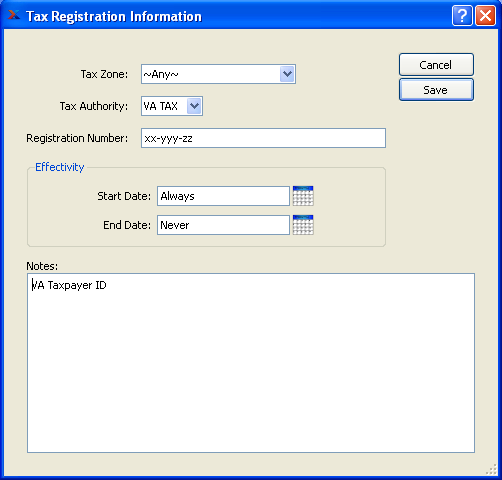
When adding a new Vendor Tax Registration Number, you are presented with the following options:
- Tax Zone
Specify the Tax Zone associated with the Tax Registration Number.
- Tax Authority
Specify the Tax Authority associated with the Tax Registration Number.
- Registration Number
Enter the Vendor's Tax Registration Number for the specified Tax Authority. The registration number is used by Tax Authorities to identify businesses and/or individuals. An Employer Identification Numbers (EIN) is an example of a Tax Registration Number.
Tip
The Vendor's Tax Registration Number is used for identifying the Vendor to relevant Tax Authorities. This information should not be confused with the Tax Registration Numbers, which are used to identify your company to relevant Tax Authorities.
To the far right of the screen, the following buttons are available:
- CANCEL
Closes the screen without creating a new Vendor Tax Registration Number, returning you to the previous screen.
- SAVE
Creates the Vendor Tax Registration Number and adds it to the master list of Vendor Tax Registration Numbers.
To view or enter Vendor contact information, select the "Contact Information" tab. The following screen will appear:
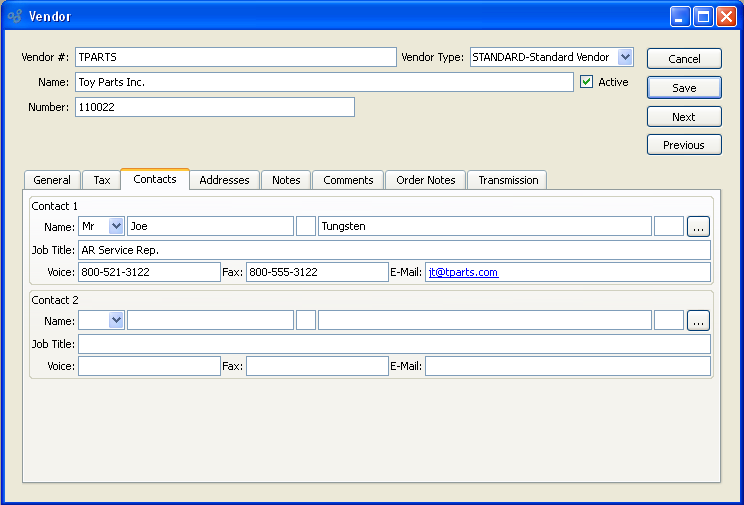
When adding Vendor contact information, you are presented with the following options:
- Contact 1
Manually enter Contact information in the fields below—or use the browse button to select pre-existing Contact information. If a new Contact is manually entered here, that Contact will be added automatically to the master list of Contacts. For additional documentation related to creating Contacts, see Section 7.1, “ New Contact”.
- Contact 2
Manually enter Contact information in the fields below—or use the browse button to select pre-existing Contact information. If a new Contact is manually entered here, that Contact will be added automatically to the master list of Contacts. For additional documentation related to creating Contacts, see Section 7.1, “ New Contact”.
Just as Customers may have multiple Ship-To addresses, Vendors may also maintain multiple Ship-From addresses. A Vendor address is a Ship-From address. To add Vendor Addresses to a Vendor master, select the "Addresses" tab. The following screen will appear:
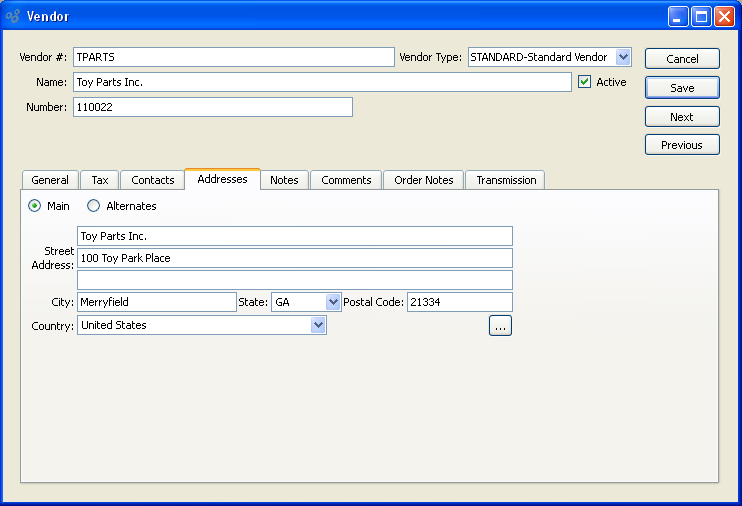
When adding Vendor Addresses, you are presented with the following options:
- Main
Select to present primary address used by Vendor. Manually enter Address information in the fields below—or use the browse button to select pre-existing Address information. By default, this address will appear as the main address when entering Purchase Orders for the Vendor. If a new Address is manually entered here, that Address will be added automatically to the master list of Addresses. For additional documentation related to creating Addresses, see Section 8.1, “ New Address”.
- Alternates
Select to list various alternate Addresses for Vendor.
To the far right of the screen, the following buttons are available:
Runs the report associated with this screen.
- NEW
Opens screen for creating a new Vendor Address.
- EDIT
Enables you to edit highlighted Vendor Address. The edit screen is the same as that for creating a new Vendor Address—except that when editing, the fields will contain Vendor Address information. Double-clicking on a Vendor Address will also bring you to the editing screen.
- VIEW
Highlight a Vendor Address and then select this button to reach a read-only view of the "Edit" screen.
- DELETE
Highlight a Vendor Address and then select this button to remove the Vendor from the list.
To create a new Vendor Address, select the NEW button. The following screen will appear:
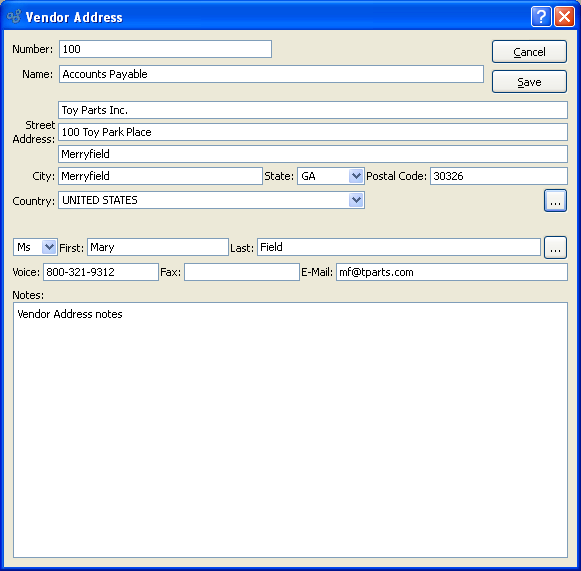
When creating a new Vendor Address, you are presented with the following options:
- Number
Enter a number or code to identify the Vendor Address. Using the value "Remit" or "REMIT" or "remit" in this field will cause the specified Address to be used as the default Remit-To Address when printing Checks for the Vendor.
Note
The Remit-To feature is only supported when printing Checks using the APCheck report definition.
- Name
Enter the name of the Vendor Address.
- Address
Manually enter Address information in the fields below—or use the browse button to select pre-existing Address information. By default, this address will appear as the main address when entering Purchase Orders for the Vendor. If a new Address is manually entered here, that Address will be added automatically to the master list of Addresses. For additional documentation related to creating Addresses, see Section 8.1, “ New Address”.
- Contact
Manually enter Contact information in the fields below—or use the browse button to select pre-existing Contact information. If a new Contact is manually entered here, that Contact will be added automatically to the master list of Contacts. For additional documentation related to creating Contacts, see Section 7.1, “ New Contact”.
- Comments
This is a scrolling text field with word-wrapping for entering Comments related to the Vendor Address.
To the far right of the screen, the following buttons are available:
- CANCEL
Closes the screen without creating a new Vendor Address, returning you to the previous screen.
- SAVE
Creates the Vendor Address and adds it to the master list of Vendor Addresses.
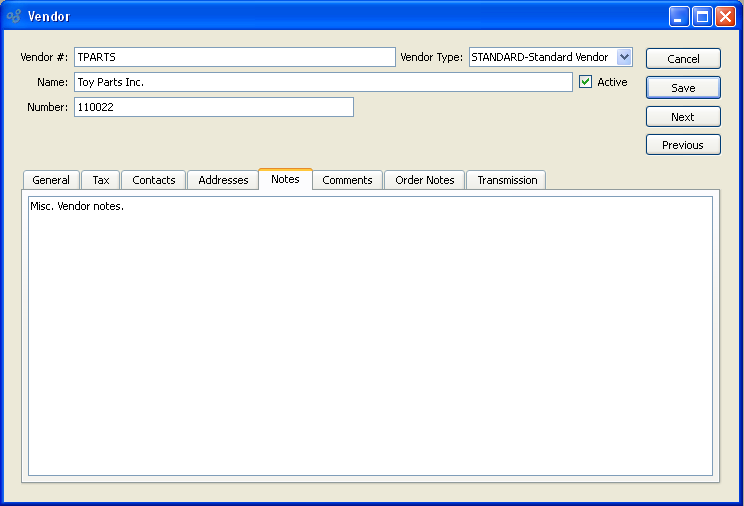
To add Notes related to a Vendor, select the "Notes" tab. The following screen will appear:
To add Comments related to a Vendor, select the "Comments" tab. The following screen will appear:
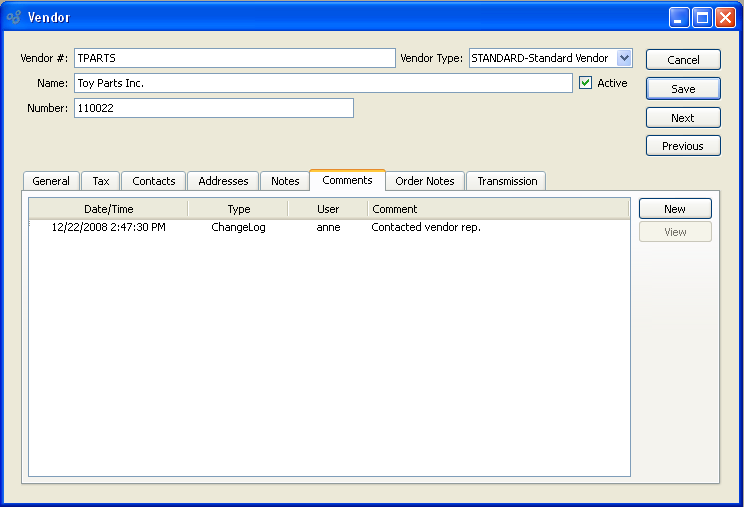
When adding or reviewing Comments, you are presented with the following options:
- Verbose Text
Select to display all Comments in the list in an expanded view which includes the entire text of each Comment. To edit a Comment, simply select the "Edit" link next to the Comment. That link will not be shown for Changelog Comments, which can't be edited. If the "Verbose Text" option is not selected, the Comment list will display only header level information for each Comment.
- Comments
Display lists Comments related to the record.
To the far right of the screen, the following buttons are available:
- NEW
Opens screen for creating a new Comment.
- VIEW
Highlight a Comment and then select this button to reach a read-only view of the "Edit" screen.
- EDIT
Enables you to edit highlighted Comments—as long as the Comments are not "ChangeLog" Comments. ChangeLog Comments are system-generated and may not be edited. The edit screen is the same as that for creating a new Comment—except that when editing, the fields will contain Comment information. Double-clicking on a Comment will also bring you to the editing screen.
To enter a new Comment, select the NEW button. The following screen will appear:
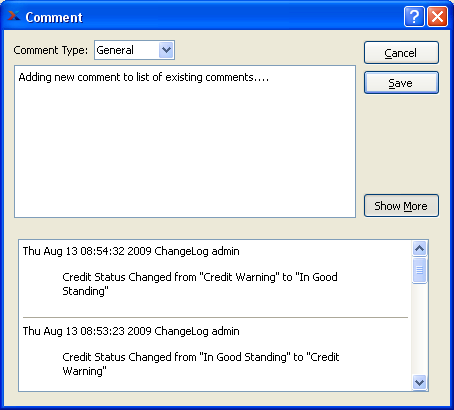
- Comment Type
Select a Comment Type from the drop-down list to classify the Comment. This is a required step. Comment Types may be system-defined (i.e., "ChangeLog" and "General") or user-defined, as described in Section 13.12, “Comment Types”. Once you have specified a Comment Type, begin typing your Comment in the main text area. The text area features word-wrapping and scroll-bar support for longer Comments.
To the far right of the screen, the following buttons are available:
- CANCEL
Closes the screen without creating the Comment, returning you to the previous screen.
- SAVE
Creates the Comment and adds it to the list of Comments.
- SHOW MORE
Select to show the complete list (i.e., "thread") of Comments associated with the record. To hide the list, simply select the SHOW MORE button again. The Comment thread will show the most recent Comment first.
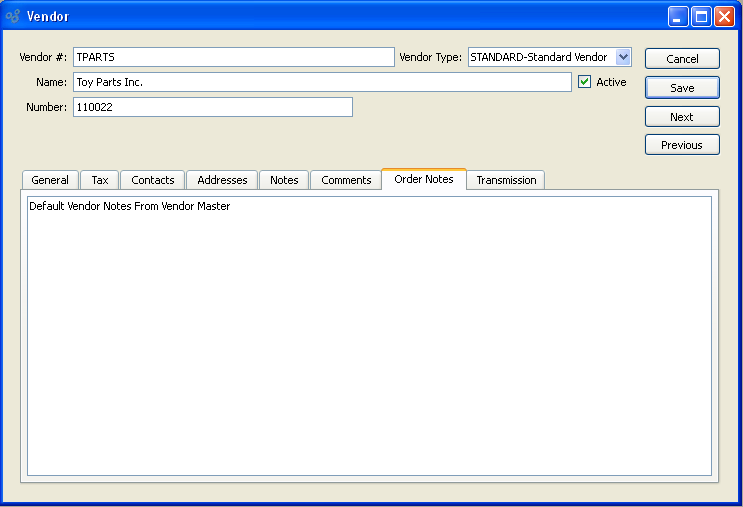
To add purchasing Notes related to a Vendor, select the "Order Notes" tab. The following screen will appear:
When adding purchasing Notes related to a Vendor, you are presented with the following options:
- Order Notes
Select the "Order Notes" tab to access this scrolling text field with word-wrapping for entering purchasing Notes related to the Vendor.
To the far right of the screen, the following buttons are available:
- CANCEL
Closes the screen without creating new purchasing Notes, returning you to the application desktop.
- SAVE
Creates the purchasing Notes and adds them to the Vendor master.
The Electronic Data Interchange (EDI) system enables you to exchange information electronically with your Vendors. To set up a Vendor to receive Purchase Orders, select the "Transmission" tab and select the "Purchase Orders" button. The following screen will appear:
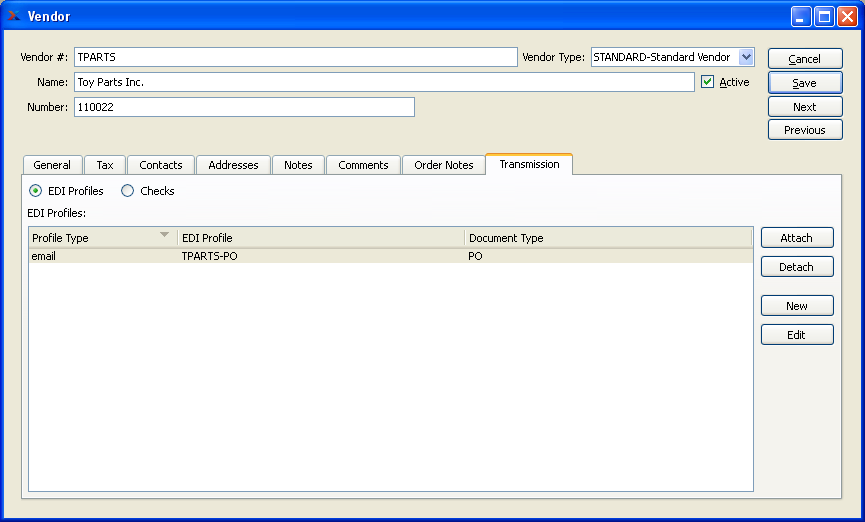
Vendor Transmissions
When associating EDI Profiles with EDI recipients, such as Customers, Ship-To Addresses, and Vendors, you are presented with the following options:
- EDI Profiles
Display lists EDI Profiles associated with this recipient (e.g. current Customer) for a particular document type. It also shows whether EDI will be sent via email or FTP.
To the far right of the screen, the following buttons are available:
- ATTACH
Connect an existing EDI Profile to this EDI recipient for a particular document type.
- DETACH
Detach the selected EDI Profile from the recipient for the selected document type.
- NEW
Create a new EDI Profile and have the opportunity to attach it to the current recipient.
- EDIT
Edit the selected EDI Profile.
To attach an existing EDI Profile to the current recipient, select the ATTACH button. The following screen will appear:
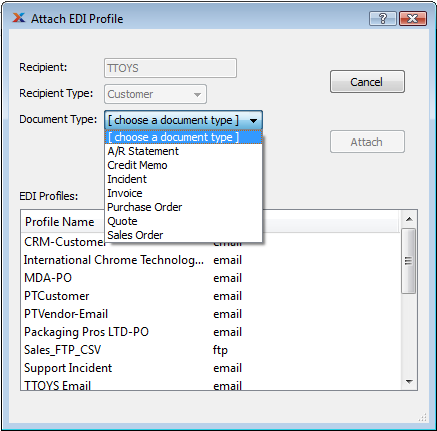
- Recipient
This shows the number of the Customer, Vendor, etc. which will receive EDI using the selected EDI Profile.
- Recipient Type
This shows whether the Recipient is a Customer, Vendor, etc. This reduces confusion in cases where a Customer and Vendor have the same number (i.e., the same CRM Account is both a Customer and Vendor).
- Document Type
Choose from this list the type of document you want to use the EDI Profile for.
- EDI Profiles
Choose from this list the EDI Profile you want to attach for the selected document type.
To the far right of the screen, the following buttons are available:
- CANCEL
Closes the screen without attaching the EDI Profile, returning you to the previous screen.
- ATTACH
Attaches the EDI Profile to the recipient and closes the screen, returning you to the previous screen.
If there is no existing EDI Profile that suits your needs, you can create a new one by selecting the NEW button. This does the same thing as clicking the NEW button on the EDI Profiles window (see Section 13.16, “EDI Profiles”). After you have created the new EDI Profile and saved it, the Attach EDI Profile window will appear with the new EDI Profile selected. Now you can select the Document Type and click ATTACH. If you click CANCEL, the new EDI Profile will still be saved but will not be attached to the recipient.
To enable Automated Clearing House (ACH) Check printing for the Vendor, select the "Checks" radio button o n the "Transmissions" tab. The following options will appear:
- Enable ACH Check Printing
Select to enable online processing or Automated Clearing House (ACH) Check printing.
- Routing Number
Enter Bank Account Routing Number.
- Account Number
Enter Bank Account Check Number.
- Account Type
Select type of Bank Account associated with Routing and Account numbers.
- Use Instead of Vendor Number and Name
Select to use alternative Vendor identification information other than Vendor Number and Name.
- Identification Number
Enter alternate Vendor identification number (i.e., tax ID number).
- Name
Enter alternate Vendor name (i.e., name of parent company).
To access the master list of Vendors, select the "Vendors" option. The following screen will appear:
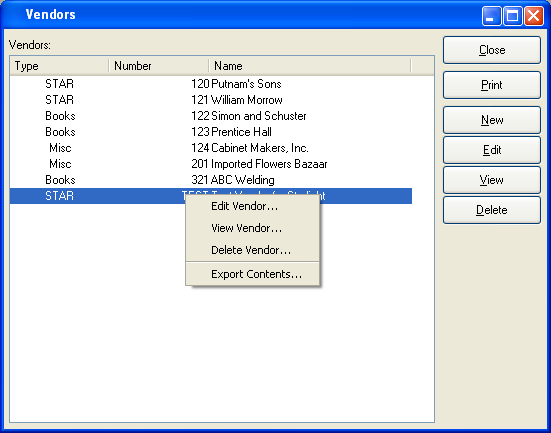
The "Vendors" screen displays information on all existing Vendors, including Vendor Type, Vendor Number, and Vendor name.
To the far right of the screen, the following buttons are available:
- CLOSE
Closes the screen, returning you to the application desktop.
Runs the report associated with this screen.
- NEW
Opens screen for creating a new Vendor.
- EDIT
Enables you to edit highlighted Vendor. The edit screen is the same as that for creating a new Vendor—except that when editing, the fields will contain Vendor information. Double-clicking on a Vendor will also bring you to the editing screen.
- VIEW
Highlight a Vendor and then select this button to reach a read-only view of the "Edit" screen.
- DELETE
Highlight a Vendor and then select this button to remove the Vendor from the list.
To search for a Vendor, select the "Search for Vendor" option. The following screen will appear:
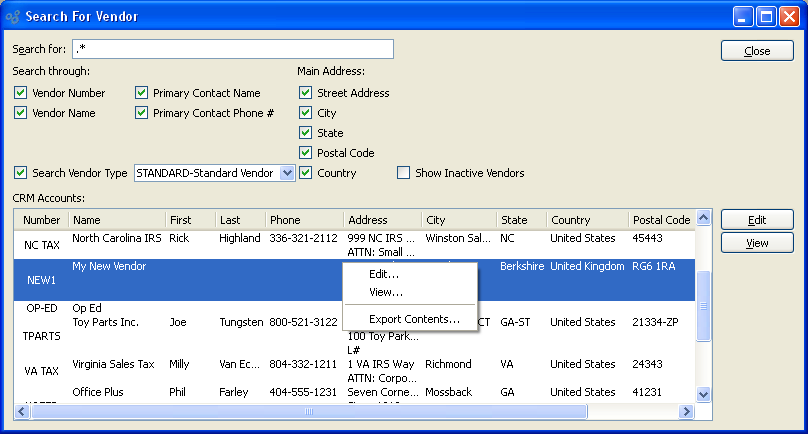
When searching to retrieve Vendor information from the database, you are presented with the following options:
- Search for
Enter any character or combination of characters you want to match, followed by the TAB key. The "Search for" field supports pattern matching with Regular Expressions.
Tip
Hitting the TAB key activates the search operation.
- Search through
Specify which of the following criteria you want to include in the search:
- Vendor Number
Select to search by Vendor Number.
- Vendor Name
Select to search by Vendor Name.
- Primary Contact Name
Select to search by Primary Contact Name.
- Primary Contact Phone #
Select to search by Primary Contact Phone Number.
- Street Address
Select to search by Primary Contact Street Address.
- City
Select to search by Primary Contact City.
- State
Select to search by Primary Contact State.
- Postal Code
Select to search by Primary Contact Postal Code.
- Country
Select to search by Primary Contact Country.
- Search Vendor Type
Select to search by Vendor Type—then specify which Vendor Type to use.
- Show Inactive Vendors
Select to show inactive Vendors as well as active Vendors. By default, inactive Vendors are not displayed.
- CRM Accounts
Display will show search results for Vendors, using specified parameters.
To the far right of the screen, the following buttons are available:
- CLOSE
Closes the screen, returning you to the application desktop.
- EDIT
Enables you to edit highlighted Vendor. The edit screen is the same as that for creating a new Vendor—except that when editing, the fields will contain Vendor information. Double-clicking on a Vendor will also bring you to the editing screen.
- VIEW
Highlight a Vendor and then select this button to reach a read-only view of the "Edit" screen.
The Vendor Workbench groups together in one location a wide range of both current and historical Vendor information. To access the Vendor Workbench, select the "Vendor Workbench" option. The following screen will appear:
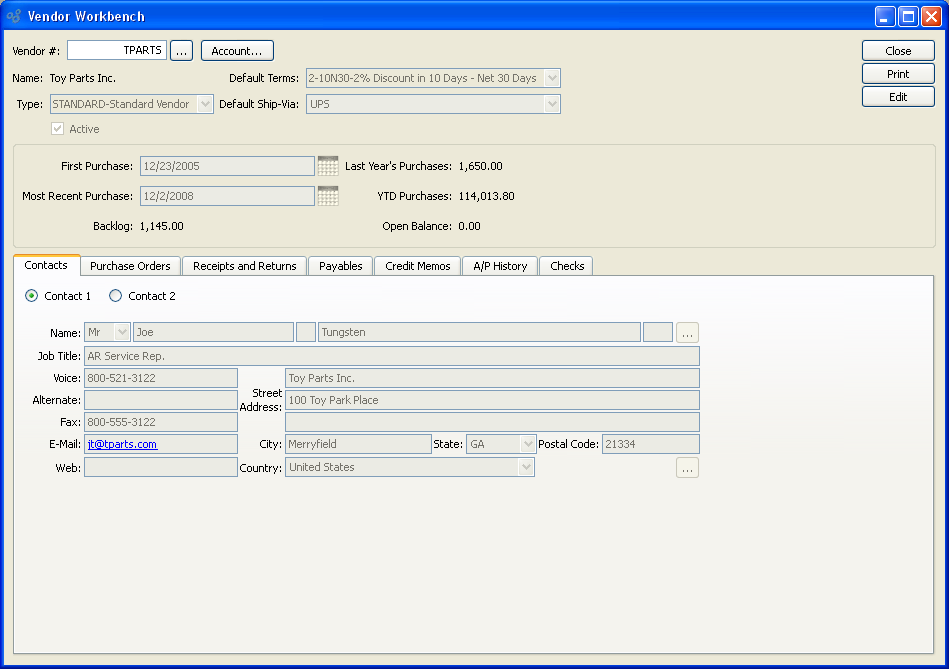
When displaying Vendor information, you are presented with the following options:
- Vendor #
Enter the Vendor Number of the Vendor whose information you want to view.
- Name
Displays Vendor name automatically when Vendor Number is entered.
- ACCOUNT
Select this button to open the CRM Account record associated with the Vendor.
- Type
Displays the Vendor Type for the specified Vendor.
- Default Terms
Displays the Vendor's default Terms.
- Default Ship Via
Displays the default Ship Via for the Vendor.
- First Purchase
Displays the first purchase from the Vendor.
- Most Recent Purchase
Displays the most recent purchase from the Vendor.
- Backlog
Displays the total cost of Purchase Order items that have been ordered but not yet received.
- Last Year's Purchases
Displays total purchases from Vendor for previous year.
- YTD Purchases
Displays year-to-date purchases made from Vendor.
- Open Balance
Displays open balance with Vendor.
To the far right of the screen, the following buttons are available:
- CLOSE
Closes the screen, returning you to the application desktop.
Runs the reports associated with this screen.
- EDIT
Select to edit the Vendor master for the specified Vendor.
To view Purchase Orders associated with the Vendor, select the "Purchase Orders" tab. The following screen will appear:
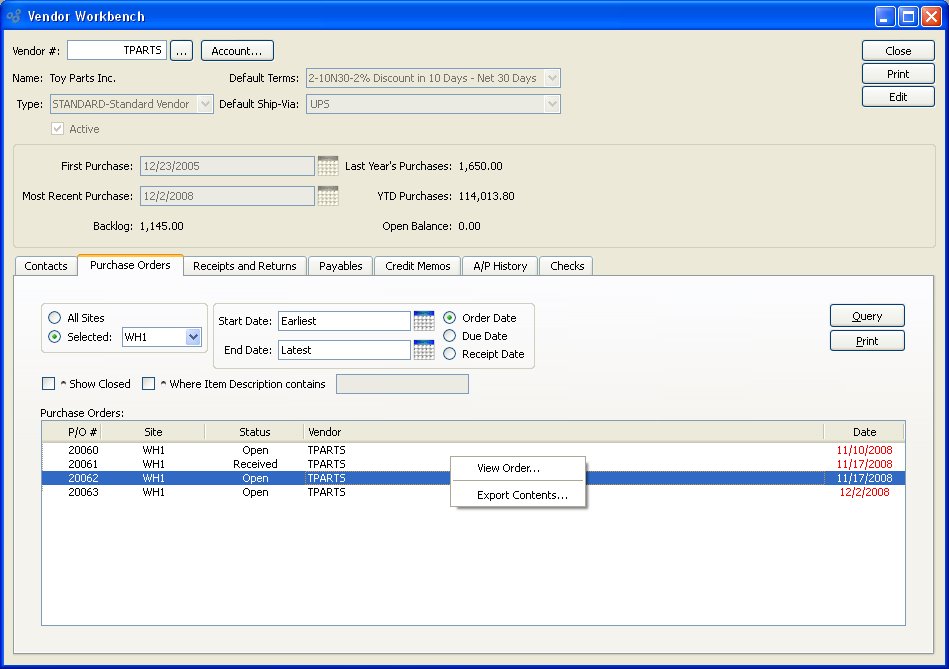
When displaying the list of Purchase Orders associated with the Vendor, you are presented with the following options:
- All Sites
Select to display Purchase Orders from all sites.
- Selected
Select to display Purchase Orders from a specific site
- Start Date
Displays Purchase orders dated on or after date specified. Date type dependent on radio button selected.
- End Date
Displays Purchase Orders dated on or before date specified. Date type dependent on radio button selected.
- Order Date
Specifies Start and End Dates are based on date Purchase Order created.
- Due Date
Specifies Start and End Dates are based on Purchase Order Due Date.
- Receipt Date
Specifies Start and End Dates are based on date goods are received against Purchase Order.
- Show Closed
Select to include closed Purchase Orders in display.
- Where Item Description contains
Specify key word or phrase from the Purchase Order description to use as a parameter for display.
To the far right of the screen, the following buttons are available:
- QUERY
Select to re-generate and update the information on the screen.
Runs the report associated with this screen.
To view Receipts and Returns associated with the Vendor, select the "Receipts and Returns" tab. The following screen will appear:
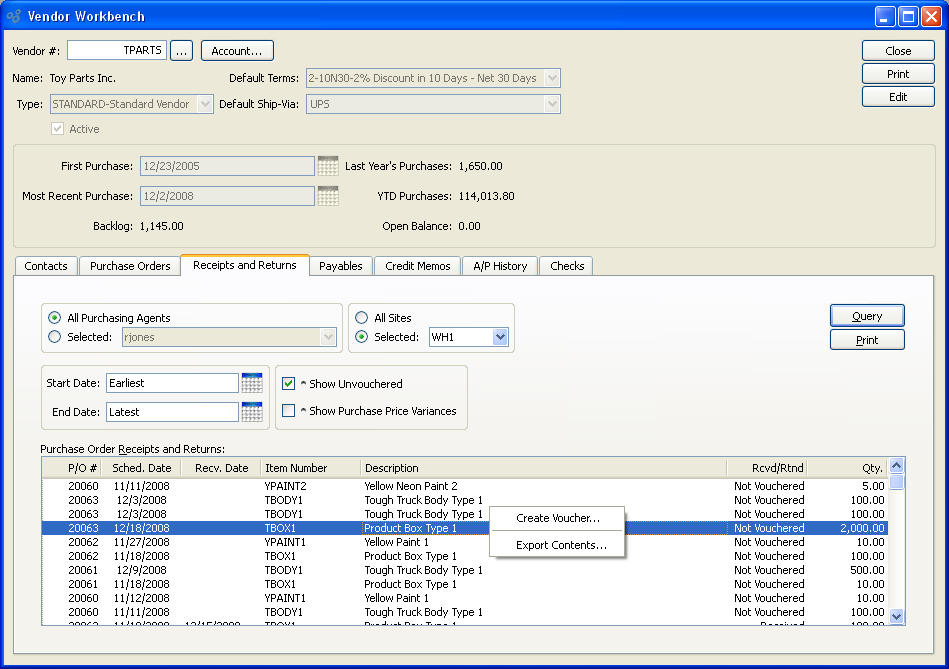
When displaying the list of Receipts and Returns associated with the Vendor, you are presented with the following options:
- All Purchasing Agents
Select to list Purchase Order Receipts and Returns associated with all Purchasing Agents.
- Selected
Select to specify only Purchase Order Receipts and Returns generated by a specific Purchasing Agent.
- All Sites
Select to display Purchase Order Receipts and Returns from all sites.
- Selected
Select to display Purchase Order Receipts and Returns from a specific site
- Start Date
Displays Purchase Order Receipts and Returns created on or after date specified.
- End Date
displays Purchase Order Receipts and Returns created on or before date specified.
- Show Unvouchered
Includes Unvouchered Purchase Order Receipts and Returns in display.
- Show Purchase Price Variances
Displays Purchase Cost, Receiving Cost, and Value in Purchase Order Receipts and Returns in results.
To the far right of the screen, the following buttons are available:
- QUERY
Select to re-generate and update the information on the screen.
Runs the report associated with this screen.
To view open Payables associated with the Vendor, select the "Payables" tab. The following screen will appear:
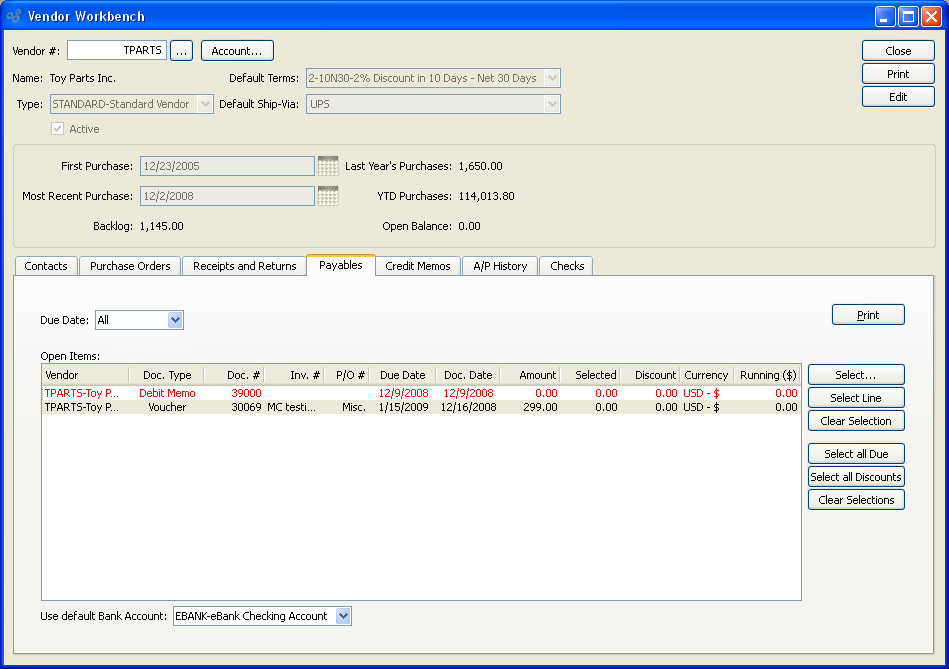
When displaying the list of Payables associated with the Vendor, you are presented with the following options:
- Due Date
Specify date parameters to query open Payables.
- Open Items
Display lists A/P open items. If a Document is past due, the line for that Document will display in red type.
To the far right of the screen, the following buttons are available:
Runs the report associated with this screen.
- SELECT
Highlight an A/P open item and then click this button to manually review and select the Item for payment. This option brings you to the individual Select Payment screen, where you will find the full range of payment options.
- SELECT LINE
Highlight an A/P open item and then click this button to automatically select the open item for payment. Any available Terms Discount will also be applied automatically.
- CLEAR SELECTION
Highlight an A/P open item and then select this button to clear the selected payment. This option effectively reverses the action of the SELECT option.
- SELECT ALL DUE
Select this button to select for payment all A/P open items whose Payment Date is due or past due and whose Currency is the same as the Bank Account's Currency.
- SELECT ALL DISCOUNTS
Select this option to automatically select all A/P open items which are eligible for a Terms Discount and whose Currency is the same as the Bank Account's Currency. The Terms Discount will be applied automatically to all selected open items.
- CLEAR SELECTIONS
Select this button to clear all selected payments due. This option effectively reverses the action of the SELECT ALL DUE option.
To view Credit Memos associated with the Vendor, select the "Credit Memos" tab. The following screen will appear:
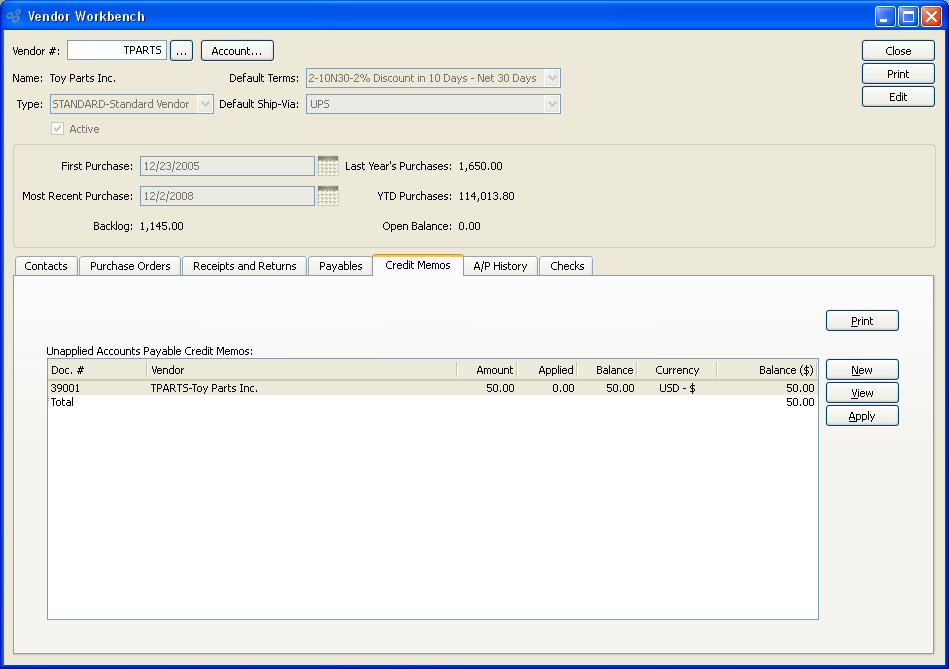
When displaying the list of Credit Memos associated with the Vendor, you are presented with the following options:
- Unapplied Accounts Payable Credit Memos
Displays the list of unapplied Credit Memos associated with the specified Vendor.
To the far right of the screen, the following buttons are available:
Runs the report associated with this screen.
- NEW
Opens screen for creating a new miscellaneous Credit Memo.
- VIEW
Highlight an unapplied Credit Memo and then select this button to reach a read-only view of the A/P open item.
- APPLY
Highlight an unapplied Credit Memo and then select this button to apply an amount.
To view purchasing history with the Vendor, select the "A/P History" tab. The following screen will appear:
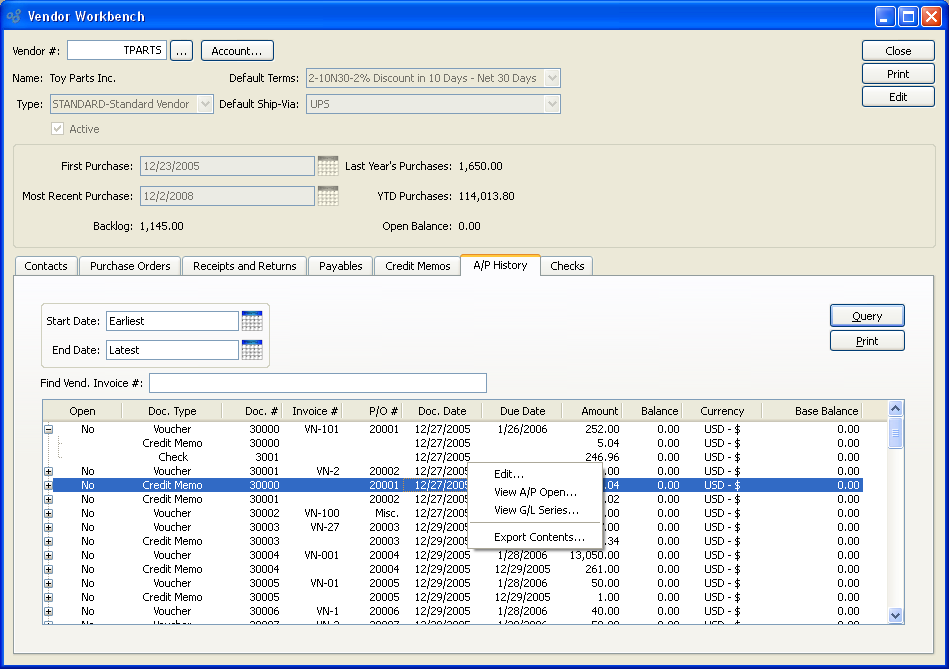
When displaying purchasing history from the Vendor, you are presented with the following options:
- Start Date
Displays Documents created on or after date specified.
- End Date
Displays Documents created on or before date specified.
- Find Vend. Invoice #
Enter specific vendor invoice number to display.
To the far right of the screen, the following buttons are available:
- QUERY
Select to re-generate and update the information on the screen.
Runs the report associated with this screen.
To view Checks associated with the Vendor, select the "Checks" tab. The following screen will appear:
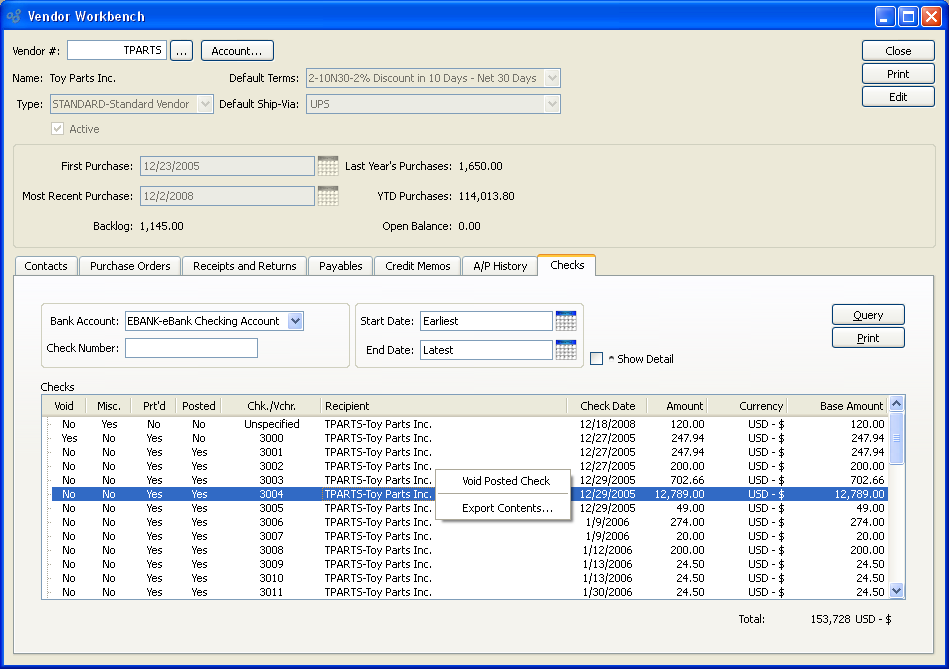
When displaying the Check Register for the Vendor, you are presented with the following options:
- Bank Account
Select Bank Account whose Checks you want to display.
- Check Number
Enter specific Check Number to include in the display.
- Start Date
Checks created on or after specified date will be included in the display.
- End Date
Queries checks created on or before specified date will be included in the display.
- Show Detail
Select to expand check detail for all items listed. This can be done manually for one check at a time by clicking on the plus (+) symbol. To collapse list select the minus (-) symbol.
To the far right of the screen, the following button is available:
- QUERY
Select to re-generate and update the information on the screen.
Runs the report associated with this screen.
To access the master list of Vendor Types, select the "Vendor Types" option. The following screen will appear:
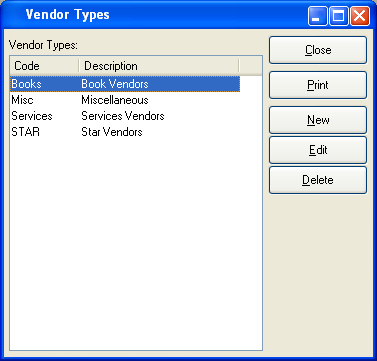
The "Vendor Types" screen displays information on all existing Vendor Types, including Vendor Type code and Vendor Type description.
To the far right of the screen, the following buttons are available:
- CLOSE
Closes the screen, returning you to the application desktop.
Runs the report associated with this screen.
- NEW
Opens screen for creating a new Vendor Type.
- EDIT
Enables you to edit highlighted Vendor Type. The edit screen is the same as that for creating a new Vendor Type—except that when editing, the fields will contain Vendor Type information. Double-clicking on a Vendor Type will also bring you to the editing screen.
- VIEW
Highlight a Vendor Type and then select this button to reach a read-only view of the "Edit" screen.
- DELETE
Highlight a Vendor Type and then select this button to remove the Vendor from the list.
To create a new Vendor Type, select the NEW button. The following screen will appear:
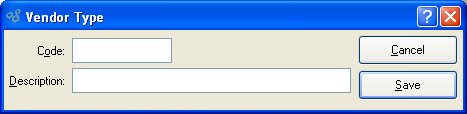
When creating a new Vendor Type, you are presented with the following options:
- Code
Enter a code to uniquely identify the Vendor Type.
- Description
Enter a description to identify the Vendor Type.
To the far right of the screen, the following buttons are available:
- CANCEL
Closes the screen without creating a new Vendor Type, returning you to the previous screen.
- SAVE
Creates the Vendor Type and adds it to the master list of Vendor Types.