A Work Order is a document which authorizes the production of manufactured Items. Work Orders can exist in five different states—from creation to completion. The five different states of Work Orders are listed below:
Open ("O"): This is the initial state a Work Order receives when it is first created.
Exploded ("E"): A Work Order is considered exploded once it has been opened and its accompanying Work Order Material Requirement and Work Order Operations have also been created.
Released ("R"): This state describes a Work Order that has been released to the shop floor.
In-process ("I"): This is the state a Work Order reaches when Work Order Material Requirements have been issued to it.
Closed ("C"): The final state of a Work Order occurs when it is closed.
The creation and control of Work Orders is handled by the "W/O Control" section.
Work Orders define requirements for the production of manufactured Items. You may also create Work Orders for purchased items that you normally purchase, but you occasionally manufacture. These Items may have a Bill of Materials (BOM)—or not. The system supports both BOM-based and non-BOM-based Work Orders.
- BOM-based
Material Requirements are drawn from the Bill of Materials when the Work Order is exploded, using the specified Revision. Users may add or subtract Material Requirements as needed.
- Non-BOM-based
Ideal for labor-only Work Orders having a Bill of Operations (BOO) but no BOM—for example, service Work Orders which require labor Operations only. Also good for Items or Jobs where the Material Requirements are not-known—but must be added on an ad-hoc basis.
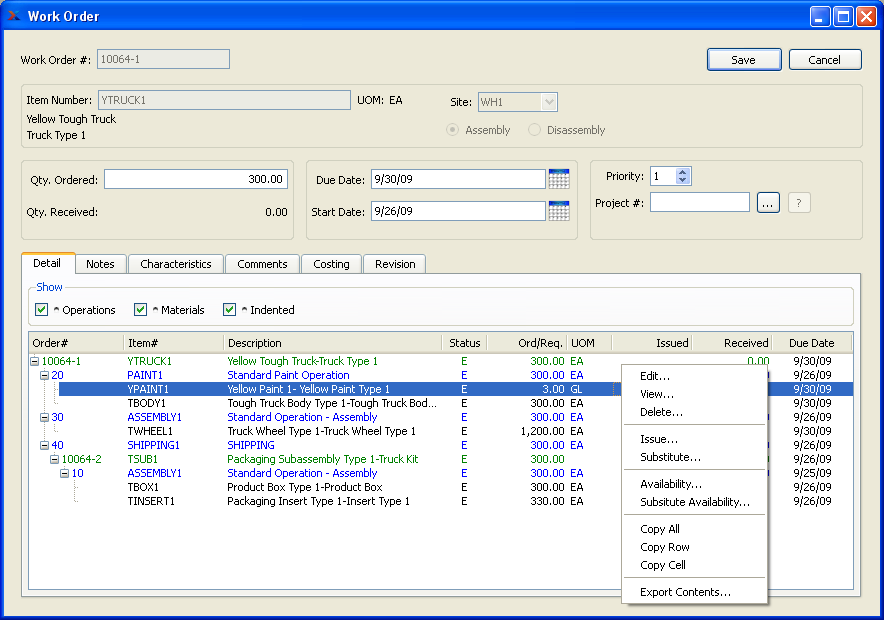
To create a new Work Order, select the "Create New Work Order" option. The following screen will appear:
Tip
To edit a Work Order after it has been created, use the right-click menu in any of the "Work Order Schedule by..." displays. There you will find an "Edit W/O" option.
When creating a new Work Order, you are presented with the following options:
- Work Order #
Next available Work Order Number will automatically display, unless your system requires you to enter Work Order Numbers manually. Default values and input parameters for Work Order Numbers are configurable at the system level.
- Item Number
Enter the Item Number of the Item you want to create a Work Order for. You may also enter purchased Items that you normally buy, but you occasionally make. The browse button located to the right of the field leads to a searchable list of make and buy items.
Note
Work Orders for Job Items are created exclusively by Sales Order demand. It is not possible to create a Job Item Work Order using the Work Order screen. Similarly, production posting for Job Items occurs in a unique way. Production for Job Item Work Orders is posted when the Sales Order which demanded the Job Item is issued to Shipping. This is the only way to post production for Job Item Work Orders.
- UOM
Inventory Unit of Measure.
- Site
Specify supplying Site for selected Item. Only Sites that contain supplying Item Sites for the selected Item may be chosen.
Note
Order Parameters may have an impact on Work Order quantity if the "on Manual Orders" option is selected in the Item Site master for a manufactured Item. If Order Parameters are in effect, the Work Order must conform to those restrictions. Both Minimum Order size and Order Multiple may be governed by Order Parameter settings.
- Assembly
Select to identify the Work Order as an assembly order.
- Disassembly
Select to identify the Work Order as a disassembly order. When disassembling Items, the system will not enforce order parameters defined at the Item Site level.
- Qty. Ordered
Value entered specifies the number of Item units to be processed by the Work Order.
- Qty. Received
Displays the quantity of finished product posted as received into Inventory to date, if any.
- Lead Time (Days)
Select a number using the arrow buttons, or manually enter a value up to a maximum of 999. Value entered specifies the manufacturing Lead Time required between the date the Work Order starts and the date it is due. Lead Times for Items are specified in the Item Site master, but may be modified on this screen.
Tip
The Lead Time option is only available when creating a new Work Order. Once the Order is created, this option will not be visible.
- Due Date
Enter the date the Work Order must be completed by.
- Start Date
Enter the date the Work Order must be started by. By default, this date will be the due date less the Lead Time. The start date may be changed by altering the Lead Time field.
- Priority
Select a number using the arrow buttons, or manually enter a value up to a maximum of 99. Value entered assigns a priority to the selected Work Order. By assigning a priority to a Work Order, you can indicate the relative importance of a Work Order in comparison to other Work Orders.
- Project #
Select a Project Number to associate with the Work Order. If the Work Order was created from Sales Order demand—and the parent Sales Order had a Project Number associated with it—then the Project Number from the parent Sales Order will automatically be entered here. In this way, Sales Orders and Work Orders may be linked to the same Project.
Note
The option to associate a Project with a Work Order will only be visible if your site is configured to use Projects.
- Detail
The "Detail" tab provides a kind of workbench for managing Materials, child Work Orders, and Operations associated with a Work Order. Use the context-sensitive right-click menu to perform actions related to Work Order management. The display is a nested list, with a plus ("+") sign located to the far left of the display next to each row that may be expanded to lower levels. By clicking your mouse on a plus sign, you reveal lower levels of information related to the group. The following color-coding has been implemented to simplify navigation: green (Work Orders), blue (Operations), black (Materials).
- Show
Specify the type of Work Order information you would like to include in the display:
- Operations
Select to include information about Work Order Operations in the display.
- Materials
Select to include information about Material Requirements in the display.
- Indented
Select to include child Work Orders in the display. If selected, child Work Orders will be shown indented in the Materials and Operations list.
- Print Traveler
Select to print a Work Order Traveler at the point when the Work Order is initially created. This option will be hidden once the Work Order has been created.
To the far right of the screen, the following buttons are available:
- SAVE
Creates the Work Order.
- CANCEL
Closes the screen without creating the Work Order, returning you to the application desktop.
To add Notes to a Work Order, select the "Notes" tab. The following screen will appear:
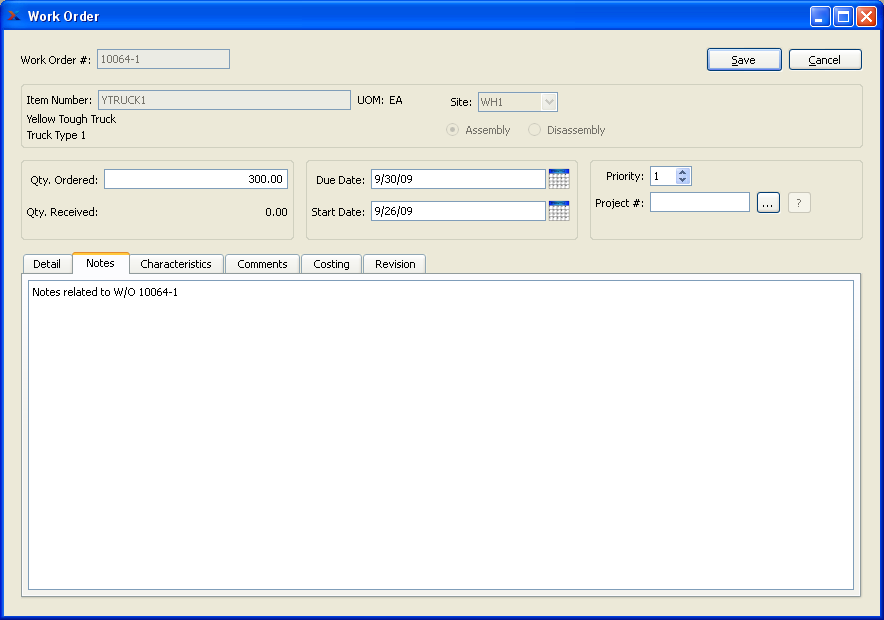
When adding Notes to a Work Order, you are presented with the following options:
- Notes
This is a scrolling text field with word-wrapping for entering production Notes related to the Work Order. Production Notes are printed on Pick Lists and Packing Lists for reference by production personnel.
Tip
If a Work Order was created from a Sales Order, the Production Notes field will contain the Sales Order Number, the Customer Name, and any additional Sales Order Line Item Notes.
If an Item has Characteristics associated with it, you have the option of linking those Characteristics to a Work Order Item. And, in the case where a Work Order is generated from a linked Sales Order, the Work Order will inherit Characteristics defined at the Sales Order level.
Tip
You can link Characteristics and Values to an Item by using the Item master. Once entered, these Characteristics and Values will be available to users entering Sales Order Line Items.
To associate Characteristics with a Work Order Item, select the "Characteristics" tab at the bottom of the screen, as shown below:
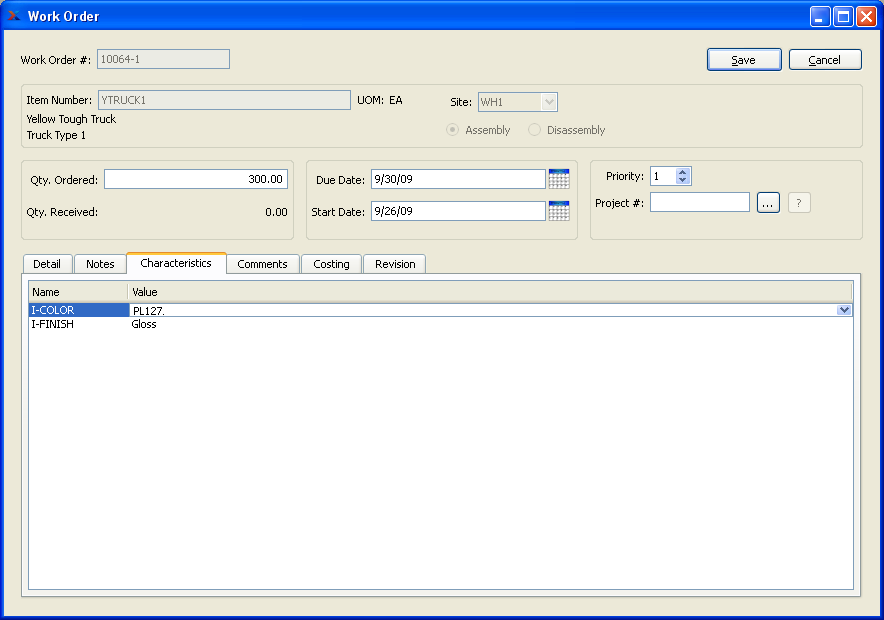
When specifying Characteristics for a Work Order Item, you are presented with the following options:
- Name
Displays the name of any Item Characteristics associated with the Item. Characteristics defined as Item Characteristics may be associated with Items on the Item master.
- Value
Displays the default Value associated with an Item Characteristic, but permits you to specify an alternate Value. When associating Characteristic Values with a Work Order Item, you have four options: 1) Select the default Value; 2) select an alternate pre-defined Value; 3) manually enter a new Value in place of the pre-defined Value; or 4) make no selection. Making no selection means the Characteristics will not be associated with the Work Order Item.
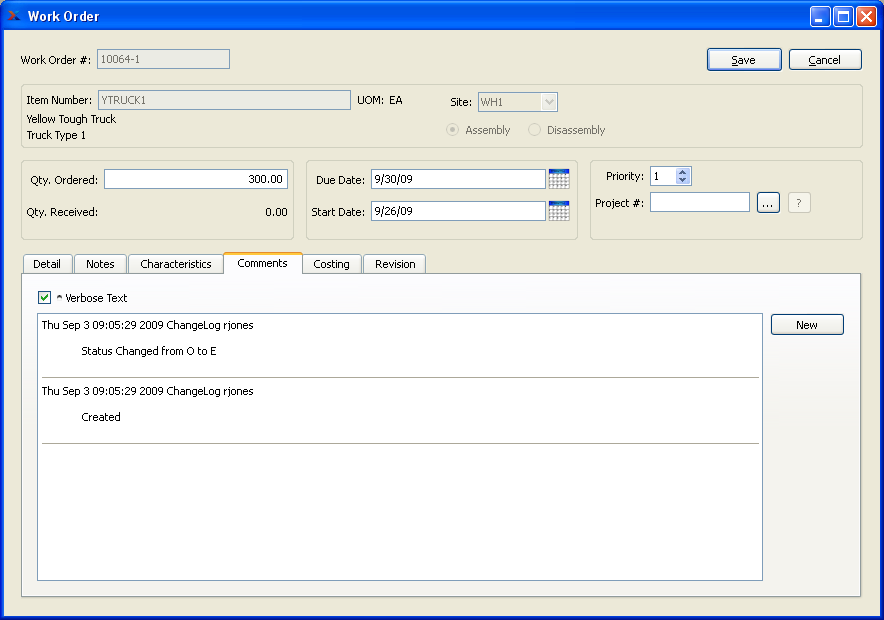
To create or view Comments related to a Work Order, select the "Comments" tab. The following screen will appear:
Note
Work Order Comments may not be added at the time of Work Order creation. Instead, use the Production Notes tab for entering Notes related to a Work Order.
When adding or reviewing Comments, you are presented with the following options:
- Verbose Text
Select to display all Comments in the list in an expanded view which includes the entire text of each Comment. To edit a Comment, simply select the "Edit" link next to the Comment. That link will not be shown for Changelog Comments, which can't be edited. If the "Verbose Text" option is not selected, the Comment list will display only header level information for each Comment.
- Comments
Display lists Comments related to the record.
To the far right of the screen, the following buttons are available:
- NEW
Opens screen for creating a new Comment.
- VIEW
Highlight a Comment and then select this button to reach a read-only view of the "Edit" screen.
- EDIT
Enables you to edit highlighted Comments—as long as the Comments are not "ChangeLog" Comments. ChangeLog Comments are system-generated and may not be edited. The edit screen is the same as that for creating a new Comment—except that when editing, the fields will contain Comment information. Double-clicking on a Comment will also bring you to the editing screen.
To enter a new Comment, select the NEW button. The following screen will appear:

- Comment Type
Select a Comment Type from the drop-down list to classify the Comment. This is a required step. Comment Types may be system-defined (i.e., "ChangeLog" and "General") or user-defined, as described in Section 13.12, “Comment Types”. Once you have specified a Comment Type, begin typing your Comment in the main text area. The text area features word-wrapping and scroll-bar support for longer Comments.
To the far right of the screen, the following buttons are available:
- CANCEL
Closes the screen without creating the Comment, returning you to the previous screen.
- SAVE
Creates the Comment and adds it to the list of Comments.
- SHOW MORE
Select to show the complete list (i.e., "thread") of Comments associated with the record. To hide the list, simply select the SHOW MORE button again. The Comment thread will show the most recent Comment first.
Once a Work Order is in process—that is, either Materials have been issued or Production or Operations have been posted—you can begin to view Costing information for the Work Order. To view Costing information for the Work Order, select the "Costing" tab. The following screen will appear:
Tip
The Costing tab will not be visible until after a Work Order has been created. You will not see Costing information when creating a Work Order.
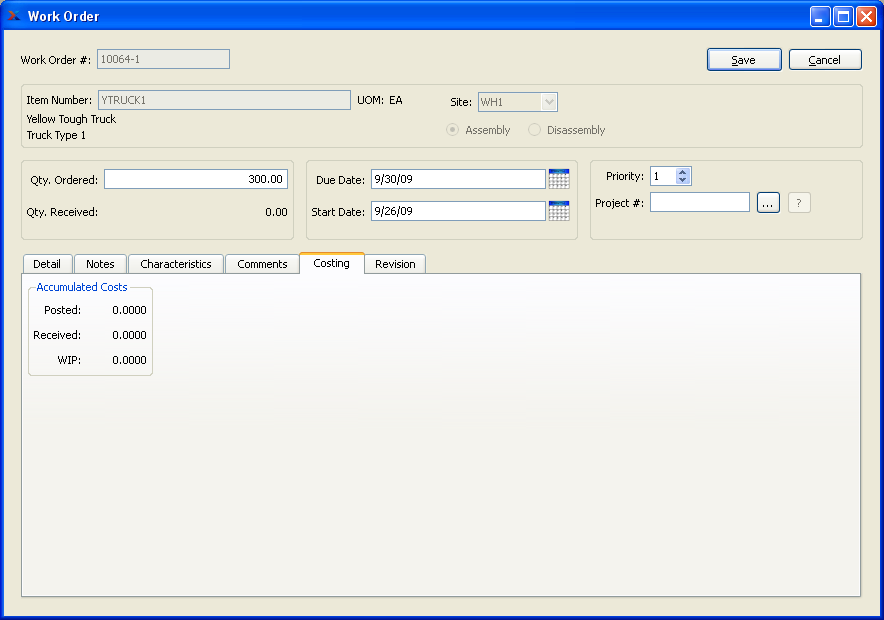
When viewing Work Order Costing information, you are presented with the following options:
- Accumulated Costs
Information about the following categories of currently accumulated Work Order Costs will be shown:
- Posted
Displays the current posted value of the Work Order. The posted value is equal to the total cost accumulated on the Work Order, including both labor and Materials. The posted value will be the same as the WIP value until the point when finished goods are received. Ultimately, once Production (or Operations) posting is completed, the posted value will be equal to the received value. If these two values are different, then a variance will result.
- Received
Displays the current value of finished goods received into Inventory from the Work Order. The received value is equal to the posted value minus WIP.
- WIP
Displays the current value of Work in Process (WIP) for the Work Order. The WIP value is equal to the posted value minus the received value.
- Cost Recognition
Used by Work Orders for Job and Average Cost Items to determine how and when costs are recognized:
- To Date
All of the costs accumulated against the Work Order will be debited to Inventory and credited to WIP.
- Proportional
Costs are recognized in proportion to the total costs posted and the total Items received to date.
Note
The default Cost Recognition method is defined at the system level; however, you may change the setting manually at the Work Order level.
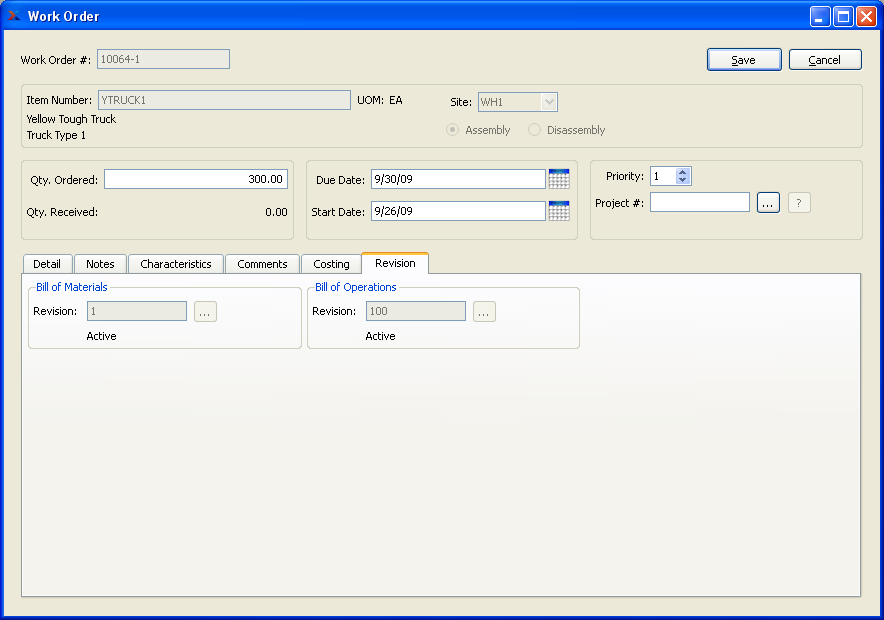
When creating a Work Order, you have the option to specify which Revision of the Work Order Item's Bill of Materials and Bill of Operations you want to use. By default, the active Revision will be used. Once the Work Order has been created, these options will become read-only. To specify Revision information for a Work Order Item, select the "Revision" tab. The following screen will appear:
Note
You may create Work Orders for pending Revisions. For Work Order purposes, a pending Revision is considered to be the same as an inactive Revision. The Revision status of a pending Revision will not be changed if a Work Order is created for it.
When specifying Revision information for a Work Order Item, you are presented with the following options:
- Bill of Materials
Specify the BOM Revision you want to use for the Work Order. By default, the active Revision will be used.
- Revision
Select from the list of existing available Revisions. The status of the Revision will also be displayed.
- Bill of Operations
Specify the BOO Revision you want to use for the Work Order. By default, the active Revision will be used.
- Revision
Select from the list of existing available Revisions. The status of the Revision will also be displayed.
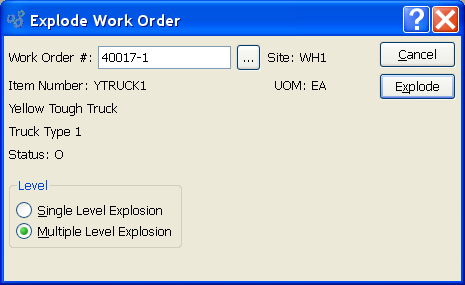
When a Work Order is exploded, Work Order Material Requirements and Work Order Operations are created for the Work Order in question, using the Bill of Materials and Bill of Operations for the parent Item. To manually explode a Work Order, select the "Explode Work Order" option. The following screen will appear:
Note
Work Orders can be exploded either manually or automatically by default. The default setting is configured at the system level.
When manually exploding a Work Order, you are presented with the following options:
- Work Order #
Enter the Work Order Number of the Work Order you want to explode. The browse button located to the right of the field leads to a searchable Work Order list featuring open Work Orders ready for explosion.
- Site
Displays Site code automatically when Work Order Number is entered into "Work Order #" field.
- Item Number
Displays Item Number automatically when Work Order Number is entered into "Work Order #" field.
- UOM
Inventory Unit of Measure.
- Status
Displays Work Order Status automatically when Work Order Number is entered into "Work Order #" field.
Note
Default Work Order explosion levels can be configured at the system level.
- Level
Select one of the following Work Order explosion levels:
- Single Level Explosion
During a single-level explosion, Work Order Material Requirements and Work Order Operations are created for the parent Item—but not for any manufactured components of the parent Item. The Work Orders for manufactured components must be exploded manually.
- Multiple Level Explosion
In a multiple-level explosion, any manufactured components of the parent Item are identified and Work Orders are created for them. Then, Work Order Material Requirements and Work Order Operations are created for both the parent Item and the manufactured components.
To the far right of the screen, the following buttons are available:
- CANCEL
Closes the screen without exploding the selected Work Order and returns you to the application desktop.
- EXPLODE
Explodes the selected Work Order.
When you implode a Work Order, you delete the Work Order's Material Requirements and Work Order Operations. Only Work Orders with exploded ("E") Status can be imploded. If the Work Order has been released ("R") or is in-process ("I"), it may not be imploded. Implosion changes a Work Order's Status from exploded ("E") back to open ("O"). To implode a Work Order, select the "Implode Work Order" option. The following screen will appear:
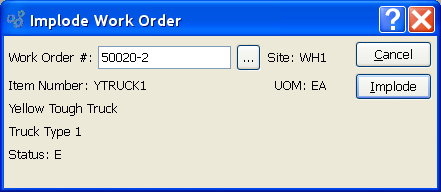
When imploding a Work Order, you are presented with the following options:
- Work Order #
Enter the Work Order Number of the Work Order you want to implode.
- Site
Displays Site code automatically when Work Order Number is entered into "Work Order #" field.
- Item Number
Displays Item Number automatically when Work Order Number is entered into "Work Order #" field.
- UOM
Inventory Unit of Measure.
- Status
Displays Work Order Status automatically when Work Order Number is entered into "Work Order #" field.
To the far right of the screen, the following buttons are available:
- CANCEL
Closes the screen without imploding the Work Order, returning you to the application desktop.
- IMPLODE
Implodes the Work Order.
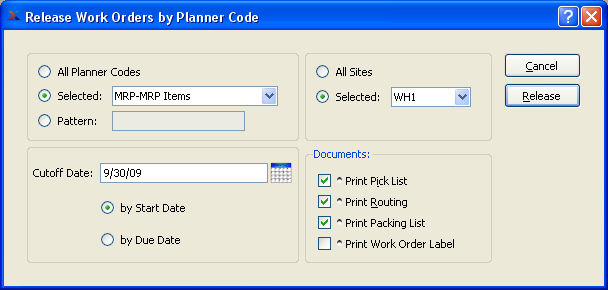
If multiple Work Orders within a Planner Code have been exploded, you have the option of releasing them simultaneously. To release Work Orders by Planner Code, select the "Release Work Orders by Planner Code" option. The following screen will appear:
Note
Once an Order has been released, the system considers the ordered quantity to be available at 00:00:01 of the due date of the Order in question.
When releasing Work Orders by Planner Code, you are presented with the following options:
- All Planner Codes
Select to release Work Orders for all Planner Codes.
- Selected
Specify Planner Code whose exploded Work Orders you want to release.
- Pattern
Enter a Planner Code pattern to select a range of Planner Codes. Refine your search using Regular Expressions.
- Cutoff Date
All relevant Work Orders exploded prior to the date entered will be released.
- by Start Date
Select to make cutoff date effective as of Work Order start date.
- by Due Date
Select to make cutoff date effective as of Work Order due date.
- All Sites
Select to release Work Orders by Planner Code from all Sites.
- Selected
Specify Site whose exploded Work Orders by Planner Code you want to release.
- Documents
Select which of the following documents you want to print when releasing the specified Work Orders:
- Print Pick List
Select to print Pick Lists for the specified Work Orders.
- Print Routing
Select to print Routings for the specified Work Orders.
- Print Packing List
Select to print Packing Lists for the specified Work Orders.
- Print Work Order Label
Select to print Work Order Labels for the specified Work Orders.
To the far right of the screen, the following buttons are available:
- CANCEL
Closes the screen without releasing Work Orders by Planner Code, returning you to the application desktop.
- RELEASE
Releases Work Orders by Planner Code, using the specified parameters.
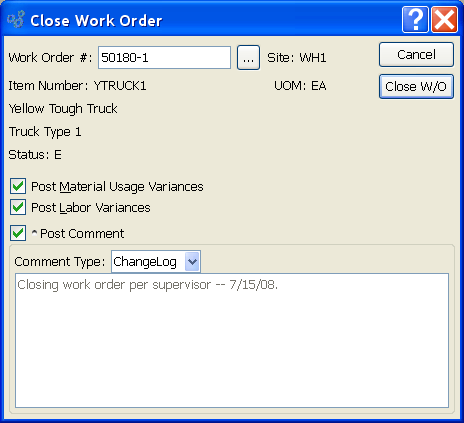
A Work Order can be closed at any point. To close a Work Order, select the "Close Work Order" option. The following screen will appear:
Note
Work Order Materials and Operations history is saved in the database after a Work Order is closed. Reports can be written to retrieve this information.
When closing a Work Order, you are presented with the following options:
- Work Order #
Enter the Work Order Number of the Work Order you want to close.
- Site
Displays Site code automatically when Work Order Number is entered into "Work Order #" field.
- Item Number
Displays Item Number automatically when Work Order Number is entered into "Work Order #" field.
- UOM
Inventory Unit of Measure.
- Status
Displays Work Order Status automatically when Work Order Number is entered into "Work Order #" field.
- Post Material Usage Variances
Material Usage Variances: Select to post material usage variances resulting from the Work Order. Variance information can be found in the Work Order reports.
- Post Labor Variances
Select to post labor variances resulting from the Work Order. Variance information can be found in the Work Order reports.
- Post Comment
Select to attach a Comment to the Work Order. This option must be selected if you want to add a Comment to the Work Order.
- Comment Type
Specify one of the following Comment Types from the drop-down list: ChangeLog or General. Comment Types are used to categorize Comments. Once you have specified a Comment Type, you may type your Comment in the main text area. The text area features word-wrapping and scroll-bar support for longer Comments.
To the far right of the screen, the following buttons are available:
- CANCEL
Closes the screen without closing the selected Work Order, returning you to the application desktop.
- CLOSE W/O
Closes the selected Work Order.
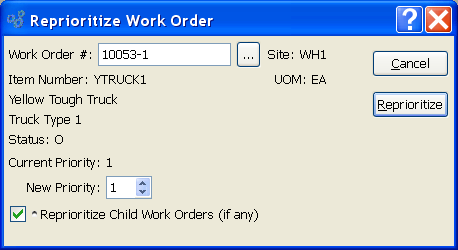
You have the ability to change the rank of Work Orders at any stage of the process before a Work Order is closed. To reprioritize a Work Order, select the "Reprioritize Work Order" option. The following screen will appear:
Tip
To edit a Work Order after it has been created, use the right-click menu in any of the "Work Order Schedule by..." displays. There you will find an "Edit W/O" option.
When reprioritizing a Work Order, you are presented with the following options:
- Work Order #
Enter the Work Order Number of the Work Order you want to reprioritize.
- Site
Displays Site code automatically when Work Order Number is entered into "Work Order #" field.
- Item Number
Displays Item Number automatically when Work Order Number is entered into "Work Order #" field.
- UOM
Inventory Unit of Measure.
- Status
Displays Work Order Status automatically when Work Order Number is entered into "Work Order #" field.
- Current Priority
Displays the current priority assigned to the Work Order.
- New Priority
Select a number using the arrow buttons, or manually enter a value up to a maximum of 99. Value entered assigns a new priority to the selected Work Order.
- Reschedule Child Work Orders (if any)
Select to reprioritize child Work Orders to meet the demands of the reprioritized parent Work Order.
To the far right of the screen, the following buttons are available:
- CANCEL
Closes the screen without reprioritizing the selected Work Order, returning you to the application desktop.
- RESCHEDULE
Assigns a new priority to the selected Work Order.
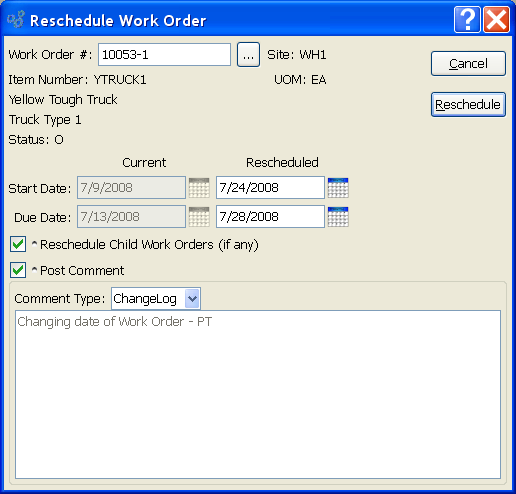
You have the ability to reschedule Work Orders at any stage of the process before a Work Order is closed. To reschedule a Work Order, select the "Reschedule Work Order" option. The following screen will appear:
Tip
To edit a Work Order after it has been created, use the right-click menu in any of the "Work Order Schedule by..." displays. There you will find an "Edit W/O" option.
When rescheduling a Work Order, you are presented with the following options:
- Work Order #
Enter the Work Order Number of the Work Order you want to reschedule.
- Site
Displays Site code automatically when Work Order Number is entered into "Work Order #" field.
- Item Number
Displays Item Number automatically when Work Order Number is entered into "Work Order #" field.
- UOM
Inventory Unit of Measure.
- Status
Displays Work Order Status automatically when Work Order Number is entered into "Work Order #" field.
- Start Date
Indicate the rescheduled Work Order start date. The current start date will be displayed.
- Due Date
Indicate the rescheduled Work Order due date. The current due date will be displayed.
- Reschedule Child Work Orders (if any)
Select to reschedule child Work Orders to meet the demands of the rescheduled parent Work Order.
- Post Comment
Select to attach a Comment to the Work Order. This option must be selected if you want to add a Comment to the Work Order.
- Comment Type
Specify one of the following Comment Types from the drop-down list: ChangeLog or General. Comment Types are used to categorize Comments. Once you have specified a Comment Type, you may type your Comment in the main text area. The text area features word-wrapping and scroll-bar support for longer Comments.
To the far right of the screen, the following buttons are available:
- CANCEL
Closes the screen without rescheduling the selected Work Order, returning you to the application desktop.
- RESCHEDULE
Reschedules the selected Work Order according to the new start and due dates entered in the screen.
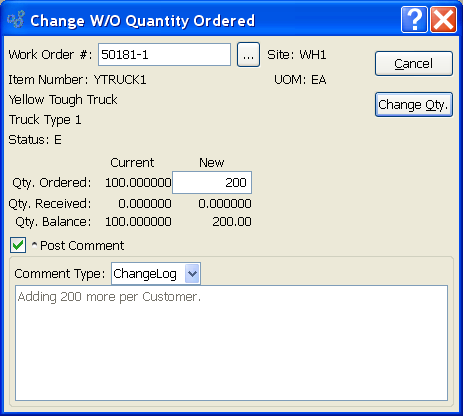
You have the ability to change the quantity of Work Orders at any stage of the process before a Work Order is closed. To change the quantity specified by a Work Order, select the "Change Work Order Quantity" option. The following screen will appear:
Tip
To edit a Work Order after it has been created, use the right-click menu in any of the "Work Order Schedule by..." displays. There you will find an "Edit W/O" option.
When changing a Work Order's quantity, you are presented with the following options:
- Work Order #
Enter the Work Order Number of the Work Order whose quantity you want to change.
- Site
Displays Site code automatically when Work Order Number is entered into "Work Order #" field.
- Item Number
Displays Item Number automatically when Work Order Number is entered into "Work Order #" field.
- UOM
Inventory Unit of Measure.
- Status
Displays Work Order Status automatically when Work Order Number is entered into "Work Order #" field.
- Qty. Ordered
Enter the revised Work Order quantity in the "New" field. The current quantity ordered will display under the "Current" column.
- Qty. Received
The current quantity received will display under the two columns.
- Qty. Balance
The current quantity balance will display under the two columns.
- Post Comment
Select to attach a Comment to the Work Order. This option must be selected if you want to add a Comment to the Work Order.
- Comment Type
Specify one of the following Comment Types from the drop-down list: ChangeLog or General. Comment Types are used to categorize Comments. Once you have specified a Comment Type, you may type your Comment in the main text area. The text area features word-wrapping and scroll-bar support for longer Comments.
To the far right of the screen, the following buttons are available:
- CANCEL
Closes the screen without changing the selected Work Order's quantity ordered, returning you to the application desktop.
- CHANGE QTY.
Changes the selected Work Order quantity to the new Work Order quantity specified in the "New" field.