Products Utilities section.
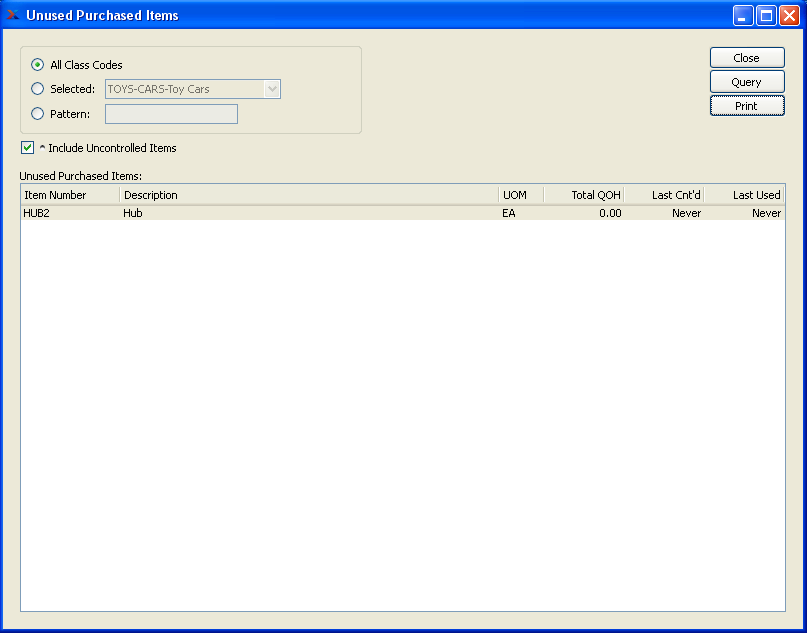
The "Unused Purchased Items" utility displays information about non-sold, purchased Items not currently in use in a Bill of Materials. Sold Items will not be included in the display. Selecting the "Unused Purchased Items" option. The following screen will appear:

Tip
This utility may run for a long period of time. We recommend running it during off-peak hours whenever possible.
When using this utility, you are presented with the following options:
- All Class Codes
Select to display unused purchased Items from all Class Codes.
- Selected
Specify Class Code whose unused purchased Items you want to display.
- Pattern
Enter a Class Code pattern to select a range of Class Codes. Refine your search using Regular Expressions.
- Include Uncontrolled Items
Select to include uncontrolled Items in the display.
- Unused Purchased Items
Display lists unused purchased Items for the range of Class Codes specified.
To the far right of the screen, the following buttons are available:
- CLOSE
Closes the screen, returning you to the application desktop.
- QUERY
Select to generate the display, using the specified parameters.
Runs the report associated with this screen.
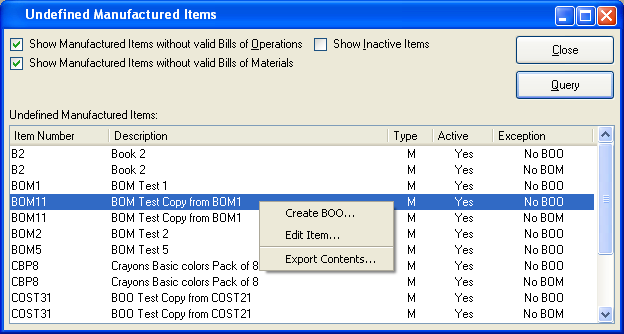
The "Undefined Manufactured Items" utility enables you to generate a list of purchased Items that do not have valid Bills of Materials and/or Bills of Operations defined. The display also provides other valuable information about each Item. Using the right-click option, you can use this utility to quickly resolve problems related to invalid Bills of Materials and/or Bills of Operations, using the right-click option. Selecting the "Undefined Manufactured Items" option. The following screen will appear:

Note
This utility may run for a long period of time. We recommend running it during off-peak hours whenever possible.
When using this utility, you are presented with the following options:
- Show Manufactured Items with valid Bills of Operations
Select to display all manufactured Items with valid Bills of Operations.
- Show Manufactured Items without valid Bills of Materials
Select to display all manufactured Items without valid Bills of Materials. Display will show undefined manufactured Items" for the selected Class Code.
- Show Inactive Items
Select to display inactive Items.
- Undefined Manufactured Items
Display lists undefined Manufactured Items, using the parameters specified on the screen.
To the far right of the screen, the following buttons are available:
- CLOSE
Closes the screen, returning you to the application desktop.
- QUERY
Select to identify undefined Manufactured Items, using the specified parameters.
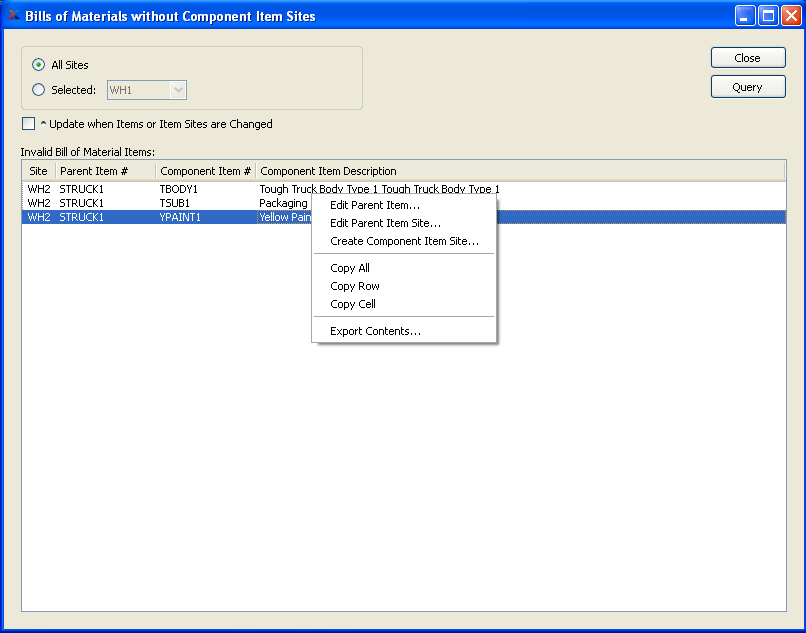
The "Bills of Materials Without Component Item Sites" utility enables you to generate a list of parent Items whose Bills of Materials do not have component Item Sites. The display also provides other valuable information about each Item. Selecting the "The Bills of Materials Without Component Item Sites" option. The following screen will appear:

Note
This utility may run for a long period of time. We recommend running it during off-peak hours whenever possible.
When using this utility, you are presented with the following options:
- All Sites
Select to display Bills of Materials without component Item Sites from all Sites.
- Selected
Specify Site whose Bills of Materials without component Items Sites you want to display.
- Update when Items or Item Sites are Changed
Select to update the display when changes are made to Items or Item Sites.
- Invalid Bill of Material Items
Display lists invalid Bill of Materials Items sorted according to the specified parameters.
To the far right of the screen, the following buttons are available:
- CLOSE
Closes the screen, returning you to the application desktop.
- QUERY
Select to identify Bills of Materials without component Item Sites, using the specified parameters.
To reassign Class Codes by Class Code, select the "Reassign Class Code by Class Code" option. The following screen will appear:

When reassigning Class Codes by Class Code, you are presented with the following options:
- Selected Class Code
Specify the Class Code you want to change.
- Class Code Pattern
Enter a Class Code pattern to select a range of Class Codes. Refine your search using Regular Expressions.
- New Class Code
Specify the new Class Code you want to assign the old Class Code(s) to.
To the far right of the screen, the following buttons are available:
- CANCEL
Closes the screen, returning you to the application desktop.
- REASSIGN
Select to reassign the specified Class Code(s), using the specified parameters.
To reassign Product Categories by Product Category, select the "Reassign Product Category by Product Category" option. The following screen will appear:

When reassigning Product Categories by Product Category, you are presented with the following options:
- Selected Product Category
Specify Product Category you want to change.
- Product Category Pattern
Enter a Product Category pattern to select a range of Product Categories. Refine your search using Regular Expressions.
- New Product Category
Specify the new Product Category you want to assign the old Product Category to.
To the far right of the screen, the following buttons are available:
- CANCEL
Closes the screen, returning you to the application desktop.
- REASSIGN
Select to reassign the specified Product Category, using the specified parameters.