Inventory Utilities section.
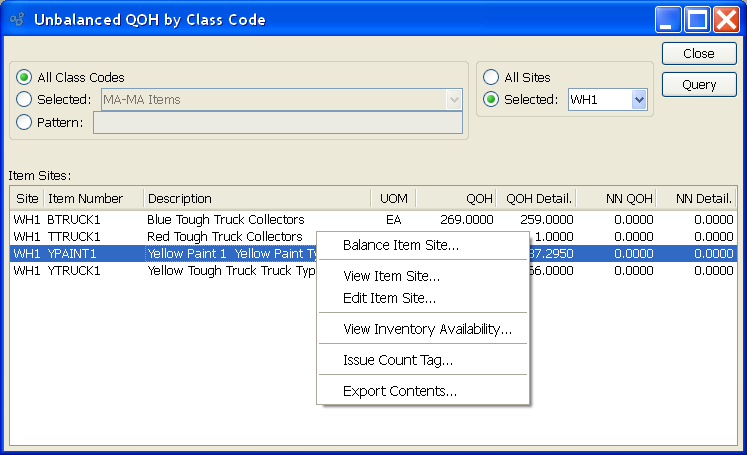
Unbalanced Quantity on Hand (QOH) can occur in Item Sites that are either Multiple Location Control (MLC) or Lot/Serial Number controlled. If the summarized QOH value does not equal the detailed QOH value, then an Item Site of these types will be considered unbalanced. By design, QOH should not become unbalanced. However, if Inventory is not distributed properly—as in the case, for example, when a computer is turned off before a transaction is completed—then QOH can become unbalanced. This display enables you to view these discrepancies and take corrective action. To correct discrepancies, use the Balance Item Site utility available from the right-click menu. To display unbalanced Quantity on Hand by Class Code, select the "Unbalanced QOH by Class Code" option. The following screen will appear:
Note
Balancing unbalanced Item Sites updates and corrects Inventory records by bringing summarized QOH into alignment with detailed QOH.
When displaying unbalanced Quantity on Hand by Class Code, you are presented with the following options:
- All Class Codes
Select to display unbalanced Quantity on Hand for all Class Codes.
- Selected
Specify Class Code whose unbalanced Quantity on Hand you want to display.
- Pattern
Enter a Class Code pattern to select a range of Class Codes. Refine your search using Regular Expressions.
- All Sites
Select to display unbalanced Quantity on Hand in all Sites.
- Selected
Specify Site whose unbalanced Quantity on Hand you want to display.
- Item Sites
Display lists unbalanced Quantity on Hand the specified Class Code(s).
To the far right of the screen, the following buttons are available:
- CLOSE
Closes the screen, returning you to the application desktop.
The utilities featured in this section are designed for updating several of the controls required for the effective management of Inventory. To access this section, select the "Update Item Controls" option.
The basic formula the system uses to determine the ABC classification of Items is to multiply the volume of transactions for an Item during a specified period by the Item Costs for the Item. Those Items having the greatest transaction value are considered Class "A" Items. Those Items having the least transaction value are considered Class "C" Items. Items may be grouped into ABC classes on a Site-by-Site basis, using any percentages you want.
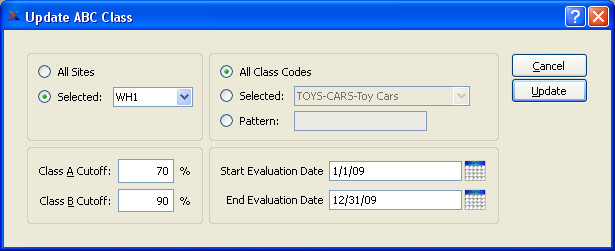
For example, let\qs say you want to do a 70-20-10 split—where A = 70% of the value for a period, B = 20%, and C = 10%. In this scenario, you would open the "Update ABC Class" screen shown below and enter the following values:
- Class A Cutoff
70
- Class B Cutoff
90
The remaining Items having the lowest percentage of the value (10%) would be assigned to the Class "C." By contrast, if you wanted to do a 50-30-20 split, you would enter the following values:
- Class A Cutoff
50
- Class B Cutoff
80
The remaining Items having the lowest percentage of the value (20%) would be assigned to the Class "C."
To update the ABC classification for Item Sites within a given Site and Class Code, select the "ABC Class" option. The following screen will appear:
Note
Updating ABC Class values across multiple Sites simultaneously can lead to inaccuracies in your data—especially if ABC values are calculated differently in different Sites. For this reason, it may make more sense to update ABC Classes on a Site-by-Site basis.
When calculating the ABC class of Item Sites within a given Site and Class Code, you are presented with the following options:
- All Sites
Select to update ABC Classes in all Sites.
- Selected
Specify Site where ABC Classes are to be updated.
- All Class Codes
Select to update ABC Classes for all Class Codes.
- Selected
Specify Class Code whose ABC Class you want to update.
- Pattern
Enter a Class Code pattern to select a range of Class Codes. Refine your search using Regular Expressions.
- Class A Cutoff %
Allows you to set the cutoff percentage for Class A Items.
- Class B Cutoff %
Allows you to set the cutoff percentage for Class B Items.
- Evaluation Start Date
Date entered determines the day from which the value will be calculated.
- Evaluation End Date
Date entered determines the day at which the value will stop being calculated.
To the far right of the screen, the following buttons are available:
- CANCEL
Closes the screen without updating Order Number, returning you to the application desktop.
- UPDATE
Updates the Order Number, using the specified parameters.
To update the frequency of scheduled Cycle Counts, select the "Cycle Count Frequency" option. The following screen will appear:
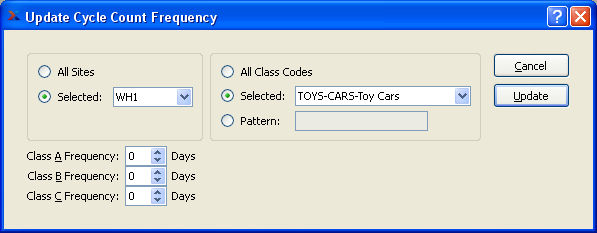
When updating Cycle Count frequency, you are presented with the following options:
- All Sites
Select to update Cycle Count frequency for all Sites.
- Selected
Specify Site where Cycle Count frequency is to be updated.
- Class A Frequency (Days)
Select a number using the arrow buttons, or manually enter a value up to a maximum of 999. Value entered specifies how frequently you want to perform Cycle Counts for the specified Class designation.
- Class B Frequency (Days)
Select a number using the arrow buttons, or manually enter a value up to a maximum of 999. Value entered specifies how frequently you want to perform Cycle Counts for the specified Class designation.
- Class C Frequency (Days)
Select a number using the arrow buttons, or manually enter a value up to a maximum of 999. Value entered specifies how frequently you want to perform Cycle Counts for the specified Class designation.
- All Class Codes
Select to update Cycle Count frequency for all Class Codes.
- Selected
Specify Class Code whose Cycle Count frequency you want to update.
- Pattern
Enter a Class Code pattern to select a range of Class Codes. Refine your search using Regular Expressions.
To the far right of the screen, the following buttons are available:
- CANCEL
Closes the screen without updating the Cycle Count frequency, returning you to the application desktop.
- UPDATE
Updates the Cycle Count frequency, using the specified parameters.
To update the Lead Times associated with Item Sites, select the "Item Site Lead Times" option. The following screen will appear:
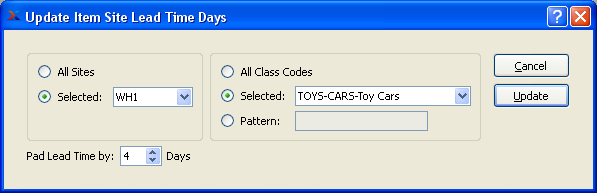
When updating Item Site Lead Times, you are presented with the following options:
- All Sites
Select to update Item Site Lead Times for all Sites.
- Selected
Specify Site where Item Site Lead Times are to be updated.
- All Class Codes
Select to update Item Site Lead Times for all Class Codes.
- Selected
Specify Class Code whose Item Site Lead Times you want to update.
- Pattern
Enter a Class Code pattern to select a range of Class Codes. Refine your search using Regular Expressions.
- Pad Lead Time by (Days)
Select a number using the arrow buttons, or manually enter a value up to a maximum of 99. Value entered specifies the number of days you want to pad Item Site Lead times by. The following formulas describe how Lead Times for different Item Types are handled:
Manufactured and Job Items: The utility first scans the Bill of Materials for the Item and finds the component Item having the longest lead time. It then scans the Bill of Operations for the Item and finds the Operation having the latest execution day. Finally it performs the following calculation:
Longest Component Item Lead Time + Execution Day + Pad Days = New Item Site Lead Time
Purchased Items (with Item Source): The utility scans any Item Sources and finds the longest Lead Time. Then if performs the following calculation:
Longest Item Source Lead Time + Pad Days = New Item Site Lead Time
All Others: The utility does the following calculation:
Pad Days = New Item Site Lead Time
To the far right of the screen, the following buttons are available:
- CANCEL
Closes the screen without updating Item Site Lead Times, returning you to the application desktop.
- UPDATE
Updates the Item Site Lead Times, using the specified parameters.
Update Reorder Levels section.
To update Reorder Levels by Item, select the "Reorder Level by Item" option. The following screen will appear:
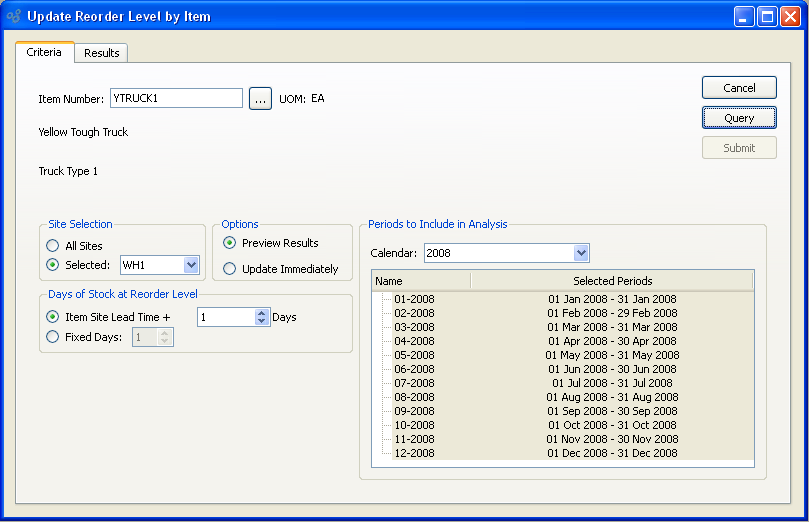
When updating Reorder Levels by Item, you are presented with the following options:
- Item Number
Enter the Item Number of the Item whose Reorder Level you want to update. The browse button located to the right of the field leads to a searchable list of make and buy items.
- Description
Inventory Item Description.
- UOM
Inventory Unit of Measure.
- Site Selection
Select what sites you want to query.
- All Sites
Select to update Reorder Levels by Item for all Sites.
- Selected
Specify Site where Reorder Levels by Item are to be updated.
- Options
Select whether you would prefer to review results of analysis before updating reorder levels or update immediately.
- Preview Results
Review Results of Analysis prior to updating reorder levels.
- Update Immediately
Update reorder levels without previewing Analysis first.
- Days of Stock at Reorder Level
Specify number of days using one of the following options:
- Item Site Lead Time +
Select a number using the arrow buttons, or manually enter a value up to a maximum of 99. Average daily usage calculated using selected Calendar periods will be multiplied by this value to determine Reorder Level.
- Fixed Days
Select a number using the arrow buttons, or manually enter a value up to a maximum of 999. Average daily usage calculated using selected Calendar periods will be multiplied by this value to determine Reorder Level.
- Periods to Include in Analysis
Specify the periods to include in the analysis using the following Calendar options:
- Calendar
Select the Calendar you want to use for the analysis.
- Name/Selected Periods
Select as many periods as you want to include in the analysis. Selected periods correspond to Calendar specified in the "Calendar" field. Select individual periods or groups of periods together. To select an individual period, highlight the period using your mouse button. The period is now selected. To select a sequence of periods, highlight the first in the sequence using your mouse button. Then, holding down the SHIFT key on your keyboard, highlight the last period in the sequence. The entire sequence is now selected. To select periods that are out of sequence (e.g., January, April, July, October), highlight the first period in the group. Then, holding down the CTRL key on your keyboard, highlight the next period you want to select. Continue highlighting periods with the CTRL key depressed until all desired periods are selected. The entire group is now selected.
To the far right of the screen, the following buttons are available:
- CANCEL
Closes the screen without updating Reorder Levels by Item, returning you to the application desktop.
- QUERY
Queries Reorder Levels by Item, using the specified parameters.
- SUBMIT
Select to submit requested action to the Batch Manager for processing.
To view Results of query, select the "Results" tab. The following screen will appear:
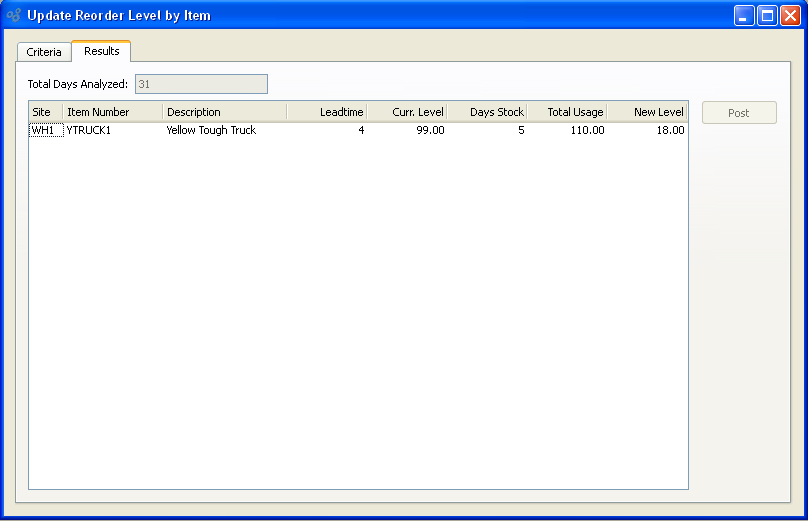
Upon selecting Results a list of Analysis results will appear on the screen.
- Total Days Analyzed
Shows how many days were analyzed in your Analysis
To the far right of the screen the following buttons are listed:
- POST
Posts new reorder levels for line items selected.
To update Reorder Levels by Planner Code, select the "Reorder Levels by Planner Code" option. The following screen will appear:
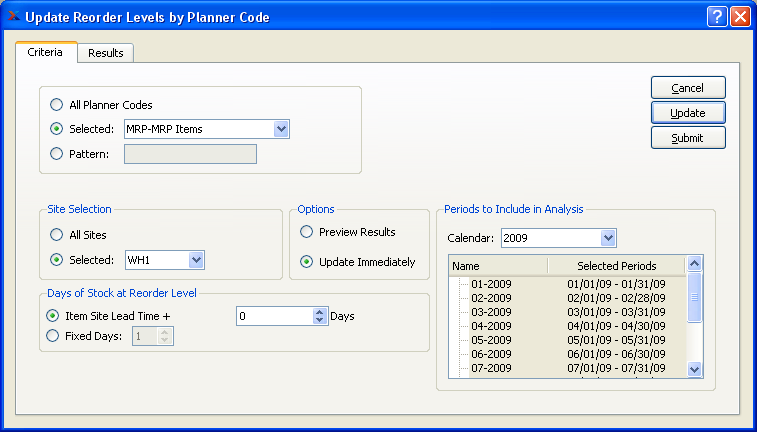
When updating Reorder Levels by Planner Code, you are presented with the following options:
- All Planner Codes
Select to update Reorder Levels for all Planner Codes.
- Selected
Specify Planner Code whose Reorder Levels you want to update.
- Pattern
Enter a Planner Code pattern to select a range of Planner Codes. Refine your search using Regular Expressions.
- Site Selection
Select what sites you want to query.
- All Sites
Select to update Reorder Levels by Planner Code for all Sites.
- Selected
Specify Site where Reorder Levels by Planner Code are to be updated.
- Options
Select whether you would prefer to review results of analysis before updating reorder levels or update immediately.
- Preview Results
Review results of analysis prior to updating reorder levels.
The SUBMIT button will be disabled in this mode.
- Update Immediately
Update reorder levels without previewing analysis first.
- Days of Stock at Reorder Level
Specify number of days using one of the following options:
- Item Site Lead Time +
Select a number using the arrow buttons, or manually enter a value up to a maximum of 99. Average daily usage calculated using selected Calendar periods will be multiplied by this value to determine Reorder Level.
- Fixed Days
Select a number using the arrow buttons, or manually enter a value up to a maximum of 999. Average daily usage calculated using selected Calendar periods will be multiplied by this value to determine Reorder Level.
- Periods to Include in Analysis
Specify the periods to include in the analysis using the following Calendar options:
- Calendar
Select the Calendar you want to use for the analysis.
- Name/Selected Periods
Select as many periods as you want to include in the analysis. Selected periods correspond to Calendar specified in the "Calendar" field. Select individual periods or groups of periods together. To select an individual period, highlight the period using your mouse button. The period is now selected. To select a sequence of periods, highlight the first in the sequence using your mouse button. Then, holding down the SHIFT key on your keyboard, highlight the last period in the sequence. The entire sequence is now selected. To select periods that are out of sequence (e.g., January, April, July, October), highlight the first period in the group. Then, holding down the CTRL key on your keyboard, highlight the next period you want to select. Continue highlighting periods with the CTRL key depressed until all desired periods are selected. The entire group is now selected.
To the far right of the screen, the following buttons are available:
- CANCEL
Closes the screen without updating Reorder Levels by Planner Code, returning you to the application desktop.
- QUERY
Queries Reorder Levels by Planner Code, using the specified parameters.
- SUBMIT
Select to submit requested action to the Batch Manager for processing. This button will be disabled if you are previewing results.
To view Results of query, select the "Results" tab. The following screen will appear:
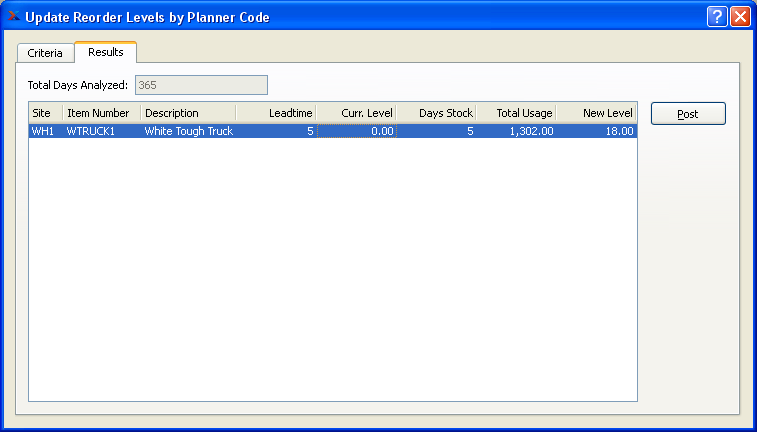
Upon selecting Results a list of Analysis results will appear on the screen.
- Total Days Analyzed
Shows how many days were analyzed in your Analysis
To the far right of the screen the following buttons are listed:
- POST
Posts new reorder levels for line items selected.
To update Reorder Levels by Class Code, select the "Reorder Levels by Class Code" option. The following screen will appear:

When updating Reorder Levels by Class Code, you are presented with the following options:
- All Class Codes
Select to update Reorder Levels for all Class Codes.
- Selected
Specify Class Code whose Reorder Levels you want to update.
- Pattern
Enter a Class Code pattern to select a range of Class Codes. Refine your search using Regular Expressions.
- Site Selection
Select what sites you want to query.
- All Sites
Select to update Reorder Levels by Class Code for all Sites.
- Selected
Specify Site where Reorder Levels by Class Code are to be updated.
- Options
Select whether you would prefer to review results of analysis before updating reorder levels or update immediately.
- Preview Results
Review Results of Analysis prior to updating reorder levels.
- Update Immediately
Update reorder levels without previewing Analysis first.
- Days of Stock at Reorder Level
Specify number of days using one of the following options:
- Item Site Lead Time +
Select a number using the arrow buttons, or manually enter a value up to a maximum of 99. Average daily usage calculated using selected Calendar periods will be multiplied by this value to determine Reorder Level.
- Fixed Days
Select a number using the arrow buttons, or manually enter a value up to a maximum of 999. Average daily usage calculated using selected Calendar periods will be multiplied by this value to determine Reorder Level.
- Periods to Include in Analysis
Specify the periods to include in the analysis using the following Calendar options:
- Calendar
Select the Calendar you want to use for the analysis.
- Name/Selected Periods
Select as many periods as you want to include in the analysis. Selected periods correspond to Calendar specified in the "Calendar" field. Select individual periods or groups of periods together. To select an individual period, highlight the period using your mouse button. The period is now selected. To select a sequence of periods, highlight the first in the sequence using your mouse button. Then, holding down the SHIFT key on your keyboard, highlight the last period in the sequence. The entire sequence is now selected. To select periods that are out of sequence (e.g., January, April, July, October), highlight the first period in the group. Then, holding down the CTRL key on your keyboard, highlight the next period you want to select. Continue highlighting periods with the CTRL key depressed until all desired periods are selected. The entire group is now selected.
To the far right of the screen, the following buttons are available:
- CANCEL
Closes the screen without updating Reorder Levels by Class Code, returning you to the application desktop.
- QUERY
Queries Reorder Levels by Class Code, using the specified parameters.
- SUBMIT
Select to submit requested action to the Batch Manager for processing.
To view Results of query, select the "Results" tab. The following screen will appear:
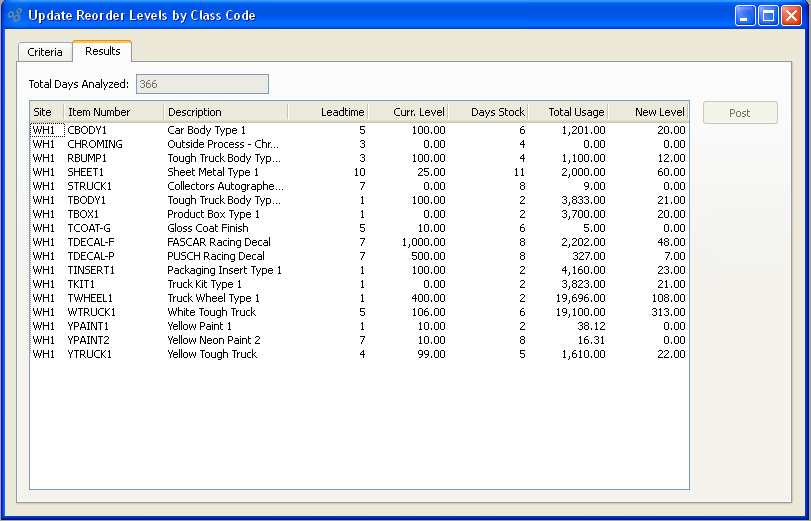
Upon selecting Results a list of Analysis results will appear on the screen.
- Total Days Analyzed
Shows how many days were analyzed in your Analysis
To the far right of the screen the following buttons are listed:
- POST
Posts new reorder levels for line items selected.
Update Order Up To Levels section.
To update Order Up To Levels by Item, select the "Order Up To Level by Item" option. The following screen will appear:
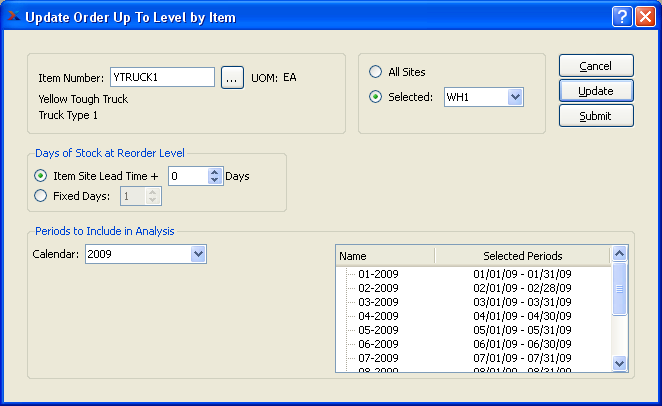
When updating Order Up To Levels by Item, you are presented with the following options:
- Item Number
Enter the Item Number of the Item whose Order Up To Level you want to update.
- UOM
Inventory Unit of Measure.
- All Sites
Select to update Order Up To Levels by Item for all Sites.
- Selected
Specify Site where Order Up To Levels by Item are to be updated.
- Days of Stock at Reorder Level
Specify number of days using one of the following options:
- Item Site Lead Time +
Select a number using the arrow buttons, or manually enter a value up to a maximum of 99. Average daily usage calculated using selected Calendar periods will be multiplied by this value to determine Reorder Level.
- Fixed Days
Select a number using the arrow buttons, or manually enter a value up to a maximum of 999. Average daily usage calculated using selected Calendar periods will be multiplied by this value to determine Reorder Level.
- Periods to Include in Analysis
Specify the periods to include in the analysis using the following Calendar options:
- Calendar
Select the Calendar you want to use for the analysis.
- Name/Selected Periods
Select as many periods as you want to include in the analysis. Selected periods correspond to Calendar specified in the "Calendar" field. Select individual periods or groups of periods together. To select an individual period, highlight the period using your mouse button. The period is now selected. To select a sequence of periods, highlight the first in the sequence using your mouse button. Then, holding down the SHIFT key on your keyboard, highlight the last period in the sequence. The entire sequence is now selected. To select periods that are out of sequence (e.g., January, April, July, October), highlight the first period in the group. Then, holding down the CTRL key on your keyboard, highlight the next period you want to select. Continue highlighting periods with the CTRL key depressed until all desired periods are selected. The entire group is now selected.
To the far right of the screen, the following buttons are available:
- CANCEL
Closes the screen without updating Reorder Levels, returning you to the application desktop.
- UPDATE
Updates Reorder Levels, using the specified parameters.
- SUBMIT
Select to submit requested action to the Batch Manager for processing.
To update Order Up To Levels by Planner Code, select the "Order Up To Levels Planner Code" option. The following screen will appear:
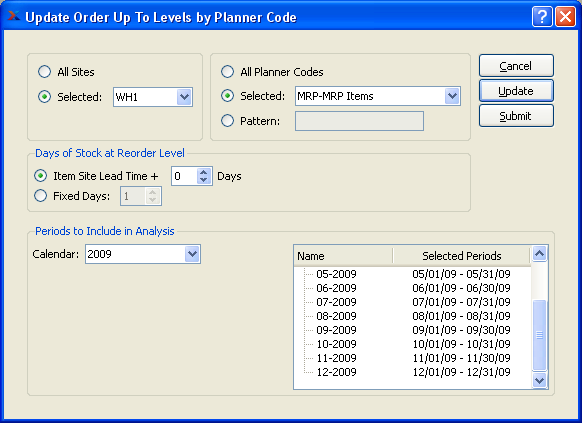
When updating Order Up To Levels by Planner Code, you are presented with the following options:
- All Sites
Select to update Order Up To Levels by Planner Code for all Sites.
- Selected
Specify Site where Order Up To Levels by Planner Code are to be updated.
- All Planner Codes
Select to update Order Up To Levels for all Planner Codes.
- Selected
Specify Planner Code whose Order Up To Levels you want to update.
- Pattern
Enter a Planner Code pattern to select a range of Planner Codes. Refine your search using Regular Expressions.
- Days of Stock at Reorder Level
Specify number of days using one of the following options:
- Item Site Lead Time +
Select a number using the arrow buttons, or manually enter a value up to a maximum of 99. Average daily usage calculated using selected Calendar periods will be multiplied by this value to determine Reorder Level.
- Fixed Days
Select a number using the arrow buttons, or manually enter a value up to a maximum of 999. Average daily usage calculated using selected Calendar periods will be multiplied by this value to determine Reorder Level.
- Periods to Include in Analysis
Specify the periods to include in the analysis using the following Calendar options:
- Calendar
Select the Calendar you want to use for the analysis.
- Name/Selected Periods
Select as many periods as you want to include in the analysis. Selected periods correspond to Calendar specified in the "Calendar" field. Select individual periods or groups of periods together. To select an individual period, highlight the period using your mouse button. The period is now selected. To select a sequence of periods, highlight the first in the sequence using your mouse button. Then, holding down the SHIFT key on your keyboard, highlight the last period in the sequence. The entire sequence is now selected. To select periods that are out of sequence (e.g., January, April, July, October), highlight the first period in the group. Then, holding down the CTRL key on your keyboard, highlight the next period you want to select. Continue highlighting periods with the CTRL key depressed until all desired periods are selected. The entire group is now selected.
To the far right of the screen, the following buttons are available:
- CANCEL
Closes the screen without updating Reorder Levels by Planner Code, returning you to the application desktop.
- UPDATE
Updates Reorder Levels by Planner Code, using the specified parameters.
- SUBMIT
Select to submit requested action to the Batch Manager for processing.
To update Order Up To Levels by Class Code, select the "Order Up To Levels by Class Code" option. The following screen will appear:
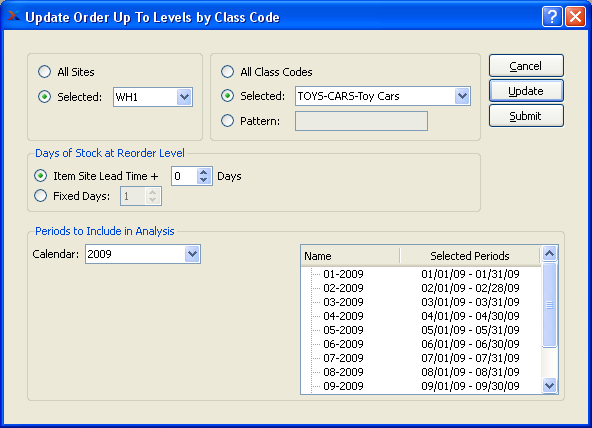
When updating Order Up To Levels by Class Code, you are presented with the following options:
- All Sites
Select to update Order Up To Levels by Class Code for all Sites.
- Selected
Specify Site where Order Up To Levels by Class Code are to be updated.
- All Class Codes
Select to update Order Up To Levels for all Class Codes.
- Selected
Specify Class Code whose Order Up To Levels you want to update.
- Pattern
Enter a Class Code pattern to select a range of Class Codes. Refine your search using Regular Expressions.
- Days of Stock at Reorder Level
Specify number of days using one of the following options:
- Item Site Lead Time +
Select a number using the arrow buttons, or manually enter a value up to a maximum of 99. Average daily usage calculated using selected Calendar periods will be multiplied by this value to determine Reorder Level.
- Fixed Days
Select a number using the arrow buttons, or manually enter a value up to a maximum of 999. Average daily usage calculated using selected Calendar periods will be multiplied by this value to determine Reorder Level.
- Periods to Include in Analysis
Specify the periods to include in the analysis using the following Calendar options:
- Calendar
Select the Calendar you want to use for the analysis.
- Name/Selected Periods
Select as many periods as you want to include in the analysis. Selected periods correspond to Calendar specified in the "Calendar" field. Select individual periods or groups of periods together. To select an individual period, highlight the period using your mouse button. The period is now selected. To select a sequence of periods, highlight the first in the sequence using your mouse button. Then, holding down the SHIFT key on your keyboard, highlight the last period in the sequence. The entire sequence is now selected. To select periods that are out of sequence (e.g., January, April, July, October), highlight the first period in the group. Then, holding down the CTRL key on your keyboard, highlight the next period you want to select. Continue highlighting periods with the CTRL key depressed until all desired periods are selected. The entire group is now selected.
To the far right of the screen, the following buttons are available:
- CANCEL
Closes the screen without updating Reorder Levels by Class Code, returning you to the application desktop.
- UPDATE
Updates Reorder Levels by Class Code, using the specified parameters.
- SUBMIT
Select to submit requested action to the Batch Manager for processing.
Transaction history is detailed by default. For example, when viewing transaction history in the Inventory History displays and reports, you see levels of detail describing each transaction. The Summarize Transaction History utility deletes detailed transaction records—using parameters you specify—and replaces them with summarized records. Summarizing records is one way to conserve disk storage space. To summarize transaction history by Class Code, select the "Summarize Transaction History by Class Code" option. The following screen will appear:
When summarizing transaction history by Class Code, you are presented with the following options:
- All Sites
Select to summarize Inventory transactions by Class Code for all Sites.
- Selected
Specify Site whose Inventory transactions by Class Code you want to summarize.
- All Class Codes
Select to summarize Inventory transactions for all Class Codes.
- Selected
Specify Class Code whose Inventory transactions you want to summarize.
- Pattern
Enter a Class Code pattern to select a range of Class Codes Refine your search using Regular Expressions.
- Start Date
Transactions entered on and after this date will be displayed.
- End Date
Transactions entered on and before this date will be displayed.
To the far right of the screen, the following buttons are available:
- CANCEL
Closes the screen without summarizing Inventory transactions by Class Code, returning you to the application desktop.
- SUMMARIZE
Summarizes Inventory transactions by Class Code based on entries specified in the screen.
When setting up a new Site, you have the ability to create batches of Item Sites—rather than having to create them one-at-a-time. To create Item Sites by Class Code, select the "Create Item Sites by Class Code" option. The following screen will appear:
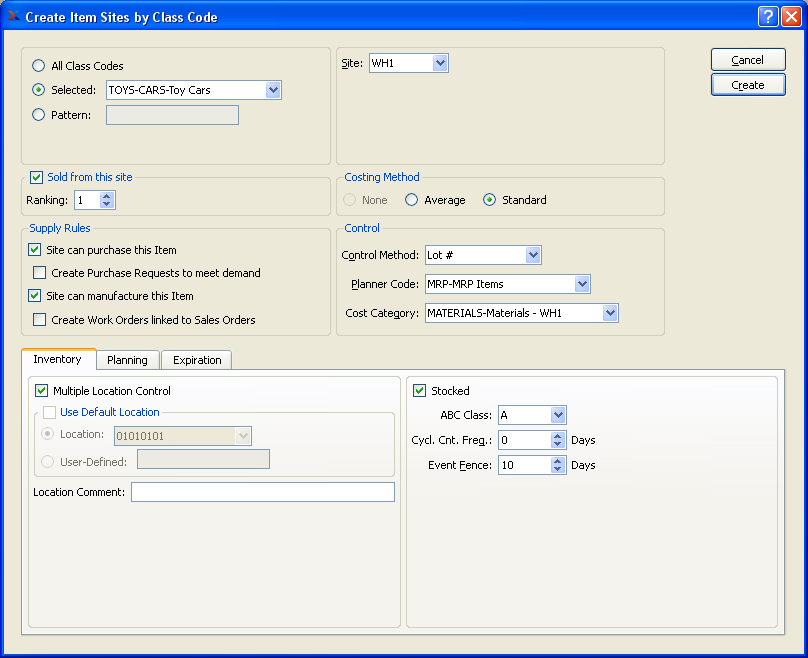
Tip
The Create Item Sites by Class Code utility can be especially useful when setting up a new Site or new product line where multiple Item Sites need to be created at once to save time.
When creating Item Sites by Class Code, you are presented with the following options:
- All Class Codes
Select to create Item Sites for all Class Codes.
- Selected
Specify Class Code you want to create Item Sites for.
- Pattern
Enter a Class Code pattern to select a range of Class Codes to create Item Sites for. Refine your search using Regular Expressions.
- Site
Specify Site where the Item Site is located.
- Active
Select to indicate the Item Site is active. Not selecting means the Item Site will be considered inactive. If inactive, the Item Site will not appear on lists of active Item Sites. To re-activate an Item Site, simply select this option.
- Sold from this Site
Select if Item is sold from specified Site. If selected, "Sold from" means that Sales Orders Line Items may request to Ship from the Site. When adding Sales Order Line Items to a Sales Order, a "Sold from" Site appears as the "Supplying Site."
- Ranking
Select a number using the arrow buttons, or manually enter a value up to a maximum of 10. Value entered specifies the order in which Item Sites will be chosen during Sales Order and Sales Quote creation. If an Item is located in more than one "Sold from" Site, the Item Site with the highest ranking will be chosen first. If two Item Sites happen to share the same ranking, selection will be based on alphabetical order. The highest ranking an Item Site can have is one (1).
- Supply Rules
Select from the following supply rules for the Item Site:
- Site can purchase this Item
Select if the Item can be purchased and received into the specified Site. Planned Purchase Orders from the Material Requirements Planning (MRP) system can only be created Item Sited having this option selected.
- Create Purchase Requests to meet demand
Select to create Purchase Requests whenever Sales Orders or Work Orders demand quantities from the Item Site. This option pertains to purchased and outside-process Items. If you select this option, you are indicating that you want Purchase Requests to be generated for the Item in question whenever quantities are demanded by either Sales Orders or Work Orders. For Sales Orders, the "Create Purchase Request" flag on the Sales Order Item screen will automatically be selected. For Work Orders using a purchased or outside process Item, Purchase Requests will be generated automatically.
Note
Purchase Requests created, as specified above, to meet Sales Order and Work Order demands will be created regardless of an Item's Availability—and also regardless of whether Material Requirements Planning (MRP) is being run in parallel.
- Site can manufacture this Item
Select if the Item can be manufactured at the specified Site. Planned Work Orders from the Material Requirements Planning (MRP) system can only be created for Item Sites having this option selected.
- Create Work Orders linked to Sales Orders
Select to create Work Orders whenever Sales Orders demand quantities from the Item Site. This option pertains to manufactured Items. If you select this option, you are indicating that you want Work Orders to be generated for the Item in question whenever quantities are demanded by a Sales Order. Selecting this option will cause the "Create Work Order" flag to be checked whenever you enter Sales Order Line Items for the Item Site.
Note
Work Orders created, as specified above, to meet Sales Order demand will be created regardless of an Item's Availability—and also regardless of whether Material Requirements Planning (MRP) is being run in parallel.
- Costing Method
Specify the Item Site Costing Method by selecting one of the available options:
- None
This Cost Method is automatically selected for the Item Site if the Control Method is "None" or the Item Type is "Reference".
- Average
Cost distributions are based on an average of all costs accumulated for the Item Site. The Quantity on Hand of Item Sites defined with this Cost Method will not be allowed to go negative.
- Standard
Cost distributions are based on the Standard Cost posted for the Item.
- Job
Cost distributions are based on actual accumulation of costs on a Work Order. This Cost Method is used exclusively by Items with Type of "Job".
- Control
The following control options are required for every Item Site:
- Control Method
Select a control method for the Item Site from the available options:
- None
Select if you don"t care to see Inventory history transactions for the Item Site.
- Regular
Select to monitor Inventory history transactions for the Item Site using a Regular method. Regular means without Lot Number or Serial Number control.
- Lot #
Select to impose Lot Number control methods on the Item Site. Item Sites using Lot Number control are subject to unique processing requirements whenever Inventory is received or distributed.
- Serial #
Select to impose Serial Number control methods on the Item Site. Item Sites using Serial Number control are subject to unique processing requirements whenever Inventory is received or distributed.
- Planner Code
Specify the Planner Code you want to assign the Item Site to. Assigning a Planner Code to an Item Site makes it possible to group Item Sites by Planner Code for the purposes of Planning.
- Cost Category
Specify the Cost Category you want to associate with the Item Site. This requirement helps ensure that all Inventory transactions involving an Item Site will be properly tracked and recorded in the General Ledger.
- Multiple Location Control
Select if the specified Item is to be stored in multiple Locations within a single Site. Items designated as Multiple Location Control (MLC) Items require special processing whenever Item quantities are distributed.
Tip
Exercise caution when adjusting the Multiple Location Control (MLC) setting for an Item Site. If you turn off MLC for an Item Site which was previously MLC, you will lose detailed Inventory records for that Item Site. All quantity will be merged into one Quantity on Hand value for the Item Site.
- Use Default Location
Default Location: Select to designate one Location within a Site as the default Location for the specified Item. This option may be used for single Location and Multiple Location Control (MLC) Items alike. You may find that Inventory distributions for MLC Items are greatly simplified if you designate a default Location.
- Location
Specify the Site Location to be used as the default Location.
- User-Defined
This is a free-form field for describing storage areas with a Site not specifically designated as Site Locations. A user-defined location is non-transactional, but may be used for reporting purposes.
- Location Comment
Enter any free-form Comment related to the Site Location. This is additional information which may be placed on a Pick List or a Pack List.
- Disallow Blank WIP Locations
Select to require the use of work-in-process (WIP) Locations when posting Work Order Operations for Multiple Location Control (MLC) finished goods. WIP Locations are an optional feature which may be defined on the Bill of Operations (BOO) for manufactured MLC Items. The feature enables you to track finished goods Inventory as it moves through the manufacturing process. If your site does not combine Multiple Location Control with Operations posting, then this option should be left unchecked.
- Stocked
Select if the Item is stocked at the specified Site. This setting is used to drive the constraint management system. As a result, to avoid inaccurate results when running that system, an Item Site must also have a Reorder Level defined to use this option.
- ABC Class
Specify the ABC classification for the specified Item.
- Cycl. Cnt. Freq.
Cnt. Freq.: Select a number using the arrow buttons, or manually enter a value up to a maximum of 999. A Cycle Count is a periodic issue of a Count Tag to count Inventory quantity within an Item Site. The Cycle Count frequency defines the length of that period, measured in days.
Tip
To monitor the frequency of Item Site Cycle Counts, view the "Last Counted" column in any of the Item Site Reports: by Item, by Class Code, etc. The Last Counted date represents the date a Count Tag was last posted (not simply issued) for the Item Site.
- Event Fence
Select a number using the arrow buttons, or manually enter a value up to a maximum of 99. Specify the period of time, measured in days, within which relevant Event notifications should be issued. If an Event affecting the Item Site occurs within the Event Fence, then the system will issue a notification. Consider the case of a manufactured Item whose Event Fence is set to five (5) days. Assume that a Work Order exists for this Item and that the scheduled start date for that Work Order is three (3) days from the current date. If someone were to change the quantity of that Work Order, the Event "WoQtyChanged" would be triggered. And because the Work Order start date falls within the Event Fence for the Item Site, an Event notification would be issued.
To the far right of the screen, the following buttons are available:
- CANCEL
Closes the screen without creating an Item Site, returning you to the application desktop.
- SAVE
Creates the Item Site and adds it to the master list of Item Sites.
To set the Item Site planning parameters, select the "Planning" tab. The following screen will appear:
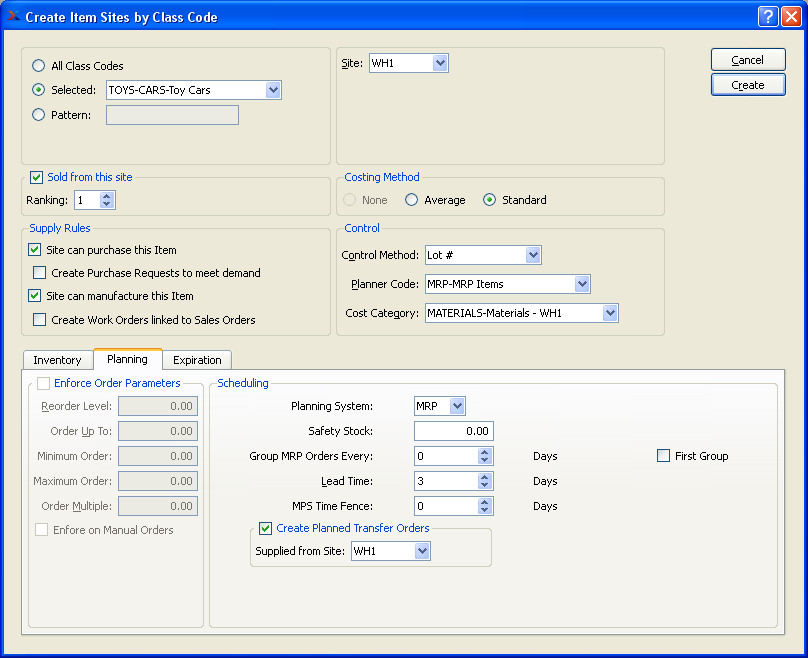
When setting the Item Site planning parameters, you are presented with the following options:
- Enforce Order Parameters
Select to enforce Order Parameters. If this option is selected, then Material Requirements Planning (MRP) will follow the Order Parameters defined below when generating Planned Replenishment Orders. Parameters you define will be saved if this option is turned ON/OFF. If you want to enforce Order Parameters on manual Orders as well, select the "on Manual Orders" option.
Note
Running Material Requirements Planning (MRP) on your system consists entirely of running the Create Planned Replenishment Orders screens—either by Item or by Planner Code. As MRP runs, the Planned Replenishment Orders are generated automatically.
- Reorder Level
The Reorder Level specifies when a Planned Replenishment Order should be created for an Item Site. If Planned Availability minus Safety Stock falls below the Reorder Level, then a Replenishment Order will be created when Material Requirements Planning (MRP) is run. The Replenishment Order quantity will be equal to the quantity required to return Planned Availability to either the Reorder Level or the Order Up To quantity—whichever is greater.
Note
Planned Availability differs from Quantity on Hand (QOH). The difference is that Planned Availability considers both QOH and also the time-phased demands placed on Inventory by Sales Orders and Work Orders. MRP uses Planned Availability when calculating which Item Sites require Planned Replenishment Orders.
- Order Up To
The Order Up To (OUT) Level indicates the level of Planned Availability an Item Site should be replenished up to when Material Requirements Planning (MRP) is run. In cases where the Reorder Level for an Item Site exceeds the Order Up To Level, MRP will replenish the Item Site up to the Reorder Level.
Tip
Setting the Order Up To Level to "0" removes any restrictions on maximum Order quantities. Removing quantity restrictions can be an effective strategy to help ensure that all Order demands are satisfied when MRP is run. Order demands may not be met if Order Up To Levels are set below the demand threshold.
- Minimum Order
Value entered indicates the minimum quantity that may be entered for a Planned Replenishment Order when MRP is run. If the "on Manual Orders" option is selected above, manually-created Work Orders will recognize the Minimum Order value.
- Maximum Order
This is a special setting which regulates the maximum quantity for Planned Replenishment Orders when MRP is run. The setting does not apply to manual Orders, but to Planned Orders only. When a maximum Order quantity is specified, MRP will ignore Order multiples and minimum Order specifications—focusing instead solely on the maximum Order setting. For example, if the maximum Order quantity is set to 10 and there is demand for 17, then Planned Orders of 10 and 7 would be generated when MRP is run.
Tip
Setting the maximum order quantity too low has been shown to slow performance when MRP is run. Unless you have special needs (i.e., crate packaging limits) which require you to set a low maximum order quantity, you should consider setting the maximum order value to "0".
- Order Multiple
Value entered indicates the quantity multiple that should be used for Planned Replenishment Orders when MRP is run. If the "on Manual Orders" option is selected above, manually-created Work Orders will recognize the Order Multiple value.
- Enforce on Manual Orders
Select to enforce Order Parameters on manually-created Work Orders. If this option is selected, Order Parameters will also be enforced whenever Work Orders are manually created. This option applies only to the following two parameters: Minimum Order and Order Multiple. The other Order Parameters listed below do not apply to manually-created Work Orders. For manual Purchase Orders, the Minimum Order and Order Multiple parameters are determined on a Vendor-by-Vendor basis, using Item Source masters.
- Scheduling
Select from the available scheduling options and parameters:
- Planning System
Specify which of the following planning systems you want the Item Site to be considered by. Keep in mind that the choice of planning system is exclusive. That is, MPS will not create Planned Orders for MRP Items when it is run. Likewise, the MRP system will not create Planned Orders for MPS Items when it is run.
- MRP
Select if you want the Material Requirements Planning (MRP) system to create Planned Orders for the Item when MRP is run.
- MPS
Select if you want the Master Production Scheduling (MPS) system to create Planned Orders for the Item when MPS is run.
- None
Select if you want MRP and MPS to ignore the Item.
- Safety Stock
Specify the quantity of Stock for the Item you want to keep in Inventory to protect against unplanned, unforeseeable trends in your Order forecasts. When Material Requirements Planning (MRP) is run, the system considers the Safety Stock value when determining whether to create Planned Replenishment Orders. If Planned Availability minus Safety Stock is below the Reorder Level, then Planned Orders will be created. If not below the Reorder Level, then no Planned Orders will be created. The system's calculation effectively creates a buffer Inventory (if needed) to handle unexpected fluctuations in demand. If you do not want to use the Safety Stock functionality, set the Safety Stock value to "0".
- Group MPS/MRP Orders Every
Specify the length of a period—measured in days—within which MPS or MRP Planned Orders will be grouped together (i.e, consolidated) to meet scheduled demand for the period. This functionality serves to limit the total number of Planned Orders, thereby simplifying order processing. For example, to consolidate demand for an Item Site into 30-day buckets, set the value to "30." When MRP is run, the system will automatically consolidate all demand falling within the 30-day horizon into a single Planned Purchase Order or Planned Work Order. The grouping of Planned Orders moves forward in time, meaning the system will create as many buckets as will fit within the cutoff date specified when MRP is run.
The initial grouping of Planned Orders is handled differently than subsequent buckets. The following formula specifies how the date range for the initial period is determined:
Start Date = Today's Date
End Date = Today's Date + Lead Time
All subsequent periods are determined using the following calculations:
Start Date = End Date of Previous Period + 1
End Date = Start Date of Current Period + Group Value
Tip
To enforce Just-In-Time (JIT) delivery methods, set the MRP group value to "0." This will ensure that Planned Order due dates are the same as the demand due dates to which they correspond. If the MRP Order grouping value is set to "0", the initial period will be determined in the same way as for all Planned Order groups:
Start Date = Today's Date
End Date = Today's Date + Lead Time
However, the date range for all subsequent JIT Planned Orders will be based on the following calculations:
Start Date = Demand Due Date - Lead Time
End Date = Demand Due Date
- Lead Time
Select a number using the arrow buttons, or manually enter a value up to a maximum of 999. Specifies the Lead Time for the specified Item, measured in days. If the Item is a manufactured Item, then the Lead Time refers to the production Lead Time. If the Item is a purchased Item, then the Lead Time refers to the planning Lead Time. The procurement Lead Time for purchased Items is determined on a Vendor-by-Vendor basis, using Item Source masters. Material Requirements Planning (MRP) will consider Lead Times when calculating Planned Order start dates when MRP is run.
- First Group
Select to enable MRP to process those orders with lead times on the first grouping.
- MPS Time Fence
Specify the length of the Demand Time Fence by using the arrow buttons or manually entering a value up to a maximum of 999. The Demand Time Fence (also known as the demand fence) is used by the Master Production Scheduling (MPS) system to evaluate when forecasted demand (i.e., from Production Plans) should be used in place of actual demand (i.e., from Sales Orders)—and vice versa. Measured in days, the Demand Time Fence is the period of time extending from the current day to the number of days into the future as specified in this field. The Demand Time Fence option applies only to those Items which currently appear on a released Production Plan. If demand for these Items falls within the Demand Time Fence period, then the Forecast will be ignored. If demand falls outside the Demand Time Fence, then the larger of actual or forecasted demand will be used. MPS responds to the demand it locates by creating firm Planned Orders for the required quantities.
- Create Planned Transfer Orders
Select if you want the Item Site to have Planned Transfer Orders created for it when the Material Requirements Planning (MRP) system is run. If selected, MRP will only create Planned Transfer Orders for the Item Site. Planned Purchase Orders or Planned Work Orders will not be created.
- Supplied from Site
Specify which Site you want Planned Transfer Orders to be supplied from when MRP is run. The Site you select must have a corresponding Item Site for the specified Item.
If the Item Site is Lot or Serial controlled, you will have access to several product expiration options. The "Expiration" tab will be disabled for non-Lot/Serial Item Sites. To view or modify expiration settings for the Item Site, select the "Expiration" tab. The following screen will appear:
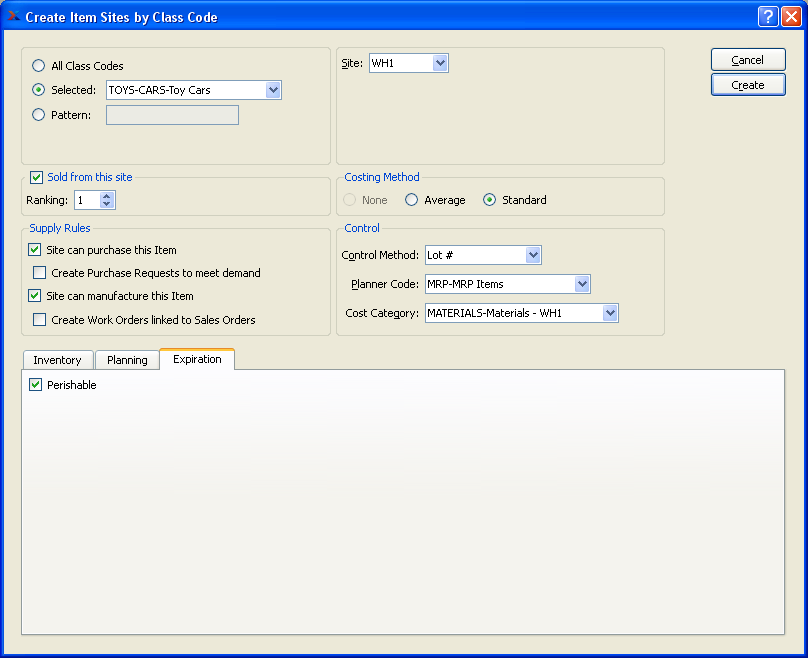
When viewing or modifying expiration settings for the Item Site, you are presented with the following options:
- Perishable
Select if the Item is Perishable. Materials received into a Perishable Item Site are required to have an expiration date, thereby increasing your ability to monitor the status of the goods.
To purge Shipping Records, select the "Purge Shipping Records" option. The following screen will appear:
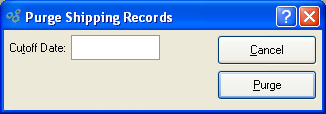
When purging Shipping Records, you are presented with the following options:
- Cutoff Date
Shipping Records created on or before this date will be purged.
To the far right of the screen, the following buttons are available:
- CANCEL
Closes the screen without purging the Shipping Records, returning you to the application desktop.
- PURGE
Purges Shipping Records on and before the specified cutoff date.
The Maintain External Shipping Records screen is a kind of workbench where you can manage shipping information exported to UPS WorldShip and similar packages. To maintain external shipping records, select the "Maintain External Shipping Records" option. The following screen will appear:
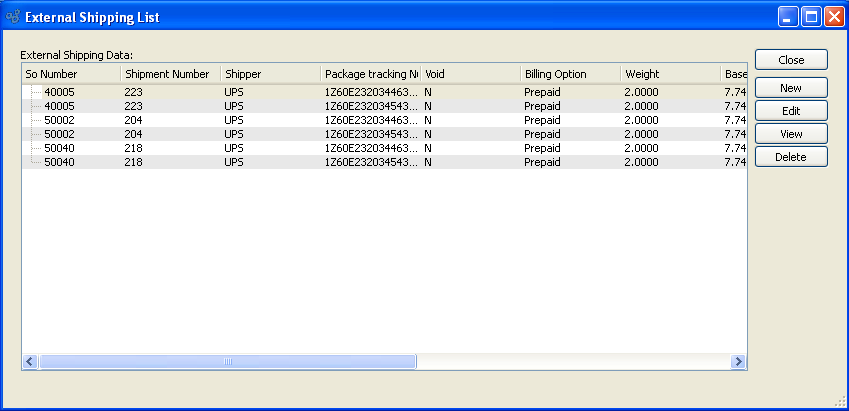
The Maintain External Shipping Records screens lists all the shipping records exported from xTuple ERP to UPS WorldShip and similar packages.
To the far right of the screen, the following buttons are available:
- CLOSE
Closes the screen without creating external shipping data.
- NEW
Opens screen for entering new shipping data.
- EDIT
Enables you to edit shipping data. The edit screen is the same as that for creating a new shipping data—except that when editing, the fields will contain existing shipping information. Double-clicking on a shipping record will also bring you to the editing screen.
- VIEW
Highlight a shipping record and then select this button to reach a read-only view of the "Edit" screen.
- DELETE
Highlight a shipping record and then select this button to remove the record from the list.
To create or maintain shipping data exported to external shipping packages like UPS WorldShip, select the NEW button. The following screen will appear:
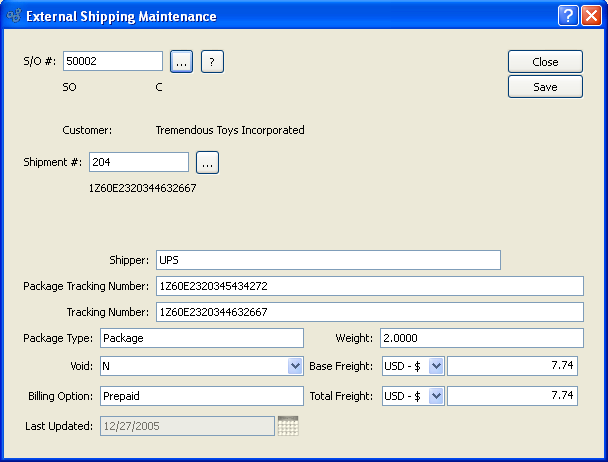
When entering new shipping data you are presented with the following options:
- S/O #
Enter the Order Number of the Sales Order you want to maintain. The browse button located to the right of the field leads to a searchable list of Sales Orders available for maintenance.
Note
The text below the S/O field represents the order type (i.e., "SO") and Status (i.e., "C"). Below this text us the customer name (i.e., "Tremendous Toys Incorporated")
- Shipment #
Enter the Shipment Number of the internal shipment order created to ship Sales Order. The browse button located to the right of the field leads to a searchable list of Shipment numbers.
Note
The text below shipment number identifies the tracking number entered on the shipment order
- Shipper
Select the external third party shipper shipping this order (i.e., UPS, FedEx, etc.).
- Package Tracking Number
Enter the Package Tracking Number that represents the external shippers tracking number for the individual package, which could be comprised of one of many or one of one.
- Tracking Number
Specify the Tracking Number that represents external shipper's tracking number for the entire order, which can be a group of packages.
- Package Type
Select the package type identified on the
- Void
Select the List option if the shipment has been voided.
- Billing Option
Enter the Billing Option which identifies how the shipment was billed by the external shipper (i.e., Prepaid, COD, etc.).
- Weight
Specify weight of shipment reported to external shipper.
- Base Freight
Enter the amount of the base freight charge to be charged to the specified Order. Freight charges may be entered during the creation or modification of an Order—or at the time of shipment.
- Total Freight
Enter the amount of the total freight charge to be charged to the complete order including taxes and surcharges.
- Last Updated
Review automatic timestamp which identifies last modification to record.