Sales Forms section.
To print a Sales Order Form, select the "Print Sales Order Form" option. The following screen will appear:
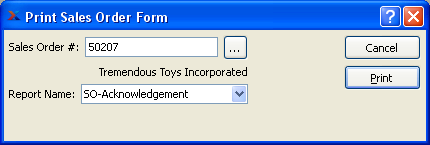
When printing a Sales Order Form, you are presented with the following options:
- Sales Order #
Enter the Sales Order Number of the Sales Order whose Form you want to print.
- Report Name
Specify the Form you want to use for printing the Sales Order. For Sales Order acknowledgements, create a Form keyed on Sales Orders and use either of the following reports: CustOrderAcknowledgement.xml or SalesOrderAcknowledgement.xml
To the far right of the screen, the following buttons are available:
- CANCEL
Closes the screen without generating a report, returning you to the application desktop.
Runs the report associated with this screen.
If the Customer specified on a Sales Order has an EDI Profile attached, you may encounter an EDI processing interface when printing it.
To print a Return Authorization, select the "Print Return Authorization Form" option. The following screen will appear:
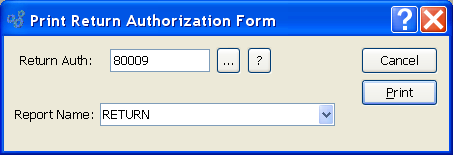
When printing or reprinting a Return Authorization, you are presented with the following options:
- Return Auth.
Specify the Return Authorization you want to print.
- Report Name
Select the report definition you want to use for the form.
To the far right of the screen, the following buttons are available:
- CANCEL
Closes the screen without printing a Return Authorization, returning you to the application desktop.
Runs the report associated with this screen.
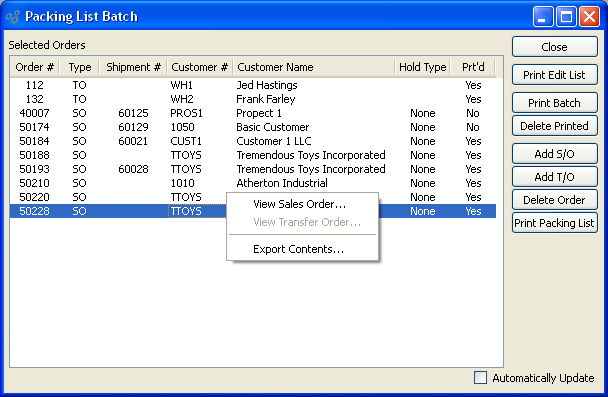
If you want to print Packing Lists or Sales Order Pick Lists in batch mode—or to gain greater visibility over your Packing and Pick Lists—select the "Packing List Batch" option. The following screen will appear:
Note
A Sales Order "Pick List" will be printed if the Sales Order does not yet have a Shipment Number associated with it—that is, if no Line Item quantity has been issued to shipping. If stock has been issued to Shipping, then the "Packing List" report definition will be used. The Pick List and Packing List Form assignments are made on the Customer Form Assignments screen.
Tip
The system includes two alternate Sales Order Pick List report definitions:
"PickingListSOClosedLines.xml"
"PickingListNoClosedLines.xml"
The first includes already closed Sales Order Line Items in the report; the other excludes closed Line Items.
When printing Packing Lists in batch mode, you are presented with the following options:
- Selected Orders
Display lists selected Orders (i.e., Sales Orders and Transfer Orders).
To the far right of the screen, the following buttons are available:
- CLOSE
Closes the screen, returning you to the application desktop.
- PRINT EDIT LIST
Select to print a copy of the contents displayed on the screen, using the specified parameters.
- PRINT BATCH
Select to print packing lists for all Orders in batch list. A Sales Order Pick List will be printed if the Sales Order does not yet have a Shipment Number associated with it—that is, if no Line Item quantity has been issued to shipping. If stock has been issued to Shipping, then the Packing List report definition will be used.
- DELETE PRINTED
Select to delete Orders from batch printing list once they have been printed.
- ADD S/O
Select to add a Sales Order to the list of selected Orders.
- ADD T/O
Select to add a Transfer Order to the list of selected Orders.
- DELETE ORDER
Highlight an Order and then select this button to remove the Order from the list.
- PRINT PACKING LIST
Highlight an Order, then select this option to print an individual Packing List or Sales Order Pick List for the specified Order. A Sales Order Pick List will be printed if the Sales Order does not yet have a Shipment Number associated with it—that is, if no Line Item quantity has been issued to shipping. If stock has been issued to Shipping, then the Packing List report definition will be used.
- Automatically Update
Select to automatically update the information displayed in the Packing List batch. The list will automatically update every 60 seconds if this option is selected.
To print a Packing List or Sales Order Pick List, select the "Print Packing List" option. The following screen will appear:
Note
A Sales Order Pick List will be printed if the Sales Order does not yet have a Shipment Number associated with it—that is, if no Line Item quantity has been issued to shipping. If stock has been issued to Shipping, then the Packing List report definition will be used. Report definitions (i.e., Forms) are assigned by Customer Type.

Tip
The system includes two alternate Sales Order Pick List report definitions:
"PickingListSOClosedLines.xml"
"PickingListNoClosedLines.xml"
The first includes already closed Sales Order Line Items in the report; the other excludes closed Line Items.
When printing a Packing List, you are presented with the following options:
- Sales Order #
Enter the Sales Order Number of the Sales Order whose Packing List you want to print.
- Transfer Order #
Enter the Transfer Order Number of the Transfer Order whose Packing List you want to print.
- From
Displays the source Site for the transfer.
- To
Displays the destination Site for the transfer.
- Shipment #
Specify the Shipment Number you want to print a Packing List for. Shipment Numbers are assigned to Orders when Line Item quantity is issued to Shipping. A single Order may have multiple Shipments associated with it. If no stock has ever been issued to Shipping for an Order, then no Shipment Number will be associated with it.
- Order Date
Displays the Order date for the Sales Order.
- Cust. Name
Displays the Customer's name.
- Cust. Phone
Displays the Customer's phone number.
- P/O Number
Displays the Customer's Purchase Order Number.
To the far right of the screen, the following buttons are available:
- CANCEL
Closes the screen, returning you to the application desktop.
Prints a copy of either the Packing List or Sales Order Pick List for the specified Sales Order. A Sales Order Pick List will be printed if the Sales Order does not yet have a Shipment Number associated with it—that is, if no Line Item quantity has been issued to shipping. If stock has been issued to Shipping, then the Packing List report definition will be used.
To send a Sales Order form to a Customer by email or FTP, select the "Send Electronic Sales Order Form" option. The following screen will appear:
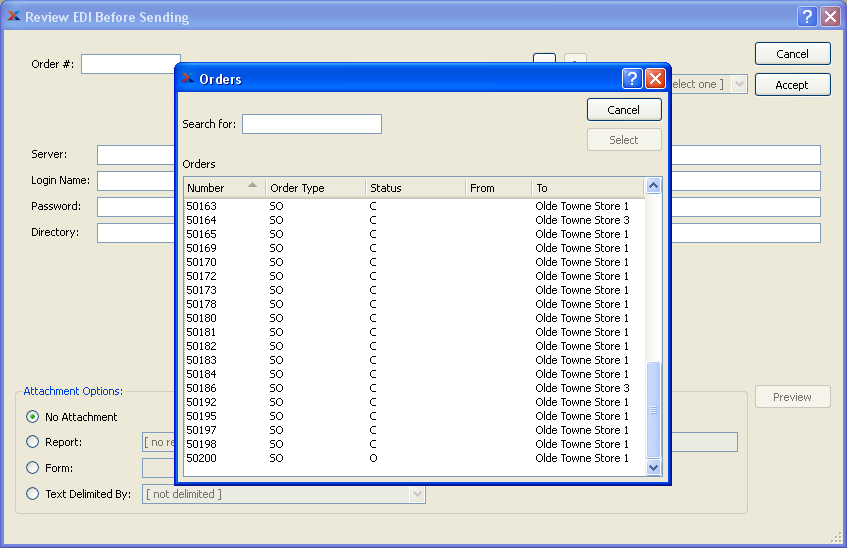
Selecting a Sales Order to Review EDI Before Sending
Type the Sales Order Number in the "Order #" field. You may also select one from a list by clicking on the "..." button, typing Ctrl-L (Command-L on Mac), or typing Ctrl-S (Command-S on Mac). You will only be shown Sales Orders for Customers who are set up to receive Sales Orders by EDI.
Note
Customers are set up to receive electronic deliveries of information using the "Transmission" tab on the Customer master.
You may be presented with one of two screens, depending on whether the document will be sent by email or by FTP. If you do not see either screen, the EDI Profile has been set to disable review before sending and will automatically be sent to the Batch Manager.
If the document will be sent by email, you will see the following screen:
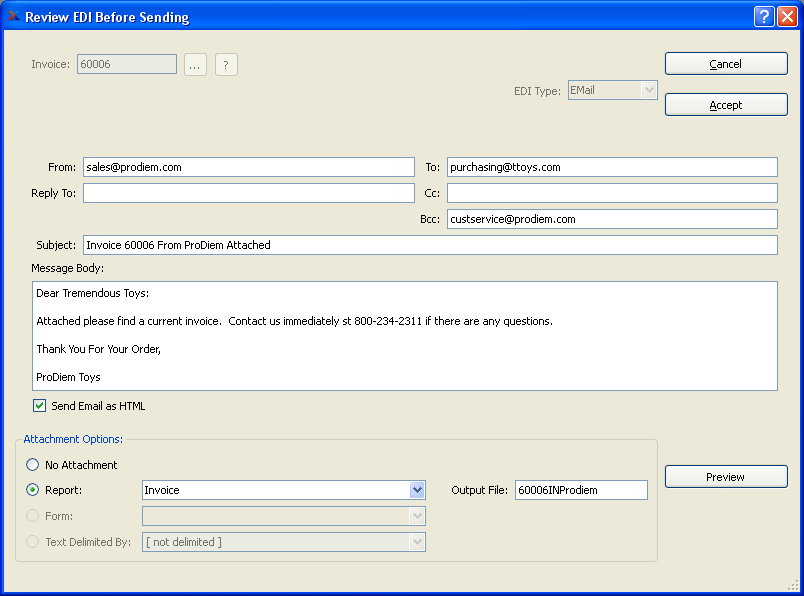
Review EDI Before Sending a document by email
The fields at the top of the window show basic information about the EDI that will be sent:
- A/R Open Item, Credit Memo, Customer #, Invoice, Order #, Quote
This shows the document number of the document you want to schedule for delivery. Which label appears depends on the document being sent. The "Customer #" is shown when sending A/R Statements.
- EDI Type
This shows whether the EDI will be sent by email or FTP.
The information in the following fields will be populated from the EDI Profile. If you have the "EditEDIBeforeSending" privilege, you will be allowed to edit the contents of these fields. You are presented with the following email-specific options:
- From
This is the email address of the person sending the email. It can be set to the address of the user running the application or a generic address (e.g. "[email protected]"). If it is left blank on this screen, the Batch Manager will fill in the email address of the user running the application at the time the EDI was prepared.
- Reply To
This is the reply-to address that will be set on the outgoing email message. This controls the email address used when someone replies to the email sent by xTuple ERP.
- To
This is the email address of the primary intended recipient of the email.
- Cc
This is the carbon copy (i.e., Cc:) email address—a copy of the email will be sent to this address.
- Bcc
This is the blind carbon copy (i.e., Bcc:) email address—a copy of the email will be sent to this address but none of the recipients will see this address.
- Subject
This is the subject line that will be used for this email.
- Message Body
This is the body of the email message that will be sent. This is a scrolling text field with word-wrapping.
- Send Email as HTML
Select if you want the body of the Email to be sent as HTML. If not selected, the Email will be sent as plain text.
- Attachment Options
Use the Attachment Options to control the contents and format of the file attached to this email. The following options are available, depending on the settings in the EDI Profile:
- No Attachment
No file will be attached to the email.
- Report
The named report will be run by the Batch Manager and attached to the email as a .PDF file.
- Form
If the document is a Sales Order or an Invoice, the Customer Form Assignment will be used. That report will be run by the Batch manager and attached to the email as a .PDF file.
- Text Delimited By
The queries defined in the EDI Form Details for the EDI Profile will be run. The results will be used to build a file with the fields delimited by the given character. Pre-defined characters include the comma (",") and tab. If you need to change the delimiter, select "[ not delimited ]" from the drop-down menu, then replace that text with your own single character. Normally, however, this should be left to the value specified in the EDI Profile.
- Output File
This is the name that will be given to the email attachment. For Forms and Reports it should end with a ".pdf" suffix. For comma-delimited files the output file should end with ".csv". Tab-delimited files should have a ".tsv" suffix.
- PREVIEW
This brings up a preview window to show what the attachment will look like when generated by the Batch Manager. It can show either reports or delimited text files.
To the far right of the screen, the following buttons are available:
- CANCEL
Closes the screen without scheduling a document for email delivery, returning you to the application desktop.
- ACCEPT
Select to submit the requested action to the Batch Manager for processing. If the EDI will be sent by email, there must be at least one email address in either the To, Cc, or Bcc fields.
If the document will be sent by FTP, you will see the following screen.
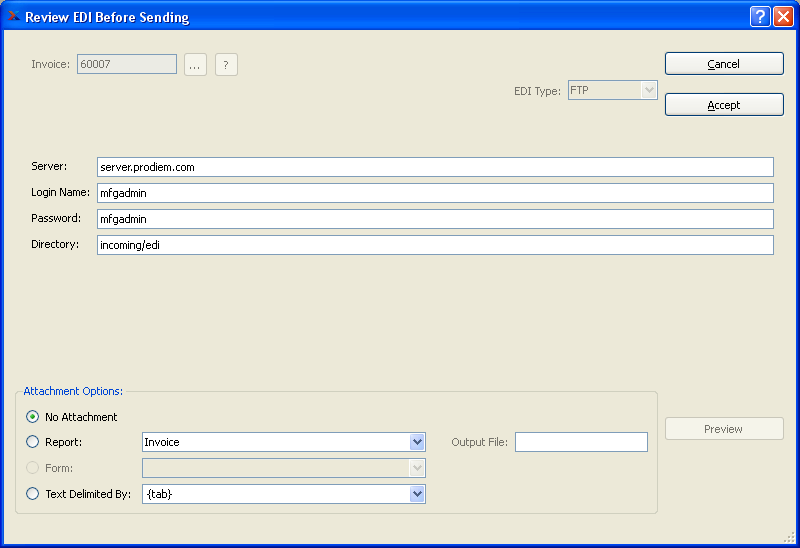
Review EDI Before Sending a document by FTP
The Attachment Options will be the same as for sending email but the transmission options will be different. Get the values for these from the EDI recipient (either your Vendor or Customer, depending on the document type). See the xTuple Batch Manager Product Guide for one suggestion on how to store these data. You are presented with the following FTP-specific options:
- Server
This is the host name or Internet address of the FTP server to send the document to.
- Login Name
This is the user name required to log in to the FTP server.
- Password
This is the password required to log in to the FTP server.
- Directory
This is the directory in which the recipient wants you to put the EDI message on the FTP server.
If both the "Login Name" and "Password" fields are empty, the Batch Manager will attempt an anonymous FTP, using the name "anonymous" for the "Login Name" and the email address of the user submitting the EDI for the "Password".
To send a Quote to a Customer or Prospect by email or FTP, select the "Send Electronic Quote" option. The following screen will appear:
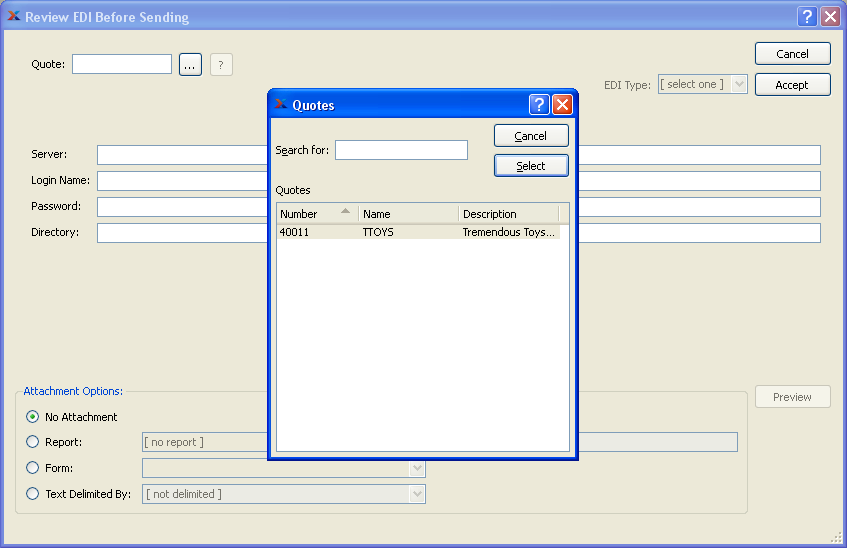
Selecting a Quote to Review EDI Before Sending
Type the Quote Number in the "Quote" field. You may also select one from a list by clicking on the "..." button, typing Ctrl-L (Command-L on Mac), or typing Ctrl-S (Command-S on Mac). You will only be shown Quotes for Customers who are set up to receive Quotes by EDI. Quotes for Prospects are allowed for those Prospects who are set up to receive Quotes by EDI or whose Contact has an email address.
Note
Customers and Prospects are set up to receive electronic deliveries of information using the "Transmission" tab on the Customer or Prospects master.
You may be presented with one of two screens, depending on whether the document will be sent by email or by FTP. If you do not see either screen, the EDI Profile has been set to disable review before sending and will automatically be sent to the Batch Manager.
If the document will be sent by email, you will see the following screen:
Review EDI Before Sending a document by email
The fields at the top of the window show basic information about the EDI that will be sent:
- A/R Open Item, Credit Memo, Customer #, Invoice, Order #, Quote
This shows the document number of the document you want to schedule for delivery. Which label appears depends on the document being sent. The "Customer #" is shown when sending A/R Statements.
- EDI Type
This shows whether the EDI will be sent by email or FTP.
The information in the following fields will be populated from the EDI Profile. If you have the "EditEDIBeforeSending" privilege, you will be allowed to edit the contents of these fields. You are presented with the following email-specific options:
- From
This is the email address of the person sending the email. It can be set to the address of the user running the application or a generic address (e.g. "[email protected]"). If it is left blank on this screen, the Batch Manager will fill in the email address of the user running the application at the time the EDI was prepared.
- Reply To
This is the reply-to address that will be set on the outgoing email message. This controls the email address used when someone replies to the email sent by xTuple ERP.
- To
This is the email address of the primary intended recipient of the email.
- Cc
This is the carbon copy (i.e., Cc:) email address—a copy of the email will be sent to this address.
- Bcc
This is the blind carbon copy (i.e., Bcc:) email address—a copy of the email will be sent to this address but none of the recipients will see this address.
- Subject
This is the subject line that will be used for this email.
- Message Body
This is the body of the email message that will be sent. This is a scrolling text field with word-wrapping.
- Send Email as HTML
Select if you want the body of the Email to be sent as HTML. If not selected, the Email will be sent as plain text.
- Attachment Options
Use the Attachment Options to control the contents and format of the file attached to this email. The following options are available, depending on the settings in the EDI Profile:
- No Attachment
No file will be attached to the email.
- Report
The named report will be run by the Batch Manager and attached to the email as a .PDF file.
- Form
If the document is a Sales Order or an Invoice, the Customer Form Assignment will be used. That report will be run by the Batch manager and attached to the email as a .PDF file.
- Text Delimited By
The queries defined in the EDI Form Details for the EDI Profile will be run. The results will be used to build a file with the fields delimited by the given character. Pre-defined characters include the comma (",") and tab. If you need to change the delimiter, select "[ not delimited ]" from the drop-down menu, then replace that text with your own single character. Normally, however, this should be left to the value specified in the EDI Profile.
- Output File
This is the name that will be given to the email attachment. For Forms and Reports it should end with a ".pdf" suffix. For comma-delimited files the output file should end with ".csv". Tab-delimited files should have a ".tsv" suffix.
- PREVIEW
This brings up a preview window to show what the attachment will look like when generated by the Batch Manager. It can show either reports or delimited text files.
To the far right of the screen, the following buttons are available:
- CANCEL
Closes the screen without scheduling a document for email delivery, returning you to the application desktop.
- ACCEPT
Select to submit the requested action to the Batch Manager for processing. If the EDI will be sent by email, there must be at least one email address in either the To, Cc, or Bcc fields.
If the document will be sent by FTP, you will see the following screen.
Review EDI Before Sending a document by FTP
The Attachment Options will be the same as for sending email but the transmission options will be different. Get the values for these from the EDI recipient (either your Vendor or Customer, depending on the document type). See the xTuple Batch Manager Product Guide for one suggestion on how to store these data. You are presented with the following FTP-specific options:
- Server
This is the host name or Internet address of the FTP server to send the document to.
- Login Name
This is the user name required to log in to the FTP server.
- Password
This is the password required to log in to the FTP server.
- Directory
This is the directory in which the recipient wants you to put the EDI message on the FTP server.
If both the "Login Name" and "Password" fields are empty, the Batch Manager will attempt an anonymous FTP, using the name "anonymous" for the "Login Name" and the email address of the user submitting the EDI for the "Password".