Sales Master Information section.
Characteristics may be used to create additional layers of information about Items, Customers, CRM Accounts, and more. For example, Characteristics defined on an Item master may be associated with Sales Order Items. And, if the Sales Order leads to the automatic generation of additional Orders (i.e., Work Orders or Purchase Orders), then the subsequent Orders will inherit the parent Sales Order Characteristics.
To access the master list of Characteristics, select the "Characteristics" option. The following screen will appear.
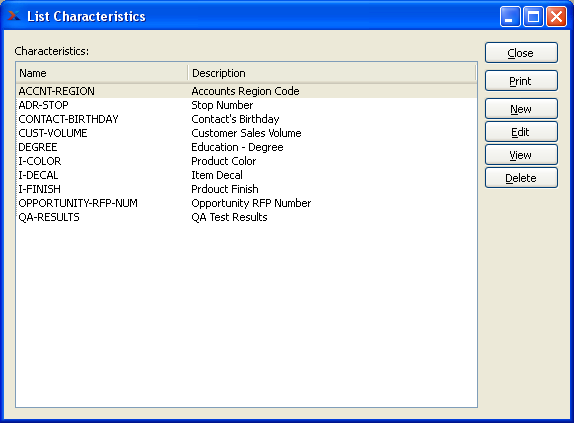
The "Characteristics" screen displays information on all existing Characteristics, including Characteristic name and Characteristic description.
To the far right of the list, the following buttons are available:
- CLOSE
Closes the screen, returning you to the application desktop.
Runs the report associated with this screen.
- NEW
Opens screen for creating a new Characteristic.
- EDIT
Enables you to edit highlighted Characteristics. The edit screen is the same as that for creating a new Characteristic—except that when editing, the fields will contain Characteristic information. Double-clicking on a Characteristic will also bring you to the editing screen.
- VIEW
Highlight a Characteristic and then select this button to reach a read-only view of the "Edit" screen.
- DELETE
Highlight a Characteristic and then select this button to remove the Characteristics from the list.
To create a new Characteristic, select the NEW button. The following screen will appear:
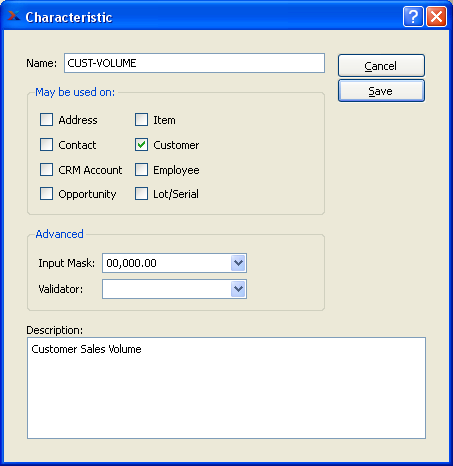
When creating a new Characteristic, you are presented with the following options:
- Name
Enter a unique name for the Characteristic.
- May be used on
Select one of the following Characteristic assignment options:
- Address
Select to make Characteristic available for Address Characteristics.
- Contact
Select to make Characteristic available for Contact Characteristics.
- CRM Account
Select to make Characteristic available for CRM Account Characteristics.
- Opportunity
Select to make Characteristic available for Opportunity Characteristics.
- Item
Select to make Characteristic available for Item Characteristics.
- Customer
Select to make Characteristic available for Customer Characteristics.
- Employee Characteristics
Select to make Characteristic available for Employee Characteristics.
- Lot/Serial
Select to make Characteristic available for Lot/Serial Characteristics.
- Advanced
Select from the following advanced features, if needed. These advanced options are not required, but if used they will enforce greater consistency and control over the values entered for your Characteristics. Typically when using these advanced validation features, you will specify either an input mask or a validator. If you decide to use both at once, they must be coordinated and consistent―otherwise users will experience difficulties when attempting to enter Characteristic values.
- Input Mask
Select from the available options―or manually enter an input mask of your own design. An input mask creates a template to guide users as they enter values for a Characteristic. It is a form of light data validation. For example, if you specify the input mask 00/00/0000, then users will be presented with the following template when they are entering values for the Characteristic : "__/__/____". In this case, users will simply have to fill in the blanks between the separators.
- 00/00/0000
Select this format to prompt users to enter a date format with the pattern shown (e.g., MM/DD/YYYY).
- ### - ### - ####
Select this format to prompt users to enter a numerical format with the pattern shown. This example would be a good match for telephone numbers (e.g., 757-555-1111).
- ### - ## - ####
Select this format to prompt users to enter a numerical format with the pattern shown. This example would be a good match for social security numbers (e.g., 012-34-5678).
- 00,000.00
Select this format to prompt users to enter a price format with the pattern shown.
- Validator
Select from the available options―or manually enter a validator of your own design. A validator is used to strictly enforce the format of data users can enter in a field. If you specify a validator for a Characteristic, then users will have to conform to the format when entering values for the Characteristic. Values which do not conform will not be accepted.
- [Y/N]
Select this boolean validator to require users to enter "Y" or "N" for Yes or No.
- \S+
Select this validator to require users to enter one or more non-white-space characters. So, for example, this validator would accept the value "Inventory" but not "Inventory Availability".
- [1-9]\d{0,3}
Select this validator to require users to enter a number from 1-9999.
- [A-Z]\d{5}[1-9]
Select this validator to require users to enter a value where the first character is A-Z, the next five characters are numbers 0-9, and the last character is a number 1-9. While this pattern may not be very useful for most people, it does illustrate how you can create your own regular expressions to design a validator to meet your own custom needs.
- www\S?(\.com|net|org)
Select this validator to require users to enter a website address (e.g., www.xtuple.com)
- Description
Enter a brief description of the Characteristic.
To the far right of the screen, the following buttons are available:
- CANCEL
Closes the screen without creating a Characteristic, returning you to the previous screen.
- SAVE
Creates the Characteristic and adds it to the master list of Characteristics.
To access the master list of Sales Representatives, select the "Sales Reps" option. The following screen will appear:
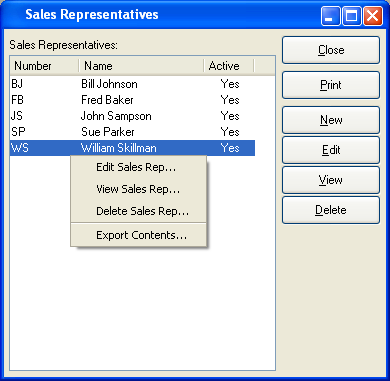
The Sales Representatives master list displays the name, identification number, and active status of all existing Sales Representatives.
To the far right of the screen, the following buttons are available:
- CLOSE
Closes the screen, returning you to the application desktop.
Runs the report associated with this screen.
- NEW
Opens screen for creating a new Sales Representative.
- EDIT
Enables you to edit highlighted Sales Representative. The edit screen is the same as that for creating a new Sales Representative—except that when editing, the fields will contain Sales Representative information. Double-clicking on a Sales Representative will also bring you to the editing screen.
- VIEW
Highlight a Sales Representative and then select this button to reach a read-only view of the "Edit" screen.
- DELETE
Highlight a Sales Representative and then select this button to remove the Sales Representative from the master list.
To create a new Sales Representative, select the NEW button. The following screen will appear:
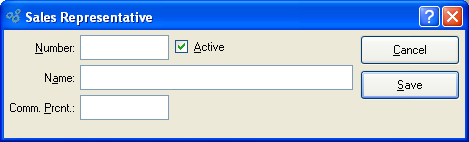
When creating a new Sales Representative, you are presented with the following options:
- Number
Enter an identification number for the Sales Representative.
- Active
Select if the Sales Representative is currently active. Not selecting means the Sales Representative is inactive.
- Name
Enter the name of the Sales Representative.
- Comm. Prcnt
Enter the commission percentage for the Sales Representative. For example, if the commission is to be 5%, enter the value ".05".
To the far right of the screen, the following buttons are available:
- CANCEL
Closes the screen without creating a Sales Representative, returning you to the application desktop.
- SAVE
Creates the Sales Representative and enters their information into the master list of Sales Representatives.
Shipping Zones are used to define geographic regions into which sold Items are shipped. Sales Orders are linked to Shipping Zones through the Ship-To Address master. This assignment of Shipping Zones to Sales Order enables you to analyze sales activity by geographic region. To access the master list of Shipping Zones, select the "Shipping Zones" option. The following screen will appear:

The Shipping Zones master list displays the name and description of all existing Shipping Zones.
To the far right of the screen, the following buttons are available:
- CLOSE
Closes the screen, returning you to the application desktop.
Runs the report associated with this screen.
- NEW
Opens screen for creating a new Shipping Zone.
- EDIT
Enables you to edit highlighted Shipping Zone. The edit screen is the same as that for creating a new Shipping Zone—except that when editing, the fields will contain Shipping Zone information. Double-clicking on a Shipping Zone will also bring you to the editing screen.
- DELETE
Highlight a Shipping Zone and then select this button to remove the Shipping Zone from the master list.
To create a new Shipping Zone, select the NEW button. The following screen will appear:
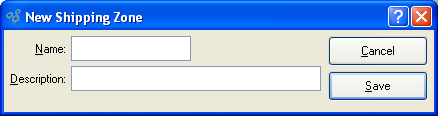
When creating a new Shipping Zone, you are presented with the following options:
- Name
Enter the name of the Shipping Zone.
- Description
Enter a description to identify the Shipping Zone.
To the far right of the screen, the following buttons are available:
- CANCEL
Closes the screen without creating a Shipping Zone, returning you to the application desktop.
- SAVE
Creates the Shipping Zone and adds it to the master list of Shipping Zones.
Ship Vias describe the transportation method used to ship Sales Order Items. Shipping companies, for example, are considered to be Ship Vias. For certain shipping companies, the system will launch a browser and link directly to shipper websites—where up-to-date shipment tracking information can be obtained.
Note
To obtain up-to-date shipment tracking information by linking to shipping company websites, use the "Query Shipment Status" option found in the "Shipments by Sales Order" report.
For the shipment tracking feature to perform correctly, specific Ship Via naming conventions must be followed. The following shipping companies and naming conventions are currently supported:
United Parcel Service: The first three letters of the Ship Via name must be "UPS" to enable connection to the UPS website. A link will be made using the specific tracking number for the shipment in question.
SAIA, Inc.: The first four letters of the Ship Via name must be "SAIA" to enable connection to the SAIA website. A link will be made using the specific tracking number for the shipment in question.
Federal Express: The first five letters of the Ship Via name must be "FEDEX" to enable connection to the FedEx website. A link will be made using the specific tracking number for the shipment in question.
Roadway Express: The first seven letters of the Ship Via name must be "ROADWAY" to enable connection to the Roadway website. A link will be made using the specific tracking number for the shipment in question.
USF Logistics, Inc.: The first three letters of the Ship Via name must be "USF" to enable connection to the USF website. A link will be made using the specific tracking number for the shipment in question.
A & B Freight Line, Inc.: The first three letters of the Ship Via name must be "A&B" to enable connection to the A&B website. The tracking number must be entered manually.
Averitt Express, Inc.: The first seven letters of the Ship Via name must be "AVERITT" to enable connection to the Averitt website. The tracking number must be entered manually.
DHL International GmbH: The first three letters of the Ship Via name must be "DHL" to enable connection to the DHL website. The tracking number must be entered manually.
R & L Carriers: The first three letters of the Ship Via name must be "R&L" to enable connection to the R&L website. The tracking number must be entered manually.
Watkins Motor Lines, Inc.: The first seven letters of the Ship Via name must be "WATKINS" to enable connection to the Watkins website. The tracking number must be entered manually.
Yellow Transportation, Inc.: The first seven letters of the Ship Via name must be "YELLOW" to enable connection to the Yellow website. The tracking number must be entered manually.
Note
If you are running an xTuple client on a Linux machine, you should set the BROWSER environment variable so it points to the executable for your default browser. This will prevent error messages when connecting to shipping company websites.
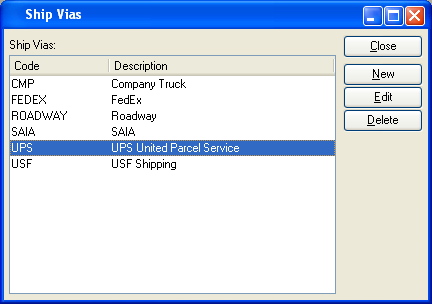
To access the master list of Ship Vias, select the "Ship Vias" option. The following screen will appear:
Tip
If your site integrates UPS WorldShip with xTuple ERP, there are separate steps to be followed.
The Ship Vias master list displays the code and description for all existing Ship Vias.
To the far right of the screen, the following buttons are available:
- CLOSE
Closes the screen, returning you to the application desktop.
- NEW
Opens screen for creating a new Ship Via.
- EDIT
Enables you to edit the highlighted Ship Via. The edit screen is the same as that for creating a new Ship Via—except that when editing, the fields will contain Ship Via information. Double-clicking on a Ship Via will also bring you to the editing screen.
- DELETE
Highlight a Ship Via and then select this button to remove the Ship Via from the master list.
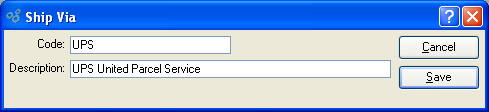
To create a new Ship Via, select the NEW button. The following screen will appear:
Note
Ship Vias may be overwritten in various places throughout the application—for example, on the Sales Order header. This functionality is intentional. Ship Vias are intended to be editable.
When creating a new Ship Via, you are presented with the following options:
- Code
Enter an identifying code for the Ship Via.
- Description
Enter a description to identify the Ship Via.
To the far right of the screen, the following buttons are available:
- CANCEL
Closes the screen without creating a Ship Via, returning you to the application desktop.
- SAVE
Creates the Ship Via and adds it to the master list of Ship Vias.
To access the master list of Shipping Charge Types, select the "Shipping Charge Types" option. The following screen will appear:
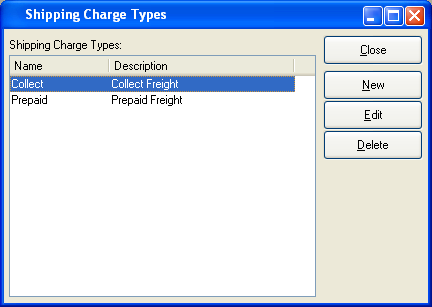
The Shipping Charge Types master list displays the name and description for all existing Shipping Charge Types.
To the far right of the screen, the following buttons are available:
- CLOSE
Closes the screen, returning you to the application desktop.
- NEW
Opens screen for creating a new Shipping Charge Type.
- EDIT
Enables you to edit highlighted Shipping Charge Type. The edit screen is the same as that for creating a new Shipping Charge Type—except that when editing, the fields will contain Shipping Charge Type information. Double-clicking on a Shipping Charge Type will also bring you to the editing screen.
- DELETE
Highlight a Shipping Charge Type and then select this button to remove the Shipping Charge Type from the master list.
To create a new Shipping Charge Type, select the NEW button. The following screen will appear:

When creating a new Shipping Charge Type, you are presented with the following options:
- Name
Enter a name to identify the Shipping Charge Type.
- Description
Enter a description to identify the Shipping Charge Type.
- Customer may pay Freight Charges
Select to allow free-form Freight Charges to be added to a Sales Order. If not selected, you are indicating that free-form Freight Charges may not be added to Sales Orders which specify the Shipping Charge Type.
To the far right of the screen, the following buttons are available:
- CANCEL
Closes the screen without creating a Shipping Charge Type, returning you to the application desktop.
- SAVE
Creates the Shipping Charge Type and adds it to the master list of Shipping Charge Types.
Tax Codes define the amount and type(s) of Tax to be added to an Order. To access the master list of Tax Codes, select the "Tax Codes" option. The following screen will appear:
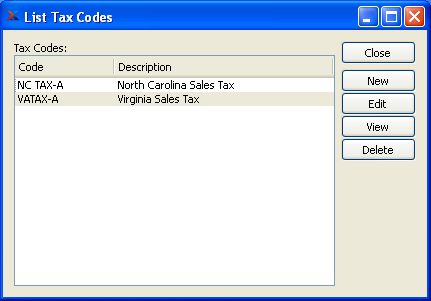
The Tax Codes master list displays the code and description for all existing Tax Codes.
To the far right of the screen, the following buttons are available:
- CLOSE
Closes the screen, returning you to the application desktop.
- NEW
Opens screen for creating a new Tax Code.
- EDIT
Enables you to edit highlighted Tax Code. The edit screen is the same as that for creating a new Tax Code—except that when editing, the fields will contain Tax Code information. Double-clicking on a Tax Code will also bring you to the editing screen.
- VIEW
Highlight a Tax Code and then select this button to reach a read-only view of the "Edit" screen.
- DELETE
Highlight a Tax Code and then select this button to remove the Tax Code from the master list
To create a new Tax Code, select the NEW button. The following screen will appear:
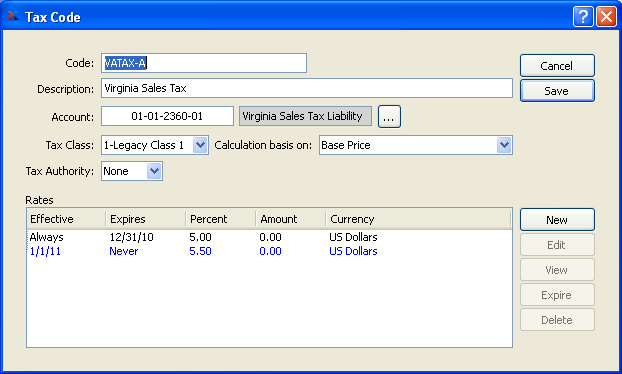
When creating a new Tax Code, you are presented with the following options:
- Code
Enter an identifying code for the Tax Code.
- Description
Enter a description to identify the Tax Code.
- Account
Specify a valid General Ledger Account. This is a Liability Account. It will be credited when Invoices are posted and debited when Credit Memos are posted.
- Tax Class
Select a valid Tax Class.
- Calculation basis on
Select a valid calculation basis. This list includes "Base Price" and all other Tax Codes that share the same Tax Class. When "Base Price" is selected the Tax Code may be assigned on the Tax Assignment window, and the tax calculation will be based on the base price amount to be taxed, plus any applicable cumulative taxes. When a Tax Code is selected, then the Tax Code will be calculated against the derived amount from the referenced Tax Code. This is a method to defined nested taxes or "a tax on a tax".
- Tax Authority
Select a valid Tax Authority.
To the far right of the screen, the following buttons are available:
- CANCEL
Closes the screen without creating a Tax Code, returning you to the application desktop.
- SAVE
Creates the Tax Code and adds it to the master list of Tax Codes.
When defining or maintaining Tax Code Rates, you are presented with the following options:
To the far right of the screen, the following buttons are available:
- NEW
Opens screen for creating a new Tax Code Rate.
- EDIT
Enables you to edit highlighted Tax Code Rates. The edit screen is the same as that for creating a new Tax Code Rate—except that when editing, the fields will contain Tax Code Rate information. Double-clicking on a Tax Code Rate also bring you to the editing screen.
- VIEW
Enables you to view highlighted Tax Code Rates. Highlight a Tax Code Rate and then select this button to reach a read-only view of the "Edit" screen.
- EXPIRE
Highlight a Tax Code Rate and then select this button to expire the Rate. The Effectivity End Date will be changed to the current date.
- DELETE
Highlight a Tax Code Rate and then select this button to remove the Rate from the list.
To create a new Tax Code Rate, select the NEW button. The following screen will appear:
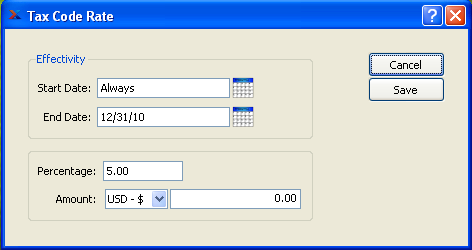
When creating a new Tax Code Rate, you are presented with the following options:
- Effectivity Start Date
Enter the date that this Tax Code Rate becomes effective.
- Effectivity End Date
Enter the date that this Tax Code Rate is no longer effective.
- Percentage
Enter the tax rate as a percentage.
- Amount
Enter the additional flat rate amount.
To the far right of the screen, the following buttons are available:
- CANCEL
Closes the screen without adding a new Tax Code Rate to the list of Tax Code Rates.
- SAVE
Creates the Tax Code Rate and adds it to the list of Tax Code Rates.
A Bill of Lading is an example of a Shipping Form. To access the master list of Shipping Forms, select the "Shipping Forms" option. The following screen will appear:
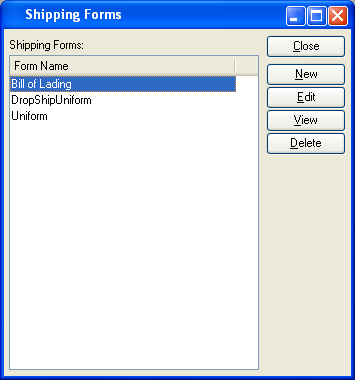
The Shipping Forms master list displays Form name of all existing Bill of Lading Formats.
To the far right of the screen, the following buttons are available:
- CLOSE
Closes the screen, returning you to the application desktop.
- NEW
Opens screen for creating a new Shipping Form.
- EDIT
Enables you to edit highlighted Shipping Forms. The edit screen is the same as that for creating a new Shipping Form—except that when editing, the fields will contain Shipping Form information. Double-clicking on a Shipping Form will also bring you to the editing screen.
- VIEW
Highlight a Shipping Form and then select this button to reach a read-only view of the "Edit" screen.
- DELETE
Highlight a Shipping Form and then select this button to remove the Shipping Form from the master list.
To create a new Shipping Form, select the NEW button. The following screen will appear:
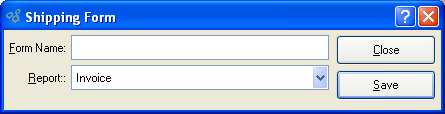
When creating a new Shipping Form, you are presented with the following options:
- Form Name
Enter a format name to identify the Shipping Form.
- Report
Specify the report definition you want to associate with the Shipping Form.
Tip
In the case where you have multiple versions (i.e., grades) of the same-named report definition, it doesn't matter which one you select when setting up a Form. The system will always use the report definition having the highest grade.
To the far right of the screen, the following buttons are available:
- CLOSE
Closes the screen without creating a new Shipping Form, returning you to the application desktop.
- SAVE
Creates the Shipping Form and enters the information into the Shipping Form master list.
Sales Categories are used to identify the General Ledger (G/L) Accounts to be used when processing the following:
Non-Inventory A/R Invoices
A/R Credit Memos (optional)
A/R Debit Memos (optional)
Cash Receipts (optional)
For example, when creating an Invoice for miscellaneous goods or services unrelated to Inventory, you must select a Sales Category—thereby identifying the G/L Accounts the sales transaction will be distributed to. To access the Sales Categories master list, select the "Sales Categories" option. The following screen will appear:
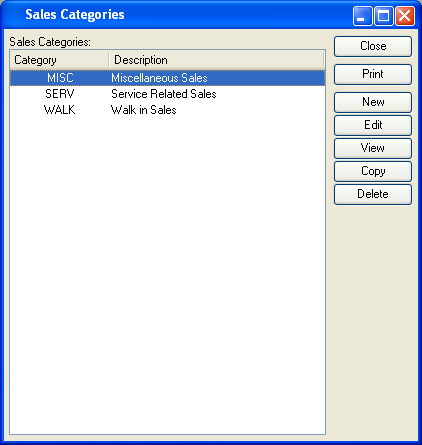
The "Sales Categories" screen displays information on existing Sales Categories.
To the far right of the screen, the following buttons are available:
- CLOSE
Closes the screen, returning you to the application desktop.
Runs the report associated with this screen.
- NEW
Opens screen for creating a new Sales Category.
- EDIT
Enables you to edit highlighted Sales Categories. The edit screen is the same as that for creating a new Sales Category—except that when editing, the fields will contain Sales Category information. Double-clicking on a Sales Category will also bring you to the editing screen.
- VIEW
Highlight a Sales Category and then select this button to reach a read-only view of the "Edit" screen.
- COPY
Highlight a Sales Category and then select this button to create a new Sales Category which duplicates the source Sales Category.
- DELETE
Highlight a Sales Category and then select this button to remove the Sales Category from the master list.
To create a new Sales Category, select the NEW button. The following screen will appear:

When creating a new Sales Category, you are presented with the following options:
- Category
Enter an identifying code for the Sales Category.
- Active
Select if the Sales Category is currently active. Not selecting means the Sales Category is inactive.
- Description
Enter a description to identify the Sales Category.
- Sales Account
Identify a General Ledger (G/L) Account to distribute Sales Revenue to. This is a Revenue Account. It will be credited when Invoices for Non-Inventory goods are posted.
- Prepaid Account
Specify a General Ledger (G/L) Account to use for handling prepaid Receivables. This is a Revenue contra Account. If a Sales Category is used when entering a Miscellaneous A/R Credit Memo, this Account will be debited when the Credit Memo is posted. If used when entering a Miscellaneous A/R Debit Memo, the Account will be credited when the Debit Memos are posted.
- A/R Account
Specify a General Ledger (G/L) Account to use for handling Customer deposits. This is an Asset Account. If a Sales Category is used when applying a Cash Receipt to a Customer Invoice, this Account will be credited when the Cash Receipt is posted.
To the far right of the screen, the following buttons are available:
- CANCEL
Closes the screen without creating a Sales Category, returning you to the application desktop.
- SAVE
Creates the Sales Category and adds it to the master list of Sales Categories.
Terms are used to determine the billing Terms for Accounts Payable and Accounts Receivable. To access the master list of Terms, select the "Terms" option. The following screen will appear:
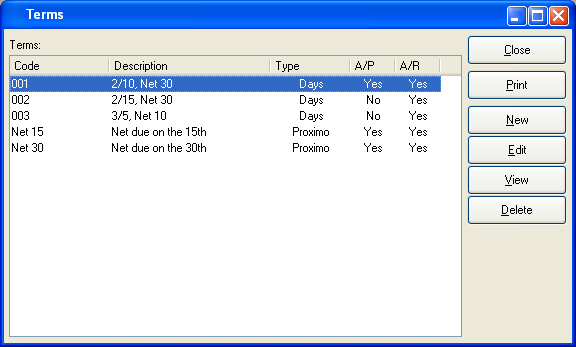
The "Terms" screen displays information on all existing Terms, including Term Code, Term description, Terms type, and Accounts Payable or Accounts Receivable status.
To the far right of the screen, the following buttons are available:
- CLOSE
Closes the screen, returning you to the application desktop.
Runs the report associated with this screen.
- NEW
Opens screen for creating new billing Terms.
- EDIT
Enables you to edit highlighted billing Terms. The edit screen is the same as that for creating new billing Terms—except that when editing, the fields will contain billing Terms information. Double-clicking on a billing Terms line will also bring you to the editing screen.
- VIEW
Highlight a billing Term and then select this button to reach a read-only view of the "Edit" screen.
- DELETE
Highlight a billing Terms line and then select this button to remove the billing Terms from the master list.
To create new billing Terms, select the NEW button. The following screen will appear:
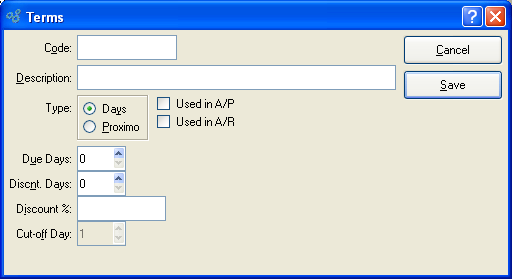
When creating new billing Term, you are presented with the following options:
Note
A/P billing Terms may be applied and Discounts taken when selecting a posted Voucher for payment.
- Used in A/R
Select if billing Terms are used for Accounts Receivable.
- Due Days
Select a number using the arrow buttons, or manually enter a value up to a maximum of 999. If the Terms type is "Days," then this refers to the number of days after the document (Invoice, Voucher, etc.) date which a payment is considered overdue. If the Terms type is "Proximo," then the setting refers to the day of the month of the document (Invoice, Voucher, etc.) date on which payment is due.
- Discnt. Days
Days: Select a number using the arrow buttons, or manually enter a value up to a maximum of 999. Specifies the number of days within which a payment must be made or received to take advantage of any Terms discount.
- Discount %
Specify the amount of any early payment discount.
- Cut-off Day
Specify the day of the month on or after which the due date will advance to the next month.
To the far right of the screen, the following buttons are available:
Sales Account assignments are used to identify the General Ledger (G/L) Accounts to be used when processing the following:
Sales Orders
Invoices
S/O Credit Memos
The Account assignments are made using a combination of Customer Type, Product Category, and Site designations. This means that transactions conforming to the defined combination will follow the assignments established for that combination. To access the Sales Account assignments master list, select the "Sales Account Assignments" option. The following screen will appear:

The "Sales Account Assignments" screen displays information on existing Sales Account assignments.
To the far right of the screen, the following buttons are available:
- CLOSE
Closes the screen, returning you to the application desktop.
Runs the report associated with this screen.
- NEW
Opens screen for creating a new Sales Account assignment.
- VIEW
Highlight a Sales Account assignment and then select this button to reach a read-only view of the "Edit" screen.
- EDIT
Enables you to edit highlighted Sales Account assignment. The edit screen is the same as that for creating a new Sales Account assignment—except that when editing, the fields will contain Sales Account assignment information. Double-clicking on a Sales Account assignment will also bring you to the editing screen.
- DELETE
Highlight a Sales Account assignment and then select this button to remove the Sales Account assignment from the master list.
To create a new Sales Account assignment, select the NEW button. The following screen will appear:
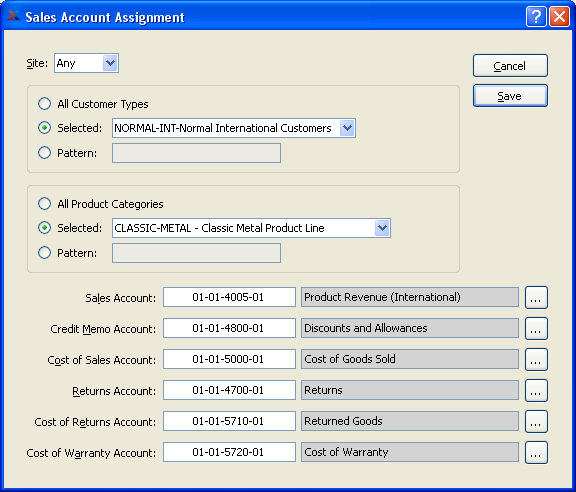
When creating a new Sales Account assignment, you are presented with the following options:
- Site
Specify Site to be associated with the Account assignment.
Note
In the case of conflicts between Sales Account assignments, the system by default selects specific assignments before all-inclusive ones. For example, if there were a choice between an assignment featuring "WHSE-1" as the supplying Site and another featuring "ANY" Site, the more-specific "WHSE-1" would be selected.
- All Customer Types
Select to associate all Customer Types with the Sales Account assignment.
- Selected
Specify the Customer Type you want to associate with the Sales Account assignment.
- Pattern
Enter a Customer Type pattern to select a range of Customer Types. Refine your search using Regular Expressions.
- All Product Categories
Select to associate all Product Categories with the Sales Account assignment.
- Selected
Specify the Product Category you want to associate with the Sales Account assignment.
- Pattern
Enter a Product Category pattern to select a range of Product Categories. Refine your search using Regular Expressions.
- Sales Account
Identify a General Ledger (G/L) Account to assign as the default Sales Account. This is a Revenue Account. It will be credited when Invoices are posted.
- Credit Memo Account
Identify a General Ledger (G/L) Account to assign as the default S/O Credit Memo Account. This is a Revenue contra Account. It will be debited when S/O Credit Memos are posted.
- Cost of Sales Account
Identify a General Ledger (G/L) Account to assign as the default Cost of Sales Account. This is an Expense Account. It will be debited when Sales Order Items are shipped. It will be credited when Sales Order Items are returned to Stock—either through Shipping or the processing of a Sales Order Credit Memo.
- Returns Account
Identify a General Ledger (G/L) Account to assign as the default Returns Account. This is a contra Revenue Account. It will be debited when sales Credit Memos are posted.
- Cost of Returns Account
Identify a General Ledger (G/L) Account to assign as the default Cost of Returns Account. This is a contra Expense Account. It will be credited when Return Authorization quantity is posted as received.
- Cost of Warranty Account
Identify a General Ledger (G/L) Account to assign as the default Warranty Account. This is a contra Expense Account. It will be debited when warranty Items are shipped and credited when warranty Items are received.
To the far right of the screen, the following buttons are available:
- CANCEL
Closes the screen without creating a Sales Account assignment, returning you to the previous screen.
- SAVE
Creates the Sales Account assignment and adds it to the master list of Sales Account assignments.
Accounts Receivable (A/R) Account assignments represent the default General Ledger (G/L) Accounts used by the system when processing the following:
Invoices
Cash Receipts
S/O Credit Memos
Miscellaneous A/R Credit Memos
Miscellaneous A/R Debit Memos
The Account assignments are made by Customer Type. This means that transactions involving a Customer will follow the assignments established for the Customer Type—unless otherwise specified. To access the A/R Account assignments master list, select the "A/R Account Assignments" option. The following screen will appear:
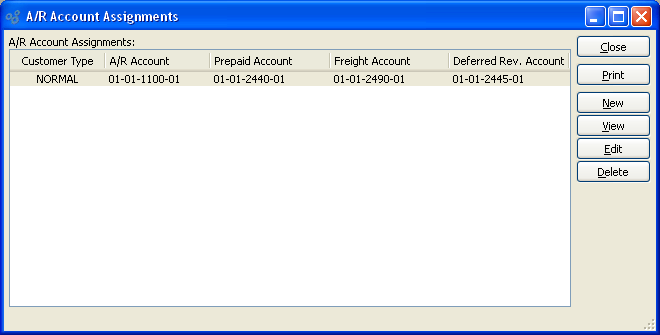
The "A/R Account Assignments" screen displays information on existing A/R Account assignments.
To the far right of the screen, the following buttons are available:
- CLOSE
Closes the screen, returning you to the application desktop.
Runs the report associated with this screen.
- NEW
Opens screen for creating a new A/R Account assignment.
- VIEW
Highlight an A/R Account assignment and then select this button to reach a read-only view of the "Edit" screen.
- EDIT
Enables you to edit highlighted A/R Account assignment. The edit screen is the same as that for creating a new A/R Account assignment—except that when editing, the fields will contain A/R Account assignment information. Double-clicking on an A/R Account assignment will also bring you to the editing screen.
- DELETE
Highlight an A/R Account assignment and then select this button to remove the A/R Account assignment from the master list.
To create a new A/R Account assignment, select the NEW button. The following screen will appear:

When creating a new A/R Account assignment, you are presented with the following options:
- Selected Customer Type
Specify the Customer Type you want to associate with the A/R Account assignment.
- Pattern
Enter a Customer Type pattern to select a range of Customer Types. Refine your search using Regular Expressions.
- A/R Account
Identify a General Ledger (G/L) Account to assign as the default A/R Account. This is an Asset Account. For example, it will be debited when Invoices are posted and credited when Cash Receipts are posted.
- Prepaid Receivables Account
Identify a General Ledger (G/L) Account to assign as the default A/R Prepaid Account. This is a Revenue contra Account. It will be debited when Miscellaneous A/R Credit Memos are posted and credited when Miscellaneous A/R Debit Memos are posted.
- Freight Account
Identify a General Ledger (G/L) Account to assign as the default Freight Account. This is a Revenue Account. It will be credited when Invoices are posted and debited when S/O Credit Memos are posted.
- Deferred Revenue Account
Identify a General Ledger (G/L) Account to assign as the default Deferred Revenue Account. This is a Liability Account. It is an optional Account, as systems may be configured to ignore it when handling Customer Deposits. When this Account is used, it will be credited when unapplied Cash Receipts are posted and debited when the A/R Credit Memos resulting from unapplied Cash Receipts are applied to A/R open items.
Note
You can disable the use of a Deferred Revenue Account for handling Customer Deposits at the system level.
To the far right of the screen, the following buttons are available:
- CANCEL
Closes the screen without creating an A/R Account assignment, returning you to the previous screen.
- SAVE
Creates the A/R Account assignment and adds it to the master list of A/R Account assignments.
Customer Form assignments are used to specify which printed reports you want your Customers to receive. You can make the assignments individually by Customer—or by Customer Type. In the case where more than one Form assignment applies to a Customer, the system will always use the most specific reference first. For example, a Form assignment for an individual Customer is more specific than a Form assignment for an entire Customer Type, etc. To access the Customer Form assignments master list, select the "Customer Form Assignments" option. The following screen will appear:
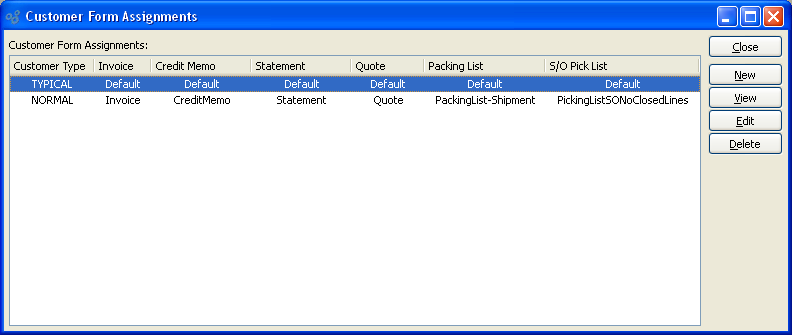
The "Customer Form Assignments" screen displays information on existing Customer Form assignments.
To the far right of the screen, the following buttons are available:
- CLOSE
Closes the screen, returning you to the application desktop.
- NEW
Opens screen for creating a new Customer Form assignment.
- VIEW
Highlight a Customer Form assignment and then select this button to reach a read-only view of the "Edit" screen.
- EDIT
Enables you to edit highlighted Customer Form assignment. The edit screen is the same as that for creating a new Customer Form assignment—except that when editing, the fields will contain Customer Form assignment information. Double-clicking on a Customer Form assignment will also bring you to the editing screen.
- DELETE
Highlight a Customer Form assignment and then select this button to remove the Customer Form assignment from the master list.
To create a new Customer Form assignment, select the NEW button. The following screen will appear:
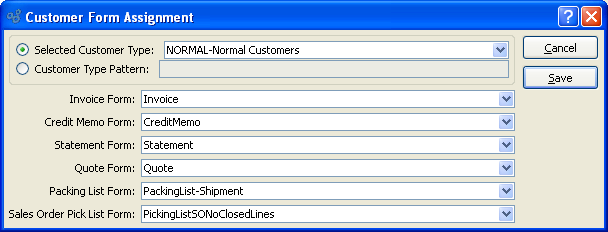
When creating a new Customer Form assignment, you are presented with the following options:
- Selected Customer Type
Specify the Customer Type you want to associate with the listed Customer Forms.
- Pattern
Enter a Customer Type pattern to select a range of Customer Types. Refine your search using Regular Expressions.
- Invoice Form
Specify the Invoice Form you want to assign to the Customer Type(s).
- Credit Memo Form
Specify the Credit Memo Form you want to assign to the Customer Type(s).
- Statement Form
Specify the Statement Form you want to assign to the Customer Type(s).
- Quote Form
Specify the Quote Form you want to assign to the Customer Type(s).
- Packing List Form
Specify the Packing List Form you want to assign to the Customer Type(s). The Packing List selection is used after Sales Order Line Item quantity has been issued to Shipping.
- Sales Order Pick List Form
Specify the Sales Order Pick List Form you want to assign to the Customer Type(s). The Sales Order Pick List selection is used before Sales Order Line Item quantity has been issued to Shipping.
Tip
The system includes two alternate Sales Order Pick List report definitions:
"PickingListSOClosedLines.xml"
"PickingListNoClosedLines.xml"
The first includes already closed Sales Order Line Items in the report; the other excludes closed Line Items. Report definitions (i.e., Forms) are assigned by Customer Type.
To the far right of the screen, the following buttons are available:
- CANCEL
Closes the screen without creating a Customer Form assignment, returning you to the previous screen.
- SAVE
Creates the Customer Form assignment and adds it to the master list of Customer Form assignments.