General Ledger section.
Journal Entry section.
To manually create a simple G/L journal entry, select the "Simple Journal Entry" option. The following screen will appear:
When creating a simple G/L journal entry, you are presented with the following options:
- Amount
Specify the monetary value of the transaction.
- Distribution Date
Specify the date when you want the simple journal entry to be posted to the General Ledger.
- Document Type
Displays the system-defined document type (i.e., "JE") used to identify simple journal entries in the General Ledger.
- Document #
Specify a Document Number to be associated with the transaction.
- Debit
Specify the Debit Account to be used for the transaction record.
- Credit
Specify the Credit Account to be used for the transaction record.
- Notes
This is a scrolling text field with word-wrapping for entering Notes related to the transaction. This may be a required field, depending on your system configuration.
Note
Your system may be configured to require Notes whenever manual journal entries are posted.
To the far right of the screen, the following buttons are available:
To create a series of G/L transactions, select the "Series Entry" option. The following screen will appear:
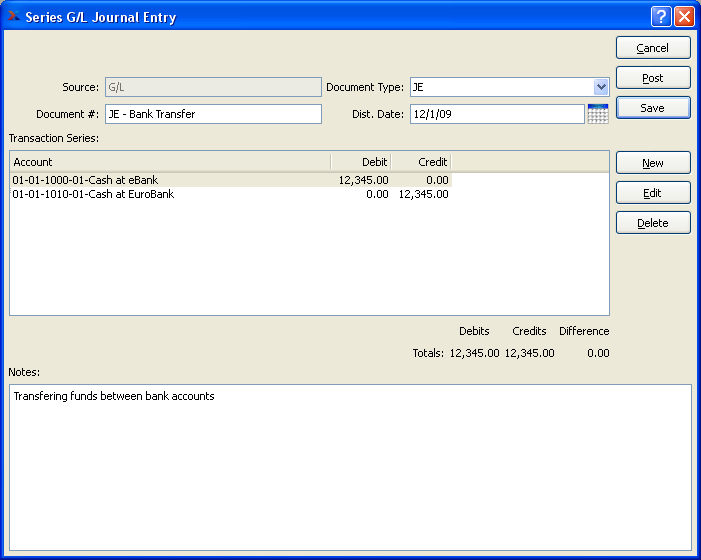
When creating a series of G/L transactions, you are presented with the following options:
- Source
Displays the source module for the transaction. By default this value will be "G/L."
- Document #
Enter a Document Number to identify the transaction series.
- Document Type
Specify a transaction type for classifying the series. By default, the Journal Entry (JE) transaction type will be used. However, you may select a different transaction type from the list. For explanations about the available transaction types, see Section 1, “ Inventory Transaction Types”.
- Dist. Date
Specify the date when you want the transaction series to be posted to the General Ledger.
- Transaction Series
Display lists transactions in the transaction series.
- Debits
Displays total Debits associated with the series. Totals will display in red if Debits and Credits do not balance.
- Credits
Displays total Credits associated with the series. Totals will display in red if Debits and Credits do not balance.
- Difference
Displays the difference between total Debits and Credits.
- Notes
This is a scrolling text field with word-wrapping for entering Notes related to the transaction series. This may be a required field, depending on your system configuration.
Note
Your system may be configured to require Notes whenever manual journal entries are posted.
To the far right of the screen, the following buttons are available:
Note
Series entries are always summary posted. In other words, if multiple entries are made for the same Account Number, the balance or summary of these entries will be posted—not each individual entry.
- SAVE
Select if you want to save the series transaction for posting at a later time.
- NEW
Opens screen for creating a new transaction item.
- EDIT
Enables you to edit highlighted transaction items. The edit screen is the same as that for creating a new transaction item—except that when editing, the fields will contain transaction item information. Double-clicking on a transaction item will also bring you to the editing screen.
- DELETE
Highlight a transaction and then select this button to remove the transaction from the list.
To add a new G/L transaction to the series, select the NEW button. The following screen will appear:
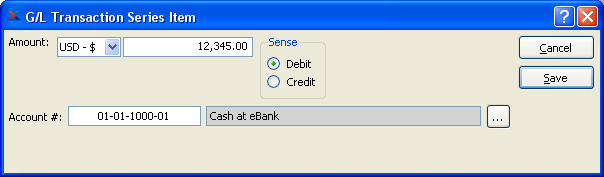
When adding a new G/L transaction item to the series, you are presented with the following options:
- Amount
Specify the monetary value of the transaction item.
- Sense
Choose one of the following options:
Debit: Select if transaction item Debits specified Account.
Credit: Select if transaction item Credits specified Account.
- Account
Specify the Account to be used for the transaction item record.
To the far right of the screen, the following buttons are available:
- CANCEL
Closes the screen without adding a new transaction item to the series, returning you to the previous screen.
- SAVE
Creates the transaction item and adds it to the series.
To display unposted G/L Series Journal Entries, select the "List Unposted Journal Entries" option. The following screen will appear:
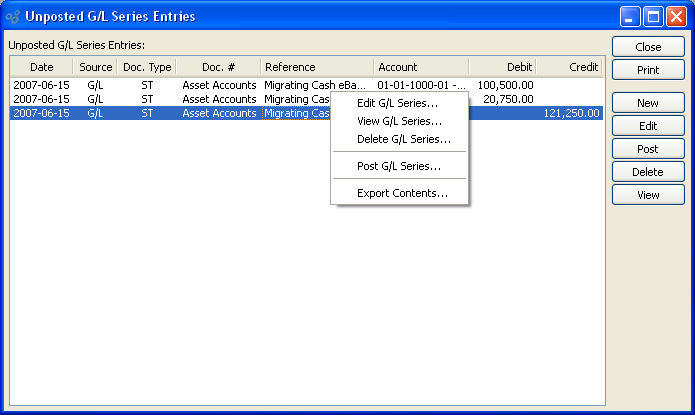
The "Unposted G/L Series Entries" screen displays information on all unposted G/L Series Journal Entries, including distribution date, source module, Document Type, Document Number, reference, Account Number of first Account in series, Debit amount, and Credit amount.
Tip
You may select multiple G/L Series Journal Entries for posting by highlighting them using your mouse—or a combination of your mouse and either the SHIFT or CTRL keys.
To the far right of the screen, the following buttons are available:
- CLOSE
Closes the screen, returning you to the application desktop.
Runs the report associated with this screen.
- NEW
Opens screen for creating a new G/L Series Journal Entry.
- EDIT
Enables you to edit highlighted G/L Series Journal Entries. The edit screen is the same as that for creating a new G/L Series Journal Entry—except that when editing, the fields will contain G/L Series Journal Entry information. Double-clicking on a G/L Series Journal Entry will also bring you to the editing screen.
- POST
Highlight one—or multiple—G/L Series Journal Entries, then select this button to post the selected G/L Series Journal Entries.
- DELETE
Highlight a G/L Series Journal Entry and then select this button to remove the G/L Series Journal Entry from the list.
- VIEW
Highlight a G/L Series Journal Entry and then select this button to reach a read-only view of the "Edit" screen.
Standard Journal section.
Standard Journals are designed to handle G/L Series transactions which must be repeated frequently on a recurring basis. For example, Standard Journals can be used for recording the payment of monthly utility bills—or any other transactions which must be posted regularly. Once a Standard Journal is set up, the posting of the Standard Journal can then be automated using the Batch Manager. In this way, Standard Journal postings can be scheduled at daily, weekly, or monthly intervals.
To create a new Standard Journal, select the "Enter New Standard Journal" option. The following screen will appear:
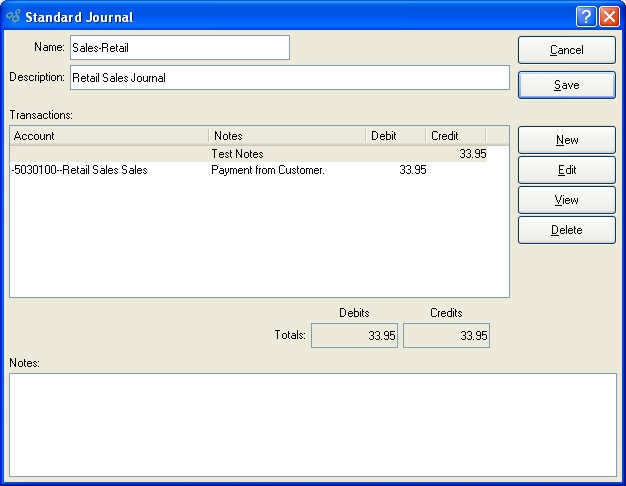
When creating a new Standard Journal, you are presented with the following options:
- Name
Enter a name to describe the Journal.
- Description
Enter a description to further describe the Journal.
- Transactions
Display lists transactions affiliated with the Journal.
- Totals
Displays the following information:
- Debits
Displays total Debits associated with the Journal. Totals will display in red if Debits and Credits do not balance.
- Credits
Displays total Credits associated with the Journal. Totals will display in red if Debits and Credits do not balance.
- Notes
This is a scrolling text field with word-wrapping for entering Notes related to the Journal.
To the far right of the screen, the following buttons are available:
- CANCEL
Closes the screen without creating a new Journal, returning you to the previous screen.
- SAVE
Creates the Journal and adds it to the master list of Standard Journals.
- NEW
Opens screen for adding new transactions to the Journal.
- EDIT
Enables you to edit highlighted transaction. The edit screen is the same as that for creating a new transaction—except that when editing, the fields will contain transaction information. Double-clicking on a transaction will also bring you to the editing screen.
- VIEW
Highlight a transaction and then select this button to reach a read-only view of the "Edit" screen.
- DELETE
Highlight a transaction and then select this button to remove the transaction from the list.
To add a new transaction to a Journal, select the NEW button. The following screen will appear:

When adding a new transaction to a Journal, you are presented with the following options:
- Amount
Specify the monetary value of the transaction.
- Sense
Choose one of the following options:
- Debit
Select if transaction Debits specified Account.
- Credit
Select if transaction Credits specified Account.
- Account
Specify the Account to be used for the transaction record.
To the far right of the screen, the following buttons are available:
- CANCEL
Closes the screen without adding a new transaction to the Journal, returning you to the previous screen.
- SAVE
Creates the transaction and adds it to the Journal.
To access the master list of Standard Journals, select the "List Standard Journals" option. The following screen will appear:
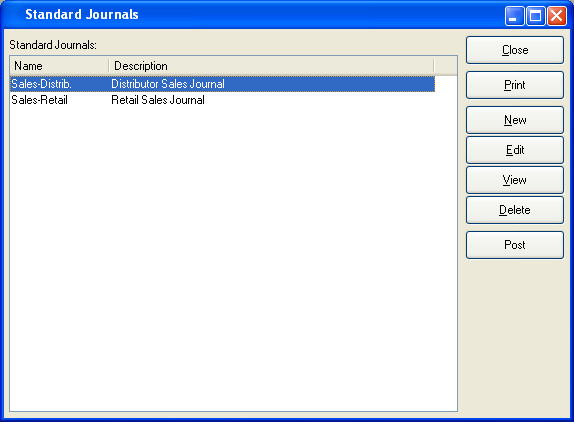
The "Standard Journals" screen displays information on all existing Standard Journals, including Journal name and Journal description.
To the far right of the list, the following buttons are available:
- CLOSE
Closes the screen, returning you to the application desktop.
Runs the report associated with this screen.
- NEW
Opens screen for creating a new Journal.
- EDIT
Enables you to edit highlighted Journal. The edit screen is the same as that for creating a new Journal—except that when editing, the fields will contain Journal information. Double-clicking on a Journal will also bring you to the editing screen.
- VIEW
Highlight a Journal and then select this button to reach a read-only view of the "Edit" screen.
- DELETE
Highlight a Journal and then select this button to remove the Journal from the list.
Standard Journals Groups are used to define groups of Standard Journals that are often posted together, such as during period end. To access the master list of Standard Journal Groups, select the "List Standard Journal Groups" option. The following screen will appear:
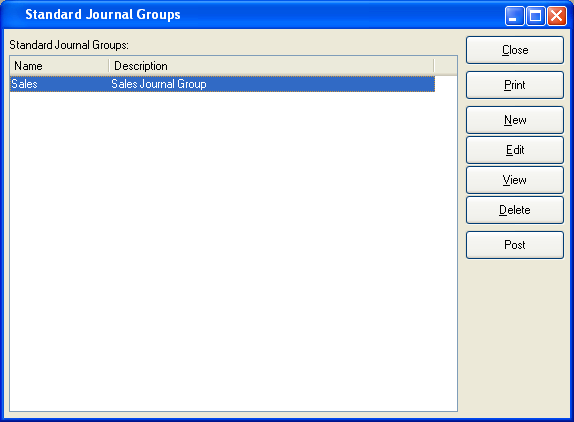
The "Standard Journals Groups" screen displays information on all existing Standard Journal Groups, including Journal Group name and Journal Group description.
To the far right of the list, the following buttons are available:
- CLOSE
Closes the screen, returning you to the application desktop.
Runs the report associated with this screen.
- NEW
Opens screen for creating a new Journal Group.
- EDIT
Enables you to edit highlighted Journal Group. The edit screen is the same as that for creating a new Journal Group—except that when editing, the fields will contain Journal Group information. Double-clicking on a Journal Group will also bring you to the editing screen.
- VIEW
Highlight a Journal Group and then select this button to reach a read-only view of the "Edit" screen.
- DELETE
Highlight a Journal Group and then select this button to remove the Journal Group from the list.
- POST
Highlight a Journal Group and then select this button to post transactions for the Journal Group to the General Ledger.
To create a new Standard Journal Group, select the NEW button. The following screen will appear:
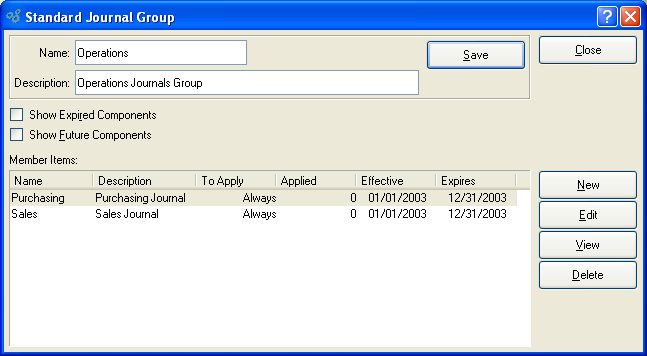
When creating a new Standard Journal Group, you are presented with the following options:
- Name
Enter a name to describe the Journal Group.
- Description
Enter a description to further describe the Journal Group.
- Show Expired Components
Select to include Journals that have been expired from the Journal Group in the displayed list of Journal Groups.
- Show Future Components
Select to include Journals that will in the future be added to the Journal Group in the displayed list of Journal Groups.
- Member Items
Display lists Journals associated with the Journal Group, using the specified parameters.
To the far right of the screen, the following buttons are available:
- CLOSE
Closes the screen, returning you to the previous screen.
- SAVE
Creates the Journal Group and saves any changes made to it.
Runs the report associated with this screen.
- NEW
Opens screen for adding a new Journal to the Journal Group.
- EDIT
Enables you to edit highlighted Journal. The edit screen is the same as that for creating a new Journal—except that when editing, the fields will contain Journal information. Double-clicking on a Journal will also bring you to the editing screen.
- VIEW
Highlight a Journal and then select this button to reach a read-only view of the "Edit" screen.
- DELETE
Highlight a Journal and then select this button to remove the Journal from the Journal Group.
To add a new Standard Journal to a Standard Journal Group, select the NEW button. The following screen will appear:
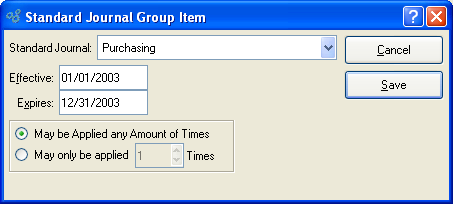
When adding a Standard Journal to a Standard Journal Group, you are presented with the following options:
- Standard Journal
Specify the Standard Journal you want to add to the Journal Group.
- Effective
Indicates date when Journal becomes an effective member of the Journal Group.
- Expires
Indicates date when Journal expires from the Journal Group.
- May be Applied any Amount of Times
Select if Standard Journal may be applied any amount of times.
- May only be Applied ... Times
Select if Standard Journal may be applied only a set amount of times.
Specify the maximum number of times the Standard Journal may be applied.
To the far right of the screen, the following buttons are available:
- CANCEL
Closes the screen without adding a new Journal to the Journal Group, returning you to the previous screen.
- SAVE
Adds the Journal to the Journal Group, using the specified parameters.
To post a Standard Journal, select the "Post Standard Journal" option. The following screen will appear:
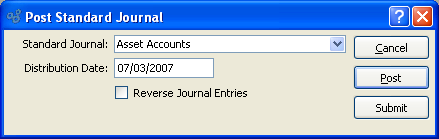
When posting a Standard Journal, you are presented with the following options:
- Standard Journal
Specify the Standard Journal you want to post.
- Distribution Date
Indicates date when the Standard Journal should be posted to the General Ledger.
- Reverse Journal Entries
Select if you want to reverse the selected Standard Journal when it is posted.
To the far right of the screen, the following buttons are available:
- CANCEL
Closes the screen without posting the Standard Journal, returning you to the application desktop.
- POST
Posts Standard Journal to the General Ledger effective on the specified distribution date.
- SUBMIT
Select to submit the Standard Journal to the Batch Manager.
To post a Standard Journal Group, select the "Post Standard Journal Group" option. The following screen will appear:

When posting a Standard Journal Group, you are presented with the following options:
- Standard Journal Group
Specify the Standard Journal Group you want to post.
- Distribution Date
Indicates date when the Standard Journal Group should be posted to the General Ledger.
- Reverse Journal Entries
Select if you want to reverse the selected Standard Journal Group when it is posted.
To the far right of the screen, the following buttons are available:
- CANCEL
Closes the screen without posting the Standard Journal Group, returning you to the application desktop.
- POST
Posts the Standard Journal Group to the General Ledger effective on the specified distribution date.
- SUBMIT
Select to submit the Standard Journal Group to the Batch Manager.
G/L Reports section.
To view General Ledger transactions sorted by source module and date, select the "G/L Transactions" option. The following screen will appear:
When displaying General Ledger transactions, you are presented with the following options:
- All Accounts
Select to display transactions for all G/L Accounts.
- Selected
Specify G/L Account whose transactions you want to display. By default, this option will be selected to prevent unintentional queries for all accounts.
- Show Running Total
Specify to show running total for a selected account.
- Start Date
G/L transactions posted on and after this date will be displayed. This is a required field.
- End Date
G/L transactions posted on and before this date will be displayed. This is a required field.
- All Sources
Select to display G/L transactions from all source modules.
- Selected Source
Specify source module whose G/L transactions you want to display.
- G/L Transactions
Display lists G/L transactions based on the specified parameters.
Tip
If your transaction records are displaying a "No" value in the "Posted" column, this means the transactions were not posted into an Accounting Period because one doesn't exist or the Accounting Period was frozen/closed at the time of posting. Once you create an Accounting Period for the time Period in question, your transaction records will display "Yes" in the posted column.
To the far right of the screen, the following buttons are available:
- CLOSE
Closes the screen, returning you to the application desktop.
- QUERY
Select to generate the display, using the specified parameters.
Start date and end date must be entered for request to proceed. Results will be displayed in the "G/L Transactions" list.
Prints a copy of the contents displayed on the screen.
Note
If the transaction refers to an Invoice, Purchase Order, Voucher, or Shipment, you may also drill down to view the original Document.
To view summarized General Ledger transactions, select the "Summarized G/L Transactions" option. The following screen will appear:
When displaying summarized General Ledger transactions, you are presented with the following options:
- All Sources
Select to display summarized G/L transactions from all source modules.
- Selected
Specify source module whose summarized G/L transactions you want to display.
- Start Date
G/L transactions posted on and after this date will be summarized in the display. This is a required field.
- End Date
G/L transactions posted on and before this date will be summarized in the display. This is a required field.
- Transactions
Select one of the following display options:
- All
Select to summarize all transactions in the display.
- Unposted
Select to summarize only unposted transactions in the display.
Note
An "unposted transaction" is a transaction involving Accounts whose Trial Balances have not yet been updated with the transaction information. Unposted transactions exist in a kind of limbo state. They are posted to the General Ledger (G/L), but not yet to the Trial Balance. This type of transaction occurs when users attempt to post transactions into frozen, closed, or non-existent Accounting Periods. Thawing and/or opening closed Periods is one method for correcting this situation; offsetting G/L journal entries may also be used.
- Posted
Select to summarize only posted transactions in the display.
- Transactions
This display is a nested list, with a plus ("+") sign located to the far left of the display next to each transaction that may be expanded to lower levels. By clicking your mouse on a plus sign, you reveal lower levels of information related to the transaction.
To the far right of the screen, the following buttons are available:
- CLOSE
Closes the screen, returning you to the application desktop.
- QUERY
Select to generate the display, using the specified parameters.
Start date and end date must be entered for request to proceed. Results will be displayed in the "Summarized G/L Transactions" list.
Prints a copy of the contents displayed on the screen.
Note
If the transaction refers to an Invoice, Purchase Order, or Voucher, you may also drill down to view the original Document.
To view series of General Ledger transactions, select the "G/L Series" option. The following screen will appear:
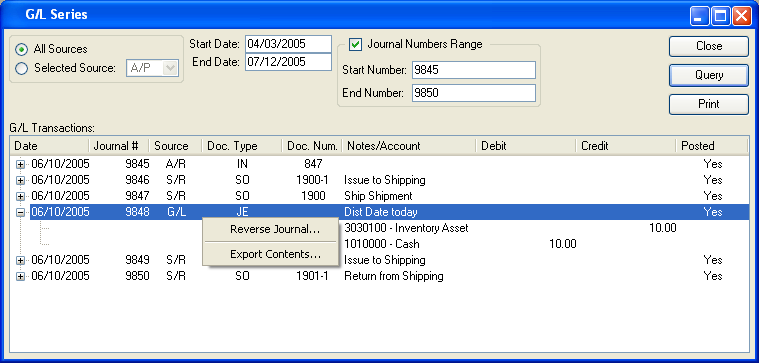
When displaying series of General Ledger transactions, you are presented with the following options:
- All Sources
Select to display serial G/L transactions from all source modules.
- Selected
Specify source module whose serial G/L transactions you want to display.
Menu includes modules whose transactions generate G/L records.
- Start Date
Serial G/L transactions posted on and after this date will be displayed. This is a required field.
- End Date
Serial G/L transactions posted on and before this date will be displayed. This is a required field.
- G/L Transactions
Display lists serial G/L transactions based on the specified parameters. This display is a nested list, with a plus ("+") sign located to the far left of the display next to each transaction that may be expanded to lower levels. By clicking your mouse on a plus sign, you reveal lower levels of information related to the transaction.
To the far right of the screen, the following buttons are available:
- CLOSE
Closes the screen, returning you to the application desktop.
- QUERY
Select to generate the display, using the specified parameters.
Start date and end date must be entered for request to proceed. Results will be displayed in the "G/L Transactions" list.
Prints a copy of the contents displayed on the screen.
Note
You may only reverse transactions which result from the posting of the following: Simple Journal Entry, Series Journal Entry, Standard Journal, or Standard Journal Group.
To view detailed information on past Standard Journal postings, select the "Standard Journal History" option. The following screen will appear:
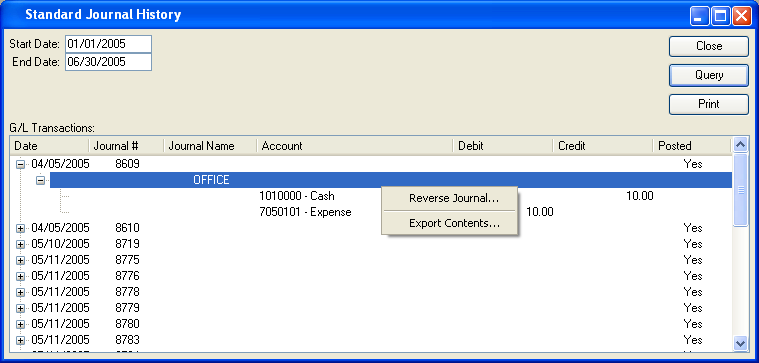
When displaying detailed information on past Standard Journal postings, you are presented with the following options:
- Start Date
Standard Journals posted on and after this date will be displayed. This is a required field.
- End Date
Standard Journals posted on and before this date will be displayed. This is a required field.
- G/L Transactions
Display lists Standard Journal posting history based on the specified parameters.
This display is a nested list, with a plus ("+") sign located to the far left of the display next to each transaction that may be expanded to lower levels. By clicking your mouse on a plus sign, you reveal lower levels of information related to the transaction.
To the far right of the screen, the following buttons are available:
- CLOSE
Closes the screen, returning you to the application desktop.
- QUERY
Select to generate the display, using the specified parameters.
Start date and end date must be entered for request to proceed. Results will be displayed in the "G/L Transactions" list.
Prints a copy of the contents displayed on the screen.
Note
You may only reverse transactions which result from the posting of the following: Simple Journal Entry, Series Journal Entry, Standard Journal, or Standard Journal Group.