The goal of this chapter is to orient you to some of the basic features of xTuple ERP. As you will see, these fundamentals appear throughout the application. We wanted to introduce them to you early so you would be familiar with them as you work your way through the xTuple Application modules.
Note
The screenshots and examples used throughout this Reference Guide are taken from the Manufacturing Edition Client for Windows, running on Windows XP. There is no functional difference between the Windows, Mac, or Linux Clients. You will find only minor graphical user interface differences. The same holds true for the xTuple ERP products.
The next sections describe the steps required to log in to and exit xTuple ERP. In some cases, you may need to ask your system administrator for information concerning site-specific settings.
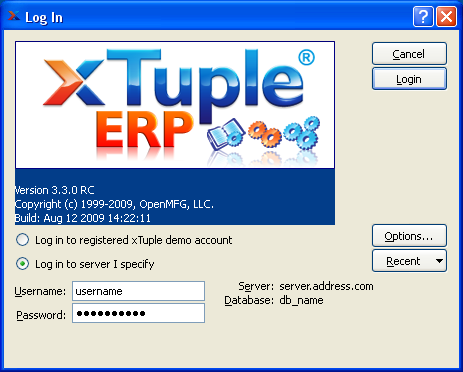
To log in using a Windows client, you should double-click on the xTuple ERP icon wherever it appears on your computer desktop. Likewise, Macintosh users may click on the xTuple ERP icon from their desktop. Linux users should run the appropriate xTuple ERP .sh file to launch the application. The following screen will appear:
Tip
You should always be sure to use a version of xTuple ERP which matches the version of your xTuple Database. Using mis-matched versions can lead to errors and loss of data integrity. The system will issue a warning message whenever you attempt to log in to a database whose version does not match the client version.
When logging into xTuple ERP, you are presented with the following options:
- Log in to registered xTuple demo account
Select this option if you are logging in to a demo database hosted on an xTuple server. If selected, the OPTIONS button will be disabled.
- Log in to server I specify
Select this option if you are logging in to any database other than an xTuple demo database. If selected, you can specify your connection details using the OPTIONS button.
- Username
Enter your assigned username. Usernames are established by your system administrator. The username is case-sensitive.
- Password
Enter your assigned password. Passwords are established by your system administrator. The password you type into this field will not display on your screen, but will be represented by asterisks (*) for security purposes.
- Server
Displays the name of the server you will be connecting to.
- Database
Displays the name of the database you will be connecting to.
To the far right of the screen, the following buttons are available:
- CANCEL
Closes the screen, returning you to your computer desktop.
- LOGIN
Click to log in to the application.
- OPTIONS
Select to verify or change your connection settings. This button will be disabled if logging in to an xTuple demo database.
Note
Most users will not need to change their Login options. If you have questions about your option settings, contact your system administrator.
- RECENT
Select to see a list of databases you have connected to recently. To reconnect to one of those databases, simply select a database connection from the list—then log in using the appropriate username/password combination. This feature bypasses the need to enter connection options manually, as long as those options have been entered recently. To clear the list of recent connection, choose the "Clear Menu" option.
To verify or change your connection settings, select the OPTIONS button. The following screen will appear:
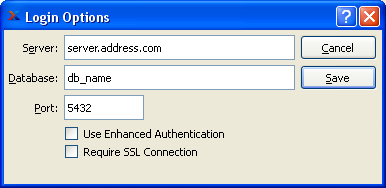
When viewing or changing your connection settings, you are presented with the following options:
- Server
Enter the address of the server where your xTuple Database is running. The address will consist of either a TCP/IP Address or a Network Alias Name. If the network address for the xTuple Server changes, you may need to change the address in this field.
- Database
Enter the name of the xTuple Database you want to connect to. The application can be used to connect to multiple xTuple databases. Be sure to enter the correct name of the database you want to access.
- Port
Displays the default port. The default port for the xTuple Database is 5432.
- Use Enhanced Authentication
Select if your site requires you to use enhanced authentication. Enhanced authentication adds a layer to the authentication process used to log in to xTuple ERP. When this feature is turned on, user passwords are stored in the xTuple Database in a modified form. The end result is that you may only log in to an xTuple Database using xTuple ERP.
Tip
Do not select the enhanced authentication option if your site does not use this method. You will find you cannot connect to the database.
- Require SSL Connection
Select if your site requires you to use a Secure Sockets Layer (SSL) connection. Selecting this option guarantees you will connect to your xTuple Database with an SSL connection. If your xTuple Database is not configured to support SSL, you will not be able to connect if this option is selected. Using SSL for client-server connections adds a layer of encryption to the authentication process.
To the far right of the screen, the following buttons are available:
- CANCEL
Closes the screen, returning you to the previous screen.
- SAVE
Saves your connection settings. Any settings you save will become your default connection settings. To change your default settings, update your Login options and then save them.
Once your username and password have been successfully authenticated, the main application desktop will appear, as shown below:

Note
The main application desktop may vary from user to user, depending on the user's granted privileges, preference settings, and the xTuple ERP version used.
In general, each of the main menu options corresponds to a different module. There are three exceptions to that rule:
- Window
The following options appear under the "Window" menu:
- Cascade
Select to arrange open screens in a cascading pattern.
- Tile
Select to arrange open screens in a tiled pattern.
- Close Active Window
Select to close the currently active screen.
- Close All Windows
Select to close all open screens.
- Community
If you have an open Internet connection, the following "Community" menu options will open in your default web browser:
- xTuple.org Home
Select to launch the xTuple.org home page.
- My Online User Account
Select to access your xTuple community user account.
- Online Customer Support
Select to access the xTuple customer support portal.
- Online Documentation / Wiki
Select to access on-line product documentation.
- xChange online store
Select to access the online store for xTuple ERP. It's called the xChange.
- Discussion Forums
Select to browse the discussion forums on the xTuple.org site.
- Bugs and Feature Requests
Select to access the Issue Tracking system on the xTuple.org site.
- Downloads
Select to access the downloads page on the xTuple.org site.
- Blogs
Select to browse the blogs on the xTuple.org site.
- Translation Portal
Select to access the Translation Portal, where you can find language packs for many international languages.
- Help
The following options appear under the "Help" menu:
- About
Select to view information about the xTuple ERP version you are running.
- Table of Contents
Select to access xTuple ERP Help files. If you have the application-based help files installed on your system, then you will be brought to the Table of Contents for those. If you do not have the application-based help files installed, then you will be presented with a link to reach the help files on the xTuple community website. The web-based help files share the same content as the application-based help files.
To exit the application using the System menu, select the "Exit" option from the System module, as shown below:
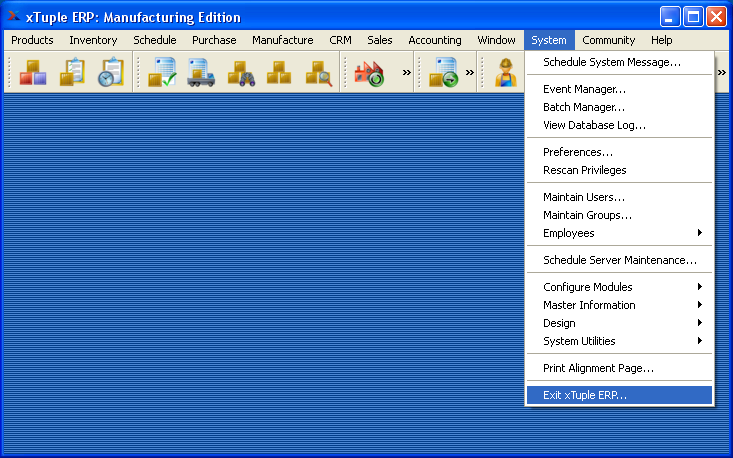
After selecting this option, the application will close, returning you to your computer desktop
Tip
Be sure to close all open screens before exiting xTuple ERP to help prevent data loss. When closing screens, it is recommended that you use the CLOSE button (or similar). We recommend that you not close screens using the "X" button on the screen.