| Prev | Part I. Introduction Chapter 2. ProActive And IC2D Installation |
 |
Next |
ProActive is available for download under the GPL 2 license. ProActive requires JDK 1.5 or later to be installed on your computer. Please note that ProActive will NOT run with any version prior to 1.5 since some features introduced in JDK 1.5 are essential.
Download and expand the ProActive archive
Set the JAVA_HOME variable to the Java distribution you want to use
Launch the scripts located in ProActive/scripts/unix
or ProActive/scripts/windows
Download and unzip the ProActive archive
Include in your CLASSPATH the
ProActive jar file ProActive/dist/lib/ProActive.jar
along with ProActive/dist/javassist.jar,
ProActive/dist/log4j.jar,
ProActive/dist/xercesImpl.jar,
ProActive/dist/components/fractal.jar,
and ProActive/dist/bouncycastle.jar
Depending on your project needs, you might need to include other libraries
located in the ProActive/lib directory.
Launch the JVM with a security policy
file using the option
-Djava.security.policy=pathToFile. A basic policy file
can be found at ProActive/dist/proactive.java.policy. You can also specify a
log4j configuration
file with the property -Dlog4j.configuration=file:pathToFile.
If a configuration file is not specified a default logger that logs on the console will be created.
Below the different steps are described in more detail.
You can download the archive file (a standard zip file) containing ProActive from the download section of the ProActive home page. You will be asked to accept the license agreement and provide a few details including your email address. Within a few minutes you will receive an email containing a password and an URL where you will be able to download the latest release of ProActive.
Unzip the archive using your favorite ZIP program, such as Winzip under Windows or the unzip command-line utility under most Linux/Unix systems. Unzipping the archive creates a ProActive directory and all the files contained in the archive go into this directory and its subdirectories.
Here is a quick overview of the directory structure of the archive:
|
Directory or File |
Description |
|
|
ProActive bytecode that you need to include in the
|
|
|
The bytecode and resources of all examples included with ProActive.
This jar file needs to be included in the |
|
|
The bytecode and resources of IC2D. This jar file needs to be included in
the |
|
|
The external libraries used by ProActive |
|
|
ProActive documentation including the full API doc |
|
|
Unix sh scripts for running the examples |
|
|
Windows bat batch files for running the examples |
|
|
For source version only, the full source code of ProActive |
|
|
For source version only, the scripts to compile ProActive using Ant. |
In order to use ProActive to write your
application you need to place in your CLASSPATH the
following jar files :
dist/lib/ProActive.jar - main library
lib/javassist.jar - used to handle bytecode manipulation.
lib/log4j.jar - logging
mechanism used in ProActive.
lib/xercesImpl.jar
- used to parse and validate XML
files, like deployment descriptors, configuration files and component
files (see Chapter 20, XML Deployment Descriptors, Chapter 18, ProActive Basic Configuration, and Chapter 25, Introduction).
lib/components/fractal.jar
- component model used for ProActive Components (see
Section 27.5.1, “Controllers and interceptors”).
lib/bouncycastle.jar - used by the ProActive security framework (see Chapter 34, Security Framework).
![[Note]](images/note.png) |
Note |
|---|---|
|
You do not need to modify your |
Under Linux/Unix:
Open a Linux/Unix terminal, change to the install directory using cd
and set the the CLASSPATH.
cd [Your ProActive install directory]
PA_PATH=$(pwd)
export CLASSPATH=.:${PA_PATH}/lib/dist/ProActive_examples.jar:\
	${PA_PATH}/lib/dist/ProActive/ProActive.jar:${PA_PATH}/lib/dist/ibis:\
	${PA_PATH}/lib/dist/asm-2.2.1.jar:\
	${PA_PATH}/lib/dist/log4j.jar:${PA_PATH}/lib/dist/xercesImpl.jar:\
	${PA_PATH}/lib/dist/fractal.jar:${PA_PATH}/lib/dist/bouncycastle.jar:\
	${PA_PATH}/lib/dist/javassist.jar
Under Windows:
Open a Windows command terminal by executing either cmd or
command in Start-> Run
Change to the ProActive installation folder by using cd
then set the CLASSPATH by executing the following commands.
cd [Your ProActive install directory]
set CLASSPATH=.;%CD%\ProActive_examples.jar;\
	%CD%\lib\dist\ProActive.jar;%CD%\lib\dist\ibis;\
	%CD%\lib\dist\asm-2.2.1.jar;%CD%\lib\dist\log4j.jar;\
	%CD%\lib\dist\xercesImpl.jar;%CD%\lib\dist\fractal.jar;\
	%CD%\lib\dist\bouncycastle.jar;%CD%\lib\dist\javassist.jar
In addition to the jar files above you may want to add the following jar files. None of them are used directly by the core functionalities of ProActive but only in part of the library. They are not needed at runtime if those specific functionalities are not used but they are needed to compile all the code.
trilead-ssh2.jar - used when tunneling with rmissh.
cryptix.jar, cog-jglobus-1.2.jar, puretls.jar, cryptix32.jar, cryptix-asn1.jar, cog-ogce.jar, cog-jglobus.jar
- used to interface with Globus
fractal.jar, fractal-gui.jar, fractal-swing.jar, fractal-adl.jar - used by the the Fractal components
commons-discovery.jar, saaj-api.jar, commons-logging.jar, jaxrpc.jar, activation.jar, wsdl4j.jar, mail.jar,servlet-api.jar,
                              				xml-apis.jar, axis.jar, soap.jar
- used by the Web Services features
bcel-5.1.jar, ibis-util-1.0.jar, colobus-0.1.jar,
                                       ibis-connect-1.0.jar, ibis-1.4.jar, bcel-5.1-fixes-1.0.jar
- used by Ibis if
configured as communication protocol
client.jar, ajo.jar, SystemDefaults.txt, njs_client.jar, scriptPlugin.jar, jh.jar
- used when deploying to a UNICORE site.
classad.jar, glite-wms-jdlj.jar - used when deploying on gLite sites.
The jar files can be found under Proactive/lib and under
ProaActive/dist/lib.
See Permissions
in the JavaTM 2 SDK to learn more about Java permissions. The
option -Djava.security.policy=pathToFile will specify which security policy file to
use within ProActive. As a first approximation, you can create a simple security
policy file granting all permissions:
grant {
  permission java.security.AllPermission;
};
|
Note |
|---|---|
|
If you use the scripts provided with the distribution to run the
examples an existing policy file named
|
See for logging using
the Apache log4j. The
option -Dlog4j.configuration=file:pathToFile will specify which logging policy file to
use within ProActive. As a first approximation, you can create a simple logging
policy file:
# This file represents the log4j config file for non regression tests.
# It is given as property (in the proactive.xml) when starting nonregression tests

# The default logging level is INFO
# The root logger logs in the test.log file

log4j.rootLogger=INFO,CONSOLE
log4j.logger.testsuite=INFO,CONSOLE

#log4j.logger.testsuite = TRACE

########### The following are existing categories in ProActive
#log4j.logger.proactive = INFO
#log4j.logger.proactive.classloader = DEBUG
#log4j.logger.proactive.events = DEBUG
#log4j.logger.proactive.runtime = DEBUG
#log4j.logger.proactive.body = DEBUG
#log4j.logger.proactive.mop = DEBUG
#log4j.logger.proactive.groups = DEBUG
#log4j.logger.proactive.sync_call = DEBUG
#log4j.logger.proactive.deployment = DEBUG
#log4j.logger.proactive.deployment.log = DEBUG
#log4j.logger.proactive.deployment.process = DEBUG
#log4j.logger.proactive.deployment.filetransfer = DEBUG,CONSOLE
#log4j.logger.proactive.filetransfer = DEBUG
#log4j.logger.proactive.nfe = FATAL
#log4j.logger.proactive.gc = DEBUG
#log4j.logger.proactive.ft = DEBUG
#log4j.logger.proactive.ft.cic = DEBUG
#log4j.logger.proactive.ft.pml = DEBUG
#log4j.logger.proactive.communication.transport.http = DEBUG
#log4j.logger.proactive.communication.rmi = DEBUG
#log4j.logger.proactive.communication.ssh = DEBUG
#log4j.logger.proactive.communication.transport.http = DEBUG
#log4j.logger.proactive.migration = DEBUG
#log4j.logger.proactive.communication.requests = DEBUG
#log4j.logger.proactive.examples = DEBUG

#log4j.logger.proactive.components = DEBUG
#log4j.logger.proactive.components.requests = DEBUG
#log4j.logger.proactive.components.activity = DEBUG
#log4j.logger.proactive.components.bytecodegeneration = DEBUG
#log4j.logger.proactive.components.adl = DEBUG
#log4j.logger.proactive.components.gui = DEBUG

#log4j.logger.proactive.p2p = DEBUG
#log4j.logger.proactive.p2p.startservice = DEBUG
#log4j.logger.proactive.p2p.vn = DEBUG
#log4j.logger.proactive.p2p.vn.service = DEBUG
#log4j.logger.proactive.p2p.nodes = DEBUG
#log4j.logger.proactive.p2p.acquaintances = DEBUG
#log4j.logger.proactive.p2p.first_contact = DEBUG
#log4j.logger.proactive.p2p.skeletons = DEBUG
#log4j.logger.proactive.p2p.skeletons.worker = DEBUG
#log4j.logger.proactive.p2p.skeletons.manager = DEBUG
#log4j.logger.proactive.p2p.daemon = DEBUG

#log4j.logger.proactive.security = DEBUG
#log4j.logger.proactive.security.node = DEBUG
#log4j.logger.proactive.security.session = DEBUG
#log4j.logger.proactive.security.body = DEBUG
#log4j.logger.proactive.security.manager = DEBUG
#log4j.logger.proactive.security.request = DEBUG
#log4j.logger.proactive.security.runtime = DEBUG
#log4j.logger.proactive.security.policy = DEBUG
#log4j.logger.proactive.security.policyserver = DEBUG
#log4j.logger.proactive.security.crypto = DEBUG
#log4j.logger.proactive.security.psm = DEBUG

#log4j.logger.proactive.skeletons = DEBUG
#log4j.logger.proactive.skeletons.taskpool = DEBUG
#log4j.logger.proactive.skeletons.structure = DEBUG
#log4j.logger.proactive.skeletons.environment = DEBUG
#log4j.logger.proactive.skeletons.application = DEBUG
#log4j.logger.proactive.skeletons.diagnosis	 = DEBUG
#log4j.logger.proactive.skeletons.system = DEBUG

#log4j.logger.proactive.scheduler = DEBUG
#log4j.logger.proactive.resourceManager = DEBUG

#log4j.logger.proactive.configuration = DEBUG
#log4j.logger.proactive.remoteobject = DEBUG,CONSOLE

#log4j.logger.proactive.jmx = DEBUG
#log4j.logger.proactive.jmx.mbean = DEBUG
#log4j.logger.proactive.jmx.notification = DEBUG

# Appender FILE writes to the file "tests.log".
log4j.appender.FILE=org.apache.log4j.FileAppender
log4j.appender.FILE.File=tests.log
# the following recreates a file for each run
log4j.appender.FILE.Append=false
# Appender FILE uses the PatternLayout.
log4j.appender.FILE.layout=org.apache.log4j.PatternLayout
# %X{hostname} adds the hostname
# %X{runtime} adds the runtime url
log4j.appender.FILE.layout.ConversionPattern=%5p [%t]: %m%n


#CONSOLE uses PatternLayout
#and displays the associated message (%m)
#using the platform dependant separator (%n)
#Use %M for method names,
#%X{hostname} for hostname and %X{runtime} for runtime url
#see log4j documentation for details

log4j.appender.CONSOLE=org.apache.log4j.ConsoleAppender
log4j.appender.CONSOLE.layout=org.apache.log4j.PatternLayout
# %X{hostname} adds the hostname
# %X{runtime} adds the runtime url
#log4j.appender.CONSOLE.layout.ConversionPattern=%n%X{runtime} - [%20.20c{2}] %m
log4j.appender.CONSOLE.layout.ConversionPattern=%m %n
|
Note |
|---|---|
|
If you use the scripts provided with the distribution to run the
examples an existing log4j file named |
You can try to run the test applications provided with ProActive.
Each example comes with a script to launch the application. Depending on your
operating system, the script you need to launch is located either in ProActive/scripts/unix or
ProActive/scripts/windows. The source code of all the examples can be found in the directory ProActive/src/Examples/org/objectweb/proactive/examples/.
This example is the ProActive version of the Readers/Writers canonical problem. To illustrate the ease-of-use of the ProActive model, different synchronization policies can be applied without even stopping the application. This example is based on a easy to use Swing GUI.
script : readers.sh or
readers.bat
source : examples/readers
This example is one possible implementation of the well-known Dining Philosophers synchronization problem. This example is based on a easy to use Swing GUI.
script : philosophers.sh or
philosophers.bat
source : examples/philosophers
You can download the archive file (a standard zip file) containing IC2D from the download section of the ProActive home page. You will be asked to accept the license agreement and provide a few details including your email address. Within a few minutes you will receive an email containing a password and an URL where you will be able to download the latest release of IC2D.
Unzip the archive using your favorite ZIP program, such as Winzip under Windows or the unzip command-line utility under most Linux/Unix systems. Unzipping the archive creates an IC2D directory and all the files contained in the archive go into this directory and its subdirectories.
Run IC2D from the installation folder to start monitoring. For information on using IC2D read Chapter 39, IC2D: Interactive Control and Debugging of Distribution
If you want to develop IC2D or plugins for IC2D the installation steps are the following:
Download and unpack the RCP/Plug-in Developers version of Eclipse.
Install Subversion or your SVN client of choice.
Download ProActive for development through the anonymous or authenticated SVN. The SVN and Eclipse configuration information can be found on the INRIA gForge website.
Compile IC2D and ProActive by running
cd [Your ProActive install directory]/compile
./build deploy
./build ic2d.libCopy
Import the IC2D plugin by going to File --> Import.
Import from the ProActive project in the workspace.
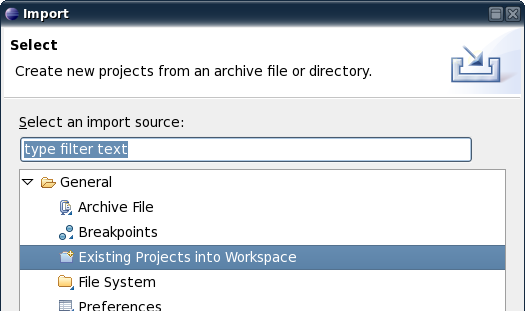
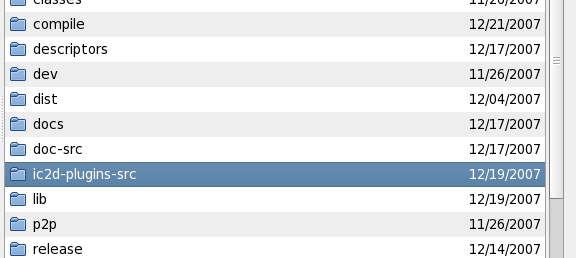
Browse for the directory containing the IC2D plugins.
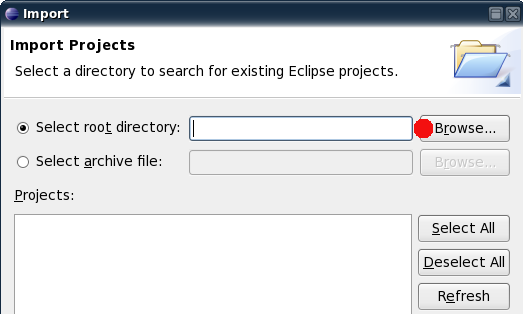
The directory
is ic2d-plugins-src in the ProActive installation
directory.
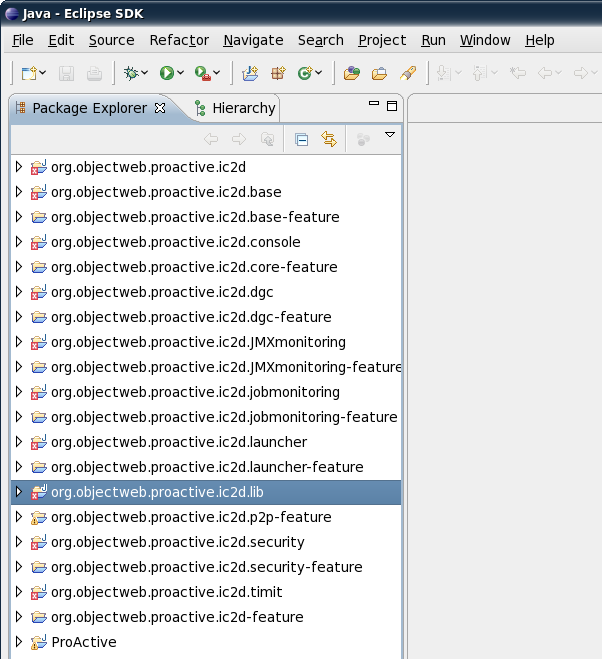
When the plugins have finished loading click on the Finish button and Eclipse should look like this:
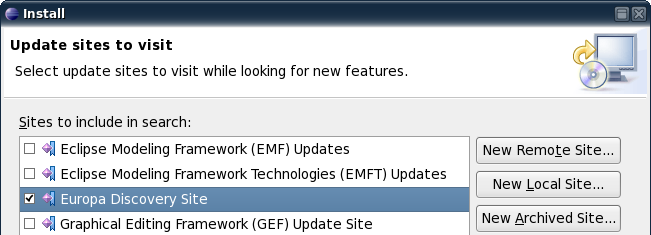
Install the Business Intelligence and Reporting Tools used by TimIt for profiling. To install go to Help-> Software Updates -> Find And Install.
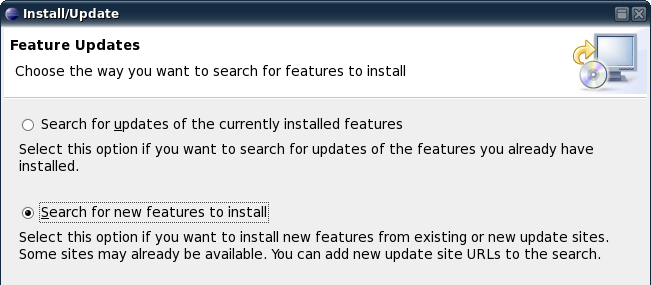
Select Europa Discovery:
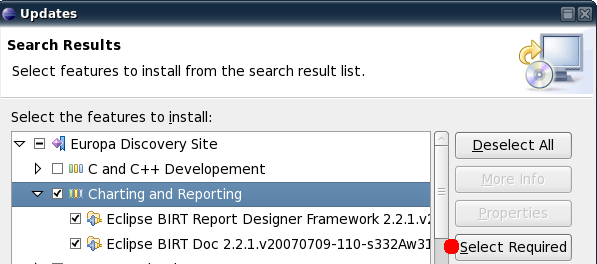
Select "Charting and Reporting" and then click the Select Required button:
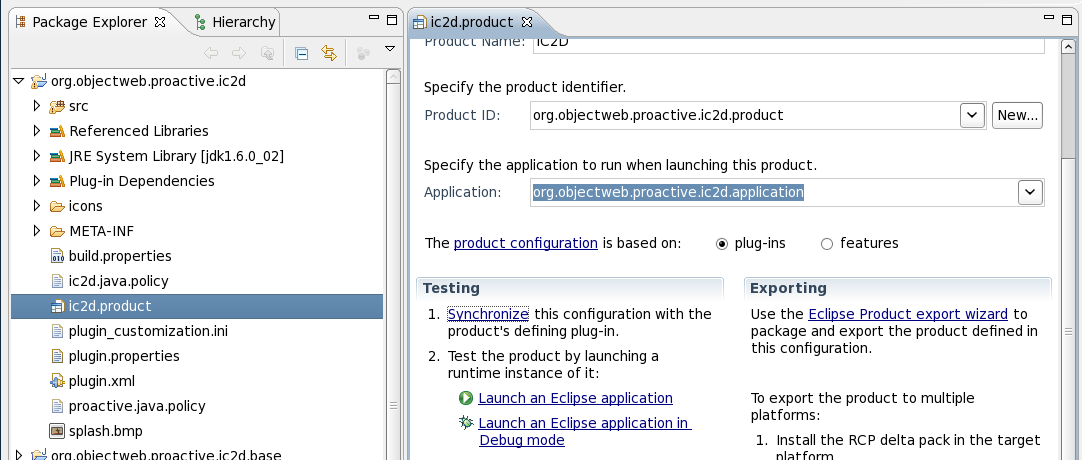
After the Birt installation is done, go to ic2dproduct and click Synchronize and then click on Launch Application. Don't worry if the launch fails we will fix that in the next step.
Open the Run Dialog, click on ic2d.product, click on Plugins tab, select all the workspace plugins, click on the Add Required button, click on Apply, and then click on Run.

You now have a running IC2D application. Feel free to test and improve the code.
ProActive has a job scheduler that can be used for submitting tasks and examining results. For an introduction on how to use the job scheduler read the scheduler documentation present on the ProActive site
© 1997-2008 INRIA Sophia Antipolis All Rights Reserved