Table of Contents
- Introduction
- 1. Installation
- 2. Architecture
- 3. Configuring Pustefix
- 4. Core Pustefix tag library
- 5. Important Concepts
- 6. Advanced topics
- 7. Module Support
- 8. Testing
- Glossary
List of Figures
List of Tables
- 3.1. Exception processor properties
- 3.2. Attributes of the <make> tag
- 3.3. Attributes of the <page> tag
- 3.4. Attributes of the <target> tag
- 3.5. Attributes of the <target> tag
- 4.1. The Core Pustefix XSLT Tags
- 4.2. Attributes of the pfx:button tag
- 4.3. Attributes of the pfx:include tag
- 4.4. Attributes of the pfx:maincontent tag
- 4.5. Attributes of the pfx:image tag
- 4.6. Attributes of the pfx:forminput tag
- 4.7. Attributes of form submit controls
- 4.8. Attributes of pfx:anchor
- 4.9. Attributes of pfx:argument
- 4.10. Attributes of pfx:command
- 4.11. Attributes of pfx:xinp[@type="text"]
- 4.12. Attributes of pfx:xinp[@type="radio|check"]
- 4.13. Attributes of pfx:xinp[@type="select"]
- 4.14. Attributes of pfx:option
- 4.15. Attributes of the pfx:checkactive and pfx:checknotactive tags
- 5.1. Variables of the context during processing
- 5.2. Attributes of an iwrp parameter
List of Examples
- 4.1. Using
<pfx:checkfield> - 6.1. Configuring roles
Pustefix is a framework that helps you to develop web based applications (referred to as projects here).
The framework consists of two more or less independent parts:
A machinery to apply recursive XSLT transformations that produces the UI of the web application.
A Java framework that takes input from the UI to change the application data and supplies changes of the application data back to the UI.
Together, the framework acts similar to the Model-View-Controller pattern (as far as this is possible in the context of a web application).
This reference guide covers all important topics that you need to know when working with any aspects of the Pustefix framework. If you are new to Pustefix we recommend reading one of the tutorials.
Table of Contents
Before we can get started, you have to make sure that some requirements are met by your development environment. You will need:
JDK 5.0 or newer
POSIX-like operating system (Pustefix has been tested with Linux and Mac OS X, but might also work with other systems like *BSD)
Apache Tomcat 5.5.x
Apache Ant 1.6.5 or newer
The installation of these tools (except Tomcat) is not covered by this tutorial. Please refer to the documentation provided with these tools for installation instructions.
If you are not using Eclipse, you can just create an empty directory that will contain the project files and proceed with Section 1.3, “Unpack the skeleton”.
Start the Eclipse workbench and create a new project of type Java Project".
Make sure that you choose separate source and build folders: Use
src for the source and build for
the build folder. This is important because the Pustefix build script
expects these folders.
Download the newest pfixcore-skel-X.X.X.tar.gz from
Pustefix's downloads page.
Unpack the archive to a temporary directory. A new directory with the name
skel will be created. Copy the content of this directory
to your new project directory.
Now you need to download Apache Tomcat. Choose the
.tar.gz archive from the download page and place it in
the lib/tomcat directory of your project directory.
After you are done with that, refresh the resources view in Eclipse to make the new files appear.
To make features like auto-completion and auto-build work, you have to
import the libraries into Eclipse. Right-click on your project in Eclipse
and choose "Build Path" ⇒ "Configure Build Path...". Now use the
"Add JARs..." button to add all libraries from the project's
lib directory.
As Pustefix generates some classes, you have to add the folder with the
generated sources to Eclipse's source path. To make this work choose the
"Source" tab in the same dialog you used to configure the build path and
add the gensrc folder to the list of source folders.
Finally, you have to configure the path to the JAR file containing Ant.
In Eclipse choose ⇒ .
In the dialog window choose ⇒ ⇒
. Choose
and create a variable with the name PFX_ANT_LIB
that contains the path to the lib/ant.jar within your
Ant installation directory.
Within the project directory, create a file called
build.properties containing two properties:
standalone.tomcat=true
makemode=test
The first property tells the build process, that we do want to run Tomcat without Apache Httpd integration. Apache Httpd integration can be useful, because static files can be served faster. However this is an advanced topic and for our purposes Tomcat alone will be okay.
The second parameter set the so-called "make mode". This flag can be set to either "test" or "prod" and will cause the editor console to appear in web pages when in "test" mode. In fact you can even make your own settings depend on the make mode, but we will take care of this later. For the moment "test" mode is just what we want. By the way, whenever you switch the make mode, you should do a complete rebuild using ant realclean && ant to make sure, all resources have been built using the same make mode.
Now run ant to perform a first build of the environment. This will create needed symlinks and initialize the environment.
Table of Contents
Figure 2.1, “High Level View of the system” shows the two main parts of the Pustefix system. On the left you can see the java framework. A request coming from the browser enters the business logic. After the processing has finished, the business logic delivers the result as a (in memory) DOM tree. To get a more detailed overview of the business logic, take a look at Chapter 5, Important Concepts.
The stylesheet that's responsible to render the UI to displays the result data is requested from the XML/XSLT generator. It uses the DOM tree as input to create the HTML output that is displayed on the browser.
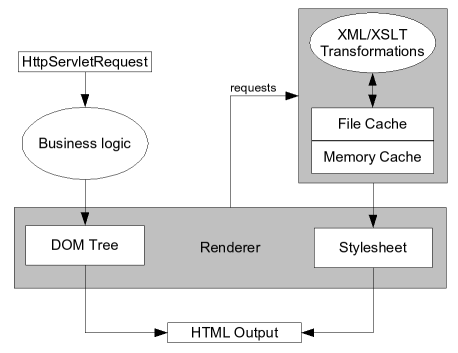
The stylesheet generator makes heavy use of caching to ensure that transformations are never made twice unless the result is out of date. Normally all generated stylesheets are cached in memory (and on disc). If you don't have enough memory to hold your site in RAM, you can specify other cache objects. E.g. we supply a LRU cache that can be configured to hold only the last N generated objects in memory.
Figure 2.2, “The Pustefix backend system” shows, how the different interfaces and classes in Pustefix are connected (not including web services and direct output support).
Figure 2.2. The Pustefix backend system
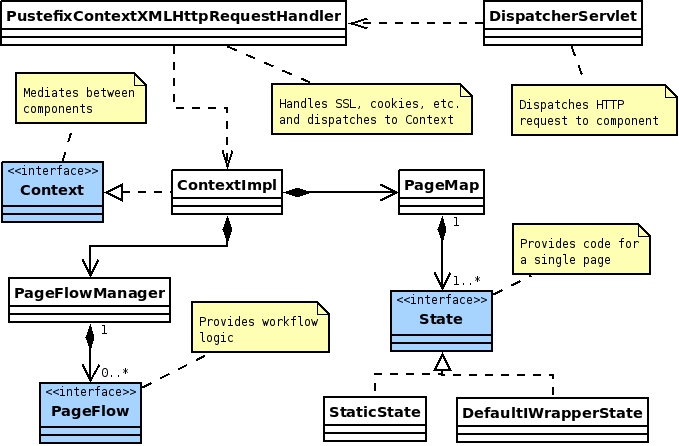
The Pustefix application runs within a Spring ApplicationContext
that is created by the DispatcherServlet. The servlet dispatches
all requests to HttpRequestHandlers that are managed as
beans in the application context. PustefixContextXMLHttpRequestHandler
handles the requests to Pustefix pages and takes care of session, cookie and SSL management.
The actual request processing (workflow handling, dispatching to the right
State) is performed by Context
(or more precisely ContextImpl).
The XML/XSLT System of Pustefix is responsible for generating the final stylesheet that represents the static content of a page. This stylesheet is then used together with the DOM tree that holds the result of the request (as given by the business logic) to produce the final HTML output.
Figure 2.3, “Recursive XSL transformations” shows the typical transformations and files that are
involved in producing the final stylesheet BazPage.xsl.
Note that we only discuss the common case here, arbitrary complex and deep transformation trees are in fact possible.
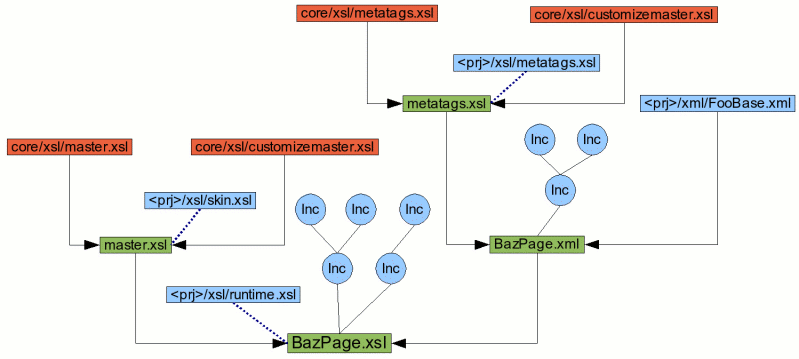
The red boxes are supplied by the framework, you don't need to create them yourself and as an
application programmer, you can't change them. Currently this is only the case for
core/xsl/master.xsl, core/xsl/metatags.xsl,
core/xsl/customizemaster.xsl and other stylesheets that make up the core
environment (these are not shown as they are included into master.xsl and
metatags.xsl via xsl:include transparently for the user).
The green boxes are the result of XSL transformations.
The blue boxes represent files that you need to create yourself. The [PROJECT]/xsl/skin.xsl and
[PROJECT]/xsl/metatags.xsl files are special, as they are not a target (see below) but just another
XSLT stylesheet that can be included via xsl:include into master.xsl and metatags.xsl resp.
[PROJECT]/xsl/skin.xsl contains the project specific templates that should apply on the last
transformation stage, while [PROJECT]/xsl/metatags.xsl contains the project specific templates that
apply only on the first stage.
There are projects that don't use a [PROJECT]/xsl/skin.xsl stylesheet at all or include even more
stylesheets. Making master.xsl aware of the presence of the [PROJECT]/xsl/skin.xsl stylesheet is
part of the transformation from core/xsl/master.xsl + core/xsl/customizemaster.xsl --> master.xsl
It'a also posible that a project doesn't use a [PROJECT]/xsl/metatags.xsl stylesheet or includes
more stylesheets: Similar to master.xsl it's the responsibility of the transformation from
core/xsl/metatags.xsl + core/xsl/customizemaster.xsl --> metatags.xsl to customize the resulting
metatags.xsl to include the stylesheets.
The [PROJECT]/xml/FooBase.xml file defines the structure of the "BazPage" page (e.g. frames, the outer
table structure if you do the layout with tables or divs and the like). You define one of these
structural xml files for every layout you want to use in your project (the number of structural xml
files is typically quite small, as many pages share the same layout).
The blue discs blue discs represent include parts. These are little snippets of XML code that make up the actual content of the page. As can be seen from the diagram, they can include each other, as long as there is no cyclic inclusion (so no include part can include itself either directly or indirectly). Include parts have a name and are organized into so called include documents. These can hold an arbitrary number of parts.
A target is everything that is the result of a XSLT transformation as seen in Figure 2.3, “Recursive XSL transformations”. It is also obvious that a target can be used to create new targets. For the sake of completeness, the initial XML or XSL files that are used in transformations are called targets, too.
The Pustefix system knows different types of targets:
Leaf targets are targets that are not the result of a XSL transformation, but are read directly from files. You only edit leaf targets, never virtual targets. The distinction between XML/XSL is made depending on the purpose the target serves. An XML target is read into the system without doing any special processing, while an XSL target is compiled into a templates object that is able to transform XML input.
Examples for leaf targets in Figure 2.3, “Recursive XSL transformations” are
FooBase.xml,core/xsl/metatags.xslandcore/xsl/master.xsl.Virtual targets are the result of a XSL transformation. They don't exist as files (in fact they do, but only to cache the result on the harddisk. These cache files must never be edited by hand). The difference between the XML/XSL type is the same as with the leaf targets.
Examples for leaf targets in Figure 2.3, “Recursive XSL transformations” are
BazPage.xml, andBazPage.xsl.
Table of Contents
Starting a new project in your Pustefix environment requires (besides developing the business logic and the UI) that you edit a bunch of configuration files.
Three different types of config files exist:
Global configuration files: These files are all located in
projects/common/conf. They define global options which apply to all projects in the environment.Project specific configuration files: These files are located within the
confdirectory of each project directory. They define options which only apply to the corresponding project.build.propertiesfile: This optional configuration file may contain properties that are used by Ant as if they were specified on the command line when calling Ant.
Virtually all configuration files used by Pustefix support a mechanism
called "customization". You may use this customization support to use
different portions of a configuration file depending on the environment
being used when building the project. For this task, the customization
tools provide a choose tag which is similar to the
choose tag provided by XSLT.
<choose>
  <when test="XPathExpression">
    <!-- Configuration code -->
  </when>
  <when test="XPathExpression">
    <!-- Configuration code -->
  </when>
  <otherwise>
    <!-- Configuration code -->
  </otherwise>
</choose>
At least one when tag has to be specified. Further
when tags and the otherwise are optional.
However, if specified, the otherwise tag has to be
the last one.
The XPath expressions may contain references to the variables
mode: Set to the propertymakemodespecified when running Ant. If no explicitmakemodeis specifiedprodis used.uid: The name of the user that executed Ant.fqdn: The fully qualified domain name of the machine the build process was run on.machine: The host name of the machine the build process was run on.__antprop_*: All properties defined within Ant'sbuild.xmlfile are provided as variables with the prefix__antprop_.
It is an error to reference a variable that is not defined. Therefore you
might use the special XPath function
pfx:isSet('variableName') to check if a variable with
a certain name is defined.
All global configuration files are located in
projects/common/conf. There are
buildtime.properties: This file is automatically generated each time Ant runs. It contains all properties defined in Ant'sbuild.xmlfile as well as some special properties (like the "makemode"). It is used by Pustefix's customization tools, which allow to check for the properties defined there. You cannot modify this file, as all changes will be overwritten the next time Ant is run. If you want to define your own properties for the customization process, use Ant properties as they will be automatically included. See Section 3.2, “Customization tools” for details.factory.xml: Configuration for factory loader.pfixlog.xml: log4j configuration file. This file uses the standard log4j syntax, however the syntax is extended by the customization tags, which for this configuration file are locate in the namespacehttp://www.schlund.de/pustefix/customize.projects.xml: Global project settings which are shared by all projects.pustefix.xml: Contains global properties using the XML properties syntax.userdata.xml: Used by the Pustefix CMS to store user accounts.
Some parts of the Pustefix frameworks are configured using Java properties. To ease this configuration Pustefix provides you with a special XML format which is read instead of the usual Java property file format. This format provides some customization mechanism to allow configuration options to depend on settings like the makemode or the machine the application is being built on.
The structure of a standard .xml property file is very easy:
  <properties
    xmlns="http://www.pustefix-framework.org/2008/namespace/properties-config"
    xmlns:xsi="http://www.w3.org/2001/XMLSchema-instance"
    xsi:schemaLocation="http://www.pustefix-framework.org/2008/namespace/properties-config http://www.pustefix-framework.org/2008/namespace/properties-config.xsd">

    <prop name="statuscodefactory.messagefile">common/dyntxt/statusmessages.xml</prop>
  </properties>
The prop tag is the most primitive way to enter a single property.
The example above would simply result in the java property
statuscodefactory.messagefile=common/dyntxt/statusmessages.xml.
Pustefix allows to customize the creation of the property files
using the mechanism described in Section 3.2, “Customization tools”.
You may reference customization variables in property values using
the syntax ${variableName}. For example
${fqdn} will be replaced by the fully qualified
domain name of the machine.
This property file is located in
projects/common/conf/factory.xml and used
by the de.schlund.pfixxml.FactoryInitServlet
servlet (contained in the special admin project used in every
Pustefix environment) whenever the servletcontainer starts up to
initialize services that are used by all the other projects. The
syntax of this file is described in Section 3.3.1, “XML property files syntax”.
The syntax of the
common/conf/pustefix.xml file
complies to the description in
Section 3.3.1, “XML property files syntax”. The properties
defined here are merged with the properties defined for a
specific servlet. However, there are some properties with a
special meaning.
Exception processing is configured via prop elements
whose names comply to following syntax:
exception.TYPE.[page|forward|processor]
For one single TYPE, there may be only one
occurrence of page, forward
and processor.
TYPE is a fully qualified class name of a
valid exception class, for which the handling should be
configured at this point. In this case it specifically means,
that the specified class must be a descendant of
java.lang.Throwable, as the
catch-block that handles the exceptions which
are specified here, catches Throwable.
If an exception occurs during exception processing, or during processing of the page the request got forwarded to, no further exception handling will take place. Therefore the code that processes exceptions and the code that drives pages to which requests get forwarded, in case of exceptions, should be robust. Otherwise the whole exception-handling thing would be quite useless, wouldn't it?
| Attribute | Description |
|---|---|
file |
Mandatory. Path to the file that contains the tags to be included (relative to docroot). |
section |
Optional.
Type of the section that shall be included. If more than
one section of the specified type exists in the file, the
content of all this sections is included. For a
DirectOutputServlet configuration
only directoutputpagerequests and
properties are valid. |
refid |
Optional. Include a section identified by the specified id. The refid specified here must match the id attribute of exactly one section in the specified file. |
xpath |
Optional.
A XPath expression specifying the node-set to be included.
The prefixes to be used for XML namespaces are "fr" for
the namespace of the fragments file tags and "pr" for the
namespace of the DirectOutputServlet
configuration tags. |
The projects.xml file contains global settings for Apache HTTPd,
Tomcat and Pustefix itself.
<global-config xmlns="http://www.pustefix-framework.org/2008/namespace/project-config">

  <!-- prefix to namespace url mappings to be used in pages xml -->
  <namespaces>
    <namespace-declaration prefix="pfx" url="http://www.schlund.de/pustefix/core"/>
    <namespace-declaration prefix="ixsl" url="http://www.w3.org/1999/XSL/Transform"/>
  </namespaces>

  <http-server>
    <tomcat>
      <minprocessors>100</minprocessors>
      <maxprocessors>500</maxprocessors>
      <connectorport>8009</connectorport>
      <debug>0</debug>
      <loglevel>info</loglevel>
      <jkhost>${fqdn}</jkhost>
      <!-- This is only for mod_jk A matching sample workers.prop file will be generated, but may need -->
      <!-- additional customization. Clustering will not work out of the box. -->
      <jkmount>router</jkmount>
      <defaulthost>sample1.${fqdn}</defaulthost>
      <jvmroute>foo</jvmroute>
    </tomcat>
    <apache>
      <logdir>pfixroot:/servletconf/log</logdir>
    </apache>
  </http-server>

  <application>
    <static>
      <path>common/img</path>
      <path>core/img</path>
      <path>core/script</path>
    </static>
  </application>

</global-config>
The namespaces section declares namespace prefixes, which are
available when editing include parts in the Pustefix CMS. You can set the
exclude-result-prefix to true
in order to exclude the namespace declaration from XHTML output sent to
the browser.
The http-server section specifies various settings for Apache
Tomcat and Apache HTTPd. Usually you do not have to change these settings.
The application section is used to specify pathnames which
contain static resources which should be made available to all projects.
For each project in your Pustefix environment you need to create a definition file
that contains all the information about your project (including references to other
project-specific configuration files). This file has to be named
project.xml and must be placed in the conf
subdirectory of the project. It can be accompanied by a Spring bean definition file
that must be called spring.xml. This file may contain arbitrary
definitions for beans that will be created within the Spring ApplicationContext
automatically created for the web application.
All other configuration files can theoretically have arbitrary names, however we strongly recommend using the naming convention used in this reference documentation.
The project.xml file contains references to all services
and resources used by this project.
<project-config xmlns="http://www.pustefix-framework.org/2008/namespace/project-config">

  <project>
    <!-- Short project name, should equal the name
         of the project directory                  -->
    <name>projectname</name>
    <!-- Description shown in Pustefix CMS -->
    <description>Description for this project</description>
    <!--
      add
    <enabled>false</enabled>
      to make disregard this project when building the
      server configuration
    -->
  </project>

  <editor>
    <!-- Set this to false to make the project disappear
         in the Pustefix CMS                             -->
    <enabled>true</enabled>
    <!-- Location of the Pustefix CMS, does not need to
         be changed usually                             -->
    <location>http://cms.${fqdn}/</location>
  </editor>

  <xml-generator>
    <!-- Path to the configuration file of
         the TargetGenerator for this project -->
    <config-file>pfixroot:/projectname/conf/depend.xml</config-file>
  </xml-generator>

  <http-server>

    <!-- IP address and port Apache HTTPd (not Tomcat!) will
         listen on for HTTP connections                      -->
    <http-port>
      <address>${fqdn}</address>
    </http-port>

    <!-- IP address and port Apache HTTPd (not Tomcat!) will
         listen on for HTTPS connections                     -->
    <https-port>
      <address>${fqdn}</address>
      <ssl-key>pfixroot:/projectname/conf/server.key</ssl-key>
      <ssl-crt>pfixroot:/projectname/conf/server.crt</ssl-crt>
    </https-port>

    <!-- Name of the virtual host for this project -->
    <server-name>projectname.${fqdn}</server-name>
    <!-- Alias for the virtual host for this project -->
    <server-alias>projectname.${machine}</server-alias>

    <apache>
      <literal>
        <!-- Stuff that is copied to the Apache configuration -->
      </literal>
    </apache>

    <tomcat>
      <!-- Set this to true to enable extra context instances
           for the virtual host created for this project      -->
      <enable-extra-webapps>false</enable-extra-webapps>
    </tomcat>

  </http-server>

  <application>

    <!-- Path that static resources will be delivered from -->
    <docroot-path>pfixroot:/sample1/htdocs</docroot-path>

    <!-- URI requests to / are redirected to -->
    <default-path>/xml/config</default-path>

    <!-- Only one context-xml-service may be specified per project -->
    <context-xml-service>
      <!-- URI the service will be available at -->
      <path>/xml/config</path>
      <!-- Path to the configuration file for the service -->
      <config-file>pfixroot:/projectname/conf/config.conf.xml</config-file>
    </context-xml-service>

    <direct-output-service>
      <!-- URI the service will be available at -->
      <path>/xml/download</path>
      <!-- Path to the configuration file for the service -->
      <config-file>pfixroot:/projectname/conf/direct.conf.xml</config-file>
    </direct-output-service>

    <!-- Extra paths for static resources -->
    <static>
      <path>sample1/img</path>
    </static>

    <!--  Custom Deplyment descriptor code
    <web-xml>
      <jee:web-app xmlns:jee="http://java.sun.com/xml/ns/javaee">
        <choose>
          <when test="$mode='test'">
            <jee:display-name>foo</jee:display-name>
          </when>
        </choose>
      </jee:web-app>
    </web-xml>
    -->

  </application>

</project-config>
As you can see, the configuration file consists of different sections: One for information about the project, one for configuring the Pustefix CMS, one for the server configuration and one for the application itself. The application consists of services and static resources. Please note that only one context-xml-service is allowed per project.
The depend.xml configuration file serves two purposes: First, it is used to create the hierarchical page structure of the project by defining a tree of pages. Then, it is used to define the internal structure of the pages by defining, for every single page, the tree of transformations that need to be applied to certain files to get the final stylesheet (which is the representation of the page in Pustefix). For an overview over the transformation aspect of the whole framework, please go here.
To make life a little easier, you can use convenience tags that are automatically transformed by the runtime system when the file is loaded.
The structure of the config file is show below:
<make project="MyProject" lang="en" themes="ThemeA ThemeB ... default">
  <navigation>
    <page name="foo" handler="/xml/static" accesskey="F">
      <page name="sub_foo1" handler="/xml/static"/>
      <page name="sub_foo2" handler="/xml/static"/>
    </page>
    <page name="bar" handler="/xml/config">...</page>

    <!-- Configuration fragements are supported as well -->
    <config-include file="myproject/conf/myfile.xml" section="navigation"/>
  </navigation>

  <!--
    The global section allows to set default values for ALL pages defined via the
    standardpage tag (see below). It's possible to set default params, and runtime
    stylesheets (see here). It's also possible to add more runtime stylesheets or
    overwrite params in the standardpage tag for a single page.
  -->
  <global>
    <param name="AName" value="AValue"/>
    <include stylesheet="path/to/AStyleSheet"/>
  </global>

  <config-include file="myproject/conf/myfile.xml" section="targets"/>

  <!--
    The only other tags allowed besides the navigation tag are target, global,
    standardmaster, standardmetatags and standardpage. The latter three are only
    convenience tags that can be expressed fully in terms of target tags
    (Expanding those tags is one of the duties of the runtime transformation of
    the depend.xml file mentioned above).
  -->
  <target name="a_target_name.xsl" type="[xsl|xml]">...</target>
  <target name="another_target_name.xml" type="[xsl|xml]">...</target>...
  <standardmaster name="..."/>
  <standardmetatags name="..."/>
  <standardpage name="a_name" master="..."
                metatags="..." themes="..." variant="..."
                xml="a_base_xml_file.xml">
    ...
  </standardpage>
</make>
The <make> tag is the root element of the
depend.xml
| Attribute | Mandatory? | Description |
|---|---|---|
| project | mandatory | The name of the project. This is the same as the corresponding entry in the project.xml.in file. |
| lang | mandatory | The default language of the project. This is the same as the value of the lang node's name attribute used in include parts. |
| themes | optional |
The attribute is a space separated list of theme names. It acts as a fallback queue of product branch names that should be checked in include parts to decide which branch to use. The least specific theme is always the "default" theme and therefore "default" should be the last theme in the list. The last theme in the list is used when a non-existing include part is created in the Pustefix CMS, so you can omit the "default" theme from the end of the list if you want to use another theme for newly created include parts. However the "default" theme will still be used as a fallback for existing include parts when no other matching theme variant of the include part exists. You should have at least a product branch named "default" in every include part to make sure to always have a valid fallback. If it's not given, it defaults (in our example where the project name is "MyProject") to "MyProject default". Note that this attribute only defines a global value, each target can define it's own themes list (see below for targets and their attributes). The allowed characters for themes are: a-zA-Z0-9_+- |
The <page> tag defines all available
pages.
| Attribute | Mandatory? | Description |
|---|---|---|
| name | mandatory | The name of the page. This name is used throughout Pustefix to reference the page (e.g. when creating internal links and in other config files). The allowed characters for page names are: a-zA-Z0-9_+- |
| handler | mandatory | This attribute tells the system which servlet is used to handle requests for this page. You can think of the handler attribute as a project wide servlet "name" as defined in the project definition |
| accesskey | optional | This attribute defines a default access key that will be used by the pfx:button tag for the links it generates. |
The <target> tag is used to specify the XSL transformations in Pustefix. In most cases, you will not have
to use the rather complex <target>, but use the convinience tags described in
the section called “Standard page definition”, the section called “Standard master target definition” and
the section called “Standard metatags target definition”.
Section 2.3.1, “XSL Targets” provides more information on the concept of targets in Pustefix.
<target name="baz.xsl" type="xsl" page="foo" variant="bar" themes="Theme_A Theme_B ... default">
  <!--
    depxml and depxsl reference other targets by their name attribute
    that serve as the XML resp. XSL input used to create this target
    via a XSL transformation. If for a given name attribute of either
    depxml or depxsl no other target definition is found, the transformation
    parent is supposed to be a leaf target and the name attribute is
    interpreted as a path relative to the docroot.
  -->
  <depxml name="foo/xsl/bar.xsl"/>
  <depxsl name="foo/xsl/baz.xsl"/>

  <!--
    Additional dependencies
  -->
  <depaux name="foo/xsl/snarf.xsl"/>
  <depaux name="foo/xsl/fubar.xsl"/>

  <!--
    param tags supply XSL transformation parameters that are used when the target is generated.
  -->
  <param name="AName" value="AValue"/>
</target>
The <target> tag supports the following attributes:
| Attribute | Mandatory? | Description |
|---|---|---|
| name | mandatory | The name of the target. This name must be unique for the whole project (not the whole environment!) |
| type | mandatory | Must be xsl for a target that should be "compiled" into a templates object. Must be xml for every target that is used as input for a transformation. |
| themes | optional | This is just a local overwrite to the global themes attribute as explained on this page |
| page | optional | It must be set for any top level target (that means a target that is not itself used to generate other targets) that should be accessible via the page name. Note: having a non-toplevel target with a page attribute is considered an error. |
| variant | optional | It makes only sense when also a page attribute is set. This attribute will discriminate between targets that should be associated with the same page, but represent a differnt variant of this page. |
<depaux> tags create user defined dependencies on the files they reference in
their name attribute. Whenever the target generation system is asked for a target, all its dependencies
are checked whether their modification time is older than the creation time of the target. Dependencies include
by design the depxml and depxsl targets (which may be files in the case
of a leaf target or another virtual target that returns its own creation time as the modification time) and all
include files from which include parts are taken during the transformation of the target.
If any of these files or targets has been changed after the target was built, it is taken care of that the target is rebuild.
<depaux> just adds more dependencies "by hand" that are not automatically detected. In the example
above, the file referenced is a XSLT stylesheets that's included via xsl:include into the foo.xsl
stylesheet. Such external dependencies are not currently recognized automatically.
E.g. if you use a foo/xsl/fubar.xsl stylesheet that serves as a library of templates you want to include into
foo.xsl, you need to add the following line to the target definition of foo.xsl to make
the system recognize changes to foo/xsl/fubar.xsl.
<depaux name="foo/xsl/fubar.xsl"/>
The standardpage tag is a convenience tag that encapsulates the typical definition of a complete page in the Pustefix system.
<standardpage name="BazPage" master="AName" metatags="AName" xml="MyProject/xml/FooBase.xml" themes="Theme_A Theme_B ... default" variant="foo">
  <!--
    Note: All the child nodes are optional (and in fact usually not needed)
  -->
  <include stylesheet="MyProject/xsl/runtime.xsl"/>
  <param name="fubar" value="bar"/>
</standardpage>
The <standardpage> tag supports the following attributes:
| Attribute | Mandatory? | Description |
|---|---|---|
| name | mandatory | The name of the page. This must be a name already defined in a page tag in the navigation tree. |
| xml | mandatory | The name of a xml target to use as input for the "metatags transformation". Often this is a leaf target and one of the projects structural xml files. |
| themes | optional | This attribute is a local overwrite of the global themes attribute explained here. |
| variant | optional | This attribute allows you to define variants of the same page. It's only possible to define variants of pages when there's already a "root" page, in other words a standardpage definition without the variant attribute. Variants also influence the local themes (in fact the visible aspect of variants is implemented in terms of themes). |
| master | optional | Default is to use the default definition of the master stylesheet (standardmaster without a name attribute). |
| metatags | optional | Default is to use the default definition of the metatags stylesheet (standardmetatags without a name attribute). |
After performing the transformation of the depend.xml on loading (automatically done by the runtime system system) this becomes
<target name="BazPage::foo.xsl" type="xsl" themes="foo Target_A Target_B ... default" page="BazPage" variant="foo">
  <!--
    For every target that is only used in the generation of one single page
    (if you look at the example given here, this is true for the generated
    targets BazPage.xml and BazPage.xsl) you must give a parameter called page
    with the name of the resulting page as the value for the standard XSLT tags
    to be able to work correctly. They need this information e.g. to create links
    to other pages and many other things. While the standardpage tag does this
    automatically for you make sure that you don't forget it for target structures
    you define yourself.

    If the master attribute is not given, the depxsl will be master.xsl
  -->
  <depxml name="BazPage::foo.xml"/>
  <depxsl name="master-AName.xsl"/>
  <param name="page" value="BazPage"/>

  <!--
    parameters given to the standardpage tag are supplied to the first of the two
    transformations. The outputencoding parameter is inserted by the build system.
    Refrain from supplying this parameter on your own, unless you really know what
    you do. Changing the encoding should be done in the project.xml file.
  -->
  <param name="fubar" value="bar"/>
  <param name="outputencoding" value="UTF-8"/>

  <!--
    All include tags given are runtime stylesheets, given to the transformation via
    the parameter stylesheets_to_include (as a space separated list if multiple
    include tags are given). Note that the needed depaux nodes are inserted automatically.
  -->
  <param name="stylesheets_to_include" value="MyProject/xsl/runtime.xsl"/>
  <depaux name="/path/to/pustefix/projects/MyProject/xsl/runtime.xsl"/>
</target>

<target name="BazPage::foo.xml" type="xml" themes="foo Themes_A Themes_B ... default">

  <!--
    If the metatags attribute has not been given, the depxsl value is metatags.xsl
  -->
  <depxml name="MyProject/xml/FooBase.xml"/>
  <depxsl name="metatags-AName.xsl"/>

  <param name="fubar" value="bar"/>
  <param name="page" value="BazPage"/>
</target>
The standardmaster tag is a convenience tag that encapsulates the typical target
definition of the master.xsl stylesheet.
<standardmaster name="AName">
  <!-- The name attribute is optional -->
  <include stylesheet="MyProject/xsl/skin.xsl"/>
  <param name="AName" value="AValue"/>
</standardmaster>
After performing the transformation of depend.xml when the runtime system loads
the file this becomes:
<target name="master-AName.xsl" type="xsl">
  <!--
    If the name attribute of the standardmaster tag has not been given,
    the value for the target's name attribute will be master.xsl.
  -->
  <depxml name="core/xsl/master.xsl"/>
  <depxsl name="core/xsl/customizemaster.xsl"/>
  <depaux name="/path/to/pustefix/projects/core/xsl/default_copy.xsl"/>
  <depaux name="/path/to/pustefix/projects/core/xsl/include.xsl"/>
  <depaux name="/path/to/pustefix/projects/core/xsl/utils.xsl"/>
  <depaux name="/path/to/pustefix/projects/core/xsl/navigation.xsl"/>
  <depaux name="/path/to/pustefix/projects/core/xsl/forminput.xsl"/>
  <depaux name="/path/to/pustefix/projects/sample1/conf/depend.xml"/>
  <param name="AName" value="AValue"/>
  <param name="docroot" value="/path/to/pustefix/projects"/>
  <param name="product" value="MyProject"/>
  <param name="lang" value="en"/>
</target>
The standardmetatags tag is a convenience tag that encapsulates the typical target definition
of the metatags.xsl stylesheet.
<standardmetatags name="AName">
  <!-- The name attribute is optional -->
  <include stylesheet="MyProject/xsl/metatags.xsl"/>
  <param name="AName" value="AValue"/>
</standardmetatags>
After performing the transformation of depend.xml when the runtime system loads
the file this becomes:
<target name="metatags-AName.xsl" type="xsl">
  <!--
    If the name attribute of the standardmetatags tag has not been given,
    the value of the name attribute here becomes metatags.xsl.
  -->

  <depxml name="core/xsl/metatags.xsl"/>
  <depxsl name="core/xsl/customizemaster.xsl"/>
  <depaux name="/path/to/pustefix/projects/core/xsl/default_copy.xsl"/>
  <depaux name="/path/to/pustefix/projects/core/xsl/include.xsl"/>
  <depaux name="/path/to/pustefix/projects/core/xsl/utils.xsl"/>
  <depaux name="/path/to/pustefix/projects/MyProject/conf/depend.xml"/>
  <depaux name="/path/to/pustefix/projects/MyProject/xsl/metatags.xsl"/>
  <param name="stylesheets_to_include" value="MyProject/xsl/metatags.xsl "/>
  <param name="AName" value="AValue"/>
  <param name="docroot" value="/path/to/pustefix/projects"/>
  <param name="product" value="MyProject"/>
  <param name="lang" value="en"/>
</target>
The ContextXMLService handles requests for all pages (where page means
some content generated by an XSL transformation). The name of the
configuration file is usually service.conf.xml
where "service" is replaced by the name from the URI of the service.
For example the configuration of the service available at
/xml/info should use a configuration file named
info.conf.xml.
This service uses a configuration file that has a special syntax. However properties and customization in this file work nearly the same way as explained for the standard property definitions.
  <context-xml-service-config
    xmlns="http://www.pustefix-framework.org/2008/namespace/context-xml-service-config"
  >
    <global-config>
      <force-ssl>false</force-ssl>
force-ssl can be set to true in order
to enforce a secure connection for all pages of this service. The
whole node is optional and defaults to false.
      <defaultstate class="a.state.Class"/>
      <defaultihandlerstate class="another.state.Class"/>
defaultstate and
defaultihandlerstate are both optional.
The class attribute must
be given. a.state.Class should
de a descendant of
de.schlund.pfixcore.workflow.app.StaticState
and another.state.Class should
be a descendant of
de.schlund.pfixcore.workflow.app.DefaultIWrapperState
(unless you really know what you are doing). They are
used to set the defaults for the state tag used when
processing the pagerequest tag
(see there for more info).
    </global-config>

    <context defaultpage="APageName" synchronized="true">
| Attribute | Description |
|---|---|
defaultpage |
Either defaultpage attribute or defaultpage element must be set. Must reference
a valid pagerequest. |
synchronized |
Optional. Defaults to true. If
set to true, only one request per
session is handled concurrently. If set to
false all requests will be handled
concurrently, requiring thread-safe business logic. |
      <defaultpage>
        <variant name="VARIANTNAME">PAGENAME</variant>
        ...
        <default>PAGENAME</default>
      </defaultpage>
The defaultpage element can be used if you want
to define multiple defaultpages for different variants.
[Since: 0.13.1]
<resource class="A_Resource">
class is
mandatory, can be any
Java class, that can be created with a default constructor.
The scope attribute is optional
and defines the scope in which the Spring bean representing
the resource is instantiated.
The bean-name attribute is
optional and specifies the name of the Spring bean that
is created for this resource.
There may be multiple resource tags given.
<implements class="A_Interface">
The whole implements node is optional.
class is
mandatory, must be a Java interface
implemented by the resource.
There may be more than one implements tag for a
resource, but each interface
must be unique in the whole context. In other words: it's
possible for a resource to
implement more than one interface, but not possible for one
interface to be implemented by two
resources used in the same
Context definition.
        </implements>
        <properties>
The whole node is optional.
<prop name="A_Name">A_Value</prop>
prop is mandatory and can
be used multiple times. It's similar to the use as a child
of pagerequest/properties, but used
here to create properties that are related to a context
resource implementation. The resulting property looks like this:
context.resourceparameter.A_Resource.A_Name=A_Value
Customization tags may be used around a property to make it
depend on a certain makemode or other parameters.
        </properties>
      </resource>
    </context>

    <scriptedflow name="AName" file="path/to/scriptfile.xml"/>
There may be an arbitrary number of scriptedflow
tags, but each one must have a unique name. Scripted flows
are a special method to control a session and do automatic
requests based on initial user input.
    <role name="A_ROLE"/>
    <condition id="A_CONDITION"/>
    <authconstraint id="AN_AUTHCONSTRAINT"/>
You can define an arbitrary number of roles, conditions and authconstraints here, for details see Section 6.3, “Authentication and authorization”.
<pageflow name="AName" final="APageName" stopnext="true|false">
There may be multiple pageflow tags defined, but you need at least one (which must be referenced by the defaultflow attribute above). We only describe the normal case without using variants. See here for more information on how to handle variants of pageflows.
| Attribute | Description |
|---|---|
name |
Mandatory. Must be a unique name. |
final |
Optional, must reference a page with a valid
pagerequest definition given in this property
file. There may be many pageflows defined for a servlet.
A page may well be used in more than one pageflow. |
stopnext |
Optional, defaults to false. If given and
true, the pageflow will stop at the
next accessible page after the current page even if this
page would normally be skipped in the workflow because
it doesn't need any input. |
<flowstep name="AnotherPageName" stophere="true|false">
| Attribute | Description |
|---|---|
name |
Mandatory. Must reference a
valid pagerequest. Usually there are many
flowsteps defined in a pageflow. |
stophere |
Optional, if true the pageflow will stop at this
step unconditionally if the submit originated from a
step that's before this one in the pageflow. See
also the stopnext
attribute of the tag which is quivalent to
specifying stophere="true" for
every single flowstep. |
<oncontinue applyall="true|false">
This tag (which is optional) starts a sequence of
test/action pairs. The tests are XPath expressions which
work on the DOM tree as produced by the flowstep's
associated state (note that the navigation is not
inserted into the DOM tree at this stage, and the
/formresult/formvalues and
/formresult/formerrors paths are also
not present). The pageflow system calls the tests whenever
a state returns a ResultDocument (before it continues with
other stuff e.g. a pageflow run).
The applyall attribute is
optional. If given and true, all actions
with matching conditions are executed, if not given or
false (the default) only the first
action with a matching condition is executed.
<when test="A_XPath_Expression">
The when tag contains the XPath expression to try
in it's test attribute. If this
attribute is omitted, the whole condition is considered to
be true.
<action type="jumpto" page="APage" pageflow="APageFlow">
The action tag denotes the
FlowStepAction to execute. The
type attribute is mandatory and
defines the special action to use. The string
jumpto denotes the special
FlowStepAction
de.schlund.pfixcore.workflow.FlowStepJumpToAction
which is used to set the jumptopage (defined via the
page attribute) and/or the
jumptopageflow (defined via the
pageflow attribute).
            </action>
          </when>
          <when test="A_XPath_Expression">
            <action type="A_FlowStepAction" somekey="somevalue">
If the type attribute is not
jumpto, the value is interpreted as a
class of type
de.schlund.pfixcore.workflow.FlowStepAction.
There can be an arbitrary number of additional
attributes (somekey in this example) which are
supplied as named parameters to the special
FlowStepAction.
            </action>
          </when>
        </oncontinue>
      </flowstep>
    </pageflow>

    <pagerequest name="APageName" copyfrom="APageName">
| Attribute | Description |
|---|---|
name |
Mandatory. It must be the name of a page defined in the corresponding depend.xml file. |
copyfrom |
Optional. If given, and set to the name of a valid
pagerequest, all configuration from this
referenced pagerequest are used for the current
page, disregarding all configuration that is made in this
pagerequest. It's a plain and simple copy, no
extending, no restricting! |
<ssl force="true|false"/>
The node is optional. If given, and the attribute
force is set to
true, the page will only run under SSL when
jumped to via a link or a submit of form data. If the session
currently does not run under SSL, the system will make sure to
redirect to a secure session prior to handling the request.
After a session is running under SSL, there is no way back
(so all other pages will run securely regardless if they have
a ssl node or not).
You can wrap this tag within a customization element to force
use of SSL only in certain modes (e.g. prod
mode).
![[Note]](images/docbook/note.png) | Note |
|---|---|
You can force the servlet as a whole to run only under SSL by specifying the ssl subnode of the servletinfo node. |
<state class="AClassName"/>
The whole node is optional. If given, the
class attribute must be the name
of a java class implementing the
de.schlund.pfixcore.workflow.ConfigurableState
interface. The used State is determined
as follows:
If state is given, use the value of it's
classattribute.If the pagerequest has an
inputchild, use the value of theclassattribute of thedefaultihandlerstatetag explained above if it is given. If this is not given, just usede.schlund.pfixcore.workflow.app.DefaultIWrapperState. Else:use the value of the
classattribute of thedefaultstatetag explained above if it is given. If this is not given, just usede.schlund.pfixcore.workflow.app.StaticState.
You can use the scope attribute to specify
the scope in which the Spring bean created for this page will be
instantiated. You may specify the bean-name
attribute to use a fixed name for the automatically created bean.
You can use any BSF-supported scripting language for writing
your State-implementation, too. Use script:path/to/script
for the class attribute.
Alternatively you can use an existing Spring bean that implements the
de.schlund.workflow.State interface. Use
the bean-ref attribute to specify the
name of the bean. However the pagerequest may not contain
any configuration if you are using a Spring bean.
<finalizer class="AClassName"/>
The whole node is optional. It may only be given for a
State that is either
de.schlund.pfixcore.workflow.app.DefaultIWrapperState
or a descendent of it.
The class attribute is mandatory
and denotes a class implementing
de.schlund.pfixcore.workflow.app.ResdocFinalizer.
![[Caution]](images/docbook/caution.png) | Caution |
|---|---|
The use of finalizers is not suggested most of the time! They can completely change the result document and the logic when to trigger the next step in the current page flow. Use them at your own risk. Or better: Don't use them at all. |
<input policy="ANY|ALL|NONE">
The whole node is optional. It may only be given for a
State that is either
de.schlund.pfixcore.workflow.app.DefaultIWrapperState
or a descendent of it!
policy is optional (default is
ANY). The policy decides when a whole page is
considered to be accessible:
ANY: just one of the associated handlers needs to be active for the page to be accessible.
ALL: all the associated handlers must be active for the page to be accessible.
NONE: none of the associated handlers needs to be active for the page to be accessible.
If one of the associated handlers returns
false on calling
prerequisitesMet(), the page is of
course still inaccessible.
<wrapper prefix="AName" class="AClassName" checkactive="true|false"/>
| Caution |
|---|---|
Note: The tag name |
There can be many wrapper nodes for a page. Each
one references an "atomic" functional entity consisting of an
IWrapper java class (usually
autogenerated from a .iwrp xml file that defines the type and names of the parameters passed
between the UI and the functional entity and an associated
IHandler java class that uses the
IWrapper to retrieve the passed
parameters via typed getter methods.
There may be an optional scope
attribute, which specifies the scope in which the handler
associated with the wrapper will be instantiated.
| Attribute | Description | |||
|---|---|---|---|---|
prefix |
Mandatory. The prefix defines a
name for the IWrapper and in effect
a namespace for the IWrapper's
parameters. If the prefix "bar" is
defined for an IWrapper that
contains a parameter called "Foo", the
submitted HTTP parameter must be called
bar.Foo. |
|||
class |
Mandatory. Must be the name of a
java class implementing
de.schlund.pfixcore.generator.IWrapper.
This implicitly defines a
de.schlund.pfixcore.generator.IHandler,
as every IWrapper knows it's
associated IHandler and can be
queried for it. |
|||
checkactive |
Optional, default is true. The
IHandler method
isActive() is
NOT called on handlers with
checkactive set to
false. In other words: the handler is
ignored when the system tries to find out if the page is
accessible or not. See also the comment for the
policy attribute above.
|
</input>
<process>
The process node holds a list of actions, which can be referenced from the UI when submitting forms or using GET requests to transmitt data. These actions group IWrappers into two groups: those that should have their handleSubmittedData() method called, and those that should have their retrieveCurrentStatus() method called when a submit has been handled sucessfully (and the same page is redisplayed). The idea beind the latter is, that sometimes you want to update the submitted form data to some canonical form (e.g. adresses or similar), so you don't want to see the exact same input in the form elements as you have submitted it, but some changed values. In other cases, submitting data to one wrapper may change the values of the form elements of another wrapper - in this case the second wrapper needs to be listed under the <retrieve> node.
        <action name="a_name">
          <submit>
            <wrapper ref="a_prefix_1"/>
            <wrapper ref="a_prefix_2"/>
            ...
          </submit>
          <retrieve>
            <wrapper ref="a_prefix_1"/>
            <wrapper ref="a_prefix_X"/>
            ...
          </retrieve>
        </action>
        <action name="another_name">
        ...
        </action>
      </process>

      <output>
The whole node is optional. Every page using a
State that is itself or a descendant of
de.schlund.pfixcore.workflow.app.StaticState
can use this.
You can have as many resource childnodes as you like.
<resource node="AName" class="AClassName"/>
| Attribute | Description |
|---|---|
class |
Mandatory (if bean-ref is not present).
class is one of the
ContextResources defined via
implements above. |
bean-ref |
Mandatory (if class is not present).
Specifies the bean name of the resource that should be
included in the output tree. |
node |
Mandatory.
node is the node in the
output tree ("/formresult/AName") under
which the ContextResource inserts
it's data. |
      </output>

      <properties>
The whole node is optional.
<prop name="APropertyKey">AValue</prop>
The node is mandatory and can be used multiple times. It will be
transformed into a java property that is associated to the page.
There are some props that are already defined for
de.schlund.pfixcore.workflow.app.StaticState
and descendants. These are listed below
| Property Name | Property Value | Description |
|---|---|---|
mimetype |
e.g. text/css |
If given, sets the mimetype of the HttpResponse
object to something else than the default
text/html. This is most often used for
text/css. |
responseheader.A_HEADER |
A_VALUE |
If given, set the header A_HEADER
of the HttpResponse object to A_VALUE.
NOTE: the Pustefix system uses a set of default headers
that are only used, when no user defined headers are
given! The set of default headers is:
Expires=Mon, 26 Jul 1997 05:00:00 GMT
  Cache-Control=private
If you want to use some of them in addition to your own
headers, you must manually supply them, too. |
      </properties>
    </pagerequest>

    <config-include file="myproject/conf/myfile.xml" section="pagerequests"/>
Includes a part of a config fragments file at this location. See Section 3.4.6, “Configuration Fragments” for details on how to define config fragments.
| Attribute | Description |
|---|---|
file |
Mandatory. Path to the file that contains the tags to be included (relative to docroot). |
section |
Optional. Type of the section that shall be included. If more than one section of the specified type exists in the file, the content of all this sections is included. |
refid |
Optional. Include a section identified by the specified id. The refid specified here must match the id attribute of exactly one section in the specified file. |
xpath |
Optional.
A XPath expression specifying the node-set to be included.
The prefixes to be used for XML namespaces are "fr" for
the namespace of the
fragments file
tags and "pr" for the namespace of the
ContextXMLServlet configuration
tags. |
One and only one of the section, refid or xpath attribute has to be specified for each config-include.
    <properties>
      <prop name="AProperty">AValue</prop>
| Property Name | Property Value | Description |
|---|---|---|
mimetype |
e.g. text/css |
If given, sets the mimetype of the HttpResponse
object to something else than the default
text/html. This is most often used for
text/css. |
responseheader.A_HEADER |
A_VALUE |
If given, set the header A_HEADER
of the HttpResponse object to A_VALUE.
Headers set here can be overwritten for specific pages.
NOTE: the Pustefix system uses a set of default headers
that are only used, when no user defined headers are
given! The set of default headers is:
Expires=Mon, 26 Jul 1997 05:00:00 GMT
  Cache-Control=private
If you want to use some of them in addition to your own
headers, you must manually supply them, too. |
You can also specify properties here that are understood by the
AbstractPustefixRequestHandler and
AbstractPustefixXMLRequestHandler classes.
    </properties>
  </context-xml-service-config>
Occasionally you don't want to generate output with an XSLT
Transformation, but e.g. deliver binary content directly to the
output stream instead. In this case you can use the
DirectOutputService. The name of the
configuration file is usually service.conf.xml
where "service" is replaced by the name from the URI of the service.
For example the configuration of the service available at
/xml/info should use a configuration file named
info.conf.xml.
The service knows about one or many
directoutputpagerequests. For the XML/XSLT
side of things, they look like normal pages (in fact, the value
of the directoutputpagerequest's name
attribute must be a page defined in the navigation
section of depened.xml. Of course, no target
definition has to be given, only the page in the navigation
structure must exist). But other than the usual
pagerequest, a
directoutputpagerequest has an associated
directoutputstate whose class attribute is a
java class implementing
de.schlund.pfixcore.workflow.app.DirectOutputState.
  <direct-output-service-config
    xmlns="http://pustefix.sourceforge.net/2004/properties"
  >
    <global-config>
      <force-ssl>false</force-ssl>
See the comment for the global-config node in
Section 3.4.3, “ContextXMLService configuration file”.
    </global-config>

    <authconstraint ref="AN_AUTHCONSTRAINT"/>
You can reference an authconstraint from the context configuration, which has to be fulfilled to access a page. This default authconstraint can be overridden for single pages. If no default authconstraint is set here, the context's default authconstraint will be used. If no authconstraint is set at all, a page requires no authentication.
<config-include file="myproject/conf/myfile.xml" section="directoutputpagerequests"/>
Includes a part of a config-fragments at this location. See Section 3.4.6, “Configuration Fragments” for details on how to define config fragments.
| Attribute | Description |
|---|---|
file |
Mandatory. Path to the file that contains the tags to be included (relative to docroot). |
section |
Optional.
Type of the section that shall be included. If more than
one section of the specified type exists in the file, the
content of all this sections is included. For a
DirectOutputServlet configuration
only directoutputpagerequests and
properties are valid. |
refid |
Optional. Include a section identified by the specified id. The refid specified here must match the id attribute of exactly one section in the specified file. |
xpath |
Optional.
A XPath expression specifying the node-set to be included.
The prefixes to be used for XML namespaces are "fr" for
the namespace of the fragments file tags and "d" for the
namespace of the DirectOutputService
configuration tags. |
One and only one of the section, refid or xpath attribute has to be specified for each config-include.
    <directoutputpagerequest name="APageName">
      <directoutputstate class="AClassName"/>
The class specified for the directoutputstate must
implement the
de.schlund.pfixcore.workflow.DirectOutputState
interface. The tag may have an optional
scope attribute which specifies the
scope in which the corresponding state should be instantiated.
There may also be an optional bean-name
which, if present, will be used as the name of the Spring bean
created for this direct output state. Instead of the
class attribute, you may specify a
bean-ref attribute which has to
reference a Spring bean defined in the spring.xml
file for this project. In this case, no Spring bean will be
created but the existing bean will be used instead.
<authconstraint ref="AN_AUTHCONSTRAINT"/>
You can optionally reference an authconstraint from the context configuration to override the default authconstraint.
<properties>
The whole properties node is optional.
<prop name="APropertyKey">AValue</prop>
The node is mandatory and can be used multiple times. It will be
transformed into a java property that is associated to the page.
The java property that is constructed will look like this:
pagerequest.APpageName.APropertyKey=AValue
where APageName is the value of the
name attribute.
      </properties>
    </directoutputpagerequest>
  </direct-output-service-config>
The configuration of AJAX / webservices is described in the corresponding section.
Configuration fragments files contain aggregated configuration directives that are intended to be reused in different configuration files.
<fr:config-fragments
  xmlns:fr="http://pustefix.sourceforge.net/configfragments200609"
  xmlns:c="http://www.pustefix-framework.org/2008/namespace/context-xml-service-config"
  xmlns:d="http://www.pustefix-framework.org/2008/namespace/direct-output-service-config"
  xmlns:xsi="http://www.w3.org/2001/XMLSchema-instance"
  xsi:schemaLocation="http://pustefix.sourceforge.net/configfragments200609 http://pustefix.sourceforge.net/configfragments200609.xsd">

  <fr:navigation id="nav1">
All sections have an optional
id that can be used to identifiy
the section when more than one section fo the same type is
present in one file. The value of the
id attribute has to be unique
within the whole file.
<page name="MyPage" handler="/xml/myhandler"/>
The structure here is the same as within the navigation tag of the depend.xml file.
  </fr:navigation>
  <fr:targets>
    <standardpage name="MyPage" xml="myproject/xml/mymaster.xml"/>
The tags allowed here are the same that are allowed for standardpage or target definitions in the depend.xml file.
  </fr:targets>
  <fr:resources>
    <c:resource class="com.example.MyResourceImpl">
      <pr:implements class="com.example.MyResource"/>
    </c:resource>
The tags allowed here are the same that are allowed for the
definition of context resources within the context
tag of the ContextXMLServlet configuration.
  </fr:resources>
  <fr:interceptors>
    <c:interceptor class="com.example.MyInterceptor"/>
The tags allowed here are the same that are allowed within the
startinterceptors and endinterceptors tags
of the ContextXMLServlet configuration.
  </c:interceptors>
  <fr:scriptedflows>
    <c:scriptedflow name="myscript" file="myproject/conf/scriptedflows/myscript.script.xml"/>
The tags allowed here are the same that are allowed within the
scriptedflows tag of the
ContextXMLServlet configuration.
  </fr:scriptedflows>
  <fr:roles>
    <c:role name="MY_ROLE">
      <c:pageaccess names="mypage*"/>
    </c:role>
The tags allowed here are the same that are used for role definition in the ContextXMLServlet configuration.
  </fr:roles>
  <fr:pageflows>
    <c:pageflow name="MyFlow">
      <c:flowstep name="MyFirstPage"/>
      <c:flowstep name="MySecondPage"/>
    </c:pageflow>
The tags allowed here are the same that are used for the definition of pageflows in the ContextXMLServlet configuration.
  </fr:pageflows>
  <fr:pagerequests>
    <c:pagerequest name="MyPage"/>
The tags allowed here are the same that are used for the definition of pagerequets in the ContextXMLServlet configuration.
  </fr:pagerequests>
  <fr:properties>
    <pr:prop name="myproperty">myvalue</pr:prop>
The tags allowed here are the same that are allowed within the
properties tag of the
ContextXMLServlet configuration.
  </fr:properties>
  <fr:directoutputpagerequests>
    <d:directoutputpagerequest name="foo">...</d:directoutputpagerequest>
Direct output pagerequests can be defined here. See Section 3.4.4, “DirectOutputService configuration file” for details on this.
  </fr:directoutputpagerequests>
</fr:config-fragments>
Table of Contents
Pustefix includes a small library of tags defined as XSLT templates which implement low level functionality common to all Pustefix applications. These templates are mostly concerned with creating links to Pustefix pages or external URLs, sending data via HTML forms (including the necessary error handling) and including XML ressources (Include Parts).
All core tags reside in their own namespace. The prefix usually used is
pfx, and the namespace is
http://www.schlund.de/pustefix/core. You are not supposed to enter your own private project
specific tags into this namespace.
The following table lists these tags together with a very short explanation of what they do. Refer to the relevant subsections below to find a detailed explanation on their relevant attributes, subnodes and how to use them.
| Tag name | Short information |
|---|---|
| pfx:document | The top-most container for all Pustefix pages, see Section 4.1, “Defining the structure of a document” |
| pfx:frameset, pfx:frame | Used to define pages with framesets and frames, see Section 4.1, “Defining the structure of a document” |
| pfx:button | This tag creates simple links to internal Pustefix pages (possibly submitting parameters for requests), see Section 4.2.1, “pfx:button” |
| pfx:url | Used to create only the content of the href attribute of a link to an internal page, see Section 4.2.2, “pfx:url” |
| pfx:elink | This tag creates links to external URLs where care must be taken to strip the session ID from the referer header to not leak sensitive information to the outside world, see Section 4.2.3, “pfx:elink” |
| pfx:include | This tag references a file via its href attribute, and includes a named snippet of xml content contained in this file via the part attribute, see Section 4.3.1, “Include parts (<pfx:include>)” |
| pfx:maincontent | This tag is used to include "computed" include parts, see Section 4.3.2, “Generated include requests (<pfx:maincontent>)” |
| pfx:image |
This tag references images to be included in the final page (via img-tags), see Section 4.3.3, “Displaying images (<pfx:image>)”
|
| pfx:forminput | This tag creates a HTML form, see Section 4.4.1, “Form creation” |
| pfx:xinp | Used to create HTML form elements, see Section 4.4.4, “Form elements” |
| pfx:checkfield | This tag supplies content depending on the error state of a special form field, see the section called “Errors attached to a field” |
| pfx:checkerror | Used to check for the presence of any error condition, see the section called “Errors attached to a field” |
| pfx:checkmessage | Used to check for the presence of any page message, see the section called “Checking for pagemessages” |
| pfx:checkactive, pfx:checknotactive | These tags check for visibility (or not) of pages or for the activity (or not) of handlers, see Section 4.5.1, “Checking page status” |
| pfx:themeselect, pfx:langselect | Used to select content depending on a matching theme or currently selected language, see Section 4.5.3, “Displaying content based on the theme” and Section 4.5.2, “Displaying content based on the language” |
| pfx:editconsole, pfx:webserviceconsole | create panels of shortcut links useful during development, see Section 4.5.4, “Using the Pustefix console” |
This section describes the format for those documents serving as the structure defining xml source of the finally transformed documents. These can be found in the xml subdirectory of your project.
The explanation keeps an eye on the expected usage patterns of these documents.
There are basically two kinds of "pages" you deliver with Pustefix.
Pages that have no frames and may deliver html or any other text based format.
Pages that contain an arbitrary amount of frames and framesets. Those usually deliver html.
For a html delivering page without frames:
<pfx:document xmlns:pfx="http://www.schlund.de/pustefix/core">
  <html>
    <!--
      Any content valid for an html document
    -->
  </html>
</pfx:document>
If you don't want to deliver html, just omit the <html> tag. The following could be used to implement a CSS stylesheet.
<pfx:document>.foo { color: #ffff00; font-family: Helvetica; }</pfx:document>
The rule of thumb is: Whatever you put between <pfx:document> is up to you and will be delivered just as you write it there. Just remember that the <html> is not automatically inserted for you, you have to write it yourself.
There are only subtle differences. A document is a Type 2 doc by definition whenever there is a <pfx:frameset> and possibly a <head> node as the only direct children of <pfx:document>.
<pfx:document xmlns:pfx="http://www.schlund.de/pustefix/core">
  <head>
    <!--
      Again, put anything you want to appear in the head of the _top frame! This means
      page title, script stuff or stylesheets.
    -->
  </head>
  <pfx:frameset rows="20,*">
    <pfx:frame name="navi">
      <html>
        <head>...</head>
        <body>
          <!-- Any HTML content -->
        </body>
      </html>
    </pfx:frame>
    <pfx:frame name="main">
      <html>
        <body>
          <!-- Any HTML content -->
        </body>
      </html>
    </pfx:frame>
  </pfx:frameset>
</pfx:document>
As you can see there is NO <html> tag just below <pfx:document>. This is the one important difference between Type 1) and Type 2). As a rule you could say that you only have to insert the <html> yourself wherever the "real" content is. In a Type 1) doc this is the whole content of the <pfx:document> tag, so we need to set it there. But for a Type 2) doc, the "real" content is the content of the <pfx:frame> tags, so you need to set it there.
Pustefix provides tags that allow you create links to internal and external pages.
The <pfx:button> tag is responsible for generating links to other
pages inside the pustefix environment. In fact, it not always creates a link, but depending on
the fact if the target page is accessible ("invisible") or not, or if the target page is the
same as the current page ("active", aka "the target page is already active") it can display
completely different content, and only when the target page is accessible and is different
from the current page, a <a href="...">...</a> is put around it.
The template takes care of constructing the correct url with session information embedded and builds up valid, url encoded query strings.
<pfx:button page="APage" pageflow="AFlow" jumptopage="APage" jumptopageflow="AFlow" forcestop="true|false|step" startwithflow="true|false">
  <!--
    Control the submit commands
  -->
  <pfx:command page="APage" name="SELWRP">prefix</pfx:command>
  <pfx:argument name="AName">AValue</pfx:argument>
  <pfx:anchor frame="AFrame">AnAnchor</pfx:anchor>

  <!--
    These three optional child nodes can be used to display different
    content depending on the situation:
  -->
  <pfx:invisible>
    <!-- Displayed when link is not accessible -->
  </pfx:invisible>
  <pfx:normal>
    <!-- Displayed when link is accessible -->
  </pfx:normal>
  <pfx:active>
    <!-- Displayed when current page == link target -->
  </pfx:active>
  <!--
    Displayed link content
  -->
</pfx:button>
The <pfx:button> tag supports the following attributes:
| Attribute name | Mandatory? | Description |
|---|---|---|
| page | optional | defaults to the current page. Used to give the target page where the link points to. Note: leaving this empty also implies mode="force". |
| pageflow / jumptopage / jumptopageflow / forcestop | optional | These attributes work the same as for form submit controls |
| startwithflow | optional |
Defaults to false. When set to true, the request will not go to a page directly, but start with the a processing of the chosen pageflow to determine the page to use. The meaning of the page attribute also changes: If the submitted page is part of the chosen pageflow, the flow will be queried for the page to use up to the point in the flow where the given page is, which is then used in any case. In other words, this constitutes an end point for the search of a matching page in the flow. |
| mode | optional |
Default is empty. When set to force, a link is created and the matching CSS is used even in the active button state, i.e. whenever the target page is the current page. When set to desc, the button state is not only active when the current page == target page, but also when the current page is a descendent page of the target page. |
| nodata | optional | Default to false. Normally, whenever you use a pfx:argument tag to attach parameters to the query string, the system automatically also adds the parmeter __sendingdata=1 to the query string, thereby signalling to the backend system, that it should process incoming data. Set this attribute to true to prohibit this behaviour. |
| frame / target | optional | Works the same as for submit controls |
| normalclass / activeclass / invisibleclass | optional | defaults are: core_button_normal, core_button_active and core_button_invisible. These three attributes define the CSS classes to be used for the three different states of a pfx:button |
It is possible to use the same children to control the submit behaviour as it is done with form controls.
The pfx:button template allows you to change the link content depending
on the status of the target page.
Content of pfx:invisible will be only displayed when the target page is not accessible.
Content of pfx:active will be only displayed when the target page is the current page.
Content of pfx:normal will be only displayed when the target page is different from the current page and when it's accessible.
Content outside of these tags will be used in any case. If you only want to have different content for the invisible case, just put the content for the active and normal case inside pfx:normal, and add a pfx:invisible child with the differing content. The content of a pfx:normal node serves as the fallback for the other two cases.
| Note |
|---|---|
Note that only in the normal (regardless if the content comes from a dedicated pfx:normal child node or not) a link is put around the generated content. |
Note also, that for differences between the three cases that can be expressed with CSS, you don't need to use these special child nodes. The system makes sure to use the three associated classes explained above to allow styling.
It is also possible to change to content, depending on whether a page has already been visited or not.
Content of pfx:visited will be only displayed when the link has been already visited at least once in this session.
Content of pfx:visited will be only displayed when the link has not been visited in this session.
The two tags above may also be put inside pfx:normal and pfx:invisible tags to express different content for accessible (or inaccessible) pages depending on the fact if they have been visited at least once already.
This makes of course not much sense with pfx:active, because a page where this applies is always the current page and by that is always visited.
This tag takes mostly the same attributes as <pfx:button>, but it only creates the URL and does not build up
any content or generate a whole link. You can use this template if you just need the pure URL string.
When creating links to external URLs care must be taken to ensure that no sensitive data (especially the session ID)
leaks into log files of remote servers via the referer header. To make sure that this can't happen, all links to
external sites must be propagated via a special servlet, the de.schlund.pfixxml.DerefServer.
Every Pustefix project has this servlet configured to be accessible under the path /xml/deref.
To make the handling of external URLs easier, there also exists a special tag <pfx:elink>
that automates the creation of the correct link.
<pfx:elink href="http://some.host/location" target="_popup|SomeName">
  <!--
    Optional, use the <pfx:host> child instead of the href attribute whenever you
    need to construct the URL with additional code (e.g. from data only available
    at runtime)
  -->
  <pfx:host>...</pfx:host>

  <!--
    Optional, use as many of <pfx:argument> tags as you need to supply the
    parameters for the query string.
  -->
  <pfx:argument name="SomeName">...</pfx:argument>

  <!--
    Place content of the link here
  -->
</pfx:elink>
There are two types of ressources that need to be included into a Pustefix page. Textual content ("Include Parts") is
included with the help of the <pfx:include> tag while images are included via the
<pfx:image> tag. Both tags make sure to register the ressources in the runtime system, so at all
times the system knows which ressources a certain page uses. This information is used to check if the page is still
up-to-date or needs rebuilding (by comparing file modification times of the ressources with the creation time of the page itself).
Of course this check can be disabled for a "live" system, as there is typically no need to check for changed ressources.
Include parts contain the content that is displayed on your pages. The parts are organized into include files. Every part has the same structure:
The children of the part tag are theme tags (at least one). The name attribute of the theme tag is the name of a theme as it is defined in the projects depend.xml.in file. Often these themes are just the project name or "default", which is used as the fallback when no more specific theme name matches (see here on how to define themes in the depend.xml.in file).
| Note |
|---|---|
Earlier versions of Pustefix had no special themeing, the only thing that was used was the project name itself and "default" as the fallback. Still today, the default value for the "themes" attribute in the root node of the depend.xml.in file (when not given explicitely) is just "<ProjectName> default", which makes the new system behave exactly as the old one did. |
The resolution of the matching theme is done at the time the part is included (see below). Every page "knows" which themes are defined for it, and therefore it is possible to decide which product branch to use on generation time. The language on the other hand can be changed dynamically while the user clicks through the application, so the selection of the right language subtree (if more than one is present) is done at runtime.
<include_parts>
  <part name="Foo">
    <theme name="default">
      <pfx:langselect>
        <pfx:lang name="default">
          <!--
            The default content of part Foo goes here...
          -->
        </pfx:lang>
        <pfx:lang name="en_GB">
          <!--
            Default content in british english goes here...
          -->
        </pfx:lang>
        <pfx:lang name="en_*">
          <!--
            Default content in any other english language goes here...
          -->
        </pfx:lang>
      </pfx:langselect>
    </theme>
    <theme name="Theme_A">
      <!--
        The default content for theme Theme_A goes here...
      -->
    </theme>
  </part>

  <part name="Baz">
    <!-- Other parts -->
  </part>
</include_parts>
A part is referenced with two attributes: The filename of the include file that contains it, and the name of the part.
<pfx:include href="MyProject/txt/MyIncludefile" part="Foo" noerror="true|false" noedit="true|false"/>
| Attribute name | Mandatory? | Description |
|---|---|---|
| href | optional | If not given, it defaults to the current include part file |
| part | mandatory | The name of the part to include |
| noerror | optional | Defaults to false. Set this to true to imply that no warning sign should be generated when the include is not found. Only set this when you know what you do. |
| noedit | optional | Defaults to false. Set this to true to imply that this include part should not be editable via the pustefix editor. Only set this when you know what you do. |
Using this tag results in the matching product branch of the include part to be inserted in place of the tag.
Looking at the example naturally leads to the question how it is possible to generate different pages with only a small number of structural xml files and always the same XSLT stylesheets. The answer is that at least one of the include parts isn't included via the pfx:include tag (which only handles static attribute values) but instead the filename of the include part is auto generated from the name of the page that is to be produced.
Looking at this page, one can see that the two transformations which produce BazPage.xml resp. BazPage.xsl have the page name supplied through the use of an XSLT transformation parameter. Using this parameter, the tag pfx:maincontent constructs an include request depending on the page name.
<pfx:maincontent part="content" path="MyProject/txt/pages" prefix="main_"/>
| Attribute name | Mandatory? | Description |
|---|---|---|
| path | optional | If not given, but a XSLT parameter $maincontentpath has been defined in the depend.xml.in file, the value of the parameter is used. If there's even no $maincontentpath parameter, it defaults to PROJECTNAME/txt/pages |
| prefix | optional | defaults to main_ |
| postfix | optional | defaults to .xml |
| part | optional | defaults to content |
For the page "home" this is equivalent to <pfx:include href="MyProject/txt/pages/main_home.xml" part="content"/> and of course similar for every other page.
Starting with this page specific include, the content of the page can be included from many different include parts.
HTML <img> tags are usually not written directly, instead they are generated by using
the <pfx:image> tag. Using this tag makes sure that the used image is registered in the
runtime system as a dependency of the current target that's being generated.
One important feature of the <pfx:image> tag is that it inserts the natural height and
width of the requested image unless they are explicitely given (as attributes width and height of course).
<pfx:image src="some/path/to/img.gif" themed-path="some/path" themed-img="img.gif"/>
| Attribute name | Mandatory? | Description |
|---|---|---|
| src | optional |
The src path references an image in the file system. It must be given as a path relative to the
docroot (typically this means something like Note that you can either specify the src attribute OR both of themed-path and themed-img |
| themed-path & themed-img | optional |
These two attributes allow for themed images. The mechanism uses the same theme fallback queue as it is used for include parts. The algorithm to find the image to use is quite easy:
Build an image path by concatenating themed-path, a Example: The themes fallback list is "foo bar default", themed-path is "MyProject/img" and themed-img is "test.gif". The image file names that are tried one after the other are
|
| other attributes | optional |
All other attributes given (e.g. |
Pustefix supplies a complete set of tags that replace the standard HTML form element tags. The advantage of using these tags is that they are automatically pre-filled with values delivered from the backend.
The creation of a html form is done with the help of the tag <pfx:forminput>.
Most often you don't need to set any attributes, the defaults should work just fine.
<pfx:forminput send-to-page="APage" send-to-pageflow="APageFlow" frame="AFrameName" target="ATargetName" type="auth|data">
  <!-- place form elements here -->
</pfx:forminput>
| Attribute name | Mandatory? | Description |
|---|---|---|
| type | optional |
Defaults to |
| target | optional |
Defaults to the parent frame (if frames are used, current window otherwise) |
| frame | optional |
This is used to select which named frame is about to be loaded into the target frame after submit. The default when frames are used is the parent frame. Most often you have to set neither frame nor target. |
| send-to-page | optional |
Selects the page the submitted data is send to. Default is to use the current page. Most of the time, this is the right thing to do. |
| send-to-pageflow | optional |
Should not be used. Selects the pageflow to use. Default is to not set a pageflow name explicitely, but
let the backend reuse the current flow or select a matching one. Leave it that way if you don't know
why you want to change it. If you want to select a pageflow to use, better do so via the submit button as
explained below. Note that this mechanism will most likely not work when using the
|
Make sure that all the other form related tags detailed below are contained inside a pfx:forminput block.
The form can be submitted by clicking on submit controls which can be realized in two ways:
The simple html submit button is made with the tag <pfx:xinp type="submit">, while using an
image as the submit control is done with <pfx:xinp type="image">.
A very useful ability of both submit controls is that it's possible to attach additional form parameters to them, that are only transmitted when that exact submit control is pressed. This way it's possible for a form to have two or more submit controls, each with different additional data attached and submitted, depending on which submit control the user clicks on.
pfx:xinp type="submit|image" pageflow="APageFlow" jumptopage="APage" jumptopageflow="APageFlow" forcestop="true|false|step">
  <!--
    Attach additional information to the controls
  -->
  <pfx:command page="APage" name="SELWRP">prefix</pfx:command>
  <pfx:argument name="AName">AValue</pfx:argument>
  <pfx:anchor frame="AFrame">AnAnchor</pfx:anchor>
</pfx:xinp>
| Attribute name | Mandatory? | Description |
|---|---|---|
| type | mandatory |
|
| pageflow | optional |
Used to explicitely set a pagflow to use after the submit has been handled sucessfully.
Note that there is no corresponding way to set the page the submit is directed at, you need to
set the send-to-page attribute of the |
| jumptopage / jumptopageflow | optional |
If you don't want the pageflow mechanism to control which page to display as the next page after a
successful submit, you can set this page via the |
| forcestop | optional |
Default is false. If you don't want the pageflow mechanism control wether to stay on the current page
after a successful submit or not, you can unconditionally force it to stay on the current page
(when setting the attribute to |
When setting the type to image, you may also specify the attributes src,
themed-path and themed-img. These attributes work exactly as described in
Section 4.3.3, “Displaying images (<pfx:image>)”.
Command controls (like described in Section 4.4.2, “Submitting forms”) and links (like described in Section 4.2.1, “pfx:button”) can contain child tags that are used to pass additional data when the link or button is clicked.
The <pfx:anchor> tag is used to supply an anchor for a link or submit button.
<pfx:anchor frame="AFrame">AnAnchor</pfx:anchor>
The content gives the name of the anchor as it's defined in the target page.
| Attribute name | Mandatory? | Description |
|---|---|---|
| frame | optional |
You need to set it if the page uses frames or not. In this case you can use more than on pfx:anchor tag, one for each frame you want to define an anchor for. This way it's possible to scroll each frame independently to the desired position with one request (without the need for JavaScript). If you don't use frames, only one pfx:anchor tag makes sense, without a frame attribute. |
The <pfx:argument> tag is used to supply additional parameters for the request.
<pfx:argument name="AName">AValue</pfx:argument>
The content gives the value of the parameter to submit. It's also possible that this value is only known at runtime by using values dynamically supplied from the DOM tree. This may be handled like here:
<pfx:argument name="foo"><ixsl:value-of select="/formresult/bar"/><pfx:argument>
| Attribute name | Mandatory? | Description |
|---|---|---|
| name | mandatory |
The name of the argument to submit. |
The <pfx:command> tag is used to explicitly select the wrappers to submit on a page.
<pfx:command page="APage" name="SELWRP">prefix</pfx:command>
The content gives the prefix of the wrapper to select as defined on the target page.
| Note |
|---|---|
Note: If you don't give and selected wrappers, all wrappers defined on the target page become selected. |
| Attribute name | Mandatory? | Description |
|---|---|---|
| name | mandatory |
The name of the command. Currently, the only non-deprecated command is the Note: As this is the only command left, it is possible that the whole pfx:command stuff will go away, being replaced by e.g. an attribute of the submit control that holds all selected wrappers. |
| page | optional |
Most often empty. This should be set to the page the request is directed at if it's not the current page. |
Using these form element tags ensures that values, that are supplied by the backend application are used as
values for the generated html form elements. This is done dynamically by generating the necessary ixsl:
statements that will check the DOM tree for matching values and adding them as value attributes (text, password and hidden
input fields) or content (text areas) or selecting them according to their value (check boxes, radio boxes, option menus).
Another thing these tags do is to automatically check if the runtime DOM tree contains an error attached to their name. In this case, the resulting html input field is augmented with special CSS classes to help with styling these fields depending on the state they have (error/no error).
Typically the CSS used when no attached error is detected is just the value of a class attribute given to the pustefix input tag. On the other hand, if an error is attached, the class attribute looks like this:
[@class] PfxError PfxInputTextError [PfxErrorLevel_$level]
where @class is the user supplied class attribute mentioned above (if it's there at all) and
$level is an optional attribute of the error element in the runtime DOM tree. The example works the
same for other input fields of the form <input type="...">, by replacing
"Text" with "Password", "Check" or "Radio"
(Hidden input fields are not visible anyway. Select menus and text areas don't need a special class as they can be easily
selected via CSS rules. For the last two, the error CSS looks like this:
[@class] PfxError [PfxErrorLevel_$level])
Text input fields are created using the <pfx:xinp> tag.
<pfx:xinp type="text" name="AName" default="AValue" position="1|..|n" class="ACssClass">
  <!--
    name and default can also be set at runtime
  -->
  <pfx:default>
    <ixsl:value-of select="/some/runtime/value"/>
  </pfx:default>
  <pfx:name>
    <ixsl:value-of select="/some/runtime/name"/>
  </pfx:name>
 </pfx:xinp>
| Attribute name | Mandatory? | Description |
|---|---|---|
| name or <pfx:name> | mandatory |
The name of the parameter. Use the name attribute when the name is a known literal value. If it must be
computed at runtime (e.g. from the runtime DOM tree), you can use the |
| name or <pfx:default> | optional |
The difference between the attribute and the child element form is analog to the description given above. You can use the default specification to pre-set a value for the case that the backend doesn't set one on it's own. |
| position | optional |
Default is |
| class | optional |
See Section 4.4.4, “Form elements” for an explanation on how the CSS class(es) for the html element are constructed. |
Text area fields are created the same way as text input fields (see the section called “Creating a text input field”),
you only have to set the type attribute to area.
Basically the same attributes as for <pfx:xinp type="text">, with the exception
that there's no default attribute or child node. The same way as it works for the html textarea tag, the content
of the element (minus the special <pfx:name> child) becomes the default value
for the form input element.
Password fields are created the same way as text input fields (see the section called “Creating a text input field”),
you only have to set the type attribute to password.
Similar to <pfx:xinp type="text">, but without the ability to set a default value from the UI and the position is fixed to be "1".
Hidden fields are created the same way as text input fields (see the section called “Creating a text input field”),
you only have to set the type attribute to password.
Basically the same attributes as for <pfx:xinp type="text">. Of course no special class attribute handling, as the result is invisible anyway.
Radio buttons and checkboxes are created using the <pfx:xinp> tag as well.
<pfx:xinp type="radio|check" name="AName" value="AValue" default="true|false" class="ACssClass">
  <pfx:name>
    <ixsl:value-of select="/some/runtime/name"/>
  </pfx:name>
  <pfx:value>
    <ixsl:value-of select="/some/runtime/value"/>
  </pfx:value>
  <pfx:default>
    <ixsl:value-of select="/runtime/true/or/false"/>
  </pfx:default>
</pfx:xinp>
| Attribute name | Mandatory? | Description |
|---|---|---|
| name or <pfx:name> | mandatory |
The name of the parameter. Use the name attribute when the name is a known literal value. If it must be computed at
runtime (e.g. from the runtime DOM tree), you can use the A group of radio- or checkboxes share the same name and differ by the value they submit when they are checked. |
| value or <pfx:value> | mandatory |
Needed to set the value that is to be submitted when the element is checked. The difference between the attribute and the child element form is analog to the description given above. |
| default or <pfx:default> | optional |
Allowed values are |
| class | optional |
See Section 4.4.4, “Form elements” for an explanation on how the CSS class(es) for the html element are constructed. |
Radio buttons and checkboxes are created using the <pfx:xinp> and <pfx:option> tags.
<pfx:xinp type="select" name="AName" class="ACssClass" multiple="true|false">
  <pfx:name>
    <ixsl:value-of select="/some/runtime/name"/>
  </pfx:name>

  <!--
    One option tag per option that is available in the menu
  -->
  <pfx:option value="AValue" default="true|false">
    <pfx:value>
      <ixsl:value-of select="/some/runtime/value"/>
    </pfx:value>
    <pfx:default>
      <ixsl:value-of select="/runtime/true/or/false"/>
    </pfx:default>
  </pfx:option>
</pfx:xinp>
| Attribute name | Mandatory? | Description |
|---|---|---|
| name or <pfx:name> | mandatory |
The name of the parameter. Use the name attribute when the name is a known literal value. If it must be computed at
runtime (e.g. from the runtime DOM tree), you can use the |
| class | optional |
See Section 4.4.4, “Form elements” for an explanation on how the CSS class(es) for the html element are constructed. |
| multiple | optional |
Defaults to false. Set to true when you want to have a select menu with multiple selectable options. |
| Attribute name | Mandatory? | Description |
|---|---|---|
| value or <pfx:value> | mandatory |
Needed to set the value that is to be submitted when the element is checked. The difference between the attribute and the child element form is analog to the description given above. |
| default or <pfx:default> | optional |
See Section 4.4.4, “Form elements” for an explanation on how the CSS class(es) for the html element are constructed. |
| multiple | optional |
Allowed values are |
All other attributes are copied to the resulting HTML element.
Errors in Pustefix come in two variants:
Field errors that are attached to a form input field and which must be handled on the page the form element is defined on.
Page messages which are (not neccessary fatal) errors or warnings which may or may not be displayed on the current or the following page.
Page messages are not associated to a single form element, but are used for general feedback on the status of the application.
The <pfx:checkerror> tag is used to display content depending on the fact if a field error
(or possibly a field error with a special level attribute) is present in the runtime DOM tree.
<pfx:checkerror level="AString">
  <!--
    Content to be displayed when any error with the matching level attribute is present in the
    runtime DOM tree. The level attribute is optional, when it's missing, any error will trigger
    the display of the content of the pfx:checkerror tag.
  -->
</pfx:checkerror>
The <pfx:checkfield> tag is used to display error messages depending on the form
field they are attached to.
<pfx:checkfield name="prefix.Name">
  <pfx:error>
    <!--
      Content that's displayed when an error associated to the form field referenced
      in the name attribute is present in the runtime DOM tree.
    -->
  </pfx:error>
  <pfx:normal>
    <!--
      Content that's displayed when no error associated to the form field referenced
      in the name attribute is present in the runtime DOM tree.
    -->
  </pfx:normal>
  <!--
    Content outside of the two child nodes is displayed in both cases.
  -->
</pfx:checkfield>
There can be more than one of <pfx:error> and <pfx:normal>
child nodes. These can be used to display completely different content based on the presence or not of an error.
The <pfx:checkfield> tag defines a set of ixsl variables that can be used inside its body. These are
-
$pfx_scode: The StatusCode node that represents the error. This can be used to callixsl:apply-templateson to display the error message. -
$pfx_level: The level attribute of the error in the runtime DOM tree (or empty, if there's no level attribute). -
$pfx_class: The CSS class that has been constructed depending on the presence of the error. If there's no error, this variable is empty. Else, if the error is present and has no level attribute set, the value is justPfxError. If the error has a level attribute, the class is set to bePfxError PfxErrorLevel_{$pfx_level}.
Example 4.1. Using <pfx:checkfield>
<tr>
  <pfx:checkfield name="addr.Street">
    <td class="{$pfx_class}">Street:</td>
  </pfx:checkfield>
  <td><pfx:xinp type="text" name="addr.Street"/></td>
</tr>
<pfx:checkfield name="addr.Street">
  <pfx:error>
    <tr>
      <td colspan="2" class="{$pfx_class}">
        <ixsl:apply-templates select="$pfx_scode"/>
      </td>
    </tr>
  </pfx:error>
</pfx:checkfield>
You can see how the second <pfx:checkfield> inserts a whole new row in the table structure
when and only when a matching error happens. Also note how the defined $pfx_class variable is used
to style content depending on the presence of an error.
The <pfx:checkmessage> tag is used to display content depending on the fact if a
page message (or possibly a page message with a special level attribute) is present in the runtime DOM tree.
<pfx:checkmessage level="AString">
  <!--
    Content to be displayed when any page message with the matching level attribute is
    present in the runtime DOM tree. The level attribute is optional, when it's missing,
    any page message will trigger the display of the content of the pfx:checkmessage tag.
  -->
<pfx:checkmessage>
The <pfx:messageloop> tag can be used to repeat content for every page message
that is present in the runtime DOM tree.
<pfx:checkmessage level="AString">
  <pfx:messageloop>
    <!--
      This content is repeated for all the page messages that match the restrictions imposed by
      the parent's level attribute (or all page messages, if the attribute isn not given).
    -->
  </pfx:messageloop>.
</pfx:checkmessage>
The <pfx:messageloop> tag defines a set of ixsl variables that can be used inside its body. These are
-
$pfx_scode: The StatusCode node that represents the error. This can be used to callixsl:apply-templateson to display the error message. -
$pfx_level: The level attribute of the error in the runtime DOM tree (or empty, if there's no level attribute). -
$pfx_class: The CSS class that has been constructed depending on the presence of the error. If there's no error, this variable is empty. Else, if the error is present and has no level attribute set, the value is justPfxError. If the error has a level attribute, the class is set to bePfxError PfxErrorLevel_{$pfx_level}.
You may face situations where you want to prevent, that the same form is submitted multiple times (e.g. by double-click, back button) or that a form, opened in a new window/tab, but already opened in another window/tab, can still be submitted from the old window/tab.
Using the <pfx:token> tag a hidden field with a random token is included into its parent form.
The token is stored in the Context, keyed by a customizable name (by default pagename#elementid, which can be overwritten/replaced
using the name attribute). After the form is submitted, the token is invalidated and submitting the form again causes the setting
of a page message. Via the errorpage attribute you can optionally jump to an error page.
<pfx:forminput>
  <pfx:token errorpage="multisubmiterror"/>
  <!-- place form elements here -->
</pfx:forminput>
You should be aware that this mechanism depends on the caching behaviour of the used browser, e.g. for browsers, which don't cache but reload pages accessed via the back button, it can't prevent the repeated form submission, because the form in fact is a new instance and we can't detect or decide that the submit is illegal.
This mechanism by default only prevents forms with illegal tokens from being processed. If you want to ensure that form submits including no token will fail too, you can force this behaviour by setting the requirestoken attribute at the pagerequest's input element to true. This will force tokens for every form that's submitted to this page.
<contextxmlserver>
  <!--
    servlet config options
  -->
  <pagerequest name="...">
    <input requirestoken="true">
      <interface prefix="..." class="..."/>
    </input>
  </pagerequest>
</contextxmlserver>
Pustefix also provides several utility tags, that might be helpful in your application.
The <pfx:checkactive> and <pfx:checknotactive> allow you
to check from the XSL-stylesheet, whether a specific IHandler currently is active or not.
<pfx:checkactive page="APageName" prefix="AHandlerName">
  <!--
    Content to be displayed, if the handler is active
  -->
</pfx:checkactive>
| Attribute name | Mandatory? | Description |
|---|---|---|
| page | optional |
When using the page attribute, the content of the tag is only displayed if the referenced page is accessible. This is an easy way to display complete subparts of a page depending on the accessibility of another page. |
| prefix | optional |
When using the prefix, the content of the tag is only displayed if a referenced handler on the current page is active. The prefix is the same name as used in the servlet property file for the handler. You can only use one of the attributes page and prefix. |
The selection mechanism of <pfx:langselect> allows to select matching content anywhere
inside a include part depending on the current language that is set in the running session.
The <pfx:lang name="default"> tag is acting as the fallback for all languages that don't
have a better, more specific named <pfx:lang> node.
<pfx:langselect>
  <pfx:lang name="en_*">...</pfx:lang>
  <pfx:lang name="en_GB">...</pfx:lang>
  <pfx:lang name="default">...</pfx:lang>
</pfx:langselect>
The system doesn't enforce but expects languages to be of the standard form of ISO language codes. In this case,
a <pfx:lang> node with a name attribute ending in an asterisk (*) can be used to
create a fallback for a whole "family" of languages. In the example above, the en_* node will serve as a fallback
for all language codes starting with en_ except en_GB (which has a more specific node below).
The selection mechanism of <pfx:themeselect> allows to select matching content anywhere inside a
include part depending on the same selection mechanism that is used to select the include part the first hand as described
in Section 4.3.1, “Include parts (<pfx:include>)”
<pfx:themeselect>
  <pfx:theme name="ATheme">...</pfx:theme>
  <pfx:theme name="default">...</pfx:theme>
</pfx:themeselect>
Of course this makes most sense, when the containing include part uses a general theme, so there are specialized themes in the theme fallback queues to select from.
| Note |
|---|---|
This tag is only to be used in very special situations. Normally you would like to use different themes for the include part to register itself correctly with the runtime system. |
Pustefix provides an edit-console and webservice-console that are helpful during debugging.
Those consoles can be included in your pages using the <pfx:editconsole> and
<pfx:webserviceconsole> tags. The webservice-console may also be included within the
editconsole using the following form: <pfx:editconsole webserviceconsole="true">.
Table of Contents
In a typical Pustefix application the DispatcherServlet
provided by Spring is usually the only servlet. This servlet instantiates a
Spring ApplicationContext on startup and delegates
all requests to the HttpRequestHandler
found by using the HandlerMapping.
If you want to do request processing for a certain path without using the
HttpRequestHandlers provided by Pustefix, you can
add your own instance of an UriProvidingHttpRequestHandler
to the Spring configuration file.
All request handlers used by Pustefix are based on AbstractPustefixRequestHandler.
The main feature of it's session handling is that it's mostly transparent to the user. You can submit data
to a URL, and the system will take care to store the supplied data (this is done in the form of a
PfixServletRequest, which can be seen as basically the same as a
HttpServletRequest, with some additional features, e.g. more or less transparent handling of
file uploads), create a session, redirect to the URL with an embedded session id, and continue with the business
logic and the data submitted with the original request afterwards.
Even SSL is handled transparently. A descending request handler must implement the method + needsSession(): boolean
to decide if the the current request should result into the session to be "secure". You don't have to make sure that
the webpages use "https://" in all needed links, the target itself tells the system that it want's to run under SSL.
If the request handler decides that it want's to run under SSL from now on, a complex redirect sequence happens that makes sure that all data is copied from the previous insecure session into a new, secure session (a session is secure if it's session id was never transmitted over an insecure channel). After a session has once transformed into a secure one, there's no way back: Every time you try to use the session with "http://" it will create a new, secure session dropping the old one (because it's tainted now). If the visitor's browser supports cookies, the system manages to map request with the old, original, insecure session id (which can happen whenever the user uses the back button of her browser to go back to a page that has still the old session id embedded in every link) to the new, currently running secure session and silenty and securely redirects to this session.
Figure 5.1, “Pustefix HTTP request handlers” shows some of the HttpRequestHandlers
that are already provided by the core framework
and should be sufficient for most of your needs when building a web application with Pustefix.
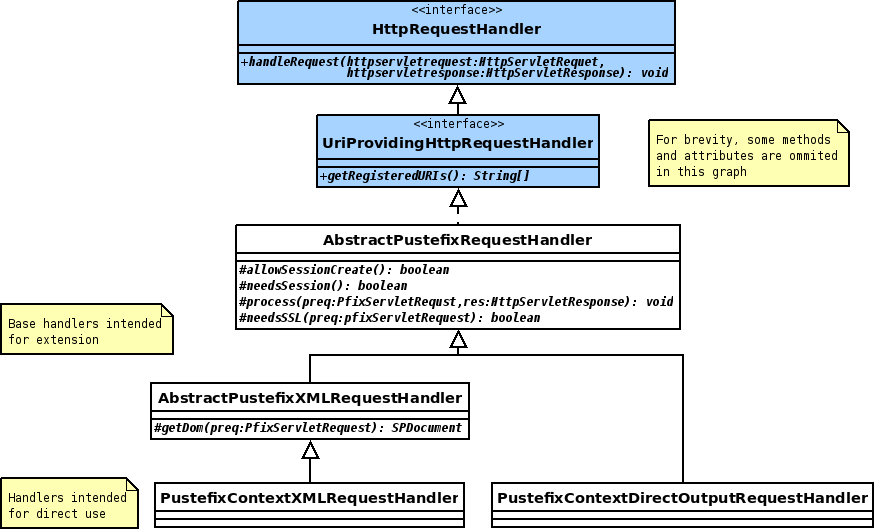
This is a small request handler that should be used whenever a link to a URL outside the own site is made. All such
external links must be of the form /xml/deref?link=http://some.other.domain/foo/bar. This is important
because for any link that goes directly to a foreign destination (e.g. <a href="http://some.other.domain/foo/bar">)
the session id visible in the logfile of the foreign site's webserver (via the Referer header). This is of course
a security problem. Using the DerefServlet avoids this by using a redirect loop so the Referer
header transmitted will no longer contain the session id.
This HTTP request handler, while still abstract, implements most of the output handling needed for request handlers that want use XSLT/XML to produce the final html sent to the browser.
The only thing a descendant needs to implement is the abstract method getDom(PfixServletRequest),
whose return value can be thought of as a small container around a org.w3c.Document. The additional data stored in
a SPDocument is among other things a map of XSLT transformation parameters that should be set and the "page name"
which the system uses to choose the correct target stylesheet to transform the DOM with.
In contrast to AbstractPustefixXMLRequestHandler and descendants, this request handler
does not produce it's output by transforming XML with a XSLT
stylesheet into HTML. There are situations where you need to stream some other format like pdf or images like
PNG or GIF instead.
The PustefixContextDirectOutputRequestHandler is used for exactly this purpose, because
it delegates request processing to
DirectOutputState objects which are allowed to write directly to the HttpServletResponse's
OutputStream.
This is the main request handler that handles almost all pages in a typical Pustefix application - everything
that produces HTML to be
precise. The servlet doesn't do much on it's own, it delegates the request processing to a
de.schlund.pfixcore.workflow.Context object. This Context is created by the
PustefixContextXMLRequestHandler
once for every session, stored into the HttpSession and reused for all later requests.
A Pustefix application has exactly one PustefixContextXMLRequestHandler.
Although more than one additional >PustefixContextDirectOutputRequestHandler
could be used, there is usually no need for such a configuration.
Every request that arrives at a pustefix application is processed in a specific way, depending
on the HTTP request handler that is being
selected by the PustefixHandlerMapping.
In this chapter we will show how PustefixContextXMLRequestHandler handles
requests.
The special processing of requests by this HTTP request handler is called the Pustefix Request Cycle. It is important to understand how this cycle works, and how to configure it in such a way to achieve the desired result for each request.
The main "director" in this cycle is the
Context
object, that will handle all the processing logic and call other objects to handle the business logic part of the request
cycle (aka: do something useful with all the user supplied parameters of the request). The other main participants are
implementations of the
State
and
PageFlow
interfaces.
Pustefix supplies default implementations of these interfaces.
The PustefixContextXMLRequestHandler does most of the request handling in an object called the
"context". The interface Context provides the applications
view on this object. From the applications view the context mainly is:
Providing an interface to
de.schlund.pfixcore.workflow.ContextResourceobjects. These objects contain the data and the methods needed to implement the desired functionality of a project. Each Context objects initializes one de.schlund.pfixcore.workflow.ContextResourceManager, which in turn initializes all the requested ContextResources. All user data must be stored in ContextResources instead of directly into the HttpSession (this is by design, because a HttpSession only allows to store untyped String-to-Object relations, while the ContextResources can expose arbitrary complex access methods to the stored data).Providing a pluggable authentication mechanism that is called before any request processing to check if the current session has the needed privileges.
Mapping of requested pagenames (aka "PageRequests") to the objects that implement the functionality that should be supplied by the page. The Context (with the help of a PageMap object initialized on startup of the Context) checks which page is requested and uses the associated de.schlund.pfixcore.workflow.State object to dispatch the request processing to. See below for more details on this process. Note that for each State only one instance is created, so no local data can be stored in States - all session data must be stored in ContextResources.
Organizing pages into PageFlows to provide a small scale "workflow management". PageFlows are linear lists of PageRequests which should be stepped through in order. The Context advances a PageFlow after a request has been handled sucessfully, ie. no error has happened as the result of processing the request data. The detailed rules on how page flows work and how the Context steps through them are explained below.
The context provides a de.schlund.pfixxml.SPDocument to the servlet. This class is a small wrapper around a org.w3c.Document and supplies the XML input document for the final transformation which produces the HTML output. Besides the DOM tree it contains the information the system needs to choose the right stylesheet for the desired page that is to be shown plus some other stuff like XSLT parameters that should be set for the transformation process. The Context doesn't produce the SPDocument itself but delegates this to the State's getDocument() method.
For the PageFlow
interface there is currently only one implementation, and at the time of this writing it's not yet possible to change this
implementation by supplying your own, although this is planned for the near future. The current implementation is called
DataDrivenPageFlow, and it will be explained in more detail below. For the discussion presented
here, it is sufficient to know the general PageFlow interface.
public interface PageFlow {
    String getName();
    String getRootName();
    boolean containsPage(String pagename);
    String findNextPage(PageFlowContext context, String currentpagename, boolean stopatcurrentpage, boolean stopatnextaftercurrentpage) throws PustefixApplicationException;
    boolean precedingFlowNeedsData(PageFlowContext context, String currentpagename) throws PustefixApplicationException;
    boolean hasHookAfterRequest(String currentpagename);
    void hookAfterRequest(Context context, ResultDocument resdoc) throws PustefixApplicationException, PustefixCoreException;
    void addPageFlowInfo(String currentpagename, Element root);
}
Both getName() and getRootName() return the name of the pageflow, the difference being that getName() contains the full qualified name (the root name
together with any variant name, if present) while get RootName() only returns the root name.
containsPage(String pagename) must return true if the given page name is part of the page flow.
findNextPage(...) is more interesting. It implements the main duty of a page flow: To supply some sort of "next" page, given the context (in the form of a
PageFlowContext which is just a stripped down version of the Context interface to only support getting information, but no
changing the inner state of the context object), the information what the current page name is (currentpagename), and two
flags:
stopatcurrentpage: If set to true and the current page is part of the pageflow, then the page flow searches no further for another matching page then the current page. I.e. for the linear page flows of theDataDrivenPageFlowimplementation this means checking all the (accessible) pages starting at the head of the flow if they need data (that means: The associatedStatereturnstruefor method callneedsData(...)) - if yes, that page is returned. But if the page under consideration is the current page, return it in any case even if it doesn't need data.stopatnextaftercurrent: This is is similar to the first flag, only that we don't stop the page flow search at the current page, but instead at the next accessible page after the current page.
The rest of the methods will be explained in more detail below.
The situation is different for
States; Pustefix supplies implementations to cover most of the needs one may have in a normal application, however there are
always situations where it is needed or at least much easier to write a specialized
State
instead of trying to re- or misuse one of the two "standard" implementations supplied with the framework.
These two implementations are
StaticState
and
DefaultIWrapperState. The first is used for all
static
pages, i.e. pages that don't need to process any input parameters, but merely display more or less static content. The only
dynamic thing this state can do is to include information from
context resources
into it's output DOM tree. The second one implements the concept of
wrappers and handlers, which is the standard way in pustefix to handle input data.
Both of these states inherit from the abstract class
StateImpl, a class that implements a bunch of helper methods useful for basically every conceivable state implementation. So it is
strongly suggested to use this (or one of the two described states) as the base class for your own implementations.
While both of these states will be explained in detail below, it is important to note that the context only knows about states, not a special implementation of it. So on this level it makes no difference if a request supplies data to be processed, or if it only request the display of a certain page. So the only thing we need to know for this chapter is the interface all states have to implement:
public interface State {
    boolean        isAccessible(Context context, PfixServletRequest preq) throws Exception;
    boolean        needsData(Context context, PfixServletRequest preq) throws Exception;
    ResultDocument getDocument(Context context, PfixServletRequest preq) throws Exception;
}
These three methods are quite easy to explain.
isAccessible(...)
is used to check if a page is accessible (the exact wording would be "the associated
State
of the page", but we use page/state interchangeable here, as there is a n:1 association of pages to states anyway, i.e.
every page has exactly one associated state, but most of the time many pages share the same state. States are singletons, so
they don't store any data themselves. This allows to share them between many pages).
getDocument(...)
is the method that does all the work. Here we produce the result DOM tree that is used to render the final HTML page with.
needsData(...)
is (or better: can be) used only during
page flow processing
to determine what the next page is that needs to be shown. This method will be explained when we describe the
PageFlow
and it's default implementation in greater detail below.
During the request-response cycle, the Context maintains a set of variables that influence the processing of the request.
These are listed in the following table. Use these as a reference to see how they can be set and changed, either by specifying
values for them in the request (directly, or by referencing an action that sets them) or by calling a method of Context
somewhere from Java code during the processing of the request.
| Variable | Type | Usage | How to set? |
|---|---|---|---|
| currentpagerequest | PageRequest |
This is basically the object representing the current page we use to process the request. The value of
currentpagerequest that is valid at the end of processing becomes the page to be displayed.
This variable must never be unset again after initialization during the whole request cycle (it only changes to other PageRequests). |
Supplied by the request via either the third request path element (e.g.
http://host.dom/xml/config/PAGE?...) or if this is not given via the request parameter
__page.
In Pustefix, this is usually transparent to the user: For POST requests, use the
If no page information can be retrieved from the request, use the default page given in the configuration. |
| currentpageflow | PageFlow | Default is null. This object represents the currently valid page flow (if any). If it is null, there is no page flow selected. |
Can be explicitly set via the parameter __pageflow (in Pustefix used via the
attribute pageflow to either
pfx:button or pfx:xinp type="submit|image" via the request or by setting
the pageflow attribute of a configured action).
Can also be set from Java by using the The current page flow is very often not set explicitly, but selected automatically by the context. See below for a detailed explanation of the rules that apply in these cases. |
| prohibitcontinue | boolean |
Default is false, if set to true during the request processing, the context will
not use the pageflow (if any) to determine the next page to show, but instead use the currentpagerequest and
display the associated page. |
Can be set from the outside by using the request parameter __forcestop=true (maps to setting
the forcestop attribute of pfx:button or pfx:xinp type="submit|image"
to true or by calling a configured action with this attribute set to true).
There is also a method in the context called |
| jumptopage and jumptopageflow | String |
Default is null for both. If set, jumptopage is interpreted as a page name that should be displayed
after the current request is processed and only if prohibitcontinue is
not set to true (in which case, as described below in more detail, no further processing takes place
and the current page is displayed).
The With other words, this mechanism is used to jump to another page after the current request has been successfully handled. |
This entry can be set quite similar to the pageflow variable above: We have __jumptopage and
__jumptopageflow, normally created via the attributes jumptopage and
jumptopageflow in either pfx:button, pfx:xinp type="submit|image" or a
configured action.
There are also two methods in the |
| stopnextforcurrentrequest | boolean | Default is false. Only has an effect if a page flow is set, and the current page is indeed
a member of this page flow.
If set to true the pageflow is expected to return the next accessible page after the
current page in the pageflow. The meaning of "after" depends on the implementation of the |
Can be set directly in a request by using __forcestop=step (and of course the same for the
attributes to the Pustefix tags and configured actions).
This may seem strange, as that parameter is also
used to set the |
| startwithflow | boolean | Default is false. This variable is used to instruct the Context to not directly use the page that is
submitted with the request (and which is still used to set the currentpagerequest variable), but instead ask the current pageflow for
the next page to use. So the caller doesn't actually know which page will be the one to display. Most often, setting this parameter also implies explicitely
setting a page flow via the methods listed above. We will cover this special case in more detail below. |
This variable can be set via the request parameter __startwithflow. With Pustefix tags this is achived by setting the
startwithflow attribute of pfx:button to true.
There is no such possibility for |
The currentpageflow variable needs some more
explanation, as in many cases, it is not given explicitly neither by submitting an action that specifies the page flow nor directly from the request parameter __pageflow.
If this is the case, the Context tries to find a matching page flow by using the following algorithm.
If the current page is a member of exactly one page flow, this flow will become the current page flow.
If the current page is a member of more than one page flow, the
Contextchecks if one of these flows has been the last flow the system has used in any request before (so this even applies if the system didn't use a page flow at all during the last requests). If this is the case, the system uses this flow as the current page flow. This has the effect that a page flow will remain the current flow as long as the pages used for requests are at least a member of this flow.If the last flow isn't part of the list of flows matching the current page, the system checks if the current page specifies a
defaultflowin its configuration (and makes sure that the page is really a member of this flow!). If yes, this flow is preferred and returned as the current page flow. If not, the first of the list will be returned.If the current page is not a member of any flow, the current page flow remains unset (the
currentpageflowvariable remainsnull).
In this section we want to explain the way the request cycle is handled in Pustefix by the Context and its peer objects (State, PageFlow) used during
processing.
After the variables have been initialized, we have two different ways to go on. Either startwithflow is set to true, or not.
The first case will be explained below in more detail, for now we assume that the value of startwithflow is false.
We also do neglect some other aspects, that have to be taken care of during request processing: Role based authentication isn't mentioned here and also the fact that each
State will always be asked if it is accessible before calling one of the other two methods won't be mentioned explicitly for the remainder of this explanation.
The first action to take is calling
getDocument(...)on theStateassociated with the current page.If the current page flow has After-Request-Hooks defined (this is checked by calling the method
hasHookAfterRequest(...)on the currentPageFlow), these hooks are being run by callinghookAfterRequest(Context context, ResultDocument resdoc). TheResultDocumentused here is the return value from thegetDocument(...)call above. These hooks can basically do anything that can be achieved with the help of theContextinterface (changingjumptopage/jumptopageflow, callingprohibitContinue()and so on). The interesting thing here is that they not only have access to theContextobject, but also the resulting DOM-Tree of the processing of the current page. We will learn about an example of such hooks when we look at the current standard implementationDataDrivenPageFlow.Now we check if
prohibitcontinueis set totrue. If yes, theResultDocumentwill be used to display the current page. The request cycle ends here.If
prohibitcontinueis still false, check ifjumptopageis set. If yes, set thecurrentpagerequestto thejumptopage(and also changecurrentpageflowto something that matches, preferringjumptopageflow, if it is set);jumptopage/jumptopagefloware unset to avoid recursion, then we re-enter the process at point 1.If
jumptopageis not set, we try to use the current page flow to get the next page by callingfindNextPage(..., ..., false, stopnextforcurrentrequest). We set this page to be the current page, callgetDocumenton its associatedStateand use the returnedResultDocumentto display the page. The request cycle ends here (there is no recursive call of the page flow process!).If no current page flow is set (
currentpageflow == null), we simply use the resulting ResultDocument of the initial call togetDocument(...)and use it to display the current page.
Up to now, we mostly neglected the fact that a page could also be not accessible, which it is if the associated State
returns false for a call to its method isAccessible(...). This method is checked each time before the
Context tries to call getDocument(...) for a page. The PageFlow is also expected to only
return a page that is accessible, and to check the accessibility before each call to needsData(...).
If the initially requested page is not accessible, but a page flow is set,
the Context will try to find a matching page by calling
findNextPage(..., ..., false, stopnextforcurrentrequest). Because this method is expected to only return
a page that is accessible (if it doesn't find one, it must throw an exception) we can safely set this page to be
the new current page and start with the request cycle as usual.
If no page flow is set, the system will try to use the default page from the configuration. If this is indeed accessible, it will be set as the new current page, and the whole process continues normally from there. If also the default page is not accessible, an exception will be thrown.
Usually this case won't happen, because you have to force Pustefix to generate a link to a page that is currently
not accessible by using the mode="force" attribute on pfx:button. But this procedure is
also done when the current page has been set from the jumptopage variable and the request
cycle is being restarted (see above). To avoid to see any strange behavior and pages that have never been
intended to be displayed, it's important to make sure that a jumptopage request only references a page
that will be accessible.
This accessibility check must also be run by the PageFlow before calling needsData(...) or
before returning any page name from findNextPage(...). It is expected to simply ignore any page that is not
accessible and continue searching for another "next" page. As already explained above, if it is not able to find a page that
is accessible, it must throw an exception.
Another change in request processing happens when the startwithflow variable is set to true. In this case,
the context doesn't expect to get a valid pagerequest from the request itself (although there is one supplied, see below
for the special meaning of this page name), so it has to "search" for the page to handle
the request processing. This search is done by directly switching to the page flow handling part of the code to retrieve
the "next" page that is suggested by the page flow.
Other than in the case of the usual page flow processing,
there is some special trick
involved: If during searching for the next page the page flow encounters the supplied page from the request, it will return
this page regardless if it needs data or not. In other words: You can limit the search in the page flow by supplying a
page that is part of this flow. If the page is not part of the page flow or it is inaccessible, it is ignored (But note that
the default page flow implementation DataDrivenPageFlow also sets the supplied page to be the
final page (see below for details on this), so essentially every supplied page becomes part of the
page flow. But this behavior is not part of the contract between PageFlow and Context and just an implementation detail
of DataDrivenPageFlow).
On a quick look, this seems to be almost the same as what is done when a request comes in to a page, that is not accessible (see above). In this case, too, a new page ist searched by asking the page flow for the next page. The main difference is that a "normal" request will always use the supplied page, as long as it is accessible, while in the startwithflow case it will only be used if no other "earlier" candidates have been returned by the page flow.
Despite all the explanation about States, most of the time one doesn't write States directly, but rather uses one of two predefined States (or trivial descendants of them).
The first is de.schlund.pfixcore.workflow.app.StaticStateliteral>. This State is used when the page doesn't
need to process any input data. This is true for most of the purely informative pages of a website (e.g. documentation,
product information). StaticState returns true for any call to needsData, which makes it of course unusable for any
non-trivial pageflow as described here. Also any call to isAccessible returns true. For the creation of the output DOM tree,
the State respects the <output> nodes of the page definition in the context configuration file, but of course any
<input> nodes are ignored.
Of course it would be possible to write specialised States for every page that needs application logic. Experience shows however that the reuseable components of the application logic are not complete pages, but smaller parts that make up the whole functionality of the page. So we need a way to aggregate these smaller parts into a predefined State that delegates and distributes the calls made by the Context.
The State that implements this is called de.schlund.pfixcore.workflow.app.DefaultIWrapperState.
The corresponding logical "atomic" components are implementations of de.schlund.pfixcore.generator.IHandler.
Associated to these IHandlers are container classes (implementations of de.schlund.pfixcore.generator.IWrapper) that
hold the user supplied input data that these handlers should work on. The IWrapper classes are autogenerated from a
XML description that is explained in more detail here.
An IHandler has the following simple interface:
boolean needsData(Context)
boolean prerequisitesMet(Context)
boolean isActive(Context)
void retrieveCurrentStatus(Context, IWrapper)
void handleSubmittedData(Context, IWrapper)
The corresponding methods of the State interface and the mappings to the IHandler
methods are:
boolean needsData(Context, PfixServletRequest): this method is just delegated to all defined IHandlers. If any of those returns true, the return value of the State methods is true, too and false otherwise.boolean isAccessible(Context, PfixServletRequest): this method maps on the two IHandler methods prerequisitesMet and isActive. The default algorithm works like this: In a first round, on all IHandlers the prerequisitesMet() method is called. If any of the IHandlers returns false here, the return value of the whole State method is false. If all IHandler return true, a second iteration over the IHandler is made with a call to their isActive method. This time, the logic is reversed: if any IHandler returns true, the State method is true, too. It only returns false when no IHandler's isActive method returns true. It's possible to customize the behavior for this second iteration in the config file with the policy attribute of the<input>node.ResultDocument getDocument(Context, PfixServletRequest): this method is mapped on either retrieveCurrentStatus or handleSubmittedData depending if the request is submitting user data by means of a GET request or a form submit (in this case handleSubmittedData would be called) or if the request just wants a page to be displayed (which would result in retrieveCurrentStatus to be called).
Some important things to note:
No IHandler method returns a ResultDocument (which is basically a wrapper around the DOM tree that is used for the final transformation to generate the HTML output). In a State it's possible (in fact needed) to create the ResultDocument itself and it's easy to put additional nodes into the DOM tree inside the getDocument method. By design, this no longer works with IHandlers. All output should be generated from the configured ContextRessources listed below the
<output>node of the config file.IHandlers don't have access to the PfixServletRequest (which is basically a wrapper around HttpServletRequest). All in- or output of parameters must take place via the typesave getter and setter methods of the associated IWrapper object. In the handleSubmittedData method one typically reads the values as they are supplied from the request, and in the retrieveCurrentStatus method one sets the parameters as they are given by the current status of the application to pre-fill form elements on the user interface (Note: the Pustefix elements to create form elements take care to automatically use the values as supplied via the IWrapper to pre-fill form elements. If you generate your form with other XSLT tags or with the original html elements, this will no longer work ot of the box).
It's an important property of Pustefix that the Context doesn't know anything of IHandlers/IWrappers. From the view of the Context, it always works with States and nothing else. This section describes the way the DefaultIWrapperState and the Context play together.
A request can be processed in two different ways by the getDocument(...) method of DefaultIWrapperState:
A request that submits data (as can be detected with the help of the method isSubmittrigger(...)) will be processed like this (EOR means end of request):
All IWrappers will initialize their data from the request.
On all IHandlers will be called handleSubmit(...) with the approbiate IWrapper object as a parameter.
The system checks if there has been an error during processing the reuqest.
If yes, put all the error codes into the ResultDocument and tell the context to stop at the current page (by calling context.prohibitContinue()). EOR.
If no, the system needs to decide to either stay on the current page (and display it again) or hand back the control to the Context to start a pageflow process that determines the next page to display. This decision is made be looking at the state of the context and the set of IHandlers. There are 3 different cases to consider:
First we need to decide if there is anything that actively forces the system to stay on the page even in the case of a successful submit. Two cases must be consideres here: The context method prohibitContinue() has already been called (which can be checked by calling the Context method isProhibitContinueSet()). This will always force the context to stop the process, use the returned ResultDocument and display the current page. For the second case, depending on which IHandlers have been called to handle data (this can be a subset of all the IHandlers on the page, see here on how to restrict the submit to a subset of the full set of defined IHandlers), the DefaultIWrapperState decides to stay on the current page. A simplified explanation of the algorithm is like this: When only a subset of the IHandlers have been used to handle a data submiting request, force the system to stay on the current page. There is an exception to this rule, though: When all the IHandlers of the restricted subset are also marked with the continue attribute on the corresponding
<interface>node in the config file set totrue, then don't force the system to stay on the current page. All of this does NOT apply when the request has set a JumpToPage (this can be queried from the Context with the method isJumpToPageSet()) - in this case the JumpToPage takes precedence. NOTE: this will maybe be removed in the future and the default will be to try to continue with the pageflow in any case, despite any restricted subset of IHandlers.Alternatively we try to check if we really want to give control back to the Context to determine the next page. This will happen if one of three conditions is true:
A JumpToPage has been set.
The current page is part of the current pageflow
Or the current pageflow has been set explicitly by the request (in this case, the current page doesn't need to be a member of this flow).
The default for the DefaultIWrapperState if none of the above conditions is true is to stay on the current page.
If the result of these checks is to stay on the current page, call prohibitContinue() on the Context and call retrieveCurrentStatus() on the suitable IHandlers - suitable in this case means a) if no restriceted subset of IHandlers is selected, use all that are defined or b) use the restricted subset and additionally all IHandlers that have the alwaysretrieve attribute on their corresponding
<interface>node in the config file set to true. EOR.
A request for a page that doesn't submit data (direct trigger), or a request that comes in while a pageflow is processed or a request that is the result of a final page instruction.
All IWrappers will initialize their data from the request.
call retrieveCurrentStatus() on all the defined IHandlers, and force the Context to stop further processing by calling prohibitContinue(). EOR.
Write introduction...
IWrappers are used to store the request data that is used as input for corresponding IHandler classes. IWrappers are not explicitly written by the developer, but are generated from .iwrp files which contain a high level XML description of the parameter types and certain checks that should be applied to them. Each .iwrp file is translated into a .java file with the same name during the build process, and a java class is created. In the corresponding IHandler, you use the IWrapper to access or store data by calling the IWrapper's get and set methods.
The syntax of the .iwrp file is given below.
<interface xsi:schemaLocation="http://pustefix.sourceforge.net/interfacewrapper200401 http://pustefix.sourceforge.net/interfacewrapper200401.xsd" extends="some.other.iwrapper.class"
  xmlns="http://pustefix.sourceforge.net/interfacewrapper200401"
  xmlns:xsi="http://www.w3.org/2001/XMLSchema-instance">
  <!--
    The class attribute references the associated IHandler class. The class attribute is
    mandatory. The ihandler node is optional, but if it is left out, the generated
    IWrapper will be abstract and cannot be used directly, unless an extends attribute
    has been given to the interface node. Normally you will want to specify an ihandler
    class here.
  -->
  <ihandler class="some.de.schlund.pfixcore.generator.IHandler.class"/>
  <!--
    This node can (and usually will) occur multiple times, one for every parameter that
    should be part of the interface
  -->
  <param name="AName" type="some.java.Type" occurrence="optional|mandatory|indexed" frequency="single|multiple" missingscode="some.defined.statuscode">
    <!--
      The whole node is optional. It allows to specify a default value (or multiple) for
      a parameter to use, when no value is supplied via the request. Note that this makes
      the destinction between optional and mandatory parameters nonsensical.
    -->
    <default>
      <value>a_default_value</value>
      <value>an_other_default_value</value>
    </default>

    <!--
      To test if a param value conforms to the rules, you can specify Check-Classes here
      whose check method will be called to test if the param value makes sense.
      The Check-Classes must implement de.schlund.pfixcore.generator.IWrapperParamPreCheck
      (the interface defines the check(...) method).
    -->
    <precheck class="a.prechecker.class">
      <cparam name="APreCheckerParamName" value="APreCheckerParamValue"></cparam>
    </precheck>

    <!--
      Each parameter must be casted from a String to the specific type (unless the type is java.lang.String itself, in this case, no caster need to be supplied). This is done by means of a class implementing de.schlund.pfixcore.generator.IWrapperParamCaster. For the usual simple types you can use a caster from the package de.schlund.pfixcore.generator.casters.
    -->
    <caster class="de.caster.class">
      <cparam name="ACasterParamName" value="ACasterParamValue"></cparam>
    </caster>

    <postcheck class="a.postchecker.class">
      <cparam name="APostCheckerParamName" value="APostCheckerParamValue"></cparam>
    </postcheck>
  </param>
</interface>
When defining the parameters for your wrapper, the following attributes are
supported in the iwrp format:
| Attribute name | Mandatory? | Description |
|---|---|---|
| name | mandatory | The name of the parameter. This is used in the getter and setter methods that are generated. E.g. for the parameter name Foo there will be - amongst others - a corresponding java method called getFoo. |
| type | mandatory | The java type of the parameter. This will determine the return type of the generated getter method. |
| occurence | Optional, default is mandatory | This attribute specifies if the parameter must be given (mandatory), or if it's not considered to be an error if it is omitted (optional). The special value indexed tells the system that it should search for occurrences of the parameter name with a suffix appended of the form AParamName.ASuffix. The suffix string must be unique for every occurrence of the parameter named AParamName. Indexed parameters are never mandatory. |
| occurence | Optional, default is single | This attribute specifies if only one parameter of the same name should be accepted or multiple. This determines if the generated getter method's return value is a single object or an array. |
| occurence | Optional, default is de.schlund.pfixcore.generator.MISSING_PARAM | This attribute applies only to mandatory parameters. It allows to specify a different than the default StatusCode to use when the parameter is not supplied. |
IWrappers support different parameter types that result in different method signatures in the generated wrapper code.
The parameter type is influenced by the attributes occurance
and frequency
In most cases, your wrappers will be used to accept and validate simple input parameters, like
data entered in input fields. These parameters are created setting frequency
to single and occurrence to mandatory
or optional.
This will lead to the following methods:
public class MyWrapper {
    Bar  getFoo();
    void setFoo(Bar value);
    void setStringValFoo(String str_value);
    void addSCodeFoo(de.schlund.util.statuscode.StatusCode scode);
    void addSCodeWithArgsFoo(de.schlund.util.statuscode.StatusCode scode, String[] args);
}
In some cases, a parameter might be present in a page more than once. This might be the
case for a list of checkboxes, where all input tags have the same name, but different
values. These parameters are created setting frequency
to multiple and occurrence to mandatory
or optional.
This will lead to the following methods:
public class MyWrapper {
    Bar[] getFoo();
    void  setFoo(Bar[] value);
    void  setStringValFoo(String[] str_value);
    void  addSCodeFoo(de.schlund.util.statuscode.StatusCode scode);
    void  addSCodeWithArgsFoo(de.schlund.util.statuscode.StatusCode scode, String[] args);
}
Pustefix also allows you to repeat a parameter inside a page/request and access
all occurrences of the parameter using an index. In the request, the parameter and
the index are separated using a . (dot).
These parameters are created setting frequency
to single and occurrence to indexed.
This will lead to the following methods:
public class MyWrapper {
    Bar  getFoo(String index);
    void setFoo(Bar value, String index);
    void setStringValFoo(String str_value, String index);
    void addSCodeFoo(de.schlund.util.statuscode.StatusCode scode, String index);
    void addSCodeWithArgsFoo(de.schlund.util.statuscode.StatusCode scode, String[] args, String index);
}
This is very helpful, if you have a list of entities (like users, books, etc.) and it is possible to edit the data of several of these entities in one form.
Of course, it is also possible to combine multiple and indexed parameters in a wrapper.
These parameters are created setting frequency
to multiple and occurrence to indexed.
This will lead to the following methods:
public class MyWrapper {
    Bar[] getFoo(String index);
    void  setFoo(Bar[] value, String index);
    void  setStringValFoo(String[] str_value, String index);
    void  addSCodeFoo(de.schlund.util.statuscode.StatusCode scode, String index);
    void  addSCodeWithArgsFoo(de.schlund.util.statuscode.StatusCode scode, String[] args, String index);
}
public interface IHandler {
    void    handleSubmittedData(Context context, IWrapper wrapper) throws Exception;
    void    retrieveCurrentStatus(Context context, IWrapper wrapper) throws Exception;
    boolean prerequisitesMet(Context context) throws Exception;
    boolean isActive(Context context) throws Exception;
    boolean needsData(Context context) throws Exception;
}
StatusCodes are assigned to IWrapper parameters and form fields to indicate invalid data and display according error messages. They are automatically assigned by the framework when prechecks, casters or postchecks fail, or they can be assigned programmatically by the application logic.
The framework predefines some common StatusCodes, e.g. MISSING_PARAM - indicating the missing of a mandatory form value, or StatusCodes for builtin prechecks, casters and postchecks, like precheck.REGEXP_NO_MATCH - indicating that a form field's value doesn't match a given regular expression. Application developers can arbitrarily define additional StatusCodes.
StatusCodes are defined as normal include parts. They're placed in their own files located under the dyntxt directory. Within such a statuscode file the part names uniquely identify the StatusCode, the content nested inside the part element represents the message.
<?xml version="1.0" encoding="UTF-8"?>
<include_parts xmlns:ixsl="http://www.w3.org/1999/XSL/Transform" xmlns:pfx="http://www.schlund.de/pustefix/core">
  <part name="ILLEGAL_LOGIN">
    <theme name="default">Illegal login data.</theme>
  </part>
  ...
</include_parts>
Those StatusCode files are used by the build process to automatically create Java classes containing the StatusCodes as constants, using the part names as field names (in uppercase form). Thus the StatusCodes can be safely referenced from within Java code.
Before the StatusCode files are recognized by the build process, they have to be configured inside a statuscode metainformation file. The file has to be called statuscodeinfo.xml and has to be located in the project's conf directory or in the dyntxt directory. Within this file you define which StatusCode constant class is built from which StatusCode files.
<?xml version="1.0" encoding="UTF-8"?>
<statuscodeinfo xmlns="http://pustefix-framework.org/statuscodeinfo" xmlns:xsi="http://www.w3.org/2001/XMLSchema-instance"
                xsi:schemaLocation="http://pustefix-framework.org/statuscodeinfo ../../core/schema/statuscodeinfo.xsd">
  <statuscodes class="example.bank.BankStatusCodes">
    <file>statusmessages.xml</file>
    <file>...</file>
  </statuscodes>
  ...
</statuscodeinfo>
Using the above examples Pustefix will build the following Java class (excerpt):
package example.bank;
...
public class BankStatusCodes {
    public static StatusCode getStatusCodeByName(String name) { ... }
    ...
    public static final StatusCode ILLEGAL_LOGIN = new StatusCode("ILLEGAL_LOGIN", __RES[0]);
}
The following login handling example uses the generated StatusCode class to indicate a failed login:
public class LoginHandler implements IHandler {
    public void handleSubmittedData(Context context, IWrapper wrapper) throws Exception {
        Login login = (Login) wrapper;
        //check login data
        //if invalid
        login.addSCodeUser(BankStatusCodes.ILLEGAL_LOGIN);
    }
}
If you take a look at the resulting XML tree, you see like the according include part is referenced inside the error element (and thus can be displayed on the page using the pfx:checkfield, pfx:error and pfx:scode tags).
<formresult ...>
   ...
   <formvalues>
      <param name="login.User">xyz</param>
      ...
   </formvalues>
   <formerrors>
     <error name="login.User">
        <pfx:include href="samplebank/dyntxt/statusmessages.xml" part="ILLEGAL_LOGIN"/>
     </error>
   </formerrors>
   ...
</formresult>
If your error message should contain dynamic data, you can use placeholders, which will be replaced by the arguments passed along with the addScode call at the IWrapper:
<part name="ILLEGAL_LOGIN">
  <theme name="default">User <pfx:argref pos="1"/> is illegal.</theme>
</part>
StatusCodes can be also referenced from within IWrapper definitions. If you're using a built-in StatusCode (from org.pustefixframework.generated.CoreStatusCodes), you can just use its name, if you're using a StatusCode from another module, you have to prefix the name with the class name of the generated class separated by a # sign:
<interface xmlns="http://pustefix.sourceforge.net/interfacewrapper200401">

  <ihandler class="..."/>

  <param name="Login" type="..." missingscode="example.bank.BankStatusCodes#MISSING_LOGIN_DATA">
    ...
  </param>

</interface>
The statusmessage files for statuscodes coming from the Pustefix core or arbitrary modules can be edited to customize the messages for your project's requirements. Therefor the original statusmessage files are initially copied or if a copy already exists, the files are merged (statusmessages for new statuscodes are added, statusmessages for omitted statuscodes are removed) by the build process. You should only customize these merged files, changes in the original files will be overwritten with the next module update.
The built-in core and editor statuscodes are merged to projects/core-override/dyntxt/statusmessages-core-merged.xml and projects/core-override/dyntxt/statusmessages-editor-merged.xml. Pustefix module statuscodes are merged to projects/modules-override/MODULENAME/dyntxt/statusmessages-merged.xml.
Table of Contents
Variants are a way to have the same page look and behave different depending on a variant id that can be set freely at runtime. This allows to select different look and behaviour depending on data collected during the user sesion.
Variants can be selected by calling the method setVariant(Variant var)
in the Context. This will store and reuse the id for the current and all following
requests until it is set to a different id (or erased by setting it to null).
The Context takes care to set the variant in the
SPDocument it returnes to the AbstractXMLServer which
in turn tries to get the matching target for the requested page and
requested variant.
If no target matching the variant is found, the "root" variant
(in other words, the page without a variant at all) will be tried.
When defining variants of pages, the system automatically makes sure that you can only define variants for a page that has also a no-variant definition. This works for pages defined using the <standardpage> tag and for pages defined by hand using <target> tags directly.
The valid characters for variants are a-zA-Z0-9_+- (but see below for compound variants and the use of the : character).
Variants can be variants of variants themself which in turn can be considered variants of another variant. The name of a variant that is a subvariant of another variant must be expressed in the following way: foo:bar:baz
Here we have a variant that is a subvariant of foo:bar which in turn is a subvariant of foo. This information is used when determining the right Target for generating the output. Say the variant foo:bar:baz has been set via the setVariant(Variant var) method of the Context and the request wants to display the page Home. When trying to get the matching Target for transforming the output the system first tries to get the matching Target for Home, variant foo:bar:baz. If it gets no result, it goes on trying Home, variant foo:bar; then Home, variant foo before finally requesting the "root" variant of page Home.
Variants can influence the way an application works:
- They can change the look and content of a page. This is implemented in terms of themes that depend on the selected variant. See below for more details.
- They can change the backend definition of a pagerequest (aka: Handlers, State, and output from ContextRessources)
- They can change the definition of a pageflow
Different variants of pages are usually defined via the standardpage tag:
<standardpage xml="MyProject/xml/frame.xml" name="Home" variant="foo:bar:baz">
What's interesting here is how the system produces the themes attribute used for the two targets that result from the expansion of the standardpage tag.
If we have not given a special local themes attribute to the standardpage tag,
and no global themes attribute has been given (see here), then the value of the
themes attribute for both targets is in this example baz bar foo MyProject default.
As can be seen, the use of the variant attribute will expand the themes as they would be valid for the targets produced from the standardpage tag (either by using a locally defined themes attribute of the standardpage tag, or automatically by using the global fallback) by putting more specific themes in front of the themes list, which are generated from the given variant id. If the variant id is a compount variant, then each segment of the compound variant will be used, from right to left, to generate a theme name to be put before the "normal" themes valid for the page.
If the standardpage had its own themes attribute given (say for example
"theme_a theme_b default"), the resulting themes after taking the
variant id into account would of course be baz bar foo theme_a theme_b default.
Variants can also be used to create different implementations for the same pagerequest. This is done by a simple extension to the way a pagerequest is defined in the servlet configuration file.
<pagerequest name="foo">
  <default>
    [Any other tag that is allowed inside a pagerequest]
  </default>
  <variant name="var_id">
    [Any other tag that is allowed inside a pagerequest]
  </variant>
  <variant name="another_var_id">
    [Any other tag that is allowed inside a pagerequest]
  </variant>
 </pagerequest>
| Note |
|---|---|
You must give a Each of the |
Variants can also be used to create different implementations for the same pageflow. This is done by a simple extension to the way a pageflow is defined in the servlet configuration file.
<pageflow name="fooFlow">
  <default>
    [Any other tag that is allowed inside a pageflow]
  </default>
  <variant name="var_id">
    [Any other tag that is allowed inside a pageflow]
  </variant>
  <variant name="another_var_id">
    [Any other tag that is allowed inside a pageflow]
  </variant>
</pageflow>
| Note |
|---|---|
You must give a Each of the |
Pustefix allows you to implement multi-language applications. As there is a clean separation between business logic and presentation, you can easily change the presentation layer to a new language.
See Section 4.5.2, “Displaying content based on the language” on more information on how the access the currently selected language in the presentation layer.
If your business logic needs to react to the currently selected language, you can retrieve
the current language of the application via the getLanguage() : String of the
Context.
The Context also provides a method setLangauge(String language),
which allows you to change the selected language at run-time.
Pustefix provides a role-based authorization mechanism. You can define arbitrary roles,
declare logical operations/combinations on this roles using authconstraints,
and assign these authconstraints to pagerequests.
A role is defined using an according XML element with a unique
name attribute value. Setting the initial
attribute to true the role will be automatically
set on context initialization.
<role name="MYROLE" initial="true"/>
Authconstraints can combine various authorization conditions,
supported conditions are: hasrole, and,
or and not, represented by according XML elements.
Using the authpage attribute you can define the page, which should be
called on authorization failure. Using the default attribute you can
set one toplevel authconstraint to be the default one for
all pagerequests having no authconstraint asssigned.
<authconstraint id="MYCONSTRAINT" authpage="login" default="true">
  <or>
    <hasrole name="MYROLE"/>
    <hasrole name="OTHERROLE"/>
  </or>
</authconstraint>
Pagerequests can either define new authconstraints as
child elements or can reference existing toplevel authconstraints by
their id.
<pagerequest name="mypage">
  <authconstraint ref="MYCONSTRAINT"/>
  ...
</pagerequest>

<pagerequest name="mypage">
  <authconstraint authpage="login">
    <hasrole name="MYROLE"/>
  </authconstraint>
  ...
</pagerequest>
You can programmatically set/query roles using the de.schlund.pfixcore.auth.Authentication
object, which can be retrieved from the Context calling its getAuthentication()
method.
public interface Authentication {
    public boolean hasRole(String roleName);
    public boolean addRole(String roleName);
    public boolean revokeRole(String roleName);

    public Role[] getRoles();
}
You can add a new role using addRole(), revoke exisiting
roles using revokeRole() or check for a role using
hasRole(). Using getRoles() you get an array
of all currently set roles. If a default role is defined, this role will be initially set.
You can also query the current roles from within your XML/XSLT code using the
XPath extension function pfx:hasRole(rolename)
<ixsl:if test="pfx:hasRole('MYROLE')">
  ...
</ixsl:if>
If you try to access a page for which the authconstraint isn't fulfilled, you're forwarded
to the according login page. The login page has to be a regular page, e.g. containing a login form.
Login forms require the type attribute set to auth.
<pfx:forminput type="auth">
  ...
</pfx:forminput>
The framework automatically inserts an authentication element into
the login page's DOM tree. This element contains the state of the authenticated
flag, the targetpage which should be accessed, the current roles
and the authorizationfailure containing the violated
authconstraint.
<formresult>
  <authentication authenticated="true" targetpage="mypage">
    <roles>
      <role name="SOMEROLE"/>
    </roles>
    <authorizationfailure authorization="pageaccess" target="mypage">
      <authconstraint>
        <hasrole name="MYROLE"/>
      </authconstraint>
    </authorizationfailure>
  </authentication>
  ...
</formresult>
You can use this information to decide which information to display on the login page.
Example 6.1. Configuring roles
The following example defines three roles. The role
ANONYMOUS is configured as initial role,
i.e. every session/context has this role automatically set from the beginning.
There are two top-level authconstraints. The authconstraint
AC_DEFAULT is declared as default, i.e. pages, having no explicitly set
authconstraint, will get this one. The authconstraint's authpage
is set to login and it has a simple condition saying that it requires the role
ANONYMOUS.
The authconstraint AC_KNOWN declares that
it requires the USER or the ADMIN role. This
authconstraint is referenced by the pagerequest userpage, using
an empty authconstraint element having a ref attribute containing the
authconstraint's id.
The pagerequest adminpage contains an anonymous
authconstraint element, which defines the role
ADMIN as requirement.
<contextxmlserver>

  <role name="ANONYMOUS" initial="true"/>
  <role name="USER"/>
  <role name="ADMIN"/>

  <authconstraint id="AC_DEFAULT" authpage="login" default="true">
    <hasrole name="ANONYMOUS"/>
  </authconstraint>

  <authconstraint id="AC_KNOWN" authpage="login">
    <or>
      <hasrole name="USER"/>
      <hasrole name="ADMIN"/>
    </or>
  </authconstraint>

  <pagerequest name="home">
    ...
  </pagerequest>

  <pagerequest name="login">
    <input>
      ...
    </input>
  </pagerequest>

  <pagerequest name="adminpage">
    <authconstraint authpage="login">
      <hasrole name="ADMIN"/>
    </authconstraint>
    ...
  </pagerequest>

  <pagerequest name="userpage">
    <authconstraint ref="AC_KNOWN"/>
    ...
  </pagerequest>
  ...
</contextxmlserver>
You can extend the authentication mechanism by providing custom conditions (additionally to the predefined conditions: hasrole, and, or, not). Therefore you just have to implement the Condition interface and register your implementation class in the context configuration file. Then your custom condition can be used within authconstraints, just as the builtin conditions and arbitrarily mixed with them.
public interface Condition {
    public boolean evaluate(Context context);
}
You have to implement the evaluate method, which returns if the condition is fulfilled. Therefore the evaluation logic can access the Context. Implementations shouldn't change the data model, perform fast and hold only immutable state (or be stateless).
The following example shows a condition which retrieves a ContextResource for a customer and checks if its debit exceeds a configured limit. The limit is automatically set to a value configured as property in the condition's configuration.
package example;

import de.schlund.pfixcore.auth.Condition;
import de.schlund.pfixcore.workflow.Context;
import example.ContextCustomer;

public class PremiumCustomerCondition implements Condition {

    private float limit;

    public boolean evaluate(Context context) {
        ContextCustomer contextCustomer=context.getContextResourceManager().getResource(ContextCustomer.class);
        return contextCustomer.getTotalDebit() >= limit;
    }

    public void setLimit(float limit) {
        this.limit = limit;
    }

}
Let's look how this condition is registered and used in the context configuration:
<condition id="isPremiumCustomer" class="example.PremiumCustomerCondition">
  <property name="limit" value="100000"/>
</condition>

<authconstraint id="..." authpage="...">
  <and>
    <hasrole name="..."/>
    <condition ref="isPremiumCustomer"/>
  </and>
</authconstraint>
Conditions are registered using top-level condition elements. They require an id and a class attribute. Authconstraints can reference conditions using condition elements with an according ref attribute.
Conditions can be checked from within XML/XSL using the pfx:condition function, e.g.:
<ixsl:if test="pfx:condition('isPremiumCustomer')">
  ...
</ixsl:if>
Roles by default are configured within the context configuration. As an alternative approach you're able to plug-in your own RoleProvider implementation. Thus you can provide roles programmatically or from another source.
You just have to implement the RoleProvider interface and register the implementation class in the context configuration.
public interface RoleProvider {
    public Role getRole(String roleName) throws RoleNotFoundException;
    public List<Role> getRoles();
}
The getRole method returns a Role object by name.
The getRoles method returns a list of all available roles.
public interface Role {
    public String getName();
    public boolean isInitial();
}
Role objects can either be created by implementing the
Role interface or by using the default implementation
de.schlund.pfixcore.auth.RoleImpl. Role implementations
have to return a unique name and if they should be initially set.
The following example shows a simple RoleProvider implementation,
which holds the roles in a programmatically filled map.
public class MyRoleProvider implements RoleProvider {
    private Map<String, Role> roles;

    public MyRoleProvider() {
        roles = new HashMap<String, Role>();
        Role role = new RoleImpl("ADMIN", false);
        roles.put(role.getName(), role);
    	...
    }

    public Role getRole(String roleName) throws RoleNotFoundException {
        Role role = roles.get(roleName);
        if(role == null) throw new RoleNotFoundException(roleName);
        return role;
    }

    public List<Role> getRoles() {
        return new ArrayList<Role>(roles.values());
    }
}
The RoleProvider implementation is registered using the
context configuration top-level roleprovider element with
a class attribute. You can optionally configure properties,
which will be automatically injected into the RoleProvider instance using
according setter methods (Spring bean-style setter injection).
<roleprovider class="example.MyRoleProvider">
  <property name="..." value="..."/>
</roleprovider>
You should be aware that the current mechanism doesn't support dynamic RoleProviders. The provided roles have to be constant, i.e. they're read at application startup time and aren't updated at a later time.
Pustefix provides AJAX-support via SOAP webservices and JSON RPC-style services. Autogenerated stubs and dynamic proxies make it easy to implement new services without any knowledge of the protocol details, among other things the protocol can be switched without changing the Javascript or Java code, additionally a service can work with both protocols at the same time.
Implementing a service can be done in two ways: Either you can export an arbitrary Spring bean as a webservice or you have to create a special service class which derives from an abstract framework class. The first way is recommended, because your service can be a POJO without any framework dependencies.
- A managed service can be an arbitrary POJO that's managed by the Spring container. Such a Spring bean can be exported as webservice within the Spring configuration file using a special namespace (see Configuration section below).
-
An unmanaged service consists of a Java interface, which defines all remotely available service methods, and the
service implementation, implementing this interface and extending the abstract service base class
org.pustefixframework.webservices.AbstractService. Thus the implementation class inherits the methodgetContextResourceManager(), which can be used to accessContextResources. The service has to be declared explicitly in the project's central webservice configuration fileprojectdir/conf/webservice.conf.xml(see Configuration section below).
| Note |
|---|---|
If you want to use SOAP as service protocol, you have to note that the SOAP runtime used by Pustefix (Sun's JAXWS implementation)
requires that service classes are annotated with the |
The Pustefix build process automatically generates Javascript SOAP stubs for all declared services (if the SOAP protocol is enabled). It also generates the deployment descriptors needed by Axis, the SOAP/webservices library used in Pustefix. Optionally it can create WSDL descriptions for all webservices. The JSON protocol support needs no build time processing, cause the stubs can either be dynamic proxies or generated at runtime by the server.
Using the services on the client-side is quite easy too. You just have to include the necessary Javascript libraries provided by Pustefix and instantiate a service proxy object via Javascript. The service proxy object delegates your local method calls to the server, which invokes the according methods on your service implementation and returns the result. The remote invocation works completely transparent for the client, just as a local method call.
The SOAP proxy is an autogenerated Javascript stub, which uses Pustefix's home-brewed Javascript SOAP implementation (as long as the native browser support for SOAP isn't sufficient). JSON provides two different proxy models: a dynamic proxy which is set up dynamically at runtime (during its instantiation the service's method list is requested from the server and according Javascript methods are created) and a stub which is generated at runtime by the server.
The client-server communication is done using the XmlHttpRequest object (supported by most modern browsers). Thus service requests can be done either synchronous or asynchronous (passing a callback function as parameter instead of getting the result directly from the service method). There's also a fallback mechanism (via hidden iframes) for older browsers that do not know a XmlHttpRequest object.
Spring-managed services are configured as part of the Spring configuration. You can export an arbitrary bean as webservice
using the webservice element (from the http://pustefixframework.org/schema/webservices
namespace). Therefor you have to reference it using the ref attribute and set a unique
servicename.
<beans xmlns="http://www.springframework.org/schema/beans"
       xmlns:xsi="http://www.w3.org/2001/XMLSchema-instance"
       xmlns:ws="http://pustefixframework.org/schema/webservices"
       xmlns:aop="http://www.springframework.org/schema/aop"
       xsi:schemaLocation="
            http://www.springframework.org/schema/beans http://www.springframework.org/schema/beans/spring-beans-2.0.xsd
            http://www.springframework.org/schema/aop http://www.springframework.org/schema/aop/spring-aop-2.5.xsd
            http://pustefixframework.org/schema/webservices http://pustefixframework.org/schema/webservices/pustefix-webservices.xsd">

  <bean id="MyBeanId" class="mypackage.MyBean" scope="session">
    <aop:scoped-proxy/>
  </bean>

  <ws:webservie
    id="Webservice_MyBean"
    servicename="MyBean"
    interface="MyBeanServiceInterface"
    ref="MyBeanId"
    protocol="ANY"
  />

</beans>
You can optionally set an interface which defines the methods which should be exported (by default all
public methods are exported, if you're using SOAP/JAXWS you can also exclude methods using the @WebMethod(exclude=true)
annotation). Using the protocol attribute you can set the webservice protocol (default is JSONWS,
other options are SOAP or ANY).
The webservice configuration file PROJECTNAME/conf/webservices.conf.xml contains global settings
for the runtime system, default settings for webservices, and optionally webservice-specific settings.
If you're using Spring-managed services only, you can ignore the webservice-specific settings in this file as they're
done as part of the Spring configuration. The global and default settings are applied to the managed services too.
<webservice-config schemaLocation="http://pustefix.sourceforge.net/wsconfig200401 ../../core/schema/wsconfig200401.xsd"
  xmlns="http://pustefix.sourceforge.net/wsconfig200401"
  xmlns:xsi="xmlns:xsi="http://www.w3.org/2001/XMLSchema-instance">

  <!--
    The webservice-global section contains general configuration options, which are applied to
    all webservices. Some of the options can be overridden individually for single webservices.
  -->
  <webservice-global>

    <!--
      Set the path under which the webservice servlet is reachable (as defined in you project
      configuration)

      [Optional - Default: /xml/webservice]
    -->
    <requestpath>/xml/webservice</requestpath>

    <!--
      Set if WSDL should be generated for SOAP-enabled webservices and where to store it (absolute path within
      the project's webapp directory)

      [Optional - Default: enabled="true" repository="/wsdl"]
    -->
    <wsdlsupport enabled="true" repository="/wsdl"/>

    <!--
      Set if Javascript stubs should be generated and where to store it (absolute path within the
      project's webapp directory - only for SOAP). The jsnamespace attribute controls what namespace
      prefix the generated Javascript should use (COMPAT: WS_, COMPAT_UNIQUE: WS_ for SOAP JWS_ for JSON,
      JAVA_NAME: full Java class name, other values are used as namespace themselves, dot-separated
      namespaces are supported too, code to setup the according JS context objects gets auto-generated)

      [Optional - Default: enabled="true" repository="/wsscript" jsnamespace="COMPAT"]
    -->
    <stubgeneration enabled="true" repository="/wsscript" jsnamespace="COMPAT"/>

    <!--
      Set which service protocol should be used. You can set a certain protocol (SOAP|JSONWS) or allow all
      protocols (ANY). If you choose to use JSONWS only, you should set the type to JSONWS to accelerate
      the build process, otherwise the SOAP stubs will be generated unnecessarily.

      [Optional - Default: type="JSONWS"]
    -->
    <protocol type="ANY"/>

    <!--
      Set which SOAP encoding style should be used. The best supported style is rpc/encoded.
      The server-side also supports other styles like rpc/literal and document/literal, but the client-side
      support for these styles is rudimentary.

      [Optional - Default: style="rpc" use="encoded"]
    -->
    <encoding style="rpc" use="encoded"/>

    <!--
      Set if the JSON representation of serialized Java beans should be augmented with
      type meta information (classhinting).

      [Optional - Default: classhinting="false"]
    -->
    <json classhinting="true"/>

    <!--
      Set if webservice requests need to have a valid HTTP/Pustefix-Session (servlet) or they should
      work without one too (none).

      [Optional - Default: type="servlet"]
    -->
    <session type="servlet"/>

    <!--
      Set the service object's scope. Scope application means that the service object is created only
      once and shared between all sessions, session, that it's created once per session, request, that
      it's created newly for each request.

      [Optional - Default: type="application"]
    -->
    <scope type="application"/>

    <!--
      Set if only https requests should be allowed.

      [Optional - Default: force="false"]
    -->
    <ssl force="true"/>

    <!--
      Set the identifier of the Context the services need to access (from /contextxmlserver/servletinfo/@name
      in your project's ContextXMLServer configuration file). Via synchronize you can control whether the service
      requests should be synchronized on the Pustefix Context (default is true).

      [Optional - Default: synchronize="true"]
    -->
    <context name="pfixcore_project:webservice::servlet:config" synchronize="true"/>


    <!--
      There are some options which should be configured differently in development and production mode.
      Therefor you can use the following choose/when elements (which are optional, you can just leave them out).
    -->
    <choose>
      <when test="$mode = 'prod'">
        <!--
          Set if admin tool should be available (see Development Tools).

          [Optional - Default: enabled="false"]
        -->
        <admin enabled="false"/>

        <!--
          Set if monitor tool should be available (see Development Tools).

          [Optional - Default: enabled="false"]
        -->
        <monitoring enabled="false"/>

        <!--
          Set if extensive logging should be enabled (i.e. logging of all request/response messages in
          pustefix-webservice.log).

          [Optional - Default: enabled="false"]
        -->
        <logging enabled="false"/>

        <!--
          Set a FaultHandler, which will process exceptions before they are sent to the client
          (see Exception Handling).

          [Optional - Default: none]
        -->
        <faulthandler class="de.schlund.pfixcore.webservice.fault.EmailNotifyingHandler">
          <param name="recipients" value="[email protected]"/>
          <param name="sender" value="[email protected]"/>
          <param name="smtphost" value="localhost"/>
        </faulthandler>
      </when>
      <otherwise>
        <admin enabled="true"/>
        <monitoring enabled="true" scope="session" historysize="10"/>
        <logging enabled="true"/>
        <faulthandler class="de.schlund.pfixcore.webservice.fault.LoggingHandler"/>
      </otherwise>
    </choose>
  </webservice-global>

  <!--
    Each service has to define name, interface and implementation. All other options are
    optional and inherited from the global section respectively. Some global options
    can be overridden here (stubgeneration, protocol, encoding, json, session, scope,
    ssl, context, faulthandler).
  -->

  <webservice name="Counter">

    <!--
      Set the service interface. [Mandatory]
    -->
    <interface name="de.schlund.pfixcore.example.webservices.Counter"/>

    <!--
      Set the service implementation class. [Mandatory]
    -->
    <implementation name="de.schlund.pfixcore.example.webservices.CounterImpl"/>
  </webservice>
  <webservice name="...">...</webservice>...
</webservice-config>
Pustefix provides a special exception handling mechanism for AJAX services. You can register predefined or custom FaultHandlers, which are automatically called before an exception is sent to the client. Thus you can filter exceptions, change them or do some logging or notification stuff.
There are three predefined FaultHandlers:
-
de.schlund.pfixcore.webservice.fault.LoggingHandler: as its name denotes, it just logs all Exceptions via log4j (location can be configured within the general log4j configuration) -
de.schlund.pfixcore.webservice.fault.EmailNotifyingHandler: this handler sends Email notifications (recipients, sender and smtphost can be configured as parameters, see the Configuration section) -
de.schlund.pfixcore.webservice.fault.ExceptionProcessorAdapter: this handler implements a direct connection to the general Pustefix exception processing mechanism via ExceptionProcessors (and only makes sense if the configured ExceptionProcessor only consumes exceptions, but doesn't produce any output, like a HTML error page)
You are free to implement your own FaultHandler and register it with your services in the webservice configuration file.
You just have to extend the abstract base class de.schlund.pfixcore.webservice.fault.FaultHandler and
implement the abstract methods init() and handleFault(Fault). The Fault object
methods getThrowable() and setThrowable can be used to get the thrown exception and
to change or replace it.
You also can derive from one of the predefined handlers. E.g. you can extend the EmailNotifyingHandler by overriding the two methods public boolean isInternalServerError(Fault fault) and public boolean isNotificationError(Fault fault) to customize if error details should be hidden from the client and if a notification mail should be sent for certain exceptions.
Pustefix provides some tools, which can help you during the development process. It provides an admin and monitoring webinterface. The admin tool lists all registered services with their service methods. The monitoring tool shows a history of the last requests including the request and response messages.
You can access these tools by including the special tag <pfx:webserviceconsole/> (see Section 4.5.4, “Using the Pustefix console”)
into your Pustefix page and enabling them in the global webservice configuration (as shown in the Configuration section:
the admin and monitoring elements within the choose/when elements).
By the way, if any unexplainable problems occur, you're recommended to take a look into the logfile pustefix-webservice.log, where (if log4j log level is set to DEBUG) among other things the request and response messages are logged too.
Doing asynchronous webservice calls, you can choose between two different webservice callback mechanisms.
You can pass a function reference as last argument of the service method call (or last but one, if you want to set a request ID too). After receiving the server's response your function will be automatically called, passing the result (if no exception occurred), the request ID (if set) and an Error object (if exception occurred).
var service=new WS_Service();
var callback=function(result,requestid,exception) {
   if(exception) {
      ...
   } else {
      ...
   }
}
var requestid="...";
service.serviceMethod(arg0, arg1, ... , callback); //asynchronous with callback
service.serviceMethod(arg0, arg1, ... , callback, requestid); //asynchronous with callback and requestidYou can instantiate the webservice stub with an object reference as argument of the constructor function. Your object has to provide methods of the same name as the service methods which are automatically called back by the stub (you don't have to pass a callback object or function to the serviceMethod).
var object={
   serviceMethod: function(result,requestid,exception) {
      if(exception) {
         ...
      } else {
         ...
      }
   }
};
var service=new WS_Service(object); //instantiate service with callback object
//optionally you can pass the scope object within
var requestid="...";
service.serviceMethod(arg0, arg1, ...); //asynchronous
service.serviceMethod(arg0, arg1, ... , requestid); //asynchronous with requestid
If you're using JSON stubs, you can optionally pass a scope object as second constructor argument. Thus this scope is used as the "this" context argument instead of the object itself when the object's callback method is called. [Since: 0.13.1]
var service = new WS_Service(object, scope);
Supported Java types are:
- Primitive Java types (boolean, byte, short, int, long, float, double)
- Object wrappers for primitive types (Boolean, Byte, Short, Integer, Long, Float, Double from java.lang)
- String type (java.lang.String)
- Date types (java.util.Calendar, java.util.Date)
- Java beans (nested arbitrarily)
- Arrays of all other supported types (except for java.util.Date with SOAP), including multidimensional arrays
Primitive, wrapper, String and Date types are mapped to their according Javascript counterpart (Number, Boolean, String, Date). Java beans are mapped to general Javascript objects with the according properties (there's no representation/simulation of the Java bean's type hierarchy, using JSON you optionally can enable classhinting, which provides every object instance with a special property - javaClass - containing the full Java class name).
The Java bean mapping mechanism supports both, so-called simple properties (having according getter and setter methods as defined in the Java Bean Specification) and public members (without access methods).
Additional Java types supported by JSON services:
- Arbitrary Lists (Java -> JSON), parameterized Lists with type parameter of instantiable type (JSON -> Java)
- Arbitrary Maps with keys of type java.lang.String (Java -> JSON), parameterized Maps with key type parameter of type java.lang.String and value type parameter of instantiable type (JSON -> Java)
Because of the restrictions of the JSON format, especially the absence of type information and the usage of builtin Javascript types (arrays for Lists, objects for Maps), the support for Lists and Maps itself is restricted: deserializing Lists to Java requires a parameterized type parameter and this type has to be instantiable (or be a parameterized List or Map itself), the same with Map values, Map keys have to be java.lang.String instances.
The JSON bean (de-)serialization mechanism supports customizable bean property mappings via Java annotations.
You can exclude individual properties from (de-)serialization by marking the according getter with an @Exclude
annotation or you can exclude all properties by marking the bean class with an @ExcludeByDefault
annotation and include individual properties with @Include annotations at their getters (marking public members is
supported too).
The following examples show the different annotations in action. Both class definitions give access to the foo and baz property and restrict access to the bar property. The first class definition includes all properties by default (which is the default behaviour without a type annotation) and excludes the bar property, while the second excludes all properties by default and includes the foo and baz properties:
public class A {

    int foo;
    int bar;
    int baz;

    public int getFoo() {return foo;}
    public void setFoo(int foo) {this.foo=foo;}

    @Exclude
    public int getBar() {return bar;}
    public void setBar(int bar) {this.bar=bar;}

    public int getBaz() {return baz;}
    public void setBaz(int baz) {this.baz=baz;}

}
@ExcludeByDefault
public class A {
int foo;
int bar;
int baz;
@Include
public int getFoo() {return foo;}
public void setFoo(int foo) {this.foo=foo;}
public int getBar() {return bar;}
public void setBar(int bar) {this.bar=bar;}
@Include
public int getBaz() {return baz;}
public void setBaz(int baz) {this.baz=baz;} }
}All annotations only take effect in the declaring class and aren't inherited. Thus, if you derive your bean class, the type annotation of your base class has no effect, so declaring new properties in your class will include them by default. Properties included or excluded in your base class will be included/excluded in your inherited class too, if you don't redeclare or override this properties. The following example demonstrates this behaviour:
public class A {

    int foo;
    int bar;
    int baz;

    public int getFoo() {return foo;}
    public void setFoo(int foo) {this.foo=foo;}

    @Exclude
    public int getBar() {return bar;}
    public void setBar(int bar) {this.bar=bar;}

    public int getBaz() {return baz;}
    public void setBaz(int baz) {this.baz=baz;}
}

@ExcludeByDefault
public class B extends A {

    int hey;
    int ho;

    @Include
    public int getHey() {return hey;}
    public void setHey(int hey) {this.hey=hey;}

    public int getHo() {return ho;}
    public void setHo(int ho) {this.ho=ho;}

    @Override
    public int getBaz() {return super.getBaz();}

}
Using the @Alias annotation you can control the name used for (de-)serialization (i.e. the name used as JSON property name). The following example shows how to add aliases to a public member and a property getter.
public class A {

    @Alias("mybaz")
    public int baz;
    int foo;

    @Alias("myfoo")
    public int getFoo() {return foo;}
    public void setFoo(int foo) {this.foo=foo;}

}
If you don't like Java annotations or you want to overwrite existing annotations, you can also customize your beans using a XML configuration file. The file has to be named beanmetadata.xml and has to be placed in the project configuration directory or in a META-INF directory that's part of the classpath.
<bean-metadata xsi:schemaLocation="http://pustefix.sourceforge.net/bean-metadata http://pustefix.sourceforge.net/beanmetadata.xsd">
  <bean class="de.schlund.pfixcore.webservice.beans.A">
    <property name="foo" alias="myfoo"/>
    <property name="bar" exclude="true"/>
  </bean>
  <bean class="de.schlund.pfixcore.webservice.beans.B" exclude-by-default="true">
    <property name="hey"/>
  </bean>
</bean-metadata>
The format is very simple: Create a bean element referencing the class you want to annotate. Add property elements referencing the properties you want to annotate. All Java annotations have an according XML attribute counterpart you can add to these elements.
Pustefix provides a lightweight object serialization mechanism, which can be used to serialize arbitrary objects into the result DOM without having to do any DOM operations by yourself. The XML binding is customizable via Java annotations within the bean classes.
The framework supports arbitrary Beans, Arrays,
Collections, Maps, Numbers (including
the primitive types and their object wrapper types), Strings,
and Date/Calendar. To support other types or to serialize
to a custom format, it's possible to write your own serializers and annotations (to attach
them to the according bean properties).
The serialization of beans can be customized using the generic Pustefix bean annotations,
which are known from the JSON serialization framework. You can exclude individual properties
from serialization by marking the according getter with an @Exclude
annotation or you can exclude all properties by marking the bean class with an
@ExcludeByDefault annotation and include individual properties with
@Include annotations at their getters (marking public members is supported
too). Using the @Alias annotation you can control
the name used as the resulting attribute or element name.
The serialization to the result tree is done by calling one of the static addObject
methods of the ResultDocument class. The element
argument is the parent DOM element at which the serialized XML will be appended, the optional name
argument can be used to create an additional child element for the serialized XML. The
object argument is the object, which should be serialized.
public class ResultDocument {
    ...
    public static Element addObject(Element element, Object object) {...}
    public static Element addObject(Element element, String name, Object object) {...}
}
The default serialization process tries to produce relatively compact XML. Thus it favours attributes over elements and serializes so-called simple types, which can be represented as strings, into attributes where it's possible and makes sense, e.g. for bean properties.
Let's look at an example, which shows the serialization of a simple bean using bean and serializer annotations to customize the serialization behaviour:
...

public class Account {

    private long accountNo;
    private float debit;
    ...

    public long getAccountNo() {
        return accountNo;
    }

    public void setAccountNo(long accountNo) {
        this.accountNo = accountNo;
    }

    @Alias("balance")
    public float getDebit() {
        return debit;
    }

    public void setDebit(float debit) {
        this.debit = debit;
    }

    public Currency getCurrency() {
        return currency;
    }

    public void setCurrency(Currency currency) {
        this.currency = currency;
    }

    @DateSerializer("yyyy-MM-dd HH:mm:ss")
    public Calendar getOpeningDate() {
        return openingDate;
    }

    public void setOpeningDate(Calendar openingDate) {
        this.openingDate = openingDate;
    }

    @Exclude
    public String getComment() {
        return comment;
    }

    public void setComment(String comment) {
        this.comment = comment;
    }
}
Here you see how the bean's serialized to the ResultDocument within
a ContextResource:
...

public class ContextAccountImpl implements ContextAccount {

    private Account account;
    ...

    public void insertStatus(ResultDocument resdoc, Element elem) throws Exception {
        ResultDocument.addObject(elem,"account",account);
    }
}
The resulting DOM fragment looks like this:
<formresult serial="1199439160721">
  ...
  <data>
    <account accountNo="2000123" currency="EUR" balance="332.54" openingDate="2003-11-04 09:15:38"/>
  </data>
  ...
</formresult>
The data element is the ContextResource's root node as configured
in the configuration file. Calling addObject with the additional
account argument, the serialized bean isn't added directly to the
data element, but an additional element is used. The bean's properties are serialized
as attributes of this element.
The debit property is renamed to balance using
the @Alias annotation. The comment property is
excluded using the @Exclude annotation. The openingDate
property is serialized using the built-in DateSerializer, which can
be customized using the @DateSerializer annotation. Thus you can
provide your own date format pattern (must be a pattern supported by
java.text.SimpleDateFormat).
Only simple type properties, i.e. properties which can be serialized to string values, can
be represented as attributes. If the Account bean would have an additional
property customer of a bean type, e.g. a Customer class,
this property would be serialized as a child element:
<formresult serial="1199439160721">
  ...
  <data>
    <account accountNo="2000123" balance="EUR" debit="332.54" openingDate="2003-11-04 09:15:38">
      <customer customerId="100000" firstName="Mike" lastName="Foo"/>
    </account>
  </data>
  ...
</formresult>
Collections and Arrays are represented using
an element for each entry. The element name is derived from the the simple name
of the entry's class (without package name and starting lowercase):
<formresult serial="1199439160721">
  ...
  <data>
    <account accountNo="2000000" currency="EUR" balance="3124.49" openingDate="2003-10-23 08:05:10"/>
    <account accountNo="2000123" currency="EUR" balance="332.54" openingDate="2003-11-04 09:15:38"/>
    <account accountNo="2001405" currency="EUR" balance="25123.11" openingDate="2005-01-13 10:10:10"/>
  </data>
  ...
</formresult>
The element name can be changed using the @ClassNameAlias annotation, e.g.
to rename the account element to bankaccount:
@ClassNameAlias("bankaccount")
public class Account {
    ...
}
Maps are represented using an entry element for each
map entry. Key and value are represented by child elements (whereas the element names are
derived from the class names):
<formresult serial="1199439160721">
  ...
  <data>
    <entry>
      <long>2000000</long>
      <account accountNo="2000000" currency="EUR" debit="3124.49" openingDate="2003-10-23 08:05:34"/>
    </entry>
    <entry>
      <key>2001405</key>
      <account accountNo="2001405" currency="EUR" debit="25123.11" openingDate="2005-01-13 10:10:34"/>
    </entry>
    <entry>
      <key>2000123</key>
      <account accountNo="2000123" currency="EUR" debit="332.54" openingDate="2003-11-04 09:15:34"/>
    </entry>
  </data>
  ...
</formresult>
![[Tip]](images/docbook/tip.png) | Changing the tag name for map entries |
|---|---|
The tag name, that is used for the entries in the map can be changed using the
|
Circular object references are handled by adding a xpathref attribute to
the according element. Its value is an absolute XPath expression referencing the according
object's element:
<formresult serial="1199702214819">
  ...
  <data>
    <account accountNo="2000123">
      <customer customerId="100000">
        <accounts>
          <account accountNo="2000000">
            <customer xpathref="/formresult/data[1]/account[1]/customer[1]"/>
          </account>
          <account xpathref="/formresult/data[1]/account[1]"/>
          <account accountNo="2001405">
            <customer xpathref="/formresult/data[1]/account[1]/customer[1]"/>
          </account>
        </accounts>
      </customer>
    </account>
  </data>
  ...
</formresult>
In this example the Account bean has a reference to a Customer
bean, which itself has a reference to all of its Accounts. You can see that all
beans, which were already serialized (as ancestors in the tree) contain an according back-reference.
Pustefix already provides several XML serializers for common serialization tasks.
Simple serializers serialize scalar values (like strings, numbers or booleans). They are added as a new attribute on the current tag.
Complex serializers are used to serialize complex data structures. These always result in new tags that are being added to the document.
The @ForceElementSerializer will create an XML tag for primitive
values instead of writing the value to an XML attribute.
It can be combined with any simple type serializer (see the section called “Simple serializers”.
Strings that contain XML code can be inserted as XML fragment the the resulting document by using
the @XMLFragmentSerializer:
public class FragmentBean {

    private String myFragment = "<foo><bar baz=\"true\"/>character data</foo>";

    @XMLFragmentSerializer
    public String getMyFragment() {
        return myFragment;
    }
}
The XML, that is returned by the getMyFragment method is not treated
as a simple string, but as an XML fragment and thus, the content is not escaped, when
inserted in the document:
<?xml version="1.0" encoding="utf-8"?>
<result>
  <myFragment>
    <foo><bar baz="true"/>character data</foo>
  </myFragment>
</result>
If you don't like the default serialization mechanism or you use unsupported types, you can
write your own serializers. There are two types of serializers: SimpleTypeSerializers,
which can produce String values (e.g. for primitive types),
and ComplexTypeSerializers, which can produce structured XML data
(e.g. for bean types).
Implementing your own serializer just requires to implement the SimpleTypeSerializer
or ComplexTypeSerializer interface and create a custom annotation to be able
to attach your serializer to a bean property.
Let's look at an example of a SimpleTypeSerializer:
a custom String serializer, which allows to configure if
Strings should be ouput lower- or uppercase. Here's the implementation:
...
import de.schlund.pfixcore.oxm.impl.AnnotationAware;
import de.schlund.pfixcore.oxm.impl.SimpleTypeSerializer;
import de.schlund.pfixcore.oxm.impl.annotation.StringSerializer;
...

public class StringTypeSerializer implements SimpleTypeSerializer, AnnotationAware {

    private boolean doLowerCase;

    public void setAnnotation(Annotation annotation) {
        StringSerializer s=(StringSerializer)annotation;
        doLowerCase=s.value();
    }

    public String serialize(Object obj, SerializationContext context) throws SerializationException {
        if(obj instanceof String) {
          String str=(String)obj;
          if(doLowerCase) str=str.toLowerCase();
          else str=str.toUpperCase();
          return str;
        }
        throw new SerializationException("Illegal type: "+obj.getClass().getName());
    }
}
The serializer implements the SimpleTypeSerializer interface.
Its serialize method checks if the passed object is of type String
and calls toLowerCase or toUpperCase before returning
the new String. The doLowerCase property controls which method is used.
This property is set within the setAnnotation method. The method is defined
in the AnnotationAware interface. This method is called by the framework
after the serializer is instantiated and passes the annotation set at the according bean
property. So you can access the configured values and configure your serializer.
Let's look at the according annotation definition:
...

@SimpleTypeSerializerClass(StringTypeSerializer.class)
@Target({ElementType.METHOD,ElementType.FIELD})
@Retention(RetentionPolicy.RUNTIME)
public @interface StringSerializer {
    boolean value();
}
You have to annotate the custom annotation with a SimpleTypeSerializerClass
annotation with the serializer class as value, make the annotation available to
methods and fields using the @Target annotation and make it visible
at runtime using the @Retention annotation. The rest of the annotation
definition can be done according to your needs. In the example we just define a boolean
property indicating if the String should be converted to lower- or uppercase. Here you
see how the annotation is applied to serialize a customer's lastname as uppercase:
public class Customer {
    ...
    @StringSerializer(false)
    public String getLastName() {...}
}
Let's look at an example of a ComplexTypeSerializer. We want to customize
the serialization of a Customer bean: the firstName and
lastName properties should be output together within a name
element:
public class Customer {
    ...
    public long getCustomerId() {...}
    public String getFirsstName() {...}
    public String getLastName() {...}
    public List<Account> getAccounts() {...}
    ...
}
The serializer just implements ComplexTypeSerializer. We don't need to
implement AnnotationAware because our annotation will have no parameter
we may want to read:
public class CustomerTypeSerializer implements ComplexTypeSerializer {

    public void serialize(Object obj, SerializationContext context, XMLWriter writer) throws SerializationException {
        if(obj instanceof Customer) {
            Customer customer=(Customer)obj;
            writer.writeStartElement("name");
            writer.writeCharacters(customer.getFirstName()+" "+customer.getLastName());
            writer.writeEndElement("name");
            context.serialize(customer.getAccounts(),writer);
        } else {
            throw new SerializationException("Illegal type: "+obj.getClass().getName());
        }
    }
}
The serialize method gets a XMLWriter object, which
is used to write the name element. Then the passed SerializationContext
is used to serialize the customer's accounts using the default serialization mechanism.
Finally we implement a custom annotation:
@ComplexTypeSerializerClass(de.schlund.pfixcore.example.bank.oxm.CustomerTypeSerializer.class)
@Target({ElementType.METHOD,ElementType.FIELD})
@Retention(RetentionPolicy.RUNTIME)
public @interface CustomerSerializer {}
Here we apply the annotation to the Account bean's
customer property:
public class Account {
    ...
    @CustomerSerializer
    public Customer getCustomer() {...}
    ...
}
Here's an excerpt of the resulting XML:
<formresult serial="1199705488403">
  ...
  <data>
    <account accountNo="2000000" balance="3124.49" currency="EUR" openingDate="2003-10-23 08:05:22">
      <customer>
        <name>Mike Foo</name>
        <account accountNo="..."/>
        <account accountNo="..."/>
        ...
      </customer>
    </account>
  </data>
  ...
</formresult>
The annotation-based IWrapper creation provides an alternative to the usual, XML configuration based, IWrapper creation. Using this approach you create IWrappers from standard Java Beans by adding the necessary configuration data in the form of annotations.
The IWrappers are automatically created during the build process using the Sun JVM's apt
tool and a custom AnnotationProcessor which analyzes the Java bean's
source code and generates the according IWrapper sources.
You're making a bean to a template for an IWrapper by adding an
@IWrapper annotation to its class declaration. By default every
bean property that is of a so-called builtin type, i.e. has a pre-defined
IWrapperParamCaster implementation, will be automatically added
as an IWrapper parameter.
Builtin types are boolean, byte, double, float, int, long,
java.lang.Boolean, java.lang.Byte, java.lang.Double, java.lang.Float, java.lang.Integer,
java.lang.Long, java.lang.String, java.util.Date and Arrays
with components of these types.
Bean properties of an unknown type are either ignored or require a @Caster
annotation specifying an appropriate caster. Bean properties can be annotated at their
getter methods or at the field itself, if it's public. If a property of a builtin type should
be skipped you can mark the according property with a @Transient annotation.
Bean based IWrappers can be used to create new beans or fill existing beans with
the IWrapper's state. Therefore the IWrapperToBean class provides
the two static methods <T> T createBean(IWrapper wrapper, Class<T> beanClass)
and populateBean(IWrapper wrapper, Object obj).
Every IWrapper configuration element known from the XML configuration has an annotation
counterpart. Besides there are some special annotations like @IWrapper
and @Transient. In the following we'll give a short overview of
all avaible annotations:
        @Target(ElementType.TYPE)
        @Retention(RetentionPolicy.RUNTIME)
        public @interface IWrapper {
          String name() default "";
          Class<? extends IHandler> ihandler() default IHandler.class;
        }

        @IWrapper(name="MyBeanWrapper",ihandler=MyBeanHandler.class)
        public class MyBean {
          ...
        }
The @IWrapper annotation is used to mark a class as template for
an IWrapper. The name attribute denotes the class name of the
generated IWrapper class (without package). By default the bean name with the
suffix Wrapper is used (and the same package). The ihandler
attribute denotes the IHandler implementation class.
        @Target({ElementType.METHOD,ElementType.FIELD})
        @Retention(RetentionPolicy.RUNTIME)
        public @interface Param {
          String name() default "";
          boolean mandatory() default true;
          boolean trim() default true;
          String missingscode() default "";
          String[] defaults() default {};
        }

        @IWrapper(name="MyBeanWrapper",ihandler=MyBeanHandler.class)
        public class MyBean {
          ...
          @Param(name="MyValue",mandatory=false)
          public int getValue() {...}
        }
The @Param annotation is used to mark a bean property as parameter
and configure its name and all the other options known from the
IWrapper XML configuration. This annotation is optional, leaving it out, the property name
is used as name and the other attributes are set to their default values.
        @Target({ElementType.METHOD,ElementType.FIELD})
        @Retention(RetentionPolicy.RUNTIME)
        public @interface Caster {
          Class<? extends IWrapperParamCaster> type();
          Property[] properties() default {};
        }

        @IWrapper(name="MyBeanWrapper",ihandler=MyBeanHandler.class)
        public class MyBean {
          ...
          @Caster(type=SomeClassCaster.class)
          public SomeClass getValue() {...}
        }
The @Caster annotation denotes the caster implementation class.
The nested properties attribute can be used to set properties via
@Property annotations. That's the same as the cparam
elements in the XML configuration (the params/properties are set using according methods
prefixed with put_).
        @Target({ElementType.METHOD,ElementType.FIELD})
        @Retention(RetentionPolicy.RUNTIME)
        public @interface Property {
          String name();
          String value();
        }
The @Property annotation is used as nested annotation within
the properties array attribute of various annotations. It consists
of simple name/value pairs.
        @Target({ElementType.METHOD,ElementType.FIELD})
        @Retention(RetentionPolicy.RUNTIME)
        public @interface PreCheck {
          Class<? extends IWrapperParamPreCheck> type();
          Property[] properties() default {};
        }

        @IWrapper(name="MyBeanWrapper",ihandler=MyBeanHandler.class)
        public class MyBean {
          ...
          @PreCheck(
            type=de.schlund.pfixcore.generator.prechecks.RegexpCheck.class,
            properties={
              @Property(name="regexp",value="/^(M|L|XL)$/")
            }
          )
          public String getValue() {...}
        }
The @PreCheck annotation denotes the precheck implementation class
with optional properties/parameters.
        @Target({ElementType.METHOD,ElementType.FIELD})
        @Retention(RetentionPolicy.RUNTIME)
        public @interface PostCheck {
          Class<? extends IWrapperParamPostCheck> type();
          Property[] properties() default {};
        }

        @IWrapper(name="MyBeanWrapper",ihandler=MyBeanHandler.class)
        public class MyBean {
          ...
          @PostCheck(
            type=de.schlund.pfixcore.generator.postchecks.IntegerRange.class,
            properties={
              @Property(name="range",value="0:2")
            }
          )
          public int getValue() {...}
        }
The @PostCheck annotation denotes the postcheck implementation class
with optional properties/parameters.
        @Target({ElementType.METHOD,ElementType.FIELD})
        @Retention(RetentionPolicy.RUNTIME)
        public @interface Transient {}

        @IWrapper(name="MyBeanWrapper",ihandler=MyBeanHandler.class)
        public class MyBean {
          ...
          @Transient
          public int getValue() {...}
        }
The @Transient annotation can be used to avoid that a bean property
of a builtin type is made to an IWrapper parameter.
Scripted flows are script files written in XML that can be used to control a user session. The script file has the following form:
<scriptedflow version="1.0"
  xmlns="http://pustefix.oss.schlund.de/scriptedflow200602">
  <!--
    The instructions are placed here.
  -->
  </scriptedflow>
A scripted flow is started by using the special __scriptedflow=[FLOWNAME] parameter in the query string of a request URI. In this query string additonal parameters can be given which are then made available inside the script.
Variables can be used to store character data between steps within a scripted flow. A variable is set using the <set-variable name="variablename">content</set-variable> command. The content may consist of character data as well as the special <value-of select="<XPath-Expression>"/> command. Within XPath expressions variables can be referenced using $variablename.
Parameters are set when a scripted flow is started. If the query string contains e.g. "name=value" the value can be accessed from within XPath expressions using the special variable name $__param_name$. Parameters can not be overwritten from within the script and never change during the execution.
There is a special variable called $__pagename$ which contains the name of the page that would have been sent to the browser, if the last request was done directly by the browser. You can use this variable to check on which page you are at the moment. This variable cannot be written to by the script.
Scripted Flows are programmed using assorted statements which are explained here:
Gives control back to the user. The output page is rendered based on the current ResultDocument (which was generated by the last request) and sent to the browser. When the browser sends the next request (e.g. by sending a form or clicking on a link) it is processed as usual but instead of returning the resulting document directly to the browser the active scripted flow is continued right at the location it was suspended, using the new ResultDocument as the base for further processing.
<interactive-request>
  <param name="thename">static text combined with <value-of select="$thevar"/> calculated text (if needed)</param>
  <param name="otherparam">other text</param>
</interactive-request>
This statement can take an arbitrary number of param tags as children. These tags can be used to provide values to pre-fill html form input elements.
Triggers a virtual request which is processed by the context like a user request. This statement can have an optional attribute page which specifies the name of the page the request should be sent to. If omitted, the current page (as defined by the Context) is used. This statement can take an arbitrary number of param tags below itself. These tags can be used to provide arguments to the request (e.g. to simulate submitted form data). The tag follows the scheme:
<virtual-request page="thepage" dointeractive="false|true|reuse">
  <param name="thename">static text combined with <value-of select="$thevar"/> calculated text (if needed)</param>
  <param name="otherparam">other text</param>
</virtual-request>
The dointeractive attribute is used in case the virtual request
returns an error. If set to "true" or "reuse",
the system will automatically fall back to do an interactive request (the
default is "false" which will just go on with the scripted flow
ignoring any errors). All errors will be cleared from the document used in the
interactive request. The difference between "true" and
"reuse" is that in the latter case, the param tags given to the
virtual request will be reused in the automatic interactive request, providing for
pre-filled input fields.
Please note that the __sendingdata or __sendingauthdata
parameter will not be added automatically but has to be added by the script developer,
if needed. The ResultDocument returned by this request is used as the basis for
further processing (e.g. XPath testing).
Sets the value of a variable. As the param tag within the virtual-request tag this tag can contain text data combined with the value-of tag. See Parameters & Variables for details on how to use variables.
Allows conditional execution of a code block. Based on a XPath expression which
is given using the test attribute the VM decides whether to execute the statements
given below the <if> tag or not. The XPath expression can
test for variables and parameters as well as querying the ResultDocument returned
by the last request.
This is the multi-branch equivalent to <if>. The form is
<choose>
  <when test="...">
    <!-- ... -->
  </when>
  <when test="...">
    <!-- ... -->
  </when>
  <otherwise>
    <!-- ... -->
  </otherwise>
</choose>
The <otherwise> branch is optional and only executed if
none of the <when> conditions is met. Only the first
<when> branch whose condition is met is executed,
branches following this branch are not evaluated regardless of their condition.
Loops as long as condition is true. Like the <if> statement
this one takes a test attribute specifying a XPath expression. When the condition is
true, the code block below this tag is executed, otherwise the next statement after
the <while> statement is executed. After executing the block
the condition is rechecked, so the block is executed repeatedly until the condition
becomes false.
Jumps out of a <while> loop. This statement is allowed
anywhere below a <while> statement. It can be used to quit
the loop immediately and to go on with the next statement after the loop.
Consider these questions:
- Do you miss fast-prototyping in Pustefix?
- Do you think dynamic programming languages (sometimes called scripting languages) can do more than just interpreting one liners or providing a new form of poetry?
If you answered any of the questions above with yes ... Then this is for you!
This feature brings scripting support to IHandlers and States. It's possible to develop any of them in any Bean Scripting Framework supported language, by providing a script file's location inside any IWrapper definition file or inside a pagerequest's definition. Script files can be located in either the application's docroot or the classpath.
Instead of providing a class name inside an IWrapper's IHander definition like this:
<ihandler class="de.schlund.pfixcore.example.TShirtHandler"/>
you can define that a file containing dynamic language code should be used as an IHandler. It's done like this:
<ihandler class="script:sample1/script/ScriptingTShirt.js"/>
... that's it! (see below under "Path Definitions" on details about difference between scripts under docroot and scripts placed in classpath).
Simply create a file containing the dynamic language code inside the docroot or the classpath.
If you want to script a State, then simply use the above definition format inside a pagerequest's state definition, like in the following example:
<pagerequest name="scriptingstate">
  <state class="script:sample1/script/ScriptingState?.bsh"/>
</pagerequest>
The following rules have to be considered, when scripting IHandlers and States alike.
-
You must define all methods of the respective interfaces
(
de.schlund.pfixcore.generator.IHandlerand/orde.schlund.pfixcore.workflow.State) as functions inside your scripts. - The functions inside your scripts have to return the correct type, if they return values at all. Note that for example en empty String is a valid boolean expression in Javascript.
- The file suffix must be one that's recognized by BSF. The listing of current supported language mappings of BSF helps you find the correct suffix for your used scripting lanuage. Basically they're the common suffixes like js for javascript, bsh for Beanshell and py for python.
Because the StateFactory caches and reuses State-instances across sessions and requests, you should be aware that script-wide global variables inside your scripts will be available to all requests and session.
This is basically the same behaviour as for States implemented in Java.
There are two alternatives for defining the location of your script file.
-
If you prepend a
/(slash character) to the location, the script file is searched for in the classpath of your application. No magic (or great effort) is applied when searching for the script file. Instead simplyScriptingIHandler.getClass().getResourceAsStream()is called to get the source of the script file. - If the script: String is not followed by a slash, the string is assumed to be a file's location relative to the docroot of the running pustefix application. This usually means everything downwards from the projects-folder.
Of course the Java platform can't interpret every arbitrary on it's own. Special Language libraries must be available to the application in order to execute script code in the respective languages.
Pfixcore comes with the Mozilla's Javascript implementation and the Beanshell distribution, so you can write IHandlers and States in Javascript or Beanshell without any further requirements.
For other languages, like groovy, python or ruby, you'll need their respective implementations for the Java platform. The BSF site holds information about where to find these implementations.
J2EE suppports filters than can be put in the request/response chain in order to modify the request and/or
response that is handled by the servlet. In order to be put into the chain, filters have to implement the
javax.servlet.Filter interface and to be declared in the webapplication deployment descriptor.
If needed, multiple filters can automatically be chained together.
Pustefix provides a special class called de.schlund.pfixxml.AbstractContextServletFilter that can be
used as a base for implementing servlet filters in Pustefix environments. This class takes care of casting the servlet
request and response objects provided by the web container to the corresponding HTTP servlet request or response types.
Besides the class automatically extracts the Context object from the HTTP session (if available) and passes it to the child class.
You should override the void doFilter(HttpServletRequest, HttpServletResponse, FilterChain, Context)
method to implement your own filter code. This code must either handle the request completely or has to call the
doFilter() method on the FilterChain object to pass the request to the next
instance in the filter chain. If you have to make sure that some code is always run after a request has been completely
processed, you can wrap the call to doFilter() within a try{}...finally{} block.
![[Warning]](images/docbook/warning.png) | Overriding the init() method |
|---|---|
When overriding the |
The context instance provided by the base class is not fully initialized at this stage of processing. Basically only
session focused methods are available. Calling a method not being available will result in an
IllegalStateException being thrown.
Configuration of filters takes place in the Section 3.4, “Project configuration files”. Filter declarations are placed
directly within the <project/> tag:
<filter name="filtername">
  <active>true</active>
  <class>my.filter.class</class>
  <foreigncontext>config</foreigncontext>
  <init-param>
    <param-name>myParam</param-name>
    <param-value>myValue</param-value>
  </init-param>
 </filter>
The name of the filter has to be unique within the whole project and is used in mappings. The filter is only
considered active if the <active> tag contains the value true.
The <class/> tag contains the fully qualified class name of the filter class.
The <foreigncontext/> tag takes a reference to a ContextXMLServlet.
The context instance of this servlet (if present within the session) will be provided to the filter code.
In addition to that an arbitrary number (0..n) of <init-param/> tags can be used to pass
configuration information to the filter. However the special parameter name "contextRef" is reserved
and may not be used.
Mappings can be performed by adding a <use-filter>filtername</use-filter> tag within a
<servlet> tag. This will force requests made to the servlet to be pre-processed by the servlet
filter.
Mappings to URIs can be performed by adding a <filter-mapping/> tag to the project node of
the configuration file. This filter-mapping tag uses exactly the same schema used in web application
deployment descriptors.
Table of Contents
Modules allow you to share functionality, configuration options and view elements between different Pustefix installations.
Pustefix supports two ways for providing resources (include parts, images, stylesheets, etc.) used by different projects.
The first (preferred) way is to place a JAR archive somewhere in the library
path (usually lib/) that contains a special deployment descriptor.
This deployment descriptor has to be named META-INF/pustefix-module.xml in
order to be recognized by the Pustefix build system. This deployment descriptor
is a XML file with the following format:
<module-descriptor
  xsi:schemaLocation="http://pustefix.sourceforge.net/moduledescriptor200702 http://pustefix.sourceforge.net/moduledescriptor200702.xsd"
  xmlns="http://pustefix.sourceforge.net/moduledescriptor200702"
  xmlns:xsi="http://www.w3.org/2001/XMLSchema-instance">

  <!--
    The module name is used to construct the path the resources will be extracted to.
    In this example the path would be projects/modules/mytest/.
  -->
  <module-name>mytest</module-name>
  <resources>
    <!--
      The srcpath attributes the directory within the JAR archive that contains the
      resources. The targetpath attribute is optional and specifies the path the
      resources are copied to (relative to the module directory). An empty targetpath
      (the default) specifies the module directory itself
      (e.g. projects/modules/mymodule) as the target directory.
    -->
    <resource-mapping srcpath="resources/txt" targetpath="txt"/>
    <resource-mapping srcpath="resources/images" targetpath="img"/>
  </resources>
</module-descriptor>
The old way is to place a JAR file in the modules/ directory of the Pustefix
environment. In this case no deplyoment descriptor is needed (and even if
present it is not read). However you have to ensure that all files within
the JAR file are in a properly named directory as the archive will be directly
extracted to the projects/modules/ directory.
| Deprecated |
|---|---|
It is not recommended to use these types of modules in Pustefix 0.12.x or higher.
The the new way (see Section 7.1.1, “Resources within library JARs”) is much more
powerful, we will drop support for the |
If your module contains an ant build file, Pustefix can execute this build
file after unpacking. If you want to deploy a build file, that is run automatically,
place a buildfile called build.xml in the folder
projects/modules/<module-name>/.
Pustefix provides a Maven archetype, which can be used to create new modules. It sets up a maven project with pre-configured POM, deployment descriptor and statusmessage support.
mvn archetype:create \
-DarchetypeGroupId=org.pustefixframework.maven.archetypes \
-DarchetypeArtifactId=pustefix-module-archetype \
-DarchetypeVersion=0.1 \
-DgroupId=mytld.myorg.myapp.mysection \
-DartifactId=mymodule \
-Dversion=1.0
You have to supply your own values for the groupId, artifactId
and version parameters. The chosen artifactId will be used as
default module and target folder name, the groupId as Java package name. Executing
the above command creates the following directory structure and artifacts:
mymodule/
mymodule/pom.xml
mymodule/src
mymodule/src/main
mymodule/src/main/resources
mymodule/src/main/resources/dyntxt
mymodule/src/main/resources/dyntxt/statusmessages.xml
mymodule/src/main/resources/dyntxt/statuscodeinfo.xml
mymodule/src/main/resources/META-INF
mymodule/src/main/resources/META-INF/pustefix-module.xml
Building with mvn clean package creates a deployable Pustfix module. At the moment
the only addition to the Maven standard build is the generation of StatusCode constant classes.
Table of Contents
Since release 0.13 Pustefix applications are regular Spring applications. Thus the benefit from building IoC based applications also applies to Pustefix: you can either make isolated, container-independent unit tests of your POJOs, or you can make integration tests within the Spring container.
Ideally your business logic is container and webframework-independent and you can test your components without any dependency to the Pustefix framework - unlike the view logic, which naturally depends on Pustefix framework classes.
The most frequently used Pustefix framework classes/interfaces are IWrappers, IHandlers and ContextResources.
In former Pustefix versions view logic objects collaborated using the Context object to programmatically retrieve the required references. Thus the objects were not only coupled to the Context object but also had implicit references to collaborating view objects.
Since release 0.13 you're recommended to wire your objects using Dependency Injection. So you often don't have a dependency to the Context object any more and the references to other objects are explicit. ContextResources implemented this way can be tested like other POJOs, in isolation and without providing a Context object.
But sometimes your ContextResource has to access the Context object (to call one of the various other methods) or you want to test an IHandler which still needs a Context object (passed as argument to the framework callback methods). If you want to test such an object in isolation, you can use a mock object that implements the Context interface.
The class org.pustefixframework.test.MockContext provides a very simple implementation of the Context interface.
It doesn't really mimic the complex behaviour of the real implementation, but provides methods to set nearly all
kind of state which can be accessed using this interface. It's intended to be used within isolated tests. Testing
complex behaviour and object collaborations (like pageflow processing) has to be done as integration test using
the real Context implementation.
The following example shows how you can test an IHandler, which uses a ContextResource to store data and will return true for needsData calls as long as no data has been submitted:
public class AdultInfoHandlerTest {

    public void testHandler() throws Exception {

        MockContext context = new MockContext();
        ContextAdultInfo info = new ContextAdultInfo();
        AdultInfoHandler handler = new AdultInfoHandler();
        handler.setContextAdultInfo(info);

        Assert.assertTrue(handler.needsData(context));

        AdultInfo iwrapper = new AdultInfo();
        iwrapper.init("info");
        iwrapper.setStringValAdult("false");
        iwrapper.loadFromStringValues();

        handler.handleSubmittedData(context, iwrapper);

        Assert.assertFalse(handler.needsData(context));

    }

}
You programmatically create a MockContext and instances of the required IHandlers, IWrappers and ContextResources.
Then you wire your objects using the according setters. The first assertion is made by checking the handler's needsData
method passing the MockContext. Then the IWrapper is populated with data and passed as argument to the handleSumittedData
method. After that an assertion is made to check if needsData is satisfied now.
The above example worked with an injected ContextResource. If you have to test classes with implicit ContextResource references, which are retrieved using the ContextResourceManager, you also have to mock the ContextResourceManager. Therefore Pustefix provides the org.pustefixframework.test.MockContextResourceManager class:
public class AdultInfoHandlerTest {

    public void testHandler() throws Exception {

        MockContext context = new MockContext();
        MockContextResourceManager resourceManager = new MockContextResourceManager();
        context.setContextResourceManager(resourceManager);

        ContextAdultInfo info = new ContextAdultInfo();
        resourceManager.addResource(info);

    }

}
You have to create a MockContextResourceManager instance and set it at the MockContext object. Then you can create and add your ContextResource instances.
The above example programmatically created an IWrapper instance and set String data, which was casted and checked calling loadFromStringValues. The following example shows how the population of an IWrapper itself can be tested:
public class TShirtWrapperTest {

    public void testIWrapper() throws Exception {

        TShirt tshirt = new TShirt();
        tshirt.init("shirt");
        tshirt.setStringValSize("MX");
        tshirt.loadFromStringValues();
        Assert.assertTrue(tshirt.errorHappened());
        IWrapperParam[] params = tshirt.gimmeAllParamsWithErrors();
        for(IWrapperParam param:params) {
            if(param.getName().equals("Color")) {
                Assert.assertSame(param.getStatusCodeInfos()[0].getStatusCode(), CoreStatusCodes.MISSING_PARAM);
            } else if(param.getName().equals("Size")) {
                Assert.assertSame(param.getStatusCodeInfos()[0].getStatusCode(), CoreStatusCodes.PRECHECK_REGEXP_NO_MATCH);
            }
        }

        tshirt.init("shirt");
        tshirt.setStringValSize("XL");
        tshirt.setStringValColor("1");
        tshirt.loadFromStringValues();
        Assert.assertFalse(tshirt.errorHappened());
        Assert.assertEquals(1, tshirt.getColor());

    }

}
First we instantiate and populate the IWrapper. After calling loadFromStringValues an assertion is made
to check if an error occurred. Then we iterate over all parameters and assert the expected statuscodes.
After that we're initializing the wrapper again, this time with valid values. Now we can check if the wrapper returns the
correct values (after they have been checked and casted calling the loadFromStringValues method).
If an error happened during casting or checking, the value won't be set and the according getter method will return null.
Pustefix applications are regular Spring applications, thus all the integration testing benefit provided by Spring is also available for Pustefix: e.g. the IoC container caching between test executions, DI of test fixtures, etc.
Pustefix supports Spring's TestContext framework by providing a custom ContextLoader implementation. The following example shows how you can use it to set up a (pre JUnit-4.4) test:
@ContextConfiguration(loader=PustefixWebApplicationContextLoader.class,
                      locations={"file:projects/sample1/conf/project.xml","file:projects/sample1/conf/spring.xml"})
public class MyTest extends AbstractJUnit38SpringContextTests {
}
You set up the Pustefix specific ApplicationContext by setting the loader attribute of the org.springframework.test.context.ContextConfiguration annotation to org.pustefixframework.test.PustefixWebApplicationContextLoader. Using the locations attribute you can set the location of the ApplicationContext's configuration files (normally project.xml and spring.xml).
In this example we use a JUnit version prior to 4.4. Therefor we have to derive an according Spring class. If you use JUnit 4.4 or newer you can alternatively set a Spring-specific Runner implementation using the JUnit @RunWith annotation.
@RunWith(SpringJUnit4ClassRunner.class)
@ContextConfiguration(loader=PustefixWebApplicationContextLoader.class,
                      locations={"file:projects/sample1/conf/project.xml","file:projects/sample1/conf/spring.xml"})
public class MyTest {
}
Setting up your test this way, you can use Spring's autowiring to inject the required beans into your test class. The following example test uses a singleton scoped bean, which is automatically injected by its name using the Autowired and Qualifier annotations:
@RunWith(SpringJUnit4ClassRunner.class)
@ContextConfiguration(loader=PustefixWebApplicationContextLoader.class,
                      locations={"file:projects/sample1/conf/project.xml","file:projects/sample1/conf/spring.xml"})
public class MyTest {

    @Autowired
    @Qualifier("global_testdata")
    private TestData testData;

    @Test
    public void testBean() {
        Assert.assertEquals(testData.getText(), "bar");
    }

}
You aren't forced to use Spring's TestContext framework, alternatively you can manually use the Pustefix ContextLoader to create a PustefixWebApplicationContext, but you loose the benefit of context caching and dependency injection:
public class MyTest extends TestCase {

    public void testBean() {

        File docroot = new File("projects");
        PustefixWebApplicationContextLoader loader = new PustefixWebApplicationContextLoader(docroot);
        String[] locations = {"pfixroot:/sample1/conf/spring.xml", "pfixroot:/sample1/conf/project.xml"};
        PustefixWebApplicationContext appContext = (PustefixWebApplicationContext) loader.loadContext(locations);

        TestData testData = (TestData)appContext.getBean("global_testdata");
        assertEquals(testData.getText(), "bar");

    }

}
Now follows a more advanced example, which shows how you can test HTTP requests and session scoped beans outside of the application server using mock objects. This example shows how to request a page and test the resulting HTML document:
@ContextConfiguration(loader=PustefixWebApplicationContextLoader.class,
                      locations={"file:projects/sample1/conf/project.xml","file:projects/sample1/conf/spring.xml"})
public class HomePageTest extends AbstractJUnit38SpringContextTests {

    @Autowired
    private ServletContext servletContext;

    @Autowired
    private PustefixContextXMLRequestHandler requestHandler;

    public void testPageRequest() throws Exception {

        MockHttpServletRequest req = new MockHttpServletRequest();
        req.setPathInfo("/home");
        req.setMethod("GET");
        MockHttpServletResponse res = new MockHttpServletResponse();
        MockHttpSession session = new MockHttpSession(servletContext);
        req.setSession(session);
        RequestContextHolder.setRequestAttributes(new ServletRequestAttributes(req));
        session.setAttribute(SessionHelper.SESSION_ID_URL, SessionHelper.getURLSessionId(req));

        requestHandler.handleRequest(req, res);
        Assert.assertTrue(res.getContentAsString().contains("<title>PFIXCORE Sample</title>"));

    }

}
First we create a mock object for the HttpServletRequest and set the path to the requested page. Then we're creating an according HttpServletResponse mock object. Next we create an HttpSession mock object an set it at the request. At last we have to set the request at Spring's RequestContextHolder and a special session attribute.
Now we can call the handleRequest method at the injected PustefixContextXMLRequestHandler, passing the request and response objects as arguments. At last we're checking if the resulting
HTML from the HttpServletResponse contains the expected content.
The final example shows you how to test a pageflow by checking the collaborating IHandlers and States, isAccessible and needsData checks, submitting to handlers and checking of the ResultDocument:
@ContextConfiguration(loader=PustefixWebApplicationContextLoader.class,
                      locations={"file:projects/sample1/conf/project.xml","file:projects/sample1/conf/spring.xml"})
public class OrderFlowTest extends AbstractJUnit38SpringContextTests {

    @Autowired
    private ServletContext servletContext;

    @Autowired
    private Context pustefixContext;

    @Autowired
    private OverviewState overviewState;

    public void testHandler() throws Exception {

        MockHttpServletRequest req = new MockHttpServletRequest();
        req.setPathInfo("/home");
        req.setMethod("GET");
        MockHttpSession session = new MockHttpSession(servletContext);
        req.setSession(session);
        RequestContextHolder.setRequestAttributes(new ServletRequestAttributes(req));
        PfixServletRequest pfxReq = new PfixServletRequestImpl(req,new Properties());
        ((ContextImpl)pustefixContext).prepareForRequest();
        ((ContextImpl)pustefixContext).setPfixServletRequest(pfxReq);

        Assert.assertFalse(overviewState.isAccessible(pustefixContext, pfxReq));
        AdultInfoHandler handler = (AdultInfoHandler)applicationContext.getBean(AdultInfoHandler.class.getName()+"#home#info");
        Assert.assertTrue(handler.needsData(pustefixContext));

        AdultInfo adultInfo = new AdultInfo();
        adultInfo.init("info");
        adultInfo.setStringValAdult("false");
        adultInfo.loadFromStringValues();
        handler.handleSubmittedData(pustefixContext, adultInfo);

        TShirtHandler tshirtHandler = (TShirtHandler)applicationContext.getBean(TShirtHandler.class.getName()+"#order#shirt");
        TShirt tshirt = new TShirt();
        tshirt.init("shirt");
        tshirt.setStringValColor("3");
        tshirt.setStringValSize("XL");
        tshirt.setStringValFeature(new String[] {"0","1","2"});
        tshirt.loadFromStringValues();
        tshirtHandler.handleSubmittedData(pustefixContext, tshirt);
        Assert.assertTrue(overviewState.isAccessible(pustefixContext, pfxReq));

        ResultDocument resDoc = overviewState.getDocument(pustefixContext, pfxReq);
        Document doc = resDoc.getSPDocument().getDocument();
        Node expNode = XMLUtils.parse("<adultinfo adult=\"false\"/>").getDocumentElement();
        XmlAssert.assertEquals(expNode, doc.getElementsByTagName("adultinfo").item(0));
    }
}
You have to be aware that some beans, e.g. States, require that the Context has set a current pagerequest
and that the Context is prepared (meaning that some ThreadLocal initialization is done). So you can't just reference an arbitrary
bean in the midst of the processing lifecycle and expect it to work outside of this lifecycle. Testing States at the moment requires
a cast to its implementation class and some initialization (as shown in this example). But this can be subject to change in future Pustefix
versions.
C
E
- Editor
Modifies projects in a web browser. The editor is itself a project which is part of the core.
- Environment
Pustefix SDK. What you install to develop your own projects with pustefix. Includes core, editor, and the basic structure. Caution: The respective download is called "pfixcore-skel-<VERSION>.tar.gz", which stands for "skeleton", because it contains everything in the correct layout of directories to start a new environement, but is missing the flesh, i.e. your private application code.
P
- Project
A web application that uses pustefix core. Projects reside in the projects directory (when starting with a skeleton environment as it can be downloaded from sourceforge - the CVS checkout itself uses the examples directory). A single environment hosts an arbitray number of projects. The term application is sometimes used as a synonym. Caution: the following directories in the projects directory do not hold projects: common, core, servletconf.
- Pfixcore
The SVN module that implements the framework.
- Pustefix
Denotes either framework, core, or environment, depending on the context.