Getting Started with dip.ui
In this section we work through a number of examples of building simple user
interfaces declaratively using the dip.ui module. First of all we will
briefly introduce some terms and concepts that we will expand on later.
dip.ui uses the well known model-view-controller
design pattern. The data being displayed by the user interface is held in a
model, the user interface is implemented as a view, and the controller updates
the model as the user interacts with the view.
A model is implemented either as a Python dictionary or, more usually, as a
sub-class of Model which is part of the dip.model
module.
If the default PyQt5 toolkit is used then a view is implemented as a hierarchy
of QWidget and QLayout
instances.
The process of associating a view with a model is called binding.
A view that is bound to a particular attribute of a model is an editor.
The controller decides if and when an editor updates the model attribute it is bound to.
The Smallest Example
The following is a complete example (which you can download from
here).
from dip.ui import Application, Form


# Every application needs an Application.
app = Application()

# Create the model.
model = dict(name='')

# Define the view.
view_factory = Form()

# Create an instance of the view bound to the model.
view = view_factory(model)

# Make the instance of the view visible.
view.visible = True

# Enter the event loop.
app.execute()

# Show the value of the model.
print("Name:", model['name'])
If you run the example from a command line prompt then the following is displayed.
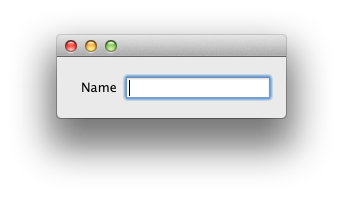
If you enter some text and click on the close button then the value you entered will be displayed at the command line.
We will now walk through the code a section at a time.
from dip.ui import Application, Form
The above line are the imports needed by the example.
app = Application()
Assuming the default PyQt5 toolkit, the above line creates a
QApplication instance adapted to the
IApplication interface.
model = dict(name='')
The above line creates the model. In this simple case we are using a
Python dictionary to implement the model. The model has a single attribute,
called name and its initial value is an empty string.
view_factory = Form()
The above line defines the view factory. Using the default PyQt5
toolkit, Form will create a
QFormLayout to layout its contents as a form (i.e.
fields with associated labels) according to the user interface guidelines of
the current style.
view = view_factory(model)
The above line calls the view factory to create the actual implementation of the view and bind it to the model. Because the view is a top-level view (i.e. it is not contained in another view) the view factory will always make sure that the toolkit specific object created can be displayed.
If required the actual toolkit specific widget can be obtained by passing the
view to the unadapted() function. It is important to
emphasise that there is no need to implement complete user interfaces using the
dip.ui module. An application may use a mixture of handwritten code,
designs created with design tools and view factories defined declaratively.
view.visible = True
The above line makes the view visible to the user.
app.execute()
The above line is the IApplication call that enters the
application’s event loop. The call will return when the user clicks on the
close button.
print("Name:", model['name'])
The above line displays the updated value of the model.
In this example we have created a usable user interface while specifying the absolute minimum amount of information about the model and view. In particular the view has inferred what it should contain by looking at the model. This is very powerful, but you will usually want to exert some control over the view in a real-life situation. The following examples describe how to do this.
Extending the Model
In this example we will build on the previous one to add an age attribute
to the model.
The complete example can be downloaded from
here and is displayed as shown
below.

We will now walk through the significant changes to the previous example.
model = dict(name='', age=0)
The above line shows the new model definition. Strictly speaking that’s all we need to do. The view will infer from the model that a new editor is needed to handle the additional attribute and that editor should be able to handle integers. However, there is a problem. The model is unordered so there is no way for the view to infer the correct order in which the editors should be displayed.
view_factory = Form('name', 'age', window_title="Extended Model")
The above line is the new view definition where we have told the view what we want to display and in what order. If the model contained other attributes then they would be ignored by the view. We also provide a title for the window.
print("Age:", model['age'])
The above line simply displays the extra attribute.
Configuring Views
As has been shown in the previous examples, a view (in actual fact the toolkit) will decide which editor to create for an attribute according to the type of that attribute. If we want to configure a view or an editor, or we wish the view to use a different editor, then we need to specify it explicitly.
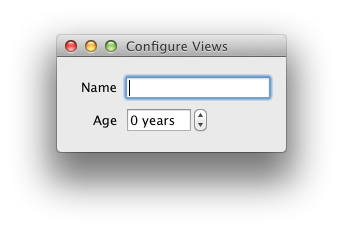
In this example we want to configure the editor used to handle the age
attribute so that it has a years suffix as shown below.
The complete example can be downloaded from
here. We will now walk
through the changes to the previous example.
from dip.ui import Application, Form, SpinBox
The above line now also imports the SpinBox view factory. As
the view that the factory creates is actually an editor (because it can be
bound to a particular attribute of a model) then we also sometimes refer to it
as an editor factory.
view_factory = Form('name', SpinBox('age', suffix=" years"),
        window_title="Configure Views")
The above lines show the new view definition. Instead of just giving the name
of the age attribute and leaving it to the view to use the default editor
factory, we tell it to use a particular editor factory configured the way we
want it.
Any arguments to an editor factory that aren’t known to the factory are passed
on to the toolkit where they may be used or ignored. The default PyQt5 toolkit
assumes them to be the names and values of Qt properties to be applied to the
actual editor that is created. In this example the suffix argument is
handled in this way.
Using a Dialog
In the previous examples the model has always been updated as the user
interacts with the view. This isn’t always desirable. For example, you may
not want a model to be updated by a dialog view unless the user clicks the
Ok button.
Whether or not a model is updated immediately is determined by the controller which manages the interaction between the view and the model. You may provide a controller to implement a particular behaviour, otherwise a controller will be created automatically as required. Controllers are covered in more detail in a later section.
The default controller that is created by a dialog will not automatically update the model when the user changes an editor.
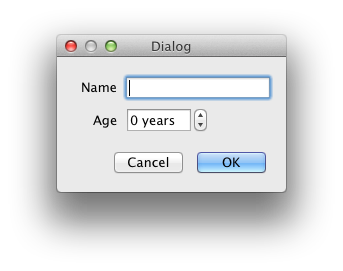
In this section we modify the example, shown below, to use a dialog and to
show that the model is only updated when the Ok button is clicked.
The complete example can be downloaded from
here. We will now walk through the
changes to the previous example.
from dip.ui import Application, Dialog, SpinBox
The above line imports the additional objects used by the example.
view_factory = Dialog('name', SpinBox('age', suffix=" years"),
        window_title="Dialog")
The above lines show the new view definition based on a dialog rather than a
form. Note that the contents of the view have been arranged (under the
covers) using a Form. This is the default when the dialog
has more than one sub-view.
view.execute()
The above line is the IDialog call that displays the dialog
and enters its event loop. If the user clicks the Ok button then the model
is updated from the dialog.
Using dip.settings with Views
Every time you run the previous example the dialog will be displayed at its
default size and position on the screen. This is fine for simple applications
but more complex applications may allow the user to configure details of the
user interface, e.g. to adjust sliders, to adjust the size of table columns, to
position dock widgets, to resize the whole of the user interface. The user
will expect that those adjustments will be saved between invocations of the
application. Using the dip.settings module this can be achieved very
easily.
A version of the previous example that uses dip.settings can be
downloaded from here. We
will now walk through the changes to the example.
First of all we import the singleton SettingsManager.
from dip.settings import SettingsManager
Next we load the application’s settings with the following line of code.
SettingsManager.load('riverbankcomputing.com')
The argument identifies the organization responsible for the application. It
is recommended that a fully qualified domain name is used. The
load() method also accepts an optional
application name argument. This defaults to the base name of sys.argv
with any extension removed. If you want to share the settings between a number
of applications then you should explicitly specify an application name.
The next step is to restore the settings for all of the application’s views with the following line of code.
SettingsManager.restore(view.all_views())
Which views support settings, and in what way, is toolkit dependent. We simply
pass the sequence of all views - any views that don’t support settings (i.e.
cannot be adapted to the ISettings interface) will just
be ignored.
Finally we want to save any settings that were changed when the user was interacting with the application. This is done after the event loop exits with the following line of code.
SettingsManager.save(view.all_views())
Our simple application has a single dialog as its user interface. A more
typical application will have some sort of main window and a number of
temporary dialogs. The same approach is taken, i.e. the application’s settings
are loaded once and then every time the event loop is about to be entered the
restore() method is called with the
appropriate sequence of views, and then after the event loop exits the
save() method is called with the same
sequence of views.
Every setting has a string identifier. With a view’s settings this is usually
the identifier of the view. A view has a default identifier which is not
guaranteed to be unique. For example the default identifier of a dialog
created by the Dialog factory is dip.dialog. If an
application has a number of different dialogs created this way then they will
all have the same identifier, and so will share the same settings. This is
probably not what the user expects. Therefore it is recommended that such
dialogs (and wizards) be given explicit and unique identifiers. This also
helps when automating user interfaces.
A final point to make is that the
restore() and
save() methods have no effect if the
load() method has not been called. This
means that user interfaces that are parts of libraries can support settings by
making calls to the restore() and
save() methods but it remains the
responsibility of the application using the library to decide if settings are
actually used.
Non-declarative Views
So far we have created views by calling a view factory that has been defined
declaratively. The view factory will also, under the covers, bind the view to
a model. This is the most concise way to create a user interface that will
automatically update the model, and also will itself be automatically updated
when the model is changed. However there are several reasons why you might
want to use a view created by some other means (e.g. by making toolkit specific
calls, or using the dip.pui module):
- to re-use an existing user interface
- to incorporate widgets that don’t have a corresponding view factory
- to configure a widget which cannot be done by setting the widget properties
- you just prefer the traditional programming style.
Even though we create the view programmatically we can still use the view with
other dip modules as if it has been created declaratively. For example the
view can be automated and tested using the dip.automate module.
If we don’t use view factories to create the view we need to explicitly bind
the view to a model. To do this we define the bindings as an instance of the
Bindings class. We then call the instance’s
bind() method to bind the particular view and model.
We will now look at a version of an earlier example that creates the view
programmatically. The complete example can be dowloaded from
here.
In the earlier example the view was defined with the following line of code.
view_factory = Form('name', 'age', window_title="Extended Model")
The view was then created and bound to the model with the following line of code.
view = view_factory(model)
In the new example we create the view with the following code. This should be
very familiar to a PyQt developer. The key thing to note is that the
QLineEdit and QSpinBox
widgets have each had their objectName property set. This is used to
identify the widget when binding it to a particular attribute of the model.
layout = QFormLayout()
layout.addRow("Name", QLineEdit(objectName='name_editor'))
layout.addRow("Age", QSpinBox(objectName='age_editor'))

view = QWidget(windowTitle="Bindings")
view.setLayout(layout)
Next we define the bindings as shown in the following line of code. The name
of each keyword argument corresponds to the objectName of a widget in the
view. The value of the keyword argument is the name of the attribute in the
model that the widget is to be bound to.
bindings = Bindings(name_editor='name', age_editor='age')
Finally, the following line of code uses the bindings we have defined to bind a particular view to a particular model.
bindings.bind(view, model)
In the above we have bound the name of a widget to the name of an attribute. We may also bind the name of a widget to an instance of a view factory. The view factory itself is bound to the name of the attribute in the usual way, i.e. by passing it as the first argument to the factory. This allows us to provide additional information about a widget and to add specific behaviour to it.
For example, say we have a model which contains a list of integer values:
model = dict(values=[])
We create a view containing a QListWidget with a pair
of QPushButton to the right of it:
button_layout = QVBoxLayout()
button_layout.addWidget(QPushButton("Add", objectName='add'))
button_layout.addWidget(QPushButton("Remove", objectName='remove'))
button_layout.addStretch()

layout = QHBoxLayout(objectName='values_editor')
layout.addWidget(QListWidget())
layout.addLayout(button_layout)

ui = QWidget()
ui.setLayout(layout)
We want to add a new entry to the list when the Add button is pressed and
to remove the current entry when the Remove button is pressed.
Now we define the bindings:
bindings = Bindings(
        values_editor=ListEditor(
                'values', column=ListColumn(column_type=Int())))
Our layout will be bound to the ListEditor view factory
because it fulfills the (toolkit specific) requirements of a list editor. In
this case those requirements are:
- a
QListWidgetthat is directly contained in the layout - a
QAbstractButtonwith anobjectNameof'add'that is contained in the layout or a sub-layout - a
QAbstractButtonwith anobjectNameof'remove'that is contained in the layout or a sub-layout.
The view factory is itself bound to the values attribute of the model. In
addition we have used the ListColumn to specify the type of an
element of the list. We have to do this because there is no way to infer it
from a dict-based model.
As a result, when the bindings’s bind() method is called
dip is able to connect everything up to achieve the desired behaviour.
Creating Views with Qt Designer
You can incorporate views created with Qt Designer (or any other toolkit specific GUI design tool) by creating them as you would normally do and explicitly binding the relevant widgets to attributes of a model as described in the previous section.
You may also use the Designer view factory to do this for you
by giving it the name of the .ui file created using Qt Designer.
For example, say we have a model which contains a single string:
model = dict(name='')
We have a file called name_editor.ui created with Qt Designer that contains
a widget that can edit a string and which has an objectName of
lineEdit.
We then create a view factory specifiying the name of the .ui file and the
bindings that define the relationship between the lineEdit widget and the
name attribute of the model:
view = Designer('name_editor.ui', bindings=Bindings(lineEdit='name'))
We then call the view factory and show the user interface it creates as normal:
ui = view(model)
ui.show()
Using a Real Model
So far in our examples we have implemented the model using a Python
dictionary. Normally models are implemented as sub-classes of
Model. Doing so has two particular advantages when using
views.
- A view can automatically use any meta-data provided by an attribute type that correspond to the names of properties that can be applied to an editor.
- A view will automatically update itself if the value of any of the model’s attributes changes. Model changes can be made programmatically or by the user using another view bound to the same model.
In this section we modify the example, shown below, to demonstrate both of these features. We also choose to create some of the GUI using the toolkit specific API just to demonstrate how easy it is to mix the toolkit independent and toolkit specific APIs.
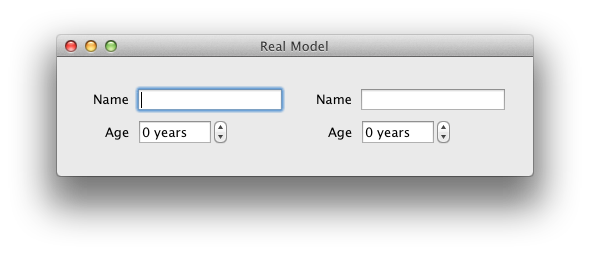
When running the example you will see that the age is limited to the
values defined by the meta-data in the model, and that changes to either view
are instantly reflected in the other.
The complete example can be downloaded from
here. We will now walk through the
changes to the previous example.
from PyQt5.QtWidgets import QHBoxLayout, QWidget

from dip.model import Int, Model, Str, unadapted
The above lines import the additional objects used by the example.
class ExampleModel(Model):

    # The name.
    name = Str(tool_tip="The person's full name")

    # The age in years.
    age = Int(minimum=0, maximum=120)
The above lines define the model. Hopefully this is fairly self-explanatory.
Note that all editors will use any status_tip, tool_tip or
whats_this text found in a type’s meta-data.
model = ExampleModel()
The above line simply creates an instance of the model.
subview_left = subview_factory(model)
subview_right = subview_factory(model)
The above lines define two identical instances of the view. Both views are bound to the same model.
layout = QHBoxLayout()
layout.addWidget(unadapted(subview_left))
layout.addWidget(unadapted(subview_right))

view = QWidget(windowTitle="Real Model")
view.setLayout(layout)
view.show()
The above lines are standard PyQt calls that create and display a
QWidget containing the two views side by side. Note
the calls to unadapted() to get the toolkit specific widgets
from the sub-views.
print("Name:", model.name)
print("Age:", model.age)
The above lines display the model’s attribute values.
Controllers and Validation
We have already briefly mentioned that a view has a controller that is responsible for the interaction between the view and the model. The specific responsibilities of the controller are:
- to determine if the data in the view is valid
- to update the model with valid data from the view
- to update the view if the model changes
- to enable and disable the editors in the view, typically in response to changes made by the user to other editors
- to provide easy programatic access to the editors in the view.
If a controller is not explicitly set for a view then a default controller is
automatically created. The default controller considers a view to be valid if
all the enabled editors contain valid data. It will update the model when any
valid data changes. As we have already mentioned the default controller
created for a Dialog will only update the model with valid
data when the Ok button is clicked.
You will usually want to create and explicitly set a controller for a view when you need to provide more sophisticated validation of a view, or to disable certain editors when other editors contain particular values.
In this section we will walk through a more complicated example, shown below, of a view that demonstrates the use of validation, help and the creation of an explicit controller.
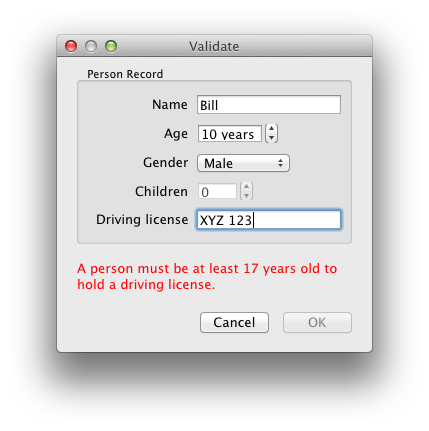
The example has the following features.
- Tool tip and What’s This help is provided for some editors.
- The
Nameeditor ensures any entered data matches a regular expression. - The
Childreneditor is disabled if the gender is inappropriate. - The view is invalid if the values of the
AgeandDriving licenseare incompatible. - A user friendly explanation of why the view is invalid is provided.
- The
Okbutton is only enabled when the view contains valid data.
The following is the complete example (which you can download from
here).
from dip.model import Enum, Int, Model, Str
from dip.ui import (Application, Dialog, DialogController, GroupBox,
        MessageArea, SpinBox)


class Person(Model):
    """ The Person class encapsulates the data held about an individual. """

    # The person's name.
    name = Str(required='stripped', tool_tip="The person's name",
            whats_this="The name of the person. It must be at least two "
                    "characters and can include spaces.")

    # The person's gender.
    gender = Enum('female', 'male')

    # The person's age.
    age = Int(1, minimum=1)

    # The number of the children the person has had.  It is only applicable if
    # the person is female.
    children = Int()

    # The person's driving license number.  A person must be 17 or older to
    # hold a driving license.
    driving_license = Str(tool_tip="The person's driving license number")


class PersonController(DialogController):
    """ The PersonController class implements a controller for a view that
    allows the update of a Person instance.
    """

    def validate_view(self):
        """ Validate the data in the view.

        :return:
            a string which will be empty if the view is valid, otherwise it
            will explain why the view is invalid.
        """

        if self.driving_license_editor.value != '' and self.age_editor.value < 17:
            invalid_reason = "A person must be at least 17 years old " \
                    "to hold a driving license."
        else:
            invalid_reason = ''

        return invalid_reason

    def update_view(self):
        """ Update the state of the view. """

        # The 'children' editor is only enabled if the gender is female.
        self.children_editor.enabled = (self.gender_editor.value == 'female')

        super(PersonController, self).update_view()


# Every application needs an Application.
app = Application()

# Create the model.
model = Person()

# Define the view.
view_factory = Dialog(
        GroupBox(
            'name',
            SpinBox('age', suffix=" years"),
            'gender',
            'children',
            'driving_license',
            title="Person Record"
        ),
        MessageArea(),
        window_title="Validate"
    )

# Create the controller.
controller = PersonController()

# Create an instance of the view bound to the model.
view = view_factory(model, controller=controller)

# Enter the dialog's modal event loop.
view.execute()

# Show the attributes of the model.
print("Name:", model.name)
print("Gender:", model.gender)
print("Age:", model.age)
print("Children:", model.children)
print("Driving license:", model.driving_license)
We will now walk through the significant parts of the code.
class Person(Model):
    """ The Person class encapsulates the data held about an individual. """

    # The person's name.
    name = Str(required='stripped', tool_tip="The person's name",
            whats_this="The name of the person. It must be at least two "
                    "characters and can include spaces.")

    # The person's gender.
    gender = Enum('female', 'male')

    # The person's age.
    age = Int(1, minimum=1)

    # The number of the children the person has had.  It is only applicable if
    # the person is female.
    children = Int()

    # The person's driving license number.  A person must be 17 or older to
    # hold a driving license.
    driving_license = Str(tool_tip="The person's driving license number")
The above code defines the Person model. The main thing to note are the
keyword arguments to the different types. These are all meta-data, i.e. they
are ignored by the types themselves but are available to other code. In this
case they are used by the view we create later on. We could just as easily
pass them as property values to the corresponding editor factory, but including
them with the model means that they will be used automatically by any view that
uses the model. If an editor factory does explicitly specify a property value
of the same name then it will be used in preference to that in the model.
The meta-data themselves should be fairly self-explanatory. The required
argument of the name attribute is used by LineEditor to
configure an instance of StringValidator to ensure that a name
doesn’t have any leading or trailing spaces.
Our controller is a sub-class of dip’s DialogController class
that reimplements the validate_view() and
update_view() methods.
The validate_view() method is called after each of
the view’s enabled editors have been successfully validated. Its purpose is to
perform any additional validation where particular combinations of (otherwise
valid) editor values are invalid. In our example, shown below, the view is
invalid if the Age and Driving license editors have incompatible
values.
    def validate_view(self):
        """ Validate the data in the view.

        :return:
            a string which will be empty if the view is valid, otherwise it
            will explain why the view is invalid.
        """

        if self.driving_license_editor.value != '' and self.age_editor.value < 17:
            invalid_reason = "A person must be at least 17 years old " \
                    "to hold a driving license."
        else:
            invalid_reason = ''

        return invalid_reason
In the above code we make use of the fact that a controller automatically
provides attributes that correspond to each editor. The name of the attribute
is the identifier of the editor with _editor appended. If the identifier
is in dotted format then only the last part of the identifier is used in the
comparison. The default identifier is the name of the attribute in the model
that the editor is bound to.
A controller provides similar access to actions (using the _action suffix)
and views (using the _view suffix).
The update_view() method is called after the view has
been fully validated and the model as been updated (if the
auto_update_model attribute has been set). Its
purpose is to update the state of any editors (or sub-views) that are dependent
on the values of any other editors. In our example, shown below, the
Children editor is only enabled if the Gender editor has an appropriate
value.
    def update_view(self):
        """ Update the state of the view. """

        # The 'children' editor is only enabled if the gender is female.
        self.children_editor.enabled = (self.gender_editor.value == 'female')

        super(PersonController, self).update_view()
Note that we also call the super-class
update_view() implementation which ensures that
the Ok button is only enabled when the view is valid.
The next significant code to look at is that which defines the view.
view_factory = Dialog(
        GroupBox(
            'name',
            SpinBox('age', suffix=" years"),
            'gender',
            'children',
            'driving_license',
            title="Person Record"
        ),
        MessageArea(),
        window_title="Validate"
    )
The main point of interest in the above code is the use of
MessageArea. If this is specified then the controller uses it
to display any messages to the user. It can be configured via its (toolkit
specific) properties. For example a message area defined as follows will show
white text on a red background:
MessageArea(styleSheet='background-color: red; color: white')
The following line creates the instance of the controller.
controller = PersonController()
Finally, the following line creates the instance of the view and uses the controller instance we have just created rather than a default one.
view = view_factory(model, controller=controller)
A Pattern for Simple GUI Utilities
Although dip contains lots of functionality intended to support the development of large, complex applications it is also very suitable for writing simple GUI utilities. In this section we walk through the code of a line counting utility using a pattern that can be used whenever there is a need to gather some information from the user, perform some task using that information as input and then displaying the output.
Such applications are typically dialog or wizard based and rarely need features of a specific toolkit. We have chosen to write this example without using any toolkit specific code.
The complete source code (which you can download from
here) is shown below.
import glob
import os

from dip.model import List, Model, Str
from dip.ui import (Application, FilesystemLocationEditor, Form, ListEditor,
        MessageArea, Stretch, VBox, Wizard, WizardPage)


class LineCounter(Model):
    """ The LineCounter class is a combined model and view for counting the
    total number of lines in a set of files.
    """

    # The name of the root directory.
    root_directory = Str()

    # The list of glob-like filters to apply to names of files in the directory
    # hierachy.  If the list is empty then all files are processed.
    filters = List(Str(required='stripped'))

    # The wizard used to get the input from the user.  Note that this is an
    # ordinary class attribute.
    wizard = Wizard(
            WizardPage(
                VBox (
                    Form(
                        FilesystemLocationEditor('root_directory',
                                mode='directory', required=True)
                    ),
                    Stretch(),
                    MessageArea()
                ),
                title="Directory name",
                subtitle="Enter the name of the directory containing the "
                        "files whose lines are to be counted."
            ),
            WizardPage(
                VBox(
                    ListEditor('filters'),
                    Stretch(),
                    MessageArea()
                ),
                title="File filters",
                subtitle="Enter the glob-like filters to apply to the file "
                        "names."
            ),
            window_title="Line counter"
        )

    def populate(self):
        """ Populate the model with input from the user.

        :return:
            ``True`` if the user didn't cancel.
        """

        wizard = self.wizard(self)

        return wizard.execute()

    def perform(self):
        """ Count the number of lines and display the total. """

        filepaths = []

        for dirpath, _, filenames in os.walk(self.root_directory):
            if len(self.filters) == 0:
                # There are no filters so look at each file.
                for filename in filenames:
                    filepaths.append(os.path.join(dirpath, filename))
            else:
                # Apply the filters.
                for filter in self.filters:
                    filepaths.extend(glob.glob(os.path.join(dirpath, filter)))

        # Count the files in each file.
        line_count = 0

        for filepath in filepaths:
            try:
                with open(filepath) as fh:
                    line_count += len(fh.readlines())
            except UnicodeDecodeError:
                # Assume it is a binary file and ignore it.
                pass
            except EnvironmentError as err:
                Application.warning("Line counter",
                        "There was an error reading the file <tt>{0}</tt>."
                                .format(filepath),
                        detail=str(err))

        # Tell the user.
        Application.information("Line counter",
                "There were {0} lines in {1} files.".format(line_count,
                        len(filepaths)))


# Every application needs an Application.
app = Application()

# Create the model/view.
line_counter = LineCounter()

# Populate the model with input from the user.
if line_counter.populate():
    # Perform the task, i.e. count the lines.
    line_counter.perform()
The code comprised three sections:
- the
importstatements - a combined model/view class that represents the input data, declaratively defines the GUI used to gather the data from the user and actually counts the lines
- the code to create the model/view instance and call its methods to create the GUI and count the lines.
Note that we have chosen to use a wizard to gather the input data from the user. However the amount of data doesn’t really justify this (a simple dialog would be sufficient) but we wanted to demonstrate how easy it is to create a wizard.
The import statements are shown below.
import glob
import os

from dip.model import List, Model, Str
from dip.ui import (Application, FilesystemLocationEditor, Form, ListEditor,
        MessageArea, Stretch, VBox, Wizard, WizardPage)
The model/view class is called LineCounter and is a sub-class of
Model as you would expect.
class LineCounter(Model):
    """ The LineCounter class is a combined model and view for counting the
    total number of lines in a set of files.
    """
The input data we want to gather from the user is the name of a directory and an optional list of glob-like patterns that are used to filter the names of files in the directory. These are represented as attributes in the model. The directory name, stored as a string is shown below.
root_directory = Str()
The declaration of the list of filters is shown below.
filters = List(Str(required='stripped'))
By specifying the required meta-data we are telling any editor that dip
creates to modify the attribute that each filter must contain at least one
non-whitespace character.
The final attribute is the declaration of the wizard used to gather the input data. Note that this is an ordinary class attribute.
    wizard = Wizard(
            WizardPage(
                VBox (
                    Form(
                        FilesystemLocationEditor('root_directory',
                                mode='directory', required=True)
                    ),
                    Stretch(),
                    MessageArea()
                ),
                title="Directory name",
                subtitle="Enter the name of the directory containing the "
                        "files whose lines are to be counted."
            ),
            WizardPage(
                VBox(
                    ListEditor('filters'),
                    Stretch(),
                    MessageArea()
                ),
                title="File filters",
                subtitle="Enter the glob-like filters to apply to the file "
                        "names."
            ),
            window_title="Line counter"
        )
The wizard has two pages the first of which is shown below as it appears when the utility is started.
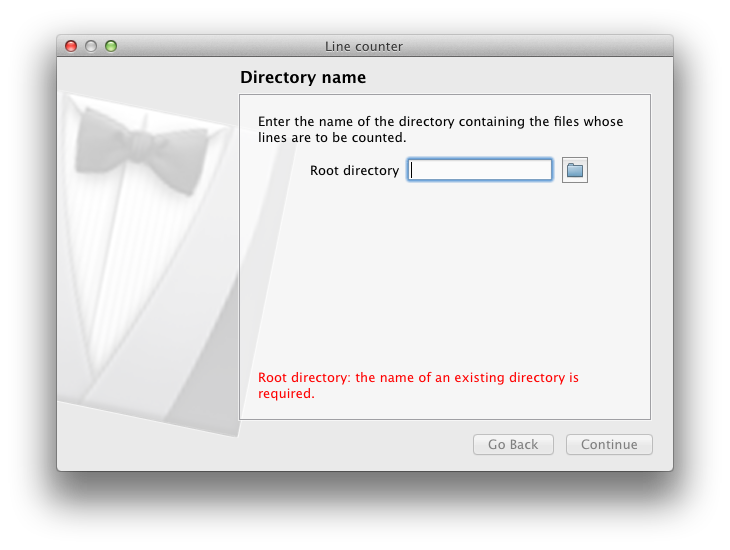
The interesting part of the page is the
FilesystemLocationEditor arranged in a Form.
The MessageArea towards the bottom of the page reflects the
fact that the directory name is currently empty. Because the page is invalid
the Continue button (or Next button depending on your platform) is
disabled. It will be automatically enabled as soon as the user enters the name
of an existing directory.
The second wizard page is shown below after we have added a *.py filter.
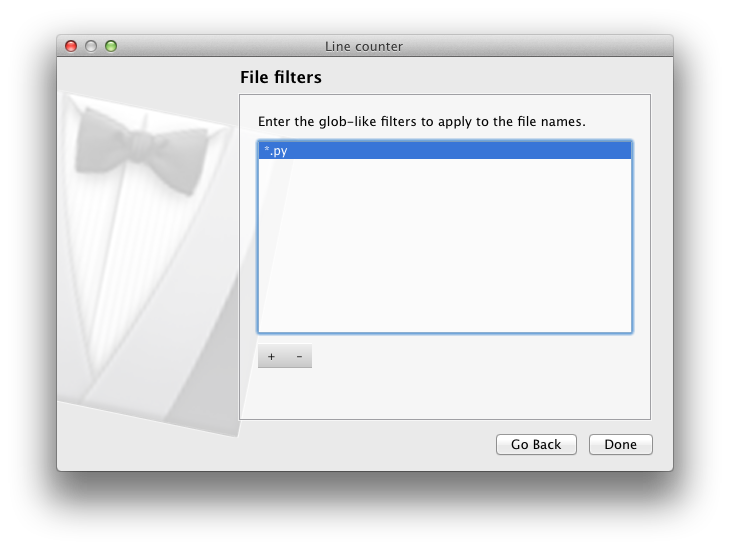
The main component in this page is the central ListEditor
where the filters can be edited.
The next part of the model/view is the populate() method, the body of which
is shown below.
        wizard = self.wizard(self)

        return wizard.execute()
The first of the above lines calls the Wizard factory to
create a wizard that implements the IWizard interface.
The second of the above lines calls the execute() method
of the IWizard interface to allow the user to interact with
it. The populate() method then returns True if the user didn’t cancel.
The next part of the model/view is the perform() method which does the
actual work of counting the lines in the files. The first section of the
method, shown below, builds up the full list of files taking any filters into
account.
        filepaths = []

        for dirpath, _, filenames in os.walk(self.root_directory):
            if len(self.filters) == 0:
                # There are no filters so look at each file.
                for filename in filenames:
                    filepaths.append(os.path.join(dirpath, filename))
            else:
                # Apply the filters.
                for filter in self.filters:
                    filepaths.extend(glob.glob(os.path.join(dirpath, filter)))
The next section of the method, shown below, reads each file and adds the number of lines in each to a running total.
        line_count = 0

        for filepath in filepaths:
            try:
                with open(filepath) as fh:
                    line_count += len(fh.readlines())
            except UnicodeDecodeError:
                # Assume it is a binary file and ignore it.
                pass
            except EnvironmentError as err:
                Application.warning("Line counter",
                        "There was an error reading the file <tt>{0}</tt>."
                                .format(filepath),
                        detail=str(err))
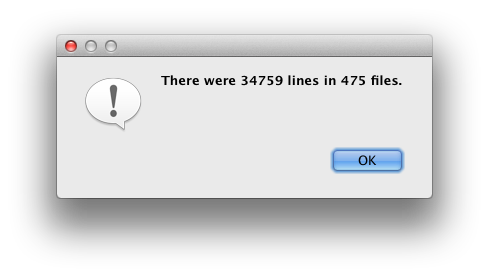
The final section of the method, shown below, displays the total line count and
the number of files as a dialog using the
information() static method.
        Application.information("Line counter",
                "There were {0} lines in {1} files.".format(line_count,
                        len(filepaths)))
An example of the output produced is shown below.
That completes our walk through of the LineCounter model/view class.
Note
This example uses a controller that is created automatically. What if we needed to use a specialised controller, perhaps to perform some additional validation?
This is most easily done (in a simple utility such as this) by combining it
with the existing model/view. In other words, LineCounter should be
sub-classed from WizardController instead of
Model. All you need to do then is to provide
LineCounter with an implementation of
validate_page().
The final section of the whole utility is shown below.
app = Application()

# Create the model/view.
line_counter = LineCounter()

# Populate the model with input from the user.
if line_counter.populate():
    # Perform the task, i.e. count the lines.
    line_counter.perform()
Here we create the toolkit specific Application instance
required by every GUI based application, create the instance of our model/view,
populate the model, and (if the user didn’t cancel) perform the task of
counting the lines of the specified files.