Tutorial
pyqtdeploy is itself deployable and the root of the source package
contains an appropriate pyqtdeploy.pdy project file. In this section we
use this as the basis of explaining pyqtdeploy‘s graphical user
interface. (Also included is a corresponding pyqtdeploycli.pdy project
file for pyqtdeploycli. This demonstrates the deployment of a
non-GUI application.)
Choosing a Directory Structure
In order to deploy an application you have to assemble the various parts, e.g. target specific versions of Python, PyQt and sip. In deciding how to organise this you might consider the following:
- consistency so that you can easily find things
- avoiding hardcoded paths in project files to make it easier to share them with other developers
- supporting multiple targets and easily switching between them. For example you may be developing a mobile application that will be deployed to iOS and Android but are doing the main development and testing under Linux.
We now describe a directory structure that addresses these issues. It is only a recommendation and not a requirement. Note that (with care) it is possble to create project files that are portable between all supported platforms.
There is a top-level directory called pyqtdeploy. Everything else will be
placed in this directory or one of its sub-directories. It does not matter
where this directory is in the filesystem. You may create it in your home
directory or you may place it in a location where it can be shared with other
users. Once it is set up there is no need for it to be updated as part of the
process of deploying an application. In other words, a shared pyqtdeploy
directory can be read-only for all users.
Within the pyqtdeploy directory we create a system root directory for each
target we are deploying to. For example we might create directories called
sysroot-linux, sysroot-ios and sysroot-android. We can use an
environment variable to point to the particular target system root directory we
wish to use. If we then use that environment variable in the project file then
we can switch between targets without having to update the project file and so
makes it possible to share the project file with other users.
pyqtdeploy has the option to run qmake which itself is
target-specific and may be installed in different locations for different
users. We therefore create a symbolic link in each target-specific system root
directory that points to the corresponding target-specific Qt installation.
For example if you have installed the combined iOS and Android Qt binary
installer in its default location then the iOS Qt directory will be
$HOME/QtX.Y.Z/X.Y/ios and the Android Qt directory will be
$HOME/QtX.Y.Z/X.Y/android_arm7 (where X.Y.Z is the version number of
Qt).
This approach can be extended further by creating a symbolic link to the target specific system root directory and setting the environment variable to the location of the symbolic link. To switch between targets you then just change the destination of the symbolic link. If you develop with multiple terminal windows open then this has the advantage is that you only need to make the one change and it will take effect in all terminals - otherwise you need to remember to update the environment variable in each of your terminals.
Throughout this documentation it is assumed that you have set an environment
variable SYSROOT which points to your target specific root directory
(possibly via a symbolic link).
Scoped qmake Variables
A pyqtdeploy project has several places where it is possible to
enter the values of certain qmake variables (specifically QT,
CONFIG, SOURCES, DEFINES, INCLUDEPATH and LIBS) which will
then be included in the generated .pro file. pyqtdeploy goes to
some trouble to make it possible to create project files that can be used
without modification across all supported host platforms.
To this end the values of these qmake variables may be scoped with
any supported qmake scope. The most common requirement is to
distinguish between Windows and non-Windows targets, therefore the most common
scopes used will be win32 and !win32.
The scope is specified immediately before the value and separated by a #.
For example, lets say that your application is targeted at all supported
desktop targets and requires SSL support. On Windows you want to link against
a copy of the OpenSSL libraries that you have statically compiled and installed
the header files and libraries in the include and lib sub-directories
of the SYSROOT directory. On Linux and OS X you want to dynamically
link against the system SSL libraries. Setting the INCLUDEPATH and
LIBS variables to the following values will ensure that the generated code
will compile as you require on all platforms:
INCLUDEPATH     win32#$SYSROOT/include
LIBS            win32#$SYSROOT/lib -lssl -lcrypto
Creating a pyqtdeploy Project
The first stage of deploying a PyQt application is to create a pyqtdeploy project for it by running:
pyqtdeploy myproject.pdy
This will create a new project, or open an exiting one if the file
myproject.pdy already exists. A project is simply a file with a .pdy
extension.
A GUI will be displayed which consists of a File menu and a set of tabbed
pages that handle different aspects of the application’s specification and
building.
The File menu contains the usual set of options to create a new project,
open an existing project, save a project and rename a project.
For the remainder of this tutorial we will use the pyqtdeploy.pdy project
file included in the root of the source package.
Defining the Application Source
Python applications are usually structured in one of the following ways:
- a single standalone executable script that is installed in a
bindirectory somewhere - a package installed in
site-packageswith a separate executable script installed in abindirectory - a package installed in
site-packageswith a separate executable script that is automatically generated bysetuptools. The script calls an entry point in the package. An entry point is the name of a module in the package and the name of a callable within the module separated by a:.
pyqtdeploy itself uses the setuptools based structure.
The tab for defining the application source is shown below.
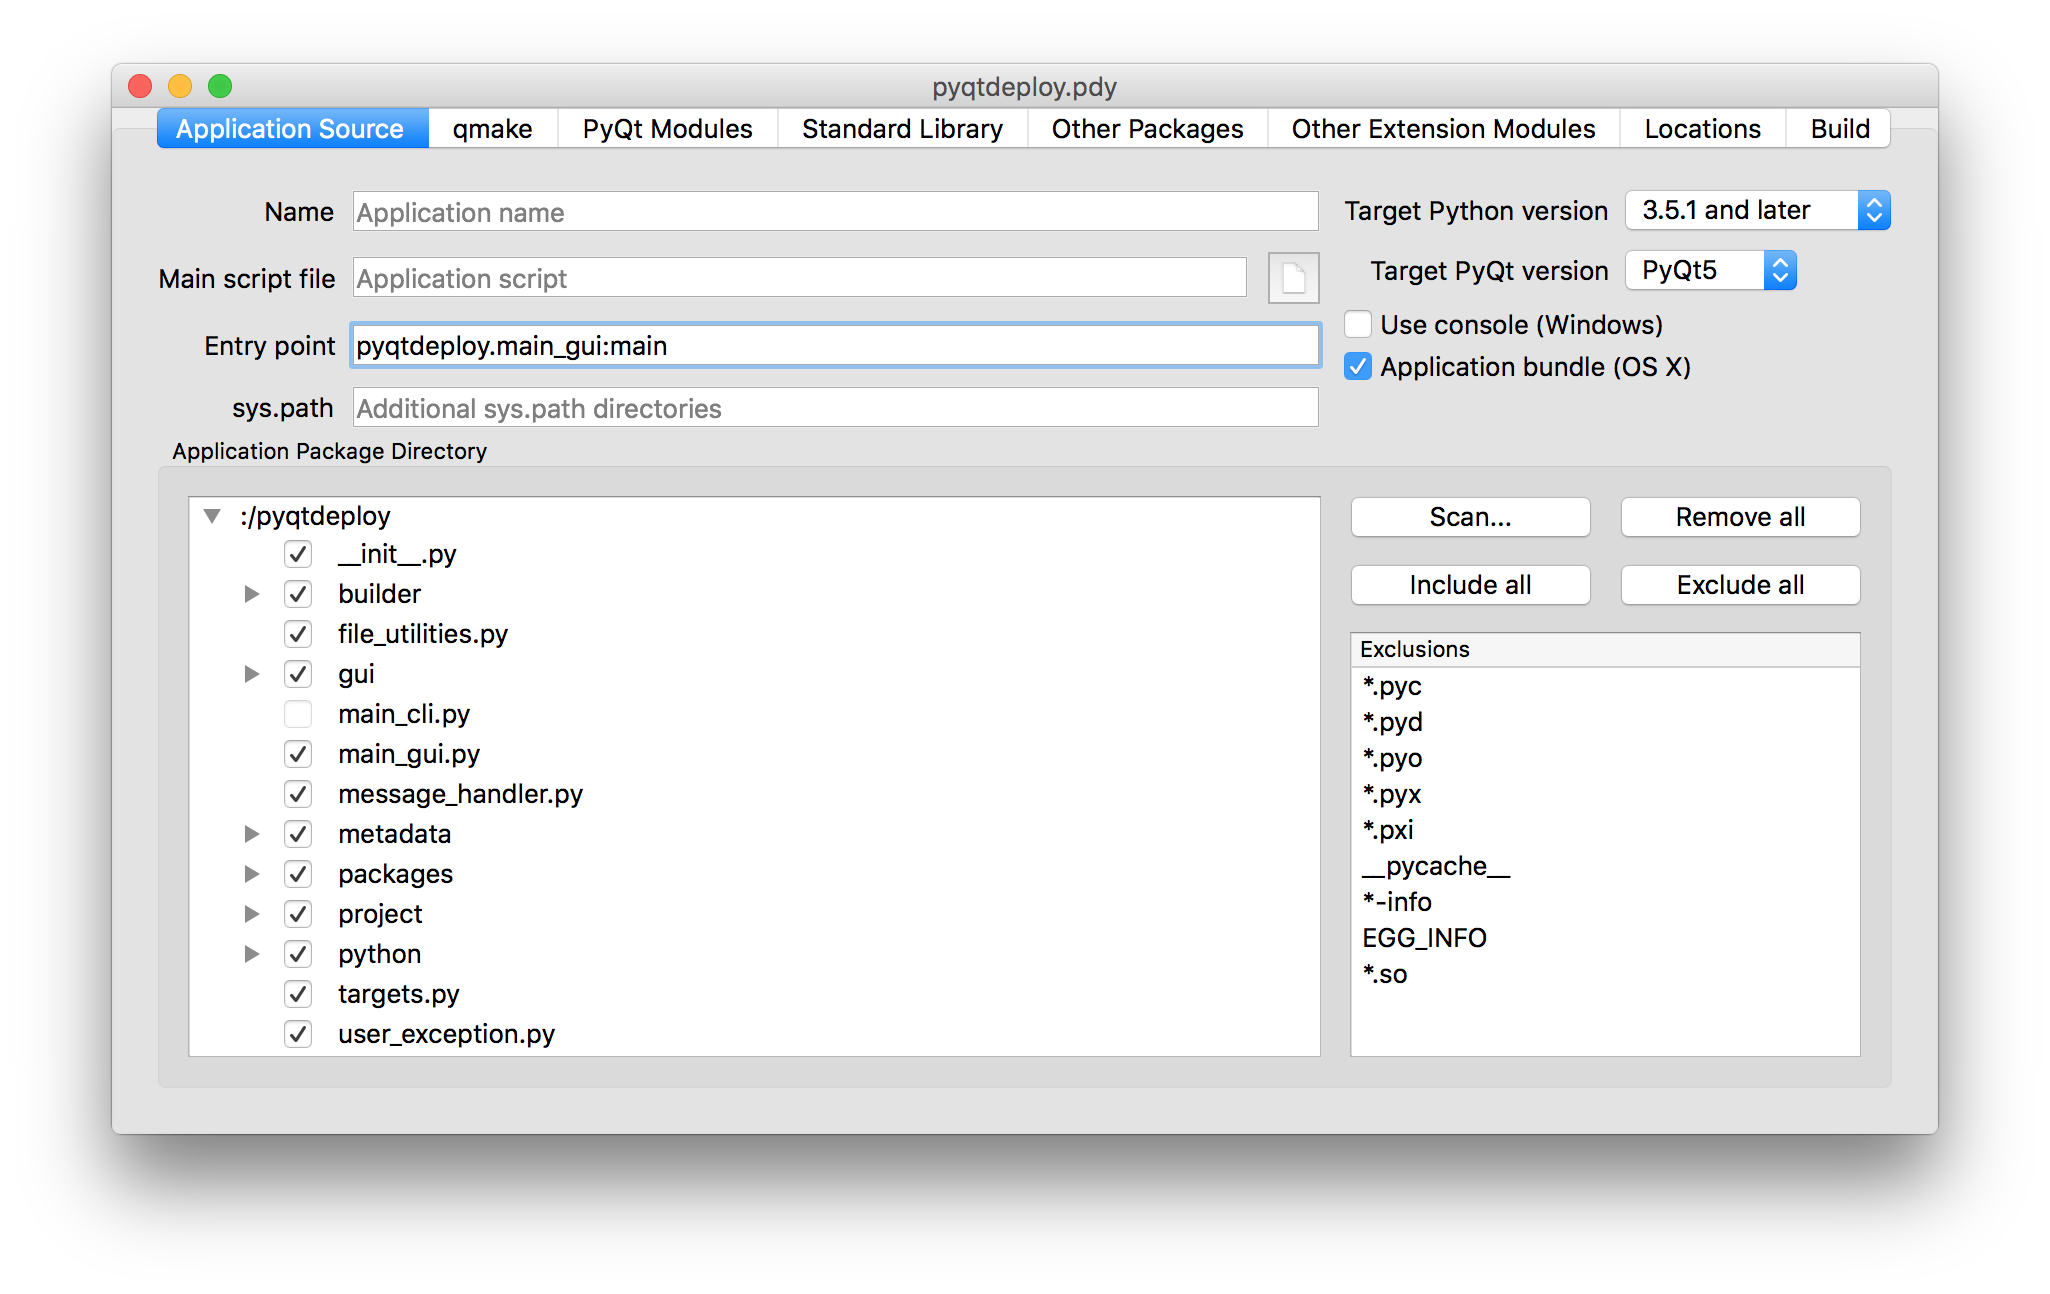
- Name
- is used to specify the name of the final application executable. If it is not specified then it is derived from the name of the main script file. If the application does not have a main script file then the name is derived from the name of the application package.
- Main script file
is used to specify the name of the executable Python script used to invoke the application. It should not be specified if an entry point is specified.
Note
Whenever a file or directory is specified, pyqtdeploy always saves its name relative to the directory containing the project file if possible. In this particular example the
pyqtdeploypackage directory is in the same directory as thepyqtdeploy.pdyproject file. Also, whenever a file or directory name is entered, pyqtdeploy allows the embedding of environment variables which will be expanded when necessary. ThePDY_PY_MAJOR,PDY_PY_MINORandPDY_PY_MICROpseudo-environment variables can also be used which will be expanded to the relevant parts of the target Python version.- Entry Point
- is used to specify the entry point of a
setuptools-based application. It should not be specified if a main script file is specified. - sys.path
is used to specify additional directories, ZIP files and eggs that will be added to
sys.path. By default pyqtdeploy generates an application that does not support the importing of packages or extension modules that are not embedded in the application. Indeed, some platforms specifically disallow this. However there are circumstances where this ability is desired:- you need to use an extension module that does not support being statically compiled
- you allow users to write Python code that is imported by the application to configure or extend its functionality.
The path is specified as a space separated list of directories. Single or double quotes may be used to embed spaces in directory names. Environment variables (specified using the standard UNIX notation) are expanded when the application is run. Any relative directory names are assumed to be relative to the directory containing the application executable. UNIX path separators should be used - the application will automatically do the appropriate conversions when running on Windows.
pyqtdeploy also supports the dynamic loading of extension modules that are installed adjacent to the application executable (i.e. in the same directory as the application executable). This is useful for packages that are implemented as a combination of pure Python modules and extension modules where the extension modules do not support being statically compiled. The pure Python modules would be added just like any other Python package (see Adding Other Packages). The extension module must be named according to its normal position in the package structure.
For example, suppose we have a package called
foowhich contains pure Python modules__init__.pyandbar.pyand a dynamically loaded extension modulebaz.so. (The extension module would be calledbaz.pydon Windows.) When used with the deployed application the module must be installed asfoo.baz.so(orfoo.baz.pyd) in the same directory as the application executable.On OS X an extension module will also be searched for in the
PlugInsandFrameworkssub-directories of the directory containing the application executable.Adjacent extension modules do not require
sys.pathto be set.Note
If you wish to allow the importing of external extension modules then you will also need to ensure that Python has been built with this enabled. See the
--enable-dynamic-loadingoption of theconfigureaction.- Target Python version
- is used to specify version of Python that you are targetting.
- Target PyQt version
- is used to specify that the application is either a PyQt4 or a PyQt5 application.
- Use console (Windows)
- is checked if the application should use a console. Specifically it adds
consoleto the value ofCONFIGin the generated.profile and only affects Windows applications. Normally this is handled automatically and a console is used only if the application does not use any GUI related PyQt module. However it may be usefull during testing of deployed GUI applications to ensure that tracebacks (e.g. about missing modules) are captured and displayed. - Application bundle (OS X)
- is checked if the application should be built as a bundle and only affects OS X applications. It would normally be unchecked for command line (i.e. non-GUI) applications.
- Application Package Directory
contains the hierachy of files and directories that implement the application package and any associated data. It is populated by clicking the Scan... button. Each file or directory can then be checked if it is to be included in the package. Note that if the main script file is a part of the application package then it’s entry must be explicitly unchecked (i.e. excluded).
Note
Non-Python (i.e. data) files can also be included in the package. An application typically accesses such files by using the
QFileInfo.absolutePath()function on the__file__attribute of a module to obtain the name of the directory containing the data file. This approach will also work with deployed applications so long as the file is accessed using theQFileclass (rather than the standard Python file access functions). However QML files require slightly different treatment as their locations are specified using a URL.- Scan...
- is clicked to specify the name of the directory containing the Python package that implements the application. (If the application consists of a single script then you would not use this.) The hierachy will be scanned for all files and directories that don’t match any of the specified exclusions and will be displayed in the Application Package Directory.
- Remove all
- is clicked to remove all the scanned files and directories.
- Include all
- is clicked to check all scanned files and directories so that they are included in the application package.
- Exclude all
- is clicked to uncheck all scanned files and directories so that they are excluded from the application package.
- Exclusions
- is used to specify the list of glob-style patterns that are applied to the scanned files and directories. Those items that match are then completely ignored. To edit the list just double-click on the entry to modify or delete. To add a new entry just double-click the list after the last entry.
Additional qmake Configuration
The tab for defining additional qmake configuration information is shown below.
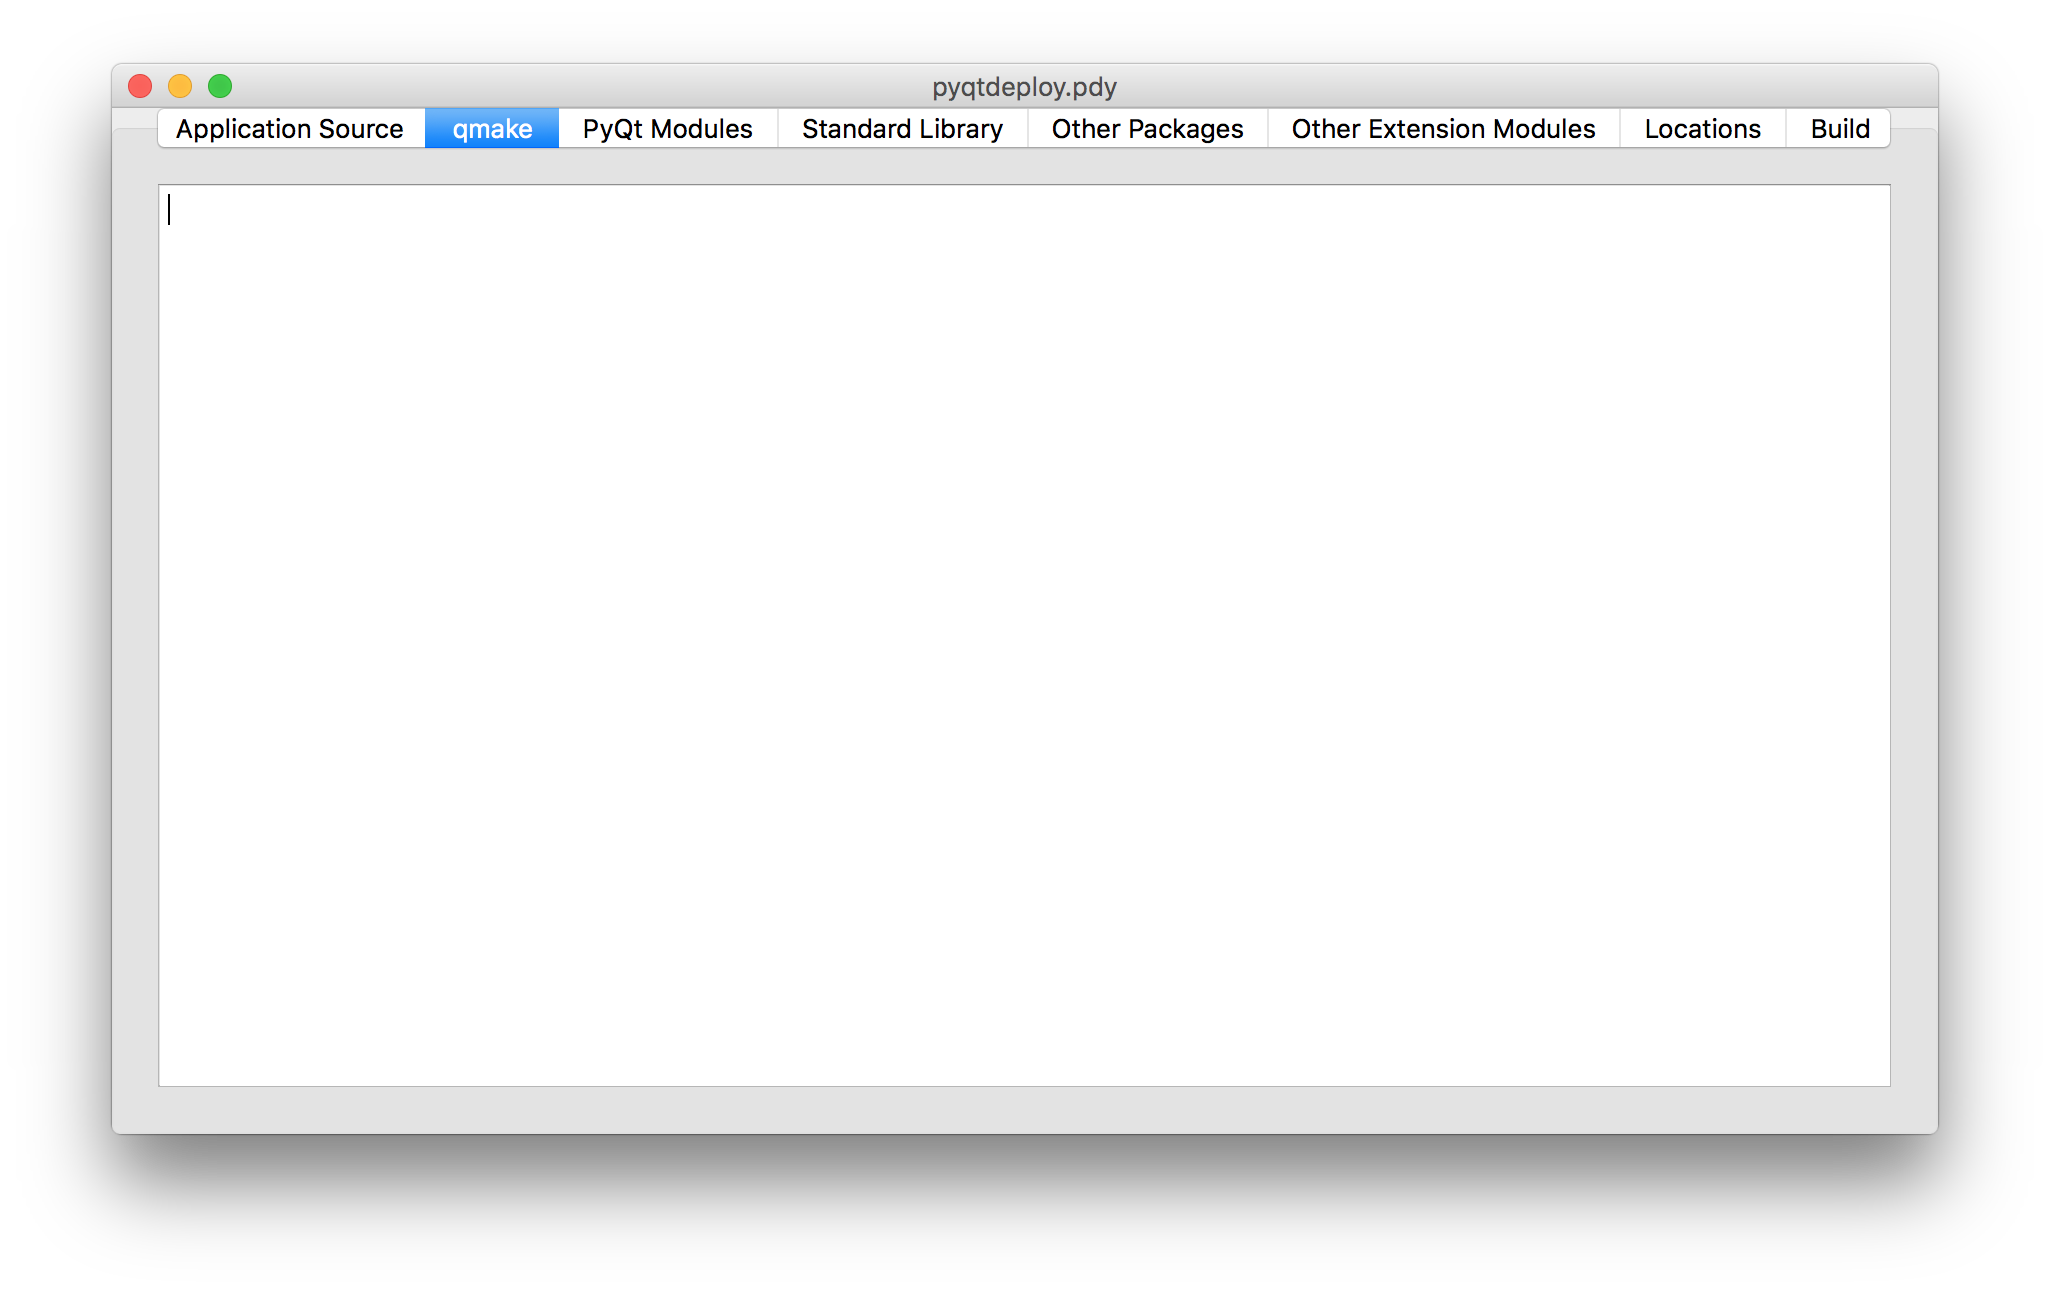
Any text entered here is added to the end of the .pro file generated by
pyqtdeploy.
Defining the PyQt Modules
The tab for defining the PyQt modules used by the application is shown below. If the application is a PyQt4 application then the PyQt4 modules will be shown instead.
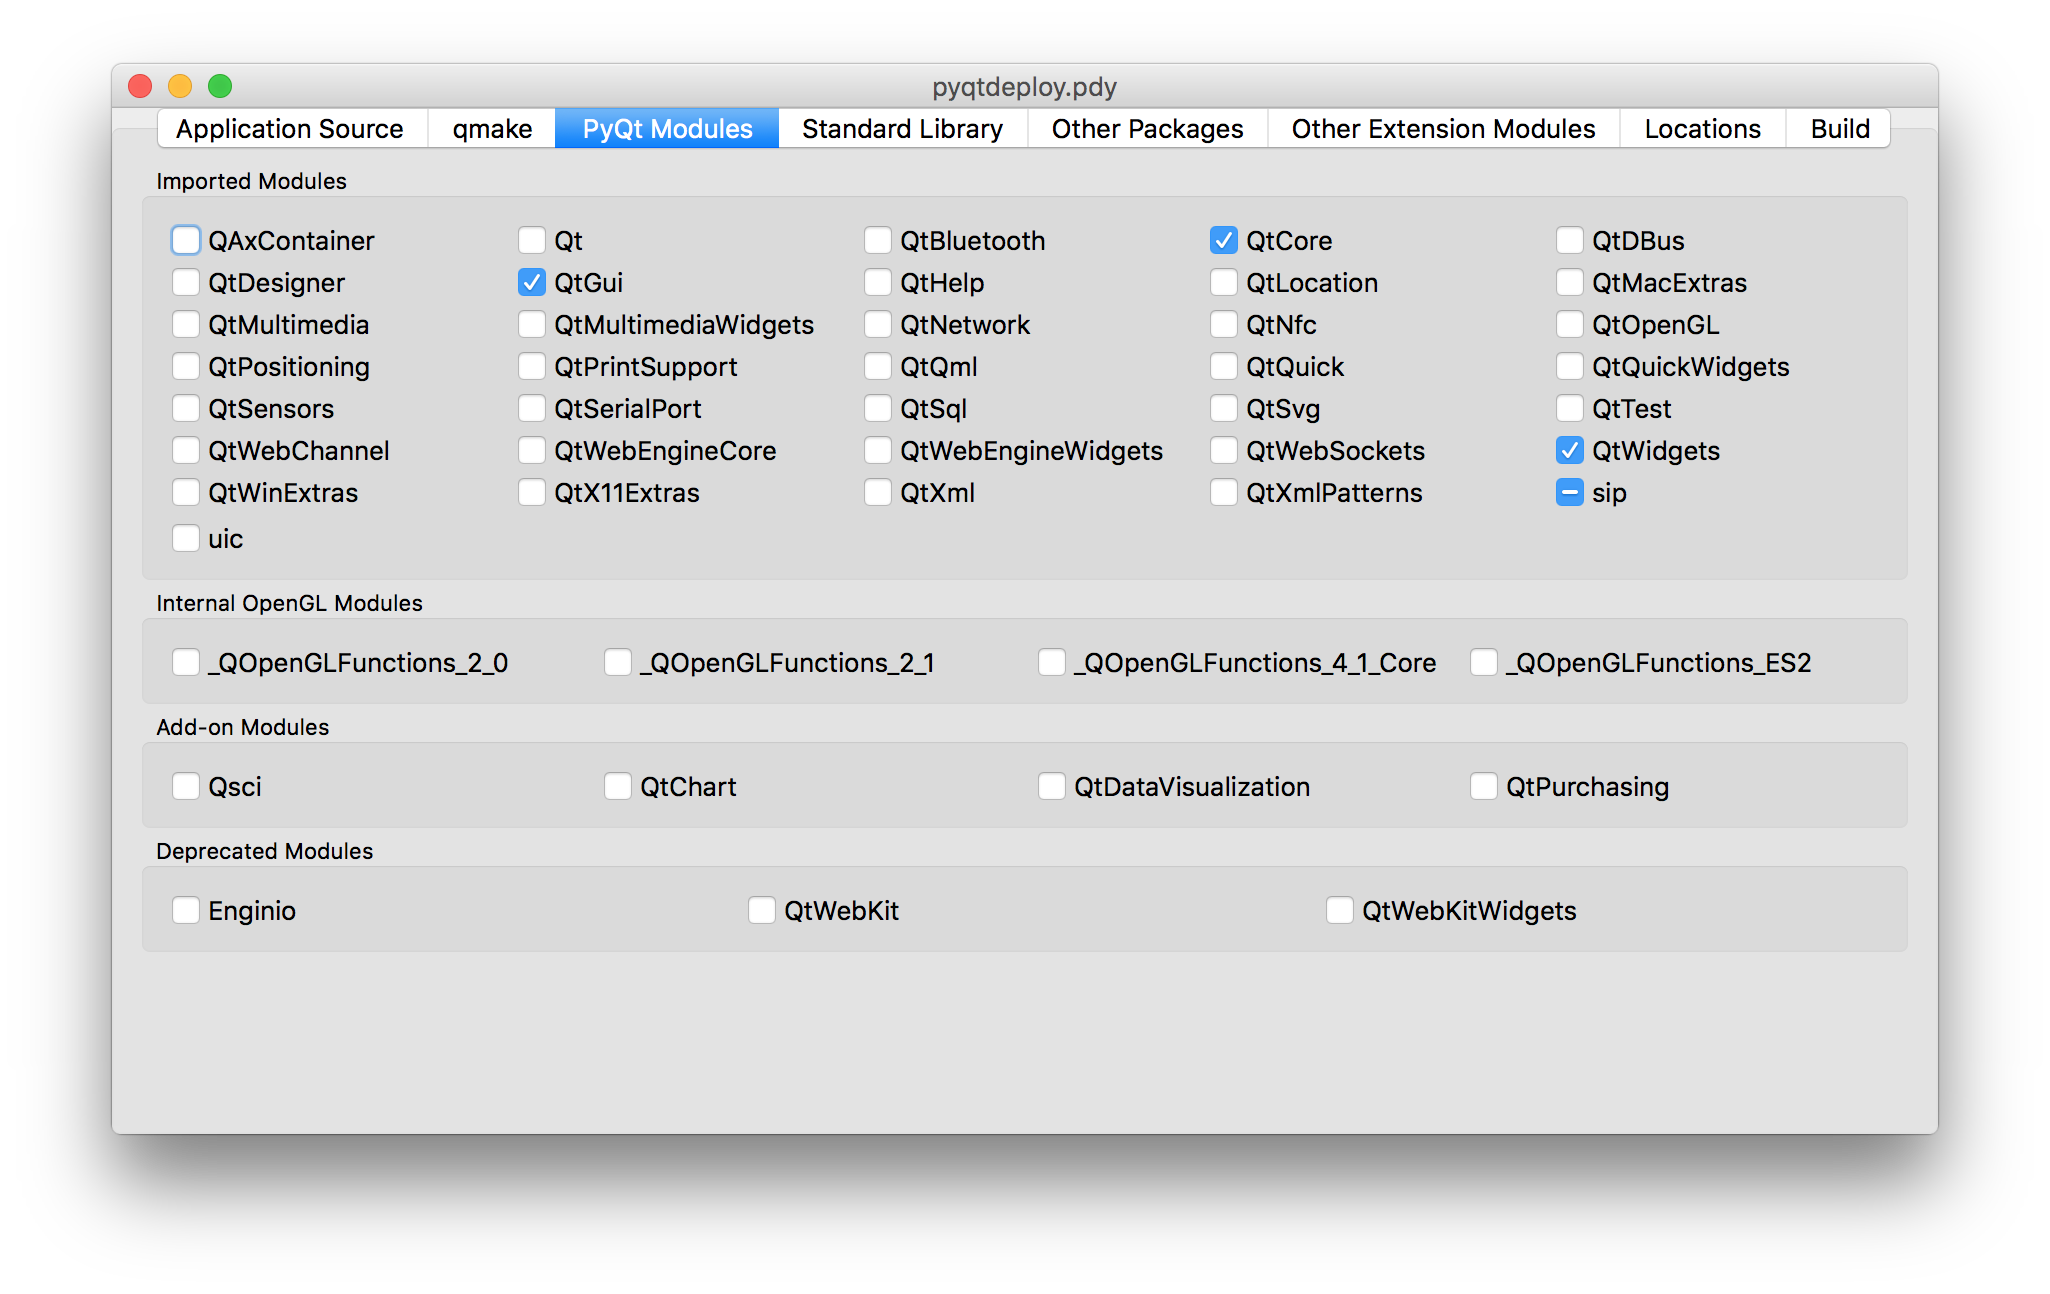
Simply check all the PyQt modules that are used.
pyqtdeploy understands the dependencies between the different PyQt
modules and will automatically check any additional modules that are required.
Therefore the same effect could have been achieved by only specifying the
QtWidgets module. However it is better to explicitly specify all
the modules imported directly by the application.
Note
These modules must be compiled statically. If you plan to use a separately deployed copy of PyQt that will be dynamically loaded by your application then do not specify any modules here.
Adding Standard Library Packages
The tab for defining the Python standard library packages used by the application is shown below.
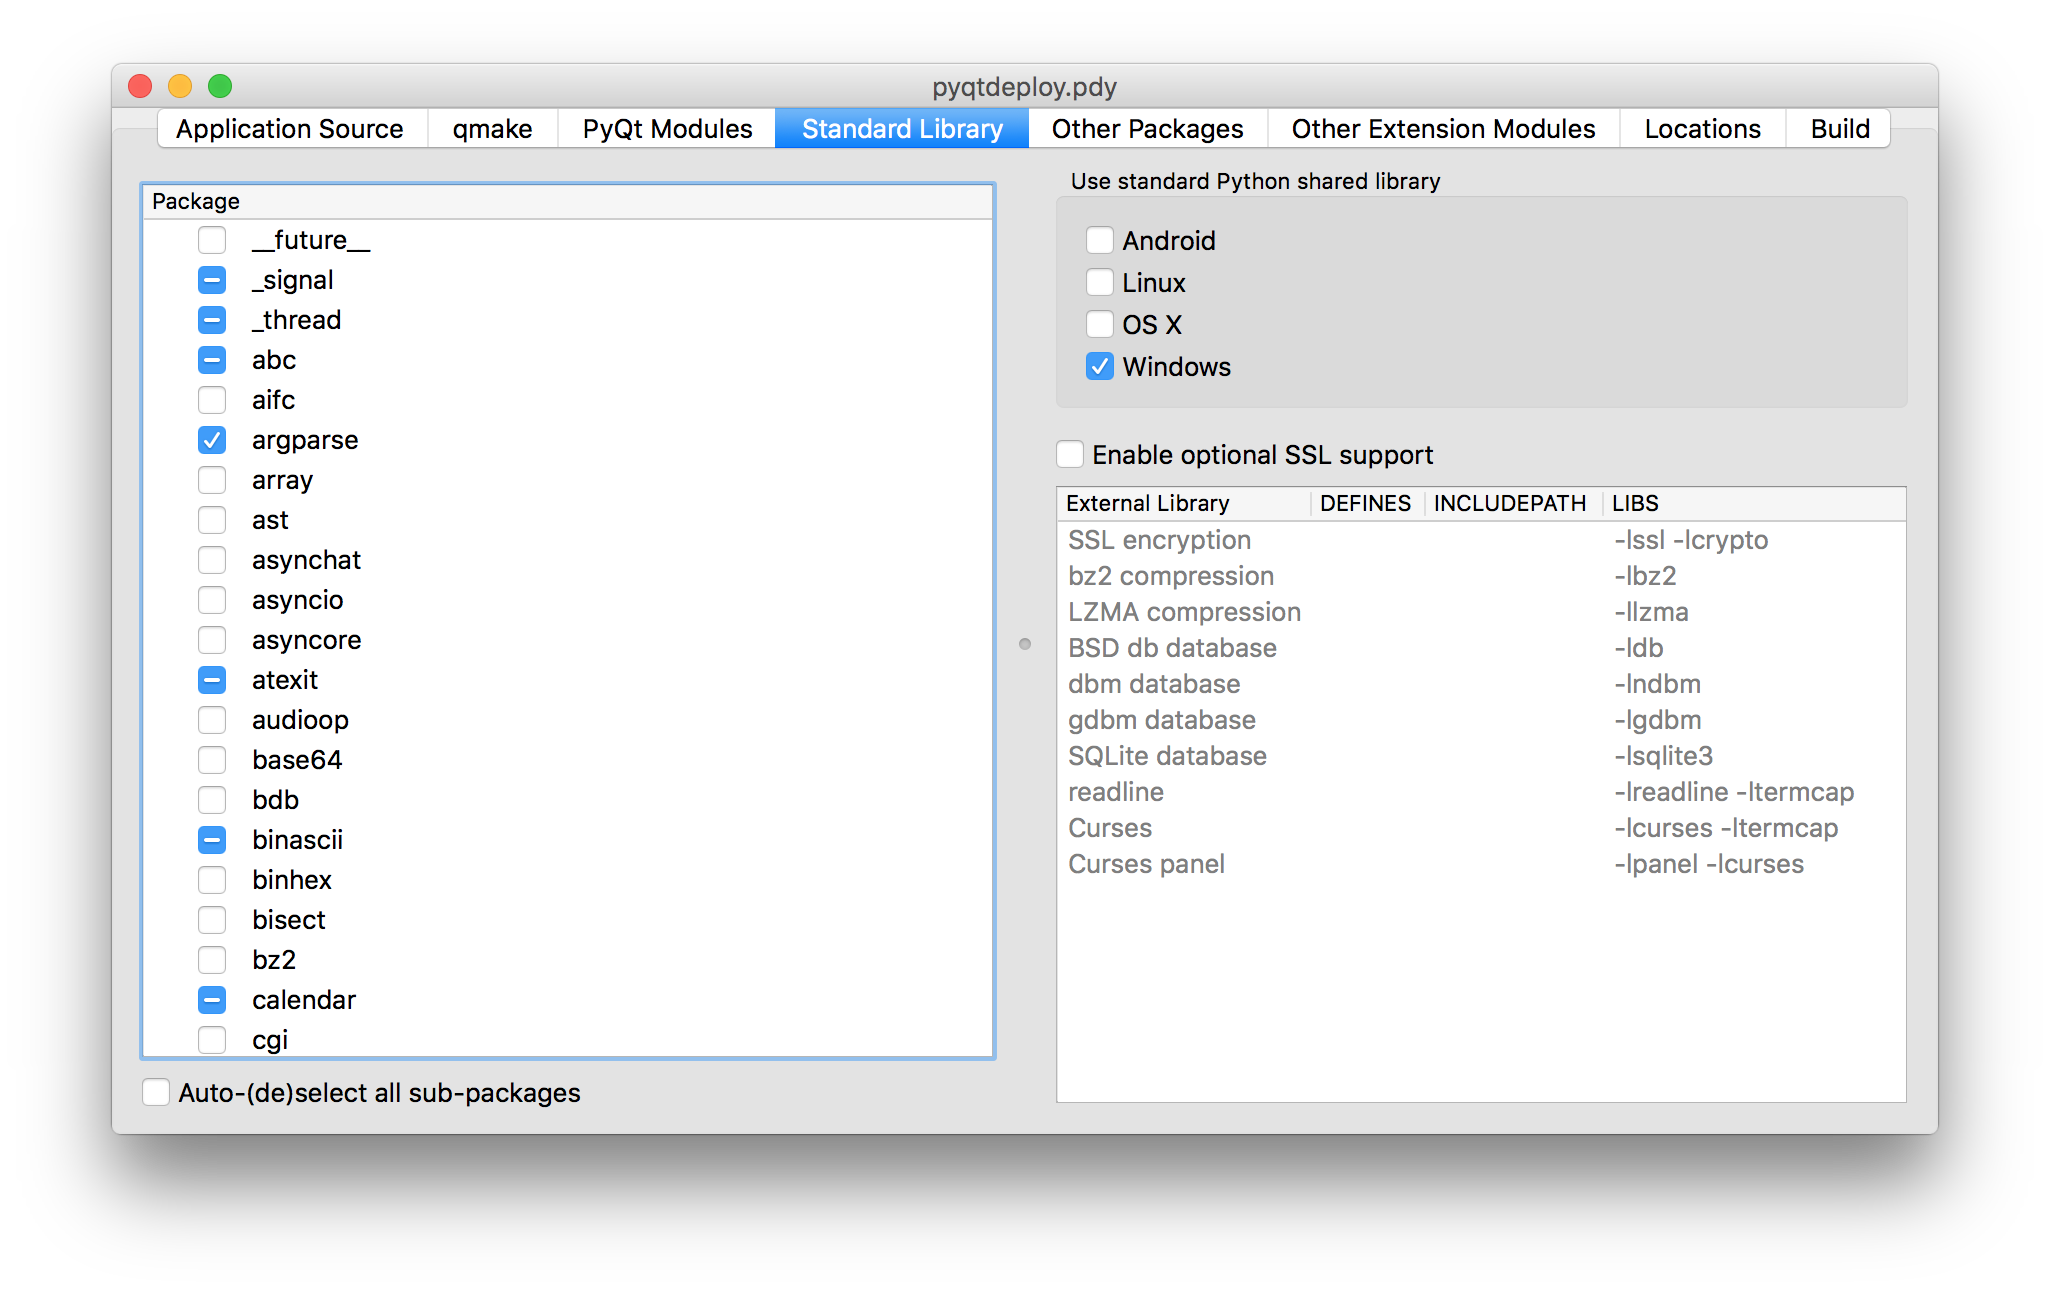
- Package
is used to specify each of the target Python version’s standard library packages that is explicitly imported by the application. Each package can be in one of three states:
- checked meaning it is explicitly imported by the application
- partially checked meaning it is implicitly imported by the application because an explicitly imported package depends on it, or the Python interpreter itself imports it
- unchecked meaning it is not needed by the application.
You should always check a package if the application explicitly imports it, even if it is already shown as partially checked.
Here we have checked the
argparsemodule and the_thread,abc,array,atexitandcalendarmodules have been partially checked automatically.- Auto-(de)select all sub-packages
- is used to specify that, when a package is explicitly imported, all of its sub-packages and modules are also automatically explicitly imported.
- Use standard Python shared library
- is used to specify, on a per-platform basis, if the standard Python shared library is to be used instead of a specially compiled shared or static library. When selected pyqtdeploy assumes that all of the Python standard library that is implemented as C extension modules is implemented in the shared library. The default is to enable this for Windows. See also Windows and Dynamic Loading of Extension Modules
- Enable optional SSL support
- is used to specify if the application requires SSL support to be enabled.
Several packages in the Python standard library will enable SSL related
functionality if it is available - even if your application doesn’t itself
import the
sslmodule. Note that you still have to provide appropriately compiled SSL libraries and header files.
The remaining part of the tab relates to non-system libraries that may need to
be linked with the application. Typically they correspond to packages in the
standard library that wrap them. If a library is required, because a package
that uses it is required, then the entry for the library will be enabled. The
corresponding DEFINES, INCLUDEPATH and LIBS fields will also be
editable allowing those values to be set appropriately. For example, if you
have built a static copy of the library then you may need to specify the
location of the library’s header files in the INCLUDEPATH field and add a
-L flag to the LIBS field if the library is not installed in locations
that will be found automatically by the compiler and linker.
pyqtdeploy does not import any package from the standard library that uses any of these libraries and so they are all disabled.
Adding Other Packages
The tab for defining additional packages used by the application is shown below.
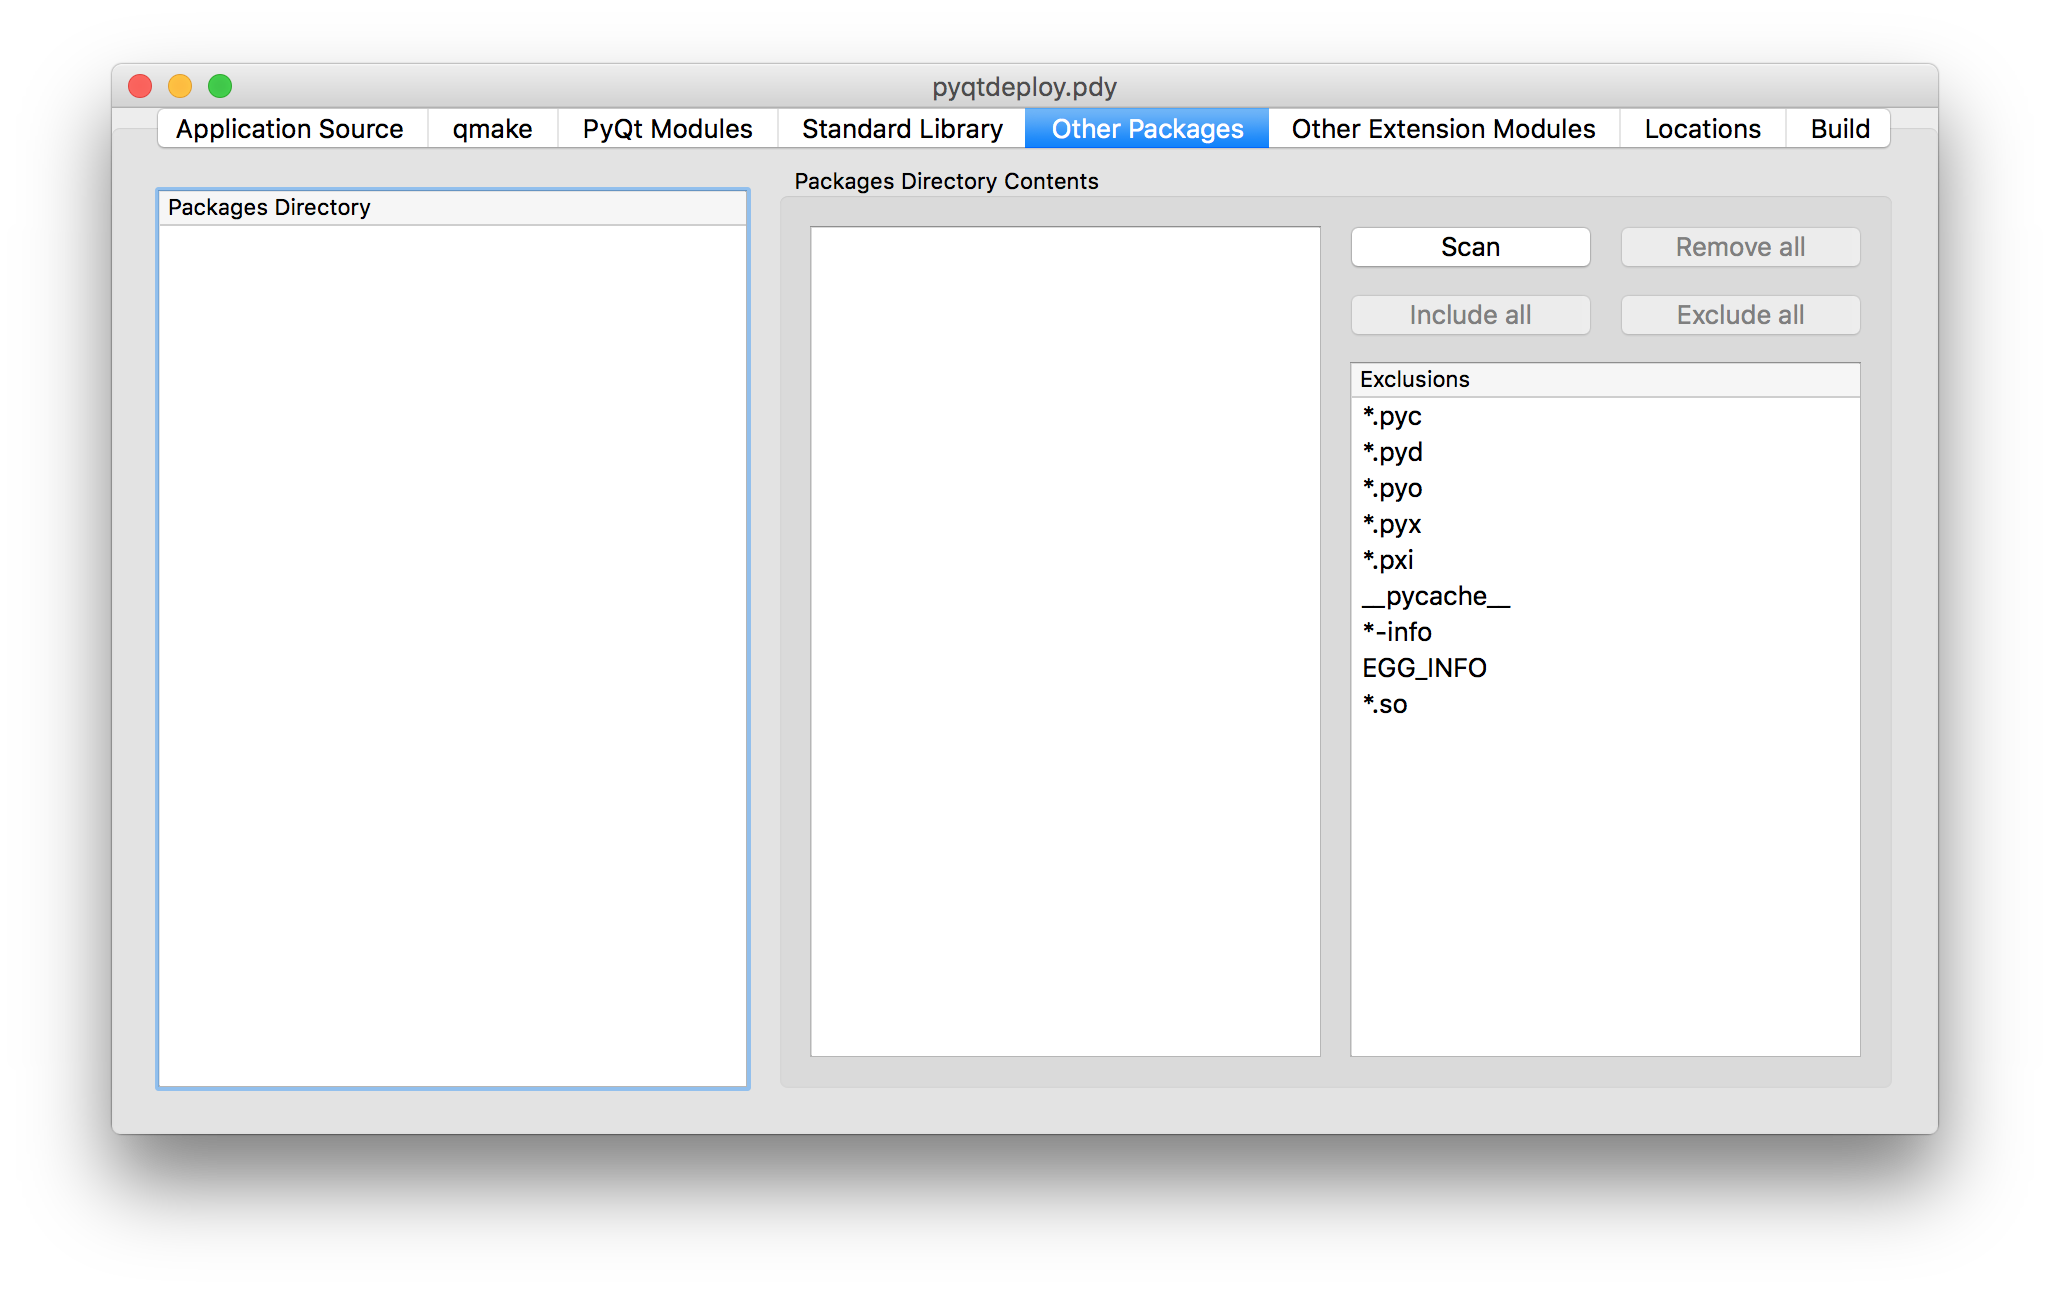
This tab is used to scan a number of directories containing additional Python packages (i.e. other than those that are part of the Python standard library). You then specify which individual modules are needed, either implicitly or explicitly, by the application.
To edit the list of directories just double-click on the entry to modify or delete. To add a new entry just double-click the list after the last entry.
In many cases you will want to add the site-packages directory of your host
Python interpreter, i.e. the interpreter being used to develop the application,
where all the additional packages required by your application are already
installed.
pyqtdeploy does not use any additional Python packages.
Adding Other Extension Modules
The tab for defining additional C extension modules used by the application is shown below.
This tab is used to specify any additional C extension modules (i.e. other than those that are part of the Python standard library or PyQt) that will be statically linked into the application.
These extension modules may already have been built, but this tab can also be used to compile them from source. You would only normally do this for simple extension modules typically made up of a single source file.
- Name
- is the full (dot separated) package name of the extension module.
- QT
- are the values added to the qmake
QTvariable. - CONFIG
- are the values added to the qmake
CONFIGvariable. - SOURCES
are the names of the source files that will be compiled to create the extension module. The file name extension determines which qmake variable the file is added to:
.asmfiles are added toMASMSOURCES.hfiles are added toHEADERS.javafiles are added toJAVASOURCES.lfiles are added toLEXSOURCES.pyxfiles are added toCYTHONSOURCES.yfiles are added toYACCSOURCES.
Files with any other extension are added to
SOURCES.- DEFINES
- are the values added to the qmake
DEFINESvariable. - INCLUDEPATH
- are the values added to the qmake
INCLUDEPATHvariable. - LIBS
- are the values added to the qmake
LIBSvariable. If the extension module has already been compiled then this is used to link it with the application.
To edit the list just double-click on the entry to modify or delete. To add a new entry just double-click the list after the last entry.
pyqtdeploy does not use any additional C extension modules.
Defining File and Directory Locations
The tab for defining the locations of various files and directories needed by pyqtdeploy is shown below.
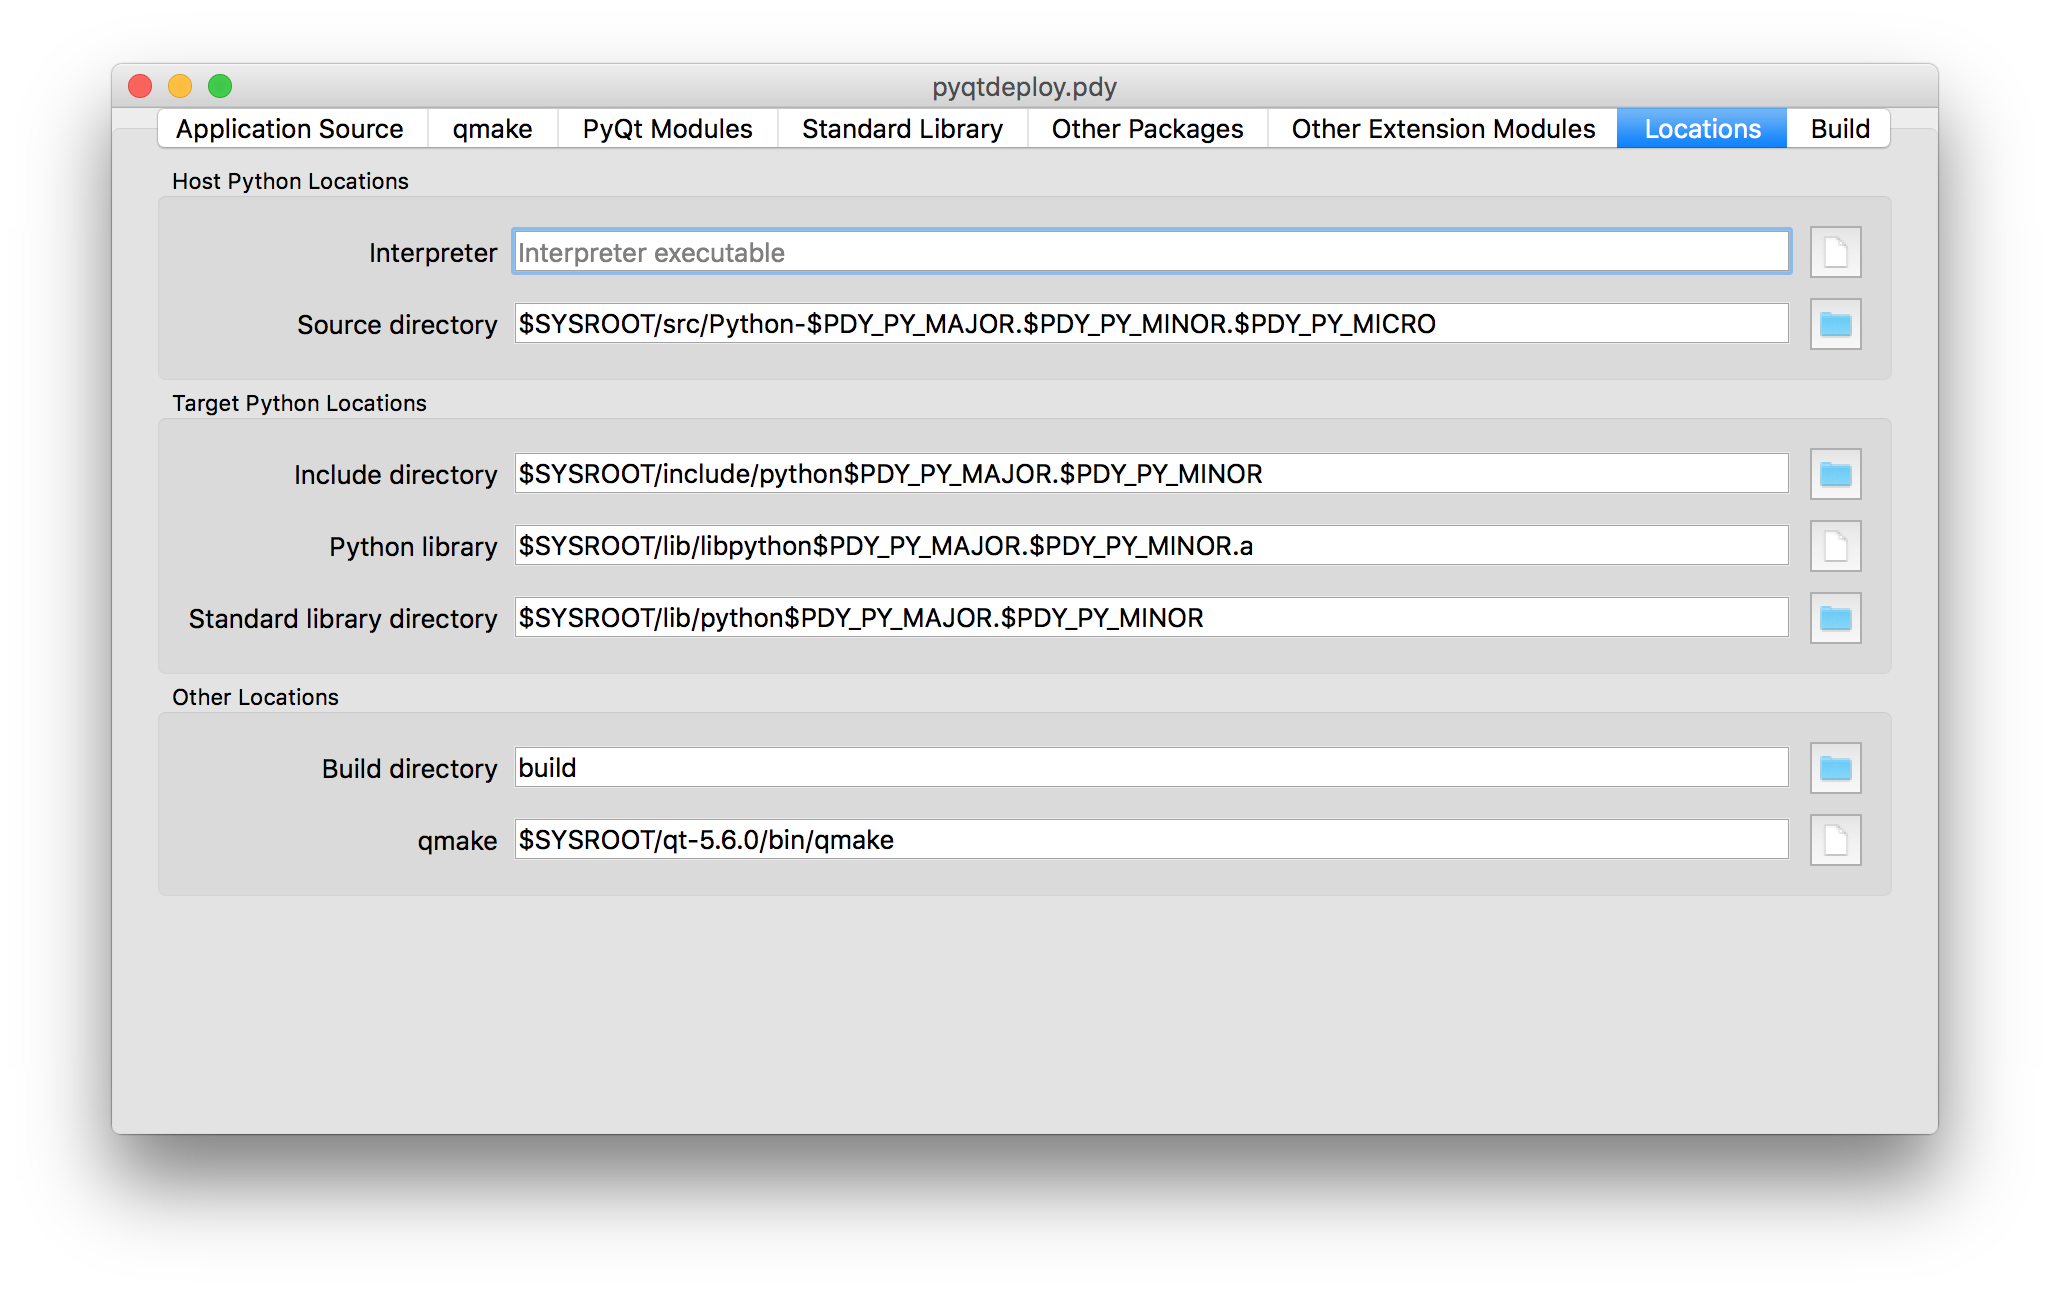
- Interpreter
- is used to specify the host Python interpreter used to compile all of
the Python modules used by the application. This must be the same version
as the target Python installation to ensure that the compiled bytecode
can be executed by the deployed application. (Of course if you are not
cross-compiling the application then the host and target Python
installations can be the same.) On Windows any trailing version number
will be automatically stripped. This makes it easier to create project
files that are portable across all platforms. If it is not specified then
pyqtdeploy will use a platform-specific default. On Windows it
will inspect the registry to try and find the required version of Python,
on other platforms it assumes that the required version is on
PATH. It can be overridden by the--interpretercommand line option of pyqtdeploycli. - Source directory
- is used to specify the name of the directory containing the Python source
code. It can be overridden by the
--source-dircommand line option of pyqtdeploycli. - Include directory
- is used to specify the name of the directory containing the target Python
installation’s
Python.hfile. It can be overridden by the--include-dircommand line option of pyqtdeploycli. - Python library
- is used to specify the name of the target Python interpreter library. Note
that in this example the library is specified as a UNIX archive, however
pyqtdeploy will interpret it correctly on Windows. It can be
overridden by the
--python-librarycommand line option of pyqtdeploycli. - Standard library directory
- is used to specify the name of the directory containing the target Python
interpreter’s standard library. It can be overridden by the
--standard-library-dircommand line option of pyqtdeploycli. - Build directory
- is used to specify the name of the directory into which all the code
generated by pyqtdeploy will be placed. It will be created
automatically if necessary. It can be overridden by the
--outputcommand line option of pyqtdeploycli. - qmake
- is used to specify the name of the qmake executable that is
optionally used to build a
Makefilefor the application.
Building the Application
Normally building an application is done from the command line. However during the debugging of the deployment it is convenient to be able to complete the whole build process (generating code, running qmake, running make and running the final application executable) from within the GUI.
The tab for building the application is shown below.
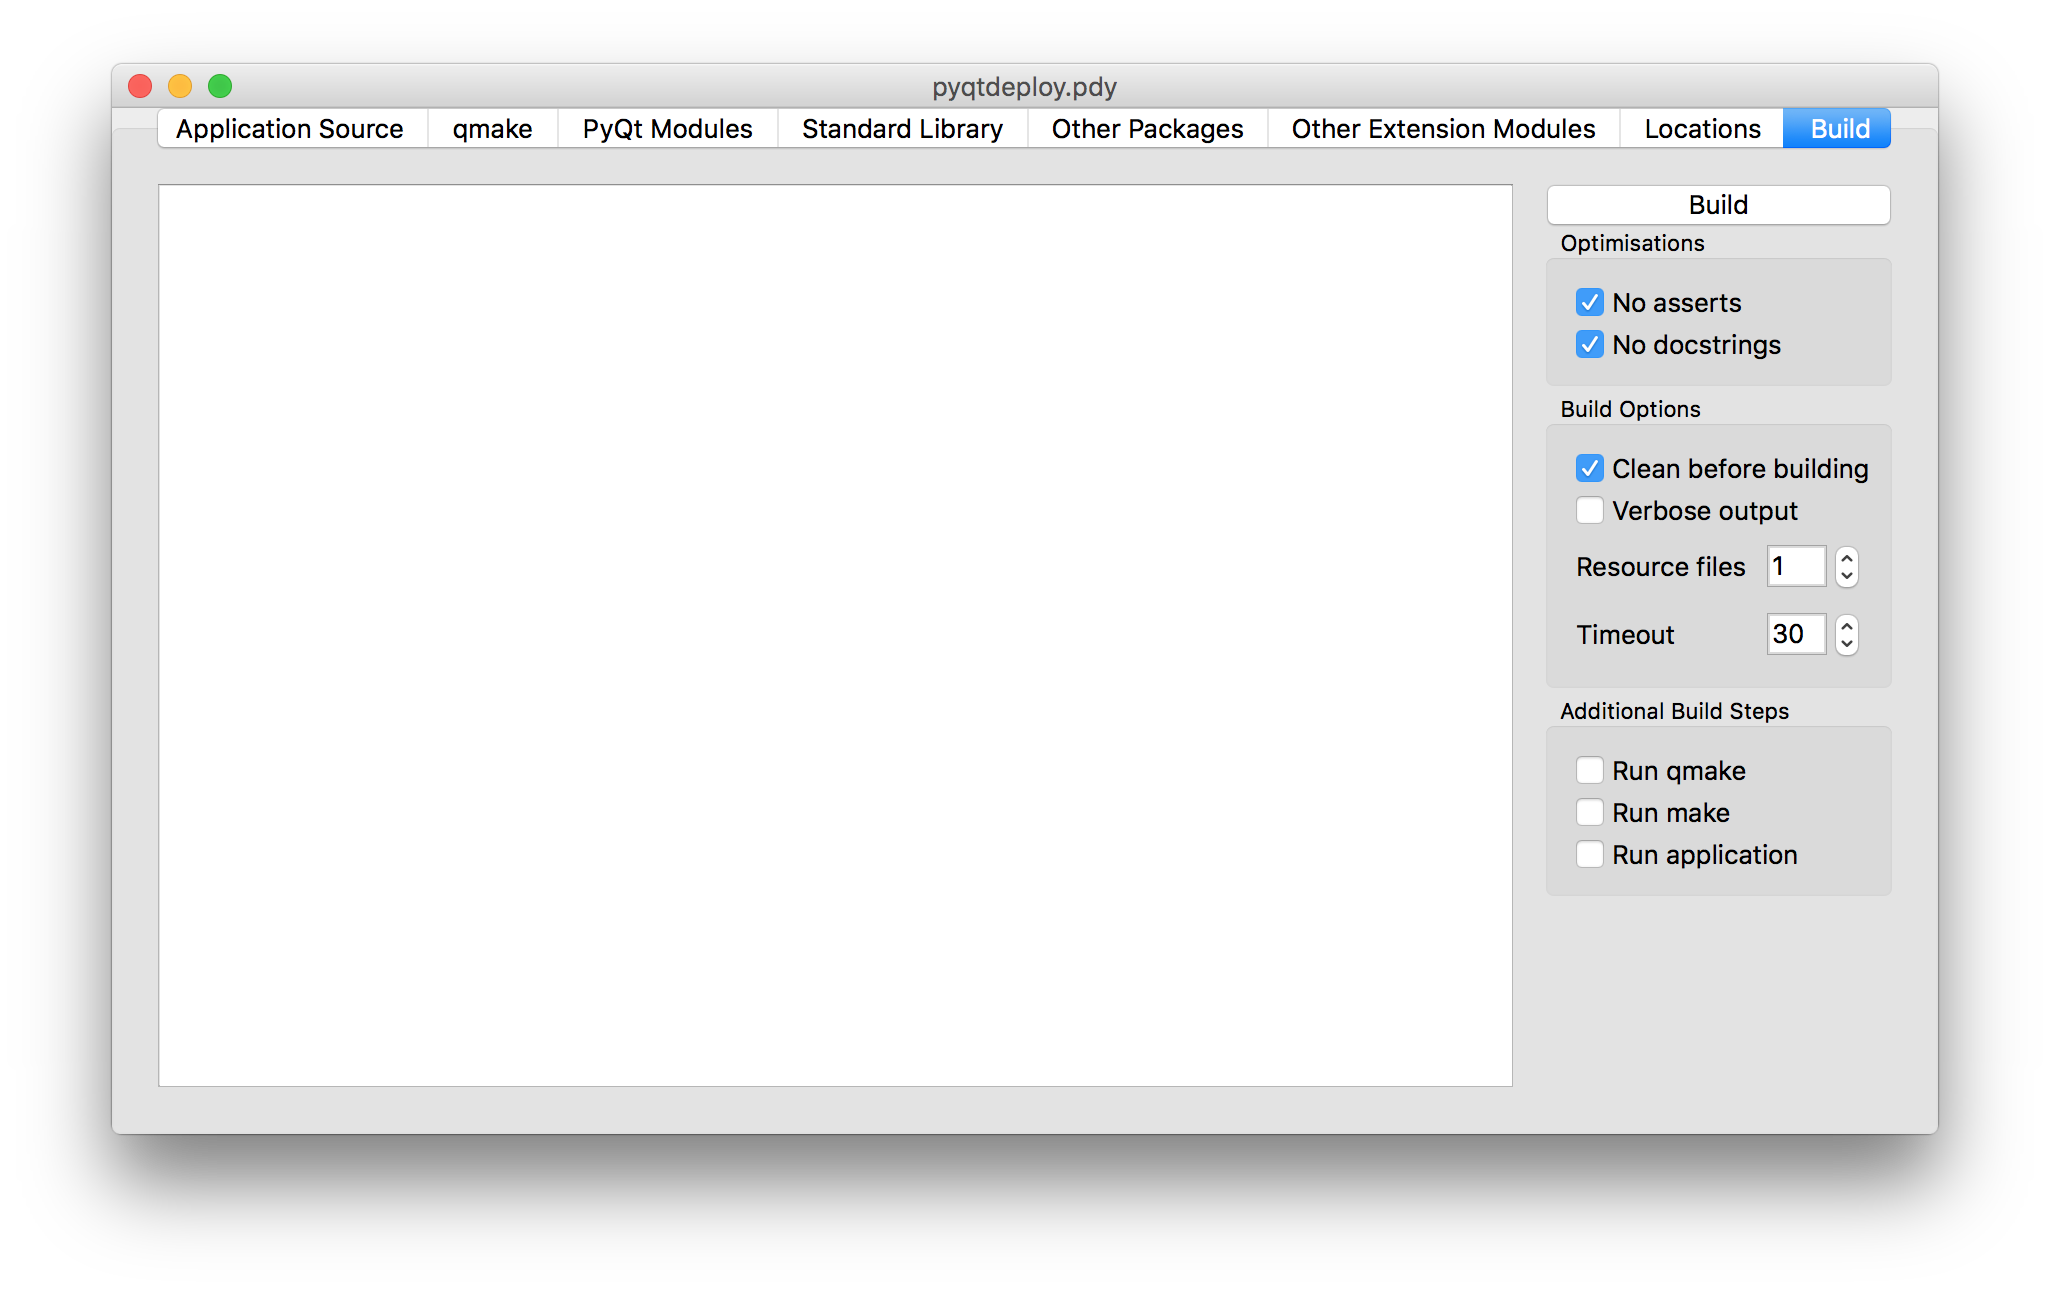
The main area of the tab shows the output of the various stages of the build.
- Build
- is clicked to build the application. The application code and
qmake
.profile will be generated in the build directory. What else is done depends on the additional build steps that have been specified. - No asserts
- is clicked to specify that all
assertstatements should be removed from frozen Python code. - No docstrings
- is clicked to specify that all docstrings should be removed from frozen Python code.
- Clean before building
- is checked to specify that the build directory is deleted and recreated before starting a new build.
- Verbose output
- is checked specify that additional information is displayed during the build process.
- Resource files
- specifies the number of Qt
.qrcresource files that are generated. On Windows, MSVC cannot cope with very large resource files and complains of a lack of heap space. If you run into this problem then try increasing the the number of resource files generated. - Timeout
- specifies the number of seconds that the build processes are allowed to run for before being timed out.
- Run qmake
- is clicked to specify that qmake will be run after generating the application code. If this is disabled the later build steps will be disabled automatically.
- Run make
- is clicked to specify that make (or nmake on Windows) will be run after running qmake. The earlier build steps will be enabled automatically. If this is disabled the later build steps will be disabled automatically.
- Run application
is clicked to specify that the application executable will be run after running make. The earlier build steps will be enabled automatically.
Note
This only makes sense if you are building natively and not cross-compiling.
Creating a Deployable Package
Assuming you have built the application code and the qmake .pro
file, the build directory will now contain the source of (as far as
qmake is concerned) a Qt based C++ application. To convert this
into a deployable application you must follow the appropriate Qt documentation
for compiling and packaging for your target platform.
For desktop platforms this is probably as simple as running qmake followed by make (or nmake on Windows).
Note
Make sure the version of qmake used is the same as the one used to build PyQt.
For mobile platforms this will be considerably more complicated.