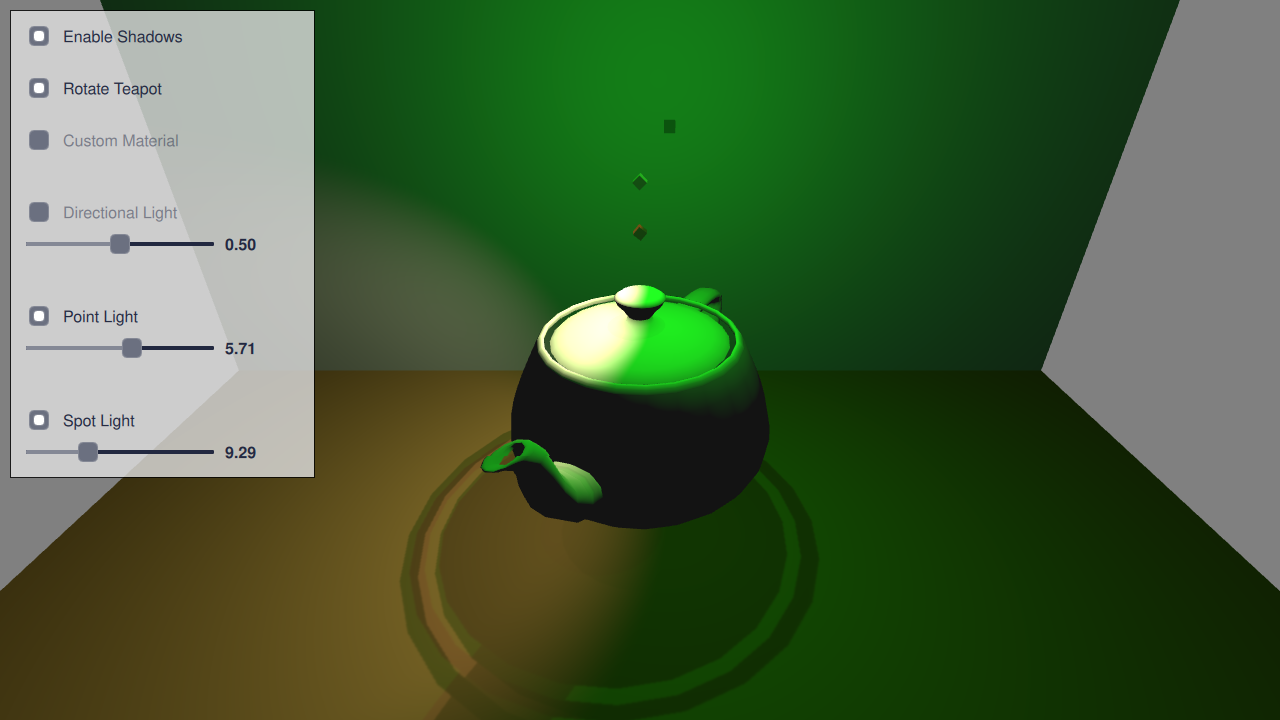
Qt Quick 3D - Lights Example
Demonstrates the use of different light types.

This example demonstrates using three different light types in an application.
Setting the Scene Lights
Directional Light
The directional light emits light in one direction from an unidentifiable source located infinitely far away. This is similar to the way sunlight works in real life. A directional light has infinite range and does not diminish.
We setup directional light to emit red color and animate its rotation around x-axis.
DirectionalLight {
    id: light1
    color: Qt.rgba(1.0, 0.1, 0.1, 1.0)
    ambientColor: Qt.rgba(0.1, 0.1, 0.1, 1.0)
    position: Qt.vector3d(0, 200, 0)
    rotation: Quaternion.fromEulerAngles(-135, -90, 0)
    shadowMapQuality: Light.ShadowMapQualityHigh
    visible: checkBox1.checked
    castsShadow: checkBoxShadows.checked
    brightness: slider1.sliderValue
    SequentialAnimation on rotation {
        loops: Animation.Infinite
        QuaternionAnimation {
            to: Quaternion.fromEulerAngles(-45, -90, 0)
            duration: 2000
            easing.type: Easing.InOutQuad
        }
        QuaternionAnimation {
            to: Quaternion.fromEulerAngles(-135, -90, 0)
            duration: 2000
            easing.type: Easing.InOutQuad
        }
    }
}
Point Light
The point light can be described as a sphere, emitting light with equal strength in all directions from the center of the light. This is similar to the way a light bulb emits light.
We setup point light to emit green color and animate its position in x-coordinate.
PointLight {
    id: light2
    color: Qt.rgba(0.1, 1.0, 0.1, 1.0)
    ambientColor: Qt.rgba(0.1, 0.1, 0.1, 1.0)
    position: Qt.vector3d(0, 300, 0)
    shadowMapFar: 2000
    shadowMapQuality: Light.ShadowMapQualityHigh
    visible: checkBox2.checked
    castsShadow: checkBoxShadows.checked
    brightness: slider2.sliderValue
    SequentialAnimation on x {
        loops: Animation.Infinite
        NumberAnimation {
            to: 400
            duration: 2000
            easing.type: Easing.InOutQuad
        }
        NumberAnimation {
            to: 0
            duration: 2000
            easing.type: Easing.InOutQuad
        }
    }
}
Spot Light
The spot light is similar to the point light, except that it emits light in a cone shape towards one direction instead of all directions. Aside from the cone angle, a spot light has the same characteristics and properties as the point light.
We setup spot light to emit a warm color and animate its rotation in y-coordinate.
SpotLight {
    id: light4
    color: Qt.rgba(1.0, 0.9, 0.7, 1.0)
    ambientColor: Qt.rgba(0.0, 0.0, 0.0, 0.0)
    position: Qt.vector3d(0, 250, 0)
    eulerRotation.x: -45
    shadowMapFar: 2000
    shadowMapQuality: Light.ShadowMapQualityHigh
    visible: checkBox4.checked
    castsShadow: checkBoxShadows.checked
    brightness: slider4.sliderValue
    coneAngle: 50
    innerConeAngle: 30
    PropertyAnimation on eulerRotation.y {
        loops: Animation.Infinite
        from: 0
        to: -360
        duration: 10000
    }
}
Setting the Scene Models
First we add two rectangle models to act as the floor and the back wall for our scene. These are useful for seeing light shadows.
Model {
    source: "#Rectangle"
    y: -200
    scale: Qt.vector3d(15, 15, 15)
    eulerRotation.x: -90
    materials: [
        DefaultMaterial {
            diffuseColor: Qt.rgba(0.8, 0.6, 0.4, 1.0)
        }
    ]
}
Model {
    source: "#Rectangle"
    z: -400
    scale: Qt.vector3d(15, 15, 15)
    materials: [
        DefaultMaterial {
            diffuseColor: Qt.rgba(0.8, 0.8, 0.9, 1.0)
        }
    ]
}
Then we add our main teapot model which is rotated around y-axis.
Model {
    id: teapotDefault
    source: "teapot.mesh"
    y: -100
    scale: Qt.vector3d(75, 75, 75)

    property variant material
    materials: [ material ]

    property bool animate: true
    NumberAnimation on eulerRotation.y {
        running: animate
        loops: Animation.Infinite
        duration: 5000
        from: 0
        to: -360
    }
}
We also add small cube models to demonstrate position & rotation of each light type. These cubes scale bigger when user is accessing related sliders.
Model {
    source: "#Cube"
    position: light1.position
    rotation: light1.rotation
    property real size: slider1.highlight ? 0.2 : 0.1
    scale: Qt.vector3d(size, size, size)
    materials: [
        DefaultMaterial {
            diffuseColor: light1.color
            opacity: 0.4
        }
    ]
}
Model {
    source: "#Cube"
    position: light2.position
    rotation: light2.rotation
    property real size: slider2.highlight ? 0.2 : 0.1
    scale: Qt.vector3d(size, size, size)
    materials: [
        DefaultMaterial {
            diffuseColor: light2.color
            opacity: 0.4
        }
    ]
}
Model {
    source: "#Cube"
    position: light4.position
    rotation: light4.rotation
    property real size: slider4.highlight ? 0.2 : 0.1
    scale: Qt.vector3d(size, size, size)
    materials: [
        DefaultMaterial {
            diffuseColor: light4.color
            opacity: 0.4
        }
    ]
}
From the settings panel user can then enable shadows and control visibility and brightness of each light separately.
Files:
- lights/CMakeLists.txt
- lights/CustomCheckBox.qml
- lights/CustomSlider.qml
- lights/RotatingTeaPot.qml
- lights/lights.pro
- lights/main.cpp
- lights/main.qml
- lights/qml.qrc
Images:
© 2023 The Qt Company Ltd. Documentation contributions included herein are the copyrights of their respective owners. The documentation provided herein is licensed under the terms of the GNU Free Documentation License version 1.3 as published by the Free Software Foundation. Qt and respective logos are trademarks of The Qt Company Ltd. in Finland and/or other countries worldwide. All other trademarks are property of their respective owners.