Searching with the Locator
You can find the locator in the bottom left of the Qt Creator window.
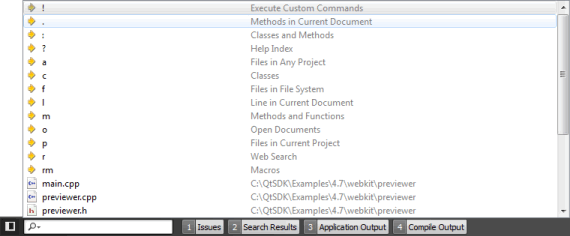
To activate the locator:
- Press Ctrl+K (Cmd+K on macOS).
- Select Tools > Locate.
- Select Edit > Go to Line.
- Click the line and column indicator on the editor toolbar.
To edit the currently open project's main.cpp file using the locator:
- Activate the locator by pressing Ctrl+K.
- Enter
main.cpp.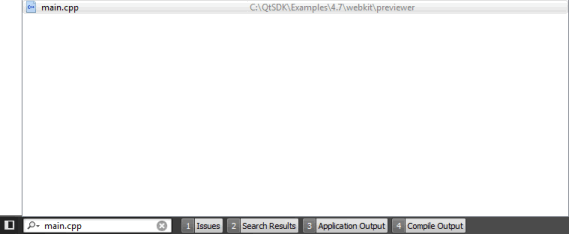
- Press Enter.
The
main.cppfile opens in the editor. - To move to a line in the file, enter the line number in the locator.
To move directly to a particular line and column in the document when you open the document, append them to the file name in the locator, separated by plus signs (+) or colons (:). For example, to open main.cpp to line 41 and column 2, enter: main.cpp:41:2.
If the path to a file is very long, it might not fit into the locator window. To view the full path, press Alt when the filename is selected or use the handle next to the locator window to increase the window width.
It is also possible to enter only a part of a search string. As you type, the locator shows the occurrences of that string regardless of where in the name of an component it appears.
To narrow down the search results, you can use the following wildcard characters:
- To match any number of any or no characters, enter
*. - To match a single instance of any character, enter
?.
Using Locator Filters
The locator enables you to browse not only files, but any items defined by locator filters. By default, the locator contains filters for:
- Locating any open document (
o) - Locating files anywhere on your file system (
f) - Locating files belonging to your project (
p), such as source, header resource, and.uifiles, or to any project (a) - Locating class (
c), enum, and function (m) definitions in your project or anywhere referenced from your project (:) - Locating symbols in the current document (
.) - Locating a specific line and column in the document displayed in your editor (
l <line_number>:<column_number>) - Opening help topics, including Qt documentation (
?) - Performing web searches (
r) - Running text editing macros that you record and save (
rm). For more information, see Using Text Editing Macros - Executing shell commands (
!) - Executing version control system commands (
git). For more information, see Using Version Control Systems - Running external tools (
x)
To use a specific locator filter, type the assigned prefix followed by Space. The prefix is usually a single character. Then type the search string (typically, a filename or class name) or the command to execute.
You can also double-click a locator filter in the filter list to use it. You can use the up and down arrow keys or the Ctrl+P and Ctrl+N keyboard shortcuts to move up and down the list, and then press Enter to use the selected filter.
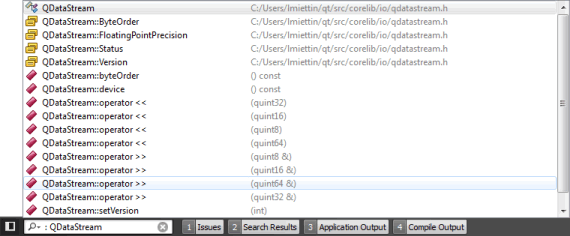
For example, to locate symbols matching QDataStream:
- Activate the locator.
- Enter
: QDataStream(:(colon) followed by a Space and the symbol name (QDataStream)).The locator lists the results.
Filters locating files also accept paths, such as tools/*main.cpp. Filters locating class and function definitions also accept namespaces, such as Utils::*View.
For example, to create a new file and open it in the editor, type f followed by Space, followed by path and file name, and then press Enter.
By default, the following filters are enabled and you do not need to use their prefixes explicitly:
- Going to a line and column in the current file (
l). - Going to an open file (
o). - Going to a file in any open project (
a).
If locator does not find some files, you can add them to the DISTFILES variable in the .pro file to include them into the distribution tarball of your project and thus make them known to Qt Creator as well.
Configuring Locator Filters
If the default filters do not match your use case, you can check whether you can change them. For all filters, you can change the filter prefix and restrict the search to items that match the filter.
To configure a locator filter:
- In the locator, click
 (Options) and select Configure to open the Locator options.
 - Select a filter, and then select Edit.
- Specify the prefix string.
- To implicitly include the filter even when not typing a prefix as a part of the search string, select Include by default.
- Specify other available options. For more information, see Adding Web Search Engines.
Adding Web Search Engines
You can use the Web Search (r) locator filter to perform web searches. URLs and search commands for Bing, Google, Yahoo! Search, cplusplus.com, and Wikipedia are configured by default.
To find out the format of the search command to use for your favorite web search engine, perform a search in your browser and copy the resulting URL to the locator filter configuration. Replace the search term with the variable %1.
To add URLs and search commands to the list:
- Select Tools > Options > Environment > Locator > Web Search (prefix: r) > Edit.
- Select Add to add a new entry to the list.
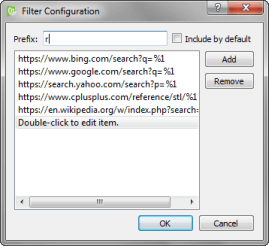
- Double-click the new entry to specify a URL and a search command. For example,
http://www.google.com/search?q=%1. - Click OK.
Creating Locator Filters
To quickly access files not directly mentioned in your project, you can create your own locator filters. That way you can locate files in a directory structure you have defined.
To create a locator filter:
- In the locator, select Options > Configure to open the Locator options.
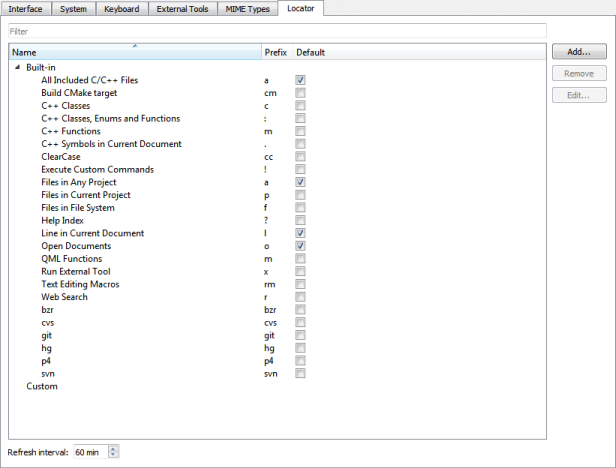
- Click Add.
- In the Filter Configuration dialog:
- Name your filter.
- Select at least one directory. The locator searches directories recursively.
- Define the file pattern as a comma separated list. For example, to search all
.hand.cppfiles, enter*.h,*.cpp - Specify the prefix string.
To implicitly include the filter even when not typing a prefix as a part of the search string, select Include by default.
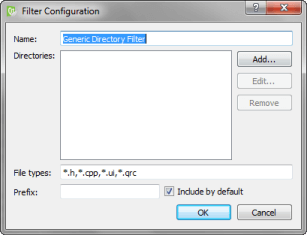
- Click OK.
Configuring Locator Cache
The locator searches the files matching your file pattern in the directories you have selected and caches that information. The cache for all default filters is updated as you write your code. By default, Qt Creator updates the filters created by you once an hour.
To update the cached information manually, select Options > Refresh in the locator.
To set a new cache update time:
- Select Tools > Options > Environment > Locator.
- In Refresh interval, define new time in minutes.
© 2016 The Qt Company Ltd. Documentation contributions included herein are the copyrights of their respective owners. The documentation provided herein is licensed under the terms of the GNU Free Documentation License version 1.3 as published by the Free Software Foundation. Qt and respective logos are trademarks of The Qt Company Ltd in Finland and/or other countries worldwide. All other trademarks are property of their respective owners.
