
Using Qt Quick UI Forms
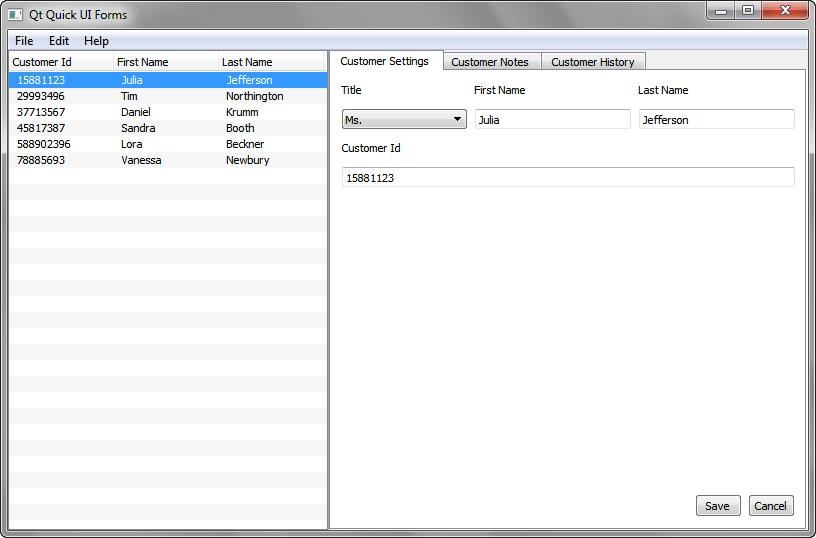
This tutorial describes how to develop an application that uses ui.qml files to separate the application logic from the UI. The tutorial uses Qt Quick Designer to implement a simplified version of the UI Forms example, which provides an interface to a customer database and is purely written in QML and JavaScript.
UI forms consist of .qml and .js files that implement the business logic, and corresponding .ui.qml files that only contain the purely declarative description of the UI. The .ui.qml files should be edited only in the Design mode of Qt Creator. However, Qt Quick Designer does not fully support all QML controls, such as the TableView, so you sometimes need to edit UI forms also in the Edit mode. You can keep this to the minimum by creating custom QML types that you edit in the Edit mode.
Creating the Project
- Select File > New File or Project > Application > Qt Quick Controls Application > Choose.
- In the Name field, enter a name for the application.
- In the Create in field, enter the path for the project files, and then select Next (or Continue on macOS).
- In the Minimal required Qt version field, select Qt 5.4, or later.
- Deselect the Enable native styling check box to keep the application size small. Enabling native styling would create a dependency to the Qt Widgets module.
- Select Next.
- Select kits for the platforms that you want to build the application for. To build applications for mobile devices, select kits for Android ARM and iPhone OS, and click Next.
Note: Kits are listed if they have been specified in Tools > Options > Build & Run > Kits (on Windows and Linux) or in Qt Creator > Preferences Build & Run > Kits (on macOS).
- Select Next.
- Review the project settings, and click Finish (or Done on macOS).
Qt Creator generates a UI file, MainForm.ui.qml, that you can modify in the Design mode and a QML file, main.qml, that you can modify in the Edit mode to add the application logic.
Creating the UI Forms Main View
The main view of the application displays a customer list in a table view and detailed information about the selected customer in a tab view.
To create the main view:
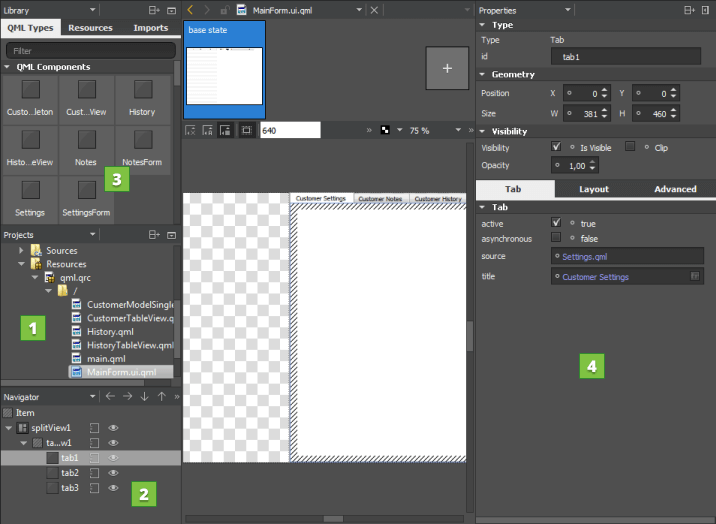
- In the Projects view (1), double-click the MainForm.ui.qml file to open it in Qt Quick Designer.
- In the Navigator (2), select the RowLayout and press Delete to delete it.
- In Library > QML Types (3), select SplitView and drag and drop it to the Item in the navigator.
- Select the split view in the navigator, then select the Layout tab in Properties (4), and then click the
 (Fill to Parent) button to anchor the split view to the item.
 - Drag and drop a TableView and a Tab View from the library to the split view in the navigator.
- Select the
 (Export) button in the navigator to export the table view as a property.
 - Right-click TabView to open the context menu and select Add Tab to create a Tab element.
Qt Creator creates the element as a separate QML file with the name that you enter in the dialog. By default, the element is called Tab.
- Select the tab in the navigator and enter Customer Settings in the Title field in the properties.
- Press Ctrl+C to copy the tab to the clipboard, and then press Ctrl+V twice to create two more tabs that you name Customer Notes and Customer History. Qt Creator uses the Tab type in the MainForm.ui.qml file. You will create separate UI forms for the tab contents later.
Editing the Table View
Qt Quick Designer does not support adding columns to TableView types, and therefore, you must use the code editor to add them. To keep editing the MainForm.ui.qml file in the Edit mode to the minimum, move the TableView type to a separate QML file called CustomerTableView.qml:
- Click Edit to open MainForm.ui.qml in Edit mode.
- To move the TableView type to a separate QML file, right-click it and select Refactoring > Move Component into Separate File.
- Add the code from the CustomerTableView.qml example file to the file that Qt Creator creates for you.
Implementing the Application Logic for the Main View
The new project wizard adds boilerplate code to the main.qml file to create menu items and push buttons. Modify the boilerplate code by removing obsolete code and by adding new code. You removed the push buttons from the UI Form, so you also need to remove the corresponding code from main.qml (or the application cannot be built).
You will want to keep the dialog box and menu bar, but change their contents, as instructed later.
Edit the main.qml file in the code editor, as described in the following sections.
Specifying Main View Size
The wizard creates an ApplicationWindow type and a MainForm type that specify the application main view. Enter the application name as the value of the title property.
Clean up the MainForm code by removing the obsolete lines that call functions when buttons are clicked:
MainForm {
    anchors.fill: parent
    button1.onClicked: messageDialog.show(qsTr("Button 1 pressed"))
    button2.onClicked: messageDialog.show(qsTr("Button 2 pressed"))
}
Remove the width and height properties from the ApplicationWindow type and use a Layout type in the MainForm type to set the minimum and preferred size of the main view.
To use the Layout type, import Qt Quick Layouts:
import QtQuick.Layouts 1.1
Then specify the following properties for the MainForm:
    MainForm {
        anchors.fill: parent
        Layout.minimumWidth: 800
        Layout.minimumHeight: 480
        Layout.preferredWidth: 768
        Layout.preferredHeight: 480
Creating the Table View Model
Use a list model to display customer data in the table view. Because the list model is accessed from several different .qml files, access it through a singleton type defined in CustomerModelSingleton.qml and registered in main.cpp. This way, you do not have to rely on the QML context scoping rules to access the list model.
- In the Projects view, right-click qml.qrc and select Add New > Qt > QML File (Qt Quick 2) to create the CustomerModelSingleton.qml file and to add it to the project.
- Copy the implementation from CustomerModelSingleton.qml.
- Add the following code to the MainForm in main.qml to access the list model:
        tableView1.model: CustomerModel

        Component.onCompleted: CustomerModel.selection = tableView1.selection
- To register the singleton type in the main.cpp file, include the Qt QML module and call the
qmlRegisterSingletonType()function in the initialization function:... #include <QtQml> int main(int argc, char *argv[]) { QApplication app(argc, argv); QUrl resourceUrl(QStringLiteral("qrc:/CustomerModelSingleton.qml")); qmlRegisterSingletonType(resourceUrl, "my.customermodel.singleton", 1, 0, "CustomerModel");
- To use the registered singleton type in main.qml, you must import the singleton type:
import my.customermodel.singleton 1.0
Creating Tabs
You can use the new file wizard to create UI forms that specify tab contents and functionality. You set the QML files as sources for the tabs in the MainForm.ui.qml file and modify the corresponding UI forms in the Design mode.
Creating UI Forms for Tab Contents
To create UI forms for the tab contents:
- Select File > New File or Project > Qt > QtQuick UI File > Choose.
- In the Component name field, enter Settings.
- Click Next.
- Click Finish to create the UI form, SettingsForm.ui.qml, and a corresponding QML file, Settings.qml.
Create the UI form, NotesForm.ui.qml, and the corresponding QML file, Notes.qml, for the notes tab in the same way. You will not need an ui.qml file for the history tab, so you will create the QML file for it later.
Creating the Settings Tab
The Customer Settings tab contains information about the selected user.
To create the tab contents:
- Double-click SettingsForm.ui.qml in the Projects view to open it for editing in the Design mode.
- Select Item in the Navigator and enter content in the Id field in Properties.
- In Library, select Imports > Add Import and import Qt Quick Controls and Layouts to make the QML types in those modules visible in the library.
- Drag and drop a Grid Layout from the library to the content item in the navigator.
- Select Layout > Top, Left, and Right buttons to anchor the grid layout to the parent.
- In the Margin fields for the anchors, set the margins to 12.
- In Properties, set Column spacing and Row spacing to 8, Columns to 3, and Rows to 4. If you add more fields, add the necessary amount of rows.
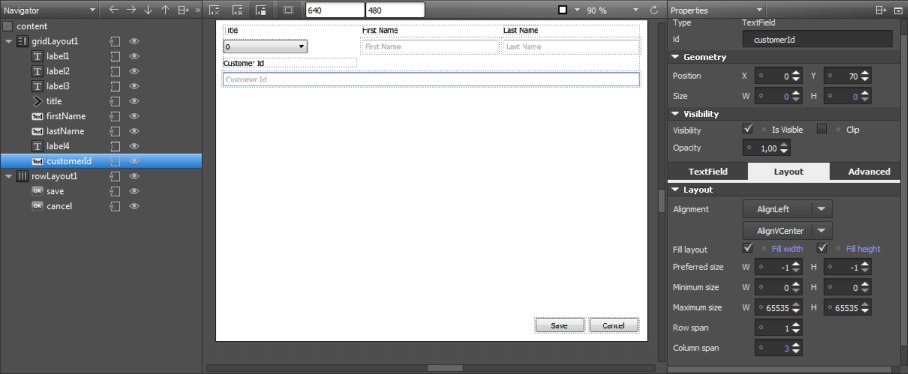
- Drag and drop four Label controls, a Combo Box, and three Text Field controls from the library to the navigator.
- Use the down arrow in the navigator to move one label down to the position above the last text field.
- In the properties, change the label text for each field in the Text field. You need the following labels: Title, First Name, Last Name, and Customer Id.
- In the properties, change the placeholder text for each text field in the Placeholder text field to be the same as the field label.
- Select the customer ID text field, then select Layout in properties and set Column span to 3 and check Fill width to make the ID field span the length of the grid layout.
- Drag and drop a Row Layout from the library to the content item in the navigator and click on it.
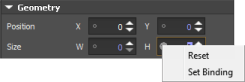
- Reset the height of the row layout in properties.
- Select Layout > Bottom and Right buttons to anchor the row layout to the parent.
- In the Margin fields for the anchors, set the margins to 12.
- Drag and drop two Button controls from the library to the row layout in the navigator.
- In the properties, change the button labels in the Text field to Save and Cancel.
- Select Layout and > Fill width and Fill height in properties for each button to have the buttons fill the row layout.
- In the navigator, select Export for each field to export the field IDs as properties. The following items should be exported, so that they can be referred to in Settings.qml:
    property alias customerId: customerId
    property alias lastName: lastName
    property alias firstName: firstName
    property alias gridLayout1: gridLayout1
    property alias rowLayout1: rowLayout1

    property alias save: save
    property alias cancel: cancel
    property alias title: title
Creating the Notes Tab
The Customer Notes tab contains a text area for entering notes about the selected customer and buttons for saving or canceling the changes.
To create the tab contents:
- Double-click NotesForm.ui.qml in the Projects view to open it for editing in the Design mode.
- Select Item in the Navigator and enter content in the Id field in Properties.
- In Library, select Imports > Add Import and import Qt Quick Controls and Layouts.
- Drag and drop a Column Layout from the library to the content item in the navigator.
- Select Layout > Top, Left, and Right buttons to anchor the grid layout to the parent and set the margins to 12.
- Drag and drop a Text Area from the library to the column layout.
- Select Layout and > Fill width and Fill height in properties to have the text area fill the column layout.
- Create the Save and Cancel buttons as instructed in Creating the Settings Tab. You can also copy and paste the row layout from SettingsForm.ui.qml.
- In the navigator, select Export for each field to export the field IDs as properties. The following items should be exported, so that they can be referred to in Notes.qml:
    property alias textArea1: textArea1
    property alias cancel: cancel
    property alias save: save
Creating the History Tab
The Customer History tab contains a table view that displays the transactions performed by the customer. Create a custom HistoryTableView type that you can edit in the Edit mode. For the history tab, you do not need an ui.qml file at all.
To create the history tab:
- In the Projects view, right-click qml.qrc and select Add New > Qt > QML File (Qt Quick 2) to create the HistoryTableView.qml file and to add it to the project.
- Copy the implementation from HistoryTableView.qml.
- Add the code from the example History.qml file to your History.qml file to access the code model.
Adding Tab Functionality
Add functions for displaying data from the customer model in the tabs. You have already created the files that you need. You now need to copy the implementation for the settings tab from the Settings.qml file and for the notes tab from the Notes.qml file.
To display the tab contents in the main view, set the QML files as sources for the tabs in the Design mode. Select the settings tab in the Navigator and specify for example Settings.qml in the Source field in the Properties view. Similarly, specify the sources for the notes and history tabs.
You can then remove the Tab.qml file that the wizard generated but that you no longer need by selecting Remove File in the context menu.
Creating Menus
The wizard adds a menu bar to the main.qml file that contains a File menu with the Open and Exit menu items. Keep the menu and the Exit menu item, and add the Edit and Help menus with standard menu items.
The wizard creates the following code:
menuBar: MenuBar {
    Menu {
        title: qsTr("&File")
        MenuItem {
            text: qsTr("&Open")
            onTriggered: messageDialog.show(qsTr("Open action triggered"));
        }
        MenuItem {
            text: qsTr("E&xit")
            onTriggered: Qt.quit();
        }
    }
}
Remove the Open menu item and add the following code to create the new menus:
    menuBar: MenuBar {
        Menu {
            title: qsTr("&File")
            MenuItem {
                text: qsTr("E&xit")
                onTriggered: Qt.quit();
            }
        }
        Menu {
            title: qsTr("&Edit")
            MenuItem {
                action: cutAction
            }
            MenuItem {
                action: copyAction
            }
            MenuItem {
                action: pasteAction
            }
        }
        Menu {
            title: qsTr("&Help")
            MenuItem {
                text: qsTr("About...")
                onTriggered: aboutDialog.open()
            }
        }
    }

    Action {
        id: copyAction
        text: qsTr("&Copy")
        shortcut: StandardKey.Copy
        iconName: "edit-copy"
        enabled: (!!activeFocusItem && !!activeFocusItem["copy"])
        onTriggered: activeFocusItem.copy()
    }

    Action {
        id: cutAction
        text: qsTr("Cu&t")
        shortcut: StandardKey.Cut
        iconName: "edit-cut"
        enabled: (!!activeFocusItem && !!activeFocusItem["cut"])
        onTriggered: activeFocusItem.cut()
    }

    Action {
        id: pasteAction
        text: qsTr("&Paste")
        shortcut: StandardKey.Paste
        iconName: "edit-paste"
        enabled: (!!activeFocusItem && !!activeFocusItem["paste"])
        onTriggered: activeFocusItem.paste()
    }
Creating Dialogs
The wizard creates a message box in the main.qml file that you should turn into an About dialog for the purpose of this example:
MessageDialog {
id: messageDialog
title: qsTr("May I have your attention, please?")
function show(caption) {
messageDialog.text = caption;
messageDialog.open();
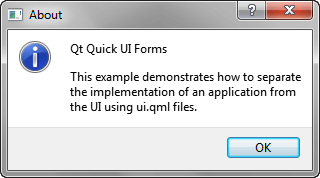
}Modify the code created by the wizard to add an icon and some text:
    MessageDialog {
        id: aboutDialog
        icon: StandardIcon.Information
        title: qsTr("About")
        text: "Qt Quick UI Forms"
        informativeText: qsTr("This example demonstrates how to separate the "
                              + "implementation of an application from the UI "
                              + "using ui.qml files.")
    }
Enable access to the About dialog from the Help menu that you create next.
Running the Application
The application is complete and ready to be run on the desktop or deployed to a device. To run the application, press Ctrl+R.
Files:
© 2016 The Qt Company Ltd. Documentation contributions included herein are the copyrights of their respective owners. The documentation provided herein is licensed under the terms of the GNU Free Documentation License version 1.3 as published by the Free Software Foundation. Qt and respective logos are trademarks of The Qt Company Ltd in Finland and/or other countries worldwide. All other trademarks are property of their respective owners.