2.2. Configuring the Client Applications
Not every customer must connect securely to a RHN Satellite Server or RHN Proxy Server within their organization. Not every customer needs to build and deploy a GPG key for custom packages. (Both of these topics are explained in detail later.) Every customer who uses RHN Satellite Server or RHN Proxy Server must reconfigure the Red Hat Update Agent (up2date) and possibly the Red Hat Network Registration Client (rhn_register) to redirect it from Red Hat Network to their RHN Satellite Server or RHN Proxy Server.
 | Important |
|---|---|
Although this is not configurable, note that the port used by the Red Hat Update Agent is 443 for SSL (HTTPS) and 80 for non-SSL (HTTP). By default, up2date uses SSL only. For this reason, users should ensure that their firewalls allow connections over port 443. To bypass SSL, change the protocol for serverURL from https to http in /etc/sysconfig/rhn/up2date. Similarly, to use RHN's Monitoring feature and probes requiring the Red Hat Network Monitoring Daemon, note that client systems must allow connections on port 4545 (or port 22, if using sshd instead). |
By default, the Red Hat Network Registration Client and the Red Hat Update Agent refer to the main Red Hat Network Servers. Users must reconfigure client systems to refer to their RHN Satellite Server or RHN Proxy Server.
Note that the latest versions of the Red Hat Update Agent can be configured to accommodate several RHN Servers, thereby providing failover protection in case the primary server is inaccessible. Refer to Section 2.2.4 Implementing Server Failover for instructions on enabling this feature.
The next sections describe three methods of configuring the client systems to access your RHN Satellite Server or RHN Proxy Server: using an Activation Key, up2date --configure, and manually updating the configuration files.( To see how virtually all reconfiguration can be scripted, see Chapter 6 Manually Scripting the Configuration.)
2.2.1. Registering with Activation Keys
Red Hat recommends using activation keys for registering and configuring client systems that access RHN Proxy Server or RHN Satellite Server. Activation keys can be used to register, entitle, and subscribe systems in a batch. Refer to the Activation Keys section of the Red Hat Update Agent chapter within the RHN Management Reference Guide for instructions on use.
Registering with an activation key has four basic steps:
Generate an Activation Key as described in the Activation Keys section of the Red Hat Update Agent chapter within the RHN Management Reference Guide
Import custom GPG keys.
Download and install the SSL Certificate RPM from the /pub/ directory of the RHN Proxy Server or RHN Satellite Server. The command for this step could look something like this:
rpm -Uvh\
http://your-satellite.com/pub/rhn-org-trusted-ssl-cert-1.0-1.noarch.rpm
Register the system with your RHN Proxy Server or RHN Satellite Server. The command for this step could look something like:
rhnreg_ks --activationkey mykey --serverUrl https://your-satellite.com/XMLRPC
Alternatively, most of the above steps can be combined in a shell script that includes the following lines:
wget -0 - http://your-satellite-DQDN/pub/bootstrap.sh | bash \ && rhnreg_ks --activation-key my_key --serverUrl \ https://your-satellite-FQDN/XMLRPC |
The bootstrap script, generated at installation and available for both RHN Satellite Server and RHN Proxy Server, is such a script. The script and the RHN Bootstrap that generates it are discussed in detail in Chapter 5 Using RHN Bootstrap.
 | Warning |
|---|---|
Systems running Red Hat Enterprise Linux 2.1 and versions of Red Hat Linux prior to 8.0 may experience problems using Activation Keys to migrate SSL certificate settings from rhn_register to up2date. Therefore, the SSL certificate information on those systems must be set manually. All other settings, such as the server URL, transfer properly. |
2.2.2. Using the --configure Option
Both the Red Hat Network Registration Client and the Red Hat Update Agent that ship with Red Hat Enterprise Linux provide interfaces for configuring various settings. For full listings of these settings, refer to the chapters dedicated to the applications in the RHN Management Reference Guide.
Each application offers a graphical user interface (GUI) for configuration that enables you to change the settings required by RHN Proxy Server or RHN Satellite Server. The GUI requires that the client system run the X Window System. The command to launch the GUI configuration interface will look like:
application_filename --configure |
To reconfigure the Red Hat Update Agent, issue the following command as root:
up2date --configure |
You are presented with a dialog box offering various settings that may be reconfigured. In the General tab, under Select a Red Hat Network Server to use replace the default value with the fully qualified domain name (FQDN) of the RHN Satellite Server or RHN Proxy Server, such as https://your_proxy_or_sat.your_domain.com/XMLRPC. Retain the /XMLRPC at the end. When finished, click OK.
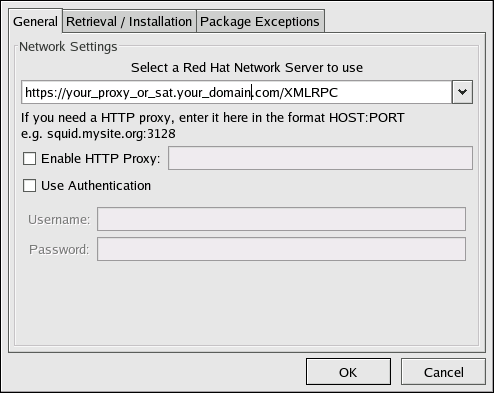
Make sure you enter the domain name of your RHN Satellite Server or RHN Proxy Server correctly. Entering an incorrect domain or leaving the field blank may prevent up2date --configure from launching. This may be resolved, however, by editing the value in the up2date configuration file. Refer to Section 2.2.3 Updating the Configuration Files Manually for precise instructions.
| Warning |
|---|---|
Systems running Red Hat Enterprise Linux 3 or newer have registration functionality built into the Red Hat Update Agent and therefore do not install the Red Hat Network Registration Client. Systems running Red Hat Enterprise Linux 2.1 (and versions of Red Hat Linux prior to 8.0) must reconfigure and use the Red Hat Network Registration Client, as well as the Red Hat Update Agent. |
To reconfigure the Red Hat Network Registration Client, perform an almost identical set of steps. As root, run the following command:
/usr/bin/rhn_register --configure |
You are presented with a dialog box offering basic settings that may be reconfigured. Under Select a Red Hat Network server to use replace the default value with the fully qualified domain name (FQDN) of the RHN Satellite Server or RHN Proxy Server, such as https://your_proxy_or_sat.your_domain.com/XMLRPC. Retain the /XMLRPC at the end. Click OK when finished.
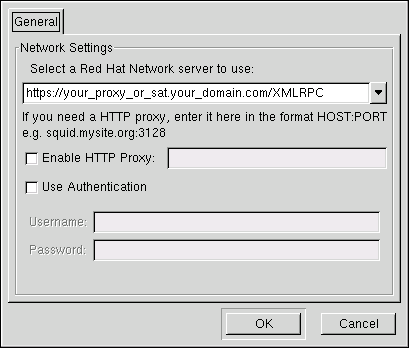
If your version of rhn_register does not display the server field, and you cannot upgrade to a later version, you may enter the domain name of your RHN Satellite Server or RHN Proxy Server directly into the rhn_register configuration file. Refer to Section 2.2.3 Updating the Configuration Files Manually for precise instructions.
2.2.3. Updating the Configuration Files Manually
As an alternative to the GUI interface described in the previous section, users may also reconfigure the Red Hat Network Registration Client and the Red Hat Update Agent by editing the applications' configuration files.
To configure Red Hat Update Agent on the client systems connecting to the RHN Proxy Server or RHN Satellite Server, edit the values of the serverURL and noSSLServerURL settings in the /etc/sysconfig/rhn/up2date configuration file (as root). Replace the default Red Hat Network URL with the fully qualified domain name (FQDN) for the RHN Proxy Server or RHN Satellite Server. For example:
serverURL[comment]=Remote server URL serverURL=https://your_primary.your_domain.com/XMLRPC noSSLServerURL[comment]=Remote server URL without SSL noSSLServerURL=http://your_primary.your_domain.com/XMLRPC |
| Warning |
|---|---|
The httpProxy setting in /etc/sysconfig/rhn/up2date does not refer to the RHN Proxy Server. It is used to configure an optional HTTP proxy for the client. With an RHN Proxy Server in place, the httpProxy setting must be blank (not set to any value). |
Skip this section if you are running Red Hat Enterprise Linux 3 or later on the client system.
 | Note |
|---|---|
You must use version 2.7.11 or higher of rhn_register on client systems so they can recognize new certificates. This RPM should be available in /var/spool/up2date on your proxy system after running up2date for the Proxy. |
To configure the Red Hat Network Registration Client on the client systems connecting to the RHN Proxy Server or RHN Satellite Server, edit the values of the serverURL and noSSLServerURL options in the /etc/sysconfig/rhn/rhn_register configuration file (as root). Replace the default Red Hat Network URL with the fully qualified domain name (FQDN) for the RHN Proxy Server or RHN Satellite Server. For example:
serverURL[comment]=Remote server URL serverURL=https://your_proxy_or_sat.your_domain.com/XMLRPC noSSLServerURL[comment]=Remote server URL without SSL noSSLServerURL=http://your_proxy_or_sat.your_domain.com/XMLRPC |
2.2.4. Implementing Server Failover
Beginning with up2date-4.2.38, the Red Hat Update Agent can be configured to seek updates from a series of RHN Servers. This can be especially helpful in sustaining constant updates if your primary RHN Proxy Server or RHN Satellite Server may be taken offline.
To use this feature, first ensure that you are running the required version of up2date. Then manually add the secondary servers to the serverURL and noSSLServerURL settings in the /etc/sysconfig/rhn/up2date configuration file (as root). Add the fully qualified domain names (FQDN) for the Proxy or Satellite immediately after the primary server, separated by a semicolon (;). For example:
serverURL[comment]=Remote server URL serverURL=https://your_primary.your_domain.com/XMLRPC; \ https://your_secondary.your_domain.com/XMLRPC; noSSLServerURL[comment]=Remote server URL without SSL noSSLServerURL=http://your_primary.your_domain.com/XMLRPC; \ https://your_secondary.your_domain.com/XMLRPC; |
Connection to the servers is attempted in the order provided here. You can include as many servers as you wish. You may list the central RHN Servers, as well. This makes sense, however, only if the client systems can reach the Internet.