Chapter 2. Using the Graphical Desktop
Red Hat Enterprise Linux includes a powerful graphical desktop environment where you can easily access your applications, files, and system resources. Both new and experienced users can take full advantage of their Red Hat Enterprise Linux systems using the graphical desktop.
This chapter covers the fundamentals of the desktop and how to configure it for your needs.
2.1. Using Nautilus
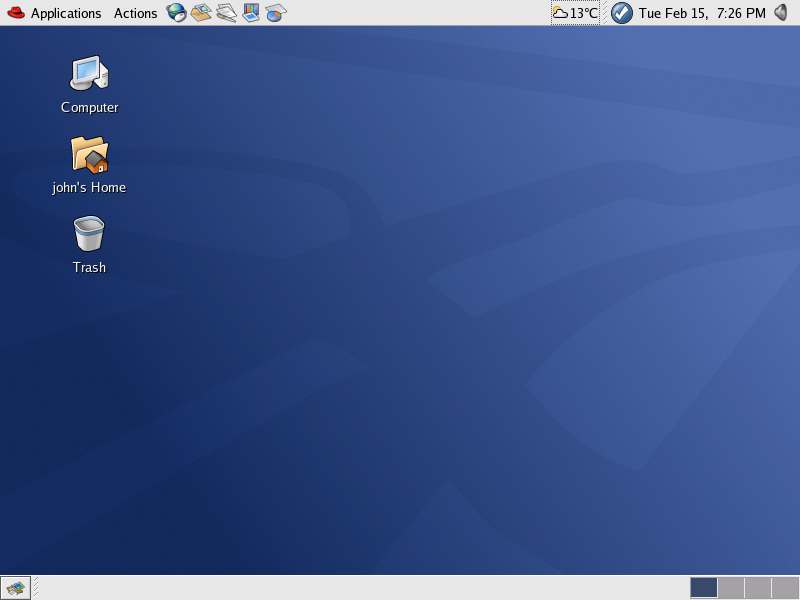
Your first view of the graphical desktop looks something like Figure 2-1. The desktop offers the following tools, represented as desktop icons: Computer, User's Home, and Trash. Each of these tools is an application of the Nautilus file manager.
Nautilus provides a graphical display of your system and personal files. Nautilus is designed to be much more than a visual listing of files, however. It allows you to configure your desktop, configure your Red Hat Enterprise Linux system, browse your photo collection, access your network resources and more — all from one integrated interface. In essence, Nautilus becomes a shell for your entire desktop experience.
Working in Nautilus provides an alternative to using a shell prompt to navigate the file system. The following sections explain how to use Nautilus to enhance your desktop experience.
2.1.1. Using the Computer icon
Double-clicking the Computer icon takes you to a list of all of the devices on your system. A device is anything connected to your computer to which data is sent or from which it is received. (You have probably heard of a 'device driver' before - this is a piece of software that allows a device to talk to your computer.) Most modern systems have the following devices: a floppy drive, a CD-ROM drive, and at least one hard drive. Other devices may be listed depending on the makeup of your system.
- Removable Media
Double-click either the Floppy icon or the CD-ROM icon to mount the drive with Nautilus and open a new window with the drive's contents. You can also right-click on the drive and then select Mount Volume from the menu. Note: you must first unmount a floppy before you eject it. Refer to Chapter 13 Diskettes and CD-ROMs for more information.
- Disk
This references the hard drive. If you are using Linux, your hard drive is already mounted, and may not be accessible from this window. If you have other hard drives available on your system (possibly used for other operating sytems), they may be mountable here.
- Filesystem
Double-click on the Filesystem icon and Nautilus opens a window that shows the entire file system, starting from the / directory. This is a quick way to reach such useful folders as /tmp/ and /usr/bin/. If you are not logged in as root, some folders will be unavailable. This is to prevent accidental damage to your system.
- Network
Double-click the Network icon to bring up a list of all systems on your network. Linux systems are listed individually. Systems running other operating systems are grouped under an icon that reflects this. (For example, Windows systems on your network appear under a Windows Network icon.) You are only able to browse those machines you have permission to access.
2.1.2. User's Home
The tool associated with the
![]() icon is referred to as
User's Home in this manual. The label
under the icon varies according to your user name. If you
are logged in as root, the label reads root's
Home. User "joe" would see the label
joe's Home.
icon is referred to as
User's Home in this manual. The label
under the icon varies according to your user name. If you
are logged in as root, the label reads root's
Home. User "joe" would see the label
joe's Home.

Double-clicking on the User's Home icon allows you to navigate through your home directory or the rest of the file system.
The browser window opens in icon view. The icons are designed to allow easy recognition of file types; directories are represented by folders, music files have musical notes, and so on. Nautilus automatically sorts your files by name and arranges them neatly. When you open a directory it opens in a new browser window.
To move a file from one directory to another, drag and drop the file into the new location, or cut and paste it. Note that in Nautilus, dragging and dropping a file moves it rather than placing a copy in the new location. If you wish to copy a file instead, right-click on the icon, select Copy, and paste the file in the new directory.
Most of these settings can be configured to meet your preferences. (Refer to Section 2.1.4 Customizing Nautilus for more information.)
2.1.3. Trash
Nautilus includes a Trash icon similar to that of other operating systems; files inside the Trash are not deleted until you choose to do so. The Trash bin can be opened by double-clicking on the desktop icon. It opens as a Nautilus window, which allows you to easily move files in and out. To empty the Trash, right-click on the desktop icon and select Empty Trash Bin.
2.1.4. Customizing Nautilus
You can also change the way Nautilus behaves. To do so, select Edit => Preferences from an open Nautilus window. A new configuration window opens with many customization options. These customization options are categorized by the tabs at the top of the window.
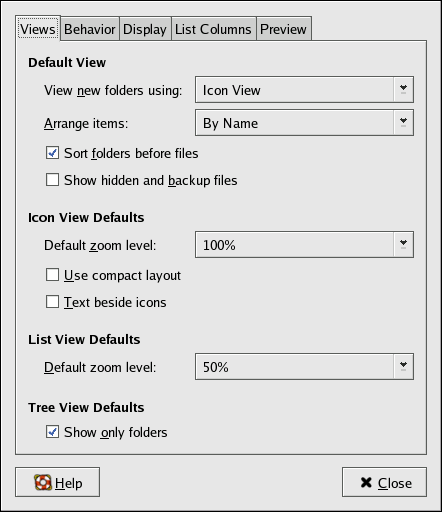
- Views Tab
The Views tab allows you to choose how your files and folders are displayed. You can also choose a Default Zoom Level. Zooming in on icons not only increases the size of the icons, but adds to the displayed information about each file or folder.
- BehaviorTab
The Behavior tab allows you to specify that Nautilus should Always open in browser windows. If you check this option, opening a folder displays the directory's contents in the current window. This behavior may be more familiar to those users accustomed to using the Start Here icon. You can also choose to include a delete option that bypases the Trash bin.
- Display Tab
The Diplay tab features a series of drop-down boxes listing various file details. Selecting these options sets the order in which these details appear as you zoom in. You can also set the format for dates and times within Nautilus.
(This only changes the time format for Nautilus. To change the date and time format of the clock on the Panel, right-click on it and choose Preferences.)
- List Columns Tab
The List Columns tab allows you to select which details are shown when folder contents are displayed as a list. If you click on the description of a detail, you can then change the order in which it is displayed by clicking Move Up or Move Down.
- Preview Tab
The Preview tab allows you to select the types of files that are previewed by Nautilus. For text files, this means that part of the text is visible on the icon. For image files, this means that Nautilus displays a thumbnail (or scaled-down view) of the file. For sound files, Nautilus plays the sound while your mouse pointer hovers over the file. If Nautilus seems to be sluggish on your machine, try turning these resource-intensive features off to increase the speed.