

Edition 1
Copyright © 2010 Red Hat, Inc.
1801 Varsity Drive
Raleigh, NC 27606-2072 USA
Phone: +1 919 754 3700
Phone: 888 733 4281
Fax: +1 919 754 3701
service pki-ca start
/usr/bin directory. These tools can be run from any location without specifying the tool location.
| Formatting Style | Purpose |
|---|---|
Monospace font
| Monospace is used for commands, package names, files and directory paths, and any text displayed in a prompt. |
Monospace with a background | This type of formatting is used for anything entered or returned in a command prompt. |
| Italicized text | Any text which is italicized is a variable, such as instance_name or hostname. Occasionally, this is also used to emphasize a new term or other phrase. |
| Bolded text | Most phrases which are in bold are application names, such as Cygwin, or are fields or options in a user interface, such as a User Name Here: field or button. |
doc-Managing_Smart_Cards.
"Incorrect command example for setup script options" is better than "Bad example".
| Revision History | |||
|---|---|---|---|
| Revision 6.0.0 | Thu Oct 22 2009 | ||
| |||

/usr/share/doc/pam-version# directory contains a System Administrators' Guide, a Module Writers' Manual, and the Application Developers' Manual, as well as a copy of the PAM standard, DCE-RFC 86.0.
/etc/pam.d/ directory contains the PAM configuration files for each PAM-aware application.
/etc/pam.d/ directory. Each file in this directory has the same name as the service to which it controls access.
/etc/pam.d/ directory. For example, the login program defines its service name as login and installs the /etc/pam.d/login PAM configuration file.
module_interface control_flag module_name module_argumentsauth — This module interface authenticates use. For example, it requests and verifies the validity of a password. Modules with this interface can also set credentials, such as group memberships or Kerberos tickets.
account — This module interface verifies that access is allowed. For example, it may check if a user account has expired or if a user is allowed to log in at a particular time of day.
password — This module interface is used for changing user passwords.
session — This module interface configures and manages user sessions. Modules with this interface can also perform additional tasks that are needed to allow access, like mounting a user's home directory and making the user's mailbox available.
pam_unix.so provides all four module interfaces.
auth required pam_unix.so
pam_unix.so module's auth interface.
sufficient or requisite value, then the order in which the modules are listed is important to the authentication process.
reboot command normally uses several stacked modules, as seen in its PAM configuration file:
[root@MyServer ~]# cat /etc/pam.d/reboot
#%PAM-1.0
auth	sufficient	pam_rootok.so
auth	required	pam_console.so
#auth	include		system-auth
account	required	pam_permit.so
auth sufficient pam_rootok.so — This line uses the pam_rootok.so module to check whether the current user is root, by verifying that their UID is 0. If this test succeeds, no other modules are consulted and the command is executed. If this test fails, the next module is consulted.
auth required pam_console.so — This line uses the pam_console.so module to attempt to authenticate the user. If this user is already logged in at the console, pam_console.so checks whether there is a file in the /etc/security/console.apps/ directory with the same name as the service name (reboot). If such a file exists, authentication succeeds and control is passed to the next module.
#auth include system-auth — This line is commented and is not processed.
account required pam_permit.so — This line uses the pam_permit.so module to allow the root user or anyone logged in at the console to reboot the system.
required — The module result must be successful for authentication to continue. If the test fails at this point, the user is not notified until the results of all module tests that reference that interface are complete.
requisite — The module result must be successful for authentication to continue. However, if a test fails at this point, the user is notified immediately with a message reflecting the first failed required or requisite module test.
sufficient — The module result is ignored if it fails. However, if the result of a module flagged sufficient is successful and no previous modules flagged required have failed, then no other results are required and the user is authenticated to the service.
optional — The module result is ignored. A module flagged as optional only becomes necessary for successful authentication when no other modules reference the interface.
include — Unlike the other controls, this does not relate to how the module result is handled. This flag pulls in all lines in the configuration file which match the given parameter and appends them as an argument to the module.
required modules are called is not critical. Only the sufficient and requisite control flags cause order to become important.
pam.d manpage.
libpam, which can locate the correct version of the module.
pam_userdb.so module uses information stored in a Berkeley DB file to authenticate the user. Berkeley DB is an open source database system embedded in many applications. The module takes a db argument so that Berkeley DB knows which database to use for the requested service. For example:
auth required pam_userdb.so db=/path/to/BerkeleyDB_file/var/log/secure file.
#%PAM-1.0
auth		required  pam_securetty.so
auth		required  pam_unix.so nullok
auth		required  pam_nologin.so
account		required  pam_unix.so
password	required  pam_cracklib.so retry=3
password	required  pam_unix.so shadow nullok use_authtok
session	required  pam_unix.so
#) at the beginning of the line.
auth required pam_securetty.so — This module ensures that if the user is trying to log in as root, the tty on which the user is logging in is listed in the /etc/securetty file, if that file exists.
Login incorrect message.
auth required pam_unix.so nullok — This module prompts the user for a password and then checks the password using the information stored in /etc/passwd and, if it exists, /etc/shadow.
nullok instructs the pam_unix.so module to allow a blank password.
auth required pam_nologin.so — This is the final authentication step. It checks whether the /etc/nologin file exists. If it exists and the user is not root, authentication fails.
auth modules are checked, even if the first auth module fails. This prevents the user from knowing at what stage their authentication failed. Such knowledge in the hands of an attacker could allow them to more easily deduce how to crack the system.
account required pam_unix.so — This module performs any necessary account verification. For example, if shadow passwords have been enabled, the account interface of the pam_unix.so module checks to see if the account has expired or if the user has not changed the password within the allowed grace period.
password required pam_cracklib.so retry=3 — If a password has expired, the password component of the pam_cracklib.so module prompts for a new password. It then tests the newly created password to see whether it can easily be determined by a dictionary-based password cracking program.
retry=3 specifies that if the test fails the first time, the user has two more chances to create a strong password.
password required pam_unix.so shadow nullok use_authtok — This line specifies that if the program changes the user's password, it should use the password interface of the pam_unix.so module to do so.
shadow instructs the module to create shadow passwords when updating a user's password.
nullok instructs the module to allow the user to change their password from a blank password, otherwise a null password is treated as an account lock.
use_authtok, provides a good example of the importance of order when stacking PAM modules. This argument instructs the module not to prompt the user for a new password. Instead, it accepts any password that was recorded by a previous password module. In this way, all new passwords must pass the pam_cracklib.so test for secure passwords before being accepted.
session required pam_unix.so — The final line instructs the session interface of the pam_unix.so module to manage the session. This module logs the user name and the service type to /var/log/secure at the beginning and end of each session. This module can be supplemented by stacking it with other session modules for additional functionality.
/usr/share/doc/pam-version# directory.
pam_timestamp.so module. It is important to understand how this mechanism works, because a user who walks away from a terminal while pam_timestamp.so is in effect leaves the machine open to manipulation by anyone with physical access to the console.
pam_timestamp.so module creates a timestamp file. By default, this is created in the /var/run/sudo/ directory. If the timestamp file already exists, graphical administrative programs do not prompt for a password. Instead, the pam_timestamp.so module freshens the timestamp file, reserving an extra five minutes of unchallenged administrative access for the user.
/var/run/sudo/user directory. For the desktop, the relevant file is unknown:root. If it is present and its timestamp is less than five minutes old, the credentials are valid.

ssh, use the /sbin/pam_timestamp_check -k root command to destroy the timestamp file.
/sbin/pam_timestamp_check -k root command from the same terminal window where the privileged application was launched.
pam_timestamp.so module must be the user who runs the /sbin/pam_timestamp_check -k command. Do not run this command as root.
/sbin/pam_timestamp_chec command.
/sbin/pam_timestamp_check -k root </dev/null >/dev/null 2>/dev/null
pam_timestamp_check man page for more information about destroying the timestamp file using pam_timestamp_check.
pam_timestamp.so module accepts several directives, with two used most commonly:
timestamp_timeout — Specifies the period (in seconds) for which the timestamp file is valid. The default value is 300 (five minutes).
timestampdir — Specifies the directory in which the timestamp file is stored. The default value is /var/run/sudo/.
/etc/passwd or /etc/shadow, to a Kerberos password database can be tedious, as there is no automated mechanism to perform this task. Refer to Question 2.23 in the online Kerberos FAQ:
kinit program after the user logs in.
kinit program on the client then decrypts the TGT using the user's key, which it computes from the user's password. The user's key is used only on the client machine and is not transmitted over the network.
ntpd, which is documented in /usr/share/doc/ntp-version-number/html/index.html.
/usr/share/doc/krb5-server-version-number.
| Documentation | Location |
|---|---|
| Kerberos V5 Installation Guide (in both PostScript and HTML) | /usr/share/doc/krb5-server-version-number |
| Kerberos V5 System Administrator's Guide (in both PostScript and HTML) | /usr/share/doc/krb5-server-version-number |
| Kerberos V5 UNIX User's Guide (in both PostScript and HTML) | /usr/share/doc/krb5-workstation-version-number |
| "Kerberos: The Network Authentication Protocol" webpage from MIT | http://web.mit.edu/kerberos/www/ |
| The Kerberos Frequently Asked Questions (FAQ) | http://www.cmf.nrl.navy.mil/CCS/people/kenh/kerberos-faq.html |
| Kerberos: An Authentication Service for Open Network Systems by Jennifer G. Steiner, Clifford Neuman, and Jeffrey I. Schille, the original paper describing Kerberos. In PostScript format. | ftp://athena-dist.mit.edu/pub/kerberos/doc/usenix.PS |
| Designing an Authentication System: a Dialogue in Four Scenes, originally by Bill Bryant in 1988, modified by Theodore Ts'o in 1997. This document is a conversation between two developers who are thinking through the creation of a Kerberos-style authentication system. The conversational style of the discussion makes this a good starting place for people who are completely unfamiliar with Kerberos. | http://web.mit.edu/kerberos/www/dialogue.html |
| A how-to article for kerberizing a network. | http://www.ornl.gov/~jar/HowToKerb.html |
| Kerberos Network Design Manual is a thorough overview of the Kerberos system. | http://www.networkcomputing.com/netdesign/kerb1.html |
man command_name.
| Manpage | Description |
|---|---|
| Client Applications | |
| kerberos | An introduction to the Kerberos system which describes how credentials work and provides recommendations for obtaining and destroying Kerberos tickets. The bottom of the man page references a number of related man pages. |
| kinit | Describes how to use this command to obtain and cache a ticket-granting ticket. |
| kdestroy | Describes how to use this command to destroy Kerberos credentials. |
| klist | Describes how to use this command to list cached Kerberos credentials. |
| Administrative Applications | |
| kadmin | Describes how to use this command to administer the Kerberos V5 database. |
| kdb5_util | Describes how to use this command to create and perform low-level administrative functions on the Kerberos V5 database. |
| Server Applications | |
| krb5kdc | Describes available command line options for the Kerberos V5 KDC. |
| kadmind | Describes available command line options for the Kerberos V5 administration server. |
| Configuration Files | |
| krb5.conf | Describes the format and options available within the configuration file for the Kerberos V5 library. |
| kdc.conf | Describes the format and options available within the configuration file for the Kerberos V5 AS and KDC. |
/usr/share/doc/ntp-version-number/html/index.html and online at http://www.ntp.org.
krb5-libs, krb5-server, and krb5-workstation packages on the dedicated machine which runs the KDC. This machine needs to be very secure — if possible, it should not run any services other than the KDC.
/etc/krb5.conf and /var/kerberos/krb5kdc/kdc.conf configuration files to reflect the realm name and domain-to-realm mappings. A simple realm can be constructed by replacing instances of EXAMPLE.COM and example.com with the correct domain name — being certain to keep uppercase and lowercase names in the correct format — and by changing the KDC from kerberos.example.com to the name of the Kerberos server. By convention, all realm names are uppercase and all DNS hostnames and domain names are lowercase. For full details about the formats of these configuration files, refer to their respective man pages.
kdb5_util utility from a shell prompt:
/usr/sbin/kdb5_util create -s
create command creates the database that stores keys for the Kerberos realm. The -s switch forces creation of a stash file in which the master server key is stored. If no stash file is present from which to read the key, the Kerberos server (krb5kdc) prompts the user for the master server password (which can be used to regenerate the key) every time it starts.
/var/kerberos/krb5kdc/kadm5.acl file. This file is used by kadmind to determine which principals have administrative access to the Kerberos database and their level of access. Most organizations can get by with a single line:
*/[email protected] *
kadmind has been started on the server, any user can access its services by running kadmin on any of the clients or servers in the realm. However, only users listed in the kadm5.acl file can modify the database in any way, except for changing their own passwords.
kadmin utility communicates with the kadmind server over the network, and uses Kerberos to handle authentication. Consequently, the first principal must already exist before connecting to the server over the network to administer it. Create the first principal with the kadmin.local command, which is specifically designed to be used on the same host as the KDC and does not use Kerberos for authentication.
kadmin.local command at the KDC terminal to create the first principal:
/usr/sbin/kadmin.local -q "addprinc username/admin"/sbin/service krb5kdc start /sbin/service kadmin start
addprinc command within kadmin. kadmin and kadmin.local are command line interfaces to the KDC. As such, many commands — such as addprinc — are available after launching the kadmin program. Refer to the kadmin man page for more information.
kinit to obtain a ticket and store it in a credential cache file. Next, use klist to view the list of credentials in the cache and use kdestroy to destroy the cache and the credentials it contains.
kinit attempts to authenticate using the same system login username (not the Kerberos server). If that username does not correspond to a principal in the Kerberos database, kinit issues an error message. If that happens, supply kinit with the name of the correct principal as an argument on the command line:
kinit principal
krb5.conf configuration file. While ssh and slogin are the preferred method of remotely logging in to client systems, Kerberized versions of rsh and rlogin are still available, though deploying them requires that a few more configuration changes be made.
krb5-libs and krb5-workstation packages on all of the client machines. Supply a valid /etc/krb5.conf file for each client (usually this can be the same krb5.conf file used by the KDC).
ssh or Kerberized rsh or rlogin, it must have its own host principal in the Kerberos database. The sshd, kshd, and klogind server programs all need access to the keys for the host service's principal. Additionally, in order to use the kerberized rsh and rlogin services, that workstation must have the xinetd package installed.
kadmin, add a host principal for the workstation on the KDC. The instance in this case is the hostname of the workstation. Use the -randkey option for the kadmin's addprinc command to create the principal and assign it a random key:
addprinc -randkey host/server.example.com
kadmin on the workstation itself, and using the ktadd command within kadmin:
ktadd -k /etc/krb5.keytab host/server.example.com
| Service Name | Usage Information |
|---|---|
| ssh |
OpenSSH uses GSS-API to authenticate users to servers if the client's and server's configuration both have GSSAPIAuthentication enabled. If the client also has GSSAPIDelegateCredentials enabled, the user's credentials are made available on the remote system.
|
| rsh and rlogin |
To use the kerberized versions of rsh and rlogin, enable klogin, eklogin, and kshell.
|
| Telnet |
To use kerberized Telnet, krb5-telnet must be enabled.
|
| FTP |
To provide FTP access, create and extract a key for the principal with a root of ftp. Be certain to set the instance to the fully qualified hostname of the FTP server, then enable gssftp.
|
| IMAP |
To use a kerberized IMAP server, the
cyrus-imap package uses Kerberos 5 if it also has the cyrus-sasl-gssapi package installed. The cyrus-sasl-gssapi package contains the Cyrus SASL plugins which support GSS-API authentication. Cyrus IMAP should function properly with Kerberos as long as the cyrus user is able to find the proper key in /etc/krb5.keytab, and the root for the principal is set to imap (created with kadmin).
An alternative to
cyrus-imap can be found in the dovecot package, which is also included in Red Hat Enterprise Linux. This package contains an IMAP server but does not, to date, support GSS-API and Kerberos.
|
| CVS |
To use a kerberized CVS server, gserver uses a principal with a root of cvs and is otherwise identical to the CVS pserver.
|
foo.example.org → EXAMPLE.ORG
		foo.example.com → EXAMPLE.COM
		foo.hq.example.com → HQ.EXAMPLE.COM
krb5.conf. For example:
[domain_realm]
.example.com = EXAMPLE.COM
example.com = EXAMPLE.COM
kadmind (it is also your realm's admin server), and one or more KDCs (slave KDCs) keep read-only copies of the database and run kpropd.
krb5.conf and kdc.conf files are copied to the slave KDC.
kadmin.local from a root shell on the master KDC and use its add_principal command to create a new entry for the master KDC's host service, and then use its ktadd command to simultaneously set a random key for the service and store the random key in the master's default keytab file. This key will be used by the kprop command to authenticate to the slave servers. You will only need to do this once, regardless of how many slave servers you install.
# kadmin.local -r EXAMPLE.COM
 Authenticating as principal root/[email protected] with password.
kadmin: add_principal -randkey host/masterkdc.example.com
Principal "host/host/[email protected]" created.
kadmin: ktadd host/masterkdc.example.com
Entry for principal host/masterkdc.example.com with kvno 3, encryption type Triple DES cbc mode with HMAC/sha1 added to keytab WRFILE:/etc/krb5.keytab.
Entry for principal host/masterkdc.example.com with kvno 3, encryption type ArcFour with HMAC/md5 added to keytab WRFILE:/etc/krb5.keytab.
Entry for principal host/masterkdc.example.com with kvno 3, encryption type DES with HMAC/sha1 added to keytab WRFILE:/etc/krb5.keytab.
Entry for principal host/masterkdc.example.com with kvno 3, encryption type DES cbc mode with RSA-MD5 added to keytab WRFILE:/etc/krb5.keytab.
kadmin: quit
kadmin from a root shell on the slave KDC and use its add_principal command to create a new entry for the slave KDC's host service, and then use kadmin's ktadd command to simultaneously set a random key for the service and store the random key in the slave's default keytab file. This key is used by the kpropd service when authenticating clients.
# kadmin -p jimbo/[email protected] -r EXAMPLE.COM
Authenticating as principal jimbo/[email protected] with password.
Password for jimbo/[email protected]:
kadmin: add_principal -randkey host/slavekdc.example.com
Principal "host/[email protected]" created.
kadmin: ktadd host/[email protected]
Entry for principal host/slavekdc.example.com with kvno 3, encryption type Triple DES cbc mode with HMAC/sha1 added to keytab WRFILE:/etc/krb5.keytab.
Entry for principal host/slavekdc.example.com with kvno 3, encryption type ArcFour with HMAC/md5 added to keytab WRFILE:/etc/krb5.keytab.
Entry for principal host/slavekdc.example.com with kvno 3, encryption type DES with HMAC/sha1 added to keytab WRFILE:/etc/krb5.keytab.
Entry for principal host/slavekdc.example.com with kvno 3, encryption type DES cbc mode with RSA-MD5 added to keytab WRFILE:/etc/krb5.keytab.
kadmin: quit
kprop service with a new realm database. To restrict access, the kprop service on the slave KDC will only accept updates from clients whose principal names are listed in /var/kerberos/krb5kdc/kpropd.acl. Add the master KDC's host service's name to that file.
echo host/[email protected] > /var/kerberos/krb5kdc/kpropd.acl
/var/kerberos/krb5kdc/.k5.REALM, either copy it to the slave KDC using any available secure method, or create a dummy database and identical stash file on the slave KDC by running kdb5_util create -s (the dummy database will be overwritten by the first successful database propagation) and supplying the same password.
kprop service. Then, double-check that the kadmin service is disabled.
kprop command will read (/var/kerberos/krb5kdc/slave_datatrans), and then use the kprop command to transmit its contents to the slave KDC.
# /usr/sbin/kdb5_util dump /var/kerberos/krb5kdc/slave_datatrans

# kprop slavekdc.example.com
kinit, verify that a client system whose krb5.conf lists only the slave KDC in its list of KDCs for your realm is now correctly able to obtain initial credentials from the slave KDC.
kprop command to transmit the database to each slave KDC in turn, and configure the cron service to run the script periodically.
A.EXAMPLE.COM to access a service in the B.EXAMPLE.COM realm, both realms must share a key for a principal named krbtgt/[email protected], and both keys must have the same key version number associated with them.
kadmin.
# kadmin -r A.EXAMPLE.COM
kadmin: add_principal krbtgt/[email protected]
Enter password for principal "krbtgt/[email protected]":
Re-enter password for principal "krbtgt/[email protected]":
Principal "krbtgt/[email protected]" created.
quit

# kadmin -r B.EXAMPLE.COM
kadmin: add_principal krbtgt/[email protected]
Enter password for principal "krbtgt/[email protected]":
Re-enter password for principal "krbtgt/[email protected]":
Principal "krbtgt/[email protected]" created.
quit
get_principal command to verify that both entries have matching key version numbers (kvno values) and encryption types.
add_principal command's -randkey option to assign a random key instead of a password, dump the new entry from the database of the first realm, and import it into the second. This will not work unless the master keys for the realm databases are identical, as the keys contained in a database dump are themselves encrypted using the master key.
A.EXAMPLE.COM realm are now able to authenticate to services in the B.EXAMPLE.COM realm. Put another way, the B.EXAMPLE.COM realm now trusts the A.EXAMPLE.COM realm, or phrased even more simply, B.EXAMPLE.COM now trusts A.EXAMPLE.COM.
B.EXAMPLE.COM realm may trust clients from the A.EXAMPLE.COM to authenticate to services in the B.EXAMPLE.COM realm, but the fact that it does has no effect on whether or not clients in the B.EXAMPLE.COM realm are trusted to authenticate to services in the A.EXAMPLE.COM realm. To establish trust in the other direction, both realms would need to share keys for the krbtgt/[email protected] service (take note of the reversed in order of the two realms compared to the example above).
A.EXAMPLE.COM can authenticate to services in B.EXAMPLE.COM, and clients from B.EXAMPLE.COM can authenticate to services in C.EXAMPLE.COM, then clients in A.EXAMPLE.COM can also authenticate to services in C.EXAMPLE.COM, even if C.EXAMPLE.COM doesn't directly trust A.EXAMPLE.COM. This means that, on a network with multiple realms which all need to trust each other, making good choices about which trust relationships to set up can greatly reduce the amount of effort required.
service/[email protected]
EXAMPLE.COM is the name of the realm.
domain_realm section of /etc/krb5.conf to map either a hostname (server.example.com) or a DNS domain name (.example.com) to the name of a realm (EXAMPLE.COM).
A.EXAMPLE.COM, B.EXAMPLE.COM, and EXAMPLE.COM. When a client in the A.EXAMPLE.COM realm attempts to authenticate to a service in B.EXAMPLE.COM, it will, by default, first attempt to get credentials for the EXAMPLE.COM realm, and then to use those credentials to obtain credentials for use in the B.EXAMPLE.COM realm.
A.EXAMPLE.COM, authenticating to a service in B.EXAMPLE.COM has three hops: A.EXAMPLE.COM → EXAMPLE.COM → B.EXAMPLE.COM .
SITE1.SALES.EXAMPLE.COM, authenticating to a service in EVERYWHERE.EXAMPLE.COM can have several series of hops:
SITE1.SALES.EXAMPLE.COM →
SALES.EXAMPLE.COM →
EXAMPLE.COM →
EVERYWHERE.EXAMPLE.COM
DEVEL.EXAMPLE.COM and PROD.EXAMPLE.ORG.
DEVEL.EXAMPLE.COM →
EXAMPLE.COM →
COM →
ORG →
EXAMPLE.ORG →
PROD.EXAMPLE.ORG
COM and ORG share a key for krbtgt/ORG@COM
ORG and EXAMPLE.ORG share a key for krbtgt/EXAMPLE.ORG@ORG
capaths section of /etc/krb5.conf, so that clients which have credentials for one realm will be able to look up which realm is next in the chain which will eventually lead to the being able to authenticate to servers.
capaths section is relatively straightforward: each entry in the section is named after a realm in which a client might exist. Inside of that subsection, the set of intermediate realms from which the client must obtain credentials is listed as values of the key which corresponds to the realm in which a service might reside. If there are no intermediate realms, the value "." is used.
[capaths]
A.EXAMPLE.COM = {
B.EXAMPLE.COM = .
C.EXAMPLE.COM = B.EXAMPLE.COM
D.EXAMPLE.COM = B.EXAMPLE.COM
D.EXAMPLE.COM = C.EXAMPLE.COM
}
A.EXAMPLE.COM realm can obtain cross-realm credentials for B.EXAMPLE.COM directly from the A.EXAMPLE.COM KDC.
C.EXAMPLE.COM realm, they will first need to obtain necessary credentials from the B.EXAMPLE.COM realm (this requires that krbtgt/[email protected] exist), and then use those credentials to obtain credentials for use in the C.EXAMPLE.COM realm (using krbtgt/[email protected]).
D.EXAMPLE.COM realm, they will first need to obtain necessary credentials from the B.EXAMPLE.COM realm, and then credentials from the C.EXAMPLE.COM realm, before finally obtaining credentials for use with the D.EXAMPLE.COM realm.
A.EXAMPLE.COM realm can obtain cross-realm credentials from B.EXAMPLE.COM realm directly. Without the "." indicating this, the client would instead attempt to use a hierarchical path, in this case:
A.EXAMPLE.COM → EXAMPLE.COM → B.EXAMPLE.COM
[1] A system where both the client and the server share a common key that is used to encrypt and decrypt network communication.
escd) from the command line:
esc
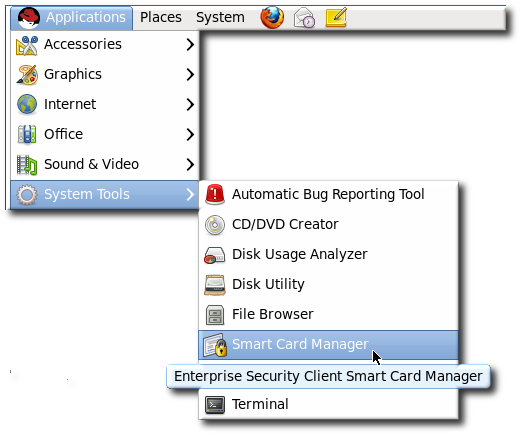
/usr/lib/esc-1.1.0/esc. On Red Hat Enterprise Linux 64-bit systems, the installation directory is /usr/lib64/esc-1.1.0/esc.
| File or Directory | Purpose |
|---|---|
| application.ini | XULRunner application configuration file. |
| components/ | XPCOM components. |
| chrome/ | Directory for Chrome components and additional application files for Enterprise Security Client XUL and JavaScript. |
| defaults/ | Enterprise Security Client default preferences. |
| esc | The script which launches the Enterprise Security Client. |
esc-prefs.js, which is installed with Enterprise Security Client. The second one is prefs.js in the Mozilla profiles directory, which is created when the Enterprise Security Client is first launched.
/usr/lib/esc-1.1.0/defaults/preferences/esc-prefs.js. On Red Hat Enterprise Linux 64-bit, this is in /usr/lib64/esc-1.1.0/defaults/preferences/esc-prefs.js.
esc-prefs.js file specifies the default configuration to use when the Enterprise Security Client is first launched. This includes parameters to connect to the TPS subsystem, set the password prompt, and configure Phone Home information. Each setting is prefaced by the word pref, then the parameter and value are enclosed in parentheses. For example:
pref(parameter,value);
esc-prefs.js file parameters are listed in Table 4.2, “esc-prefs.js Parameters”. The default esc-prefs.js file is shown in Example 4.1, “Default esc-prefs.js File”.
| Parameter | Description | Notes and Defaults |
|---|---|---|
| toolkit.defaultChromeURI | Defines the URL for the Enterprise Security Client to use to contact the XUL Chrome page. | ("toolkit.defaultChromeURI", "chrome://esc/content/settings.xul") |
| esc.tps.message.timeout | Sets a timeout period, in seconds, for connecting to the TPS. | ("esc.tps.message.timeout","90"); |
| esc.disable.password.prompt |
Enables the password prompt, which means that a password is required to read the certificate information off the smart card.
The password prompt is disabled by default, so anyone can use the Enterprise Security Client. However, in security contexts, like when a company uses security officers to manage token operations, then this should be enabled, to restrict access to the Enterprise Security Client.
|
("esc.disable.password.prompt","yes");
|
| esc.global.phone.home.url |
Sets the URL to use to contact the TPS server.
Normally, the Phone Home information is set on the token already through its applet. If a token does not have Phone Home information, meaning it has no way to contact the TPS server, then the Enterprise Security Client checks for a global default Phone Home URL.
This setting is only checked if it is explicitly set. This setting also applies to every token formatted through the client, so setting this parameter forces all tokens to point to the same TPS. Only use this parameter if that specific behavior is desired.
|
("esc.global.phone.home.url", "http://server.example.com:7888/cgi-bin/home/index.cgi");
|
| esc.global.alt.nss.db |
Points to a directory that contains a common security database that is used by all Enterprise Security Client users on the server.
Phone Home URL.
This setting is only checked if it is explicitly set. If this is not set, then each user accesses only each individual profile security database, rather than a shared database.
|
prefs("esc.global.alt.nss.db", "C:/Documents and Settings/All Users/shared-db");
|
#pref("toolkit.defaultChromeURI", "chrome://esc/content/settings.xul");
pref("signed.applets.codebase_principal_support",true); for internal use only

pref("capability.principal.codebase.p0.granted", "UniversalXPConnect"); for internal use only
pref("capability.principal.codebase.p0.id", "file://"); for internal use only

pref("esc.tps.message.timeout","90");

#Do we populate CAPI certs on windows?
pref("esc.windows.do.capi","yes");

#Sample Security Officer Enrollment UI
#pref("esc.security.url","http://test.host.com:7888/cgi-bin/so/enroll.cgi");

#Sample Security Officer Workstation UI
#pref("esc.security.url","https://dhcp-170.sjc.redhat.com:7889/cgi-bin/sow/welcome.cgi");

#Hide the format button or not.
pref("esc.hide.format","no");

#Use this if you absolutely want a global phone home url for all tokens
#Not recommended!
#pref("esc.global.phone.home.url","http:/test.host.com:7888/cgi-bin/home/index.cgi");
~/.redhat/esc/alphanumeric_string.default/prefs.js in Red Hat Enterprise Linux 6.0.
prefs.js file. Editing this file is tricky. The prefs.js file is generated and edited dynamically by the Enterprise Security Client, and manual changes to this file are overwritten when the Enterprise Security Client exits.
| Parameter | Description | Notes and Defaults |
|---|---|---|
| esc.tps.url | Sets a URL for the Enterprise Security Client to use to connect to the TPS. This is not set by default. | |
esc.key.token_ID.tps.url
|
Sets the hostname and port to use to contact a TPS.
If this Phone Home information was not burned into the card at the factory, it can be manually added to the card by adding the TPS URL, an enrollment page URL, the issuer's name, and Phone Home URL.
|
("esc.key.token_ID.tps.url" = "http://server.example.com:7888/nk_service");
|
| esc.key.token_ID.tps.enrollment-ui.url |
Gives the URL to contact the enrollment page for enroll certificates on the token.
If this Phone Home information was not burned into the card at the factory, it can be manually added to the card by adding the TPS URL, an enrollment page URL, the issuer's name, and Phone Home URL.
| ("esc.key.token_ID.tps.enrollment-ui.url" = "http://server.example.com:7888/cgi_bin/esc.cgi?"); |
| esc.key.token_ID.issuer.name |
Gives the name of the organization enrolling the token.
| ("esc.key.token_ID.issuer.name" = "Example Corp"); |
| esc.key.token_ID.phone.home.url |
Gives the URL to use to contact the Phone Home functionality for the TPS.
The global Phone Home parameter sets a default to use with any token enrollment, if the token does not specify the Phone Home information. By setting this parameter to a specific token ID number, the specified Phone Home parameter applies only to that token.
| ("esc.key.token_ID.phone.home.url" = "http://server.example.com:7888/cgi-bin/home/index.cgi?"); |
| esc.security.url |
Points to the URL to use for security officer mode.
If this is pointed to the security officer enrollment form, then the Enterprise Security Client opens the forms to enroll security officer tokens. If this is pointed to the security officer workstation URL, then it opens the workstation to enroll regular users with security officer approval.
|
("esc.security.url","https://server.example.com:7888/cgi-bin/so/enroll.cgi");
|
/usr/lib[64]/esc-1.1.0/chrome/content/esc/.
| Filename | Purpose |
|---|---|
| settings.xul | Contains the code for the Settings page. |
| esc.xul | Contains the code for the Enrollment page. |
| config.xul | Contains the code for the configuration UI. |
| Filename | Purpose |
|---|---|
| ESC.js | Contains most of the Smart Card Manager JavaScript functionality. |
| TRAY.js | Contains the tray icon functionality. |
| AdvancedInfo.js | Contains the code for the Diagnostics feature. |
| GenericAuth.js | Contains the code for the authentication prompt. This prompt is configurable from the TPS server, which requires dynamic processing by the Smart Card Manager. |
op.format.userKey.issuerinfo.enable=true
op.format.userKey.issuerinfo.value=http://server.example.com
esc-prefs.js, has a parameter which allows a global Phone Home URL default to be set. This parameter is esc.global.phone.home.url and is not in the file by default.
~/.redhat/esc.
esc-prefs.js file.
/usr/lib/esc-1.1.0/defaults/preferences. On 64-bit systems, this is /usr/lib64/esc-1.1.0/defaults/preferences.
esc-prefs.js file. For example:
pref("esc.global.phone.home.url","http://server.example.com:7888/cgi-bin/home/index.cgi");esc-prefs.js file for the esc.global.phone.home.url parameter.

~/.redhat/esc/alphanumeric_string.default/prefs.js file:
"esc.key.token_ID.tps.url" = "http://server.example.com:7888/nk_service""esc.key.token_ID.tps.enrollment-ui.url" = "http://server.example.com:7888/cgi_bin/esc.cgi?""esc.key.token_ID.issuer.name" = "Example Corp""esc.key.token_ID.phone.home.url" = "http://server.example.com:7888/cgi-bin/home/index.cgi?""esc.key.token_ID.EnrolledTokenBrowserURL" = "http://www.test.example.com"prefs.js file are listed in Table 4.3, “prefs.js Parameters”.
index.cgi in the /var/lib/pki-tps/cgi-bin/home directory; this prints the Phone Home information to XML.
<ServiceInfo><IssuerName>Example Corp</IssuerName>
    <Services>
        <Operation>http://server.example.com:7888/nk_service ## TPS server URL
        </Operation>
        <UI>http://server.example.com:7888/cgi_bin/esc.cgi   ## Optional
Enrollment UI
        </UI>
        <EnrolledTokenBrowserURL>http://www.test.url.com   ## Optional
enrolled token url
        </EnrolledTokenBrowserURL>
    </Services>
</ServiceInfo>http://server.example.com:7888/cgi-bin/home/index.cgi; the URL can reference the machine name, fully-qualified domain name, or an IPv4 or IPv6 address, as appropriate. When the TPS configuration URI is accessed, the TPS server is prompted to return all of the Phone Home information to the Enterprise Security Client.
esc-prefs.js file.
dc=server,dc=example,dc=com; this directory is used to authenticate any user attempting to enroll a smart card. The other database is used for internal TPS instance entries, including TPS agents, administrators, and security officers. This subtree has a DN like dc=server.example.com-pki-tps. The TUS Officers group entry is under the dc=server.example.com-pki-tps suffix.
cn=TUS Officers,ou=Groups,dc=server.example.com-pki-tps.
ldapmodify:
/usr/lib/mozldap/ldapmodify -a -D "cn=Directory Manager" -w secret -p 389 -h server.example.com

dn: uid=jsmith,cn=TUS Officers,ou=Groups, dc=server.example.com-pki-tps
objectclass: inetorgperson
objectclass: organizationalPerson
objectclass: person
objectclass: top
sn: smith
uid: jsmith
cn: John Smith
mail: [email protected]
userPassword: secretvim /var/lib/pki-tps/cgi-bin/sow/cfg.pl
#
# Feel free to modify the following parameters:
#
my $ldapHost = "localhost";
my $ldapPort = "389";
my $basedn = "ou=People,dc=server, dc=example,dc=com";
my $port = "7888";
my $secure_port = "7889";
my $host = "localhost";https://server.example.com:9444/ca/ee/ca/
esc
/var/lib/pki-tps/cgi-bin/so/index.cgi
esc-prefs.js file. The first, esc.disable.password.prompt, sets security officer mode. The second, esc.security.url, points to the security officer enrollment page. Just the presence of the esc.security.url parameter instructs the Enterprise Security Client to open in security officer mode next time it opens.
pref("esc.disable.password.prompt","no");
pref("esc.security.url","https://server.example.com:7888/cgi-bin/so/enroll.cgi");esc
esc-prefs.js file again, and this time change the esc.security.url parameter to point to the security officer workstation page.
pref("esc.security.url","https://server.example.com:7889/cgi-bin/sow/welcome.cgi");escd process, and comment out the esc.securty.url and esc.disable.password.prompt lines in the esc-prefs.js file. When the esc process is restarted, it starts in normal mode.
esc process is running.
esc

esc-pref.js file (Section 4.4.1, “Enabling Security Officer Mode”) the security officer enrollment page opens.
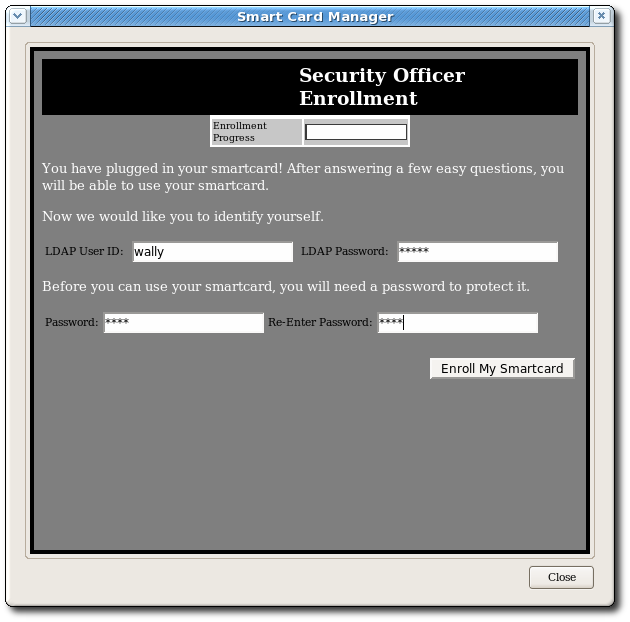
esc process is running. If necessary, start the process.
esc

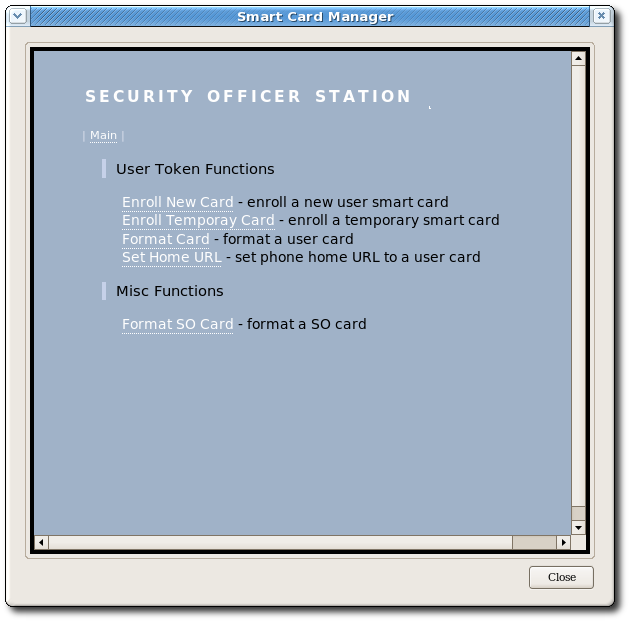
esc process is running. If necessary, start the process.
esc


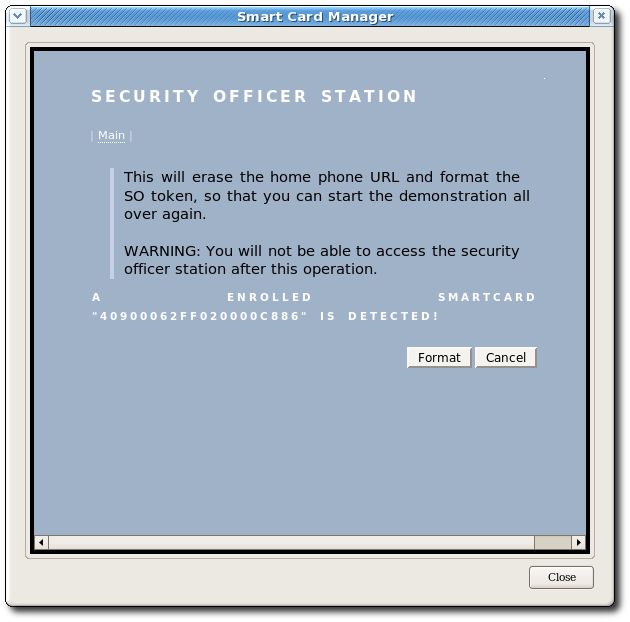

https://server.example.com:7890/cgi-bin/home/index.cgi
/var/lib/pki-tps/cgi-bin/home/Enroll.html for regular enrollments
/var/lib/pki-tps/cgi-bin/so/Enroll.html for security officer enrollments
/var/lib/pki-tps/cgi-bin/sow/Enroll.html for security officer workstation enrollments (users enrolled through the security officer UI)
docroot/ directory, such as /var/lib/pki-tps/docroot/esc/sow for the security officer enrollment file in /var/lib/pki-tps/cgi-bin/sow.
<!-- Change the title if desired --> <title>Enrollment</title> ... <p class="headerText">Smartcard Enrollment</p> ... <!-- Insert customized descriptive text here. --> <p class="bodyText">You have plugged in your smart card!After answering a few easy questions, you will be able to use your smart card.</p> <p class="bodyText">Now we would like you to identify yourself.</p> ... <table> <tr> <td><p >LDAP User ID:</p></td> <td> </td> <td><input type="text" id="snametf" value=""></td> </tr> </table>
style.css CSS style sheet and the logo image, logo.png.
<link rel=stylesheethref="/esc/home/style.css"type="text/css"> ... <table width="100%" class="logobar"> <tr> <td> <img alt=""src="/home/logo.jpg"> </td> <td> <p class="headerText">Smartcard Enrollment</p> </td> </tr> </table>
style.css file is a standard CSS file, so all of the tags and classes can be defined as follows:
body {
background-color: grey;
        font-family: arial;
        font-size: 7p
}Enroll.html files is through the JavaScript file which sets the page functionality. This file controls features like the progress meter, as well as processing the inputs which are used to authenticate the user to the user directory.
<progressmeter id="progress-id" hidden="true" align = "center"/> ... <table> <tr> <td><p >LDAP User ID: </p></td> <td> </td> <td><input type="text"id="snametf"value=""></td> </tr> </table>
util.js file. If this file is improperly edited, it can break the Enterprise Security Client UI and prevent tokens from being enrolled.
/var/lib/pki-tps/cgi-bin/home/Enroll.html file is in Example 4.6, “Complete Enroll.html File”.
<html>
<head>
<meta http-equiv="Content-Type" content="text/html; charset=utf-8">
<link rel=stylesheet href="/esc/home/style.css" type="text/css">

<title>Enrollment</title>
</head>
<script type="text/JavaScript" src="/esc/home/util.js">
</script>
<body onload="InitializeBindingTable();" onunload=cleanup()>

<progressmeter id="progress-id" hidden="true" align = "center"/>
<table width="100%" class="logobar">
  <tr>
    <td>
<img alt="" src="/home/logo.jpg">
    </td>
    <td>
      <p class="headerText">Smartcard Enrollment</p>p
    </td>
  </tr>
</table>
  <table id="BindingTable" width="200px"align="center">
    <tr id="HeaderRow">
    </tr>
  </table>
  <p class="bodyText">You have plugged in your smart card! After answering a few easy questions, you will be able to use your smart card.
  </p>p
  <p class="bodyText">
      Now we would like you to identify yourself.
   </p>p
    <table>
      <tr>
        <td><p >LDAP User ID: </p>p</td>
        <td> </td>
        <td><input type="text" id="snametf"  value=""></td>
         <td> </td>
        <td><p>LDAP Password: </p>p</td>
         <td> </td>
        <td><input type="password" id="snamepwd" value=""></td>
      </tr>

      </table>

      <p class="bodyText"> Before you can use your smart card, you will need a password to protect it.</p>p
      <table>
      <tr>
        <td><p >Password:</p>p</td>
        <td><input type="password" id="pintf" name="pintf" value=""></td>

        <td><p >Re-Enter Password:</p>p</td>
        <td><input type="password" id="reenterpintf" name="reenterpintf" value=""></td>
    </table>
    <br>
    <table width="100%">
      <tr>
        <td align="right">
          <input type="button" id="enrollbtn" name="enrollbtn" value="Enroll My Smartcard" onClick="DoEnrollCOOLKey();">
        </td>
      </tr>
    </table>
</body></html>service pki-tps stop
false.
op.operation_type.token_type.loginRequest.enable=false
op.operation_type.token_type.auth.enable=false
enroll, format, or pinreset. Disabling authentication for one operation type does not disable it for any other operation types.
op.enroll.userKey.loginRequest.enable=false
op.enroll.userKey.pinReset.enable=false
service pki-tps start
CS.cfg:
auth.instance.0.baseDN=dc=example,dc=comauth.instance.0.hostport=server.example.com:389
/usr/bin/ldapmodify -a -D "cn=Directory Manager" -w secret-p 389 -h server.example.comdn: uid=jsmith,ou=People,dc=example,dc=comobjectclass: person objectclass: inetorgperson objectclass: top uid: jsmith cn: John Smith email: [email protected] userPassword: secret
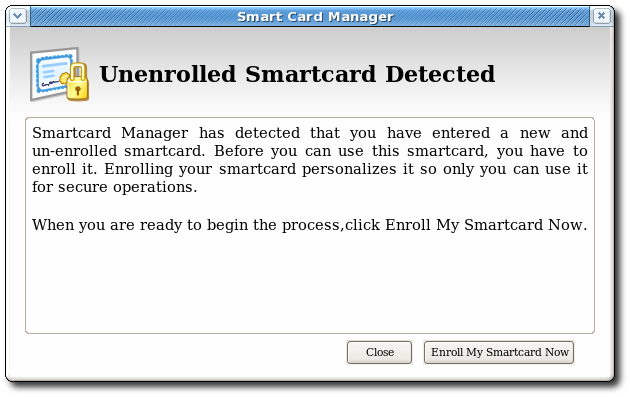
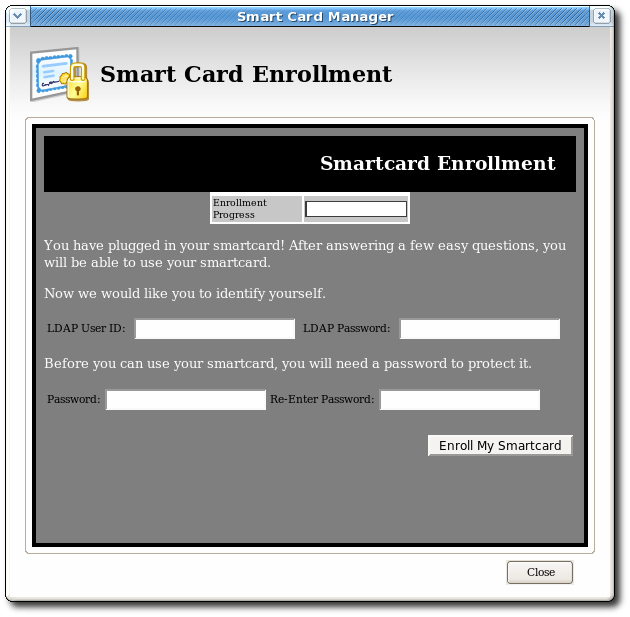
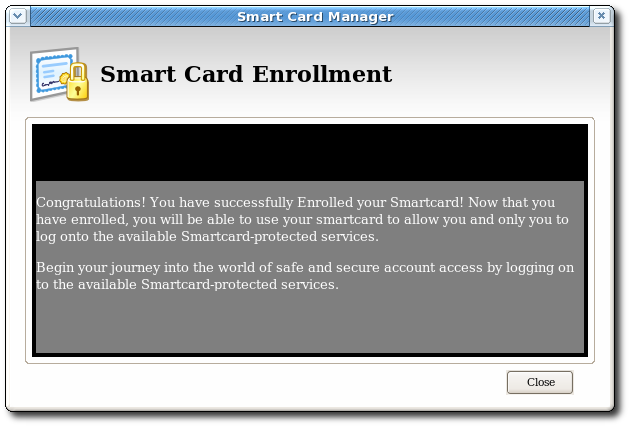

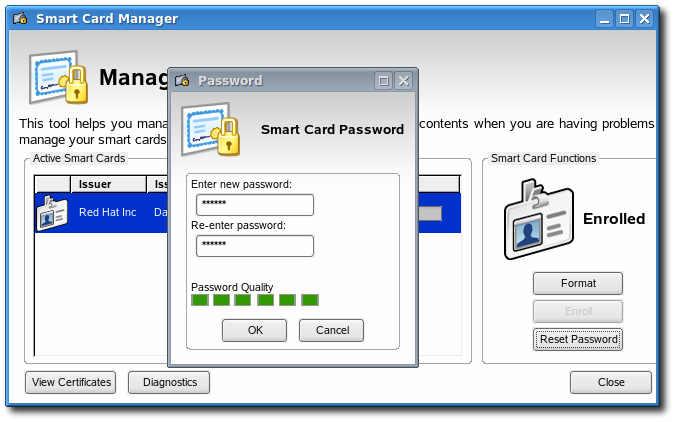
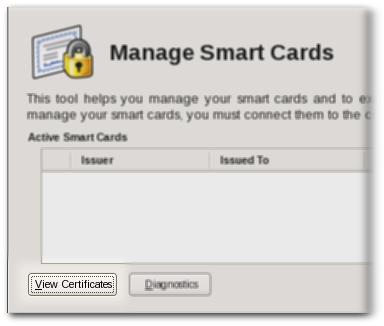
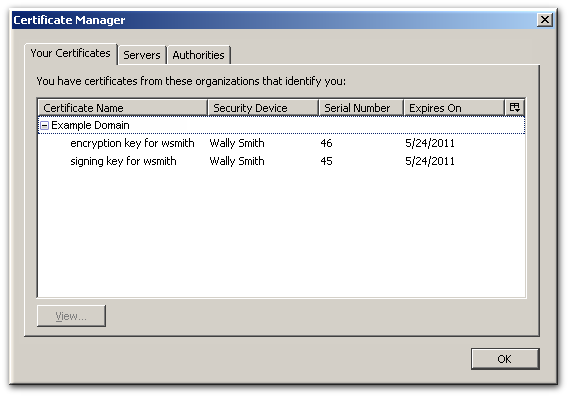
https://server.example.com:9444/ca/ee/ca/


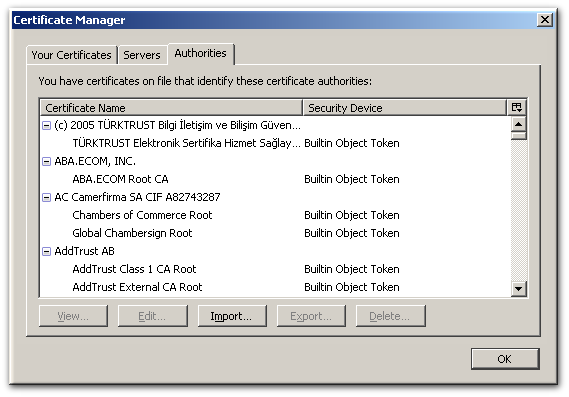


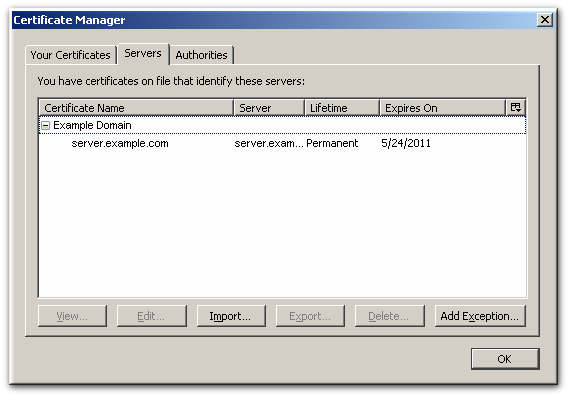
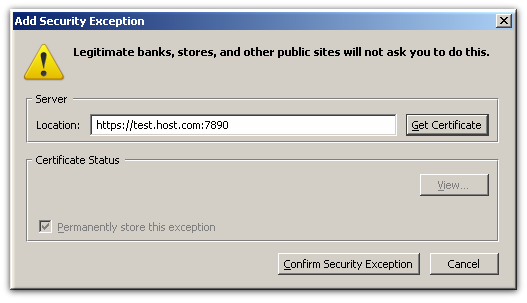


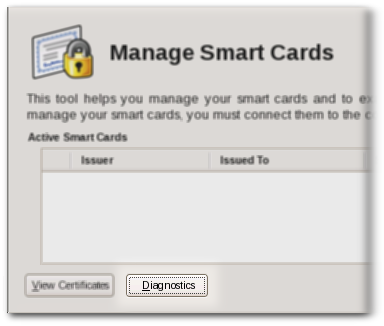
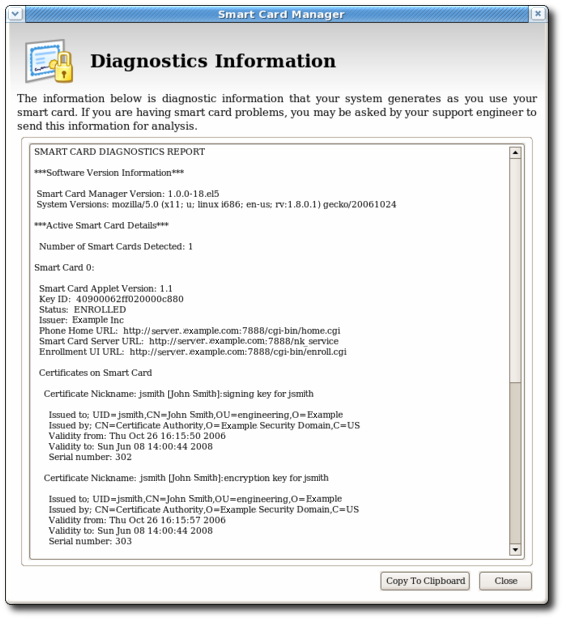
Example Corp.
3BEC00FF8131FE45A0000000563333304A330600A1
PCSC daemon.
tps-debug.log or tps-error.log files, depending on the cause for the message.
| Return Code | Description |
|---|---|
| General Error Codes | |
| 6400 | No specific diagnosis |
| 6700 | Wrong length in Lc |
| 6982 | Security status not satisfied |
| 6985 | Conditions of use not satisfied |
| 6a86 | Incorrect P1 P2 |
| 6d00 | Invalid instruction |
| 6e00 | Invalid class |
| Install Load Errors | |
| 6581 | Memory Failure |
| 6a80 | Incorrect parameters in data field |
| 6a84 | Not enough memory space |
| 6a88 | Referenced data not found |
| Delete Errors | |
| 6200 | Application has been logically deleted |
| 6581 | Memory failure |
| 6985 | Referenced data cannot be deleted |
| 6a88 | Referenced data not found |
| 6a82 | Application not found |
| 6a80 | Incorrect values in command data |
| Get Data Errors | |
| 6a88 | Referenced data not found |
| Get Status Errors | |
| 6310 | More data available |
| 6a88 | Referenced data not found |
| 6a80 | Incorrect values in command data |
| Load Errors | |
| 6581 | Memory failure |
| 6a84 | Not enough memory space |
| 6a86 | Incorrect P1/P2 |
| 6985 | Conditions of use not satisfied |
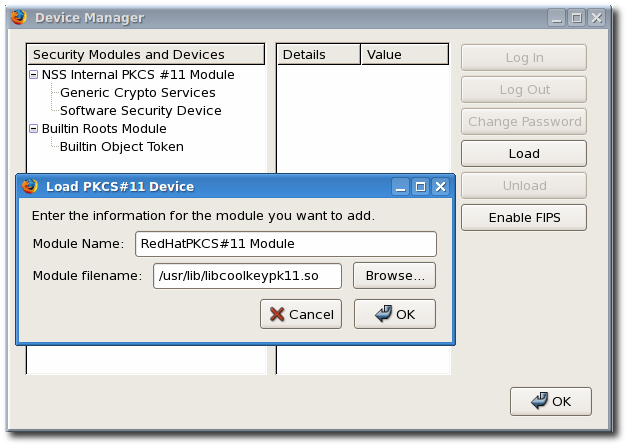
/usr/lib/libcoolkeypk11.so.
about:config to display the list of current configuration options.
negotiate to restrict the list of options.
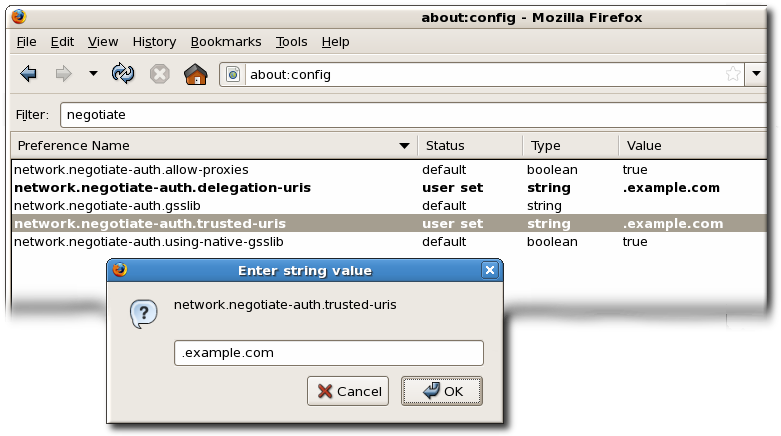
kinit command and supply the user password for the user on the KDC.
[jsmith@host ~] $ kinit
Password for [email protected]:
NSPR_LOG_* variables:
export NSPR_LOG_MODULES=negotiateauth:5
export NSPR_LOG_FILE=/tmp/moz.log
/tmp/moz.log file for error messages with nsNegotiateAuth in the message.
-1208550944[90039d0]: entering nsNegotiateAuth::GetNextToken()
-1208550944[90039d0]: gss_init_sec_context() failed: Miscellaneous failure
No credentials cache found
kinit to generate the Kerberos ticket and then open the website again.
-1208994096[8d683d8]: entering nsAuthGSSAPI::GetNextToken()
-1208994096[8d683d8]: gss_init_sec_context() failed: Miscellaneous failure
Server not found in Kerberos database
[domain_realm] section of the /etc/krb5.conf file to identify the domain. For example:
.example.com = EXAMPLE.COM
example.com = EXAMPLE.COM
certutil command. For example:
certutil -A -d /etc/pki/nssdb -n "root CA cert" -t "CT,C,C" -i /tmp/ca_cert.crt
Ignore means that the system continues functioning as normal if the smart card is removed, while Lock immediately locks the screen.
ocsp_on option to the cert_policy directive.
pam_pkcs11.conf file.
vim /etc/pam_pkcs11/pam_pkcs11.conf
cert_policy line so that it contains the ocsp_on option.
cert_policy =ca, ocsp_on, signature;cert_policy and the equals sign. Otherwise, parsing the parameter fails.
/etc/pam_pkcs11/cn_map.
cn_map file:
MY.CAC_CN.123454->login
pklogin_finder tool (in debug mode) first maps the login ID to the certificates on the card and then attempts to output information about the validity of certificates.
pklogin_finder debug
token key pk11 driver.
https://server.example.com:9444/ca/ee/ca/
token keypk11 driver.
https://server.example.com:9444/ca/ee/ca/
See Also password-based authentication, certificate-based authentication, client authentication, server authentication.
See Also servlet.
See Also certificate authority (CA), root CA.
See Also certificate authority (CA).
See Also password-based authentication.
See Also certificate-based authentication, password-based authentication, server authentication.
See Also Secure Sockets Layer (SSL).
See PKCS #11 module.
See Also FIPS PUBS 140-1.
See Also encryption.
See Also nonrepudiation, encryption.
See Also encryption key, public-key cryptography, signing key.
See Also decryption.
kinit. The default keytab file is /etc/krb5.keytab. The KDC administration server, /usr/kerberos/sbin/kadmind, is the only service that uses any other file (it uses /var/kerberos/krb5kdc/kadm5.keytab).
kinit command allows a principal who has already logged in to obtain and cache the initial ticket-granting ticket (TGT). Refer to the kinit man page for more information.
See Also one-way hash.
See Also authentication, certificate-based authentication.
root[/instance]@REALM. For a typical user, the root is the same as their login ID. The instance is optional. If the principal has an instance, it is separated from the root with a forward slash ("/"). An empty string ("") is considered a valid instance (which differs from the default NULL instance), but using it can be confusing. All principals in a realm have their own key, which for users is derived from a password or is randomly set for services.
See Also cryptographic algorithm.
See enrollment.
See Also CA certificate.
See Also client authentication.
See Also cryptographic algorithm, digital signature.