

Edition 1
1801 Varsity Drive
Raleigh, NC 27606-2072 USA
Phone: +1 919 754 3700
Phone: 888 733 4281
Fax: +1 919 754 3701
ftpd Mono-spaced Bold
To see the contents of the filemy_next_bestselling_novelin your current working directory, enter thecat my_next_bestselling_novelcommand at the shell prompt and press Enter to execute the command.
Press Enter to execute the command.Press Ctrl+Alt+F2 to switch to the first virtual terminal. Press Ctrl+Alt+F1 to return to your X-Windows session.
mono-spaced bold. For example:
File-related classes includefilesystemfor file systems,filefor files, anddirfor directories. Each class has its own associated set of permissions.
Choose → → from the main menu bar to launch Mouse Preferences. In the Buttons tab, click the Left-handed mouse check box and click to switch the primary mouse button from the left to the right (making the mouse suitable for use in the left hand).To insert a special character into a gedit file, choose → → from the main menu bar. Next, choose → from the Character Map menu bar, type the name of the character in the Search field and click . The character you sought will be highlighted in the Character Table. Double-click this highlighted character to place it in the Text to copy field and then click the button. Now switch back to your document and choose → from the gedit menu bar.
Mono-spaced Bold ItalicProportional Bold Italic
To connect to a remote machine using ssh, typesshat a shell prompt. If the remote machine isusername@domain.nameexample.comand your username on that machine is john, typessh [email protected].Themount -o remountcommand remounts the named file system. For example, to remount thefile-system/homefile system, the command ismount -o remount /home.To see the version of a currently installed package, use therpm -qcommand. It will return a result as follows:package.package-version-release
Publican is a DocBook publishing system.
mono-spaced roman and presented thus:
books        Desktop   documentation  drafts  mss    photos   stuff  svn
books_tests  Desktop1  downloads      images  notes  scripts  svgs
mono-spaced roman but add syntax highlighting as follows:
package org.jboss.book.jca.ex1;

import javax.naming.InitialContext;

public class ExClient
{
   public static void main(String args[])
       throws Exception
   {
      InitialContext iniCtx = new InitialContext();
      Object         ref    = iniCtx.lookup("EchoBean");
      EchoHome       home   = (EchoHome) ref;
      Echo           echo   = home.create();

      System.out.println("Created Echo");

      System.out.println("Echo.echo('Hello') = " + echo.echo("Hello"));
   }
}
6.
virt-manager and virsh. Virtualized guests are run as Linux processes and threads which are controlled by these modules.
virsh and virt-manager tools.
virsh command-line tool is built on the libvirt management API and operates as an alternative to the graphical virt-manager application. The virsh command can be used in read-only mode by unprivileged users or, with root access, full administration functionality. The virsh command is ideal for scripting virtualization administration.
virsh command is included in the libvirt-client package.
virt-manager is a graphical desktop tool for managing virtualized guests. virt-manager can be used to perform virtualization administration, virtualized guest creation, migration and configuration tasks. virt-manager allows access to graphical guest consoles. virt-manager can view virtualized guests, host statistics, device information and performance graphs. virt-manager can manage the local hypervisor and remote hypervisors using the same interface and methods.
ac97 device emulates a Cirrus CLGD 5446 PCI VGA card.
vga device emulates a dummy VGA card with Bochs VESA extensions (hardware level, including all non-standard modes).
ac97 device emulates an Intel 82801AA AC97 Audio compatible sound card.
es1370 device emulates an ENSONIQ AudioPCI ES1370 sound card.
e1000 driver emulates an Intel E1000 network adaptor (Intel 82540EM, 82573L, 82544GC).
ne2k_pci driver emulates a Novell NE2000 network adaptor.
pcnet driver emulates an AMD Lance Am7990 network adaptor.
rtl8139 driver emulates a Realtek 8139 network adaptor.
virt-v2v tool converts and imports virtual machines from Xen, other versions of KVM and VMware ESX.
/var/lib/libvirt/images/ folder. If you use a different directory you must add the directory to the SELinux policy. Refer to Section 16.2, “SELinux and virtualization” for details.
| Operating system | Support level |
|---|---|
| Red Hat Enterprise Linux 3 x86 | Optimized with para-virtualized drivers |
| Red Hat Enterprise Linux 4 x86 | Optimized with para-virtualized drivers |
| Red Hat Enterprise Linux 4 AMD 64 and Intel 64 | Optimized with para-virtualized drivers |
| Red Hat Enterprise Linux 5 x86 | Optimized with para-virtualized drivers |
| Red Hat Enterprise Linux 5 AMD 64 and Intel 64 | Optimized with para-virtualized drivers |
| Red Hat Enterprise Linux 6 x86 | Optimized with para-virtualized drivers |
| Red Hat Enterprise Linux 6 AMD 64 and Intel 64 | Optimized with para-virtualized drivers |
| Fedora 12 x86 | Optimized with para-virtualized drivers |
| Fedora 12 AMD 64 and Intel 64 | Optimized with para-virtualized drivers |
| Fedora 13 x86 | Optimized with para-virtualized drivers |
| Fedora 13 AMD 64 and Intel 64 | Optimized with para-virtualized drivers |
| Windows Server 2003 R2 32-Bit | Optimized with para-virtualized drivers |
| Windows Server 2003 R2 64-Bit | Optimized with para-virtualized drivers |
| Windows Server 2003 Service Pack 2 32-Bit | Optimized with para-virtualized drivers |
| Windows Server 2003 Service Pack 2 64-Bit | Optimized with para-virtualized drivers |
| Windows XP 32-Bit | Optimized with para-virtualized drivers |
| Windows Vista 32-Bit | Supported |
| Windows Vista 64-Bit | Supported |
| Windows Server 2008 32-Bit | Optimized with para-virtualized drivers |
| Windows Server 2008 (and R2) 64-Bit | Optimized with para-virtualized drivers |
| Windows 7 32-Bit | Optimized with para-virtualized drivers |
| Windows 7 64-Bit | Optimized with para-virtualized drivers |
virtio drivers, are PCI devices. Presently, guests are limited to a maximum of 32 PCI devices. Some PCI devices are critical for the guest to run and these devices cannot be removed. The default, required devices are:
fstab file, the initrd file or used by the kernel command line. If less privileged users, especially virtualized guests, have write access to whole partitions or LVM volumes the host system could be compromised.
/dev/sdb). Virtualized guests with access to block devices may be able to access other block devices on the system or modify volume labels which can be used to compromise the host system. Use partitions (for example, /dev/sdb1) or LVM volumes to prevent this issue.
igb driver)
igb driver)
vxge driver)
ixgbe driver)
ixgbe driver)
Table of Contents
yum command and the Red Hat Network (RHN).

virt-manager, libvirt and virt-viewer for installation.

Customize the packages (if required)

%packages section of your Kickstart file, append the following package group:
%packages
@kvm
rhn_register command and follow the prompts.
yumkvm package. The kvm package contains the KVM kernel module providing the KVM hypervisor on the default Red Hat Enterprise Linux kernel.
kvm package, run:
# yum install kvm
virt-install command for creating virtual machines.
libvirtd daemon that handles the library calls, manages virtualizes guests and controls the hypervisor.
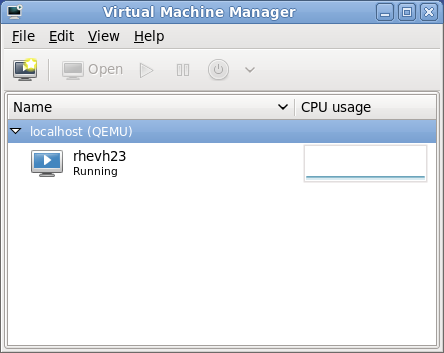
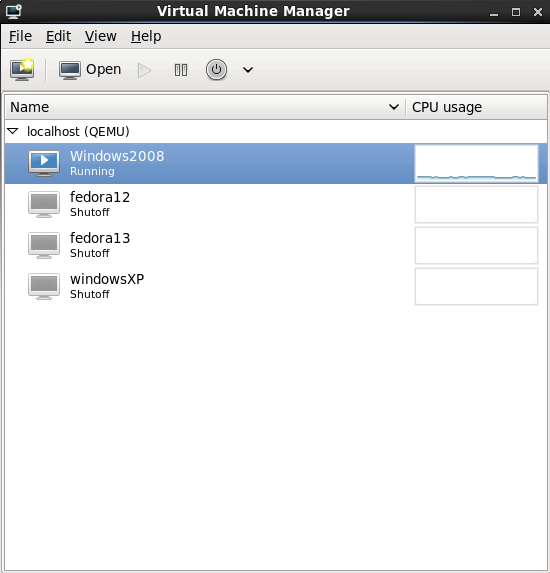
virt-manager, also known as Virtual Machine Manager, provides a graphical tool for administering virtual machines. It uses libvirt-client library as the management API.
virsh command line tool to manage and control virtualized guests and hypervisors from the command line or a special virtualization shell.
# yum install virt-manager libvirt libvirt-python python-virtinst libvirt-client
virt-install. Both methods are covered by this chapter.
virt-install command to create virtualized guests from the command line. virt-install is used either interactively or as part of a script to automate the creation of virtual machines. Using virt-install with Kickstart files allows for unattended installation of virtual machines.
virt-install tool provides a number of options one can pass on the command line. To see a complete list of options run:
$ virt-install --help
virt-install man page also documents each command option and important variables.
qemu-img is a related command which may be used before virt-install to configure storage options.
--vnc option which opens a graphical window for the guest's installation.
# virt-install \
   --network network:default \
   --name rhel5support --ram=756\
   --file=/var/lib/libvirt/images/rhel5support.img \
   --file-size=6 --vnc --cdrom=/dev/sr0
man virt-install for more examples.
virt-manager, also known as Virtual Machine Manager, is a graphical tool for creating and managing virtualized guests.
Open virt-manager
virt-manager. Launch the application from the menu and submenu. Alternatively, run the virt-manager command as root.
Optional: Open a remote hypervisor
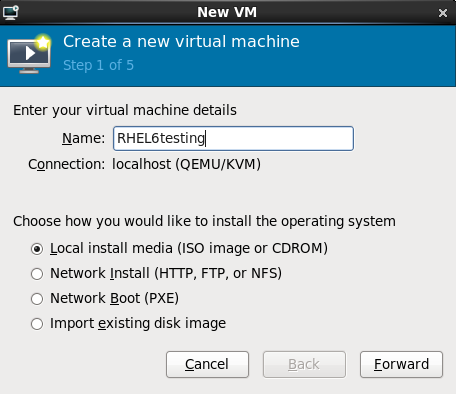
Create a new guest
New VM wizard
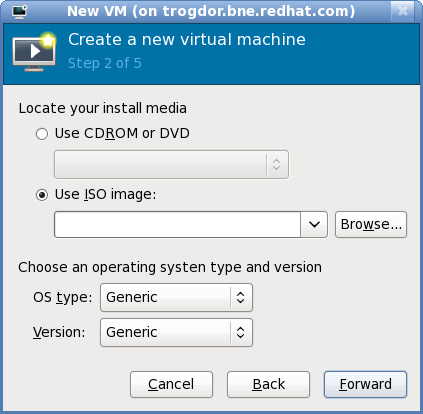
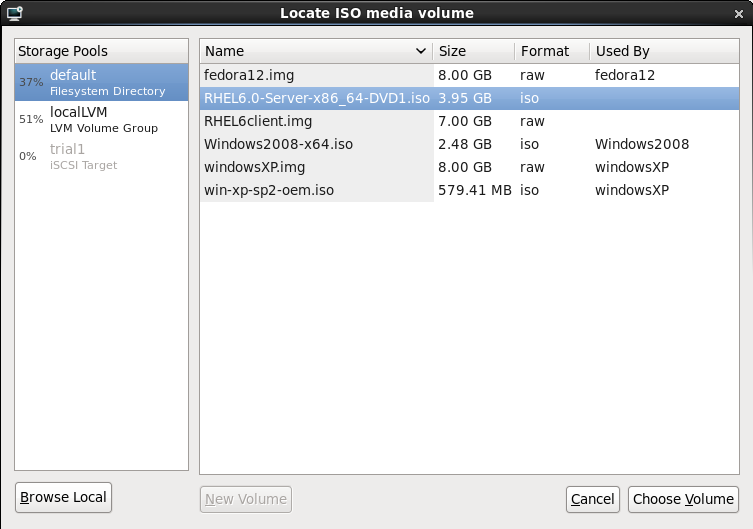
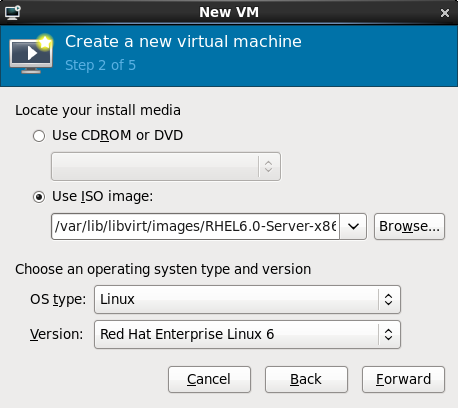
virt-manager can access the installation media (whether locally or over the network).
Specify name and installation type
_), periods (.), and hyphens (-).
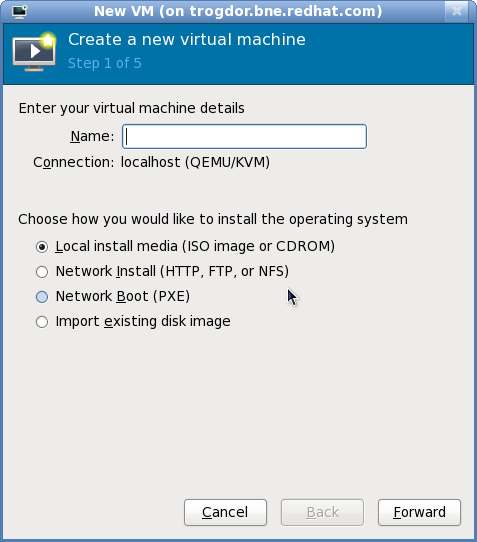
.iso).
Configure installation
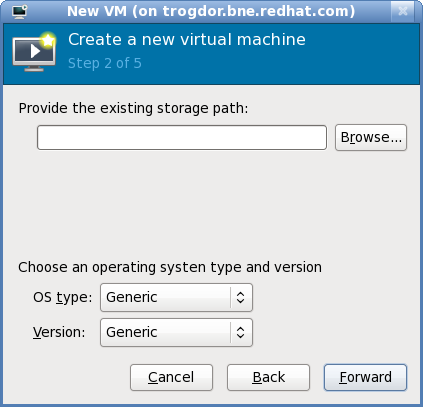
/var/lib/libvirt/images/. If you are using a different location, make sure it is added to your SELinux policy and relabeled before you continue with the installation. Refer to Section 16.2, “SELinux and virtualization” for details on how to do this.

Configure CPU and memory
Configure storage
/var/lib/libvirt/images/ to satisfy default SELinux permissions.
virt-manager will skip this step.
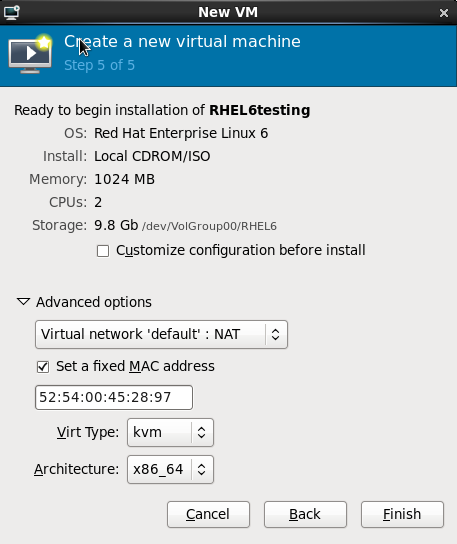
Final configuration
virt-manager will then create the guest with your specified hardware settings.
virt-manager. Chapter 6, Virtualized guest installation overview contains step-by-step instructions to installing a variety of common operating systems.
Create a new bridge
/etc/sysconfig/network-scripts/ directory. This example creates a file named ifcfg-installation which makes a bridge named installation.
# cd /etc/sysconfig/network-scripts/
# vim ifcfg-installation
DEVICE=installation
TYPE=Bridge
BOOTPROTO=dhcp
ONBOOT=yes
TYPE=Bridge, is case-sensitive. It must have uppercase 'B' and lower case 'ridge'.
ifup installation command can start the individual bridge but it is safer to test the entire network restarts properly.
# service network restart
brctl show command to view details about network bridges on the system.
# brctl show
bridge name     bridge id               STP enabled     interfaces
installation    8000.000000000000       no
virbr0          8000.000000000000       yes
virbr0 bridge is the default bridge used by libvirt for Network Address Translation (NAT) on the default Ethernet device.
Add an interface to the new bridge
BRIDGE parameter to the configuration file with the name of the bridge created in the previous steps.
# Intel Corporation Gigabit Network Connection
DEVICE=eth1
BRIDGE=installation
BOOTPROTO=dhcp
HWADDR=00:13:20:F7:6E:8E
ONBOOT=yes
# service network restart
brctl show command:
# brctl show
bridge name     bridge id               STP enabled     interfaces
installation    8000.001320f76e8e       no              eth1
virbr0          8000.000000000000       yes
Security configuration
iptables to allow all traffic to be forwarded across the bridge.
# iptables -I FORWARD -m physdev --physdev-is-bridged -j ACCEPT
# service iptables save
# service iptables restart
iptables rules. In /etc/sysctl.conf append the following lines:
net.bridge.bridge-nf-call-ip6tables = 0
net.bridge.bridge-nf-call-iptables = 0
net.bridge.bridge-nf-call-arptables = 0
sysctl.
# sysctl -p /etc/sysctl.conf
Restart libvirt before the installation
libvirt daemon.
# service libvirtd reload
virt-install append the --network=bridge:installation installation parameter where installation is the name of your bridge. For PXE installations use the --pxe parameter.
# virt-install --hvm --connect qemu:///system \
    --network=bridge:installation --pxe\
    --name EL10 --ram=756 \
    --vcpus=4
    --os-type=linux --os-variant=rhel5
    --file=/var/lib/libvirt/images/EL10.img \
virt-manager installation procedures.
Select PXE

Select the bridge

Start the installation

Optional: Preparation
Open virt-manager and start the wizard

Name the virtualized guest
Select the installation media
/var/lib/libvirt/images/ directory. Any other location may require additional configuration for SELinux, refer to Section 16.2, “SELinux and virtualization” for details.
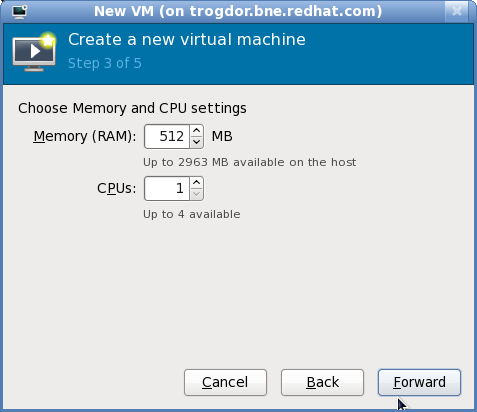
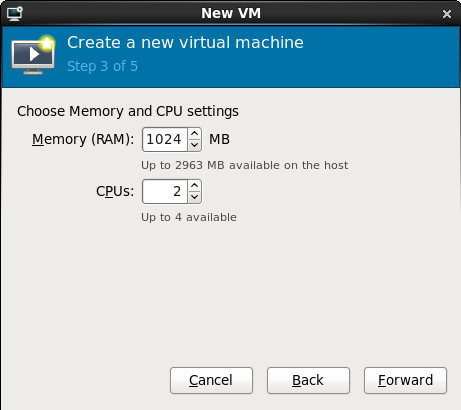
Set RAM and virtual CPUs
X available field.
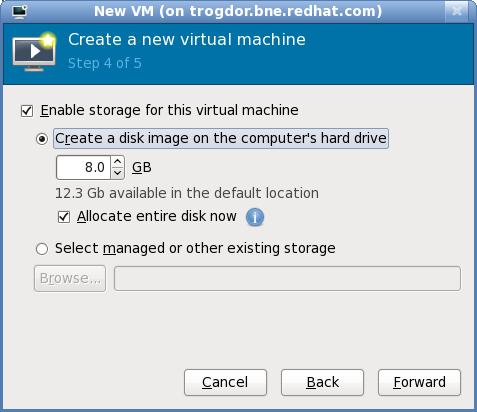
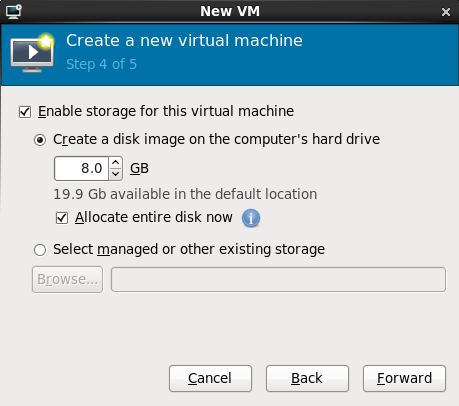
Storage
With the default local storage
/var/lib/libvirt/images/ directory. Enter the size of the disk image to be created. If the Allocate entire disk now check box is selected, a disk image of the size specified will be created immediately. If not, the disk image will grow as it becomes filled.
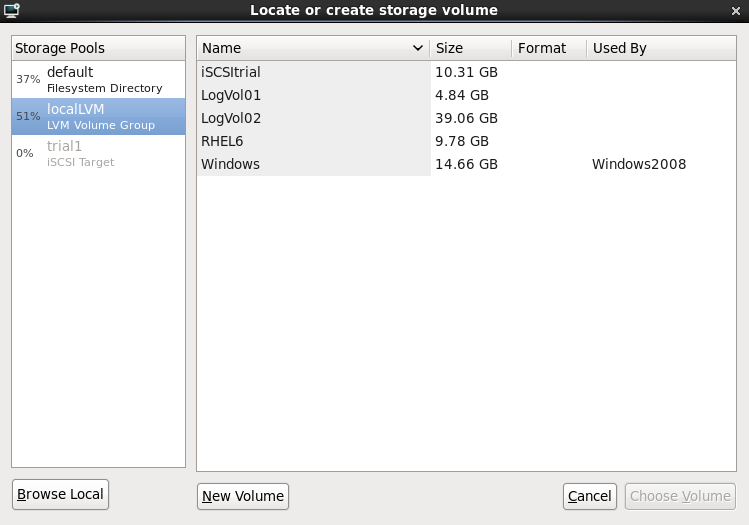
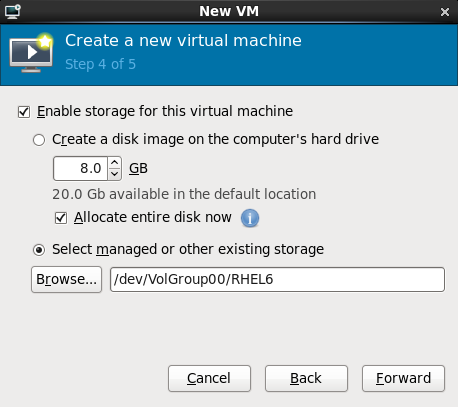
With a storage pool
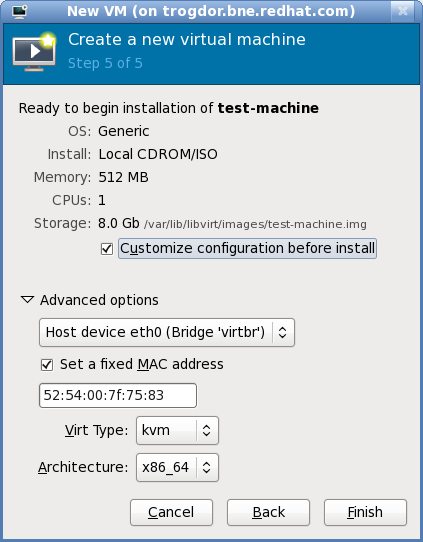
Verify and finish
Optional: Preparation
Open virt-manager and start the wizard
Name the virtualized guest
Optional: Preparation
Open virt-manager and start the wizard
Name the virtualized guest
virt-install command. For instructions on virt-manager, refer to the procedure in Section 8.2, “Using virt-manager”.
virt-install tool. The --vnc option shows the graphical installation. The name of the guest in the example is rhel6PV, the disk image file is rhel6PV.img and a local mirror of the Red Hat Enterprise Linux 6 installation tree is http://example.com/installation_tree/RHEL6-x86/. Replace those values with values for your system and network.
# virt-install --namerhel6PV\ --disk /var/lib/libvirt/images/rhel6PV.img,size=5 \ --vnc --paravirt --vcpus=2 --ram=1024 \ -location=http://example.com/installation_tree/RHEL6-x86/
http://example.com/kickstart/ks.cfg, to fully automate the installation.
# virt-install --namerhel6PV\ --disk /var/lib/libvirt/images/rhel6PV.img,size=5 \ --nographics --paravirt --vcpus=2 --ram=1024 \ -location=http://example.com/installation_tree/RHEL6-x86/ \ -x "ks=http://example.com/kickstart/ks.cfg"

Open virt-manager
virt-manager. Launch the application from the menu and submenu. Alternatively, run the virt-manager command as root.
Select the hypervisor
qemu.
Start the new virtual machine wizard

Name the virtual machine
Choose a virtualization method

Select the installation method

Locate installation media

/var/lib/libvirt/images/ directory. Any other location may require additional configuration for SELinux, refer to Section 16.2, “SELinux and virtualization” for details.
Storage setup
/var/lib/libvirt/images/ directory to satisfy default SELinux permissions. Assign sufficient space for your virtualized guest and any applications the guest requires.

Network setup

Memory and CPU allocation

Verify and start guest installation

Installing Red Hat Enterprise Linux
virt-install), launch the operating system's installer inside the guest, and access the installer through virt-viewer.
virt-viewer tool. This tool allows you to display the graphical console of a virtual machine (via the VNC protocol). In doing so, virt-viewer allows you to install a fully virtualized guest's operating system through that operating system's installer (e.g. the Windows XP installer).
virt-install or virt-manager)
virt-viewer)
virt-install command allows you to create a fully-virtualized guest from a terminal, i.e. without a GUI. If you prefer to use a GUI instead, refer to Section 6.3, “Creating guests with virt-manager” for instructions on how to use virt-manager.
# virt-install \ --name=guest-name\ --network network=default \ --disk path=path-to-disk\ --disk size=disk-size\ --cdrom=path-to-install-disk\ --vnc --ram=1024
path-to-disk/dev/sda3) or image file (/var/lib/libvirt/images/name.img). It must also have enough free space to support the disk-size/var/lib/libvirt/images/. Other directory locations for file-based images are prohibited by SELinux. If you run SELinux in enforcing mode, refer to Section 16.2, “SELinux and virtualization” for more information on installing guests.
virt-install interactively. To do so, use the --prompt command, as in:
# virt-install --prompt
virt-viewer will launch the guest and run the operating system's installer. Refer to to the relevant Microsoft installation documentation for instructions on how to install the operating system.
virt-viewer launches, press F5 and refer to Section 9.2, “Installing Windows 2003” for further instructions before proceeding.
virt-viewer launches and boots the installer, press F5. If you do not press F5 at the right time you will need to restart the installation. Pressing F5 allows you to select a different HAL or Computer Type.
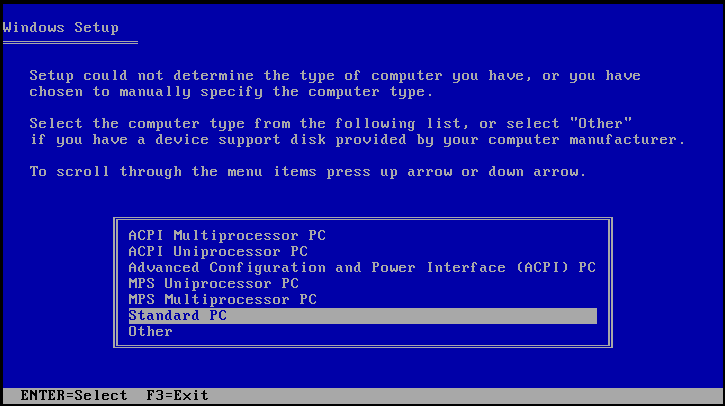
Standard PC as the Computer Type. Then, press Enter to continue with the installation process.
Table of Contents
libvirt installation provides NAT based connectivity to virtual machines out of the box. This is the so called 'default virtual network'. Verify that it is available with the virsh net-list --all command.
# virsh net-list --all
Name                 State      Autostart
-----------------------------------------
default              active     yes
# virsh net-define /usr/share/libvirt/networks/default.xml
/usr/share/libvirt/networks/default.xml
# virsh net-autostart default
Network default marked as autostarted
# virsh net-start default
Network default started
libvirt default network is running, you will see an isolated bridge device. This device does not have any physical interfaces added. The new device uses NAT and IP forwarding to connect to outside world. Do not add new interfaces.
# brctl show
bridge name     bridge id               STP enabled     interfaces
virbr0          8000.000000000000       yes
libvirt adds iptables rules which allow traffic to and from guests attached to the virbr0 device in the INPUT, FORWARD, OUTPUT and POSTROUTING chains. libvirt then attempts to enable the ip_forward parameter. Some other applications may disable ip_forward, so the best option is to add the following to /etc/sysctl.conf.
net.ipv4.ip_forward = 1
/etc/libvirtd/qemu/myguest.xml) for the guest:
<interface type='network'>
   <source network='default'/>
</interface>
<interface type='network'>
  <source network='default'/>
  <mac address='00:16:3e:1a:b3:4a'/>
</interface>
/etc/sysconfig/network-scripts/ directory).
# chkconfig NetworkManager off
# chkconfig network on
# service NetworkManager stop
# service network start
NM_CONTROLLED=no" to the ifcfg-* scripts used in the examples.
Change to the network scripts directory
/etc/sysconfig/network-scripts directory:
# cd /etc/sysconfig/network-scripts
Modify a network interface to make a bridge
/etc/sysconfig/network-scripts/ifcfg-eth0 is used. This file defines eth0, the physical network interface which is set as part of a bridge:
DEVICE=eth0
# change the hardware address to match the hardware address your NIC uses
HWADDR=00:16:76:D6:C9:45
ONBOOT=yes
BRIDGE=br0
MTU variable to the end of the configuration file.
MTU=9000
Create the bridge script
/etc/sysconfig/network-scripts directory called ifcfg-br0 or similar. The br0 is the name of the bridge, this can be anything as long as the name of the file is the same as the DEVICE parameter, and that it matches the bridge name used in step 2.
DEVICE=br0
TYPE=Bridge
BOOTPROTO=dhcp
ONBOOT=yes
DELAY=0
TYPE=Bridge, is case-sensitive. It must have uppercase 'B' and lower case 'ridge'.
Restart the network
# service network restart
Configure iptables
iptables to allow all traffic to be forwarded across the bridge.
# iptables -I FORWARD -m physdev --physdev-is-bridged -j ACCEPT
# service iptables save
# service iptables restart
iptables rules. In /etc/sysctl.conf append the following lines:
net.bridge.bridge-nf-call-ip6tables = 0
net.bridge.bridge-nf-call-iptables = 0
net.bridge.bridge-nf-call-arptables = 0
sysctl.
# sysctl -p /etc/sysctl.conf
Restart the libvirt service
libvirt service with the service command.
# service libvirtd reload
Verify the bridge
brctl).
# brctl show
bridge name     bridge id               STP enabled     interfaces
virbr0          8000.000000000000       yes
br0             8000.000e0cb30550       no              eth0
virt-manager and libvirt, which guests can be attached and have full network access.
virbr0 bridge. Do not attempt to attach a physical device to virbr0. The virbr0 bridge is only for Network Address Translation (NAT) connectivity.
virtio, virtio_blk, virtio_net, virtio_pci and virtio_ring. All five modules must be loaded to use both the para-virtualized block and network devices drivers.
virtio, virtio_net and virtio_pci modules. To use the block device driver only, load the virtio, virtio_ring, virtio_blk and virtio_pci modules.
/boot directory. The original initrd file is saved to /boot/initrd- kernel-version .img.virtio.orig. The original initrd file is replaced with a new initrd RAM disk containing the virtio driver modules. The initrd RAM disk is modified to allow the guest to boot from a storage device using the para-virtualized drivers. To use a different initrd file, you must ensure that drivers are loaded with the sysinit script (Loading the para-virtualized drivers with the sysinit script) or when creating new initrd RAM disk (Adding the para-virtualized drivers to the initrd RAM disk).
sysinit script. Note that the guest cannot use the para-virtualized drivers for the default boot disk if the modules are loaded with the sysinit script.
virtio
virtio_ring
virtio_blk
virtio_net
virtio_pci
virtio_net and virtio_blk can be change. If the drivers are loaded in a different order, drivers will not work.
/etc/rc.d/rc.sysinit file.
if [ -f /etc/rc.modules ]; then
        /etc/rc.modules
fi
Append the following lines after that section:
if [ -f /etc/rc.modules ]; then
        /etc/rc.modules
fi

modprobe virtio
modprobe virtio_ring # Comment this out if you do not need block driver
modprobe virtio_blk  # Comment this out if you do not need block driver
modprobe virtio_net  # Comment this out if you do not need net driver
modprobe virtio_pci
--with parameter for the mkinitrd command. Append following set of parameters, in the exact order, when using the mkinitrd command to create a custom initrd RAM disk:
--with virtio --with virtio_ring --with virtio_blk --with virtio_net --with virtio_pci
x86_64 version of the virtio package for AMD64 systems.
ia32e version of the virtio package for Intel 64 systems. Using the x86_64 version of the virtio may cause a 'Unresolved symbol' error during the boot sequence on Intel 64 systems.
interface with the network interface used by the guest):
# ethtool -k interface# ethtool -Kinterfacegso off # ethtool -Kinterfacetso off
/etc/fstab file and locate the lines containing swap partitions, for example:
/dev/hda3 swap swap defaults 0 0
/dev/vd* naming convention, not the /dev/hd* naming convention. To resolve this issue modify the incorrect swap entries in the /etc/fstab file to use the /dev/vd* convention, for the example above:
/dev/vda3 swap swap defaults 0 0Download the drivers
yum command.
# yum install virtio-win
virtio-win.iso, in the /usr/share/virtio-win/ directory.
Install the para-virtualized drivers
virt-manager and then install the drivers.
Open virt-manager and the guest
virt-manager, select your virtualized guest from the list by double clicking the guest name.
Open the hardware window

Select the device type

Select the ISO file
/usr/share/virtio-win/virtio-win.iso.

Finish adding virtual hardware

Reboot
Open My Computer

Select the correct installation files
RHEV-Block.msi for 32-bit guests or RHEV-Block64.msi for 64-bit guests),
RHEV-Network.msi for 32-bit guests or RHEV-Block64.msi for 64-bit guests),
Install the block device driver
Start the block device driver installation
RHEV-Block.msi or RHEV-Block64.msi.

Confirm the exception

Finish

Install the network device driver
Start the network device driver installation
RHEV-Network.msi or RHEV-Network64.msi.

Performance setting
| Value | Action |
|---|---|
| 0 | Disable TCP timestamps and window scaling. |
| 1 | Enable TCP window scaling. |
| 2 | Enable TCP timestamps. |
| 3 | Enable TCP timestamps and window scaling. |

Confirm the exception
Finish

Reboot
virtio) drivers for the default storage device.
# yum install virtio-win
Creating the guest with virsh
virsh use the virsh define command not the virsh create command.
virsh command.
virsh command. This example can be copied and used if there are no other virtualized floppy devices attached to the virtualized guest.
# virsh attach-disk guest1 /usr/share/virtio-win/virtio-drivers.vfd fda --type floppyCreating the guest with virt-manager

Add the new device
Select the driver disk
/usr/share/virtio-win/virtio-drivers.vfd.
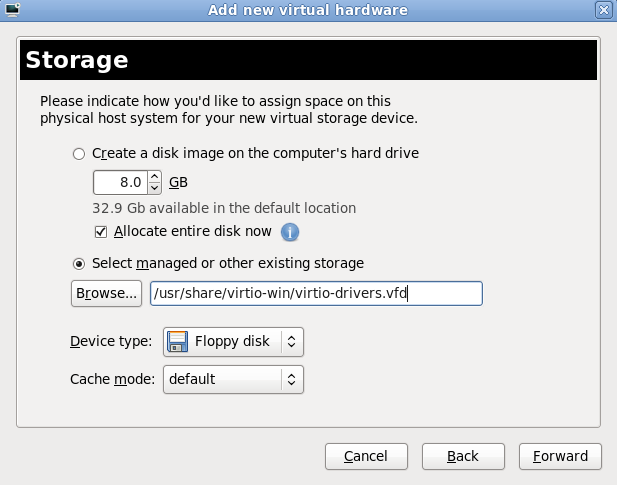
Confirm the new device

Creating the guest with virt-install
virt-install command :
--disk path=/usr/share/virtio-win/virtio-drivers.vfd,device=floppy
Windows Server 2003 and Windows XP


Windows Server 2008
Drive A: and pick the driver that suits your guest operating system and architecture.
virtio driver instead of the virtualized IDE driver. This example edits libvirt configuration files. Alternatively, virt-manager, virsh attach-disk or virsh attach-interface can add a new device using the para-virtualized drivers Section 11.4, “Using KVM para-virtualized drivers for new devices”. Note that the guest does not need to be shut down to perform these steps, however the change will not be applied until the guest is completely shut down and rebooted.
virsh edit <guestname> command to edit the XML configuration file for your device. For example, virsh edit guest1. The configuration files are located in /etc/libvirt/qemu.
<disk type='file' device='disk'>
   <source file='/var/lib/libvirt/images/disk1.img'/>
   <target dev='hda' bus='ide'/>
</disk>
virtio. Note that if the disk was previously IDE it will have a target similar to hda, hdb, or hdc and so on. When changing to bus=virtio the target needs to be changed to vda, vdb, or vdc accordingly.
<disk type='file' device='disk'>
   <source file='/var/lib/libvirt/images/disk1.img'/>
   <target dev='vda' bus='virtio'/>
</disk>
virt-manager.
virsh attach-disk or virsh attach-interface commands can be used to attach devices using the para-virtualized drivers.
virt-manager.

Select hardware type

Select the storage device and driver

Finish the procedure

Select hardware type

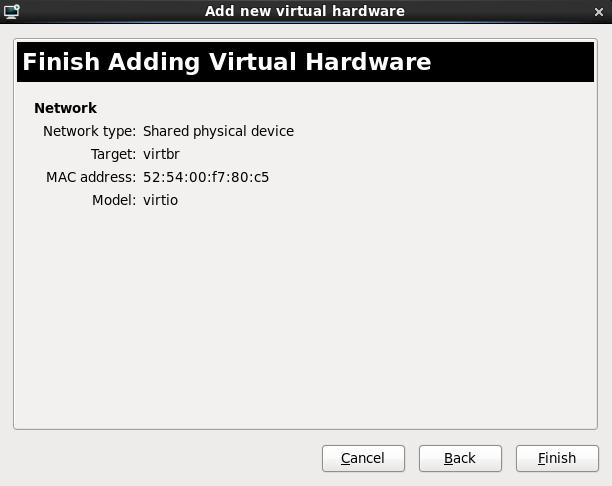
Select the network device and driver

Finish the procedure
Enable the Intel VT-d extensions
Activate Intel VT-d in the kernel
intel_iommu=on parameter to the kernel line of the kernel line in the /boot/grub/grub.conf file.
grub.conf file with Intel VT-d activated.
default=0
timeout=5
splashimage=(hd0,0)/grub/splash.xpm.gz
hiddenmenu
title Red Hat Enterprise Linux Server (2.6.32-36.x86-645)
        root (hd0,0)
        kernel /vmlinuz-2.6.32-36.x86-64 ro root=/dev/VolGroup00/LogVol00 rhgb quiet intel_iommu=on
        initrd /initrd-2.6.32-36.x86-64.img
Ready to use
Enable AMD IOMMU extensions
pci_8086_3a6c, and a fully virtualized guest named win2k3.
Identify the device
virsh nodedev-list command lists all devices attached to the system. The --tree option is useful for identifying devices attached to the PCI device (for example, disk controllers and USB controllers).
# virsh nodedev-list --tree
# virsh nodedev-list | grep pci
pci_0000_00_00_0
pci_0000_00_02_0
pci_0000_00_02_1
pci_0000_00_03_0
pci_0000_00_03_2
pci_0000_00_03_3
pci_0000_00_19_0
pci_0000_00_1a_0
pci_0000_00_1a_1
pci_0000_00_1a_2
pci_0000_00_1a_7
pci_0000_00_1b_0
pci_0000_00_1c_0
lspci output to lspci -n (which turns off name resolution) output can assist in deriving which device has which device identifier code.
virsh nodedev-dumpxml command:
# virsh nodedev-dumpxml pci_8086_3a6c
<device>
  <name>pci_8086_3a6c</name>
  <parent>computer</parent>
  <capability type='pci'>
    <domain>0</domain>
    <bus>0</bus>
    <slot>26</slot>
    <function>7</function>
    <id='0x3a6c'>82801JD/DO (ICH10 Family) USB2 EHCI Controller #2</product>
    <vendor id='0x8086'>Intel Corporation</vendor>
  </capability>
</device># virsh nodedev-dettach pci_8086_3a6c Device pci_8086_3a6c dettached
$ printf %x 0 0 $ printf %x 26 1a $ printf %x 7 7
bus='0x00' slot='0x1a' function='0x7'
virsh edit (or virsh attach device) and added a device entry in the <devices> section to attach the PCI device to the guest.
# virsh edit win2k3
<hostdev mode='subsystem' type='pci' managed='yes'>
<source>
<address domain='0x0000' bus='0x00' slot='0x1a' function='0x7'/>
</source>
</hostdev>ehci driver is loaded by default for the USB PCI controller.
$ readlink /sys/bus/pci/devices/0000\:00\:1a.7/driver ../../../bus/pci/drivers/ehci_hcd
$ virsh nodedev-dettach pci_8086_3a6c
$ readlink /sys/bus/pci/devices/0000\:00\:1d.7/driver ../../../bus/pci/drivers/pci-stub
$ setsebool -P virt_manage_sysfs 1
# virsh start win2k3virt-manager tool. The following procedure adds a 2 port USB controller to a virtualized guest.
Identify the device
virsh nodedev-list command lists all devices attached to the system. The --tree option is useful for identifying devices attached to the PCI device (for example, disk controllers and USB controllers).
# virsh nodedev-list --tree
# virsh nodedev-list | grep pci
pci_0000_00_00_0 pci_0000_00_02_0 pci_0000_00_02_1 pci_0000_00_03_0 pci_0000_00_03_2 pci_0000_00_03_3 pci_0000_00_19_0 pci_0000_00_1a_0 pci_0000_00_1a_1 pci_0000_00_1a_2 pci_0000_00_1a_7 pci_0000_00_1b_0 pci_0000_00_1c_0
lspci output to lspci -n (which turns off name resolution) output can assist in deriving which device has which device identifier code.
Detach the PCI device
# virsh nodedev-dettach pci_8086_3a6c
Device pci_8086_3a6c dettached
Open the hardware settings
Add the new device

Select a PCI device

Confirm the new device

--host-device parameter.
Identify the PCI device
virsh nodedev-list command lists all devices attached to the system. The --tree option is useful for identifying devices attached to the PCI device (for example, disk controllers and USB controllers).
# virsh nodedev-list --tree
# virsh nodedev-list | grep pci
pci_0000_00_00_0
pci_0000_00_02_0
pci_0000_00_02_1
pci_0000_00_03_0
pci_0000_00_03_2
pci_0000_00_03_3
pci_0000_00_19_0
pci_0000_00_1a_0
pci_0000_00_1a_1
pci_0000_00_1a_2
pci_0000_00_1a_7
pci_0000_00_1b_0
pci_0000_00_1c_0
lspci output to lspci -n (which turns off name resolution) output can assist in deriving which device has which device identifier code.
Add the device
virsh nodedev command as the value for the --host-device parameter.
# virt-install \
 -n hostdev-test -r 1024 --vcpus 2 \
 --os-variant fedora11 -v \
 -l http://download.fedoraproject.org/pub/fedora/linux/development/x86_64/os \
 -x 'console=ttyS0 vnc' --nonetworks --nographics  \
 --disk pool=default,size=8 \
 --debug --host-device=pci_8086_10bd
Complete the installation
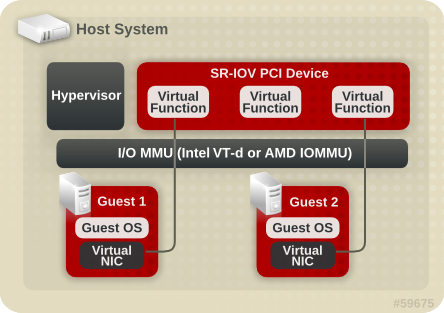
vhost-net feature.
Enable Intel VT-d in BIOS and in the kernel
Verify support
lspci command to verify if the device was detected.
# lspci
03:00.0 Ethernet controller: Intel Corporation 82576 Gigabit Network Connection (rev 01)
03:00.1 Ethernet controller: Intel Corporation 82576 Gigabit Network Connection (rev 01)
Start the SR-IOV kernel modules
modprobe command. The Intel 82576 network interface card uses the igb driver kernel module.
# modprobe igb [<option>=<VAL1>,<VAL2>,]
# lsmod |grep igb
igb    87592  0
dca    6708    1 igb
Activate Virtual Functions
max_vfs parameter of the igb module allocates the maximum number of Virtual Functions. The max_vfs parameter causes the driver to spawn, up to the value of the parameter in, Virtual Functions. For this particular card the valid range is 0 to 7.
# modprobe -r igb
max_vfs set to 1 or any number of Virtual Functions up to the maximum supported by your device.
# modprobe igb max_vfs=7
Make the Virtual Functions persistent
modprobe command /etc/modprobe.d/igb.conf options igb max_vfs=7
Inspect the new Virtual Functions
lspci command, list the newly added Virtual Functions attached to the Intel 82576 network device.
# lspci | grep 82576
0b:00.0 Ethernet controller: Intel Corporation 82576 Gigabit Network Connection (rev 01)
0b:00.1 Ethernet controller: Intel Corporation 82576 Gigabit Network Connection (rev 01)
0b:10.0 Ethernet controller: Intel Corporation 82576 Virtual Function (rev 01)
0b:10.1 Ethernet controller: Intel Corporation 82576 Virtual Function (rev 01)
0b:10.2 Ethernet controller: Intel Corporation 82576 Virtual Function (rev 01)
0b:10.3 Ethernet controller: Intel Corporation 82576 Virtual Function (rev 01)
0b:10.4 Ethernet controller: Intel Corporation 82576 Virtual Function (rev 01)
0b:10.5 Ethernet controller: Intel Corporation 82576 Virtual Function (rev 01)
0b:10.6 Ethernet controller: Intel Corporation 82576 Virtual Function (rev 01)
0b:10.7 Ethernet controller: Intel Corporation 82576 Virtual Function (rev 01)
0b:11.0 Ethernet controller: Intel Corporation 82576 Virtual Function (rev 01)
0b:11.1 Ethernet controller: Intel Corporation 82576 Virtual Function (rev 01)
0b:11.2 Ethernet controller: Intel Corporation 82576 Virtual Function (rev 01)
0b:11.3 Ethernet controller: Intel Corporation 82576 Virtual Function (rev 01)
0b:11.4 Ethernet controller: Intel Corporation 82576 Virtual Function (rev 01)
0b:11.5 Ethernet controller: Intel Corporation 82576 Virtual Function (rev 01)
-n parameter of the lspci command. The Physical Functions corresponds to 0b:00.0 and 0b:00.1. All the Virtual Functions have Virtual Function in the description.
Verify devices exist with virsh
libvirt service must recognize the device before adding a device to a guest. libvirt uses a similar notation to the lspci output. All punctuation characters, ; and ., in lspci output are changed to underscores (_).
virsh nodedev-list command and the grep command to filter the Intel 82576 network device from the list of available host devices. 0b is the filter for the Intel 82576 network devices in this example. This may vary for your system and may result in additional devices.
# virsh nodedev-list | grep 0b
pci_0000_0b_00_0
pci_0000_0b_00_1
pci_0000_0b_10_0
pci_0000_0b_10_1
pci_0000_0b_10_2
pci_0000_0b_10_3
pci_0000_0b_10_4
pci_0000_0b_10_5
pci_0000_0b_10_6
pci_0000_0b_11_7
pci_0000_0b_11_1
pci_0000_0b_11_2
pci_0000_0b_11_3
pci_0000_0b_11_4
pci_0000_0b_11_5
Get device details with virsh
pci_0000_0b_00_0 is one of the Physical Functions and pci_0000_0b_10_0 is the first corresponding Virtual Function for that Physical Function. Use the virsh nodedev-dumpxml command to get advanced output for both devices.
<device>
    <name>pci_0000_0b_00_0</name>
    <parent>pci_0000_00_01_0</parent>
    <driver>
      <name>igb</name>
    </driver>
    <capability type='pci'>
      <domain>0</domain>
      <bus>11</bus>
      <slot>0</slot>
      <function>0</function>
      <product id='0x10c9'>Intel Corporation</product>
      <vendor id='0x8086'>82576 Gigabit Network Connection</vendor>
    </capability>
  </device>
# virsh nodedev-dumpxml pci_0000_0b_10_0
  <device>
    <name>pci_0000_0b_10_0</name>
    <parent>pci_0000_00_01_0</parent>
    <driver>
      <name>igbvf</name>
    </driver>
    <capability type='pci'>
      <domain>0</domain>
      <bus>11</bus>
      <slot>16</slot>
      <function>0</function>
      <product id='0x10ca'>Intel Corporation</product>
      <vendor id='0x8086'>82576 Virtual Function</vendor>
    </capability>
  </device>
pci_0000_0b_10_0 to the guest in Step 10. Note the bus, slot and function parameters of the Virtual Function, these are required for adding the device.
Detach the Virtual Functions
# virsh nodedev-dettach pci_0000_0b_10_0
Device pci_0000_0b_10_0 dettached
Add the Virtual Function to the guest
virsh nodedev-dumpxml pci_8086_10ca_0 command to calculate the values for the configuration file. Convert slot and function values to hexadecimal values (from decimal) to get the PCI bus addresses. Append "0x" to the beginning of the output to tell the computer that the value is a hexadecimal number.
printf utility to convert decimal values to hexadecimal values.
$ printf %x 3
3
$ printf %x 16
10
$ printf %x 1
1
bus='0x03'
slot='0x10'
function='0x01'
virsh edit command. This example edits a guest named MyGuest.
# virsh edit MyGuestdevices section of the XML configuration file.
<hostdev mode='subsystem' type='pci'>
      <source>
        <address bus='0x03' slot='0x10' function='0x01'/>
      </source>
</hostdev>
Restart
# virsh start MyGuest# virsh start test error: Failed to start domain test error: internal error unable to start guest: char device redirected to /dev/pts/2 get_real_device: /sys/bus/pci/devices/0000:03:10.0/config: Permission denied init_assigned_device: Error: Couldn't get real device (03:10.0)! Failed to initialize assigned device host=03:10.0
ntpd service:
# service ntpd start
# chkconfig ntpd on
ntpd service should minimize the affects of clock skew in all cases.
constant_tsc flag is present. To determine if your CPU has the constant_tsc flag run the following command:
$ cat /proc/cpuinfo | grep constant_tsc
constant_tsc bit. If no output is given follow the instructions below.
constant_tsc bit, disable all power management features (BZ#513138). Each system has several timers it uses to keep time. The TSC is not stable on the host, which is sometimes caused by cpufreq changes, deep C state, or migration to a host with a faster TSC. Deep C sleep states can stop the TSC. To prevent the kernel using deep C states append processor.max_cstate=1 to the kernel boot options in the grub.conf file on the host:
title Red Hat Enterprise Linux (2.6.32-36.x86-64)
        root (hd0,0)
kernel /vmlinuz-2.6.32-36.x86-64 ro root=/dev/VolGroup00/LogVol00 rhgb quiet processor.max_cstate=1cpufreq (only necessary on hosts without the constant_tsc) by editing the /etc/sysconfig/cpuspeed configuration file and change the MIN_SPEED and MAX_SPEED variables to the highest frequency available. Valid limits can be found in the /sys/devices/system/cpu/cpu*/cpufreq/scaling_available_frequencies files.
| Red Hat Enterprise Linux | Additional guest kernel parameters |
|---|---|
| 6.0 AMD64/Intel 64 with the para-virtualized clock | Additional parameters are not required |
| 6.0 AMD64/Intel 64 without the para-virtualized clock | notsc lpj=n |
| 5.5 AMD64/Intel 64 with the para-virtualized clock | Additional parameters are not required |
| 5.5 AMD64/Intel 64 without the para-virtualized clock | divider=10 notsc lpj=n |
| 5.5 x86 with the para-virtualized clock | Additional parameters are not required |
| 5.5 x86 without the para-virtualized clock | divider=10 clocksource=acpi_pm lpj=n |
| 5.4 AMD64/Intel 64 | divider=10 notsc |
| 5.4 x86 | divider=10 clocksource=acpi_pm |
| 5.3 AMD64/Intel 64 | divider=10 notsc |
| 5.3 x86 | divider=10 clocksource=acpi_pm |
| 4.8 AMD64/Intel 64 | notsc divider=10 |
| 4.8 x86 | clock=pmtmr divider=10 |
| 3.9 AMD64/Intel 64 | Additional parameters are not required |
| 3.9 x86 | Additional parameters are not required |
PMTIMER clock source (the PMTIMER usually uses the TSC) add the following line to the Windows boot settings. Windows boot settings are stored in the boot.ini file. Add the following line to the boot.ini file:
/use pmtimer
boot.ini file is no longer used from Windows Vista and newer. Windows Vista, Windows Server 2008 and Windows 7 use the Boot Configuration Data Editor (bcdedit.exe) to modify the Windows boot parameters.
{default} in the example below) should be changed if the system UUID is different than the default boot device.
C:\Windows\system32>bcdedit /set {default} USEPLATFORMCLOCK on
The operation completed successfullyTable of Contents
ftpd setenforce command.
# setenforce 1
AutoFS, NFS, FTP, HTTP, NIS, telnetd, sendmail and so on.
/var/lib/libvirt/images/. If you are using a different directory for your virtual machine images make sure you add the directory to your SELinux policy and relabel it before starting the installation.
vsftpd server.
fstab file, the initrd file or used by the kernel command line. If less privileged users, especially virtualized guests, have write access to whole partitions or LVM volumes.
/dev/sdb). Use partitions (for example, /dev/sdb1) or LVM volumes.
/var/lib/libvirt/images.
NewVolumeName on the volume group named volumegroup.
# lvcreate -nNewVolumeName-L5Gvolumegroup
NewVolumeName logical volume with a file system that supports extended attributes, such as ext3.
# mke2fs -j /dev/volumegroup/NewVolumeName/etc, /var, /sys) or in home directories (/home or /root). This example uses a directory called /virtstorage
# mkdir /virtstorage# mount/dev/volumegroup/NewVolumeName/virtstorage
# semanage fcontext -a -t virt_image_t "/virtstorage(/.*)?"
/etc/selinux/targeted/contexts/files/file_contexts.local file which makes the change persistent. The appended line may resemble this:
/virtstorage(/.*)? system_u:object_r:virt_image_t:s0
/virtstorage) and all files under it to virt_image_t (the restorecon and setfiles commands read the files in /etc/selinux/targeted/contexts/files/).
# restorecon -R -v /virtstorage
touch command) on the file system.
# touch /virtstorage/newfile# sudo ls -Z/virtstorage-rw-------. root root system_u:object_r:virt_image_t:s0newfile
virt_image_t.
# semanage fcontext -a -t virt_image _t -f -b /dev/sda2
# restorecon /dev/sda2
| SELinux Boolean | Description |
|---|---|
| allow_unconfined_qemu_transition | Default: off. This Boolean controls whether KVM guests can be transitioned to unconfined users. |
| qemu_full_network | Default: on. This Boolean controls full network access to KVM guests. |
| qemu_use_cifs | Default: on. This Boolean controls KVM's access to CIFS or Samba file systems. |
| qemu_use_comm | Default: off. This Boolean controls whether KVM can access serial or parallel communications ports. |
| qemu_use_nfs | Default: on. This Boolean controls KVM's access to NFS file systems. |
net.ipv4.ip_forward = 1) is also required for shared bridges and the default bridge. Note that installing libvirt enables this variable so it will be enabled when the virtualization packages are installed unless it was manually disabled.


# ps -eZ | grep qemu

system_u:system_r:svirt_t:s0:c87,c520 27950 ?  00:00:17 qemu-kvm
system_u:system_r:svirt_t:s0:c639,c757 27989 ? 00:00:06 qemu-system-x86
# ls -lZ /var/lib/libvirt/images/*

  system_u:object_r:svirt_image_t:s0:c87,c520   image1
| Type | SELinux Context | Description |
|---|---|---|
| Virtualized guest processes | system_u:system_r:svirt_t:MCS1 | MCS1 is a randomly selected MCS field. Currently approximately 500,000 labels are supported. |
| Virtualized guest images | system_u:object_r:svirt_image_t:MCS1 | Only svirt_t processes with the same MCS fields are able to read/write these image files and devices. |
| Virtualized guest shared read/write content | system_u:object_r:svirt_image_t:s0 | All svirt_t processes are allowed to write to the svirt_image_t:s0 files and devices. |
| Virtualized guest shared read only content | system_u:object_r:svirt_content_t:s0 | All svirt_t processes are able to read files/devices with this label. |
| Virtualized guest images | system_u:object_r:virt_content_t:s0 | System default label used when an image exits. No svirt_t virtual processes are allowed to read files/devices with this label. |
virsh command. The migrate command accepts parameters in the following format:
# virsh migrate --live GuestName DestinationURLGuestName parameter represents the name of the guest which you want to migrate.
DestinationURL parameter is the URL or hostname of the destination system. The destination system must run the same version of Red Hat Enterprise Linux, be using the same hypervisor and have libvirt running.
test1.example.com to test2.example.com. Change the host names for your environment. This example migrates a virtual machine named RHEL4test.
Verify the guest is running
test1.example.com, verify RHEL4test is running:
[root@test1 ~]# virsh list
Id Name                 State
----------------------------------
 10 RHEL4                running
Migrate the guest
test2.example.com. Append /system to the end of the destination URL to tell libvirt that you need full access.
# virsh migrate --live RHEL4test qemu+ssh://test2.example.com/systemWait
virsh only reports errors. The guest continues to run on the source host until fully migrated.
Verify the guest has arrived at the destination host
test2.example.com, verify RHEL4test is running:
[root@test2 ~]# virsh list
Id Name                 State
----------------------------------
 10 RHEL4                running
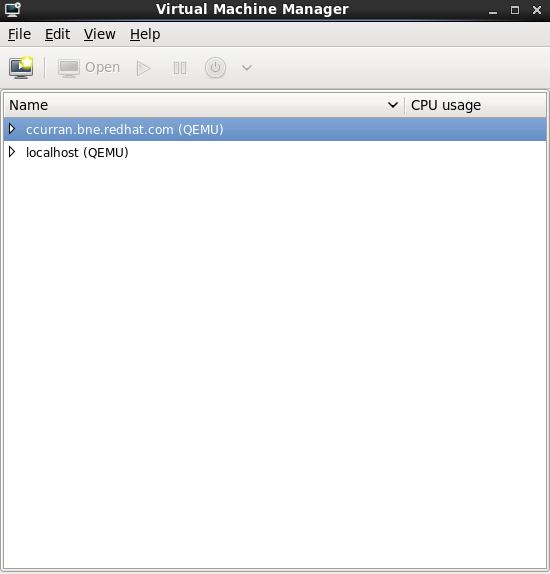
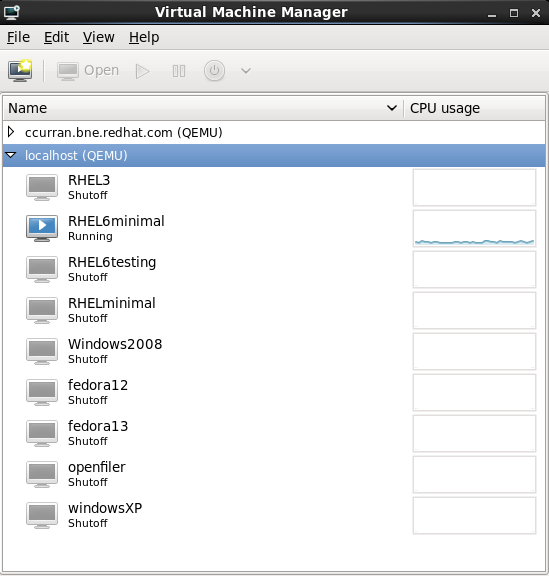
virt-manager.
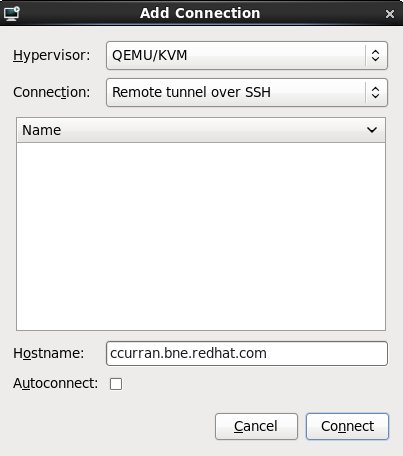
Connect to the source and the target hosts
virt-manager now displays the newly connected host in the list of available hosts.
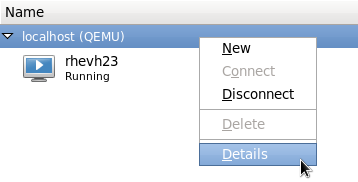
Add a storage pool to both hosts
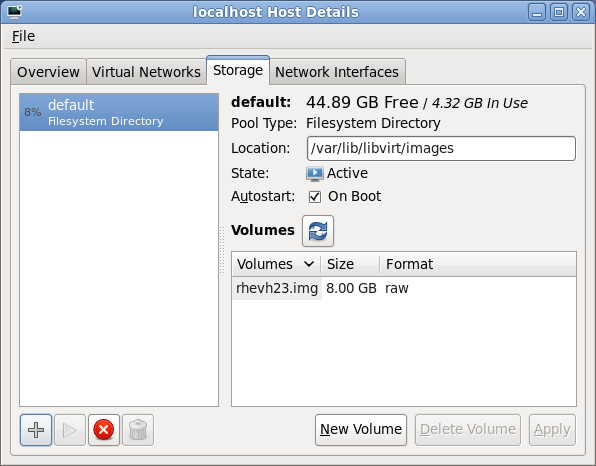
Open the storage tab
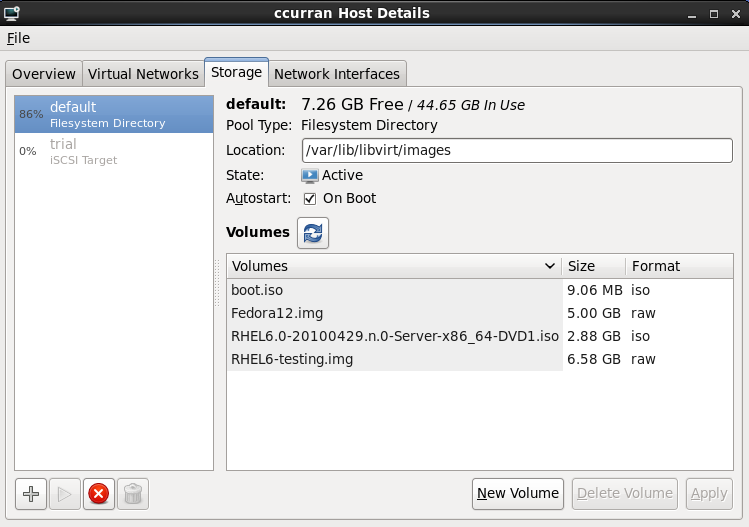
Add a storage pool with the same NFS to the source and target hosts.
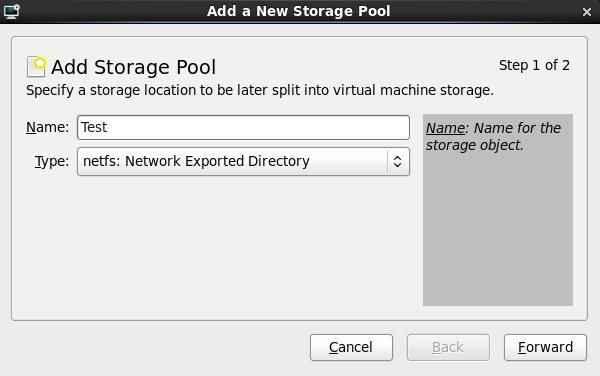
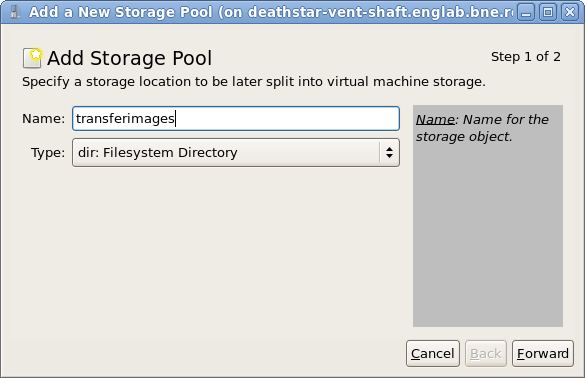
Specify storage pool details
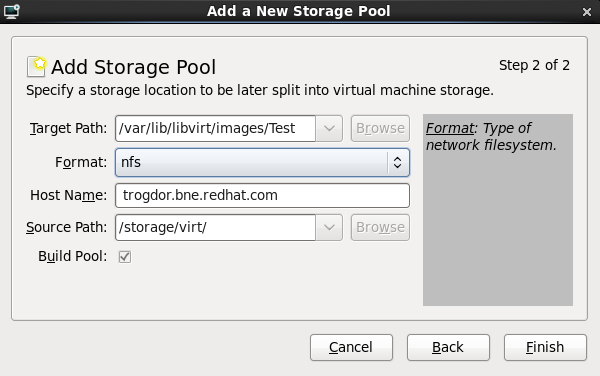
Verify the new storage pool was added sucessfully
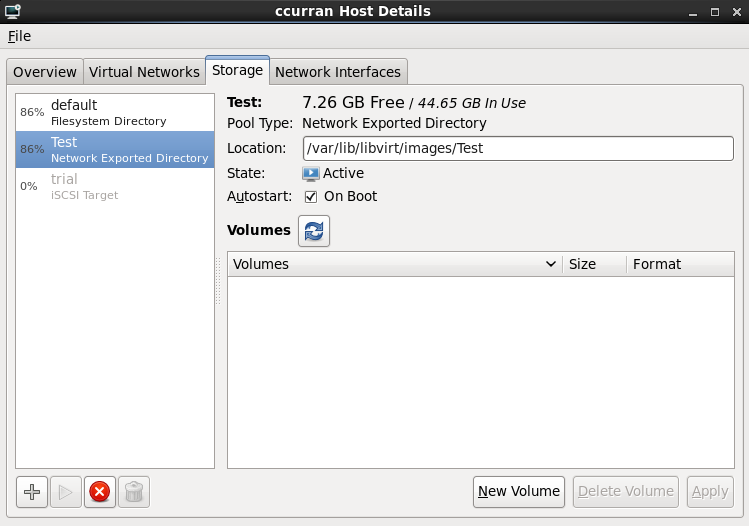
Optional: Add a volume to the storage pool
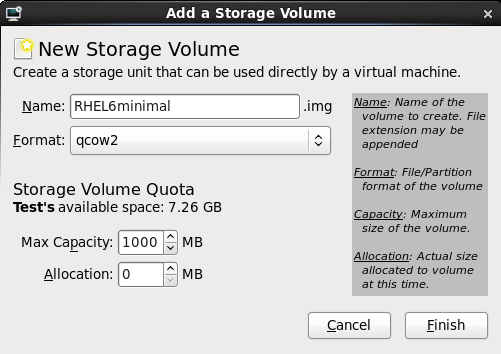
Create a new virtualized guest on the new volume
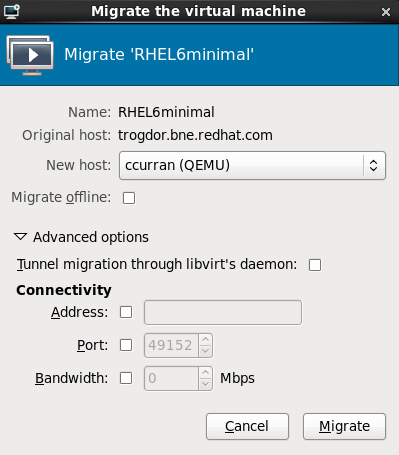
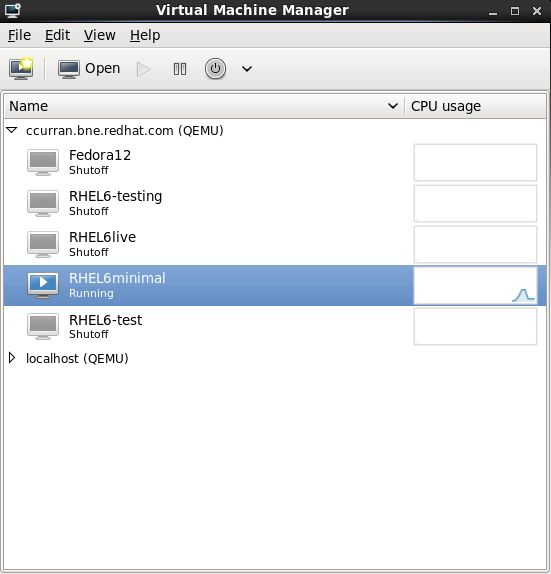
Migrate the virtualized guest
ssh or TLS and SSL.
libvirt management connection securely tunneled over an SSH connection to manage the remote machines. All the authentication is done using SSH public key cryptography and passwords or passphrases gathered by your local SSH agent. In addition the VNC console for each guest virtual machine is tunneled over SSH.
virt-manager virt-manager must run as the user who owns the keys to connect to the remote host. That means, if the remote systems are managed by a non-root user virt-manager must be run in unprivileged mode. If the remote systems are managed by the local root user then the SSH keys must be owned and created by root.
virt-manager.
Optional: Changing user
$ su -
Generating the SSH key pair
virt-manager is used. This example uses the default key location, in the ~/.ssh/ directory.
$ ssh-keygen -t rsa
Copying the keys to the remote hosts
ssh-copy-id command to copy the key to root user at the system address provided (in the example, [email protected]).
$ ssh-copy-id -i ~/.ssh/id_rsa.pub [email protected]
[email protected]'s password:
ssh [email protected] command and check in the .ssh/authorized_keys file to make sure unexpected keys have not been added.
Optional: Add the passphrase to the ssh-agent
ssh-agent, if required. On the local host, use the following command to add the passphrase (if there was one) to enable password-less login.
# ssh-add ~/.ssh/id_rsa.pub
libvirt daemon (libvirtd)libvirt daemon provide an interface for managing virtual machines. You must have the libvirtd daemon installed and running on every remote host that needs managing.
$ ssh root@somehost
# chkconfig libvirtd on
# service libvirtd start
libvirtd and SSH are configured you should be able to remotely access and manage your virtual machines. You should also be able to access your guests with VNC at this point.
libvirt management connection opens a TCP port for incoming connections, which is securely encrypted and authenticated based on x509 certificates.
/etc/pki/CA/cacert.pem.
/etc/pki/libvirt-vnc/clientcert.pem for system wide use, or
$HOME/.pki/libvirt-vnc/clientcert.pem for an individual user.
/etc/pki/libvirt-vnc/private/clientkey.pem for system wide use, or
$HOME/.pki/libvirt-vnc/private/clientkey.pem for an individual user.
libvirt supports the following transport modes:
/var/run/libvirt/libvirt-sock and /var/run/libvirt/libvirt-sock-ro (for read-only connections).
libvirtd) must be running on the remote machine. Port 22 must be open for SSH access. You should use some sort of ssh key management (for example, the ssh-agent utility) or you will be prompted for a password.
ext parameter is used for any external program which can make a connection to the remote machine by means outside the scope of libvirt. This parameter is unsupported.
virsh and libvirt to connect to a remote host. URIs can also be used with the --connect parameter for the virsh command to execute single commands or migrations on remote hosts.
driver[+transport]://[username@][hostname][:port]/[path][?extraparameters]
server7, using SSH transport and the SSH username ccurran.
qemu+ssh://ccurran@server7/
server7 using TLS.
qemu://server7/
server7 using TLS. The no_verify=1 instructs libvirt not to verify the server's certificate.
qemu://server7/?no_verify=1
qemu+unix:///system?socket=/opt/libvirt/run/libvirt/libvirt-sock
test+tcp://10.1.1.10:5000/default
| Name | Transport mode | Description | Example usage |
|---|---|---|---|
| name | all modes | The name passed to the remote virConnectOpen function. The name is normally formed by removing transport, hostname, port number, username and extra parameters from the remote URI, but in certain very complex cases it may be better to supply the name explicitly. | name=qemu:///system |
| command | ssh and ext | The external command. For ext transport this is required. For ssh the default is ssh. The PATH is searched for the command. | command=/opt/openssh/bin/ssh |
| socket | unix and ssh | The path to the UNIX domain socket, which overrides the default. For ssh transport, this is passed to the remote netcat command (see netcat). | socket=/opt/libvirt/run/libvirt/libvirt-sock |
| netcat | ssh |
The
netcat command can be used to connect to remote systems. The default netcat parameter uses the nc command. For SSH transport, libvirt constructs an SSH command using the form below:
command -p port [-l username] hostname
netcat -U socket
The
port, username and hostname parameters can be specified as part of the remote URI. The command, netcat and socket come from other extra parameters.
| netcat=/opt/netcat/bin/nc |
| no_verify | tls | If set to a non-zero value, this disables client checks of the server's certificate. Note that to disable server checks of the client's certificate or IP address you must change the libvirtd configuration. | no_verify=1 |
| no_tty | ssh | If set to a non-zero value, this stops ssh from asking for a password if it cannot log in to the remote machine automatically (for using ssh-agent or similar). Use this when you do not have access to a terminal - for example in graphical programs which use libvirt. | no_tty=1 |
pdflush process, the cleanup process, starts. The pdflush process kills processes to free memory so the system does not crash. pdflush may destroy virtualized guests or other system processes which may cause file system errors and may leave virtualized guests unbootable.This can cause issues if virtualized guests use their total RAM.
qemu-kvm process. Once the guest is running the contents of the guest operating system image can be shared when guests are running the same operating system or applications. KSM only identifies and merges identical pages which does not interfere with the guest or impact the security of the host or the guests. KSM allows KVM to request that these identical guest memory regions be shared.
ksm service starts and stops the KSM kernel thread.
ksmtuned service controls and tunes the ksm, dynamically managing same-page merging. The ksmtuned service starts ksm and stops the ksm service if memory sharing is not necessary. The ksmtuned service must be told with the retune parameter to run when new virtualized guests are created or destroyed.
ksm service is a standard Linux daemon that uses the KSM kernel features.
ksm service is not started, KSM shares only 2000 pages. This default is low and provides limited memory saving benefits.
ksm service is started, KSM will share up to half of the host system's main memory. Start the ksm service to enable KSM to share more memory.
# service ksm start
Starting ksm:                                              [  OK  ]
ksm service can be added to the default startup sequence. Make the ksm service persistent with the chkconfig command.
# chkconfig ksm on
ksmtuned service does not have any options. The ksmtuned service loops and adjusts ksm. The ksmtuned service is notified by libvirt when a virtualized guest is created or destroyed.
# service ksmtuned start
Starting ksmtuned:                                         [  OK  ]
ksmtuned service can be tuned with the retune parameter. The retune parameter instructs ksmtuned to run tuning functions manually.
/etc/ksmtuned.conf file is the configuration file for the ksmtuned service. The file output below is the default ksmtuned.conf file.
# Configuration file for ksmtuned.

# How long ksmtuned should sleep between tuning adjustments
# KSM_MONITOR_INTERVAL=60

# Millisecond sleep between ksm scans for 16Gb server.
# Smaller servers sleep more, bigger sleep less.
# KSM_SLEEP_MSEC=10

# KSM_NPAGES_BOOST=300
# KSM_NPAGES_DECAY=-50
# KSM_NPAGES_MIN=64
# KSM_NPAGES_MAX=1250

# KSM_THRES_COEF=20
# KSM_THRES_CONST=2048

# uncomment the following to enable ksmtuned debug information
# LOGFILE=/var/log/ksmtuned
# DEBUG=1
/sys/kernel/mm/ksm/ directory. Files in this directory are updated by the kernel and are an accurate record of KSM usage and statistics.
/etc/ksmtuned.conf file as noted below.
/sys/kernel/mm/ksm/ files/var/log/ksmtuned log file if the DEBUG=1 line is added to the /etc/ksmtuned.conf file. The log file location can be changed with the LOGFILE parameter. Changing the log file location is not advised and may require special configuration of SELinux settings.
/etc/sysconfig/ksm file can manually set a number or all pages used by KSM as not swappable.
/etc/sysconfig/ksm file with a text editor.
# The maximum number of unswappable kernel pages
# which may be allocated by ksm (0 for unlimited)
# If unset, defaults to half of total memory
# KSM_MAX_KERNEL_PAGES=
KSM_MAX_KERNEL_PAGES line to manually configure the number of unswappable pages for KSM. Setting this variable to 0 configures KSM to keep all identical pages in main memory which can improve performance if the system has sufficient main memory.
# The maximum number of unswappable kernel pages
# which may be allocated by ksm (0 for unlimited)
# If unset, defaults to half of total memory
KSM_MAX_KERNEL_PAGES=0
ksm service and the ksmtuned service. Stopping the services deactivates KSM but does not persist after restarting.
# service ksm stop
Stopping ksm:                                              [  OK  ]
# service ksmtuned stop
Stopping ksmtuned:                                         [  OK  ]
chkconfig command. To turn off the services, run the following commands:
# chkconfig ksm off
# chkconfig ksmtuned off
virt-v2v command converts guests from a foreign hypervisor to run on KVM, managed by libvirt. The virt-v2v command can currently convert Red Hat Enterprise Linux 4, Red Hat Enterprise Linux 5, Windows Vista, Windows 7, Windows Server 2003 and Windows Server 2008 virtualized guests running on Xen, KVM and VMware ESX. The virt-v2v command enables para-virtualized (virtio) drivers in the converted guest if possible.
virt-v2v is available on Red Hat Network (RHN) in the Red Hat Enterprise Linux Server (v. 6 for 64-bit x86_64) or Red Hat Enterprise Linux Workstation (v.6 for x86_64) channel.
virt-v2v tool requires root access to the host system.
virt-v2v from RHN, ensure the system is subscribed to the appropriate channel, then run:
yum install virt-v2vvirt-v2v copies the guest storage to a locally defined libvirt storage pool during import. This pool can be defined using any libvirt tool, and can be of any type. The simplest way to create a new pool is with virt-manager. Select your host, right click and select details.
virt-manager can also create and manage bridges.
virt-v2v.conf. This step is optional, and is not required for most use cases.
/etc/virt-v2v.conf must be edited to specify the network mapping for all interfaces. You can specify an alternative virt-v2v.conf file with the -f parameter.
--network or --bridge parameters, rather than modifying virt-v2v.conf.
virt-v2v may install a new kernel and drivers on the virtualized guest. If the host running virt-v2v is registered to Red Hat Network (RHN), the required packages will be automatically downloaded. For environments where RHN is not available, the virt-v2v.conf file references a list of RPMs used for this purpose. The RPMs relevant to your virtualized guest must be downloaded manually from RHN and made available in the directory specified by the path-root configuration element, which by default is /var/lib/virt-v2v/software/. virt-v2v will display an error similar to Example 23.1, “Missing Package error” if software it depends upon for a particular conversion is not available.
virt-v2v: Installation failed because the following files referenced in the configuration file are required, but missing:
rhel/5/kernel-2.6.18-128.el5.x86_64.rpm
rhel/5/ecryptfs-utils-56-8.el5.x86_64.rpm
rhel/5/ecryptfs-utils-56-8.el5.i386.rpm
/var/lib/virt-v2v/software. For Red Hat Enterprise Linux 5, the directory is /var/lib/virt-v2v/software/rhel/5
virt-v2v. This package provides support for NTFS, which is used by many Windows systems. If you attempt to convert a virtualized guest using NTFS without the libguestfs-winsupport package installed, the conversion will fail.
virt-v2v. This package provides para-virtualized block and network drivers for Windows guests. If you attempt to convert a virtualized guest running Windows without the virtio-win package installed, the conversion will fail giving an error message concerning missing files.
virt-v2v uses a libvirt domain description to determine the current configuration of the virtualized guest, including the location of its storage. Before starting the conversion, obtain this from the host running the virtualized guest with the following command:
virsh dumpxml vm-name > vm-name.xmlThis will require booting into a Xen kernel to obtain the XML, as libvirt needs to connect to a running Xen hypervisor to obtain its metadata. The conversion process is optimized for KVM, so obtaining domain data while running a Xen kernel, then performing the conversion using a KVM kernel will be more efficient than running the conversion on a Xen kernel.
virt-v2v to perform the actual conversions. This section provides the steps to convert the virtualized guests, and the reference table for virt-v2v. Note that conversions are resource intensive processes, involving copying the whole disk image for a virtualized guest. In typical environments, converting a single virtualized guest takes approximately 5-10 minutes.
virt-v2v -i libvirtxml -op pool --bridge brname vm-name.xml
virt-v2v -op pool --network netname vm-name
virt-v2v -ic esx://esx.example.com/?no_verify=1 -op pool --bridge brname vm-name
-i input
|
Specifies the input method to obtain the guest for conversion. The default is libvirt. Supported options are:
|
-ic URI
|
Specifies the connection to use when using the libvirt input method. If omitted, this defaults to qemu:///system.
virt-v2v can currently automatically obtain guest storage from local libvirt connections, ESX connections, and connections over SSH. Other types of connection are not supported.
|
-o method
|
Specifies the output method. If no output method is specified, the default is libvirt. Supported output methods are:
|
-oc URI
|
Specifies the libvirt connection to use to create the converted guest. If omitted, this defaults to qemu:///system. Note that virt-v2v must be able to write directly to storage described by this libvirt connection. This makes writing to a remote connection impractical at present.
|
-op pool
|
Specifies the pool which will be used to create new storage for the converted guest.
|
-osd domain
|
Specifies the path to an existing Red Hat Enterprise Virtualization Export storage domain.
The domain must be in the format <host > <path>; for example,
storage.example.com:/rhev/export. The nfs export must be mountable and writable by the machine running virt-v2v.
|
-f file | --config file
| Load the virt-v2v configuration from file. Defaults to /etc/virt-v2v.conf if it exists. |
-n network | --network network
|
Map all guest bridges or networks which don't have a mapping in the configuration file to the specified network.
This option cannot be used in conjunction with --bridge.
|
-b bridge | --bridge bridge
|
Map all guest bridges or networks which don't have a mapping in the configuration file to the specified bridge.
This option cannot be used in conjunction with --network.
|
--help
| Display brief help. |
--version
| Display version number and exit. |
virt-v2v -i libvirtxml -op pool --bridge brname vm-name.xml
pool is the local storage pool to hold the image, brname is the name of a local network bridge to connect the converted guest's network to, and vm-name.xml is the path to the virtualized guest's exported XML. You may also use the --network parameter to connect to a locally managed network, or specify multiple mappings in /etc/virt-v2v.conf.
virt-v2v will attempt to install a new kernel during the conversion process. You can avoid this requirement by installing a regular kernel, which won't reference a hypervisor in its name, alongside the Xen kernel prior to conversion. You should not make this newly installed kernel your default kernel, because Xen will not boot it. virt-v2v will make it the default during conversion.
virt-v2v -ic xen+ssh://[email protected] -op pool --bridge brname vm-name
vmhost.example.com is the host running the virtualized guest, pool is the local storage pool to hold the image, brname is the name of a local network bridge to connect the converted guest's network to, and vm-name is the domain of the Xen virtualized guest. You may also use the --network parameter to connect to a locally managed network, or specify multiple mappings in /etc/virt-v2v.conf.
virt-v2v will attempt to install a new kernel during the conversion process. You can avoid this requirement by installing a regular kernel, which won't reference a hypervisor in its name, alongside the Xen kernel prior to conversion. You should not make this newly installed kernel your default kernel, because Xen will not boot it. virt-v2v will make it the default during conversion.
virt-v2v -ic esx://esx.example.com/ -op pool --bridge brname vm-name
esx.example.com is the VMware ESX server, pool is the local storage pool to hold the image, brname is the name of a local network bridge to connect the converted guest's network to, and vm-name is the name of the virtualized guest. You may also use the --network parameter to connect to a locally managed network, or specify multiple mappings in /etc/virt-v2v.conf.
virt-v2v supports password authentication when connecting to ESX. It reads passwords from $HOME/.netrc. The format of this file is described in the netrc(5) man page. An example entry is:
machine esx.example.com login root password s3cr3t
.netrc file must have a permission mask of 0600 to be read correctly by virt-v2v
... -ic esx://esx.example.com/?no_verify=1 ...
virt-v2v -i libvirtxml -o rhev -osd storage.example.com:/exportdomain --network rhevm vm-name.xml
vm-name.xml is the path to the virtualized guest's exported xml, and storage.example.com:/exportdomain is the export storage domain. You may also use the --network parameter to connect to a locally managed network, or specify multiple mappings in /etc/virt-v2v.conf.
virt-v2v will attempt to install a new kernel during the conversion process. You can avoid this requirement by installing a regular kernel, which won't reference a hypervisor in its name, alongside the Xen kernel prior to conversion. You should not make this newly installed kernel your default kernel, because Xen will not boot it. virt-v2v will make it the default during conversion.
virt-v2v will create a new libvirt domain for the converted virtualized guest with the same name as the original virtualized guest. It can be started as usual using libvirt tools, for example virt-manager.
virt-v2v will make certain changes to a guest to enable it to run on a KVM hypervisor either with or without virtio drivers. These changes are specific to the guest operating system. The details specified here pertain to supported Red Hat based Linux distributions and Windows.
| Change | Description |
|---|---|
| Kernel | Un-bootable, that is, xen para-virtualized, kernels will be uninstalled. No new kernel will be installed if there is a remaining kernel which supports virtio. If no remaining kernel supports virtio and the configuration file specifies a new kernel it will be installed and configured as the default. |
| X reconfiguration | If the guest has X configured, its display driver will be updated. See GUEST DRIVERS for which driver will be used. |
| Rename block devices | If changes have caused block devices to change name, these changes will be reflected in /etc/fstab |
| Configure device drivers | Whether virtio or non-virtio drivers are configured, virt-v2v will ensure that the correct network and block drivers are specified in the modprobe configuration. |
| initrd | virt-v2v will ensure that the initrd for the default kernel supports booting the root device, whether it is using virtio or not. |
| SELinux | virt-v2v will initiate a relabel of the guest on the next boot. This ensures that any changes it has made are correctly labeled according to the guest's local policy. |
virt-v2v will configure the following drivers in a Linux guest:
| Para-virtualized driver type | Driver module |
|---|---|
| Display | cirrus |
| Storage | virtio_blk |
| Network | virtio_net |
| In addition, initrd will preload the virtio_pci driver |
| Other drivers | |
|---|---|
| Display | cirrus |
| Block | Virtualized IDE |
| Network | Virtualized e1000 |
virt-v2v. These packages provide support for NTFS and Windows para-virtualized block and network drivers. If you attempt to convert a virtualized guest using NTFS without the libguestfs-winsupport package installed, the conversion will fail. If you attempt to convert a virtualized guest running Windows without the virtio-win package installed, the conversion will fail giving an error message concerning missing files.
virt-v2v can convert virtualized guests running Windows Vista, Windows 7, Windows Server 2003 and Windows Server 2008. The conversion process for virtualized guests running Windows is slightly to different to the process for virtualized guests running Linux. Windows virtualized guest images are converted as follows:
virt-v2v has completed the conversion. The converted virtualized guest is now bootable, but does not yet have all the drivers installed necessary to function correctly. The conversion must be finished by the Red Hat Enterprise Virtualization Manager. The Manager performs the following steps:
ftpd virsh to set a guest, TestServer, to automatically start when the host boots.
# virsh autostart TestServer
Domain TestServer marked as autostarted
--disable parameter
# virsh autostart --disable TestServer
Domain TestServer unmarked as autostarted
qemu-img command line tool is used for formatting various file systems used by KVM. qemu-img should be used for formatting virtualized guest images, additional storage devices and network storage. qemu-img options and usages are listed below.
filename of size size and format format.
# qemu-img create [-6] [-e] [-b base_image] [-fformat]filename[size]
convert option is used for converting a recognized format to another image format.
# qemu-img convert [-c] [-e] [-f format]filename[-Ooutput_format]output_filename
filename to disk image output_filename using format output_format. The disk image can be optionally encrypted with the -e option or compressed with the -c option.
qcow2 format supports encryption or compression. the compression is read-only. It means that if a compressed sector is rewritten, then it is rewritten as uncompressed data.
qcow or cow. The empty sectors are detected and suppressed from the destination image.
info parameter displays information about a disk image. the format for the info option is as follows:
# qemu-img info [-f format] filename
raw qemu-img info to know the real size used by the image or ls -ls on Unix/Linux.
qcow2 qcow cow cow format is included only for compatibility with previous versions. It does not work with Windows.
vmdk cloop $ grep -E 'svm|vmx' /proc/cpuinfo
vmx entry indicating an Intel processor with the Intel VT extensions:
flags   : fpu tsc msr pae mce cx8 apic mtrr mca cmov pat pse36 clflush
	dts acpi mmx fxsr sse sse2 ss ht  tm syscall lm constant_tsc pni monitor ds_cpl
	vmx est tm2 cx16 xtpr lahf_lm
svm entry indicating an AMD processor with the AMD-V extensions:
flags   :  fpu tsc msr pae mce cx8 apic mtrr mca cmov pat pse36 clflush
	mmx fxsr sse sse2 ht syscall nx mmxext fxsr_opt lm 3dnowext 3dnow pni cx16
	lahf_lm cmp_legacy svm cr8legacy ts fid vid ttp tm stc
flags:" output content may appear multiple times, once for each hyperthread, core or CPU on the system.
For users of the KVM hypervisor
kvm modules are loaded in the kernel:
# lsmod | grep kvm
kvm_intel or kvm_amd then the kvm hardware virtualization modules are loaded and your system meets requirements. sudo
virsh command can output a full list of virtualization system capabilities. Run virsh capabilities as root to receive the complete list.
virsh nodeinfo command provides information about how many sockets, cores and hyperthreads there are attached a host.
# virsh nodeinfo
CPU model:           x86_64
CPU(s):              8
CPU frequency:       1000 MHz
CPU socket(s):       2
Core(s) per socket:  4
Thread(s) per core:  1
NUMA cell(s):        1
Memory size:         8179176 kB
virsh capabilities to get additional output data on the CPU configuration.
# virsh capabilities
<capabilities>
  <host>
    <cpu>
      <arch>x86_64</arch>
    </cpu>
    <migration_features>
      <live/>
      <uri_transports>
        <uri_transport>tcp</uri_transport>
      </uri_transports>
    </migration_features>
    <topology>
      <cells num='2'>
        <cell id='0'>
          <cpus num='4'>
            <cpu id='0'/>
            <cpu id='1'/>
            <cpu id='2'/>
            <cpu id='3'/>
          </cpus>
        </cell>
        <cell id='1'>
          <cpus num='4'>
            <cpu id='4'/>
            <cpu id='5'/>
            <cpu id='6'/>
            <cpu id='7'/>
          </cpus>
        </cell>
      </cells>
    </topology>
    <secmodel>
      <model>selinux</model>
      <doi>0</doi>
    </secmodel>
  </host>

 [ Additional XML removed ]

</capabilities>virsh freecell command to display the free memory on all NUMA nodes.
# virsh freecell
0: 2203620 kB
1: 3354784 kB
virsh capabilities command) about NUMA topology.
virsh capabilities output.
<topology>
  <cells num='2'>
    <cell id='0'>
    <cpus num='4'>
      <cpu id='0'/>
      <cpu id='1'/>
      <cpu id='2'/>
      <cpu id='3'/>
    </cpus>
  </cell>
  <cell id='1'>
    <cpus num='4'>
      <cpu id='4'/>
      <cpu id='5'/>
      <cpu id='6'/>
      <cpu id='7'/>
    </cpus>
  </cell>
  </cells>
</topology><cell id='1'>, has physical CPUs 4 to 7.
cpuset attribute to the configuration file.
virsh edit.
vcpus element.
<vcpus>4</vcpus>
cpuset attribute with the CPU numbers for the relevant NUMA cell.
<vcpus cpuset='4-7'>4</vcpus>
virt-install provisioning tool provides a simple way to automatically apply a 'best fit' NUMA policy when guests are created.
cpuset option for virt-install can use a CPU set of processors or the parameter auto. The auto parameter automatically determines the optimal CPU locking using the available NUMA data.
--cpuset=auto with the virt-install command when creating new guests.
virsh vcpuinfo and virsh vcpupin commands can perform CPU affinity changes on running guests.
virsh vcpuinfo command gives up to date information about where each virtual CPU is running.
guest1 is a guest with four virtual CPUs is running on a KVM host.
# virsh vcpuinfo guest1
VCPU:           0
CPU:            3
State:          running
CPU time:       0.5s
CPU Affinity:   yyyyyyyy
VCPU:           1
CPU:            1
State:          running
CPU Affinity:   yyyyyyyy
VCPU:           2
CPU:            1
State:          running
CPU Affinity:   yyyyyyyy
VCPU:           3
CPU:            2
State:          running
CPU Affinity: yyyyyyyyvirsh vcpuinfo output (the yyyyyyyy value of CPU Affinity) shows that the guest can presently run on any CPU.
# virsh vcpupinguest10 4 # virsh vcpupinguest11 5 # virsh vcpupinguest12 6 # virsh vcpupinguest13 7
virsh vcpuinfo command confirms the change in affinity.
# virsh vcpuinfo guest1
VCPU:           0
CPU:            4
State:          running
CPU time:       32.2s
CPU Affinity:   ----y---
VCPU:           1
CPU:            5
State:          running
CPU time:       16.9s
CPU Affinity:   -----y--
VCPU:           2
CPU:            6
State:          running
CPU time:       11.9s
CPU Affinity:   ------y-
VCPU:           3
CPU:            7
State:          running
CPU time:       14.6s
CPU Affinity: -------y# grep pid /var/run/libvirt/qemu/guest1.xml
<domstatus state='running' pid='4907'>
# grep Cpus_allowed_list /proc/4907/task/*/status
/proc/4907/task/4916/status:Cpus_allowed_list: 4
/proc/4907/task/4917/status:Cpus_allowed_list: 5
/proc/4907/task/4918/status:Cpus_allowed_list: 6
/proc/4907/task/4919/status:Cpus_allowed_list: 7
</section>macgen.py. Now from that directory you can run the script using ./macgen.py and it will generate a new MAC address. A sample output would look like the following:
$ ./macgen.py
00:16:3e:20:b0:11

#!/usr/bin/python
# macgen.py script to generate a MAC address for virtualized guests
#
import random
#
def randomMAC():
	mac = [ 0x00, 0x16, 0x3e,
		random.randint(0x00, 0x7f),
		random.randint(0x00, 0xff),
		random.randint(0x00, 0xff) ]
	return ':'.join(map(lambda x: "%02x" % x, mac))
#
print randomMAC()
python-virtinst to generate a new MAC address and UUID for use in a guest configuration file:
# echo  'import virtinst.util ; print\
 virtinst.util.uuidToString(virtinst.util.randomUUID())' | python
# echo  'import virtinst.util ; print virtinst.util.randomMAC()' | python
#!/usr/bin/env python
#  -*- mode: python; -*-
print ""
print "New UUID:"
import virtinst.util ; print virtinst.util.uuidToString(virtinst.util.randomUUID())
print "New MAC:"
import virtinst.util ; print virtinst.util.randomMAC()
print ""
qemu-kvm processes) busy or stalled processes on the host.
pdflush kernel function. pdflush automatically kills processes to keep the system from crashing and to free up memory. Always ensure the host has sufficient swap space when overcommitting memory.
swapoff command can disable all swap partitions and swap files on a system.
# swapoff -a
swap lines from the /etc/fstab file and restart the host system.
ftpd vsftpd can provide access to installation trees for para-virtualized guests (for example, the Red Hat Enterprise Linux repositories) or other data. If you have not installed vsftpd during the server installation you can grab the RPM package from your Server directory of your installation media and install it using the rpm -ivh vsftpd*.rpm (note that the RPM package must be in your current directory).
vsftpd, edit /etc/passwd using vipw and change the ftp user's home directory to the directory where you are going to keep the installation trees for your guests. An example entry for the FTP user would look like the following:
ftp:x:14:50:FTP User:/installtree/:/sbin/nologin
vsftpd is not enabled using the chkconfig --list vsftpd:
$ chkconfig --list vsftpd
vsftpd          0:off   1:off   2:off   3:off   4:off   5:off   6:off
chkconfig --levels 345 vsftpd on to start vsftpd automatically for run levels 3, 4 and 5.
chkconfig --list vsftpd command to verify the vsftpd daemon is enabled to start during system boot:
$ chkconfig --list vsftpd
vsftpd          0:off   1:off   2:off   3:on    4:on    5:on    6:off
service vsftpd start vsftpd to start the vsftpd service:
$service vsftpd start vsftpd
Starting vsftpd for vsftpd:                  [  OK  ]
# service smartd stop
# chkconfig --del smartd
vino-preferences command.
~/.vnc/xstartup file to start a GNOME session whenever vncserver is started. The first time you run the vncserver script it will ask you for a password you want to use for your VNC session.
xstartup file:
#!/bin/sh
# Uncomment the following two lines for normal desktop:
# unset SESSION_MANAGER
# exec /etc/X11/xinit/xinitrc
[ -x /etc/vnc/xstartup ] && exec /etc/vnc/xstartup
[ -r $HOME/.Xresources ] && xrdb $HOME/.Xresources
#xsetroot -solid grey
#vncconfig -iconic &
#xterm -geometry 80x24+10+10 -ls -title "$VNCDESKTOP Desktop" &
#twm &
if test -z "$DBUS_SESSION_BUS_ADDRESS" ; then
	eval `dbus-launch --sh-syntax –exit-with-session`
	echo "D-BUS per-session daemon address is: \
	$DBUS_SESSION_BUS_ADDRESS"
fi
exec  gnome-session
Minimal installation installation option will not install the acpid package.
virsh shutdown command is executed. The virsh shutdown command is designed to gracefully shut down virtualized guests.
virsh shutdown is easier and safer for system administration. Without graceful shut down with the virsh shutdown command a system administrator must log into a virtualized guest manually or send the Ctrl-Alt-Del key combination to each guest.
virsh shutdown command requires that the guest operating system is configured to handle ACPI shut down requests. Many operating systems require additional configuration on the guest operating system to accept ACPI shut down requests.
Install the acpid package
acpid service listen and processes ACPI requests.
# yum install acpid
Enable the acpid service
acpid service to start during the guest boot sequence and start the service:
# chkconfig acpid on
# service acpid start
virsh shutdown command is used.
virsh edit command. See Editing a guest's configuration file for details.
| Value | Description |
|---|---|
| utc | The guest clock will be synchronized to UTC when booted. |
| localtime | The guest clock will be synchronized to the host's configured timezone when booted, if any. |
| timezone |
The guest clock will be synchronized to a given timezone, specified by the timezone attribute.
|
| variable |
The guest clock will be synchronized to an arbitrary offset from UTC. The delta relative to UTC is specified in seconds, using the adjustment attribute. The guest is free to adjust the Real Time Clock (RTC) over time and expect that it will be honored following the next reboot. This is in contrast to utc mode, where any RTC adjustments are lost at each reboot.
|
<clock offset="utc" />
<clock offset="localtime" />
<clock offset="timezone" timezone="Europe/Paris" />
<clock offset="variable" adjustment="123456" />
name is required, all other attributes are optional.
| Value | Description |
|---|---|
| platform | The master virtual time source which may be used to drive the policy of other time sources. |
| pit | Programmable Interval Timer - a timer with periodic interrupts. |
| rtc | Real Time Clock - a continuously running timer with periodic interrupts. |
| hpet | High Precision Event Timer - multiple timers with periodic interrupts. |
| tsc | Time Stamp Counter - counts the number of ticks since reset, no interrupts. |
platform or rtc.
| Value | Description |
|---|---|
| host | RTC wallclock always tracks host time. |
| guest | RTC wallclock always tracks guest time. |
| Value | Description |
|---|---|
| none | Continue to deliver at normal rate (i.e. ticks are delayed). |
| catchup | Deliver at a higher rate to catch up. |
| merge | Ticks merged into one single tick. |
| discard | All missed ticks are discarded. |
tsc. All other timers operate at a fixed frequency (pit, rtc), or at a frequency fully controlled by the guest (hpet).
tsc. All other timers are always emulated.
| Value | Description |
|---|---|
| auto | Native if safe, otherwise emulated. |
| native | Always native. |
| emulate | Always emulate. |
| paravirt | Native + para-virtualized. |
| Value | Description |
|---|---|
| yes | Force this timer to the visible to the guest. |
| no | Force this timer to not be visible to the guest. |
<clock mode="localtime">
	<timer name="rtc" tickpolicy="catchup" wallclock="guest" />
	<timer name="pit" tickpolicy="none" />
	<timer name="hpet" present="no" />
</clock>
/var/lib/libvirt/images/ directory, as the default storage pool. The default storage pool can be changed to another storage pool.
--pool storage_pool volume_name.
firstimage in the guest_images pool.
# virsh vol-info --poolguest_imagesfirstimageName:firstimageType: block Capacity: 20.00 GB Allocation: 20.00 GB virsh #
secondimage.img, visible to the host system as /images/secondimage.img. The image can be referred to as /images/secondimage.img.
# virsh vol-info/images/secondimage.imgName:secondimage.imgType: file Capacity: 20.00 GB Allocation: 136.00 KB
c3pKz4-qPVc-Xf7M-7WNM-WJc8-qSiz-mtvpGn
/images/secondimage.img
Wlvnf7-a4a3-Tlje-lJDa-9eak-PZBv-LoZuUr:
# virsh vol-info Wlvnf7-a4a3-Tlje-lJDa-9eak-PZBv-LoZuUr
Name:           firstimage
Type:           block
Capacity:       20.00 GB
Allocation:     20.00 GB
virsh provides commands for converting between a volume name, volume path, or volume key:
# virsh vol-name /dev/guest_images/firstimagefirstimage# virsh vol-nameWlvnf7-a4a3-Tlje-lJDa-9eak-PZBv-LoZuUr
# virsh vol-path Wlvnf7-a4a3-Tlje-lJDa-9eak-PZBv-LoZuUr /dev/guest_images/firstimage# virsh vol-path --poolguest_imagesfirstimage/dev/guest_images/firstimage
# virsh vol-key /dev/guest_images/firstimageWlvnf7-a4a3-Tlje-lJDa-9eak-PZBv-LoZuUr # virsh vol-key --poolguest_imagesfirstimageWlvnf7-a4a3-Tlje-lJDa-9eak-PZBv-LoZuUr
/dev/sdb). Use partitions (for example, /dev/sdb1) or LVM volumes.
virsh command.
Create a GPT disk label on the disk
msdos partition table.
# parted /dev/sdb
GNU Parted 2.1
Using /dev/sdb
Welcome to GNU Parted! Type 'help' to view a list of commands.
(parted) mklabel
New disk label type? gpt
(parted) quit
Information: You may need to update /etc/fstab.

#
Create the storage pool configuration file
name parameter determines the name of the storage pool. This example uses the name guest_images_disk in the example below.
/dev/sdb'/>device parameter with the path attribute specifies the device path of the storage device. This example uses the device /dev/sdb .
/dev</path>target parameter with the path sub-parameter determines the location on the host file system to attach volumes created with this this storage pool.
/dev/, as in the example below, means volumes created from this storage pool can be accessed as /dev/sdb1, /dev/sdb2, /dev/sdb3.
gpt'/>format parameter specifies the partition table type. his example uses the gpt in the example below, to match the GPT disk label type created in the previous step.
<pool type='disk'>
  <name>guest_images_disk</name>
  <source>
    <device path='/dev/sdb'/>
    <format type='gpt'/>
  </source>
  <target>
    <path>/dev</path>
  </target>
  </pool>
Attach the device
virsh pool-define command with the XML configuration file created in the previous step.
# virsh pool-define ~/guest_images_disk.xml
Pool guest_images_disk defined from /root/guest_images_disk.xml
# virsh pool-list --all
Name                 State      Autostart
-----------------------------------------
default              active     yes
guest_images_disk    inactive   no
Start the storage pool
virsh pool-start command. Verify the pool is started with the virsh pool-list --all command.
# virsh pool-start guest_images_disk
Pool guest_images_disk started
# virsh pool-list --all
Name                 State      Autostart
-----------------------------------------
default              active     yes
guest_images_disk    active     no
Turn on autostart
autostart for the storage pool. Autostart configures the libvirtd service to start the storage pool when the service starts.
# virsh pool-autostart guest_images_disk
Pool guest_images_disk marked as autostarted
# virsh pool-list --all
Name                 State      Autostart
-----------------------------------------
default              active     yes
guest_images_disk    active     yes
Verify the storage pool configuration
running.
# virsh pool-info guest_images_disk
Name:           guest_images_disk
UUID:           551a67c8-5f2a-012c-3844-df29b167431c
State:          running
Capacity:       465.76 GB
Allocation:     0.00
Available:      465.76 GB
# ls -la /dev/sdb
brw-rw----. 1 root disk 8, 16 May 30 14:08 /dev/sdb
# virsh vol-list guest_images_disk
Name                 Path
-----------------------------------------
Optional: Remove the temporary configuration file
# rm ~/guest_images_disk.xml
/dev/sdc) partitioned into one 500GB, ext4 formatted partition (/dev/sdc1). We set up a storage pool for it using the procedure below.
Open the storage pool settings
virt-manager graphical interface, select the host from the main window.


Create the new storage pool
Add a new pool (part 1)
guest_images_fs. Change the to fs: Pre-Formatted Block Device.

Add a new pool (part 2)

virt-manager will create the directory.
ext4 file system, the default Red Hat Enterprise Linux file system.
Source Path field.
/dev/sdc1 device.
Verify the new storage pool
458.20 GB Free in this example. Verify the field reports the new storage pool as Active.
libvirtd service starts.

virsh command.
/dev/sdb). Guests should not be given write access to whole disks or block devices. Only use this method to assign partitions (for example, /dev/sdb1) to storage pools.
Create the storage pool definition
pool-define-as command to create a new storage pool definition. There are three options that must be provided to define a pre-formatted disk as a storage pool:
name parameter determines the name of the storage pool. This example uses the name guest_images_fs in the example below.
device parameter with the path attribute specifies the device path of the storage device. This example uses the partition /dev/sdc1 .
mountpoint on the local file system where the formatted device will be mounted. If the mount point directory does not exist, the virsh command can create the directory.
/guest_images is used in this example.
# virsh pool-define-asguest_images_fsfs - -/dev/sdc1- "/guest_images" Pool guest_images_fs defined
Verify the new pool
# virsh pool-list --all
Name                 State      Autostart
-----------------------------------------
default              active     yes
guest_images_fs      inactive   no
Ceate the mount point
virsh pool-build command to create a mount point for a pre-formatted file system storage pool.
# virsh pool-buildguest_images_fsPool guest_images_fs built # ls -la /guest_imagestotal 8 drwx------. 2 root root 4096 May 31 19:38 . dr-xr-xr-x. 25 root root 4096 May 31 19:38 .. # virsh pool-list --all Name State Autostart ----------------------------------------- default active yes guest_images_fs inactive no
Start the storage pool
virsh pool-start command to mount the file system onto the mount point and make the pool available for use.
# virsh pool-start guest_images_fs
Pool guest_images_fs started
# virsh pool-list --all
Name                 State      Autostart
-----------------------------------------
default              active     yes
guest_images_fs      active     no
Turn on autostart
virsh is not set to automatically start each time the libvirtd starts. Turn on automatic start with the virsh pool-autostart command. The storage pool is now automatically started each time libvirtd starts.
# virsh pool-autostart guest_images_fs
Pool guest_images_fs marked as autostarted

# virsh pool-list --all
Name                 State      Autostart
-----------------------------------------
default              active     yes
guest_images_fs      active     yes
Verify the storage pool
running. Verify there is a "lost+found" directory in the mount point on the file system, indicating the device is mounted.
# virsh pool-info guest_images_fs
Name:           guest_images_fs
UUID:           c7466869-e82a-a66c-2187-dc9d6f0877d0
State:          running
Capacity:       458.39 GB
Allocation:     197.91 MB
Available:      458.20 GB
# mount | grep /guest_images
/dev/sdc1 on /guest_images type ext4 (rw)
# ls -la /guest_images
total 24
drwxr-xr-x.  3 root root  4096 May 31 19:47 .
dr-xr-xr-x. 25 root root  4096 May 31 19:38 ..
drwx------.  2 root root 16384 May 31 14:18 lost+found
virt-manager or the virsh command line tools.
Create the local directory
Optional: Create a new directory for the storage pool
/guest_images.
# mkdir /guest_imagesSet directory ownership
# chown root:root /guest_imagesSet directory permissions
# chmod 700 /guest_imagesVerify the changes
# ls -la /guest_images
total 8
drwx------.  2 root root 4096 May 28 13:57 .
dr-xr-xr-x. 26 root root 4096 May 28 13:57 ..
Configure SELinux file contexts
# semanage fcontext -a -t virt_image_t /guest_images
Open the storage pool settings
virt-manager graphical interface, select the host from the main window.
Create the new storage pool
Add a new pool (part 1)
guest_images_dir. Change the to dir: Filesystem Directory.

Add a new pool (part 2)
/guest_images.

Verify the new storage pool
36.41 GB Free in this example. Verify the field reports the new storage pool as Active.
libvirtd service sarts.

Create the storage pool definition
virsh pool-define-as command to define a new storage pool. There are two options required for creating directory-based storage pools:
name of the storage pool.
guest_images_dir. All further virsh commands used in this example use this name.
path to a file system directory for storing virtualized guest image files . If this directory does not exist, virsh will create it.
/guest_images directory.
# virsh pool-define-asguest_images_dirdir - - - - "/guest_images" Pool guest_images_dir defined
Verify the storage pool is listed
inactive.
# virsh pool-list --all
Name                 State      Autostart
-----------------------------------------
default              active     yes
guest_images_dir     inactive   no
Create the local directory
virsh pool-build command to build the directory-based storage pool. virsh pool-build sets the required permissions and SELinux settings for the directory and creates the directory if it does not exist.
# virsh pool-buildguest_images_dirPool guest_images_dir built # ls -la /guest_imagestotal 8 drwx------. 2 root root 4096 May 30 02:44 . dr-xr-xr-x. 26 root root 4096 May 30 02:44 .. # virsh pool-list --all Name State Autostart ----------------------------------------- default active yes guest_images_dir inactive no
Start the storage pool
pool-start for this. pool-start enables a directory storage pool, allowing it to be used for volumes and guests.
# virsh pool-start guest_images_dir
Pool guest_images_dir started
# virsh pool-list --all
Name                 State      Autostart
-----------------------------------------
default              active     yes
guest_images_dir    active     no
Turn on autostart
autostart for the storage pool. Autostart configures the libvirtd service to start the storage pool when the service starts.
# virsh pool-autostart guest_images_dir
Pool guest_images_dir marked as autostarted
# virsh pool-list --all
Name                 State      Autostart
-----------------------------------------
default              active     yes
guest_images_dir     active     yes
Verify the storage pool configuration
running.
# virsh pool-info guest_images_dir
Name:           guest_images_dir
UUID:           779081bf-7a82-107b-2874-a19a9c51d24c
State:          running
Capacity:       49.22 GB
Allocation:     12.80 GB
Available:      36.41 GB

# ls -la /guest_images
total 8
drwx------.  2 root root 4096 May 30 02:44 .
dr-xr-xr-x. 26 root root 4096 May 30 02:44 ..
#
Optional: Create new partition for LVM volumes
Create a new partition
fdisk command to create a new disk partition from the command line. The following example creates a new partition that uses the entire disk on the storage device /dev/sdb.
# fdisk /dev/sdb
Command (m for help):
n for a new partition.
p for a primary partition.
Command action
   e   extended
   p   primary partition (1-4)
1.
Partition number (1-4): 1Enter.
First cylinder (1-400, default 1):
Enter.
Last cylinder or +size or +sizeM or +sizeK (2-400, default 400):
t.
Command (m for help): t1.
Partition number (1-4): 18e for a Linux LVM partition.
Hex code (type L to list codes): 8eCommand (m for help):wCommand (m for help):q
Create a new LVM volume group
guest_images_lvm.
# vgcreateguest_images_lvm/dev/sdb1 Physical volmue "/dev/vdb1" successfully created Volume group "guest_images_lvm" successfully created
guest_images_lvm, can now be used for an LVM-based storage pool.
Open the storage pool settings
virt-manager graphical interface, select the host from the main window.
Create the new storage pool
Start the Wizard
guest_images_lvm for this example. Then change the to logical: LVM Volume Group, and

Add a new pool (part 2)
/guest_images.
/dev/storage_pool_name.
/dev/guest_images_lvm.
Source Path field is optional if an existing LVM volume group is used in the .
Source Path field. This example uses a blank partition /dev/sdc.
virt-manager to create a new LVM volume group. If you are using an existing volume group you should not select the checkbox.

Confirm the device to be formatted

Verify the new storage pool
465.76 GB Free in our example. Also verify the field reports the new storage pool as Active.

# virsh pool-define-asguest_images_lvmlogical - -/dev/sdclibvirt_lvm/dev/libvirt_lvmPool guest_images_lvm defined # virsh pool-buildguest_images_lvmPool guest_images_lvm built # virsh pool-startguest_images_lvmPool guest_images_lvm started # vgs VG #PV #LV #SN Attr VSize VFree libvirt_lvm 1 0 0 wz--n- 465.76g 465.76g # virsh pool-autostartguest_images_lvmPool guest_images_lvm marked as autostarted # virsh pool-list --all Name State Autostart ----------------------------------------- default active yes guest_images_lvm active yes # virsh vol-create-asguest_images_lvmvolume18GVol volume1 created # virsh vol-create-asguest_images_lvmvolume28GVol volume2 created # virsh vol-create-asguest_images_lvmvolume38GVol volume3 created # virsh vol-listguest_images_lvmName Path ----------------------------------------- volume1 /dev/libvirt_lvm/volume1 volume2 /dev/libvirt_lvm/volume2 volume3 /dev/libvirt_lvm/volume3 # lvscan ACTIVE '/dev/libvirt_lvm/volume1' [8.00 GiB] inherit ACTIVE '/dev/libvirt_lvm/volume2' [8.00 GiB] inherit ACTIVE '/dev/libvirt_lvm/volume3' [8.00 GiB] inherit # lvs LV VG Attr LSize Origin Snap% Move Log Copy% Convert volume1 libvirt_lvm -wi-a- 8.00g volume2 libvirt_lvm -wi-a- 8.00g volume3 libvirt_lvm -wi-a- 8.00g # vgs VG #PV #LV #SN Attr VSize VFree libvirt_lvm 1 3 0 wz--n- 465.76g 441.76g vg_host2 1 3 0 wz--n- 465.27g 0 #
Install the required packages
# yum install scsi-target-utils
Start the tgtd service
tgtd service hosts SCSI targets and uses the iSCSI protocol to host targets. Start the tgtd service and make the service persistent after restarting with the chkconfig command.
# service tgtd start
# chkconfig tgtd on
Optional: Create LVM volumes
virtimage1 on a new volume group named virtstore on a RAID5 array for hosting virtualized guests with iSCSI.
Create the RAID array
Create the LVM volume group
virtstore with the vgcreate command.
# vgcreate virtstore /dev/md1Create a LVM logical volume
virtimage1 on the virtstore volume group with a size of 20GB using the lvcreate command.
# lvcreate --size 20G -nvirtimage1virtstore
virtimage1, is ready to use for iSCSI.
Optional: Create file-based images
virtimage2.img for an iSCSI target.
Create a new directory for the image
# mkdir -p /var/lib/tgtd/virtualizationCreate the image file
virtimage2.img with a size of 10GB.
# dd if=/dev/zero of=/var/lib/tgtd/virtualization/virtimage2.imgbs=1M seek=10000 count=0
Configure SELinux file contexts
# restorecon -R /var/lib/tgtd
virtimage2.img, is ready to use for iSCSI.
Create targets
/etc/tgt/targets.conf file. The target attribute requires an iSCSI Qualified Name (IQN). The IQN is in the format:
iqn.yyyy-mm.reversed domain name:optional identifier text
yyyy-mm represents the year and month the device was started (for example: 2010-05);
reversed domain name is the hosts domain name in reverse (for example server1.example.com in an IQN would be com.example.server1); and
optional identifier text is any text string, without spaces, that assists the administrator in identifying devices or hardware.
server1.example.com with an optional identifier trial. Add the following to the /etc/tgt/targets.conf file.
<target iqn.2010-05.com.example.server1:trial> backing-store /dev/virtstore/virtimage1#LUN 1 backing-store /var/lib/tgtd/virtualization/virtimage2.img#LUN 2 write-cache off </target>
/etc/tgt/targets.conf file contains the default-driver iscsi line to set the driver type as iSCSI. The driver uses iSCSI by default.
Restart the tgtd service
tgtd service to reload the configuration changes.
# service tgtd restart
iptables configuration
iptables.
# iptables -I INPUT -p tcp -m tcp --dport 3260 -j ACCEPT
# service iptables save
# service iptables restart
Verify the new targets
tgt-admin --show command.
# tgt-admin --show
Target 1: iqn.2010-05.com.example.server1:trial
System information:
Driver: iscsi
State: ready
I_T nexus information:
LUN information:
LUN: 0
    Type: controller
    SCSI ID: IET     00010000
    SCSI SN: beaf10
    Size: 0 MB
    Online: Yes
    Removable media: No
    Backing store type: rdwr
    Backing store path: None
LUN: 1
    Type: disk
    SCSI ID: IET     00010001
    SCSI SN: beaf11
    Size: 20000 MB
    Online: Yes
    Removable media: No
    Backing store type: rdwr
    Backing store path: /dev/virtstore/virtimage1
LUN: 2
    Type: disk
    SCSI ID: IET     00010002
    SCSI SN: beaf12
    Size: 10000 MB
    Online: Yes
    Removable media: No
    Backing store type: rdwr
    Backing store path: /var/lib/tgtd/virtualization/virtimage2.img
Account information:
ACL information:
ALLOptional: Test discovery
# iscsiadm --mode discovery --type sendtargets --portal server1.example.com
127.0.0.1:3260,1 iqn.2010-05.com.example.server1:trial1
Optional: Test attaching the device
iqn.2010-05.com.example.server1:trial1) to determine whether the device can be attached.
# iscsiadm -d2 -m node --login
scsiadm: Max file limits 1024 1024

Logging in to [iface: default, target: iqn.2010-05.com.example.server1:trial1, portal: 10.0.0.1,3260]
Login to [iface: default, target: iqn.2010-05.com.example.server1:trial1, portal: 10.0.0.1,3260] successful.
# iscsiadm -d2 -m node --logout
scsiadm: Max file limits 1024 1024

Logging out of session [sid: 2, target: iqn.2010-05.com.example.server1:trial1, portal: 10.0.0.1,3260
Logout of [sid: 2, target: iqn.2010-05.com.example.server1:trial1, portal: 10.0.0.1,3260] successful.
virt-manager.
Open the host storage tab
virt-manager.
virt-manager window.
Add a new pool (part 1)

Add a new pool (part 2)
/dev/disk/by-path/, adds the drive path to that folder. The target path should be the same on all hosts for migration.
server1.example.com.
iqn.2010-05.com.example.server1:trial1.

Create the storage pool definition
name element sets the name for the storage pool. The name is required and must be unique.
uuid element provides a unique global identifier for the storage pool. The uuid element can contain any valid UUID or an existing UUID for the storage device. If a UUID is not provided, virsh will generate a UUID for the storage pool.
host element with the name attribute specifies the hostname of the iSCSI server. The host element attribute can contain a port attribute for a non-standard iSCSI protocol port number.
iqn.2010-05.com.example.server1:trial1'/>device element path attribute must contain the IQN for the iSCSI server.
trial1.xml.
<pool type='iscsi'>
  <name>trial1</name>
  <uuid>afcc5367-6770-e151-bcb3-847bc36c5e28</uuid>
  <source>
    <host name='server1.example.com'/>
    <device path='iqn.2010-05.com.example.server1:trial1'/>
  </source>
  <target>
    <path>/dev/disk/by-path</path>
   </target>
</pool>pool-define command to define the storage pool but not start it.
# virsh pool-define trial1.xml
Pool trial1 defined
Alternative step: Use pool-define-as to define the pool from the command line
virsh command line tool. Creating storage pools with virsh is useful for systems administrators using scripts to create multiple storage pools.
virsh pool-define-as command has several parameters which are accepted in the following format:
virsh pool-define-asname type source-host source-path source-dev source-nametarget
iscsi, defines this pool as an iSCSI based storage pool. The name parameter must be unique and sets the name for the storage pool. The source-host and source-path parameters are the hostname and iSCSI IQN respectively. The source-dev and source-name parameters are not required for iSCSI-based pools, use a - character to leave the field blank. The target parameter defines the location for mounting the iSCSI device on the host.
# virsh pool-define-as trial1 iscsi server1.example.com iqn.2010-05.com.example.server1:trial1 - - /dev/disk/by-path
Pool trial1 defined
Verify the storage pool is listed
inactive.
# virsh pool-list --all
Name                 State      Autostart
-----------------------------------------
default              active     yes
trial1               inactive   no
Start the storage pool
pool-start for this. pool-start enables a directory storage pool, allowing it to be used for volumes and guests.
# virsh pool-startguest_images_diskPool guest_images_disk started # virsh pool-list --all Name State Autostart ----------------------------------------- default active yestrial1active no
Turn on autostart
autostart for the storage pool. Autostart configures the libvirtd service to start the storage pool when the service starts.
# virsh pool-autostart trial1
Pool trial1 marked as autostartedtrial1 pool has autostart set:
# virsh pool-list --all
Name                 State      Autostart
-----------------------------------------
default              active     yes
trial1               active     yes
Verify the storage pool configuration
running.
# virsh pool-infotrial1Name:trial1UUID: afcc5367-6770-e151-bcb3-847bc36c5e28 State: running Persistent: unknown Autostart: yes Capacity: 100.31 GB Allocation: 0.00 Available: 100.31 GB
virt-manager.
Open the host storage tab
virt-manager.
virt-manager window.
Create a new pool (part 1)

Create a new pool (part 2)
server1.example.com.
/nfstrial.

# virsh vol-create-asguest_images_diskvolume18G Vol volume1 created # virsh vol-create-asguest_images_diskvolume28G Vol volume2 created # virsh vol-create-asguest_images_diskvolume38G Vol volume3 created # virsh vol-listguest_images_diskName Path ----------------------------------------- volume1 /dev/sdb1 volume2 /dev/sdb2 volume3 /dev/sdb3 # parted -s/dev/sdbprint Model: ATA ST3500418AS (scsi) Disk /dev/sdb: 500GB Sector size (logical/physical): 512B/512B Partition Table: gpt Number Start End Size File system Name Flags 2 17.4kB 8590MB 8590MB primary 3 8590MB 17.2GB 8590MB primary 1 21.5GB 30.1GB 8590MB primary #
# virsh vol-clone --poolguest_images_diskvolume3clone1Vol clone1 cloned from volume3 # virsh vol-listguest_images_diskName Path ----------------------------------------- clone1 /dev/sdb1 volume2 /dev/sdb2 volume3 /dev/sdb3 # parted -s/dev/sdbprint Model: ATA ST3500418AS (scsi) Disk /dev/sdb: 500GB Sector size (logical/physical): 512B/512B Partition Table: gpt Number Start End Size File system Name Flags 2 8590MB 17.2GB 8590MB primary 3 17.2GB 25.8GB 8590MB primary 1 25.8GB 34.4GB 8590MB primary #
dd command. Sparse files are not recommended due to data integrity and performance issues. Sparse files are created much faster and can used for testing but should not be used in production environments.
# dd if=/dev/zero of=/var/lib/libvirt/images/FileName.img bs=1M seek=4096 count=0
# dd if=/dev/zero of=/var/lib/libvirt/images/FileName.img bs=1M count=4096
Guest1 and the file is saved in the users home directory.
# virsh dumpxmlGuest1> ~/Guest1.xml
Guest1.xml in this example) in a text editor. Find the <disk> elements, these elements describe storage devices. The following is an example disk element:
<disk type='file' device='disk'>
     <driver name='virtio' cache='none'/>
    <source file='/var/lib/libvirt/images/Guest1.img'/>
    <target dev='sda'/>
</disk>
<disk> element. Ensure you specify a device name for the virtual block device attributes. These attributes must be unique for each guest configuration file. The following example is a configuration file section which contains an additional file-based storage container named FileName.img.
<disk type='file' device='disk'>
    <driver name='virtio' cache='none'/>
    <source file='/var/lib/libvirt/images/Guest1.img'/>
    <target dev='sda'/>
</disk>
<disk type='file' device='disk'>
     <driver name='virtio' cache='none'/>
    <source file='/var/lib/libvirt/images/FileName.img'/>
    <target dev='sdb'/>
</disk>
# virsh create Guest1.xml
FileName.img as the device called /dev/sdb. This device requires formatting from the guest. On the guest, partition the device into one primary partition for the entire device then format the device.
n for a new partition.
# fdisk /dev/sdb
Command (m for help):
p for a primary partition.
Command action
e   extended
p   primary partition (1-4)
1.
Partition number (1-4): 1Enter.
First cylinder (1-400, default 1):
Enter.
Last cylinder or +size or +sizeM or +sizeK (2-400, default 400):
t.
Command (m for help): t1.
Partition number (1-4): 183 for a linux partition.
Hex code (type L to list codes): 83Command (m for help):wCommand (m for help):q
ext3 file system.
# mke2fs -j /dev/sdb1
# mount /dev/sdb1 /myfilesmultipath and persistence on the host if required.
virsh attach command as below, replacing:
# virsh attach-diskmyguest/dev/sdb1sdc--driver tap --mode readonly
myguest with the name of the guest.
/dev/sdb1 with the device on the host to add.
sdc with the location on the guest where the device should be added. It must be an unused device name.
sd* notation for Windows guests as well, the guest will recognize the device correctly.
--mode readonly parameter if the device should be read only to the guest.
--type hdd parameter to the command for CD-ROM or DVD devices.
--type floppy parameter to the command for floppy devices.
/dev/sdb on Linux or D: drive, or similar, on Windows. This device may require formatting.
fstab file, the initrd file or on the kernel command line. Doing so presents a security risk if less privileged users, such as virtualized guests, have write access to whole partitions or LVM volumes.
/dev/sdb). Virtualized guests with access to block devices may be able to access other block devices on the system or modify volume labels which can be used to compromise the host system. Use partitions (for example, /dev/sdb1) or LVM volumes to prevent this issue.
# virsh vol-delete --poolguest_images_diskvolume1Vol volume1 deleted # virsh vol-listguest_images_diskName Path ----------------------------------------- volume2 /dev/sdb2 volume3 /dev/sdb3 # parted -s/dev/sdbprint Model: ATA ST3500418AS (scsi) Disk /dev/sdb: 500GB Sector size (logical/physical): 512B/512B Partition Table: gpt Number Start End Size File system Name Flags 2 8590MB 17.2GB 8590MB primary 3 17.2GB 25.8GB 8590MB primary #
dd command. Replace /dev/fd0 with the name of a floppy device and name the disk appropriately.
# dd if=/dev/fd0 of=~/legacydrivers.img
virt-manager running a fully virtualized Fedora installation with an image located in /var/lib/libvirt/images/Fedora.img.
virsh command on a running guest.
# virsh dumpxml Fedora > Fedora.xml
# dd if=/dev/zero of=/var/lib/libvirt/images/Fedora-floppy.img bs=512 count=2880
<disk type='file' device='floppy'>
	<source file='/var/lib/libvirt/images/Fedora-floppy.img'/>
	<target dev='fda'/>
</disk>
virsh shutdown command instead.
# virsh destroy Fedora# virsh create Fedora.xml
multipath must use Single path configuration. Systems running multipath can use Multiple path configuration.
udev. Only use this procedure for hosts which are not using multipath.
/etc/scsi_id.config file.
options=--whitelisted --replace-whitespace
scsi_id --whitelisted --replace-whitespace --device=/dev/sd* command. For example:
# scsi_id --whitelisted --replace-whitespace --device=/dev/sdc
1IET_00010001
/dev/sdc.
scsi_id --whitelisted --replace-whitespace --device=/dev/sd* command is correct and as expected.
20-names.rules in the /etc/udev/rules.d directory. Add new rules to this file. All rules are added to the same file using the same format. Rules follow this format:
KERNEL=="sd*", SUBSYSTEM=="block", PROGRAM="/sbin/scsi_id --whitelisted --replace-whitespace /dev/$name", RESULT=="UUID", NAME="devicename"
UUID and devicename with the UUID retrieved above, and a name for the device. This is an example for the rule above for three example iSCSI luns:
KERNEL=="sd*", SUBSYSTEM=="block", PROGRAM="/sbin/scsi_id --whitelisted --replace-whitespace /dev/$name", RESULT=="1IET_00010001", NAME="rack4row16lun1"
KERNEL=="sd*", SUBSYSTEM=="block", PROGRAM="/sbin/scsi_id --whitelisted --replace-whitespace /dev/$name", RESULT=="1IET_00010002", NAME="rack4row16lun2"
KERNEL=="sd*", SUBSYSTEM=="block", PROGRAM="/sbin/scsi_id --whitelisted --replace-whitespace /dev/$name", RESULT=="1IET_00010003", NAME="rack4row16lun3"
udev daemon now searches all devices named /dev/sd* for a matching UUID in the rules. When a matching device is connected to the system the device is assigned the name from the rule. For example:
# ls -la /dev/rack4row16*
brw-rw---- 1 root disk 8, 18 May 25 23:35 /dev/rack4row16lun1
brw-rw---- 1 root disk 8, 34 May 25 23:35 /dev/rack4row16lun2
brw-rw---- 1 root disk 8, 50 May 25 23:35 /dev/rack4row16lun3
/etc/scsi_id.config and /etc/udev/rules.d/20-names.rules to all relevant hosts.
multipath package is used for systems with more than one physical path from the computer to storage devices. multipath provides fault tolerance, fail-over and enhanced performance for network storage devices attached to Red Hat Enterprise Linux 6 systems.
multipath environment requires defined alias names for your multipath devices. Each storage device has a UUID, also known as a World Wide Identifier or WWID, which acts as a key for the aliased names.
multipath daemon.
scsi_id --whitelisted --replace-whitespace --device=/dev/sd* command:
# scsi_id --whitelisted --replace-whitespace --device=/dev/sde
1IET_00010004
# scsi_id --whitelisted --replace-whitespace --device=/dev/sdf
1IET_00010005
# scsi_id --whitelisted --replace-whitespace --device=/dev/sdg
1IET_00010006
# scsi_id --whitelisted --replace-whitespace --device=/dev/sdh
1IET_00010007
/etc/multipath.conf. In it create a defaults section, and disable the user_friendly_names option unless you have a specific need for it. It is also a good idea to configure the default arguments for the getuid_callout option. This is generally a useful start:
defaults {
	user_friendly_names no
	getuid_callout      "/sbin/scsi_id --whitelisted --replace-whitespace --device=/dev/%n"
}
defaults section add a multipaths section (note the plural spelling). In this section add each of the WWIDs identified from the scsi_id command above. For example:
multipaths {
	multipath {
		wwid			1IET_00010004
		alias			oramp1
	}

	multipath {
		wwid			1IET_00010005
		alias			oramp2
	}

	multipath {
		wwid			1IET_00010006
		alias			oramp3
	}

	multipath {
		wwid			1IET_00010007
		alias			oramp4
	}
}
/dev/mapper directory. The above example will create 4 LUNs named /dev/mapper/oramp1, /dev/mapper/oramp2, /dev/mapper/oramp3 and /dev/mapper/oramp4.
multipathd daemon to start at system boot.
# chkconfig multipathd on
# chkconfig --list multipathd
multipathd     	0:off	1:off	2:on	3:on	4:on	5:on	6:off
# ls -la /dev/mapper/oramp*
brw-rw---- 1 root disk 253, 6 May 26 00:17 /dev/mapper/oramp1
brw-rw---- 1 root disk 253, 7 May 26 00:17 /dev/mapper/oramp2
brw-rw---- 1 root disk 253, 8 May 26 00:17 /dev/mapper/oramp3
brw-rw---- 1 root disk 253, 9 May 26 00:17 /dev/mapper/oramp4
# multipath -ll
oramp1 (1IET_00010004) dm-6 IET,VIRTUAL-DISK
size=20.0G features='0' hwhandler='0' wp=rw
|-+- policy='round-robin 0' prio=1 status=active
| `- 8:0:0:4  sde  8:64   active ready running
`-+- policy='round-robin 0' prio=1 status=enabled
  `- 9:0:0:4  sdbl 67:240 active ready running
oramp3 (1IET_00010006) dm-8 IET,VIRTUAL-DISK
size=20.0G features='0' hwhandler='0' wp=rw
|-+- policy='round-robin 0' prio=1 status=active
| `- 8:0:0:6  sdg  8:96   active ready running
`-+- policy='round-robin 0' prio=1 status=enabled
  `- 9:0:0:6  sdbn 68:16  active ready running
oramp2 (1IET_00010005) dm-7 IET,VIRTUAL-DISK
size=20.0G features='0' hwhandler='0' wp=rw
|-+- policy='round-robin 0' prio=1 status=active
| `- 8:0:0:5  sdf  8:80   active ready running
`-+- policy='round-robin 0' prio=1 status=enabled
  `- 9:0:0:5  sdbm 68:0   active ready running
oramp4 (1IET_00010007) dm-9 IET,VIRTUAL-DISK
size=20.0G features='0' hwhandler='0' wp=rw
|-+- policy='round-robin 0' prio=1 status=active
| `- 8:0:0:7  sdh  8:112  active ready running
`-+- policy='round-robin 0' prio=1 status=enabled
  `- 9:0:0:7  sdbo 68:32  active ready running
kpartx tool, covered by this section, to mount the guest file system as a loop device which can then be accessed.
kpartx command creates device maps from partition tables. Each guest storage image has a partition table embedded in the file.
# yum install kpartx
guest1.img.
# kpartx -l /var/lib/libvirt/images/guest1.img
loop0p1 : 0 409600 /dev/loop0 63
loop0p2 : 0 10064717 /dev/loop0 409663
guest1 is a Linux guest. The first partition is the boot partition and the second partition is an EXT3 containing the root partition.
/dev/mapper/.
# kpartx -a /var/lib/libvirt/images/guest1.img# ls /dev/mapper/ loop0p1 loop0p2
loopXpY.
/mnt/guest1 for mounting the partition.
# mkdir /mnt/guest1
# mount /dev/mapper/loop0p1 /mnt/guest1 -o loop,ro
/mnt/guest1 directory. Read or copy the files.
# umount /mnt/guest1
# kpartx -d /var/lib/libvirt/images/guest1.imgguest1.img to the recognized devices in the /dev/mapper/ directory.
# kpartx -a /var/lib/libvirt/images/guest1.imgvgscan command to find the new volume groups.
# vgscan
Reading all physical volumes . This may take a while...
Found volume group "VolGroup00" using metadata type lvm2
VolGroup00 by default) with the vgchange -ay command.
# vgchange -ay VolGroup00
2 logical volumes in volume group VolGroup00 now active.
lvs command to display information about the new volumes. The volume names (the LV column) are required to mount the volumes.
# lvs
LV VG Attr Lsize Origin Snap% Move Log Copy%
LogVol00 VolGroup00 -wi-a- 5.06G
LogVol01 VolGroup00 -wi-a- 800.00M
/dev/VolGroup00/LogVol00 in the /mnt/guestboot/ directory.
# mount /dev/VolGroup00/LogVol00 /mnt/guestboot
/mnt/guestboot directory. Read or copy the files.
# umount /mnt/guestboot
VolGroup00
# vgchange -an VolGroup00# kpartx -d /var/lib/libvirt/images/guest1.imgadmin> portcfgshow 0 ...... NPIV capability ON ...... Usage portCfgNPIVPort <PortNumber> <Mode> Mode Meaning 0 Disable the NPIV capability on the port 1 Enable the NPIV capability on the port
admin> portCfgNPIVPort 0 1
# ls /proc/scsi
QLogic HBAs are listed as qla2xxx. Emulex HBAs are listed as lpfc.
# ls /proc/scsi/qla2xxx
# ls /proc/scsi/lpfc
# cat /proc/scsi/qla2xxx/7 FC Port Information for Virtual Ports: Virtual Port index = 1 Virtual Port 1:VP State = <ACTIVE>, Vp Flags = 0x0 scsiqla2port3=500601609020fd54:500601601020fd54:a00000:1000: 1; scsiqla2port4=500601609020fd54:500601681020fd54:a10000:1000: 1; Virtual Port 1 SCSI LUN Information: ( 0:10): Total reqs 10, Pending reqs 0, flags 0x0, 2:0:1000,
# cat /proc/scsi/lpfc/3
SLI Rev: 3
NPIV Supported: VPIs max 127 VPIs used 1
RPIs max 512 RPIs used 13
Vports list on this physical port:
Vport DID 0x2f0901, vpi 1, state 0x20
Portname: 48:19:00:0c:29:00:00:0d Nodename: 48:19:00:0c:29:00:00:0b
libvirt, you require a NPIV capable HBA and switch.
/sys/class/fc_host/hostN directory where class is the type of adaptor and fc_host is the host number.
1111222233334444:5555666677778888' is WWPN:WWNN and host5 is the physical HBA which the virtual HBA is a client of.
# echo '1111222233334444:5555666677778888' > /sys/class/fc_host/host5/vport_create# echo '1111222233334444:5555666677778888' > /sys/class/fc_host/host5/vport_deletevirsh. This procedure requires a compatible HBA device.
List available HBAs
# virsh nodedev-list -TODO-cap=scsi_host
pci_10df_fe00_0_scsi_host
pci_10df_fe00_0_scsi_host_0
pci_10df_fe00_scsi_host
pci_10df_fe00_scsi_host_0
pci_10df_fe00_scsi_host_0_scsi_host
pci_10df_fe00_scsi_host_0_scsi_host_0
Gather parent HBA device data
pci_10df_fe00_scsi_host.
# virsh nodedev-dumpxml pci_10df_fe00_scsi_host
<device>
  <name>pci_10df_fe00_scsi_host</name>
  <parent>pci_10df_fe00</parent>
  <capability type='scsi_host'>
    <host>5</host>
    <capability type='fc_host'>
      <wwnn>20000000c9848140</wwnn>
      <wwpn>10000000c9848140</wwpn>
    </capability>
    <capability type='vport_ops' />
  </capability>
</device>type='vport_ops' in the XML definition.
Create the XML definition for the virtual HBA
newHBA.xml.
<device>
  <parent>pci_10df_fe00_0_scsi_host</parent>
  <capability type='scsi_host'>
    <capability type='fc_host'>
      <wwpn>1111222233334444</wwpn>
      <wwnn>5555666677778888</wwnn>
    </capability>
  </capability>
</device><parent> element is the name of the parent HBA listed by the virsh nodedev-list command. The <wwpn> and <wwnn> elements are the WWNN and WWPN for the virtual HBA.
# virsh nodedev-create badwwn.xml
error: Failed to create node device from badwwn.xml
error: Write of '1111222233334444:5555666677778888' to '/sys/class/fc_host/host6/vport_create' during vport create/delete failed: No such file or directory
Create the virtual HBA
virsh nodedev-create command using the file from the previous step.
# virsh nodedev-create newHBA.xml
Node device pci_10df_fe00_0_scsi_host_0_scsi_host created from newHBA.xml
virsh nodedev-destroy:
# virsh nodedev-destroy pci_10df_fe00_0_scsi_host_0_scsi_host
Destroyed node device 'pci_10df_fe00_0_scsi_host_0_scsi_host'
Table of Contents
virsh is a command line interface tool for managing guests and the hypervisor.
virsh command-line tool is built on the libvirt management API and operates as an alternative to the qemu-kvm command and the graphical virt-manager application. The virsh command can be used in read-only mode by unprivileged users or, with root access, full administration functionality. The virsh command is ideal for scripting virtualization administration.
| Command | Description |
|---|---|
help
| Prints basic help information. |
list
| Lists all guests. |
dumpxml
| Outputs the XML configuration file for the guest. |
create
| Creates a guest from an XML configuration file and starts the new guest. |
start
| Starts an inactive guest. |
destroy
| Forces a guest to stop. |
define
| Outputs an XML configuration file for a guest. |
domid
| Displays the guest's ID. |
domuuid
| Displays the guest's UUID. |
dominfo
| Displays guest information. |
domname
| Displays the guest's name. |
domstate
| Displays the state of a guest. |
quit
| Quits the interactive terminal. |
reboot
| Reboots a guest. |
restore
| Restores a previously saved guest stored in a file. |
resume
| Resumes a paused guest. |
save
| Save the present state of a guest to a file. |
shutdown
| Gracefully shuts down a guest. |
suspend
| Pauses a guest. |
undefine
| Deletes all files associated with a guest. |
migrate
| Migrates a guest to another host. |
virsh command options manage guest and hypervisor resources:
| Command | Description |
|---|---|
setmem
| Sets the allocated memory for a guest. |
setmaxmem
| Sets maximum memory limit for the hypervisor. |
setvcpus
| Changes number of virtual CPUs assigned to a guest. |
vcpuinfo
| Displays virtual CPU information about a guest. |
vcpupin
| Controls the virtual CPU affinity of a guest. |
domblkstat
| Displays block device statistics for a running guest. |
domifstat
| Displays network interface statistics for a running guest. |
attach-device
| Attach a device to a guest, using a device definition in an XML file. |
attach-disk
| Attaches a new disk device to a guest. |
attach-interface
| Attaches a new network interface to a guest. |
detach-device
|
Detach a device from a guest, takes the same kind of XML descriptions as command attach-device.
|
detach-disk
| Detach a disk device from a guest. |
detach-interface
| Detach a network interface from a guest. |
virsh commands for managing and creating storage pools and volumes.
| Command | Description |
|---|---|
| find-storage-pool-sources | Returns the XML definition for all storage pools of a given type that could be found. |
find-storage-pool-sources port
| Returns data on all storage pools of a given type that could be found as XML. If the host and port are provided, this command can be run remotely. |
pool-autostart
| Sets the storage pool to start at boot time. |
pool-build
|
The pool-build command builds a defined pool. This command can format disks and create partitions.
|
pool-create
|
pool-create creates and starts a storage pool from the provided XML storage pool definition file.
|
pool-create-as name
|
Creates and starts a storage pool from the provided parameters. If the --print-xml parameter is specified, the command prints the XML definition for the storage pool without creating the storage pool.
|
pool-define
| Creates a storage bool from an XML definition file but does not start the new storage pool. |
pool-define-as name
|
Creates but does not start, a storage pool from the provided parameters. If the --print-xml parameter is specified, the command prints the XML definition for the storage pool without creating the storage pool.
|
pool-destroy
|
Permanently destroys a storage pool in libvirt. The raw data contained in the storage pool is not changed and can be recovered with the pool-create command.
|
pool-delete
| Destroys the storage resources used by a storage pool. This operation cannot be recovered. The storage pool still exists after this command but all data is deleted. |
pool-dumpxml
| Prints the XML definition for a storage pool. |
pool-edit
| Opens the XML definition file for a storage pool in the users default text editor. |
pool-info
| Returns information about a storage pool. |
pool-list
|
Lists storage pools known to libvirt. By default, pool-list lists pools in use by active guests. The --inactive parameter lists inactive pools and the --all parameter lists all pools.
|
pool-undefine
| Deletes the definition for an inactive storage pool. |
pool-uuid
| Returns the UUID of the named pool. |
pool-name
| Prints a storage pool's name when provided the UUID of a storage pool. |
pool-refresh
| Refreshes the list of volumes contained in a storage pool. |
pool-start
| Starts a storage pool that is defined but inactive. |
virsh commands:
| Command | Description |
|---|---|
version
|
Displays the version of virsh
|
nodeinfo
| Outputs information about the hypervisor |
virsh:
# virsh connect {name}{name} is the machine name (hostname) or URL of the hypervisor. To initiate a read-only connection, append the above command with --readonly.
virsh:
# virsh dumpxml {guest-id, guestname or uuid}stdout). You can save the data by piping the output to a file. An example of piping the output to a file called guest.xml:
# virsh dumpxmlGuestID>guest.xml
guest.xml can recreate the guest (refer to Editing a guest's configuration file. You can edit this XML configuration file to configure additional devices or to deploy additional guests. Refer to Section 33.1, “Using XML configuration files with virsh” for more information on modifying files created with virsh dumpxml.
virsh dumpxml output:
# virsh dumpxml r5b2-mySQL01
<domain type='kvm' id='13'>
    <name>r5b2-mySQL01</name>
    <uuid>4a4c59a7ee3fc78196e4288f2862f011</uuid>
    <bootloader>/usr/bin/pygrub</bootloader>
    <os>
        <type>linux</type>
        <kernel>/var/lib/libvirt/vmlinuz.2dgnU_</kernel>
	<initrd>/var/lib/libvirt/initrd.UQafMw</initrd>
        <cmdline>ro root=/dev/VolGroup00/LogVol00 rhgb quiet</cmdline>
    </os>
    <memory>512000</memory>
    <vcpu>1</vcpu>
    <on_poweroff>destroy</on_poweroff>
    <on_reboot>restart</on_reboot>
    <on_crash>restart</on_crash>
    <devices>
        <interface type='bridge'>
            <source bridge='br0'/>
            <mac address='00:16:3e:49:1d:11'/>
            <script path='bridge'/>
        </interface>
        <graphics type='vnc' port='5900'/>
        <console tty='/dev/pts/4'/>
    </devices>
</domain>
dumpxml option (refer to Creating a virtual machine XML dump (configuration file)). To create a guest with virsh from an XML file:
# virsh create configuration_file.xmldumpxml option (refer to Creating a virtual machine XML dump (configuration file)) guests can be edited either while they run or while they are offline. The virsh edit command provides this functionality. For example, to edit the guest named softwaretesting:
# virsh edit softwaretesting$EDITOR shell parameter (set to vi by default).
virsh:
# virsh suspend {domain-id, domain-name or domain-uuid}resume (Resuming a guest) option.
virsh using the resume option:
# virsh resume {domain-id, domain-name or domain-uuid}suspend and resume operations.
virsh command:
# virsh save {domain-name, domain-id or domain-uuid} filenamerestore (Restore a guest) option. Save is similar to pause, instead of just pausing a guest the present state of the guest is saved.
virsh save command (Save a guest) using virsh:
# virsh restore filenamevirsh command:
# virsh shutdown {domain-id, domain-name or domain-uuid}on_shutdown parameter in the guest's configuration file.
virsh command:
#virsh reboot {domain-id, domain-name or domain-uuid}on_reboot element in the guest's configuration file.
virsh command:
# virsh destroy {domain-id, domain-name or domain-uuid}virsh destroy can corrupt guest file systems . Use the destroy option only when the guest is unresponsive.
# virsh domid {domain-name or domain-uuid}# virsh domname {domain-id or domain-uuid}# virsh domuuid {domain-id or domain-name}virsh domuuid output:
# virsh domuuid r5b2-mySQL01
4a4c59a7-ee3f-c781-96e4-288f2862f011
virsh with the guest's domain ID, domain name or UUID you can display information on the specified guest:
# virsh dominfo {domain-id, domain-name or domain-uuid}virsh dominfo output:
# virsh dominfo r5b2-mySQL01
id:             13
name:           r5b2-mysql01
uuid:           4a4c59a7-ee3f-c781-96e4-288f2862f011
os type:      	linux
state:          blocked
cpu(s):         1
cpu time:     	11.0s
max memory:     512000 kb
used memory:    512000 kb
# virsh nodeinfo
virsh nodeinfo output:
# virsh nodeinfo
CPU model                    x86_64
CPU (s)                      8
CPU frequency                2895 Mhz
CPU socket(s)                2
Core(s) per socket           2
Threads per core:            2
Numa cell(s)                 1
Memory size:                 1046528 kb
virsh pool-edit command takes the name or UUID for a storage pool and opens the XML definition file for a storage pool in the users default text editor.
virsh pool-edit command is equivalent to running the following commands:
# virsh pool-dumpxmlpool>pool.xml # vimpool.xml # virsh pool-definepool.xml
$VISUAL or $EDITOR environment variables, and default is vi.
virsh:
# virsh list
--inactive option to list inactive guests (that is, guests that have been defined but are not currently active), and
--all option lists all guests. For example:
# virsh list --all
 Id Name                 State
----------------------------------
  0 Domain-0             running
  1 Domain202            paused
  2 Domain010            inactive
  3 Domain9600           crashed
virsh list is categorized as one of the six states (listed below).
running state refers to guests which are currently active on a CPU.
blocked are blocked, and are not running or runnable. This is caused by a guest waiting on I/O (a traditional wait state) or guests in a sleep mode.
paused state lists domains that are paused. This occurs if an administrator uses the pause button in virt-manager, xm pause or virsh suspend. When a guest is paused it consumes memory and other resources but it is ineligible for scheduling and CPU resources from the hypervisor.
shutdown state is for guests in the process of shutting down. The guest is sent a shutdown signal and should be in the process of stopping its operations gracefully. This may not work with all guest operating systems; some operating systems do not respond to these signals.
dying state are in is in process of dying, which is a state where the domain has not completely shut-down or crashed.
crashed guests have failed while running and are no longer running. This state can only occur if the guest has been configured not to restart on crash.
virsh:
# virsh vcpuinfo {domain-id, domain-name or domain-uuid}virsh vcpuinfo output:
# virsh vcpuinfo r5b2-mySQL01
VCPU:           0
CPU:            0
State:          blocked
CPU time:       0.0s
CPU Affinity:   yy
# virsh vcpupin domain-id vcpu cpulistdomain-id parameter is the guest's ID number or name.
vcpu parameter denotes the number of virtualized CPUs allocated to the guest.The vcpu parameter must be provided.
cpulist parameter is a list of physical CPU identifier numbers separated by commas. The cpulist parameter determines which physical CPUs the VCPUs can run on.
virsh:
# virsh setvcpus {domain-name, domain-id or domain-uuid} countcount value cannot exceed the count above the amount specified when the guest was created.
virsh :
# virsh setmem {domain-id or domain-name} count
virsh domblkstat to display block device statistics for a running guest.
# virsh domblkstat GuestName block-devicevirsh domifstat to display network interface statistics for a running guest.
# virsh domifstat GuestName interface-device virsh. Migrate domain to another host. Add --live for live migration. The migrate command accepts parameters in the following format:
# virsh migrate --live GuestName DestinationURL--live parameter is optional. Add the --live parameter for live migrations.
GuestName parameter represents the name of the guest which you want to migrate.
DestinationURL parameter is the URL or hostname of the destination system. The destination system requires:
libvirt service must be started.
virsh command. To list virtual networks:
# virsh net-list
# virsh net-list
Name                 State      Autostart
-----------------------------------------
default              active     yes
vnet1	             active     yes
vnet2	             active     yes
# virsh net-dumpxml NetworkName# virsh net-dumpxml vnet1
<network>
<name>vnet1</name>
<uuid>98361b46-1581-acb7-1643-85a412626e70</uuid>
<forward dev='eth0'/>
<bridge name='vnet0' stp='on' forwardDelay='0' />
<ip address='192.168.100.1' netmask='255.255.255.0'>
<dhcp>
<range start='192.168.100.128' end='192.168.100.254' />
</dhcp>
</ip>
</network>
virsh commands used in managing virtual networks are:
virsh net-autostart network-name — Autostart a network specified as network-name.
virsh net-create XMLfile — generates and starts a new network using an existing XML file.
virsh net-define XMLfile — generates a new network device from an existing XML file without starting it.
virsh net-destroy network-name — destroy a network specified as network-name.
virsh net-name networkUUID — convert a specified networkUUID to a network name.
virsh net-uuid network-name — convert a specified network-name to a network UUID.
virsh net-start nameOfInactiveNetwork — starts an inactive network.
virsh net-undefine nameOfInactiveNetwork — removes the definition of an inactive network.
virt-manager) windows, dialog boxes, and various GUI controls.
virt-manager provides a graphical view of hypervisors and guest on your system and on remote machines. You can use virt-manager to define virtualized guests. virt-manager can perform virtualization management tasks, including:
virt-manager session open the menu, then the menu and select (virt-manager).
virt-manager main window appears.
virt-managervirt-manager can be started remotely using ssh as demonstrated in the following command:
ssh -X host's address
[remotehost]# virt-manager
ssh to manage virtual machines and hosts is discussed further in Section 19.1, “Remote management with SSH”.
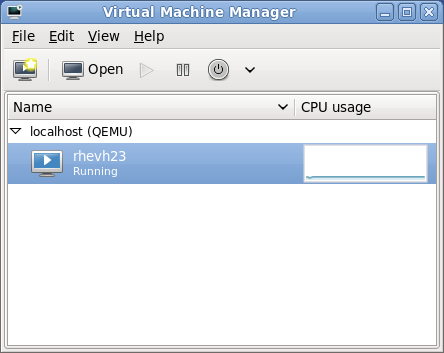
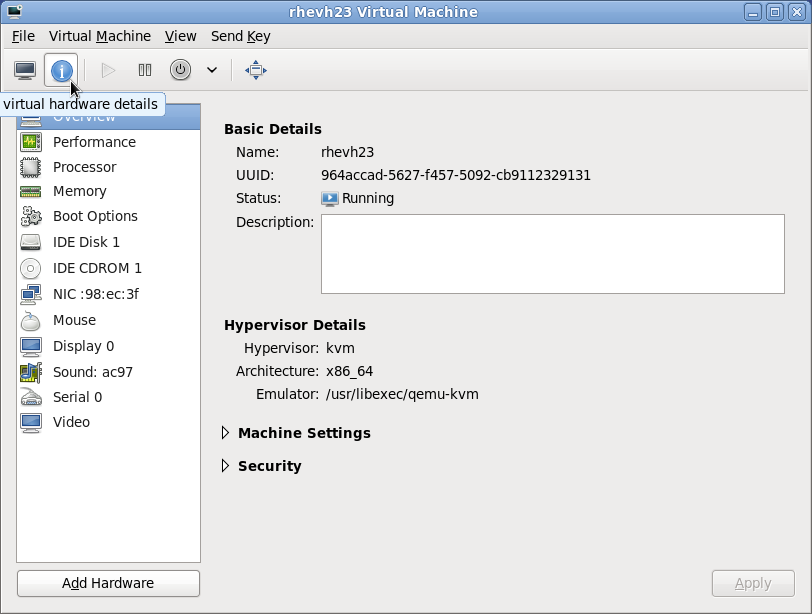
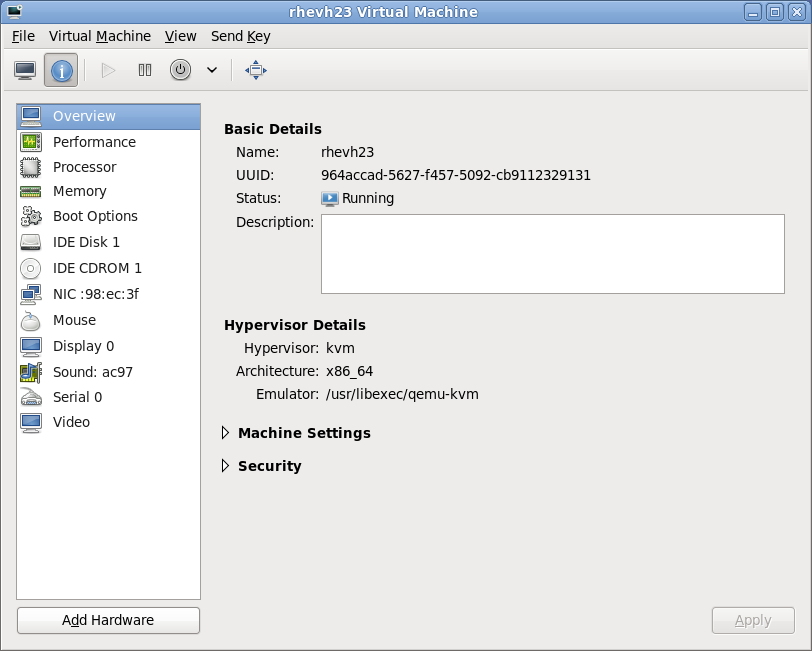
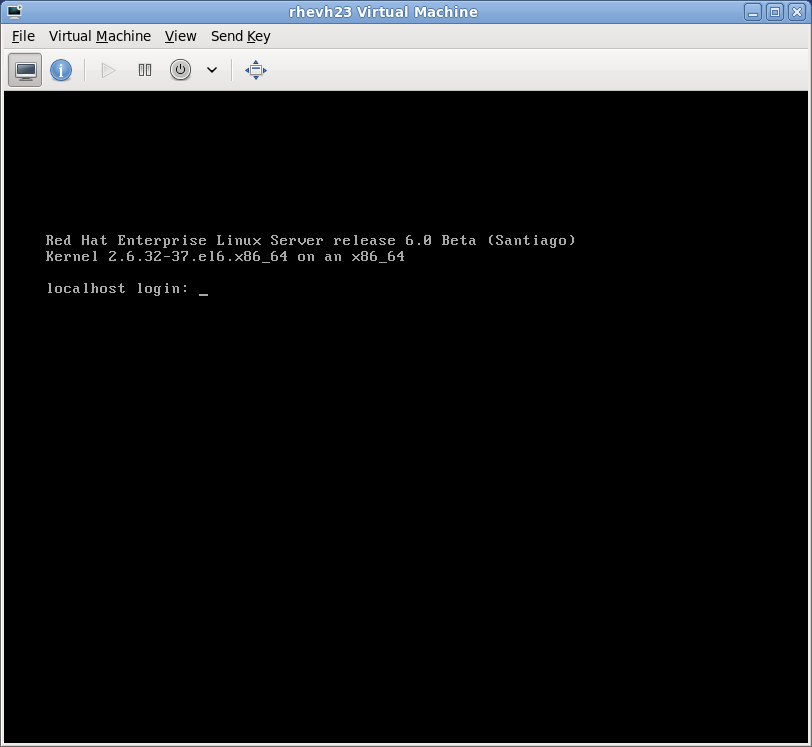
127.0.0.1). This ensures only those with shell privileges on the host can access virt-manager and the virtual machine through VNC.
virt-managersticky key' capability to send these sequences. You must press any modifier key (Ctrl or Alt) 3 times and the key you specify gets treated as active until the next non-modifier key is pressed. Then you can send Ctrl-Alt-F11 to the guest by entering the key sequence 'Ctrl Ctrl Ctrl Alt+F1'.
virt-manager.
virt-manager window.
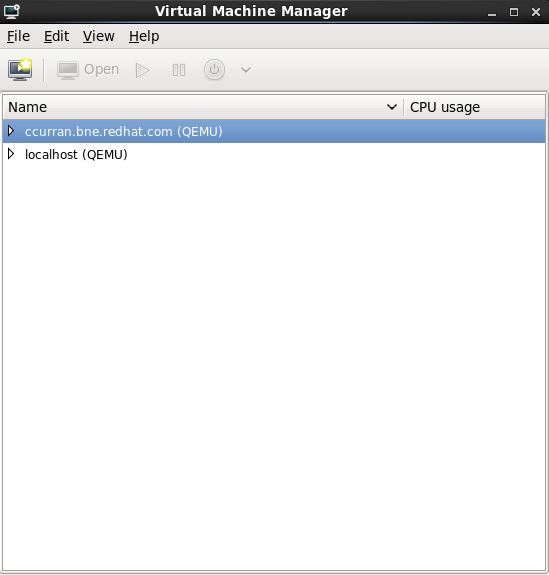
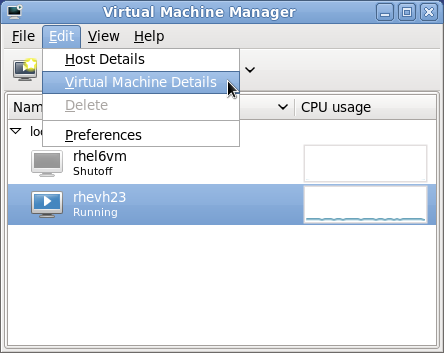
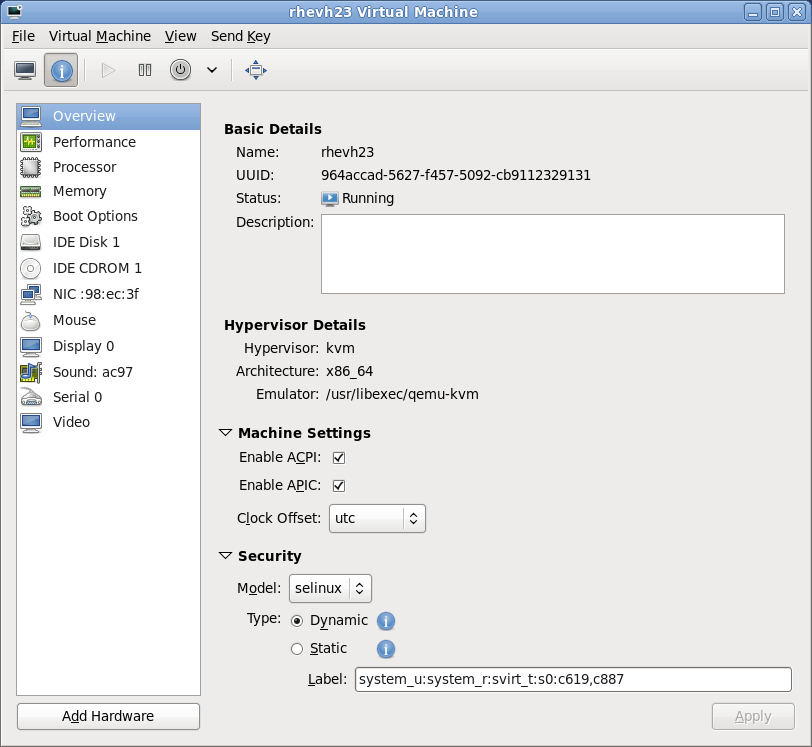
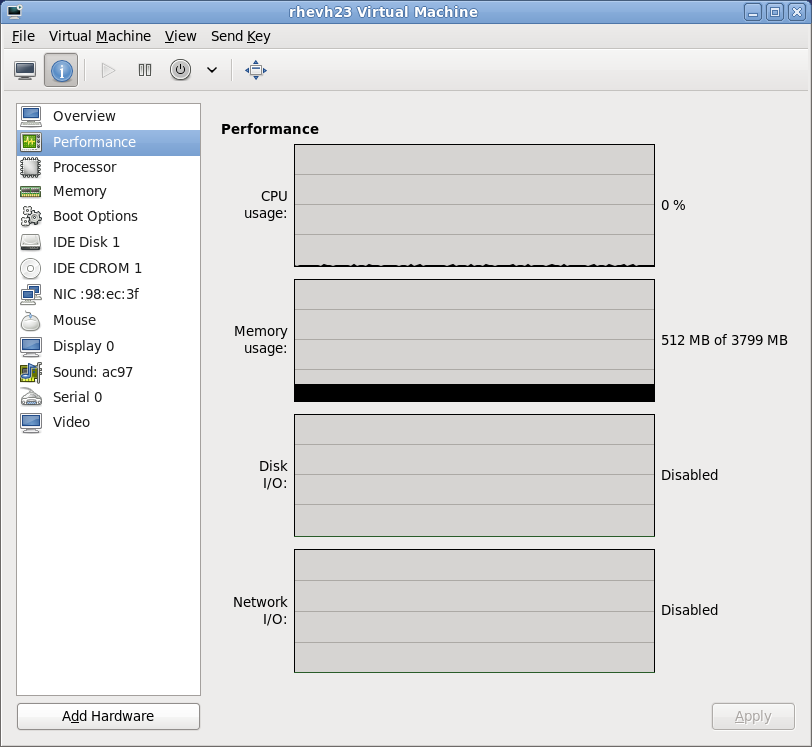
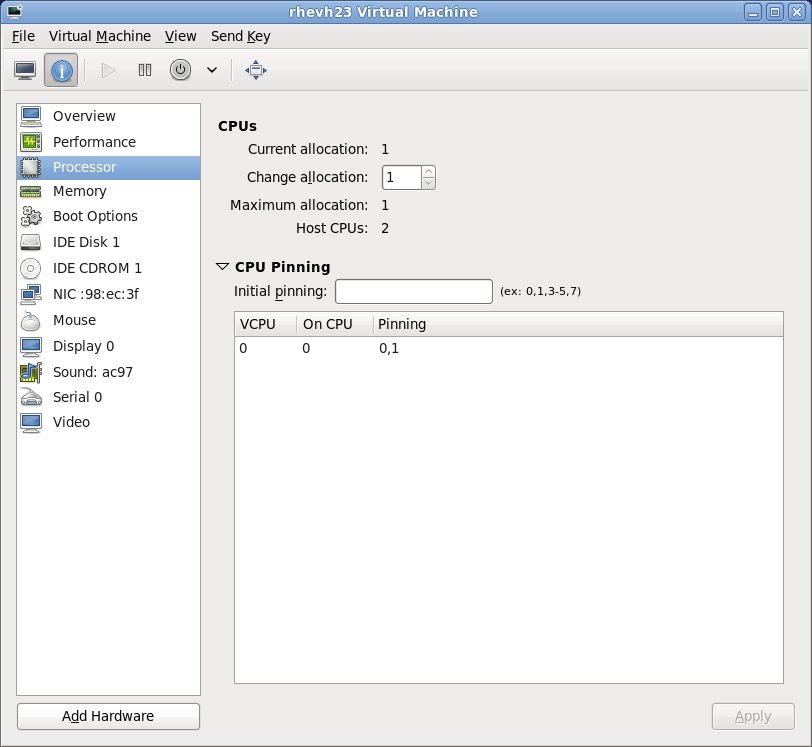
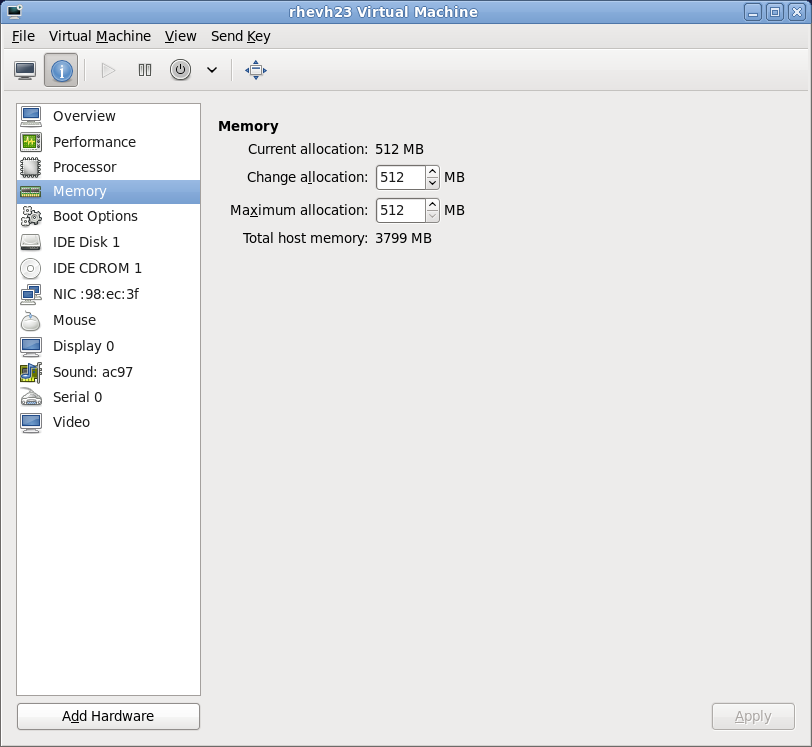
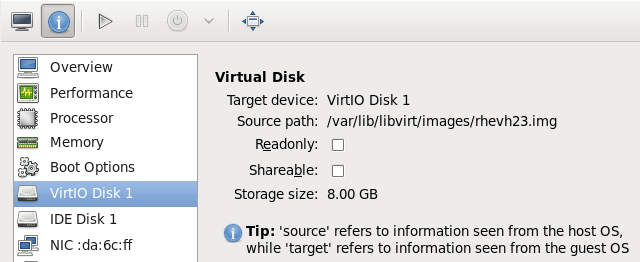
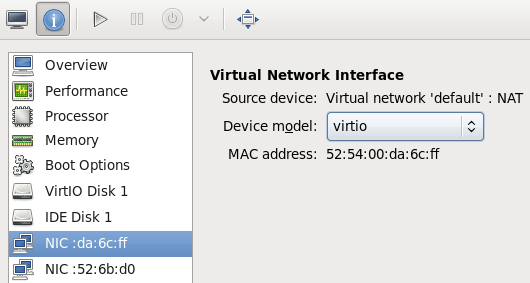
virt-manager's preferences window.
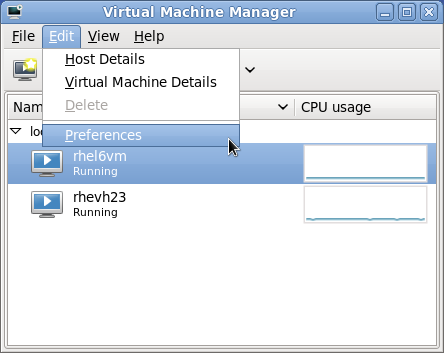
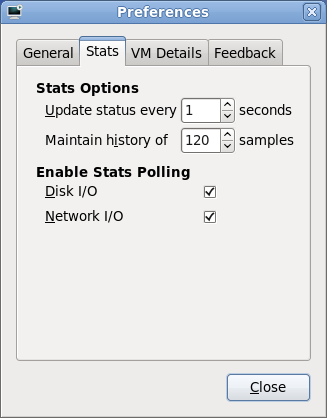
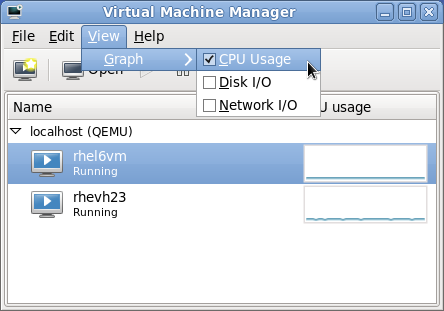
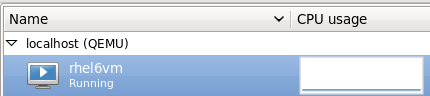
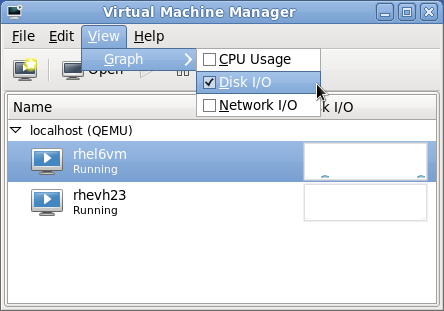
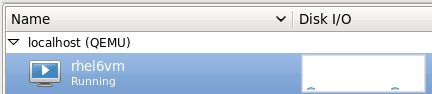
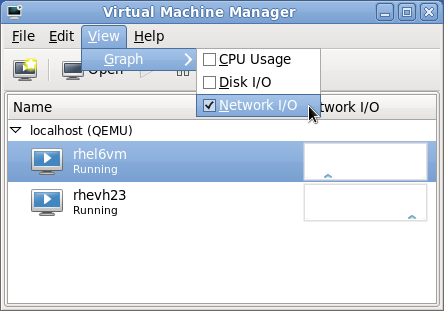
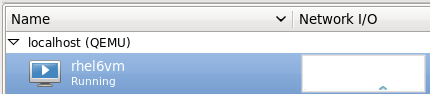

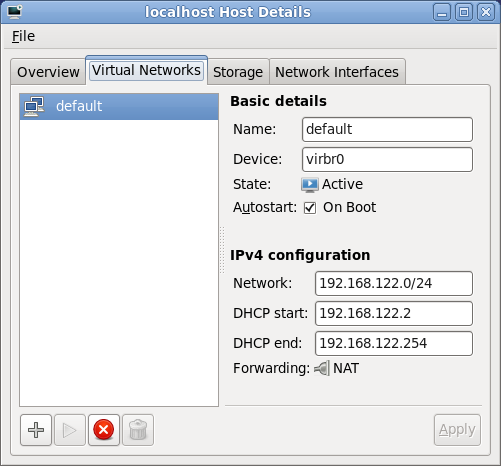
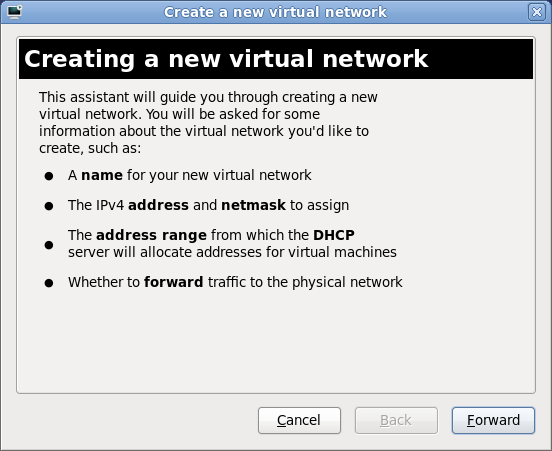
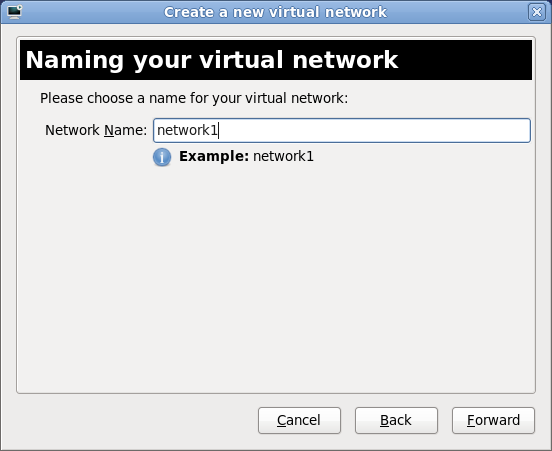
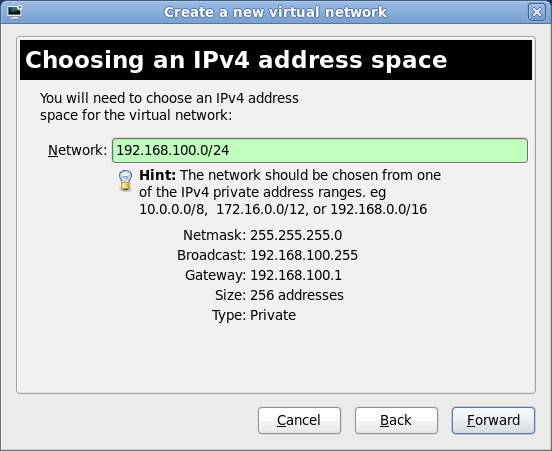

DHCP range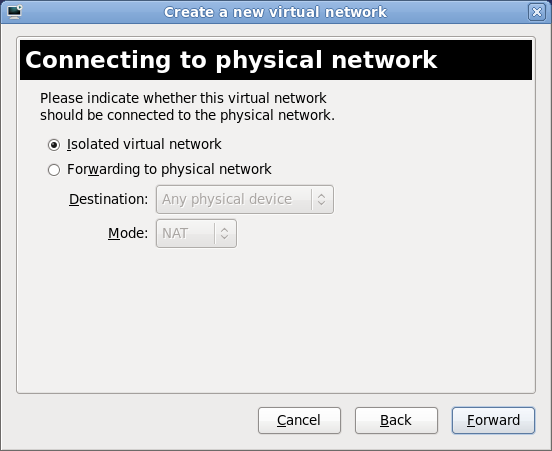
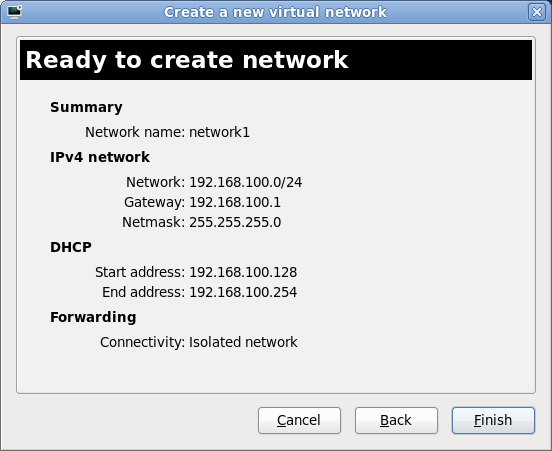
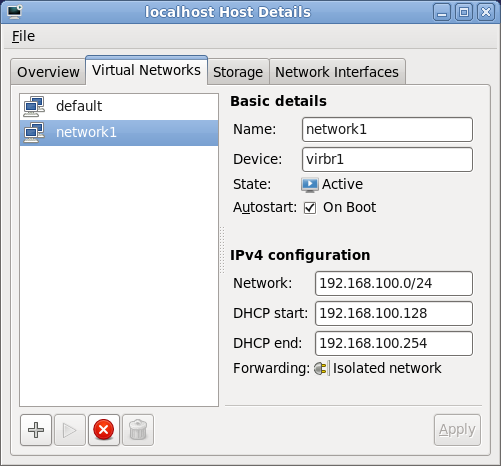
| Item | Description |
|---|---|
pae
|
Specifies the physical address extension configuration data.
|
apic
|
Specifies the advanced programmable interrupt controller configuration data.
|
memory
|
Specifies the memory size in megabytes.
|
vcpus
|
Specifies the numbers of virtual CPUs.
|
console
|
Specifies the port numbers to export the domain consoles to.
|
nic
|
Specifies the number of virtual network interfaces.
|
vif
|
Lists the randomly-assigned MAC addresses and bridges assigned to use for the domain's network addresses.
|
disk
|
Lists the block devices to export to the domain and exports physical devices to domain with read only access.
|
dhcp
|
Enables networking using DHCP.
|
netmask
|
Specifies the configured IP netmasks.
|
gateway
|
Specifies the configured IP gateways.
|
acpi
|
Specifies the advanced configuration power interface configuration data.
|
libvirt.
libvirt.
virsh can handle XML configuration files. You may want to use this to your advantage for scripting large deployments with special options. You can add devices defined in an XML file to a running virtualized guest. For example, to add a ISO file as hdc to a running guest create an XML file:
# cat satelliteiso.xml
<disk type="file" device="disk">
	<driver name="file"/>
	<source file="/var/lib/libvirt/images/rhn-satellite-5.0.1-11-redhat-linux-as-i386-4-embedded-oracle.iso"/>
	<target dev="hdc"/>
	<readonly/>
</disk>
virsh attach-device to attach the ISO as hdc to a guest called "satellite" :
# virsh attach-device satellite satelliteiso.xml
Table of Contents
kvm_stat
kvmtrace
vmstat
iostat
lsof
systemtap
crash
sysrq
sysrq t
sysrq w
ifconfig
tcpdump
tcpdump command 'sniffs' network packets. tcpdump is useful for finding network abnormalities and problems with network authentication. There is a graphical version of tcpdump named wireshark.
brctl
brctl is a networking tool that inspects and configures the Ethernet bridge configuration in the Virtualization linux kernel. You must have root access before performing these example commands:
# brctl show
bridge-name    bridge-id          STP  enabled  interfaces
-----------------------------------------------------------------------------
virtbr0             8000.feffffff       yes        eth0

# brctl showmacs virtbr0
port-no           mac-addr                  local?       aging timer
1                 fe:ff:ff:ff:ff:           yes            0.00
2                 fe:ff:ff:fe:ff:           yes            0.00
# brctl showstp virtbr0
virtbr0
bridge-id              8000.fefffffffff
designated-root        8000.fefffffffff
root-port              0                   path-cost             0
max-age                20.00               bridge-max-age        20.00
hello-time             2.00                bridge-hello-time     2.00
forward-delay          0.00                bridge-forward-delay  0.00
aging-time            300.01
hello-timer            1.43                tcn-timer             0.00
topology-change-timer  0.00                gc-timer              0.02
yum install vnc command.
yum install vnc-server command.
kvm_stat command is a python script which retrieves runtime statistics from the kvm kernel module. The kvm_stat command can be used to diagnose guest behavior visible to kvm. In particular, performance related issues with guests. Currently, the reported statistics are for the entire system; the behavior of all running guests is reported.
kvm_stat command requires that the kvm kernel module is loaded and debugfs is mounted. If either of these features are not enabled, the command will output the required steps to enable debugfs or the kvm module. For example:
# kvm_stat
Please mount debugfs ('mount -t debugfs debugfs /sys/kernel/debug')
and ensure the kvm modules are loadeddebugfs if required:
# mount -t debugfs debugfs /sys/kernel/debug
kvm_stat command outputs statistics for all virtualized guests and the host. The output is updated until the command is terminated (using Ctrl+c or the q key).
# kvm_stat

kvm statistics

efer_reload                 94       0
exits                  4003074   31272
fpu_reload             1313881   10796
halt_exits               14050     259
halt_wakeup               4496     203
host_state_reload	1638354   24893
hypercalls                   0       0
insn_emulation         1093850    1909
insn_emulation_fail          0       0
invlpg                   75569       0
io_exits               1596984   24509
irq_exits                21013     363
irq_injections           48039    1222
irq_window               24656     870
largepages                   0       0
mmio_exits               11873       0
mmu_cache_miss           42565       8
mmu_flooded              14752       0
mmu_pde_zapped           58730       0
mmu_pte_updated              6       0
mmu_pte_write           138795       0
mmu_recycled                 0       0
mmu_shadow_zapped        40358       0
mmu_unsync                 793       0
nmi_injections               0       0
nmi_window                   0       0
pf_fixed                697731    3150
pf_guest                279349       0
remote_tlb_flush             5       0
request_irq                  0       0
signal_exits                 1       0
tlb_flush               200190       0
VMEXIT calls.
VMENTRY reloaded the FPU state. The fpu_reload is incremented when a guest is using the Floating Point Unit (FPU).
halt calls. This type of exit is usually seen when a guest is idle.
halt.
insn_emulation attempts.
tlb_flush operations performed by the hypervisor.
kvm_stat command is exported by the KVM hypervisor as pseudo files located in the /sys/kernel/debug/kvm/ directory.
/var/lib/libvirt/images directory.
qemu-kvm.[PID].log is the log file created by the qemu-kvm process for each fully virtualized guest. When using this log file, you must retrieve the given qemu-kvm process PID, by using the ps command to examine process arguments to isolate the qemu-kvm process on the virtual machine. Note that you must replace the [PID] symbol with the actual PID qemu-kvm process.
virt-manager.log file that resides in the /.virt-manager directory. Note that every time you start the Virtual Machine Manager, it overwrites the existing log file contents. Make sure to backup the virt-manager.log file, before you restart the Virtual Machine manager after a system error.
virsh console command.
ttyS0 on Linux or COM1 on Windows.
/boot/grub/grub.conf file by inserting the line console=tty0 console=ttyS0,115200.
title Red Hat Enterprise Linux Server (2.6.32-36.x86-64)
	root (hd0,0)
	kernel /vmlinuz-2.6.32-36.x86-64 ro root=/dev/volgroup00/logvol00
	console=tty0 console=ttyS0,115200
	initrd /initrd-2.6.32-36.x86-64.img
# virsh console
virt-manager to display the virtual text console. In the guest console window, select Serial Console from the View menu.
GuestName.log
virt-manager.log file that resides in the /.virt-manager directory. Note that every time you start the Virtual Machine Manager, it overwrites the existing log file contents. Make sure to backup the virt-manager.log file, before you restart the Virtual Machine manager after a system error.
/etc/modprobe.conf. Edit /etc/modprobe.conf and add the following line to it:
options loop max_loop=64
phy: device or file: file commands.
Enabling the virtualization extensions in BIOS
cat /proc/cpuinfo | grep vmx svm. If the command outputs, the virtualization extensions are now enabled. If there is no output your system may not have the virtualization extensions or the correct BIOS setting enabled.
e1000) driver is also supported as an emulated driver choice. To use the e1000 driver, replace virtio in the procedure below with e1000. For the best performance it is recommended to use the virtio driver.
virsh command (where GUEST is the guest's name):
# virsh edit GUESTvirsh edit command uses the $EDITOR shell variable to determine which editor to use.
<interface type='network'>
  [output truncated]
  <model type='rtl8139' />
</interface>
'rtl8139' to 'virtio'. This will change the driver from the rtl8139 driver to the e1000 driver.
<interface type='network'>
  [output truncated]
  <model type='virtio' />
</interface>
Guest1):
# virsh dumpxmlGuest1> /tmp/guest-template.xml
# cp /tmp/guest-template.xml /tmp/new-guest.xml
# vi /tmp/new-guest.xml
 <interface type='network'>
  [output truncated]
  <model type='virtio' />
</interface>
# virsh define /tmp/new-guest.xml
# virsh start new-guest
libvirt virtualization API.
man virsh and /usr/share/doc/libvirt-<version-number> — Contains sub commands and options for the virsh virtual machine management utility as well as comprehensive information about the libvirt virtualization library API.
/usr/share/doc/gnome-applet-vm-<version-number> — Documentation for the GNOME graphical panel applet that monitors and manages locally-running virtual machines.
/usr/share/doc/libvirt-python-<version-number> — Provides details on the Python bindings for the libvirt library. The libvirt-python package allows python developers to create programs that interface with the libvirt virtualization management library.
/usr/share/doc/python-virtinst-<version-number> — Provides documentation on the virt-install command that helps in starting installations of Fedora and Red Hat Enterprise Linux related distributions inside of virtual machines.
/usr/share/doc/virt-manager-<version-number> — Provides documentation on the Virtual Machine Manager, which provides a graphical tool for administering virtual machines.
virt-manager and virsh.
ext2 and ext3 file system identifiers, RAID device identifiers, iSCSI and LUN device identifiers, MAC addresses and virtual machine identifiers.
| Revision History | |||||||||||
|---|---|---|---|---|---|---|---|---|---|---|---|
| Revision 6.0-35 | Mon Oct 04 2010 | ||||||||||
| |||||||||||
| Revision 6.0-25 | Thu Sep 09 2010 | ||||||||||
| |||||||||||
| Revision 6.0-24 | Fri Sep 03 2010 | ||||||||||
| |||||||||||
| Revision 6.0-23 | Tue May 25 2010 | ||||||||||
| |||||||||||
| Revision 6.0-22 | Fri May 14 2010 | ||||||||||
| |||||||||||
| Revision 6.0-11 | Tue Apr 20 2010 | ||||||||||
| |||||||||||
| Revision 6.0-10 | Thu Apr 15 2010 | ||||||||||
| |||||||||||
| Revision 6.0-5 | Mon Mar 01 2010 | ||||||||||
| |||||||||||