

/dev/sdb). Use partitions (for example, /dev/sdb1) or LVM volumes.
virsh command.
Create a GPT disk label on the disk
msdos partition table.
# parted /dev/sdb
GNU Parted 2.1
Using /dev/sdb
Welcome to GNU Parted! Type 'help' to view a list of commands.
(parted) mklabel
New disk label type? gpt
(parted) quit
Information: You may need to update /etc/fstab.

#
Create the storage pool configuration file
name parameter determines the name of the storage pool. This example uses the name guest_images_disk in the example below.
/dev/sdb'/>device parameter with the path attribute specifies the device path of the storage device. This example uses the device /dev/sdb .
/dev</path>target parameter with the path sub-parameter determines the location on the host file system to attach volumes created with this this storage pool.
/dev/, as in the example below, means volumes created from this storage pool can be accessed as /dev/sdb1, /dev/sdb2, /dev/sdb3.
gpt'/>format parameter specifies the partition table type. his example uses the gpt in the example below, to match the GPT disk label type created in the previous step.
<pool type='disk'>
  <name>guest_images_disk</name>
  <source>
    <device path='/dev/sdb'/>
    <format type='gpt'/>
  </source>
  <target>
    <path>/dev</path>
  </target>
  </pool>
Attach the device
virsh pool-define command with the XML configuration file created in the previous step.
# virsh pool-define ~/guest_images_disk.xml
Pool guest_images_disk defined from /root/guest_images_disk.xml
# virsh pool-list --all
Name                 State      Autostart
-----------------------------------------
default              active     yes
guest_images_disk    inactive   no
Start the storage pool
virsh pool-start command. Verify the pool is started with the virsh pool-list --all command.
# virsh pool-start guest_images_disk
Pool guest_images_disk started
# virsh pool-list --all
Name                 State      Autostart
-----------------------------------------
default              active     yes
guest_images_disk    active     no
Turn on autostart
autostart for the storage pool. Autostart configures the libvirtd service to start the storage pool when the service starts.
# virsh pool-autostart guest_images_disk
Pool guest_images_disk marked as autostarted
# virsh pool-list --all
Name                 State      Autostart
-----------------------------------------
default              active     yes
guest_images_disk    active     yes
Verify the storage pool configuration
running.
# virsh pool-info guest_images_disk
Name:           guest_images_disk
UUID:           551a67c8-5f2a-012c-3844-df29b167431c
State:          running
Capacity:       465.76 GB
Allocation:     0.00
Available:      465.76 GB
# ls -la /dev/sdb
brw-rw----. 1 root disk 8, 16 May 30 14:08 /dev/sdb
# virsh vol-list guest_images_disk
Name                 Path
-----------------------------------------
Optional: Remove the temporary configuration file
# rm ~/guest_images_disk.xml
/dev/sdc) partitioned into one 500GB, ext4 formatted partition (/dev/sdc1). We set up a storage pool for it using the procedure below.
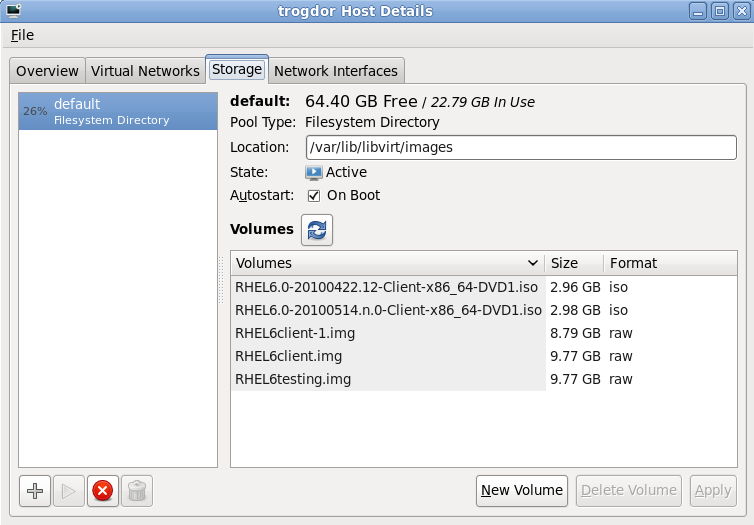
Open the storage pool settings
virt-manager graphical interface, select the host from the main window.

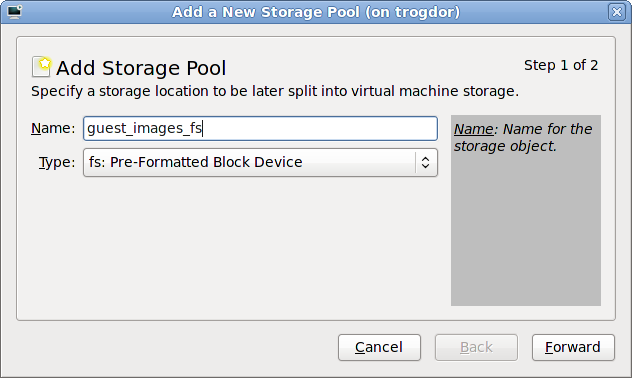
Create the new storage pool
Add a new pool (part 1)
guest_images_fs. Change the to fs: Pre-Formatted Block Device.
Add a new pool (part 2)

virt-manager will create the directory.
ext4 file system, the default Red Hat Enterprise Linux file system.
Source Path field.
/dev/sdc1 device.
Verify the new storage pool
458.20 GB Free in this example. Verify the field reports the new storage pool as Active.
libvirtd service starts.

virsh command.
/dev/sdb). Guests should not be given write access to whole disks or block devices. Only use this method to assign partitions (for example, /dev/sdb1) to storage pools.
Create the storage pool definition
pool-define-as command to create a new storage pool definition. There are three options that must be provided to define a pre-formatted disk as a storage pool:
name parameter determines the name of the storage pool. This example uses the name guest_images_fs in the example below.
device parameter with the path attribute specifies the device path of the storage device. This example uses the partition /dev/sdc1 .
mountpoint on the local file system where the formatted device will be mounted. If the mount point directory does not exist, the virsh command can create the directory.
/guest_images is used in this example.
# virsh pool-define-asguest_images_fsfs - -/dev/sdc1- "/guest_images" Pool guest_images_fs defined
Verify the new pool
# virsh pool-list --all
Name                 State      Autostart
-----------------------------------------
default              active     yes
guest_images_fs      inactive   no
Ceate the mount point
virsh pool-build command to create a mount point for a pre-formatted file system storage pool.
# virsh pool-buildguest_images_fsPool guest_images_fs built # ls -la /guest_imagestotal 8 drwx------. 2 root root 4096 May 31 19:38 . dr-xr-xr-x. 25 root root 4096 May 31 19:38 .. # virsh pool-list --all Name State Autostart ----------------------------------------- default active yes guest_images_fs inactive no
Start the storage pool
virsh pool-start command to mount the file system onto the mount point and make the pool available for use.
# virsh pool-start guest_images_fs
Pool guest_images_fs started
# virsh pool-list --all
Name                 State      Autostart
-----------------------------------------
default              active     yes
guest_images_fs      active     no
Turn on autostart
virsh is not set to automatically start each time the libvirtd starts. Turn on automatic start with the virsh pool-autostart command. The storage pool is now automatically started each time libvirtd starts.
# virsh pool-autostart guest_images_fs
Pool guest_images_fs marked as autostarted

# virsh pool-list --all
Name                 State      Autostart
-----------------------------------------
default              active     yes
guest_images_fs      active     yes
Verify the storage pool
running. Verify there is a "lost+found" directory in the mount point on the file system, indicating the device is mounted.
# virsh pool-info guest_images_fs
Name:           guest_images_fs
UUID:           c7466869-e82a-a66c-2187-dc9d6f0877d0
State:          running
Capacity:       458.39 GB
Allocation:     197.91 MB
Available:      458.20 GB
# mount | grep /guest_images
/dev/sdc1 on /guest_images type ext4 (rw)
# ls -la /guest_images
total 24
drwxr-xr-x.  3 root root  4096 May 31 19:47 .
dr-xr-xr-x. 25 root root  4096 May 31 19:38 ..
drwx------.  2 root root 16384 May 31 14:18 lost+found
virt-manager or the virsh command line tools.
Create the local directory
Optional: Create a new directory for the storage pool
/guest_images.
# mkdir /guest_imagesSet directory ownership
# chown root:root /guest_imagesSet directory permissions
# chmod 700 /guest_imagesVerify the changes
# ls -la /guest_images
total 8
drwx------.  2 root root 4096 May 28 13:57 .
dr-xr-xr-x. 26 root root 4096 May 28 13:57 ..
Configure SELinux file contexts
# semanage fcontext -a -t virt_image_t /guest_images
Open the storage pool settings
virt-manager graphical interface, select the host from the main window.
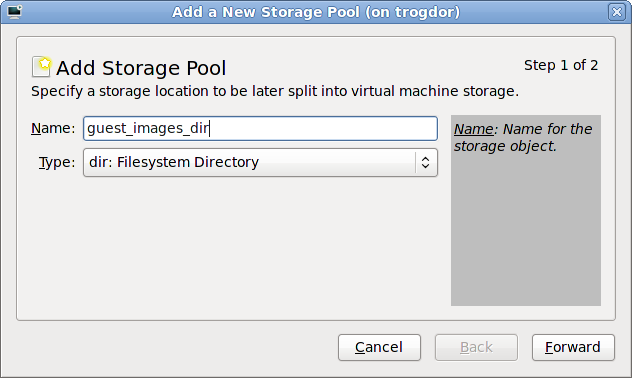
Create the new storage pool
Add a new pool (part 1)
guest_images_dir. Change the to dir: Filesystem Directory.
Add a new pool (part 2)
/guest_images.

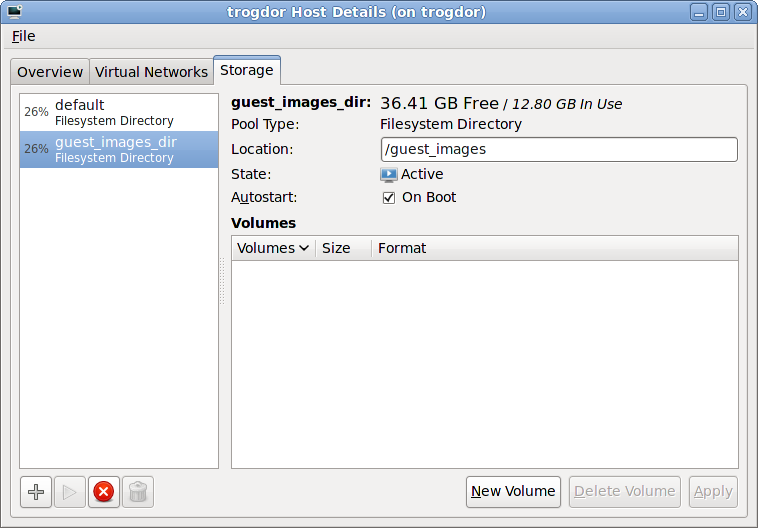
Verify the new storage pool
36.41 GB Free in this example. Verify the field reports the new storage pool as Active.
libvirtd service sarts.
Create the storage pool definition
virsh pool-define-as command to define a new storage pool. There are two options required for creating directory-based storage pools:
name of the storage pool.
guest_images_dir. All further virsh commands used in this example use this name.
path to a file system directory for storing virtualized guest image files . If this directory does not exist, virsh will create it.
/guest_images directory.
# virsh pool-define-asguest_images_dirdir - - - - "/guest_images" Pool guest_images_dir defined
Verify the storage pool is listed
inactive.
# virsh pool-list --all
Name                 State      Autostart
-----------------------------------------
default              active     yes
guest_images_dir     inactive   no
Create the local directory
virsh pool-build command to build the directory-based storage pool. virsh pool-build sets the required permissions and SELinux settings for the directory and creates the directory if it does not exist.
# virsh pool-buildguest_images_dirPool guest_images_dir built # ls -la /guest_imagestotal 8 drwx------. 2 root root 4096 May 30 02:44 . dr-xr-xr-x. 26 root root 4096 May 30 02:44 .. # virsh pool-list --all Name State Autostart ----------------------------------------- default active yes guest_images_dir inactive no
Start the storage pool
pool-start for this. pool-start enables a directory storage pool, allowing it to be used for volumes and guests.
# virsh pool-start guest_images_dir
Pool guest_images_dir started
# virsh pool-list --all
Name                 State      Autostart
-----------------------------------------
default              active     yes
guest_images_dir    active     no
Turn on autostart
autostart for the storage pool. Autostart configures the libvirtd service to start the storage pool when the service starts.
# virsh pool-autostart guest_images_dir
Pool guest_images_dir marked as autostarted
# virsh pool-list --all
Name                 State      Autostart
-----------------------------------------
default              active     yes
guest_images_dir     active     yes
Verify the storage pool configuration
running.
# virsh pool-info guest_images_dir
Name:           guest_images_dir
UUID:           779081bf-7a82-107b-2874-a19a9c51d24c
State:          running
Capacity:       49.22 GB
Allocation:     12.80 GB
Available:      36.41 GB

# ls -la /guest_images
total 8
drwx------.  2 root root 4096 May 30 02:44 .
dr-xr-xr-x. 26 root root 4096 May 30 02:44 ..
#
Optional: Create new partition for LVM volumes
Create a new partition
fdisk command to create a new disk partition from the command line. The following example creates a new partition that uses the entire disk on the storage device /dev/sdb.
# fdisk /dev/sdb
Command (m for help):
n for a new partition.
p for a primary partition.
Command action
   e   extended
   p   primary partition (1-4)
1.
Partition number (1-4): 1Enter.
First cylinder (1-400, default 1):
Enter.
Last cylinder or +size or +sizeM or +sizeK (2-400, default 400):
t.
Command (m for help): t1.
Partition number (1-4): 18e for a Linux LVM partition.
Hex code (type L to list codes): 8eCommand (m for help):wCommand (m for help):q
Create a new LVM volume group
guest_images_lvm.
# vgcreateguest_images_lvm/dev/sdb1 Physical volmue "/dev/vdb1" successfully created Volume group "guest_images_lvm" successfully created
guest_images_lvm, can now be used for an LVM-based storage pool.
Open the storage pool settings
virt-manager graphical interface, select the host from the main window.
Create the new storage pool
Start the Wizard
guest_images_lvm for this example. Then change the to logical: LVM Volume Group, and
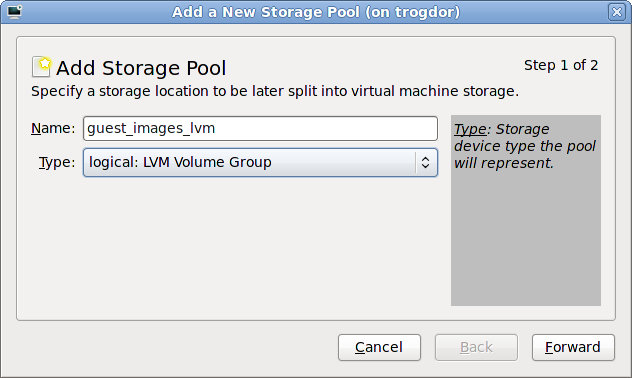
Add a new pool (part 2)
/guest_images.
/dev/storage_pool_name.
/dev/guest_images_lvm.
Source Path field is optional if an existing LVM volume group is used in the .
Source Path field. This example uses a blank partition /dev/sdc.
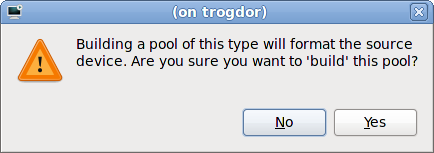
virt-manager to create a new LVM volume group. If you are using an existing volume group you should not select the checkbox.

Confirm the device to be formatted
Verify the new storage pool
465.76 GB Free in our example. Also verify the field reports the new storage pool as Active.

# virsh pool-define-asguest_images_lvmlogical - -/dev/sdclibvirt_lvm/dev/libvirt_lvmPool guest_images_lvm defined # virsh pool-buildguest_images_lvmPool guest_images_lvm built # virsh pool-startguest_images_lvmPool guest_images_lvm started # vgs VG #PV #LV #SN Attr VSize VFree libvirt_lvm 1 0 0 wz--n- 465.76g 465.76g # virsh pool-autostartguest_images_lvmPool guest_images_lvm marked as autostarted # virsh pool-list --all Name State Autostart ----------------------------------------- default active yes guest_images_lvm active yes # virsh vol-create-asguest_images_lvmvolume18GVol volume1 created # virsh vol-create-asguest_images_lvmvolume28GVol volume2 created # virsh vol-create-asguest_images_lvmvolume38GVol volume3 created # virsh vol-listguest_images_lvmName Path ----------------------------------------- volume1 /dev/libvirt_lvm/volume1 volume2 /dev/libvirt_lvm/volume2 volume3 /dev/libvirt_lvm/volume3 # lvscan ACTIVE '/dev/libvirt_lvm/volume1' [8.00 GiB] inherit ACTIVE '/dev/libvirt_lvm/volume2' [8.00 GiB] inherit ACTIVE '/dev/libvirt_lvm/volume3' [8.00 GiB] inherit # lvs LV VG Attr LSize Origin Snap% Move Log Copy% Convert volume1 libvirt_lvm -wi-a- 8.00g volume2 libvirt_lvm -wi-a- 8.00g volume3 libvirt_lvm -wi-a- 8.00g # vgs VG #PV #LV #SN Attr VSize VFree libvirt_lvm 1 3 0 wz--n- 465.76g 441.76g vg_host2 1 3 0 wz--n- 465.27g 0 #
Install the required packages
# yum install scsi-target-utils
Start the tgtd service
tgtd service hosts SCSI targets and uses the iSCSI protocol to host targets. Start the tgtd service and make the service persistent after restarting with the chkconfig command.
# service tgtd start
# chkconfig tgtd on
Optional: Create LVM volumes
virtimage1 on a new volume group named virtstore on a RAID5 array for hosting virtualized guests with iSCSI.
Create the RAID array
Create the LVM volume group
virtstore with the vgcreate command.
# vgcreate virtstore /dev/md1Create a LVM logical volume
virtimage1 on the virtstore volume group with a size of 20GB using the lvcreate command.
# lvcreate --size 20G -nvirtimage1virtstore
virtimage1, is ready to use for iSCSI.
Optional: Create file-based images
virtimage2.img for an iSCSI target.
Create a new directory for the image
# mkdir -p /var/lib/tgtd/virtualizationCreate the image file
virtimage2.img with a size of 10GB.
# dd if=/dev/zero of=/var/lib/tgtd/virtualization/virtimage2.imgbs=1M seek=10000 count=0
Configure SELinux file contexts
# restorecon -R /var/lib/tgtd
virtimage2.img, is ready to use for iSCSI.
Create targets
/etc/tgt/targets.conf file. The target attribute requires an iSCSI Qualified Name (IQN). The IQN is in the format:
iqn.yyyy-mm.reversed domain name:optional identifier text
yyyy-mm represents the year and month the device was started (for example: 2010-05);
reversed domain name is the hosts domain name in reverse (for example server1.example.com in an IQN would be com.example.server1); and
optional identifier text is any text string, without spaces, that assists the administrator in identifying devices or hardware.
server1.example.com with an optional identifier trial. Add the following to the /etc/tgt/targets.conf file.
<target iqn.2010-05.com.example.server1:trial> backing-store /dev/virtstore/virtimage1#LUN 1 backing-store /var/lib/tgtd/virtualization/virtimage2.img#LUN 2 write-cache off </target>
/etc/tgt/targets.conf file contains the default-driver iscsi line to set the driver type as iSCSI. The driver uses iSCSI by default.
Restart the tgtd service
tgtd service to reload the configuration changes.
# service tgtd restart
iptables configuration
iptables.
# iptables -I INPUT -p tcp -m tcp --dport 3260 -j ACCEPT
# service iptables save
# service iptables restart
Verify the new targets
tgt-admin --show command.
# tgt-admin --show
Target 1: iqn.2010-05.com.example.server1:trial
System information:
Driver: iscsi
State: ready
I_T nexus information:
LUN information:
LUN: 0
    Type: controller
    SCSI ID: IET     00010000
    SCSI SN: beaf10
    Size: 0 MB
    Online: Yes
    Removable media: No
    Backing store type: rdwr
    Backing store path: None
LUN: 1
    Type: disk
    SCSI ID: IET     00010001
    SCSI SN: beaf11
    Size: 20000 MB
    Online: Yes
    Removable media: No
    Backing store type: rdwr
    Backing store path: /dev/virtstore/virtimage1
LUN: 2
    Type: disk
    SCSI ID: IET     00010002
    SCSI SN: beaf12
    Size: 10000 MB
    Online: Yes
    Removable media: No
    Backing store type: rdwr
    Backing store path: /var/lib/tgtd/virtualization/virtimage2.img
Account information:
ACL information:
ALLOptional: Test discovery
# iscsiadm --mode discovery --type sendtargets --portal server1.example.com
127.0.0.1:3260,1 iqn.2010-05.com.example.server1:trial1
Optional: Test attaching the device
iqn.2010-05.com.example.server1:trial1) to determine whether the device can be attached.
# iscsiadm -d2 -m node --login
scsiadm: Max file limits 1024 1024

Logging in to [iface: default, target: iqn.2010-05.com.example.server1:trial1, portal: 10.0.0.1,3260]
Login to [iface: default, target: iqn.2010-05.com.example.server1:trial1, portal: 10.0.0.1,3260] successful.
# iscsiadm -d2 -m node --logout
scsiadm: Max file limits 1024 1024

Logging out of session [sid: 2, target: iqn.2010-05.com.example.server1:trial1, portal: 10.0.0.1,3260
Logout of [sid: 2, target: iqn.2010-05.com.example.server1:trial1, portal: 10.0.0.1,3260] successful.
virt-manager.
Open the host storage tab
virt-manager.
virt-manager window.
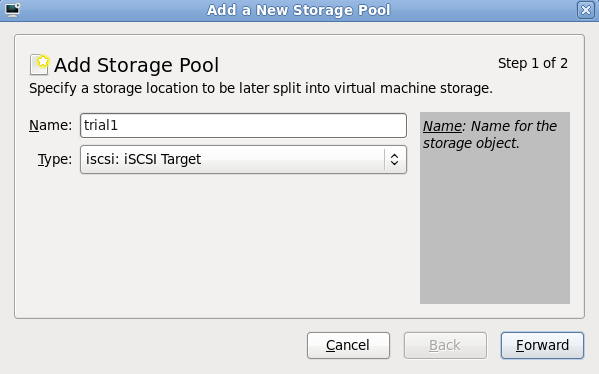
Add a new pool (part 1)
Add a new pool (part 2)
/dev/disk/by-path/, adds the drive path to that folder. The target path should be the same on all hosts for migration.
server1.example.com.
iqn.2010-05.com.example.server1:trial1.

Create the storage pool definition
name element sets the name for the storage pool. The name is required and must be unique.
uuid element provides a unique global identifier for the storage pool. The uuid element can contain any valid UUID or an existing UUID for the storage device. If a UUID is not provided, virsh will generate a UUID for the storage pool.
host element with the name attribute specifies the hostname of the iSCSI server. The host element attribute can contain a port attribute for a non-standard iSCSI protocol port number.
iqn.2010-05.com.example.server1:trial1'/>device element path attribute must contain the IQN for the iSCSI server.
trial1.xml.
<pool type='iscsi'>
  <name>trial1</name>
  <uuid>afcc5367-6770-e151-bcb3-847bc36c5e28</uuid>
  <source>
    <host name='server1.example.com'/>
    <device path='iqn.2010-05.com.example.server1:trial1'/>
  </source>
  <target>
    <path>/dev/disk/by-path</path>
   </target>
</pool>pool-define command to define the storage pool but not start it.
# virsh pool-define trial1.xml
Pool trial1 defined
Alternative step: Use pool-define-as to define the pool from the command line
virsh command line tool. Creating storage pools with virsh is useful for systems administrators using scripts to create multiple storage pools.
virsh pool-define-as command has several parameters which are accepted in the following format:
virsh pool-define-asname type source-host source-path source-dev source-nametarget
iscsi, defines this pool as an iSCSI based storage pool. The name parameter must be unique and sets the name for the storage pool. The source-host and source-path parameters are the hostname and iSCSI IQN respectively. The source-dev and source-name parameters are not required for iSCSI-based pools, use a - character to leave the field blank. The target parameter defines the location for mounting the iSCSI device on the host.
# virsh pool-define-as trial1 iscsi server1.example.com iqn.2010-05.com.example.server1:trial1 - - /dev/disk/by-path
Pool trial1 defined
Verify the storage pool is listed
inactive.
# virsh pool-list --all
Name                 State      Autostart
-----------------------------------------
default              active     yes
trial1               inactive   no
Start the storage pool
pool-start for this. pool-start enables a directory storage pool, allowing it to be used for volumes and guests.
# virsh pool-startguest_images_diskPool guest_images_disk started # virsh pool-list --all Name State Autostart ----------------------------------------- default active yestrial1active no
Turn on autostart
autostart for the storage pool. Autostart configures the libvirtd service to start the storage pool when the service starts.
# virsh pool-autostart trial1
Pool trial1 marked as autostartedtrial1 pool has autostart set:
# virsh pool-list --all
Name                 State      Autostart
-----------------------------------------
default              active     yes
trial1               active     yes
Verify the storage pool configuration
running.
# virsh pool-infotrial1Name:trial1UUID: afcc5367-6770-e151-bcb3-847bc36c5e28 State: running Persistent: unknown Autostart: yes Capacity: 100.31 GB Allocation: 0.00 Available: 100.31 GB
virt-manager.
Open the host storage tab
virt-manager.
virt-manager window.
Create a new pool (part 1)

Create a new pool (part 2)
server1.example.com.
/nfstrial.
