Now we've seen the simplest possible application, and should be ready to move on to a more realistic example. In the real world, we are going to need dynamic and generated content, links and an occasional form that needs to be filled out and processed.
We're going to use a little number guessing game as a slightly simplified real world example. The game let's the user guess a number and repeatedly responds "too high" or "too low", until the guess is correct.
The numberguess example is available in the same RIFE examples file that we used in the previous chapter. Repeat the instructions from the Hello World example to setup RIFE and Jetty for the game.
cd ~/tutorial/rife-examples-{version}
mkdir 03_numberguess/WEB-INF/lib
cp ROOT/WEB-INF/lib/rife-{version}.jar 03_numberguess/WEB-INF/lib/
mv 03_numberguess ../jetty-{version}/webapps/
You will need to start Jetty again, you can try the example out at the location http://localhost:8080/03_numberguess/.
The number of files is starting to grow as the application gets more advanced, so let's take a look at the directory structure and files before moving on:
Example 3.1. Directory structure for the numberguess example
classes/
    rep/
        participants.xml

    sites/
        numberguess.xml

    elements/
        start.xml
        guess.xml
        success.xml

    templates/
        guess.html
        success.html

    implementations/
        tutorial/
            numberguess/
                Start.java
                Guess.java
                Success.java

src/
    tutorial/
        numberguess/
            backend/
                Contest.java
                Game.java
If you look in the elements directory you see three different XML files. Each of them represents an element in the game. The elements are connected by creating execution flows between them in the site definition. These flows are called "Flow links" and are created with the flowlink tag. If you want to pass data between different elements you use "Data links" which are represented by the datalink tag.
We are going to connect the elements like this:
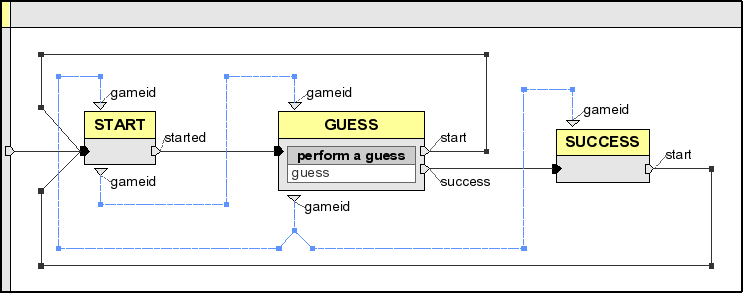
Elements must provide one or more "exits" if you want to make it possible to link them to other elements. An exit is the starting point of a flow link and the end point is another element.
In Figure 3.1, “The numberguess site” the data links are represented by blue arrows while the flow links are black. We can also see that START has one exit named "started", GUESS has two exits named "start" and "success" and SUCCESS has one exit called "start". By connecting the exit "started" from START to go to GUESS we get the elements linked together.