Copyright © 2002-2005 Thomas M. Eastep
Permission is granted to copy, distribute and/or modify this document under the terms of the GNU Free Documentation License, Version 1.2 or any later version published by the Free Software Foundation; with no Invariant Sections, with no Front-Cover, and with no Back-Cover Texts. A copy of the license is included in the section entitled “GNU Free Documentation License”.
2005-03-31
Table of Contents
Setting up a Linux system as a firewall for a small network with DMZ is a fairly straight-forward task if you understand the basics and follow the documentation.
This guide doesn't attempt to acquaint you with all of the features of Shorewall. It rather focuses on what is required to configure Shorewall in one of its more popular configurations:
Linux system used as a firewall/router for a small local network.
Single public IP address.
Note
If you have more than one public IP address, this is not the guide you want -- see the Shorewall Setup Guide instead.
DMZ connected to a separate ethernet interface. The purpose of a DMZ is to isolate those servers that are exposed to the Internet from your local systems so that if one of those servers is compromised there is still a firewall between the hacked server and your local systems.
Connection through DSL, Cable Modem, ISDN, Frame Relay, dial-up, ...
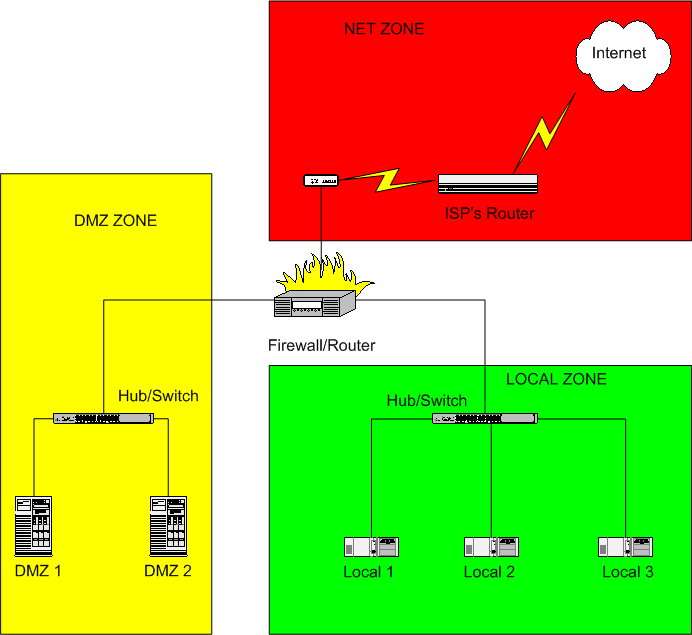
Here is a schematic of a typical installation.
Shorewall requires that you have the
iproute/iproute2 package installed
(on RedHat™, the package is called
iproute). You can tell if this package is installed
by the presence of an ip program on your firewall
system. As root, you can use
the which command to check for this program:
[root@gateway root]# which ip
/sbin/ip
[root@gateway root]#I recommend that you first read through the guide to familiarize yourself with what's involved then go back through it again making your configuration changes.
Caution
If you edit your configuration files on a Windows™ system, you must save them as Unix™ files if your editor supports that option or you must run them through dos2unix before trying to use them. Similarly, if you copy a configuration file from your Windows™ hard drive to a floppy disk, you must run dos2unix against the copy before using it with Shorewall.

If you have an ADSL Modem and you use PPTP to communicate with a server in that modem, you must make the changes recommended here in addition to those detailed below. ADSL with PPTP is most commonly found in Europe, notably in Austria.
The configuration files for Shorewall are contained in the directory
/etc/shorewall -- for simple setups, you will only
need to deal with a few of these as described in this guide.
Warning
Note to Debian Users
If you install using the .deb, you will find that your /etc/shorewall directory is empty. This
is intentional. The released configuration file skeletons may be found
on your system in the directory /usr/share/doc/shorewall/default-config.
Simply copy the files you need from that directory to /etc/shorewall and modify the
copies.
Note that you must copy /usr/share/doc/shorewall/default-config/shorewall.conf
and /usr/share/doc/shorewall/default-config/modules to /etc/shorewall
even if you do not modify those files.
After you have installed Shorewall, download
the three-interface
sample, un-tar it (tar -zxvf
three-interfaces.tgz) and and copy the
files to /etc/shorewall (the files will replace files
with the same names that were placed in
/etc/shorewall when Shorewall was installed).
As each file is introduced, I suggest that you look through the actual file on your system -- each file contains detailed configuration instructions and default entries.
Shorewall views the network where it is running as being composed of a set of zones. In the three-interface sample configuration, the following zone names are used:
| Name | Description |
|---|---|
| net | The Internet |
| loc | Your Local Network |
| dmz | Demilitarized Zone |
Zone names are defined in
/etc/shorewall/zones.
Shorewall also recognizes the firewall system as its own zone - by
default, the firewall itself is known as fw.
Rules about what traffic to allow and what traffic to deny are expressed in terms of zones.
You express your default policy for connections from one zone to another zone in the
/etc/shorewall/policyfile.You define exceptions to those default policies in the
/etc/shorewall/rulesfile.
For each connection request entering the firewall, the request is
first checked against the /etc/shorewall/rules file.
If no rule in that file matches the connection request then the first
policy in /etc/shorewall/policy that matches the
request is applied. If there is a comon action defined for the
policy in /etc/shorewall/actions or
/usr/share/shorewall/actions.std then that action is
peformed before the action is applied.
The /etc/shorewall/policy file included with
the three-interface sample has the following policies:
#SOURCE    DEST        POLICY      LOG LEVEL    LIMIT:BURST
loc        net         ACCEPT
net        all         DROP        info
all        all         REJECT      info
Important
In the three-interface sample, the line below is included but commented out. If you want your firewall system to have full access to servers on the internet, uncomment that line.
#SOURCE    DEST        POLICY      LOG LEVEL    LIMIT:BURST
fw         net         ACCEPT
The above policy will:
allow all connection requests from your local network to the internet
drop (ignore) all connection requests from the internet to your firewall or local network
optionally accept all connection requests from the firewall to the internet (if you uncomment the additional policy)
reject all other connection requests.
At this point, edit your /etc/shorewall/policy
file and make any changes that you wish.
The firewall has three network interfaces. Where Internet
connectivity is through a cable or DSL “Modem”, the External
Interface will be the ethernet adapter that is connected to that
“Modem” (e.g., eth0)
unless you connect via Point-to-Point Protocol over
Ethernet (PPPoE) or Point-to-Point Tunneling Protocol
(PPTP) in which case the External Interface will be a
ppp interface (e.g., ppp0). If you connect via a regular modem,
your External Interface will also be ppp0. If you connect using ISDN, you
external interface will be ippp0.
If your external interface is ppp0 or ippp0 then you will want to set
CLAMPMSS=yes in
/etc/shorewall/shorewall.conf.
Your Local Interface will be an ethernet adapter (eth0, eth1 or eth2) and will be connected to a hub or
switch. Your local computers will be connected to the same switch (note:
If you have only a single local system, you can connect the firewall
directly to the computer using a cross-over cable).
Your DMZ Interface will also be an ethernet adapter (eth0, eth1 or eth2) and will be connected to a hub or
switch. Your DMZ computers will be connected to the same switch (note: If
you have only a single DMZ system, you can connect the firewall directly
to the computer using a cross-over cable).
Caution
Do not connect the internal and external interface to the same hub
or switch except for testing AND you are running Shorewall version 1.4.7
or later. When using these recent versions, you can test using this kind
of configuration if you specify the arp_filter option in
/etc/shorewall/interfaces for all interfaces
connected to the common hub/switch. Using such a setup with a production
firewall is strongly recommended against.
The Shorewall three-interface sample configuration assumes that the
external interface is eth0, the
local interface is eth1 and the
DMZ interface is eth2. If your
configuration is different, you will have to modify the sample
/etc/shorewall/interfaces file accordingly. While you
are there, you may wish to review the list of options that are specified
for the interfaces. Some hints:
Tip
If your external interface is ppp0 or ippp0, you can replace the
“detect” in the second column with “-”
(without the quotes).
Tip
If your external interface is ppp0 or ippp0 or if you have a static IP address,
you can remove “dhcp” from the option list.
Tip
If you specify nobogons for your external
interface, you will want to check the Shorewall
Errata periodically for updates to the
/usr/share/shorewall/bogons file.
Before going further, we should say a few words about Internet Protocol (IP) addresses. Normally, your ISP will assign you a single Public IP address. This address may be assigned via the Dynamic Host Configuration Protocol (DHCP) or as part of establishing your connection when you dial in (standard modem) or establish your PPP connection. In rare cases, your ISP may assign you a static IP address; that means that you configure your firewall's external interface to use that address permanently. Regardless of how the address is assigned, it will be shared by all of your systems when you access the Internet. You will have to assign your own addresses for your internal network (the local and DMZ Interfaces on your firewall plus your other computers). RFC 1918 reserves several Private IP address ranges for this purpose:
10.0.0.0    - 10.255.255.255
172.16.0.0  - 172.31.255.255
192.168.0.0 - 192.168.255.255
Before starting Shorewall, you should look at the IP address of your
external interface and if it is one of the above ranges, you should remove
the norfc1918 option from the external interface's
entry in /etc/shorewall/interfaces.
You will want to assign your local addresses from one sub-network or
subnet and your DMZ addresses from another subnet. For our purposes, we
can consider a subnet to consists of a range of addresses x.y.z.0 - x.y.z.255. Such a subnet will have a Subnet
Mask of 255.255.255.0. The
address x.y.z.0 is reserved as
the Subnet Address and x.y.z.255
is reserved as the Subnet Broadcast Address. In Shorewall, a subnet is
described using Classless InterDomain Routing (CIDR) notation with
consists of the subnet address followed by /24. The
24 refers to the number of consecutive “1”
bits from the left of the subnet mask.
Table 1. Example sub-network
| Range: | 10.10.10.0 -
10.10.10.255 |
| Subnet Address: | 10.10.10.0 |
| Broadcast Address: | 10.10.10.255 |
| CIDR Notation: | 10.10.10.0/24 |
It is conventional to assign the internal interface either the first
usable address in the subnet (10.10.10.1 in the above example) or the
last usable address (10.10.10.254).
One of the purposes of subnetting is to allow all computers in the subnet to understand which other computers can be communicated with directly. To communicate with systems outside of the subnetwork, systems send packets through a gateway (router).
Your local computers (Local Computers 1 & 2) should be configured with their default gateway set to the IP address of the firewall's internal interface and your DMZ computers (DMZ Computers 1 & 2) should be configured with their default gateway set to the IP address of the firewall's DMZ interface.
The foregoing short discussion barely scratches the surface regarding subnetting and routing. If you are interested in learning more about IP addressing and routing, I highly recommend “IP Fundamentals: What Everyone Needs to Know about Addressing & Routing”, Thomas A. Maufer, Prentice-Hall, 1999, ISBN 0-13-975483-0.
The remainder of this quide will assume that you have configured your network as shown here:
Figure 3. DMZ

The default gateway for the DMZ computers would be 10.10.11.254 and the default gateway
for the Local computers would be 10.10.10.254.
Warning
Your ISP might assign your external interface an RFC 1918
address. If that address is in the 10.10.10.0/24 subnet then you will
need to select a DIFFERENT RFC 1918 subnet for your local network
and if it is in the 10.10.11.0/24 subnet then you will
need to select a different RFC 1918 subnet for your DMZ.
The addresses reserved by RFC 1918 are sometimes referred to as non-routable because the Internet backbone routers don't forward packets which have an RFC-1918 destination address. When one of your local systems (let's assume local computer 1) sends a connection request to an internet host, the firewall must perform Network Address Translation (NAT). The firewall rewrites the source address in the packet to be the address of the firewall's external interface; in other words, the firewall makes it look as if the firewall itself is initiating the connection. This is necessary so that the destination host will be able to route return packets back to the firewall (remember that packets whose destination address is reserved by RFC 1918 can't be routed accross the internet). When the firewall receives a return packet, it rewrites the destination address back to 10.10.10.1 and forwards the packet on to local computer 1.
On Linux systems, the above process is often referred to as IP Masquerading and you will also see the term Source Network Address Translation (SNAT) used. Shorewall follows the convention used with Netfilter:
Masquerade describes the case where you let your firewall system automatically detect the external interface address.
SNAT refers to the case when you explicitly specify the source address that you want outbound packets from your local network to use.
In Shorewall, both Masquerading and SNAT are configured
with entries in the /etc/shorewall/masq
file.
If your external firewall interface is eth0, your local interface eth1 and your DMZ interface is eth2 then you do not need to modify the file
provided with the sample. Otherwise, edit /etc/shorewall/masq and
change it to match your configuration.
If, in spite of all advice to the contrary, you are using this guide
and want to use one-to-one NAT or Proxy ARP for your DMZ, remove the entry
for eth2 from /etc/shorewall/masq.
If your external IP is static, you can enter it in the third column
in the /etc/shorewall/masq
entry if you like although your firewall will work fine if you leave that
column empty. Entering your static IP in column 3 makes processing
outgoing packets a little more efficient.
If you are using the Debian package, please check your
shorewall.conf file to ensure that the following is
set correctly; if it is not, change it appropriately:
IP_FORWARDING=On
One of your goals will be to run one or more servers on your DMZ computers. Because these computers have RFC-1918 addresses, it is not possible for clients on the Internet to connect directly to them. It is rather necessary for those clients to address their connection requests to your firewall who rewrites the destination address to the address of your server and forwards the packet to that server. When your server responds, the firewall automatically performs SNAT to rewrite the source address in the response.
The above process is called Port Forwarding or
Destination Network Address Translation (DNAT). You
configure port forwarding using DNAT rules in the /etc/shorewall/rules
file.
The general form of a simple port forwarding rule in /etc/shorewall/rules is:
#ACTION   SOURCE    DEST                                          PROTO      DEST PORT(S)
DNAT      net       dmz:<server local IP address>[:<server port>] <protocol> <port>
If you don't specify the <server
port>, it is assumed to be the same as
<port>.
Example 1. You run a Web Server on DMZ Computer 2 and you want to forward incoming TCP port 80 to that system
#ACTION   SOURCE    DEST                PROTO      DEST PORT(S)
DNAT      net       dmz:10.10.11.2      tcp        80
ACCEPT    loc       dmz:10.10.11.2      tcp        80
Entry 1 forwards port 80 from the Internet.
Entry 2 allows connections from the local network.
Several important points to keep in mind:
When you are connecting to your server from your local systems, you must use the server's internal IP address (
10.10.11.2).Many ISPs block incoming connection requests to port 80. If you have problems connecting to your web server, try the following rule and try connecting to port 5000 (e.g., connect to
http://w.x.y.z:5000 where w.x.y.zis your external IP).#ACTION SOURCE DEST PROTO DEST PORT(S) SOURCE # PORT(S) DNAT net dmz:10.10.11.2:80 tcp 80 5000
If you want to be able to access your server from the local network using your external address, then if you have a static external IP you can replace the loc->dmz rule above with:
#ACTION   SOURCE    DEST            PROTO  DEST PORT(S)  SOURCE   ORIGINAL
#                                                        PORT(S)  DEST
DNAT      loc       dmz:10.10.11.2  tcp    80            -        <external IP>
If you have a dynamic IP then you must ensure that your external interface is up before starting Shorewall and you must take steps as follows (assume that your external interface is
eth0):Include the following in /etc/shorewall/params:
ETH0_IP=$(find_interface_address eth0)
Make your
loc->dmzrule:#ACTION SOURCE DEST PROTO DEST PORT(S) SOURCE ORIGINAL # PORT(S) DEST DNAT loc dmz:10.10.11.2 tcp 80 - $ETH0_IP
If you want to access your server from the DMZ using your external IP address, see FAQ 2a.
At this point, add the DNAT and ACCEPT rules for your servers.
Normally, when you connect to your ISP, as part of getting an IP
address your firewall's Domain Name Service (DNS)
resolver will be automatically configured (e.g., the
/etc/resolv.conf file will be written).
Alternatively, your ISP may have given you the IP address of a pair of DNS
name servers for you to manually configure as your primary and secondary
name servers. It is your responsibility to configure the resolver in your
internal systems. You can take one of two approaches:
You can configure your internal systems to use your ISP's name servers. If your ISP gave you the addresses of their servers or if those addresses are available on their web site, you can configure your internal systems to use those addresses. If that information isn't available, look in
/etc/resolv.confon your firewall system -- the name servers are given in “nameserver” records in that file.You can configure a Caching Name Server on your firewall or in your DMZ. Red Hat™ has an RPM for a caching name server (which also requires the 'bind' RPM) and for Bering users, there is
dnscache.lrp. If you take this approach, you configure your internal systems to use the caching name server as their primary (and only) name server. You use the internal IP address of the firewall (10.10.10.254in the example above) for the name server address if you choose to run the name server on your firewall. To allow your local systems to talk to your caching name server, you must open port 53 (both UDP and TCP) from the local network to the server; you do that by adding the rules in/etc/shorewall/rules.
If you run the name server on the firewall:
#ACTION   SOURCE    DEST                PROTO      DEST PORT(S)
AllowDNS  loc       fw
AllowDNS  dmz       fw
Run name server on DMZ computer 1:
#ACTION   SOURCE    DEST                PROTO      DEST PORT(S)
AllowDNS  loc       dmz:10.10.11.1
AllowDNS  fw        dmz:10.10.11.1
In the rules shown above, “AllowDNS” is an example of a
defined action. Shorewall includes a number of
defined actions and you can add your
own. To see the list of actions included with your version of
Shorewall, look in the file
/usr/share/shorewall/actions.std. Those actions that
accept connection requests have names that begin with
“Allow”.
You don't have to use defined actions when coding a rule in
/etc/shorewall/rules; the generated Netfilter ruleset
is slightly more efficient if you code your rules directly rather than
using defined actions. The first example above (name server on the
firewall) could also have been coded as follows:
#ACTION   SOURCE    DEST                PROTO      DEST PORT(S)
ACCEPT    loc       fw                  tcp        53
ACCEPT    loc       fw                  udp        53
ACCEPT    dmz       fw                  tcp        53
ACCEPT    dmz       fw                  udp        53
In cases where Shorewall doesn't include a defined action to meet your needs, you can either define the action yourself or you can simply code the appropriate rules directly.
The three-interface sample includes the following rule:
#ACTION   SOURCE    DEST                PROTO      DEST PORT(S)
AllowDNS  fw        net
That rule allow DNS access from
your firewall and may be removed if you commented out the line in
/etc/shorewall/policy allowing all connections from
the firewall to the Internet.
The sample also includes:
#ACTION   SOURCE    DEST                PROTO      DEST PORT(S)
AllowSSH  loc       fw
AllowSSH  loc       dmz
Those rules allow you to run an SSH server on your firewall and in each of your DMZ systems and to connect to those servers from your local systems.
If you wish to enable other connections between your systems, the general format for using a defined action is:
#ACTION   SOURCE        DEST                PROTO      DEST PORT(S)
<action>  <source zone> <destination zone>
The general format when not using a defined action is:
#ACTION   SOURCE        DEST                PROTO      DEST PORT(S)
ACCEPT    <source zone> <destination zone>  <protocol> <port>
Example 2. You want to run a publicly-available DNS server on your firewall system
Using defined actions:
#ACTION   SOURCE    DEST                PROTO      DEST PORT(S)
AllowDNS  net       fw
Not using defined actions:
#ACTION   SOURCE    DEST                PROTO      DEST PORT(S)
ACCEPT    net       fw                  tcp        53
ACCEPT    net       fw                  udp        53
Those rules would of course be in addition to the rules listed above under "If you run the name server on your firewall".
If you don't know what port and protocol a particular application uses, look here.
Important
I don't recommend enabling telnet to/from the Internet because it uses clear text (even for login!). If you want shell access to your firewall from the Internet, use SSH:
#ACTION   SOURCE    DEST                PROTO      DEST PORT(S)
AllowSSH  net       fw
 Bering
users will want to add the following two rules to be compatible with
Jacques's Shorewall configuration:
Bering
users will want to add the following two rules to be compatible with
Jacques's Shorewall configuration:
#ACTION   SOURCE    DEST                PROTO      DEST PORT(S)
ACCEPT    loc       fw                  udp        53
ACCEPT    net       fw                  tcp        80
Entry 1 allows the DNS Cache to be used.
Entry 2 allows the “weblet” to work.
Now modify /etc/shorewall/rules to add or
remove other connections as required.
You cannot test your firewall from the inside. Just because you send requests to your firewall external IP address does not mean that the request will be associated with the external interface or the “net” zone. Any traffic that you generate from the local network will be associated with your local interface and will be treated as loc->fw traffic.
IP addresses are properties of systems, not of interfaces. It is a mistake to believe that your firewall is able to forward packets just because you can ping the IP address of all of the firewall's interfaces from the local network. The only conclusion you can draw from such pinging success is that the link between the local system and the firewall works and that you probably have the local system's default gateway set correctly.
All IP addresses configured on firewall interfaces are in the $FW (fw) zone. If 192.168.1.254 is the IP address of your internal interface then you can write “$FW:192.168.1.254” in a rule but you may not write “loc:192.168.1.254”. Similarly, it is nonsensical to add 192.168.1.254 to the loc zone using an entry in
/etc/shorewall/hosts.Reply packets do NOT automatically follow the reverse path of the one taken by the original request. All packets are routed according to the routing table of the host at each step of the way. This issue commonly comes up when people install a Shorewall firewall parallel to an existing gateway and try to use DNAT through Shorewall without changing the default gateway of the system receiving the forwarded requests. Requests come in through the Shorewall firewall where the destination IP address gets rewritten but replies go out unmodified through the old gateway.
Shorewall itself has no notion of inside or outside. These concepts are embodied in how Shorewall is configured.
The installation procedure
configures your system to start Shorewall at system boot but beginning
with Shorewall version 1.3.9 startup is disabled so that your system won't
try to start Shorewall before configuration is complete. Once you have
completed configuration of your firewall, you can enable Shorewall startup
by removing the file /etc/shorewall/startup_disabled.
Important
Users of the .deb package must edit
/etc/default/shorewall and set
startup=1.
Important
Users running Shorewall 2.1.3 or later should edit
/etc/shorewall/shorewall.conf and set
STARTUP_ENABLED=Yes.
The firewall is started using the shorewall
start command and stopped using shorewall
stop. When the firewall is stopped, routing is enabled on those
hosts that have an entry in /etc/shorewall/routestopped.
A running firewall may be restarted using the shorewall
restart command. If you want to totally remove any trace of
Shorewall from your Netfilter configuration, use shorewall
clear.
The three-interface sample assumes that you want to enable routing
to/from eth1 (your local network)
and eth2 (DMZ) when Shorewall is
stopped. If these two interfaces don't connect to your local network and
DMZ or if you want to enable a different set of hosts, modify
/etc/shorewall/routestopped accordingly.
Warning
If you are connected to your firewall from the Internet, do not
issue a shorewall stop command unless you have
added an entry for the IP address that you are connected from to
/etc/shorewall/routestopped.
Also, I don't recommend using shorewall restart; it
is better to create an alternate
configuration and test it using the shorewall
try command.
I highly recommend that you review the Common Configuration File Features page -- it contains helpful tips about Shorewall features than make administering your firewall easier.