![]()
![]()
![]()
![]()
|
|
|
|
|
|
||
Launch the Report Viewer from the start-up menu.
Load the report either from the tool bar or the file menu. A dialog pops up prompting you to enter the name of the report.
Enter the name of the report or browse to reach the report.
Select the report type, for example, cdb, anlyser, tef etc.
Click OK to load the selected report.
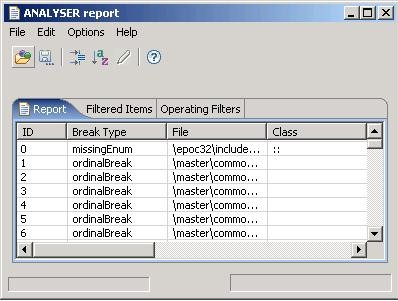
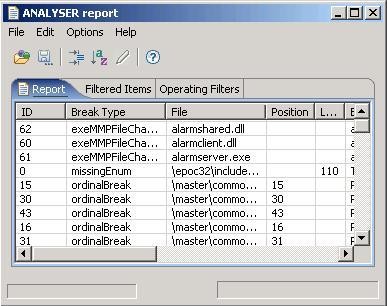
A typical report looks like this when loaded into the Report Viewer:
|
|
The Report Viewer is fully pluggable, this means that any report, irrespective of the tool used to produce it, can be viewed using the Report Viewer.
To load and interact with a report, the Report Viewer uses a plug-in. The plug-in instructs the Report Viewer as to how the report should be loaded, which columns should be created and how the data should be organised. Once the report is loaded, any operation that the Report Viewer supports can be applied to the data in the report. Plug-ins are usually stored in a plugin folder in the installation directory of the Report Viewer.
A plug-in is a .vp file type, with the same name as that of
the report type. When loading a report, the Report Viewer looks in the plugin
folder to find the type of the report it currently supports. Select a report to
load and then select the type of the report from the drop-down list. To add and
remove plug-ins, refer to Adding/Removing plug-ins section.
|
|
|
|
During data analysis you might need specific data from the report. You can use the Report Viewer to filter out unwanted data.
Select an item to be filtered, right click and select 'Filter'. This filters the selected items from the main report and copies them to 'Filtered Items' tab. It also creates a new filter in the 'Operating filters' tab.
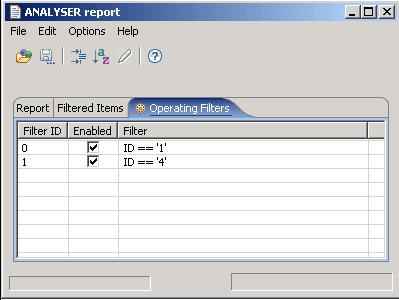
Click 'Operating filters' tab to see the filter criteria.
To unfilter the filtered item, select the item from the 'Filtered Items' tab and right-click it.
Enable or disable a filter by checking/unchecking the checkbox in the 'Operating filters' tab. Once it is disabled, the filter is not applied to the report.
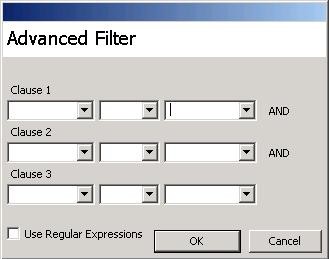
The Report Viewer allows you to filter reports in a more complex way using the advanced filtering options.
Select Advanced filters from the tool bar or edit menu. The 'Advanced Filter' dialog looks like the one below. Provide the criteria to filter the report and click 'OK'.
The filter can be saved to hard disk, so that you can use it in future. Select 'Export' then 'Export filters' option from the options menu on the menu bar. Whenever you want to apply the filter to a report, simply import it from the place where you saved it previously.
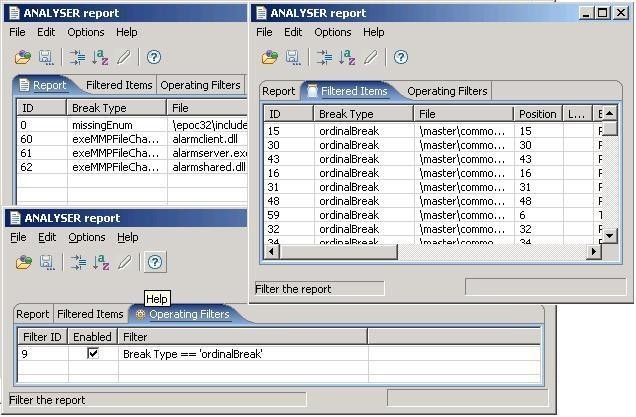
The figure shows the report after filtering the items, filtered items in the 'Filtered items' tab, and the filter in the 'Operating Filters' tab.
|
|
If a filter is used frequently for data analysis, you can convert it to a baseline filter, this option saves the filter definition. To use the filter in future follow the steps provided:
Load a report, then go to options menu and select, 'Generate a baseline filter'. Enter a filename, click OK. The report you have loaded is converted into a complex filter and is saved in the file.
When you have to load your favourite filter:
Choose Import > Import Filters and load the filter that you created. The items in the 'Report' tab gets disappeared. Click 'Operating filters' tab, you'll see a bunch of filters defined, based upon the entries in the report.
|
|
You can sort the data in the report, to view it in a specific order. To sort the items by a column, click the column heading, for example, Break Type.
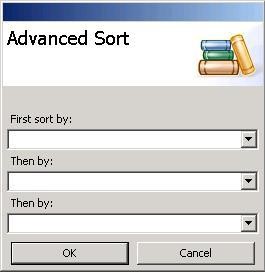
You can sort the reports in a more complex way using advanced sorting options.
Select 'Advanced Sort' either from the edit menu or from the tool bar. Using the advanced sorting option you can sort the data by three columns i.e data in the report is first sorted by column A, then by column B and finally by column C. Note that only one sort order can be viewed in a report at any one time.
You can save the sort order to hard disk for future use.
Select Export, and then 'Export current sorting' from the option menu. To apply the sort order to a different report, load the report and import the saved sort order.
The figure shows the report after sorting by the ‘Break Type’ column.
|
|
You can hide unwanted columns from the report to make it more compact and clean.
To do this:
Select Edit menu, then select Hide Columns. 'Column Selector' dialog pops up.
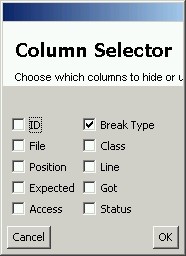
Select the columns you wish to hide, click OK. The columns will remain hidden.
Deselect the columns to restore the hidden columns.
|
|
Using the Report Viewer, you can highlight an item and add a note to it so that it can be easily identified.
To do this:
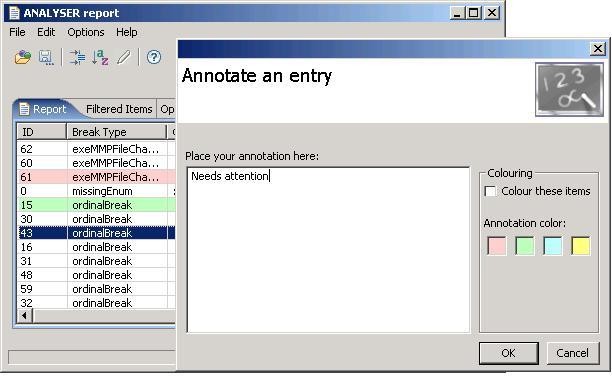
Select the row to be annotated. Right click and select 'Edit Annotation', 'Annotate an entry' dialog pops up. When more than one row is selected, you need to confirm the action.
Add a note in the space provided. Select 'Color these items' check box to add color to the item. Select a color. You can see items in the report annotated and highlighted in colors.
To remove or edit the annotation, select the item and right click, select 'Edit Annotation', in the 'Annotate an entry' dialog delete or update the note.
To remove the highlight, select the row, right click and select 'Remove highlight'. This can also be done by deselecting 'Color these items' check box in 'Annotate an entry' dialog.
|
|
You can save the report along with the filtered and annotated items. The
saved report mirrors the current state of the report i.e. if the report
contains filtered items, hidden columns and annotated items, the exported
report will reflect these changes. The report can be saved either as a
.csv or a .htm file.
To save the report:
Navigate to File, select Save Report or use save icon from the tool bar.
Choose the 'File Type' as .csv or a .htm file.
Click OK.
|
|
The report that is saved using the Save option is static, and cannot be modified when you load the report later. To modify the report when you load it later; you need to save the configuration of the report.
To do this:
Navigate to Viewing Configuration through options menu.
Select Save, this opens the Save as dialog, type the name of the
document. This will save the configuration as .xml.
To load the report, navigate to Viewing Configuration and select Load. You can modify the configuration in the report.
|
|
The Report Viewer allows you to compare any two reports and quickly identify how the data has changed over time. For example, you can compare two test logs to find where a test started to fail or to identify new BC (Binary Compatibility) breaks introduced in the new report. A Report Differencer is used to compare the reports.
To launch the Report Differencer:
Click File > Launch Report Differencer, 'Report Differencer' dialog pops up.
Load the reports to be compared, then select the report type.
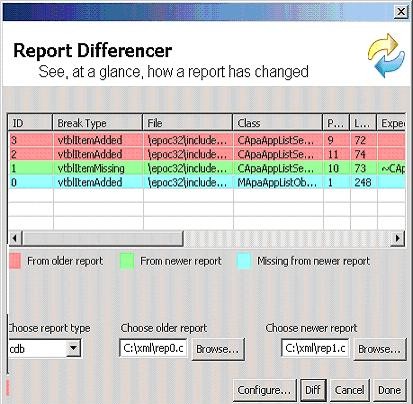
Click Diff, the annotated copy is loaded into the preview pane of the differencer.
You can identify the items which are taken from:
the older report(in red)
the newer report(in green)
missing from the new report(in blue).
By default the tool finds the difference based on each column. The line number in the report may change, but the tool should be able to identify the same break (row) in two reports even if they occurred on different lines.
Click 'Configure' to set the differencing criteria, 'Column Selector' dialog pops up.
Check the columns you wish to use in the differencer.
Click OK to recalculate the difference.
Click Done.
|
|
To view a report generated by tools such as CDB (Code Database), AURA (API Usage Report Analysis), CodeCoverity etc., the tools need to provide respective plug-ins. You can add these plug-ins using Plug-in Manager.
The Report Viewer manages the plug-ins using Plug-in Manager. This allows you to quickly and easily add, remove plug-ins, or query the set of installed plug-ins.
Click Options > Manage plug-ins to load the plug-in manager. The plug-in manager lists the set of installed plug-ins.
Click Add or Remove to add or remove a plug-in.
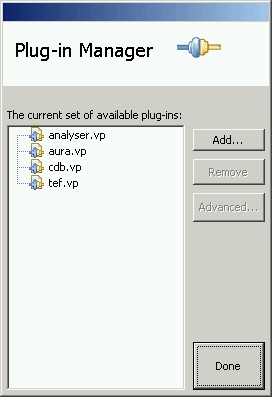
Note that Remove and Advanced buttons would be greyed out until you select a plug-in from the list.
Click 'Advanced' button to query a plug-in, it displays the information about the plug-in.
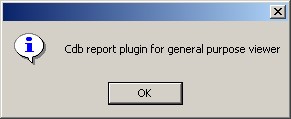
You can also get this information by double-clicking on the plug-in in the list.
The report is displayed in the main Report Viewer, ready to be sorted and annotated.
|
Copyright ©2008 Symbian Software Ltd. |
|
![[Top]](../../../../../a_stock/btn_top.gif)