Table of Contents
No matter which protocol you use to access your repositories, you always need to create at least one repository. This can either be done with the Subversion command line client or with TortoiseSVN.
If you haven't created a Subversion repository yet, it's time to do that now.
You can create a repository with the FSFS backend or with the older Berkeley Database (BDB) format. The FSFS format is generally faster and easier to administer, and it works on network shares and Windows 98 without problems. The BDB format was once considered more stable simply because it has been in use for longer, but since FSFS has now been in use in the field for several years, that argument is now rather weak. Read Choosing a Data Store in the Subversion book for more information.
Create an empty folder with the name SVN (e.g.
D:\SVN\), which is used as root for all your repositories.Create another folder
MyNewRepositoryinsideD:\SVN\.Open the command prompt (or DOS-Box), change into
D:\SVN\and typesvnadmin create --fs-type bdb MyNewRepository
or
svnadmin create --fs-type fsfs MyNewRepository
Now you've got a new repository located at
D:\SVN\MyNewRepository.
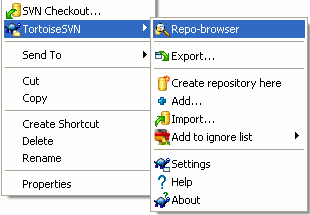
Open the windows explorer
Create a new folder and name it e.g.
SVNRepositoryRight-click on the newly created folder and select → .
A repository is then created inside the new folder. Don't edit those files yourself!!!. If you get any errors make sure that the folder is empty and not write protected.
Tip
TortoiseSVN no longer offers the option to create BDB repositories, although you can still use the command line client to create them. FSFS repositories are generally easier for you to maintain, and also makes it easier for us to maintain TortoiseSVN due to compatibility issues between the different BDB versions.
Future versions of TortoiseSVN will not support
file:// access to BDB repositories due to these
compatibility issues, although it will of course always support
this repository format when accessed via a server through the
svn://,
http:// or
https:// protocols.
For this reason, we strongly recommend that any new repository
which must be accessed using file://
protocol is created as FSFS.
Of course we also recommend that you don't use file://
access at all, apart from local testing purposes. Using a server is
more secure and more reliable for all but single-developer use.
To access your local repository you need the path to that folder.
Just remember that Subversion expects all repository paths in the form
file:///C:/SVNRepository/.
Note the use of forward slashes throughout.
To access a repository located on a network share you can either
use drive mapping, or you can use the UNC path. For UNC paths,
the form is
file://ServerName/path/to/repos/.
Note that there are only 2 leading slashes here.
Prior to SVN 1.2, UNC paths had to be given in the more obscure form
file:///\ServerName/path/to/repos.
This form is still supported, but not recommended.
Warning
Do not create or access a Berkeley DB repository on a network share. It cannot exist on a remote file system. Not even if you have the network drive mapped to a drive letter. If you attempt to use Berkeley DB on a network share, the results are unpredictable - you may see mysterious errors right away, or it may be months before you discover that your repository database is subtly corrupted.
Although in theory it is possible to put a FSFS repository on a network
share and have multiple users access it using file://
protocol, this is most definitely not
recommended. In fact we would strongly
discourage it, and do not support such use.
Firstly you are giving every user direct write access to the repository, so any user could accidentally delete the entire repository or make it unusable in some other way.
Secondly not all network file sharing protocols support the locking that Subversion requires, so you may find your repository gets corrupted. It may not happen straight away, but one day two users will try to access the repository at the same time.
Thirdly the file permissions have to be set just so. You may just about get away with it on a native Windows share, but SAMBA is particularly difficult.
file:// access is intended for local, single-user
access only, particularly testing and debugging. When you want to share
the repository you really need to set up a proper server,
and it is not nearly as difficult as you might think.
Read Chapter 3, Setting Up A Server for guidelines on choosing and
setting up a server.
Before you import your data into the repository you should first think about how you want to organize your data. If you use one of the recommended layouts you will later have it much easier.
There are some standard, recommended ways to organize a
repository. Most people create a trunk
directory to hold the “main line” of development, a
branches directory to contain branch
copies, and a tags directory to contain
tag copies. If a repository holds only one project, then
often people create these top-level directories:
/trunk
/branches
/tags
If a repository contains multiple projects, people often index their layout by branch:
/trunk/paint
/trunk/calc
/branches/paint
/branches/calc
/tags/paint
/tags/calc
...or by project:
/paint/trunk
/paint/branches
/paint/tags
/calc/trunk
/calc/branches
/calc/tags
Indexing by project makes sense if the projects are not closely related and each one is checked out individually. For related projects where you may want to check out all projects in one go, or where the projects are all tied together in a single distribution package, it is often better to index by branch. This way you have only one trunk to checkout, and the relationships between the sub-projects is more easily visible.
If you adopt a top level /trunk /tags /branches
approach, there is nothing to say that you have to copy the entire trunk
for every branch and tag, and in some ways this structure offers the
most flexibility.
For unrelated projects you may prefer to use separate repositories. When you commit changes, it is the revision number of the whole repository which changes, not the revision number of the project. Having 2 unrelated projects share a repository can mean large gaps in the revision numbers. The Subversion and TortoiseSVN projects appear at the same host address, but are completely separate repositories allowing independent development, and no confusion over build numbers.
Of course, you're free to ignore these common layouts. You can create any sort of variation, whatever works best for you or your team. Remember that whatever you choose, it's not a permanent commitment. You can reorganize your repository at any time. Because branches and tags are ordinary directories, TortoiseSVN can move or rename them however you wish.
Switching from one layout to another is just a matter of issuing a series of server-side moves; If you don't like the way things are organized in the repository, just juggle the directories around.
So if you haven't already created a basic folder structure inside
your repository you should do that now. There are two ways to
achieve this. If you simply want to create a
/trunk /tags /branches structure, you can use
the repository browser to create the three folders (in three separate
commits). If you want to create a deeper hierarchy then it is simpler
to create a folder structure on disk first and import it in a single
commit, like this:
create a new empty folder on your hard drive
create your desired top-level folder structure inside that folder - don't put any files in it yet!
import this structure into the repository via a right click on the folder and selecting → This will import your temp folder into the repository root to create the basic repository layout.
Note that the name of the folder you are importing does not appear in the repository, only its contents. For example, create the following folder structure:
C:\Temp\New\trunk
C:\Temp\New\branches
C:\Temp\New\tags
Import C:\Temp\New into the repository root,
which will then look like this:
/trunk
/branches
/tags