Example - Creating a Billboard Plane
Unity comes with the Plane and Quad primitive objects to represent flat surfaces (see the Primitive Objects page for further details). However, it is useful to examine how a minimal plane mesh can be constructed, since this is probably the simplest useful example, with just four vertices for the corners and two triangles.
The first thing is to set the vertices array. We'll assume that the plane lies in the X and Y axes and let its width and height be determined by parameter variables. We'll supply the vertices in the order bottom-left, bottom-right, top-left, top-right.
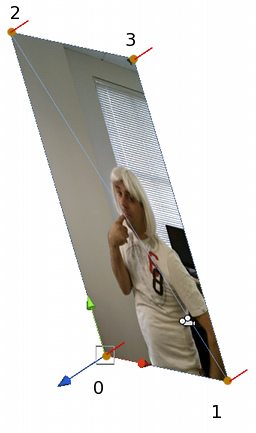
var vertices: Vector3[] = new Vector3[4];

vertices[0] = new Vector3(0, 0, 0);
vertices[1] = new Vector3(width, 0, 0);
vertices[2] = new Vector3(0, height, 0);
vertices[3] = new Vector3(width, height, 0);

mesh.vertices = vertices;
(Since the Mesh data properties execute code behind the scenes, it is much more efficient to set up the data in your own array and then assign this to a property rather than access the property array element by element.)
Next come the triangles. Since we want two triangles, each defined by three integers, the triangles array will have six elements in total. Remembering the clockwise rule for ordering the corners, the lower left triangle will use 0, 2, 1 as its corner indices, while the upper right one will use 2, 3, 1.
var tri: int[] = new int[6];

//	Lower left triangle.
tri[0] = 0;
tri[1] = 2;
tri[2] = 1;

//	Upper right triangle.
tri[3] = 2;
tri[4] = 3;
tri[5] = 1;

mesh.triangles = tri;
A mesh with just the vertices and triangles set up will be visible in the editor but will not look very convincing since it is not correctly shaded without the normals. The normals for the flat plane are very simple - they are all identical and point in the negative Z direction in the plane's local space. With the normals added, the plane will be correctly shaded but remember that you need a light in the scene to see the effect.
var normals: Vector3[] = new Vector3[4];

normals[0] = -Vector3.forward;
normals[1] = -Vector3.forward;
normals[2] = -Vector3.forward;
normals[3] = -Vector3.forward;

mesh.normals = normals;
Finally, adding texture coordinates to the mesh will enable it to display a material correctly. Assuming we want to show the whole image across the plane, the UV values will all be 0 or 1, corresponding to the corners of the texture.
var uv: Vector2[] = new Vector2[4];

uv[0] = new Vector2(0, 0);
uv[1] = new Vector2(1, 0);
uv[2] = new Vector2(0, 1);
uv[3] = new Vector2(1, 1);

mesh.uv = uv;
The complete script might look a bit like this:-
var width: float;
var height: float;

function Start() {
	var mf: MeshFilter = GetComponent(MeshFilter);
	var mesh = new Mesh();
	mf.mesh = mesh;

	var vertices: Vector3[] = new Vector3[4];

	vertices[0] = new Vector3(0, 0, 0);
	vertices[1] = new Vector3(width, 0, 0);
	vertices[2] = new Vector3(0, height, 0);
	vertices[3] = new Vector3(width, height, 0);

	mesh.vertices = vertices;

	var tri: int[] = new int[6];

	tri[0] = 0;
	tri[1] = 2;
	tri[2] = 1;

	tri[3] = 2;
	tri[4] = 3;
	tri[5] = 1;

	mesh.triangles = tri;

	var normals: Vector3[] = new Vector3[4];

	normals[0] = -Vector3.forward;
	normals[1] = -Vector3.forward;
	normals[2] = -Vector3.forward;
	normals[3] = -Vector3.forward;

	mesh.normals = normals;

	var uv: Vector2[] = new Vector2[4];

	uv[0] = new Vector2(0, 0);
	uv[1] = new Vector2(1, 0);
	uv[2] = new Vector2(0, 1);
	uv[3] = new Vector2(1, 1);

	mesh.uv = uv;
}
Note that the if the code is executed once in the Start function then the mesh will stay the same throughout the game. However, you can just as easily put the code in the Update function to allow the mesh to be changed each frame (although this will increase the CPU overhead considerably).
Page last updated: 2013-05-09